USER MANUAL OVEN / INCUBATOR OCG | OCF 2020-21 - Anamed Systems
←
→
Page content transcription
If your browser does not render page correctly, please read the page content below
2020-21

USER MANUAL
  OVEN / INCUBATOR
      OCG | OCF
TABLE OF CONTENT
Table Of Contents
1. Safety ..................................................................................................................................................... 1

         1.1. Legal Consideration ..................................................................................................................... 1

         1.2. Structure Of Incubator Instructions ............................................................................................ 2

            1.2.1.Safety Word Panel .................................................................................................................. 2

            1.2.2.Safety Art Symbol ................................................................................................................... 3

            1.2.3.Pictograms .............................................................................................................................. 3

         1.3. Position Of Safety Labels ............................................................................................................. 4

         1.4. General Safety Instruction On Installing And Configuration Of The Incubator ........................... 5

2. Description Of Chamber .............................................................................................................. 7

         2.1. Front View And Side View Of Chamber ....................................................................................... 7

         2.2. Rearview Of Chamber ................................................................................................................. 8

3. Transportation Precautions ........................................................................................................ 10
4. Unpacking And Inspection .......................................................................................................... 11
5. Storage Of The Chamber ............................................................................................................ 12

         5.1. Storage Temperature Range ..................................................................................................... 12

6. Installation Of The Chamber ....................................................................................................... 13

         6.1. Location Of Installation And Ambient Conditions ..................................................................... 13

         6.2. Separation From Wall................................................................................................................ 14

         6.3. Electrical Connection ................................................................................................................. 15

7. Turn On The Chamber ................................................................................................................ 17
8. Setting Up The Device ................................................................................................................ 18

         8.1. Device Registration ................................................................................................................... 18

         8.2. Home Screen ............................................................................................................................ 19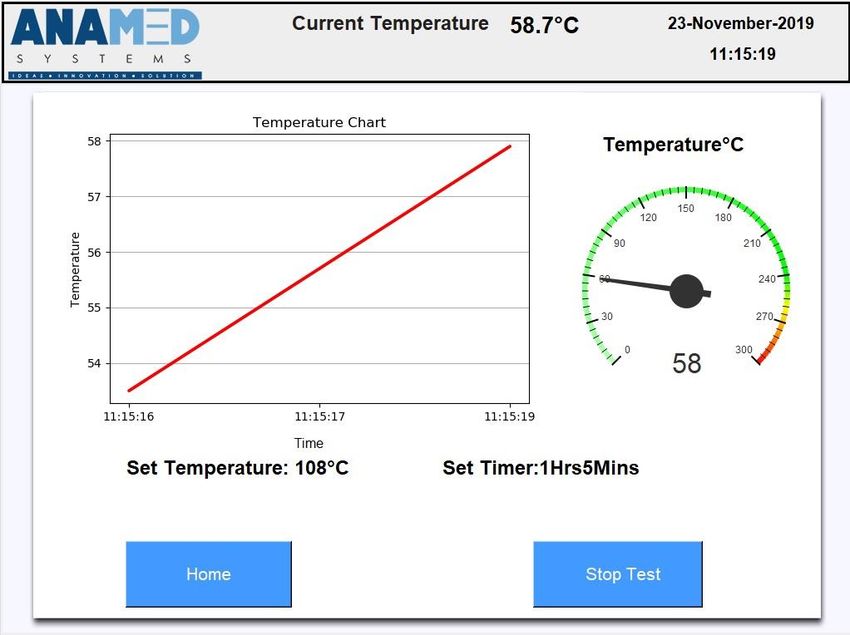
8.3. Start Test ................................................................................................................................... 20

           8.3.1. Set Temprature .................................................................................................................... 21

           8.3.2. Set Timer ............................................................................................................................. 22
                 8.3.2.1.          Timer Mode ......................................................................................................... 22
                 8.3.2.2.          Infinity Mode ....................................................................................................... 22
           8.3.3. Set Level .............................................................................................................................. 24
           8.3.4. Set Fan Speed ...................................................................................................................... 24
           8.3.5. Set User ............................................................................................................................... 24

        8.4. Set Settings ................................................................................................................................ 25

           8.4.1.Instrument Settings .............................................................................................................. 25

                 8.4.1.1.          Company Details .................................................................................................. 26

                 8.4.1.2.          Time .................................................................................................................... 27

                 8.4.1.3.          Temperature Settings .......................................................................................... 28

                 8.4.1.4.          Disk Storage ......................................................................................................... 29

                 8.4.1.5.          Screen Time-Out .................................................................................................. 29

9. Set User ..................................................................................................................................... 30

        9.1. Add A New User ........................................................................................................................ 31

        9.2. Delete User ................................................................................................................................ 31

        9.3. Edit User .................................................................................................................................... 31

10. About ........................................................................................................................................ 33

11. Damper ..................................................................................................................................... 34

12. Sound ........................................................................................................................................ 35

13. Set User ..................................................................................................................................... 35

        13.1.          Power Failure .................................................................................................................... 36

        13.2.          Alarm Warning .................................................................................................................. 37

14. Results....................................................................................................................................... 38
        14.1.          Search ............................................................................................................................... 39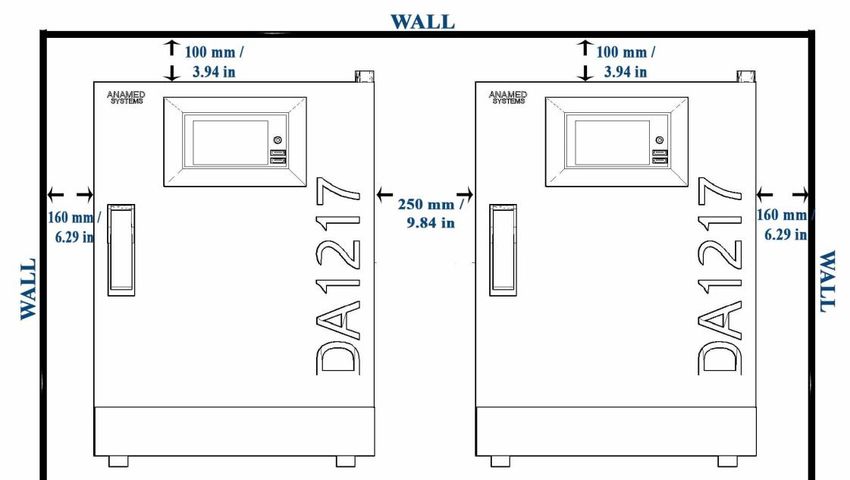
14.2.         Exports Results .................................................................................................................. 40
15. Windows Of Started Test ........................................................................................................... 42
        15.1.         Timer Mode ...................................................................................................................... 42
        15.2.         Infinity Mode .................................................................................................................... 42
        15.3.         Warning Buzzer ................................................................................................................. 43
16. Result Graphs Windows ............................................................................................................. 45
        16.1.         Graph Options ................................................................................................................... 45
        16.2.         Export CSV To Usb............................................................................................................. 46
17. Troubleshooting ........................................................................................................................ 47
18. Maintenance ............................................................................................................................. 48
        18.1.         Cleaning ............................................................................................................................ 48
        18.2.         Decontamination .............................................................................................................. 49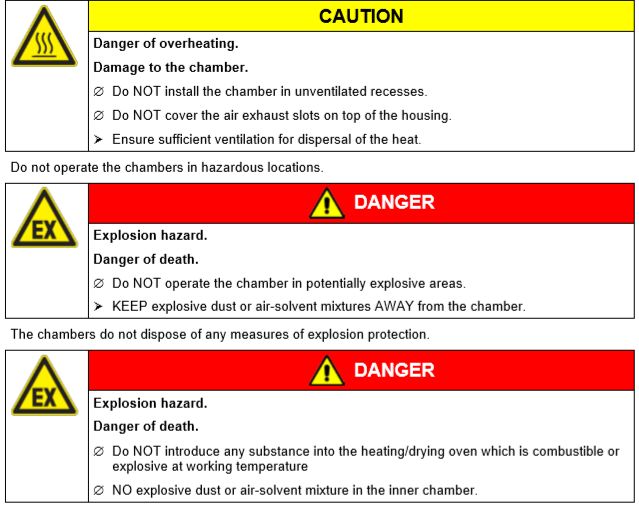
USER MANUAL 2020 | OCG

         Dear consumer, to correctly operate the instrument, please read and understand the manual completely
         and follow it as instructed. Failing to read, recognize, or observe the instruction may lead to personal
         injury. It can also damage the instrument or can affect the overall performance of the instrument.

         This user manual is also included in the delivery. Please keep it handy for the references. These devices
         should only be unboxed and operated by the person in charge of a laboratory or working in a laboratory
         trained for this purpose and familiar with all the precautions to be taken while working in a laboratory.

         Laboratory personnel age should meet the minimum criteria announced by the respective government.
         To avoid mishaps or injuries, please follow the manual strictly.

                 1.1     Legal Consideration:

                 The manual is provided for information purposes only. It contains records for putting in, start-
                 up, operation, and maintenance of the product. Note: the product and content can be changed
                 without any prior notice.

                 Understanding and observing the instructions in this operating manual are prerequisites for
                 hazard-free use and safety during operation and maintenance. Anamed systems should not be
                 held liable for any direct or indirect damage that may occur or about manual use.

                 This user manual does not cover all the possible applications. If you would like extra
                 information, or if any specific problems get up that are not sufficiently addressed in this guide,
                 please ask your supplier or get in touch with us immediately by calling us on the number
                 mentioned on page number one.

Anamed System User Manual | As of: 10.06.2020
Technical specifications are subject to change.
                                                                                                                      1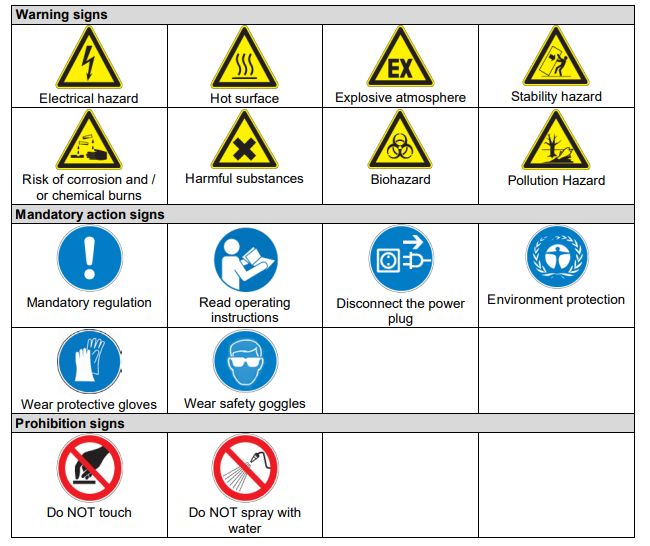
USER MANUAL 2020 | OCG

                        Structure of Incubator Instructions:

                In this user manual, the following safety definitions and symbols denote dangerous conditions
                following the organization of ISO 9001, ANSI and CE Marking.

                        i)      Single Word Panel

                Depending on the probability of great consequences, capacity dangers are diagnosed with a
                signal word, the corresponding safety color, and if appropriate, the safety alert symbol.

                         Points to an instant dangerous or risky situation which if not avoided may lead to
                         severe injury or death loss.

                         Points to a possibly dangerous situation which, if not avoided, could result in death or
                         serious (irreversible) injury

                         Points to a possibly dangerous situation which, if not avoided, could result in
                         moderate or minor injury

                         Points to a possibly dangerous situation which, if not avoided, may damage the
                                products itself or its functionality or of a property of its closeness

Anamed System User Manual | As of: 10.06.2020
Technical specifications are subject to change.
                                                                                                                    2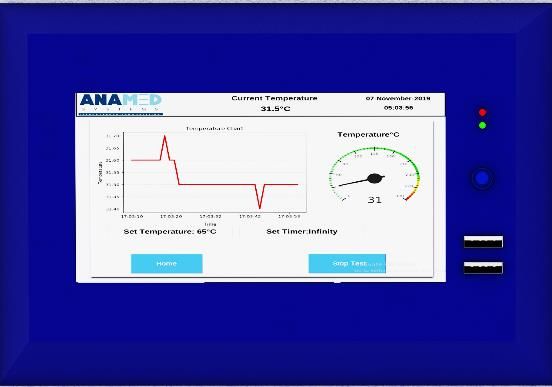
USER MANUAL 2020 | OCG

                        ii)     Safety Art Symbol:

                        This symbol indicates the sign of damage, danger, or injury that may cause certain
                        inappropriate actions.

                        Strictly follow the guidance and ensure all the measurements to be marked with a safety
                        alert symbol to avoid any damage or death.

                        iii)    Pictograms:

Anamed System User Manual | As of: 10.06.2020
Technical specifications are subject to change.
                                                                                                                  3
USER MANUAL 2020 | OCG

                1.3     Position of Safety Labels:

                        Following are the positions of our safety labels described in each picture:

Anamed System User Manual | As of: 10.06.2020
Technical specifications are subject to change.
                                                                                                        4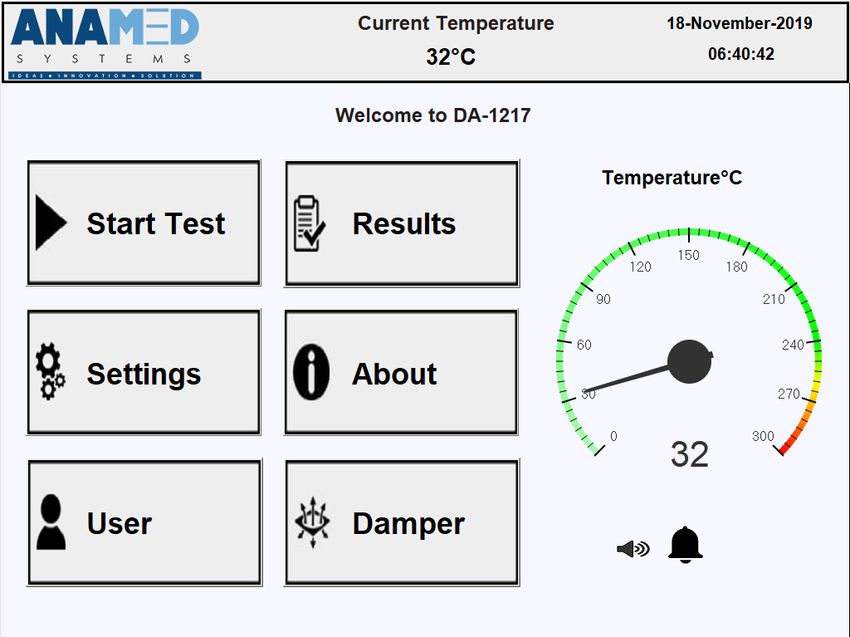
USER MANUAL 2020 | OCG

                1.4     General safety instruction on installing and configuration of the incubator

                        About working the incubator and to the installation location, please see the respected
                        model tips (provided with the packing) for safe operating in laboratories.

                        Anamed Systems is only liable for the safety capabilities of the incubator supplied by
                        professional electricians or qualified employees legalized by Anamed Systems perform
                        all renovation and repair, and if components referring to incubator protection are
                        replaced inside the event of a failure with unique spare components.

                        To operate the incubator, use simply original Anamed Systems accessories or
                        accessories from third-party suppliers authorized with the aid of Anamed Systems. The
                        user is chargeable for any risk due to using unauthorized add-ons or accessories.

Anamed System User Manual | As of: 10.06.2020
Technical specifications are subject to change.
                                                                                                                 5
USER MANUAL 2020 | OCG

         Any solvent contained in the charging material must not be explosive or inflammable. I.E., no matter the
         solvent concentration inside the steam room, NO explosive combination with air has to form. The
         temperature in the chamber has to lie under the flash factor or below the sublimation factor of the
         charging cloth. Familiarize yourself with the bodily and chemical homes of the charging fabric, in addition
         to the contained moisture constituent and its conduct with the addition of heat power. Familiarize
         yourself with any capacity fitness risks because of the charging cloth, the contained moisture constituent,
         or via reaction merchandise that could arise in the course of the temperature process. Take good enough
         measures to exclude such risks before setting the chamber into operation

Anamed System User Manual | As of: 10.06.2020
Technical specifications are subject to change.
                                                                                                                       6
USER MANUAL 2020 | OCG
2.1 Front View and Side View of Chamber
(1)
(7)
(6) (8)
(9)
(10)
(11)
(12)
(5)
(13)
(4)
(2)
(3)
1. Top Hinge 8. Front Panel
2. Bottom Hinge 9. Warranty Led
3. Lower Drawer 10. Main LED
4. Chamber Door 11. LCD On/Off Button
5. Wrench Door Level Open/Close 12. USB Port
6. Outer Chamber Side Plates 13. LCD Touch Screen
7. Chamber Body
Anamed System User Manual | As of: 10.06.2020
Technical specifications are subject to change.
7USER MANUAL 2020 | OCG
8. Front Panel Contains the 7-inch LCD Touch & Display Screen with a PCB contains Button for
switching Controller on and off, small semiconductors like led & buzzer to show running and
warnings alerts of the system. USB Port is also present in the Front Panel used to save the data
from the chamber to Personal Flash Drive. The door handle is used to Open/Close the door.
Adjustable Hinges and Lock mechanism.
9. Software Contains All the Function Settings, Start/ Stop, Test, calibration, warning alarms.
10. Thermostat (Safety Limiter) is used to Cut off Temperature if it exceeds the limit Range,
attached directly to the inner chamber. Programmable opening and closing of Air Flappers for
Ventilation. Programmable Speed control of Fan. Easily Replaceable LCD Screen. Pt-100 sensor
to detect the temperature.
2.2 REARVIEW OF CHAMBER
(1)
(4)
(2)
(3)
1. Top hinge
2. Damper 5. Main On/ Off Switch
3. Air Ventilation Holes 6. Fuses
4. Main Board 7. Power Cord
Anamed System User Manual | As of: 10.06.2020
Technical specifications are subject to change.
8USER MANUAL 2020 | OCG
Description:
The damper is used for the Air / Heat Exchange from the Inside of the Chamber to the Outside
Environment.
Air Ventilation Holes are placed to make the Air Exchange from the Outside Environment to the
chamber Circuit Area and backside to make them cool.
Main Switch is used to Turn On/OFF the Unit.
The Fuse is present to cutoff the chamber power in case of any voltage drop or increase, they can easily
reset.
Power Cord is used to supplying the power from socket to chamber
Anamed System User Manual | As of: 10.06.2020
Technical specifications are subject to change.
9USER MANUAL 2020 | OCG
TRANSPORTATION TEMPERATURE RANGES:
The optimal ambient temperature range during transportation is: -10 °C up to +60 °C.
While transferring from the cold storage areas to the warmer area, wait at least one hour before
starting the chamber so the chamber will attain the ambient temperature. Try to make the chamber
clean and dry before starting.
DAMAGE PRECAUTIONS.
Sliding or tilting may cause damage to the chamber.
Do NOT use the door or handle to lift or Pull the chamber for transportation.
Sliding or tilting may cause damage to the chamber
DAMAGE TO THE CHAMBER.
Lift the chamber from the lower corner side with the aid of at least 2 people.
Transport the chamber in its original packaging only.
For moving or shipping, secure the chamber with transport straps.
PACKAGING:
You will get a packed Chamber with a strong carton box and the covering inside to protect the chamber
from any scratch and damage.
Pallets will be provided with bigger models for moving or shipping purposes from Anamed Systems or
you can specialize in the order.
DAMAGE TO THE CHAMBER
Do NOT Spray Water on the Chamber.
Do Not Place on the wet Surface.
Anamed System User Manual | As of: 10.06.2020
Technical specifications are subject to change.
10USER MANUAL 2020 | OCG
Before unpacking or removing the carton box & covering from the chamber, please check the Shock watch
meter attached to the chamber box, check the color, and immediately inform the Carrier and company
about it.
Note: If the Shock watch is Red-colored means the chamber faced a lot of shaking and mishandling while
transportation which may cause the problem in the functionality of the chamber
After unpacking, please check the chamber, its belongings such as manuals, stainless steel racks, etc. Also
check for the optional accessories (if any), based on the delivery receipt. If you found any shortage or
transportation damage, inform the carrier immediately.
The final tests of the manufacturer may have caused traces of the shelves on the inner surfaces. This has
no impact on the function and performance of the chamber.
Note: If you need to return the chamber, please use the original packing and observe the guidelines for
safe lifting and transportation.
Please remove any transportation protection stuff or adhesives in/on the chamber and
on the doors and remove the user manuals, accessories and equipment.
Second-hand chambers (Demo-Units):
Second-hand chambers are chambers that were used for a short time for tests or exhibitions. They are
thoroughly tested before sale. Our Company ensures that the chamber is technically sound and will
work flawlessly & efficiently.
Second-hand chambers are marked with a sticker on the chamber door and sealed by the Anamed
Systems service providers. Please remove the seal before using the chamber.
Anamed System User Manual | As of: 10.06.2020
Technical specifications are subject to change.
11USER MANUAL 2020 | OCG
If you want to store the Chamber without installing it in any storage area or any other places some
conditions need to be filled to make the chamber stored in the best condition for a long time.
5.1 Storage Temperature Range:
The normal temperature range with the closed and dry area is the best condition for the storage of the
chamber.
Avoid the areas with extreme conditions or wet areas as it will cause damage to the chamber.
Optimal ambient temperature range during storage: -10 °C up to +60 °C.
Optimal ambient humidity: max. 70 % RH (Relative humidity), non-condensing.
While transferring from the cold storage areas to the warmer area, wait at least one hour before
starting the chamber so the chamber will attain the ambient temperature. Try to make the chamber
clean and dry before starting.
Place the Chamber in Cool Dry Area.
Do not Place the Chamber in Extreme High Conditions.
Anamed System User Manual | As of: 10.06.2020
Technical specifications are subject to change.
12USER MANUAL 2020 | OCG
6.1 Location of installation and ambient conditions
The chambers are designed for indoor use. To set the chamber first check the place it should be Even,
Dry, non-combustible, heat and fireproof, non-vibrating, properly ventilated, a weight-bearing capability
that is the surface should be capable of carrying chamber weight along with the samples. You can check
the surface level using a spirit level.
CAUTION
The danger of overheating and Damage to the chamber.
∅ Do NOT set up chambers in a non-ventilated area.
Confirm appropriate ventilation for dispersal of the heat.
Do NOT place the chamber near Flammable Places or Objects.
Optimal ambient temperature range during operation: +18 °C up to +40 °C.
While increasing the ambient temperature cause fluctuations in temperature value.
The ambient temperature should not be significantly higher than the indicated ambient
temperature of +22 °C ± 3 °C or 71.6 °F ± 5.4 °F to which the specified technical data
relate. Deviations from the indicated data are possible for other ambient
Optimal ambient humidity: max. 70 % RH (Relative humidity), non-condensing.
Installation height: max. 2000 m / 6562 ft. above sea level.
Do not install or operate the chamber in hazardous locations.
Explosion hazard. The danger of death.
∅ Do NOT operate the chamber in potentially explosive areas.
KEEP explosive dust or air-solvent mixtures AWAY from the vicinity of the chamber.
Anamed System User Manual | As of: 10.06.2020
Technical specifications are subject to change.
13USER MANUAL 2020 | OCG
6.2 Separation from Wall:
When placing several chambers of the same size side by side, maintain a minimum distance of 250 mm /
9.84 In between each chamber. Wall distances: Rear 100 mm / 3.94 in, sides 160 mm / 6.29 in. Spacing
above the chamber of at least 100 mm / 3.94 in must also be maintained.
Install the chamber in a way that the power plug is easily accessible and can be easily pulled in case of
danger. To completely separate the chamber from the power supply, you must disconnect the power
plug.
DANGER
In case of Emergency unplug the chamber by disconnecting the power plug
from the socket
Figure 1: Distance of Chamber from the adjacent side and Top side.
Anamed System User Manual | As of: 10.06.2020
Technical specifications are subject to change.
14USER MANUAL 2020 | OCG
Figure 2: Distance of Chamber from the Backside and Top side.
6.3 Electrical Connection:
The provided chamber is ready to use condition all the testing and checking were done in the factory.
It contains the Fixed Power cable for 220V of about 2m / 78.74in /2000mm.
Europe Power Cord 16A, 3 Wire Schuko Straight Plug EU-Germany International VDE Certified CE-Power
Supply Cord.
The Chamber came with the Shockproof Power plug (German Shoe) and the Nominal voltage +/- 10% at
the indicated power frequency is 230 V at 50 - 60 Hz and the Current type is 1N~ (Single phase).
The EU socket must also provide a protective conductor. Make sure that the connection of the
protective conductor of the EU installations to the chamber’s protective conductor meets the latest
technology. The protective conductors of the socket and plug must be compatible!
Anamed System User Manual | As of: 10.06.2020
Technical specifications are subject to change.
15USER MANUAL 2020 | OCG
Before connection and start-up, check the power supply voltages in the socket. Compare the values to
the specified data located on the chamber’s type plate that is 230 V at 50 - 60 Hz.
When connecting, please observe the regulations specified by the local electricity supply company as
well as your country followed Electrical directives e.g. VDE directives (for Germany). We recommend the
use of a residual current circuit breaker.
Pollution degree (acc. to IEC 61010-1): 2
Over-voltage category (acc. to IEC 61010-1): II
Danger of incorrect power supply voltage. Damage to the equipment
Check the power supply voltage before connection and start-up.
Compare the power supply voltage with the data indicated on the type plate.
To completely separate the chamber from the power supply, you must disconnect the
power plug. Install the chamber in a way that the power plug is easily accessible and can be
easily pulled in case of danger.
Anamed System User Manual | As of: 10.06.2020
Technical specifications are subject to change.
16USER MANUAL 2020 | OCG
Note: Warming chambers may release odors in the first few days after commissioning. This is not a
quality defect. To reduce odors quickly we recommend heating up the chamber to its nominal
temperature for one day and in a well-ventilated location.
The device can be started by following the given steps
1. Plug the 220 volt wire into the socket at the back of system.
2. Switch on main power button located at rear side of system.
3. The green led on screen panel and the LCD backlight will illuminates which shows the device is
started.
4. The device is started and the LCD backlight illuminates.
5. The boot up process takes up to 2 min. After the boot up Anamed systems animation is loaded.
6. The device is needed to be setup for the first time.
7. The software will boot up to home screen from second time.
Anamed System User Manual | As of: 10.06.2020
Technical specifications are subject to change.
17USER MANUAL 2020 | OCG
Upon the first start of the device, it will require registration by the user. This registration is compulsory
and only required for the first time.
8.1 Device Registration
Register the device by following the below-given instruction:
Fill in all the entry section with the appropriate information. Please contact our support team if any of
the information is not found/provided.
Temperature inside oven
Current date of system
DEVICE ENTRY 1
DEVICE ENTRY 2 Current Time of system
DEVICE ENTRY 3
DEVICE ENTRY 4
DEVICE ENTRY 5
DEVICE ENTRY 6
DEVICE ENTRY 7
Anamed System User Manual | As of: 10.06.2020
Technical specifications are subject to change.
18USER MANUAL 2020 | OCG
8.2 Home Screen:
DEVICE REGISTERED NAME
Temperature in
degree
centigrade
Analog meter
Buzzer Button
Notification Button
Pressing the start test button opens the set parameters screen
Anamed System User Manual | As of: 10.06.2020
Technical specifications are subject to change.
19USER MANUAL 2020 | OCG
8.3 Start Test:
Button 2
Button 1
The start test screen consists of 5 entries:
The start test screen consists of 5 entries:
8.3.1)) Set temperature
8.3.2) Set timer
8.3.2.1) Timer mode
8.3.2.2) Infinity mode
8.3.3) Set level
8.3.4) Set fan speed
8.3.5) Set user
Anamed System User Manual | As of: 10.06.2020
Technical specifications are subject to change.
20USER MANUAL 2020 | OCG
8.3.1) Set Temperature:
The temperature can be set in the range of ambient temperature plus 5 degrees centigrade and
300 degrees centigrade. The entry box can be filled by clicking on it which will open the numeric
keyboard as shown below. The temperature can be set in the Fahrenheit as well. For changing
the temperature from degree Centigrade to Fahrenheit it is discussed in chapter 4 section 2.1.2.
Button 1) Back:
The back button is located at the bottom right of the screen. When the button is pressed home
screen is displayed.
Button 2) Start to run a test:
This button is located at the top right of the screen. When the button is pressed test would run
if all the entries are filled otherwise a popup message of error will be displayed in front of the
screen.
All the entries are necessary to be filled otherwise a popup message of error will be displayed in
front of the screen (as shown in chap 1)
IMPORTANT
Clear Entry
Press for moving Press enter for Press for moving
the cursor to right saving entered data the cursor to left
If the temperature above 300 degree centigrade is entered the error popup message will be
displayed. Similarly if the temperature above 572 degree Fahrenheit is entered the error popup
message (as shown in chap 1) will be displayed.
Anamed System User Manual | As of: 10.06.2020
Technical specifications are subject to change.
21USER MANUAL 2020 | OCG
8.3.2) Set Timer:
The timer can be set by touching on two entry box
There are two types of modes.
8.3.2.1) Timer mode
8.3.2.2) Infinity mode
8.3.2.1) Timer Mode:
This mode is used to select the time the test is going to run at a set point. The time can be in
only hours and minutes. The test will be completed after completing the set time and the device
will come back to idle mode.
8.3.2.2) Infinity Mode:
This mode is selected to run the test in infinity mode. This test will only stop after the stop
button is pressed discussed in chapter 5.
If enter hours is greater than 99 and entered minutes is greater than 59 error popup message will
be displayed (as shown in chap 1)
IMPORTANT
Anamed System User Manual | As of: 10.06.2020
Technical specifications are subject to change.
22USER MANUAL 2020 | OCG
Infinity mode
Clear Entry button
Press for moving the Press enter for Press for moving the
cursor to right saving entered cursor to left
data
When the timer mode is selected the entered hours is represented in the first entry box and the entered
minutes is represented in the second entry box.
Anamed System User Manual | As of: 10.06.2020
Technical specifications are subject to change.
23USER MANUAL 2020 | OCG
When the infinity mode is selected the entered values represent set timer is in infinity mode.
8.3.3. Set level
The set level represents the speed of heating in which set point is reached. Default mode is Fast mode.
The level can be selected by touching on entry box which will enable drop down options.
1) Fast mode represents the smallest time to reach set point.
2) Medium mode represents the fast and slow mode time median to reach set point.
3) Slow mode represents the slowest time to reach the set point.
8.3.4. Set Fan Speed:
The set fan speed represents the speed of fan during the test. Once set during the test it cannot be
changed during the test. Default set fan speed is 100%. There are 5 different fan speeds i.e. off, 25%,
50%, 75%, and 100%. The fan speed can be selected by touching on entry box which will enable drop
down options.
8.3.5. Set User:
Once the user is created the user is present in dropdown selection. The user can be selected by touching
on entry box and select the desired user for running the test. The user creation is discussed in chapter 4
section3.1.
Anamed System User Manual | As of: 10.06.2020
Technical specifications are subject to change.
24USER MANUAL 2020 | OCG
8.4. Set Settings:
Select settings button at home screen to open new window named settings.
There are two settings:
8.4.1) Instrument Settings
8.4.2) Service Mode Settings
8.4.1) Instrument Settings:
Select the instrument button at settings screen to open a new window named instrument
settings.
There are five options in instrument settings:
8.4.1.1) Company Detail
8.4.1.2) Time
8.4.1.3) Temperature Setting
8.4.1.4) Disk Storage
8.4.1.5) Screen Time Out
Anamed System User Manual | As of: 10.06.2020
Technical specifications are subject to change.
25USER MANUAL 2020 | OCG
At the top of the instrument settings window, there are three buttons i.e. save button, home
button, and back button.
When the Save button has pressed the settings in the instrument window are saved.
When the Home button is pressed Home screen window will be opened.
When the Back button is pressed Settings window will be opened.
8.4.1.1. Company Details:
Company detail consists of two entries company name and telephone number.
When clicked on company name entry alphabetical keyboard is opened shown on pages 5 and 6.
When clicked on the telephone entry numeric keyboard is shown on the next page.
When clicked on save, the Company name and telephone number will be present at the
instrument settings window.
Anamed System User Manual | As of: 10.06.2020
Technical specifications are subject to change.
26USER MANUAL 2020 | OCG
8.4.1.2. Time:
The current time format can be changed from 12-hour clock to 24-hour clock and 24-hour clock
to 12-hour clock. The toggle button 1 is pressed to change the time format and the save button
is pressed to save the format.
Time format
changed to 24
hour clock
Anamed System User Manual | As of: 10.06.2020
Technical specifications are subject to change.
27USER MANUAL 2020 | OCG
8.4.1.3. Temperature Setting:
The temperature displayed in software can be changed from degree Centigrade to Fahrenheit.
The toggle button 2 is pressed to change the temperature and the save button is pressed to save
the settings. The Temperature entry in the start test window and calibration window (discussed
in chapter 4 section 2.2.2.2) is also changed to Fahrenheit. The temperature can be changed in
running tests. When the temperature is changed in running the test the graph (discussed in
chapter 5) is also shifted from Centigrade to Fahrenheit and setpoint is also changed from
degree Centigrade to Fahrenheit (discussed in chapter 5 running test options).
Temperature changed
to degree Fahrenheit
Toggle Button2
Anamed System User Manual | As of: 10.06.2020
Technical specifications are subject to change.
28USER MANUAL 2020 | OCG
8.4.1.4. Disk Storage:
The filled storage is shown in percentage and a horizontal bar.
Occupied Space in Disk
Remaining Space in Disk
8.4.1.5. Screen Time-Out
The LCD turn off options can be changed by touching on entry box and selecting from the drop
down options. The LCD turnoff options are given below:
Never turn off LCD
Turnoff after 5 minutes
Turn Off 10 minutes
Turn Off 15 minutes
Turn Off 20 minutes.
The default option is never turnoff LCD.
Anamed System User Manual | As of: 10.06.2020
Technical specifications are subject to change.
29USER MANUAL 2020 | OCG
Press on User button at the home screen to display a new window named users. In this window, the
user is created, edited, and deleted. The name, employer id, contact number, and designation are
also displayed. This window is a touch scroll window (discussed in chapter 1).
Anamed System User Manual | As of: 10.06.2020
Technical specifications are subject to change.
30USER MANUAL 2020 | OCG
9.1 Add New User:
The user creation is described in the following steps:
1) Press on add new user button
2) The new window will open named add new user.
3) Touch on entries box to display keyboard and fill all the entries (as described in chapter 1).
4) When all the entries are filled click on add user button to add the user.
5) The user window is opened and all the entries filled are shown on this window (shown in
figure 4.28).
9.2 Delete User
This button deletes the user’s name, employer id, contact, and designation
9.3 Edit User
The edit user button opens the window to add the user. In this window user’s data can be
edited as shown in figure 4.30. Press on the entry box to open the keyboard and enter the
edited data. Press on the save button in figure 4.30 to save edited data.
Back
This button shows the home screen on pressed
Anamed System User Manual | As of: 10.06.2020
Technical specifications are subject to change.
31USER MANUAL 2020 | OCG
Button to
Button to edit
delete
user’s data
current user
Anamed System User Manual | As of: 10.06.2020
Technical specifications are subject to change.
32USER MANUAL 2020 | OCG
Same name user cannot be created otherwise error message will be displayed.
Name and Employee id is compulsory otherwise error message will be displayed.
Deleted data cannot be recovered.
Newly created user is always at top of table.
When about button is pressed the new window is opened named about us. In this window all
about the Anamed Systems is described.
Back: This button shows the home screen on pressed.
Anamed System User Manual | As of: 10.06.2020
Technical specifications are subject to change.
33USER MANUAL 2020 | OCG
11.
When the damper button is pressed the new window is opened named Damper. At the start of
the device, the damper is off. The damper window consists of three options:
1) Off
2) Half
3) Full
Off
Upon the pressing the off button, the damper will turn to 00 (zero degrees)
Half:
When the half button is pressed the damper is tuned to 45 degrees and the damper is partially
on.
Full:
When the full button is pressed the damper is tuned to 90 degrees and the damper is fully on.
Back: this button will get you back to the home screen
Anamed System User Manual | As of: 10.06.2020
Technical specifications are subject to change.
34USER MANUAL 2020 | OCG
The buzzer sound can be controlled by pressing on the sound icon on the home window.
The notification icon is placed at the bottom of the screen. When the notification icon is
pressed the new window is opened named notifications
This window contains two buttons:
1) Power failure
2) Alarm Warning
Back: This button shows the home screen when pressed.
Anamed System User Manual | As of: 10.06.2020
Technical specifications are subject to change.
35USER MANUAL 2020 | OCG
13.1. Power Failure
When the power failure button is pressed the new window is opened named power. This window
contains the date, time, and when the device shutdown and boot up was.
The data contains in this window is in tabular form and it will go up to 50 rows. When the data is increased
from 50 rows the first row will be deleted and it will be updated by new row in last.
Back:
This button shows the notification windows upon pressed.
Anamed System User Manual | As of: 10.06.2020
Technical specifications are subject to change.
36USER MANUAL 2020 | OCG
13.2 Alarm Warning
When the alarm warning button is pressed the new window is opened named alarm warning. This
window contains the date, time, and the limit current temperature has crossed during test i.e. upper
limit or lower limit and duration of the crossed limit.
The data contains in this window is in tabular form and it will go up to 50 rows. When the data is increased
from 50 rows the first row will be deleted and it will be updated by new row in last.
Back:
This button shows the notification windows upon pressed.
Anamed System User Manual | As of: 10.06.2020
Technical specifications are subject to change.
37USER MANUAL 2020 | OCG
When the results button at the home screen is pressed the new window is opened name results.
This window contains all the data of the tests performed. The data include the date, setpoint,
duration, user, speed, fan speed, status, and show result button. The specific result can be
shown by pressing the button in the show result column. When this button is pressed the
window of result graph screen is opened (as discussed in chapter 6).
Anamed System User Manual | As of: 10.06.2020
Technical specifications are subject to change.
38USER MANUAL 2020 | OCG
14.1 Search
The specific test performed can be searched by using the search option in the software.
The usage of a search engine is described in given steps:
1) First, touch on the drop-down and then select the entry. It will search for the specific
column.
2) Touch on entry box beside dropdown the keyboard screen will be opened to fill the
entry based on the column selected.
3) Press on the search button the result screen gets updated and it will show rows
according to the specifications given entries.
Label of
dropdown
menu selected
Dropdown Entry box for
option for the defined drop
selection of down search.
column
First Step:
The select temperature in dropdown options.
Second Step:
Enter 50 degrees in the entry field
Anamed System User Manual | As of: 10.06.2020
Technical specifications are subject to change.
39USER MANUAL 2020 | OCG
Third Step:
Click on the search button the result screen gets updated and show specific rows.
14.2 Exports Results
When the export button at the home screen is pressed the new window is opened name
export results. This window contains six buttons:
1) Export all tabular data
2) Export all graphs
3) Export all test performed
4) Print all tabular data
5) Print all graphs
6) Print all test performed
EXPORT ALL TABULAR DATA:
The tabular data of temperature and time of all tests performed are stored in CSV files. This button is
used to export all tabular data CSV files to USB.
EXPORT ALL GRAPHS:
The graphs of all tests performed can be exported to USB by using this button.
EXPORT ALL Test Performed:
The tabular data of Date, setpoints, duration, user, speed, fan speed, status is exported to USB by using
this button.
Anamed System User Manual | As of: 10.06.2020
Technical specifications are subject to change.
40USER MANUAL 2020 | OCG
Print All Tabular Data:
The tabular data of temperature and time of all tests performed are stored in CSV files. This button is
used to print all tabular data CSV files.
Print All Graphs:
The graphs of all tests performed can be printed by using this button
Print All Test Performed:
The tabular data of Date, setpoints, duration, user, speed, fan speed, status is printed by using this
button.
BACK: This button shows the home screen on pressed.
The data contains in this window is in tabular form and it will go up to 100 rows. When the data is
increased from 100 rows the first row will be deleted and it will be updated by new row in last.
The printer will only print when printer settings are configured and data will only exported when USB is
connected on front panel.
Anamed System User Manual | As of: 10.06.2020
Technical specifications are subject to change.
41USER MANUAL 2020 | OCG
15.
When the button starts the test is pressed in start test window as (discussed in chapter 4.1) the
new window is displayed which contains the graph of running test displayed in red color when
the current temperature is below the set point. As the temperature goes above the set point the
graph is shown in blue color. The graph will display all the temperature values of the past to the
current temperature values of the present. In the running test, the device settings can be
changed from instrument settings, results can be displayed, users can be created and damper
can be turned on and off. During the test press on the home, button to view the home window.
There are two modes in which the device will operate:
1) Timer mode
2) Infinity mode
15.1 Timer Mode:
When the device is operating in the timer mode the set timer and set temperature is displayed
(as shown in figure 5.1). The set timer will start when the current temperature will reach the set
point. When the timer is started the graph will be shown in blue color as the temperature has
reached a set point. The running timer is shown on top of the window. When the timer is
completed the new window will be displayed named result screen.
15.2 Infinity Mode:
When the device is operating in infinity mode the set timer will show infinity. In Infinity Mode,
the device started to reach the setpoint and will maintain its set point temperature for infinity
time. The device will be started to work in infinity mode and infinity mode will only stop when
the stop button is pressed. On pressing stop button the results window is displayed.
POWER FAILURE MODE IN INFINITY:
In infinity mode even if there is a power failure and the device is turned back on the device will
open from where it was left. All device temperature reading, graph, the setpoint will be the
same as it was left.
Stop Test
When the stop test button is pressed the device set point, the model of device, username, level,
fan speed, test completed, or not all the data are saved and displayed in the graph results
window.
Anamed System User Manual | As of: 10.06.2020
Technical specifications are subject to change.
42USER MANUAL 2020 | OCG
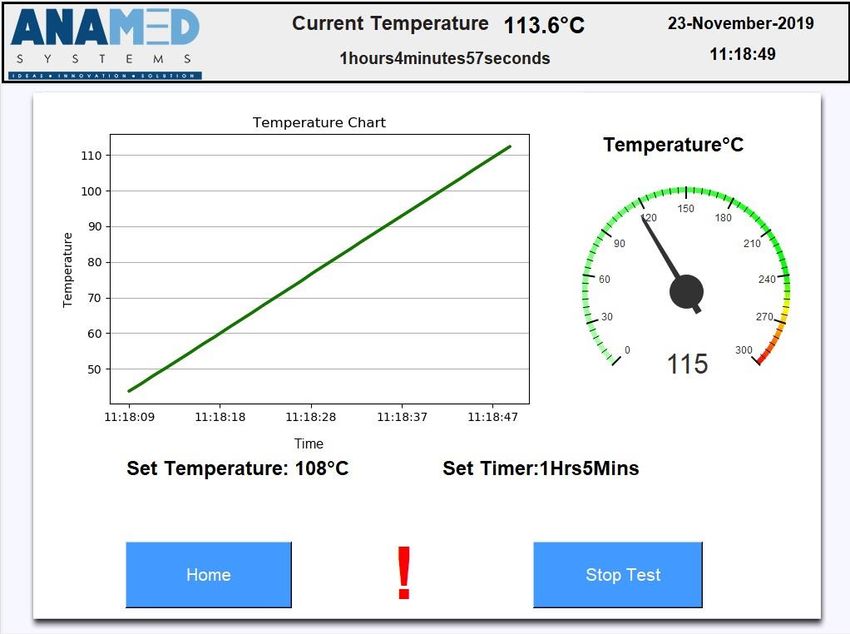
15.3 Warning Buzzer
When the current temperature passed the set temperature limit (as discussed in chapter 4
Section 2.2.2.4) the warning sign appears at the bottom of the graph window and after 5
minutes the buzzer starts to beep and the error message is displayed in the window. The buzzer
will only stop when the stop button is pressed. The buzzer beep time, date, and temperature
limit are recorded and it is shown in the alarm status screen as described in chapter 4 section
7.2.
Do not change the service mode settings during test because it can cause failure in
system.
The buzzer will not turned on if the buzzer is muted in home button.
Will show
selected
timer mode
Result graph
Screen will
Home display upon
Window will pressing this
display upon button
pressing this
button
Anamed System User Manual | As of: 10.06.2020
Technical specifications are subject to change.
43USER MANUAL 2020 | OCG
When current temperature
reached the set point the timer
starts
Warning sign current
temperature has crossed set
limits
Anamed System User Manual | As of: 10.06.2020
Technical specifications are subject to change.
44USER MANUAL 2020 | OCG
This window is opened on pressing the stop test button in running graph window (as discussed
in chapter 4 section 8) and this window is also opened when show result button is pressed (as
discussed in chapter This window contains all the information of the test performed i.e. set
point, set mode, set level, set user, the graph of test performed and the test completed or not.
16.1 Graph Options
There are graph options at bottom of graph:
1) Zoom In / Zoom Out
2) Move right, left, top, and down.
3) Home
Zoom In / Zoom Out
Press on this button and go to the graph and touch on any graph portion to zoom in and out.
Move Right, Left, Top, and Down
Press on the move button and hold on the graph and move the graph up, down, right, and left.
Home
Press on a home in graph options to reset the graph to the original position.
Print
This results screen can be printed by pressing the print button
Save To USB
The graph can be saved to USB by pressing the save button at the bottom.
Anamed System User Manual | As of: 10.06.2020
Technical specifications are subject to change.
45USER MANUAL 2020 | OCG
Home
On pressing the home button home window is displayed.
16.2 Export CSV to USB:
The tabular data can be saved to USB by pressing the export CSV to USB button.
Graph
Options
Home Zoom
Move
Anamed System User Manual | As of: 10.06.2020
Technical specifications are subject to change.
46USER MANUAL 2020 | OCG
S/N Problems Cause Solution
1. Green LED on LCD panel does Check the main socket is Ensure power is
not work connected and the switch is available.
on.
Check the main switch
Turn on the main
behind the device is on
switch.
Check push button rest
circuit breaker is active.
The press circuit breaker
or contact with a service
engineer.
2. Temperature not exceeding The setpoint is lower than Increase the set point.
and not reached at set point. the ambient temperature.
The door was not closed.
Close the door properly.
The gas kit is defective.
Contact a service
engineer.
3. The temperature is not The room temperature is Improve room
getting low. too high. temperature.
The previous set point is
higher than the current set
Open the door or wait
point.
for a decrease in
temperature.
The controller or sensor is
faulty.
Contact a service
engineer.
Anamed System User Manual | As of: 10.06.2020
Technical specifications are subject to change.
47USER MANUAL 2020 | OCG
4. The red LED on panel and Check the temperature limit Increase the
caution icon in LCD is blinking is very low. temperature alarm
limit.
The door is not closed
properly. Close the door properly
and adjust the door
adjustment.
5. The oven does not heat up. The heater may be Contact a service
defective. Or SSR may be engineer.
faulty
6. Greenlight on the panel is on LCD or PCB is faulty. Contact a service
but the display doesn’t work. engineer.
18.1 Cleaning:
Before cleaning of any type insure that the main switch of the unit is off and the main plug
is plugged out from the socket. Do not spill or any liquid on the unit it causes danger. Avoid
using any flammable liquid of chemicals when the unit is hot or warm.
Use only a wet towel or piece of rug to clean the chamber from inside and outer the body.
Procedure:
For cleaning the unit first, turn off the unit and plugs it out from the socket. Open the oven
door. Remove all inner sheets of the chamber carefully. For removing the sheets please
flow the under mention procedure.
First Pull the upper sheet carefully located inside of the chamber.
Then lift slightly left and right side sheets and pull out.
For removing the bottom plate slightly lift and pull out.
At last, you can remove the back sheet only in ICF and OCF models.
You can wash all sheets with a soft detergent. After washing wipe and dry properly. Now
with the help of a wet towel clean the inside of the chamber and wipe with a dry cloth.
Anamed System User Manual | As of: 10.06.2020
Technical specifications are subject to change.
48USER MANUAL 2020 | OCG
Weakly maintenance
Dusting the complete unit from the outer side. Only Use soft detergent
if necessary. Avoid using halide and acid.
Check the door seal and door alignment if found any discrepancies
please make fix it.
Check the power cord and power plug if found any damages please
contact to service engineer or authorize person.
Yearly maintenance
Remove all sheets of inner of the chamber (see chap Xyz) for more
assistance.
Wash all sheets with soft detergent or any alcoholic solution.
Clean heater and inner chamber with wet cotton or towel.
Disinfect inner chamber and heater with disinfector.
Assemble all sheets on their places again after dry well.
Adjust temperature if required after checking with a certified device.
18.2 Decontamination
Before decontamination of units make sure the unit is plugged out from the socket. Remove all inner sheets
carefully (see chap Xyz) for further assistance. Wash all sheets with a soft detergent and deionize water.
Clean inner chamber and heater with a wet towel. When all parts get dry then clean with certified
disinfector and wait till disinfector works. now place all sheets on their places. OCG and OCF turn on the
unit and start the test at 190 Co for 30 minutes. For ICG and ICF start the test for 100 Co one hour.
Anamed System User Manual | As of: 10.06.2020
Technical specifications are subject to change.
49You can also read