USER MANUAL VERSION 6.3 - cloudfront.net
←
→
Page content transcription
If your browser does not render page correctly, please read the page content below

USER MANUAL VERSION 6.3
ESPAÑOL                   POLSKI   ITALIANO   DEUTSCH   FRANÇAIS   NEDERLANDS   ENGLISH
ENGLISH
MANUAL
ENGLISH
1.      GENERAL                          1
1.1      Welcome                          1
1.2      Use of the manual                1
1.3      Service and technical support    1

2       SAFETY                           2
2.1      EnergyPak battery & charger      2
2.2      Luggage carrier                  2
2.3      Bike usage                       2
2.4      Transportation                   2

3       OVERVIEW E-PARTS                 3
3.1      Explanation                      3
3.2      EnergyPak & Charger              4
3.2.1    Overview                         4
3.2.2    General remarks                  4
3.2.3    New EnergyPak                    5
3.2.4    Charging                         5
3.2.5    Usage                            8
3.2.6    Storage                          8
3.3      SyncDrive                        9
3.4      RideControl                      9
3.4.1    Overview                         9
3.4.2    Settings                        10
3.4.3    Reset settings                  13
3.4.4    Switch (Km/hMph)             13
3.4.5    Position adjustment             13

4       BIKE USAGE                       14
4.1      Maintenance                     14
4.2      Range                           15
4.3      Shifting recommendations        15
4.4      keys                            15

5       TROUBLESHOOTING                  16
5.1      Error indication                16
5.2      EVO display                     16
5.3      Charge display                  16

6       FREQUENTLY ASKED QUESTIONS       17
6.1      Ridecontrol - display           17
6.2      EnergyPak                       17
6.3      SyncDrive motor                 18
6.4      Miscellaneous                   18

7       LEGAL DOCUMENTATION              19
7.1      Warranty                        19
7.2      Exclusions                      20
7.3      Conformity                      20
7.4      FCC                             20
7.5      IC                              21
ENGLISH
1. General
1.1 WELCOME
Welcome and congratulations on your purchase of a new Giant E-bike, the fun of pedalling is only
moments away.

Ride Life, Ride Giant
Nothing makes us happier than seeing people out riding bikes. Since 1972 Giant has manufactured
quality bikes for every type of terrain and rider imaginable. Giant bicycles have allowed millions of
cyclists just like you the opportunity to live happier, healthier lives because of the joy, exercise and sheer
exhilaration that riding a bicycle brings. And it is this commitment to sharing the joy of the ride that
inspires us to continually offer the world’s most innovative bicycles.

1.2 USE OF THE MANUAL
Read this manual carefully before you start riding on your new Giant E-bike. Safety instructions are
very important and should not be overlooked. By doing so you will have a better understanding of the
general operation of the various bike parts. Some frequently asked questions will be covered as well.
Obviously, legal documentation is included in this manual at your service. So, take a moment to read
this manual before you start riding.

1.3 SERVICE AND TECHNICAL SUPPORT
This manual is not intended to be an extensive reference book about service, maintenance and/or
repairs. Please consult your dealer for service and technical support. You can find more information
about our products or find a dealer via our global website(www.giant-bicycles.com/).

                                                                                                                 1
2 Safety
           2.1 ENERGYPAK BATTERY & CHARGER
       • Keep the EnergyPak battery & charger away from
   !     water and open fire.
DANGER • Do not use the battery & charger for other pur-
         poses.
       • Do not connect positive and negative terminals;
       • Keep the battery away from children and pets.
       • Do not subject the battery & charger to shocks
         (e.g. by dropping).
       • Do not cover the battery & charger or place
         objects on top of it.
       • Stop the charging procedure immediately if you
         notice a strange smell or smoke.
       • In the unlikely case that the battery is on fire, do
         NOT try to put it out with water. Use sand instead
         and call emergency services immediately.

           Avoid contact with battery and charger during charging operation. The charger heats up.
   !       Please read/note additional information on the rear of the battery case.
CAUTION

           2.2 LUGGAGE CARRIER
           Some type of bikes have the battery holder and lug-
           gage carrier combined. Please ensure that luggage
           is securely fixed to avoid that it can cause damage to
           the battery and/or holder.

           Maximum rear carrier load including EnergyPak:
           22 kG.

           2.3 BIKE USAGE
           Before using the E-bike on the open road, ride the bike in a secure area to get acquainted with riding a
           bike with electric pedalling support. Try all settings on the bike and get familiar with the results.

           2.4 TRANSPORTATION
           Batteries are not designed to be on the bike during transportation by car. Batteries must be taken off the
CAUTION    bike(s) and transported inside the car.

       2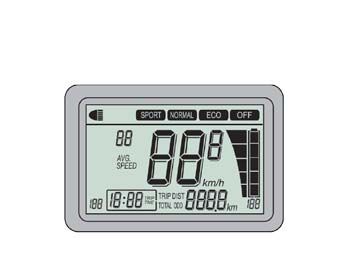
ENGLISH
3 Overview E-parts
3.1 EXPLANATION
Giant E-bikes are equipped with parts that work together to make a smooth and powerful assisted
E-bike.
Giant’s integrated Lithium-ion battery packs are unique because they have the highest energy density
in the market. If we consider weight and size, Giant EnergyPaks produce the best performance in an
integrated package. Furthermore, this EnergyPak charges twice as fast compared to earlier battery
systems and provides a superb maximum range. The batteries are thoroughly tested in Giant factories
to ensure reliability. Giant E-bikes are equiped with 300Wh, 400Wh or 500Wh EnergyPaks.
Powered by YAMAHA
Innovation, manufacturing expertise and a motor system powered by Yamaha all combine to help
extend any rider’s abilities. The new SyncDrive motor delivers smooth pedaling power that’s sonically
tuned for quiet performance. The SyncDrive motor is widely acclaimed for its performance and reliability.
The small mid-drive motor delivers a massive maximum 80Nm (Newton Meters) of torque, and gives
you the option of using a double chainring crankset so you can choose an easier gear, which requires
less energy from the rider and battery.
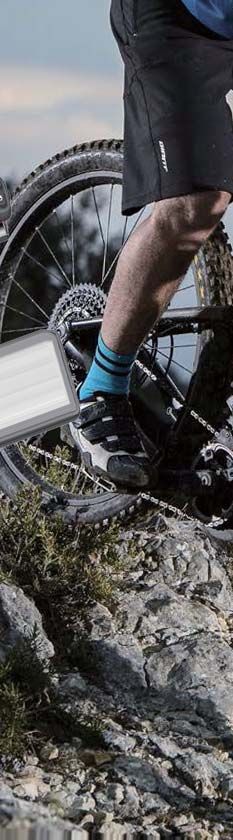
The handlebar-mounted command center provides easy-to-operate controls with a more ergonomic
button that controls the display and support levels in a comfortable way. The RideControl display has a
central position and is multi-adjustable. It provides riders with the following important information:
• Battery level indicator
• Support level indicator
• General indicators like speed, distance etc.
ECO
The lowest power assist level can be used for riding urban and suburban roads when minimal
assistance is needed. Eco level requires less battery capacity and helps you cover a greater distances.
NORMAL
This support level is good for hills and country roads. It helps riders complete longer distances with less
effort and fatigue.
POWER
The Power level gives you the highest power boost to climb steep hills. It’s the perfect choice when
you’re riding the most challenging mountains and terrain.
Systems with Yamaha ‘PRO’ motor use ‘ECO’, ‘BASIC’, ‘ACTIVE’, ‘SPORT’ and ‘POWER’ for assist
modes. For these systems the same explanation is applicable; ECO is good for best range, POWER is
good for best assist.
33.2 ENERGYPAK & CHARGER
3.2.1 Overview
EnergyPak integrated EnergyPak integrated (sideways)
C
C
A B A B
A EnergyPak A EnergyPak
B Charging socket B Charging socket
C Energy Level check (button) C Energy Level check (button)
EnergyPak rear rack Charger
A
D C B A
C B
A EnergyPak A AC socket (110~230V) (type will vary)
B Charging socket B Charger
C Energy Level check (button) C Charging indicator
D Charging socket
3.2.2 General remarks
• Stop the charging procedure immediately if you notice a strange smell or smoke. Take the Energy-
! Pak to an Authorised Giant Dealer for service or replacement.
DANGER
• In the unlikely case that the EnergyPak is on fire, do NOT try to put it out with water. Use sand
instead to cover the fire and call emergency services as soon as possible.
4ENGLISH
3.2.3 New EnergyPak
A new EnergyPak is shipped in a protective ‘hibernate’ state. Such an EnergyPak needs to be activated
before it can be used;
• A ‘hibernate’ EnergyPak can be recognized by pushing the energy level check button. The LED’s of
the EnergyPak will not light up.
• Plug an active charger in the EnergyPak.
• Unplug the charger from the EnergyPak.
• The EnergyPak is now out of ‘hibernate’ state. Pushing the energy level check button will result in
lighting up LED’s.
• The EnergyPak is ready for usage.
It is not possible for an EnergyPak to go back to ‘hibernate’ state once it is awoken.
Usually, the dealer will charge the EnergyPak and therefore undo ‘hibernate’ state.
3.2.4 Charging
• Charging the EnergyPak battery should be at room temperature (±20°C/68°F). Charging below 0°C
or above 40°C (32°F~104 °F) can lead to insufficient charging and can be harmful to the battery life
cycle.
• During charging:
- Charger LED will be continuously red.
- EnergyPak LED’s that are continuously red show charge level.
- EnergyPak LED’s that blink show charging is in progress.
• Charging is completed:
- When charger’s LED turns green.
- All EnergyPak’s LED’s are red and then switch off.
Integrated downtube EnergyPak outside the bike
1. Insert the key and unlock the EnergyPak, pull
the EnergyPak battery backwards at the top.
2. Lift out the EnergyPak.
3. Connect the charger to the EnergyPak.
4.
5.
Connect the charger to an AC outlet.
Charging operation can be discontinued at any
1 2
6.
given time.
Disconnect the charger first from the outlet and
3
then from the EnergyPak.
57. Reinstall the EnergyPak and make sure the slots
are aligned correctly at the bottom.
8. Push the top of the EnergyPak and make sure
8
the EnergyPak is secured properly. A ‘click’ can
be noticed while doing so. 7
9. Pull out the key.
10. The bike is ready for usage.
Integrated downtube EnergyPak outside the bike (sideways slider)
1. Insert the key and unlock the EnergyPak, slide
the top of the EnergyPak battery sideways to
the left.
2. Lift out the EnergyPak.
3. Connect the charger to the EnergyPak.
4. Connect the charger to an AC outlet.
5. Charging operation can be discontinued at any
2 3
6.
given time.
Disconnect the charger first from the outlet and
1
then from the EnergyPak.
7. Reinstall the EnergyPak and make sure the slots
are aligned correctly at the bottom.
8. Push the top of the EnergyPak and make sure
the EnergyPak is secured properly. A ‘click’ can
be noticed while doing so. 8
9. Pull out the key.
10. The bike is ready for usage.
7
6ENGLISH
Integrated downtube EnergyPak inside the bike
1. Connect the charger to the EnergyPak.
2. Connect the charger to an AC outlet.
3. Charging operation can be discontinued at any
given time.
4. Disconnect the charger first from the outlet and
then from the EnergyPak.
5. The bike is ready for usage.
Rear rack EnergyPak outside the bike
1. Insert the key and unlock the EnergyPak, hold
the grip and pull the EnergyPak backwards.
2. Slide out the EnergyPak.
2
1
3. Connect the charger to the EnergyPak.
4. Connect the charger to an AC outlet.
5. Charging operation can be discontinued at any
given time.
6. Disconnect the charger first from the outlet and
then from the EnergyPak.
7. Reinstall the EnergyPak and make sure the slots
are aligned correctly in the bottom.
8. Push the EnergyPak forwards and make sure
the EnergyPak is secured properly. A ‘click’ can
be noticed.
9. Pull out the key.
10. The bike is ready for usage.
Rear rack EnergyPak inside the bike
1. Connect the charger to the EnergyPak outlet on
the front of the rear rack.
2.
3.
Connect the charger to an AC outlet.
Charging operation can be discontinued at any
2
given time.
4. Disconnect the charger first from the outlet and
then from the EnergyPak 1
5. The bike is ready for usage.
73.2.5 Usage
If only 3% of the EnergyPak power is left, the Energy-
Pak will automatically switch assistance to ECO
mode in order to save energy.
If only 1% of the EnergyPak power is left, assistance
will automatically stop. Power assist level indication
bar will blink 3 times. Lights can still be used for
approximately 2 hours.
Power in the EnergyPak can be checked by pushing
the Energy Level check button.
Discharge the EnergyPak completely by riding the
bicycle after 15 normal charges or at least every 3
months totally before charging the EnergyPak again.
This will increase the lifespan of the EnergyPak.
When an EnergyPak is connected to the bike, some
power will get lost in the system when the bike is not in use. To prevent this, EnergyPak can be discon-
nected from the bike when not in use for more than a few days.
Charge table (200V-240V)
Charge time in hours
300Wh 8,8Ah 400Wh 11,3Ah 500Wh 13,8Ah
80% charge 1:45h 2:00h 2:45h
100% charge 3:30h 4:30h 5:00h
Charge table (110V)
Charge time in hours
300Wh 8,8Ah 400Wh 11,3Ah 500Wh 13,8Ah
80% charge 2:20 h 3:00 h 3:40 h
100% charge 4:40 h 6:00 h 7:20 h
3.2.6 Storage
If the bike is not used for a longer period (one month or more) the EnergyPak is best stored:
• At 60% of its capacity (3 out of 5 charging LED’s).
• Separate from the bike.
• At temperatures between 0°C and 40°C.
• Checked every month to see if at least one LED is still blinking. Charge when needed.
Charging the EnergyPak should be done at a minimum of every 3 months. Negligence to this could void
the warranty of the EnergyPak.
8ENGLISH
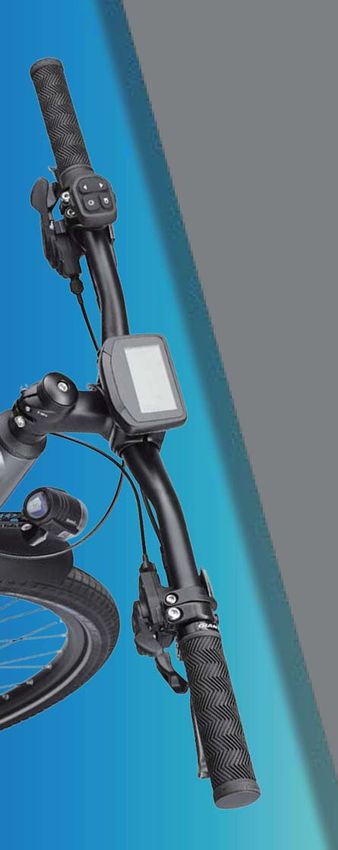
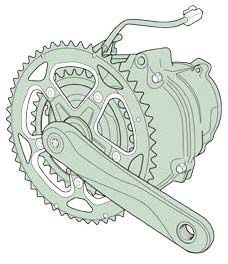
3.3 SYNCDRIVE
The SyncDrive motor is responsible for the SyncDrive Central
pedalling assistance of your E-bike.
Information from internal sensors and the speed
sensor are being processed to give a smooth and
natural ride. Sideways play of the bottom bracket
axle of one millimeter maximum is designed in the
motor for best endurance. A
B
C
A Motor
B Chainwheel
C Crank
3.4 RIDECONTROL
3.4.1 Overview
Remote Controller
T
T
Q R
Q P
S
S
P On/off
Q Assistance level (up/down)
R Lights
S Walk assist
T General indication
9EVO display Charge display
D D
A
G H
E J G E
A L M
K B C H
C
N J
C C B
A Speed A Speed
B Units (Km/h or mph) B Units (Km/h or mph)
C Indication settings: C Indication settings:
Trip time, distance, average speed, top Trip time, distance, average speed, ODO
speed, ODO (total distance), remaining range, (total distance)
cadence D Micro USB outlet (Output 5V – 0,5A)
D Micro USB outlet (Output 5V – 0,5A) E Power assist indication
E Power assist indication G Lighting indicator
G Lighting indicator H EnergyPak charge indicator (bar)
H EnergyPak charge indicator (bar) J EnergyPak charge indicator (%)
J EnergyPak charge indicator (%) L Error code indicator
K Service indicator M Power indicator
N Remaining range
3.4.2 Settings
On:
Press the ON/OFF button (P) to switch on the
system;
Off:
Press the ON/OFF button (P) for at least three
seconds and release the button to switch off the
system;
10ENGLISH
Power assist:
Press the Assistance level button (Q) up or down to
choose the correct Power assist level (E).
• OFF: For riding without power assist but with
bicycle computer and light functions.
• Assistance: Some E-bikes use ‘ECO/NORMAL/
POWER’, others use ‘ECO/BASIC/ACTIVE/
SPORT/POWER’ for assistance.
• The lower the assistance, the higher the range.
• The higher the assistance, the lower the range.
Walk assist:
Walk assist is used to help you while walking with the
bike. It works up to a speed of 6km/h / 4mph. Walk
assist is at its most powerful in the lowest gear, which
means the smallest chain wheel up front and the
biggest sprocket on the rear.
Lighting
Press the Light button (R) to switch the lights on/off.
The EnergyPak supplies power to the lights.
The lights will stay on when the bicycle is standing
still. For S-pedalecs (high speed E-bikes) this button
switches between low beam and high beam.
- For EVO display:
• When the bike is switched on, lights will be
switched on. Backlight is on as well.
• Press button to dim backlight. Lights are still on.
• Press button again to switch off light and
backlight.
- For CHARGE display:
• When the bike is switched on, the display shows its initial settings without backlight.
• When lights are switched on, the backlight will be switched on for better visibility in darkness.
11Integrated head tube light:
Some bikes (Prime-E+) have additional daylight
integrated in head tube. Lighting system for these
bikes is slightly different. B
• Under the fender front light there is a switch C
(A). This switches between ‘auto’ and ‘manual’ A
lighting.
• When the switch is in ‘auto’ mode, the light
sensor (B) on top of the fender front light (C)
switches between head tube light (D) or front
fender light (C) depending on the amount of
ambient daylight. The system requires 5 seconds
to adapt from head tube light to fender light, 20
seconds the other way around.
• When the switch is in ‘manual’ mode, the light
button on the handle bar will switch the front
fender light only. The head tube light can’t be
used in this mode.
D
General indications
Press General indication button (T) to switch the
following display indications:
- For EVO display:
• Trip time, distance, average speed, top speed,
ODO (total distance), remaining range, cadence.
The display will startup in the position it was switched
off.
In case the power assist mode is in ‘OFF’, the
remaining range will show ‘999’.
- For Charge display:
• Speed average speed
• Trip distance / ODO (total distance)
12ENGLISH
3.4.3 Reset settings
Press both Assistance buttons ‘up’ and ‘down’ (Q)
simultaneously for THREE seconds to reset trip
distance, trip time and average speed. This reset can
only be done when one of these settings is shown on
the display.
3.4.4 Switch (Km/hMph)
Press the Settings button (T) for 5 seconds to switch
between Km/h and Mph indication.
For EVO displays, Both kilometers and miles units will
be displayed.
For Charge display, only ‘km/h’ and Km’ is displayed’.
Both units ‘m’ and ‘mph’ will not be displayed.
3.4.5 Position adjustment
- For EVO display:
Loosen bolts (D) crosswise.
Adjust the angle of the aluminium housing.
Tighten the bolts clockwise and crosswise. Do not
overtighten.
13- For CHARGE display:
Loosen bolts (D). Adjust the angle of the LCD mount.
Tighten the bolts. Do not overtighten. Allowing
the display to rotate a little will prevent substantial
damage in case of a crash.
- For Remote control:
Unscrew the grip bolt a few turns counter clockwise.
Adjust the angle of the remote control.
Tighten the bolt.
4 Bike usage
4.1 MAINTENANCE
Giant Hybrid E-bikes use plastic shells to cover the electric parts, so it is forbidden to use excessive
water to wash the plastic. Use a soft cloth with a neutral solution to wipe the dirt off the plastic shells.
After that, wipe it dry with a clean soft cloth.
CAUTION
Do not use high-pressure water or air hoses for cleaning. It can force water into electric components,
which may cause malfunctioning.
Do not wash plastic components with exessive water. When the internal electrical parts are infected with
CAUTION water, the insulator may corrode which leads to power-drain or other problems
Do not use soap solutions to wash the plastic components. Non-neutral solutions may cause color-
change, distortion, scratching etcetera.
14ENGLISH
Avoid leaving the bike outdoors
When not riding, keep the bike in a location where it will be protected from snow, rain, sun etc. Snow
and rain can cause the bike to corrode. The ultraviolet from the sun can fade the paint or crack any
rubber or plastic on the bike.
4.2 RANGE
The range on one charge strongly depends on several circumstances, such as (but not only):
• Weather conditions such as ambient temperature and wind;
• Road conditions such as elevation and road surface;
• Bike conditions such as tire pressure and maintenance level;
• Bike usage such as acceleration and shifting;
• Rider and luggage weight;
• Charge and discharge cycles.
4.3 SHIFTING RECOMMENDATIONS
For better range, Giant advises to shift according to the speed. For low speeds and setting off, low
gearing is best. The higher the speed, the higher the gear can be chosen. For smooth support and
optimum range, it is best to release pedal pressure while shifting gears.
• High speed, high gear.
• Low speed, low gear.
• Release power during shifting.
4.4 KEYS
The bike comes standard with two keys that are used for the battery lock. Some bike come standard
with a ring lock as well. For those bikes the keys fit both locks. A qualified locksmith can duplicate the
keys. For bikes without bike lock, onboard charging can lead to the battery lock key being unused for a
long period. This key is needed for maintenance and repair however. Be aware of this when storing the
key.
• Keep non-used key(s) in a safe place for repairs and emergencies.
• Make sure to have always at least one spare key.
• Always bring the key when going to the dealer for maintenance or repairs.
155 Troubleshooting
5.1 ERROR INDICATION
An error notification will be shown on the display in case a problem is detected in the system. In the
majority of cases there is no reason for immediate concern, however it is recommended to visit your
Giant dealer to have it checked. For removing all error codes from display, visiting your Giant dealer is
required.
5.2 EVO DISPLAY
In case of a system error the EVO display can show various error messages in following sequence;
1. ‘system message’ for 2 seconds.
2. One of these root causes:
• ‘SyncDrive error’
• ‘RideControl error’
• ‘Bluetooth error’
• ‘EnergyPak error’
• ‘Speed sensor error’
3. Only in case of ‘SyncDrive error’, ‘no power
support’ will be shown and power assist
will stop. (When EnergyPak is empty, power
assistance will stop as well)
4. ‘Your E-bike needs servicing’
5. Service indication pictogram shows in normal
screen until dealer is visited for servicing.
5.3 CHARGE DISPLAY
In case of an error, ‘EnergyPak indicator (%)’ (J),
‘EnergyPak indicator (bar)’(H) and ‘Error code
indicator’ will blink 3 times. The root cause will be
displayed by ‘Error code indicator’ (L).
If error code ‘A1’ is indicated or when EnergyPak is
empty, power assistance will stop. For all other error L
codes power assistance will continue. H
J
16ENGLISH
6 frequently asked questions
6.1 RIDECONTROL - DISPLAY
My Charge display can be rotated over the handlebar. Giant should have tightened this better.
• The Charge display should not be overtightened. It should be able to rotate a little in case of rude
contact.
Can I upgrade my Charge display with an EVO display?
• Giant E-parts are mostly interchangeable. Swapping a Charge display for an EVO version is possible.
There is an error code on my screen. What should I do now?
• The error code shows something irregular has happened. It is best to contact your dealer shortly. It
will not harm your bike if you continue using it.
An error code was displayed on my display, but now it is gone. What should I do?
• An error has occurred. The error is not persistent. There is no need to contact your dealer
immediately and the error can be checked during your next routine service check.
When I change settings on my EVO display, it seems the new digits stacks up to the old ones. Can you
explain what is going on?
• The EVO display is a ‘liquid crystal display’, using liquid for displaying data. When it’s getting colder,
it takes longer for the digits to fade out. The display is not broken. New settings like adjusting the
assistance level are active instantly.
6.2 ENERGYPAK
How do I know how much charge my EnergyPak has when it is not connected to the bike?
• By pushing the power button on the EnergyPak, LEDs will light up, indicating the remaining capacity.
•
There are EnergyPak with 300, 400 and 500Wh. Why is the housing not consequently bigger?
• For different capacities, Giant uses cells with different densities. This way, housing can be the same
and fit a variety of bikes.
Can I retrofit a bigger capacity Giant EnergyPak in my bike?
• Yes, Giant EnergyPak are interchangeable.
How come the charge times are not even with the capacity?
• Charging an EnergyPak is not done in a straight line. Especially the last part takes a lot of time.
Should I always empty my EnergyPak completely before recharging?
• There is no need to do complete discharge every time. Complete discharge every 3 months is
appreciated for refreshing EnergyPak management.
What happens if my EnergyPak gets empty while riding?
• Obviously, assistance will stop. At 3%, assistance will be less to improve range. At 1%, assistance
will stop completely. Lights will still function for about 2 or 3 hours. Your bike can be ridden without
assistance.
176.3 SYNCDRIVE MOTOR
If I simply rotate my pedals, I hardly get any assistance. How come?
• Giant’s SyncDrive central motor has a torque sensor. The motor assists accordingly the applied
force. More basic systems can use rotation sensor only.
I can feel sideways play on my cranks. Is this normal?
• That is ok. Giant SyncDrive Central motor by Yamaha has been designed with a sideways play in the
bottom bracket axle with a maximum of 1millimeter. This has been done for better durability under all
conditions.
How come competition motors make a different sound?
• Giant uses different internal structure than some competitors. As a consequence, we have a slightly
higher frequency and better torque value.
6.4 MISCELLANEOUS
What is the QR code on my bike for?
• The QR code can be used to register your bicycle on an anti-theft website.
What is the best way to clean my bike?
• The E-parts are best cleaned with a dry cloth. The rest of the bike should be treated as any other
bike.
Can I mount wired lighting system on my bike?
• Yes, wiring and buttons are prepared for this. Be sure to use correct type of lighting (6V for example).
My partner rides the same bike as I do. My range is much bigger. How come?
• Range is depending on a lot of influences (tire pressure, engaged own power, gear). One of them
may cause this difference.
18ENGLISH
7 Legal documentation
7.1 WARRANTY
Giant warrants for the original owner only the frame, rigid fork, or original component parts of each new
Giant brand bicycle to be free from defects in material and workmanship for the following specified
periods:
Warranty of two years for electronical equipments such as:
• RideControl display & buttons
• SyncDrive motor
• EnergyPak battery;
- for 60% of its original nominal capacity at a maximum of 600 charges.
• Wiring
The maximum total loaded weight (bike, rider and luggage) for our E-bikes is;
Total maximum for bikes with integrated battery 156Kg (Full-E, Dirt-E, Quick-E, Road-E and Explore).
Total maximum for bikes with carrier mounted battery 160Kg (Prime, Ease-E, Elegance and Entour).
For all other parts and components we refer to Giant’s general user manual that been delivered with this
E-bike as well. That user manual is leading in case of any issues. Text below and chapter 7.2 is just for
reference.
REQUIRED ASSEMBLY WHEN PURCHASED.
This warranty applies only to bicycles and framesets purchased new from an Authorized Giant
Dealer and assembled by that dealer at the time of purchase.
LIMITED REMEDY
Unless otherwise provided, the sole remedy under the above warranty, or any implied warranty, is
limited to the replacement of defective parts with those of equal or greater value at the sole discretion
of Giant. This warranty extends from the date of purchase, applies only to the original owner, and is not
transferable. In no event shall Giant be responsible for any direct, incidental or consequential damages,
including, without limitation, damages for personal injury, property dam- age, or economic losses,
whether based on contract, warranty, negligence, product liability, or any other theory.
Giant makes no other warranties, express or implied. All implied warranties, including the warranties
of merchantability and fitness for a particular purpose are limited in duration to that of the express
warranties stated above.
Any claim against this warranty must be made through an Authorized Giant Dealer or distributor. The
purchase receipt or other proof of the date of purchase is required before a warranty claim may be
processed.
Claims made outside the country of purchase may be subject to fees and additional restrictions.
Warranty duration and detail may differ by frame type and/or by country. This warranty gives you
specific legal rights, and you may also have other rights which may vary from place to place. This
warranty does not affect your statutory rights.
197.2 EXCLUSIONS
Normal wear and tear on parts such as tires, chains, brakes, cables and gearwheels in situations where
there are no assembly or material defects.
• Bicycles serviced by other than an Authorized Giant dealer.
• Modifications from the original condition.
• Use of the bicycle for abnormal, competition and/or commercial activities or for purposes other than
those for which the bicycle was designed.
• Damage caused by failing to follow the owner’s manual.
• Paint finish and decal damage resulting from taking part in competitions, jumping, downhill and/ or
training for such activities or events or as a result of exposing the bike to, or riding the bike in, severe
conditions or climates.
• Labour charges for part replacement or changeover.
Except as is provided by this warranty and subject to all additional warranties Giant and its employees
and agents shall not be liable for any loss or damage whatsoever (including incidental and consequential
loss or damage caused by negligence or default) arising from or concerning any Giant bicycle.
7.3 CONFORMITY
Hybrid power bicycles with a maximum support speed of 45km/h fulfil the requirements of
EU Directive 168/2013/EC for L1e-B category vehicles.
Hybrid power bicycles with a maximum support speed of 25km/h fulfil the requirements of
EU Machinery Directive 2006/42/EC.
These bicycles also comply with the following non-harmonized standards:
• Bicycle standard: ISO 4210-2
• Electric bicycles: EN 15194
The declaration of conformity for your specific Giant E-bike can be found as an inlay in this user manual.
Disclaimer
We strongly advise you not to remove or replace any original equipment or modify your cycle in any
way that may change its design and/or operation. Such changes could seriously impair your cycle’s
handling, stability and other aspects of the cycle, making it unsafe to ride. Removing or modifying
parts or using non-original equipment as replacements can also render your bike not in compliance
with the applicable laws and regulations. To ensure safety, quality and reliability, use only original
parts or Giant authorized replacements for repair and replacement.
7.4 FCC
This device complies with part 15 of the FCC Rules. Operation is subject to the following two conditi-
ons:
(1) This device may not cause harmful interference, and
(2) this device must accept any interference received, including interference that may cause undesired
operation.
Please note that changes or modifications not expressly approved by the party responsible for
compliance could void the user’s authority to operate the equipment.
20ENGLISH
Note: This equipment has been tested and found to comply with the limits for a Class B digital device,
pursuant to part 15 of the FCC Rules. These limits are designed to provide reasonable protection
against harmful interference in a residential installation. This equipment generates, uses and can radiate
radio frequency energy and, if not installed and used in accordance with the instructions, may cause
harmful interference to radio communications. However, there is no guarantee that interference will not
occur in a particular installation. If this equipment does cause harmful interference to radio or television
reception, which can be determined by turning the equipment off and on, the user is encouraged to try
to correct the interference by one or more of the following measures:
• Reorient or relocate the receiving antenna.
• Increase the separation between the equipment and receiver.
• Connect the equipment into an outlet on a circuit different from that to which the receiver is
connected.
• Consult the dealer or an experienced radio/TV technician for help.
This equipment complies with radio frequency exposure limits set forth by the FCC for an uncontrolled
environment.
This equipment should be installed and operated with a minimum distance of 5mm between the device
and the user or bystanders.
This device must not be co-located or operating in conjunction with any other antenna or transmitter.
7.5 IC
This device complies with Industry Canada’s licence-exempt RSSs. Operation is subject to the following
two conditions:
(1) This device may not cause interference; and
(2) This device must accept any interference, including interference that may cause undesired operation
of the device.
Le présent appareil est conforme aux CNR d’Industrie Canada applicables aux appareils radio exempts
de licence. L’exploitation est autorisée aux deux conditions suivantes:
(1) l’appareil ne doit pas produire de brouillage;
(2)l’utilisateur de l’appareildoit accepter tout brouillageradioélectriquesubi, mêmesi le brouillageest
susceptible d’encompromettre le fonctionnement.
This equipment complies with radio frequency exposure limits set forth by the Innovation, Science and
Economic Development Canada for an uncontrolled environment.
This equipment should be installed and operated with a minimum distance of 5mm between the device
and the user or bystanders.
This device must not be co-located or operating in conjunction with any other antenna or transmitter.
Cet équipement est conforme aux limites d’exposition aux radiofréquences définies par la Innovation,
Sciences et Développement économique Canada pour un environnement non contrôlé.
Cet équipement doit être installé et utilisé avec un minimum de 5mm de distance entre le dispositif et
l’utilisateurou des tiers.
Ce dispositif ne doit pas êtreutilisé à proximitéd’une autre antenne ou d’un autreémetteur.
21You can also read