Tab G10 - Quick Start Guide English - Pokini
←
→
Page content transcription
If your browser does not render page correctly, please read the page content below
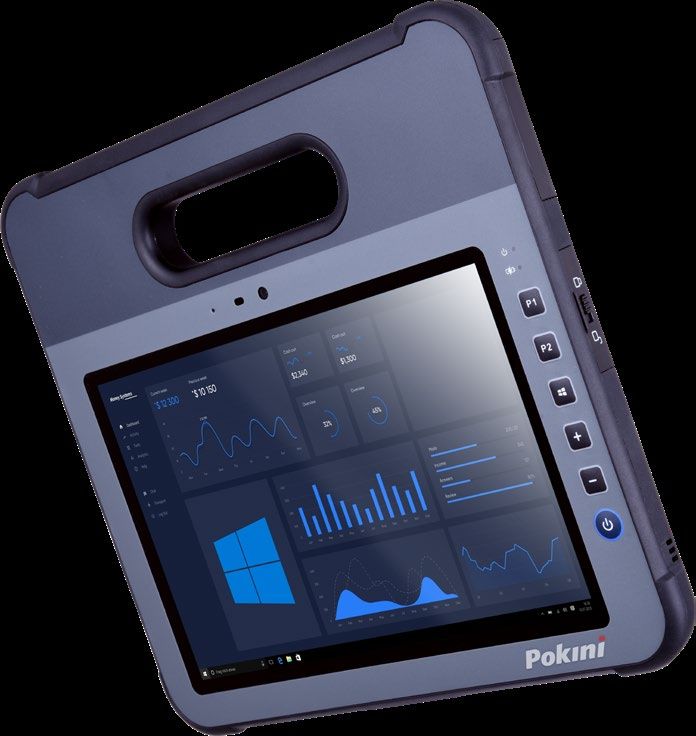
Tab G10

Quick Start Guide
      English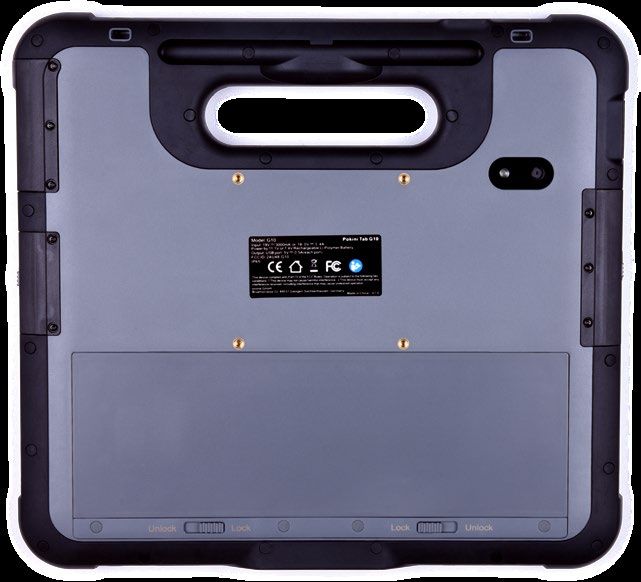
English
Contents Introduction
1. Introduction .................................................................................................................................................................. 03 Welcome to your G10 Tablet PC.
To ensure the optimal performance of this product, please take the time to read this manual carefully.
G10 is a rugged tablet intended for medical/commercial uses.
2. Device Layout ................................................................................................................................................................ 04
Explanation of Advisements
(Front, Side, Top, Bottom View) In this manual we use three (3) levels of Advisements as follows:
The Note symbol is used for notifying the user of something important or of something that needs special attention.
3. Managing Device Power ......................................................................................................................................... 07
(AC Adapter, Battery) TheCautionsymbolisusedtoinformofsomethingthatcouldcauseharmto,ormalfunctionof,theequipment.
TheWarningsymbolisusedtoinformofsomethinginwhichthereisaconceivableriskofharmtotheuserifthe Warning is ignored.
4. Using optional features .......................................................................................................................................... 10
(RFID, NFC, CAC, Finger Print, Barcode Reader, GPS, Digitizer)
Symbols and Markings
This section provides information about the symbols that are used on the G10, its accessories, or packaging.
5. eController App and its Applications ............................................................................................................... 14
(RFID, NFC, CAC, Finger Print, Barcode Reader, GPS)
Symbol or Markings Description
6. Product Care ................................................................................................................................................................... 17
(Temperature, Humidity) Power On/Off Indicator
7. Safety ................................................................................................................................................................................ 17
Dispose of in accordance with your country’s requirements.
8. Trouble shooting .......................................................................................................................................................... 18
CE is the abbreviation of the European Communities and this mark tells customs officials in
the European Union that the product complies with one or more of the EC Directives.
This is a certification mark employed on electronic products manufactured or sold in the
United States which certifies that the electromagnetic interference from the device is under
limits approved by the Federal Communications Commission.
Consult User´s Manual
UL Marking
The product meet UL’s requirements for Canada and the United States.
Conforms to relevant Australian EMC requirements
2 3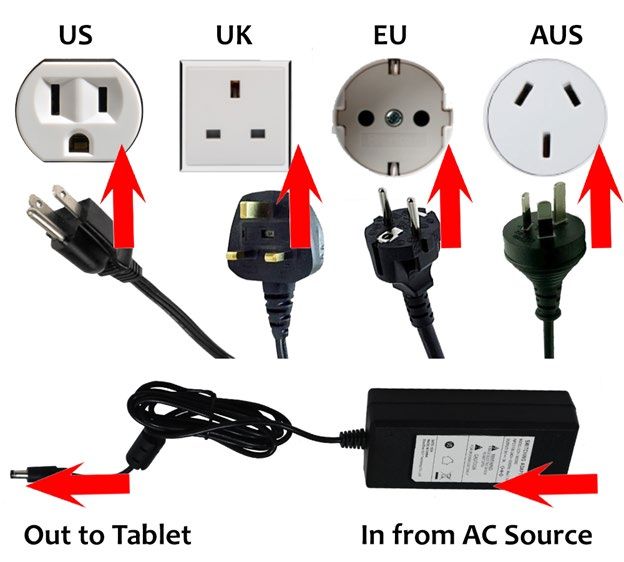
English

Device Layout                                                                                                             Left-Side View

Front View

                                                                                                                              14   Barcode Reader (Optional)   Optically Scans 1D or 2D Barcodes, if Equipped

                                                                                                                              15   Audio                       Connect headphones, speakers, or another external audio device.

                                                                                                                              16   USB 3.0                     Connect any external USB device or storage volume.

                                                                                                                              17   HDMI                        Connect a secondary display via HDMI.

                                                                                                                          Top View

          1   Finger Print Reader    Provides Fingerprint Authentication and Security for your device (if equipped).

          2   MIC                    Audio Recording Device                                                                                                    Press to activate Barcode Reader Scanning Device (button will be deactivated if tablet
                                                                                                                              18   Barcode Reader Button
                                                                                                                                                               not equipped with barcode reader).
          3   Ambient Light Sensor   Provides Automatic Adjustment of Screen Brightness for Various Lighting Conditions
                                                                                                                              19   Stylus Tether Hole          The stylus can be tethered through this hole.
          4   Front Camera           Record Still and Video Images – 8 MP

          5   NFC/RFID Reader        Near Field Communication/Radio-Frequency ID Device

          6   Power LED Indicator    Green – Power On
                                     White light Blink – Battery Charging
          7   Charge LED Indicator   Solid Green – Charge Complete
                                     Red Blink– Low Battery (Battery Below 10%)                                           Bottom View
          8   Function Key 1         Programmable – Can be used for common special functions

          9   Function Key 2         Programmable – Can be used for common special functions

         10   Windows Key            Opens or closes the Start menu.

         11   Volume + Button        Increases the audio volume.

         12   Volume - Button        Decreases the audio volume.

         13   Power Button           Turn power On/Off – Hold 10s to Reset
                                                                                                                              20   Docking Connector           Connects the tablet with the Tablet Docking Station

4                                                                                                                                                                                                                                                       5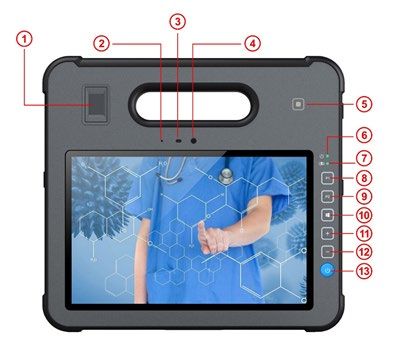
English

Right-Side View                                                                                                                               Managing Device Power

                                                                                                                                              AC adapter
                                                                                                                                              The AC adapter accepts 100-240VAC Input.

                                                                                                                                              A standard US polarized, grounded three-pin plug adapter is included.
                                                                                                                                              International plug AC adapters are available for certain regions.

            21      CAC Card Reader        For reading Common Access Card for ID authentication.

            22      IO Cover Lock          Cover the IO port for waterproof.

            23      DC in                  Direct current (DC) power for charging/using the tablet.

            24      RJ45 Port              10/100/1000 MB network port

            25      Speaker                Sends out sound and voice.

Rear View

       26     Stylus Tether Hole           Stylus can be tethered to this hole.

       27     LED                          Flash light, controlled by P1&P2 button, Press P1 to turn on the Flash light and P2 to turn off.
                                           Serves as the input device by tapping on the touchscreen to make selections and enter
       28     Stylus pen
                                           information.

       29     Rear Camera                  Allows you to use the camera function.

       30     Hot Swappable Battery Lock   To lock/unlock the hot swappable battery
                                                                                                                                                   Use only the AC adapter included with your Tablet PC. Using other AC adapters may damage the device.
       31     Hot Swappable Battery        Supplies power to your Tablet PC when external power is not connected.

       32     SIM Slot                     Insert SIM card to enable 4G LTE service (optional)

       33     MicroSD Slot                 Accepts MicroSD Memory Cards

6                                                                                                                                                                                                                                                         7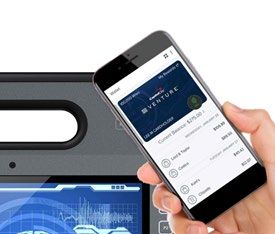
English

Battery Pack                                                                                                                      Hot Swapping the Battery Pack
                                                                                                                                  The G10 Tablet PC battery can be replaced without shutting down the tablet or interrupting your work, by use of the built-in bat-
The G10 device has one small, permanent, internal battery and one hot-swappable battery. When hot swappable battery has           tery. The built-in battery can sustain power for up to 30 minutes, during which period the swappable battery must be changed
low voltage and needs to be replaced, the built-in battery will power the tablet for up to 30 minutes.                            to prevent loss of function.

To charge the Battery Pack:
1. Connect the power cable to the charging port on the device.
2. Connect the power adapter to an electrical outlet and charge the tablet until the battery is fully charged.
3. After your device is fully charged, disconnect the charger from both the device and the electrical outlet.
4. Additional hot-swappable batteries can be charged independently of the Tablet PC by placing the battery
   into a docking station with a battery charging bay (available separately).

       NOTE: To prevent damage to batteries, please see Section 8: Safety

       Battery life naturally degrades over time. Failure to follow instructions for recommended operating temperatures,
       charge and discharge rates, and other instructions may accelerate battery decay rates. If your tablet battery will
       not accept or hold a satisfactory charge, it may need to be replaced.

       For battery storage and charging temperatures, see Section 8: Safety                                                       To swap the battery, lay the tablet on a flat surface, and pull the two tabs indicated towards the edges of the tablet. The battery
                                                                                                                                  will pop loose and a replacement can be slid into place.

Checking the Battery Level
To check the battery charge level of the G10, you may use the battery monitor within Windows operating system or by the volt-           The appropriate temperature range for hot swapping the battery pack is between -10 °C (14 °F) and 50 °C (122 °F).
age gauge of hot swappable battery pack.
When the hot swappable battery pack is not installed in the Tablet PC and you want to know the battery level, press the Battery
Test (1) button. The gauge will display the battery level.                                                                              Check the Bridge Battery Indicator after unlocking the battery latch. Replace the battery pack only when the indicator
                                                                                                                                        lights in green. A red light means the bridge battery level is too low for you to safely hot swap the battery pack.

                                                                                                                                        When the battery latch is unlocked, the display brightness level will be fixed at a low level and cannot be adjusted

                                                                                                                                        If the hot swappable battery pack is not inserted within 30 minutes, the Tablet PC enters Hibernation
                                                                                                                                        mode or may switch off entirely.

                                                                                                                                  .
                       1                                                                                                          Internal Battery
                                                                                                                                  The internal battery is not user-replaceable and is not visible to the operating system. It never functions as the power source
                                                                                                                                  as long as the hot swappable battery pack is installed, It enables the hot-swapping function, since it provides power only when
                                                                                                                                  the battery pack is being removed. The internal battery should not be used to power the tablet during regular operation.

       Any battery level indication is an estimated result. The actual operating time can be different from the
       estimated time, depending on how you are using the Tablet PC.

                                                                                                                                  By default, the internal battery is charged by external AC power (if connected) or the main battery pack if it is not fully charged.
                                                                                                                                  To preserve battery life, it is possible to set the internal battery to charge only when connected to an AC Power Source.

8                                                                                                                                                                                                                                                                    9
English

Using optional features
      Due to the overlap features of NFC, RFID and CAC card readers, they are designed in the same location of the tablet,
      so the three modules cannot be installed in the same tablet, only one module can be selected.

Using the RFID Reader
This device may include an internal RFID reader module. The RFID system involves a tag and a reader, used for inventory man-
agement, asset tracking and so on. As it is shown in product layout in chapter 2 (Position 5). For more details, see Technical
Specifications in Appendix A.

To use an RFID Device:
• Scan a smart card or RFID tag near the RFID reader, please follow the instructions in the specific software
  for your application and use RFID function properly.                                                                                 Users must keep the NFC tag or cards close to the NFC area within 2.5 mm, otherwise the internal NFC module may not
                                                                                                                                       receive the signal from the tag or card. If you hear a small beep, it means the scan is successful.

                                                                                                                                       If you cannot get the NFC function work properly, check tag or card type. if still not working, please contact your supplier
                                                                                                                                       for instruction.

                                                                                                                                      • If you want to check the NFC hardware is working properly, you may use eController app to test.
                                                                                                                                         See Chapter 6: eController App and its Applications.

                                                                                                                                 Using the CAC (Common Access Card) Card Reader
                                                                                                                                 This device has internal CAC card module for ID authentication, as it is shown in chapter 2 (Position 21). For more details, see
                                                                                                                                 Technical Specifications in Appendix A.
      The RFID tag/card must be within the range of an RFID reader. An audible beep will indicate a successful scan.
                                                                                                                                      • Users can insert the smart card into the Reader, please follow the instructions in the specific software
                                                                                                                                        for your application and use CAC card function properly.
      If you experience errors while attempting to read an RFID tag with the scanner, please try a different tag.
      If the error persists, contact your dealer for assistance.

      • If you want to check whether the RFID reader hardware is working properly, you may use eController app to test.
        See Chapter 6: eController App and its Applications.

Using the NFC Reader
This device may include an optional internal NFC (Near Field Communication) module for different applications, such as check-
ing security tags, or communicating with smartphones. You can view the location of the NFC Module in the product layout in
Chapter 2 (Position 5). For more details, see Technical Specifications in Appendix A.                                                 If you cannot get the CAC Card reader function work properly, use different CAC card and check again. also make sure
                                                                                                                                      the cards are the correct type and inserted fully in the slot. If still not working, please contact your
To use an NFC Device:                                                                                                                 supplier for instruction.
• Users can scan a card or device near the NFC sensor area. Please follow the instructions in the specific software for
  your application and use NFC function properly. Below it is example for mobile payment application using NFC.                       • If you want to check the CAC card hardware is working properly, you may use eController app to test.
                                                                                                                                        See Chapter 6: eController App and its Applications.

10                                                                                                                                                                                                                                                                  11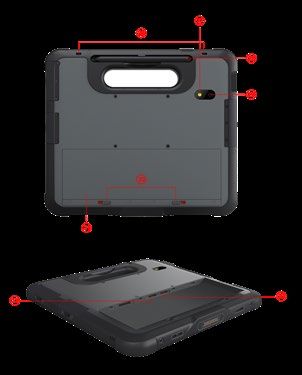
English

Using the Barcode Reader                                                                                                                   Users must insert the SIM card in the slot fully and in the correct orientation, and make sure the SIM card is
This device has optional internal Barcode Reader module. It is an optical input device used to capture and read information                enabled by the carrier, otherwise the card will not be read.
contained in a bar code. Most common 1D and 2D barcode formats can be read. The position of the reader is shown in the
product layout in Chapter 2 (Position 14).
Press the physical scan button on the tablet to activate the scanner. A barcode placed win the scanner field of view will be read.         The G10 Tablet is able to support cellular connections that do not require a SIM card (such as eSIM or Built-In SIM).
To enable the barcode function, please follow the instructions in the specific software for your application and use barcode               Please follow your cellular carrier’s instructions to achieve this.
reader function properly.

                                                                                                                                     Using GPS
                                                                                                                                     This device has internal GPS module for navigation, please follow the instructions in the specific software for your application
                                                                                                                                     for GPS application. For more details, see Technical Specifications in Appendix A.

                                                                                                                                           • If you want to check whether the GPS hardware is working properly, you may use eController app to test.
                                                                                                                                              See Chapter 6: eController App and its Applications.

                                                                                                                                     Using the Digitizer Pen
                                                                                                                                     G10 Tablet offers either a standard, passive stylus (Digitizer Pen) or an active stylus.
      The maximum operating temperature for the barcode scanner is 50 °C (122 °F).

      The barcode reader only works at close range under appropriate ambient light conditions. A small beep indicates
      that the barcode has been successfully read.

                                                                                                                                                                                                Standard stylus
      • If you want to check the Barcode Reader hardware is working properly, you may use eController app to test.
        See Chapter 6: eController App and its Applications.

Using Cellular Connectivity
This device offers an internal, two-antenna cellular module for a fast connection to cellular systems and mobile internet. The                                                                    Active stylus
location of the 4G LTE cellular module is shown in the product layout in Chapter 2 (Position 32). For more details, see Technical
Specifications in Appendix A.

If your cellular service requires a SIM Card:                                                                                        The standard stylus can be used for writing and selecting elements on the screen. The active stylus works together with a
                                                                                                                                     specialized touch sensor panel to support functions like Double Click, Palm Reject, Hover, Accurate Drawing, Legal Signatures,
      • Insert your SIM card into the SIM card slot, located beneath the battery cover. The device will automatically                and other special functions. For more details, see Technical Specifications in Appendix A.
        read the card. The 4G LTE Module will provide further on-screen instructions.
                                                                                                                                     To use double click function, Tap the desired point on the screen twice in quick succession with the pen.

                                                                                                                                     Hoover function, if you hover the pen a little bit, you will see that the pen has a corresponding mark.

                                                                                                                                           Please keep the pen within 3mm from the touch screen, otherwise the mark might not be displayed in the screen.

                                                                                                                                     Palm rejection Function: when you are writing using an active digitizer, the finger and the palm on the screen won’t produce
                                                                                                                                     input, as the screen recognizes a difference between the input from your hand and input from your stylus.

12                                                                                                                                                                                                                                                                    13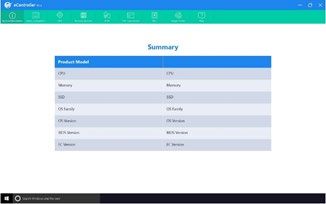
English

eController App and its Applications
                                                                                                                                     CAC Card Reader
The eController App is designed to quickly check if device modules are working properly. It tests the following modules:             When activated, the user may place an enabled card into
                                                                                                                                     the chip card reader. Users should then select “Read” on the
1. Fingerprint Reader                                                                                                                screen, and the screen will display whether the card was read
2. CAC (Common Access Card) Card                                                                                                     properly or not.
3. RFID
4. NFC                                                                                                                                    If the reader indicates that the card cannot be read,
5. Barcode Scanner                                                                                                                        please remove and reinsert the card, checking that it is
6. GPS                                                                                                                                    inserted fully and in appropriate orientation. If the card
7. Assign function to programmable buttons F1 and F2.                                                                                     still cannot be read, try a different card.

     Most of the above the modules are optional items. If the eController top menu bars are greyed out or unselectable
     on certain items, the related modules are not installed (or have been disabled).

     The eController is not application software. You need install the proper application software (App) to use the module for
     your desired functions.

                                                                                                                                     RFID
                                                                                                                                     Place the RFID tagged device near the indicator on the tablet,
                                                                                                                                     and select the “Read” button on the screen. The RFID reader
                                                                                                                                     will display whether or not an RFID tag was detected and
                                                                 System information                                                  read properly. If the tag is not detected or not read properly,
                                                                 The System Information component of the eController App             ensure that the devices are near enough together.
                                                                 will automatically check the tablet’s information.

                                                                  Fingerprint scanner                                                NFC
                                                                  When activated, the user may place a fingertip on the              The eController can test if the NFC transmitter and receiver on
                                                                  scanner, and the scanner will read the print and display it        the tablet is working properly.
                                                                  in the indicated area of the screen, until removed                 Place any NFC device (tag, smart phone with NFC is enabled,
                                                                                                                                     contactless EMV card, etc.) near the sensor area of the tablet
                                                                       The fingerprint scanner will operate continuously once        (keep distance within 2.5mm), the screen will display if NFC
                                                                       this test is selected until exited. To preserve battery and   detection successful: Detected or NONE
                                                                       enable all tablet functions, please exit the test
                                                                       when complete.
                                                                                                                                          If you cannot detect smartphone NFC, please check if
                                                                                                                                          the NFC is enabled on the phone.

14                                                                                                                                                                                                15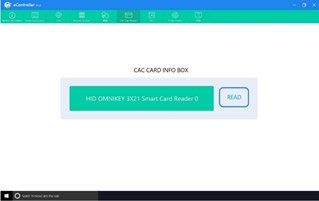
English

           Barcode Scanner                                                     Product Care
           To test the barcode scanner, select the barcode test, point the
           scanner at a barcode (or QR code), and press the SCAN button
           on the screen or press the physical scan button on the handle       Temperature & Humidity
           of the tablet. System will quickly scan and display the barcode
           information on screen.                                              General Use - Operating temperature
           Press the button again to read the barcode again. The               The G10 is best kept in dry conditions at room temperature. The recommended range for temperature and the humidity value
           displayed info will refresh and display the new barcode             for the device is as follows:
           information                                                            • Ambient temperature: 0°C to 35°C (32°F to 95°F)
                                                                                  • Relative humidity: 10% to 90% (no condensation on the device)
                 Please aim the laser at the center of barcode.                   • Atmospheric Pressure: 80 kPa to 106 kPa (600 mmHg to 795 mmHg)
                 Do not place the scanner too far from barcode.
                                                                               Transportation and Storage
                 Barcode scanner uses laser technology,                        For transportation and storage, the recommended range for temperature and the humidity value for the device is as follows:
                 do not point it toward anyone’s eyes.                            • Temperature: -20°C to 60°C (–4°F to 140°F)
                                                                                  • Relative humidity: 10% to 90% (no condensation on the device)

                                                                               Transporting the G10 Device
                                                                               Disconnect all the cables from the G10 while carrying the device.
           Button configuration                                                When you transport the device for any reason, use the original casing and packaging materials. It is recommended to keep the
           Button configuration can program the F1 and F2 buttons on           original packaging materials for the G10.
           your tablet. Select the button you want to program, choose          If the device needs to be returned to Device Manufacturer for Warranty related issues or repair, it is beneficial that the original
           the desired function and press the SAVE button to save              packaging or equivalent is used for shipping. Most shipping carriers require at least 2 inches of packing material around the
            settings, or you can select cancel to discard the changes.         device.
           If you want to program the buttons to a function not on the
           list, please contact your supplier for further instructions.              Due to Joint Commission regulations, any shipping materials including boxes sent to
                                                                                     Device Manufacturer must be discarded.

                                                                               Safety
           GPS
           The eController GPS test is based on Chart cross Limited APP.
                                                                                     The G10 device has been tested and approved as compliant to all the Specifications and Standards listed in
           Turn on Location Services. The App will automatically run and
                                                                                     Appendix B Compliance Information, and in the Appendix A Technical Specifications. Nevertheless, in order to ensure
           check the GPS signal, satellite positions, your current location,
                                                                                     safe operation of your G10 device, there are a few safety warnings to bear in mind:
           speed, heading and altitude.
                                                                                     Do not disassemble this product. You may receive an electric shock, or foreign matter may enter and result in a fire.
           In the graphic below:
                                                                                     If a malfunction or trouble occurs, immediately turn the power off and unplug the AC plug. Then contact your
           1. GPS signal bar chart, showing the signal strength for each
                                                                                     technical support office for repair.
              satellite detected, as well as the accuracy and status of the
              GNSS network.
                                                                                     Do not service or perform maintenance on the device while the device is in use. Make sure to shut the device
           2. Satellite positions in the sky, shown on a rotating compass.
                                                                                     down and unplug all cables before starting and service or maintenance work on the device.
           3. Your current location on the earth shown as text and on a
              world map. The current position of the sun and the day/
                                                                               Power Supply and Batteries
              night transition curve is also shown.
                                                                               The G10 device contains two rechargeable batteries. All rechargeable batteries degrade over time. Thus, the possible usage
           4. Compass
                                                                               times for the G10 after a full charge can become shorter over time than when the device was new.
           5. The current time read from the GPS and the local time in
              your current time zone, as well as the sunrise and sunset
                                                                                     The G10 device uses a Li-ion Polymer battery.
              times at your location.
           6. Your current speed, heading and altitude shown as text.
                                                                                     If you are in a hot environment, be aware that it can affect the ability to charge the battery. The internal temperature
                                                                                     must be between 0°C/32 °F and 45°C/113°F for the battery to charge. If the internal battery temperature rises
                 Please test GPS in an open outdoor area. Otherwise,
                                                                                     above 45°C/113°F the battery will not charge at all.
                 the GPS may not work properly.

                 If you have any further questions about this help file,
                 please contact the supplier.
16                                                                                                                                                                                                              17
English
Avoid exposing the G10 device to fire or to temperatures above 60°C/140°F. These conditions may cause the battery to B1 FCC Statement
malfunction, generate heat, ignite or explode. Be aware that it is possible, in a worst-case scenario, for temperatures to This device complies with Part 15 of the FCC Rules. Operation is subject to the following two conditions: (1) this device may not
reach greater than those stated above in, for example, the trunk of a car on a hot day. cause harmful interference and (2) this device must accept any interference received, including interference that may cause
undesired operation.
Only charge the G10 battery in an ambient temperature of 0°C/32°F to 45°C/113°F.
Modifications not expressly approved by Device Manufacturer could void the user’s authority to operate the equipment
Use only the supplied power adapter to charge the G10 device. Using unauthorized power adapters may severely under FCC rules.
damage the G10 device.
Part 15B Equipment
For safe operation of the G10 device, use only charger and accessories approved by Device Manufacturer. This equipment has been tested and found to comply with the limits for a Class B digital device, pursuant to part 15 of the
FCC rules. These limits are designed to provide reasonable protection against harmful interference in a residential installation.
If the Power Supply Cord is damaged it needs to be replaced by Service Personnel only. Do not use the Power This equipment generates, uses and can radiate radio frequency energy and, if not installed and used in accordance with the
Supply Cord until replaced. instruc- tions, may cause harmful interference to radio communications.
Disconnect the AC power plug of the Power adapter from the wall socket when not charging the device and disconnect However, there is no guarantee that interference will not occur in a particular installation. If this equipment does cause harmful
the power cable from the device. interference to radio or television reception, which can be determined by turning the equipment off and on, the user is encour-
aged to try to correct the interference by one or more of the following measures:
Special regulations apply to shipping devices containing Li-ion Polymer batteries. If dropped, crushed, or short- circuited, • Reorient or relocate the receiving antenna.
these batteries can release dangerous amounts of heat, may ignite, and may be dangerous in fires. • Increase the separation between the equipment and receiver.
• Connect the equipment into an outlet on a circuit different from that to which the receiver is connected.
The plug/adapter plug pins insulate the device from the main supply. Do not position the device in a position • Consult the dealer or an experienced radio/TV technician for help.
where it is difficult to disconnect the device from the supply mains to safely terminate operation of the device.
Any changes or modifications not expressly approved by the manufacturer could void the user’s authority to operate the
Temperature equipment . Modifications not expressly approved by Device Manufacturer could void the user’s authority to operate the
Due to use in direct sunshine or in any other hot environment the G10 device may have hot surfaces. There is a built-in equipment under FCC rules.
temperature sensor that monitors the temperature. If the sensor detects high internal temperature, the device will
automatically trigger a Windows Shut Down or Hibernate (depending on Windows Power Button configuration). It may FCC RF Radiation Exposure Statement:
take a while before G10 device can be restarted as the unit may first need time to cool down. • This Transmitter must not be co-located or operating in conjunction with any other antenna or transmitter.
• This equipment complies with FCC RF radiation exposure limits set forth for an uncontrolled environment. This device
was tested for typical hand-held operations with the device contacted directly to the human body to the sides of
Electricity the de- vice. To maintain compliance with FCC RF exposure compliance requirements, avoid direct contact to the
The device contains no user serviceable parts. Do not open the case of the G10 Tablet Device. Doing so will void the transmitting antenna during transmitting.
product warranty and may expose you to electrical hazards.
B2 Radio Wave Exposure and Specific Absorption Rate (SAR) Information
Software The G10 device has been tested as a Class 1 Medical Device. Medical electrical equipment such as this requires special caution
Using an antivirus program is strongly recommended. regarding Electro-magnetic Compatibility (EMC) and thus needs to be installed and placed into service according to the in- for-
Software other than that which is pre-installed on the G10 is installed at the user’s own risk. External software could mation provided in this manual.
cause the G10 to malfunction and might not be covered by the warranty.
Using other cables and accessories other than those provided or that are integrated in the device may affect
Magnetic Field EMC performance.
The G10 device contains magnets. Magnetic fields may interfere with pacemakers, defibrillators, or other medical
devices. As a rule, maintain a minimum distance of 6 inches (15 centimeters) between any item with magnets The SAR (Specific Absorption Rate) limit as dictated by the FCC (in the USA) and by the IC (in Canada) is 1.6W/kg averaged over
and your heart device. 1 gram of tissue. In Europe/EU (CE regulations) it is 2.0 W/kg averaged over 10 grams of tissue. The Devices, G10 have been
tested against these SAR limits to maintain compliance with FCC/IC/CE RF exposure requirements.
Third Party
Any use of the G10 outside the intended use and together with any third-party software or hardware that changes the This equipment complies with FCC/IC/EU RF radiation exposure limits set forth for an uncontrolled environment. The highest
intended use voids the responsibility of the device manufacturer SAR value for the G10 device isEnglish
B3 Industry Canada Statement
Caution Technical Specifications
1. The device for operation in the band 5150-5250 MHz is only for indoor use to reduce the potential for harmful
interference to co-channel mobile satellite systems;
2. The maximum antenna gain permitted for devices in the bands 5250-5350 MHz and 5470-5725 MHz shall be such •IP-65 Waterproof | •Drop: 4FT drop resistant on 4 corners to plywood (MIL-STD-810G) | •Shock resistant: MIL-STD-810G,
that the equipment still complies with the e.i.r.p. limit; Ruggedness
method 516.6, procedure I | •ESD Protection: 4KV touch, 8KV air Ultra-LCD protection (Option)
3. The maximum antenna gain permitted for devices in the band 5725-5850 MHz shall be such that the equipment
still com- plies with the e.i.r.p. limits specified for point-to-point and non-point-to-point operation as appropriate; and Processor Intel® Apollo Lake N4200, Quad-core, base 1.1GHz, Burst 2.5GHz
4. Users should also be advised that high-power radars are allocated as primary users (i.e. priority users) of the bands
GPU Intel® HD Graphics 505, Base 200MHz, Burst 750MHz, Max Video Memory 8GB
5250- 5350 MHz and 5650-5850 MHz and that these radars could cause interference and/or damage to LE-LAN devices.
OS Windows 10 Pro/IOT, Linux
Avertissement
1. les dispositifs fonctionnant dans la bande 5150-5250 MHz sont réservés uniquement pour une utilisation à l’intérieur Security Intel® AES New Instructions Support, Support TPM 2.0
afin de réduire les risques de brouillage préjudiciable aux systèmes de satellites mobiles utilisant les mêmes canaux;
2. le gain maximal d’antenne permis pour les dispositifs utilisant les bandes de 5250 à 5350 MHz et de 5470 à 5725 MHz System Memory 4GB LPDDR3-1866, Option: 8GB LPDDR3
doit être conforme à la limite de la p.i.r.e;
Storage 128GB SSD M.2 interface (2280), Options: 256GB, 512GB, 1TB
3. le gain maximal d’antenne permis (pour les dispositifs utilisant la bande de 5725 à 5850 MHz) doit être conforme
à la limite de la p.i.r.e. spécifiée pour l’exploitation point à point et l’exploitation non point à point, selon le cas; Button Power on/off (Hold 7s will reset system), Vol- / Vol+, Windows button, 2x program buttons Barcode scan button (Option)
4. De plus, les utilisateurs devraient aussi être avisés que les utilisateurs de radars de haute puissance sont désignés
utilisa- teurs principaux (c.-à-d., qu’ils ont la priorité) pour les bandes 5250-5350 MHz et 5650-5850 MHz et que ces radars LCD 10.1” IPS, 1920 x 1200 Resolution, 400 NIT Brightness, Option: 1000 NIT LCD, sunlight readable
pour- raient causer du brouillage et/ou des dommages aux dispositifs LANEL.
Capacitive 10-point Multi-touch, Chemical harden cover glass, Anti-AG, AR, AF coating (Option)
Touch Screen
Support multi touch mode (include water splash), Ultra-screen protection (Option)
This device complies with Industry Canada license-exempt RSS standard(s). Operation is subject to the following two condi-
tions: (1) this device may not cause interference, and (2) this device must accept any interference, including interference that Active Capacitive Coupled, Pressure Level: 256~1024,
Digitizer (Option)
may cause undesired operation of the device. Support double click, hoover, palm rejection, High accuracy for legal signature
Audio Built-in microphone, One internal 8ohm 0.5W speaker
Le présent appareil est conforme aux CNR d’Industrie Canada applicables aux appareils radio exempts de licence. L’exploitation
est autorisée aux deux conditions suivantes: (1) l’appareil ne doit pas produire de brouillage, et (2) l’utilisateur de l’appareil doit Camera Front camera: 2MP, Rear Camera: 5MP with Auto Focus, Option: 8MP rear camera
accepter tout brouillage radioélectrique subi, même si le brouillage est susceptible d’en compromettre le fonctionnement.
Wireless WiFi 802.11 a/b/g/n/ac support 2.4G&5G, Bluetooth 4.
B4 CE Statement
This equipment complies with the requirements relating to electromagnetic compatibility, the essential protection requirement 4G LTE (Option) Standard M2 Interface, Selectable 4G LTE module for different carriers
of Electromagnetic Compatibility (EMC) Directive 2014/30/EU on the approximation of the laws of the Member States relating
GPS (Option) UBox 7, Support GPS/QZSS L1 C/A, GLONASS L1 FDMA, SBAS: WAAS, EGNOS, MSAS | Cold start: 40s
to electromagnetic compatibility and Radio Equipment Directive (RED) 2014/53/EU to meet the regulation of the radio equip-
ment and telecommunications terminal equipment. NFC (Option) Compliant with ISO/IEC 14443 A/B, 15693/18092
B5 Directives and Standards CAC card reader (Option) EMV 2000 Level 1, ISO 7816, CCID
The G10 complies with the following directives:
RFID reader (Option) ISO 14443 A/B, ISO 15693
• Medical Device Regulation (MDR)
• Low voltage Directive 2014/35/EU Finger Print Reader (Option) Capacitive, Compliant to FIPS 201
• Electromagnetic Compatibility (EMC) Directive 2014/30/EU
• Radio Equipment Directive (RED) 2014/53/EU Barcode scanner (Option) Built-in 1D/2D (QR) Barcode Reader, support multi 1D and 2D code Lighting: Red LED 625±10 nm
• RoHS2 Directive 2011/65/EU
• WEEE Directive 2012/19/EU Sensors Gyroscope, Light sensor, compass.
• Reach Directive 2006/121/EC, 1907/2006/EC Annex 17
40 WH Hot Swappable battery with voltage meter (3S1P, 11.1V, 3800mAh)
• Batteries Directive 2013/56/EU Battery
Internal Battery, 30 minutes run time for battery hot swap (2S1P, 7.4V, 400mAh)
The device has been tested to comply with FCC, IEC 60601-1, IATA/IEC62133, and other relevant standards for the intended 1x USB 3.0 @1.5A Type A, 1x HDMI output: Type A, 1x Audio jack (3.5mm, 4 pole, support MIC input), 1x DC jack: 5.5mm OD jack,
markets. I/O 1x RJ45 port: 10/100/1000M, 1x Micro SD slot (under hot swappable battery), 1x Micro SIM slot (under hot swappable battery),
1x Docking connector (12V DC and 2x USB)
Mechanical Option: Anti-Microbial medical chassis, Dimension: 280*256*22mm, Weight: 1.1KG
AC adaptor 12V 3.3A input., 110 -240V AC in, standard US plug, or multi-nation plugs Option: medical AC adapter 12V/3.3A input
Environmental Operation temperature: 0-50°C, Storage Temperature: -20 – 60 °C, Humidity: 10% to 90%, ROHS: Compliant
Regulatory FCC, IATA/IEC62133, IEC60601-1
20 21Support
You have any technical questions?
If you have problems or questions, please contact us by e-mail:
@pokini.de
support@
V1.1 / 07-2020
EXTRA Computer GmbH
Brühlstr. 12
89537 Giengen-Sachsenhausen
Deutschland/ Germany all rights reservedYou can also read