What is this...
   and what am I supposed to do with it?
←
→
Page content transcription
If your browser does not render page correctly, please read the page content below
What is this... and what am I supposed to do with it?
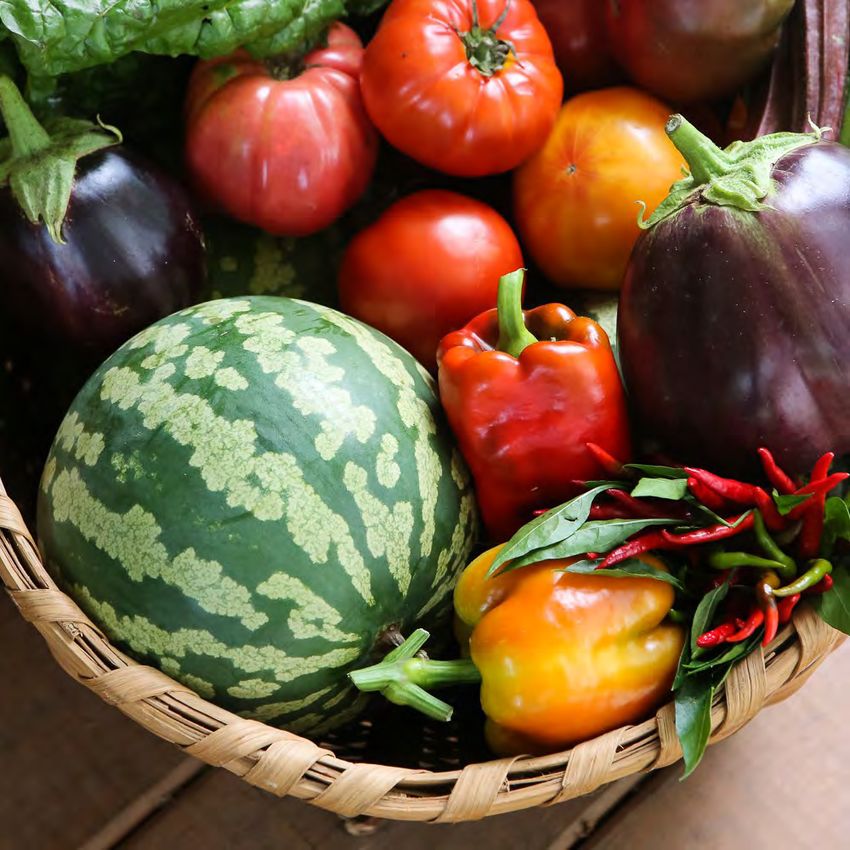
Contents
Arugula                  page 3-4
Asparagus                page 5-6
Basil                    page 7
Beans                    page 8-9
Beets                    page 10-13
Broccoli                 page 14-15
Brussels Sprouts         page 16-17
Cabbage                  page 18-19
Cauliflower              page 20-21
Carrots                  page 22-23
Celery                   page 24-25
Cilantro                 page 26
Corn Salad (see Mache)   page 36-37
Cucumbers                page 27-28
Eggplant                 page 29-32
Garlic                   page 33-34
Leafy Greens             page 35
Mache                    page 36-37
Okra                     page 38-39
Potatoes                 page 40-41
Peas                     page 42-43
Peppers                  page 44-45
Pumpkin (see Squash)     page 52-56
Rhubarb                  page 46-49
Rose                     page 50
Rutabaga                 page 51
Squash                   page 52-59 (Pumpkins, Summer Squash, Winter Squash, Zucchini)
Strawberry               page 60-61
Tomatillos               page 62-63
Tomatoes                 page 64-67
Zucchini (see Squash)    page 52-59
Arugula
Arugula is a spicy, peppery green that pairs well with the sweet and tangy flavors of fruit, as well as the savory flavors
of meat and cheese, which makes it a perfect addition to salads and sandwiches. For growing and storage instructions
see Leafy Greens. Arugula may be substituted in recipes that call for watercress, spinach, or mache.

Arugula Salad with Strawberry Rhubarb Vinaigrette
Vinaigrette
1 cup chopped fresh rhubarb
1 ¼ cup chopped fresh strawberries
3 large shallots, coarsely chopped
1 tablespoon sugar
⅓ cup red wine vinegar
¾ cup canola oil
¼ teaspoon Dijon mustard

Salad
1 bunch arugula
12 strawberries
4 ounces goat cheese

Simmer rhubarb, strawberries, shallots, sugar, and red wine
vinegar in small non-reactive saucepan until tender, about 10
minutes. Puree, strain into large bowl, and cool. Whisk in can-
ola oil and Dijon. Serve over tossed salad.

Recipe from WSU Extension of Clark County

Arugula Salad with Pears and Gorgonzola
                                                                          Dressing
                                                                          2 fresh pears sliced
                                                                          2 tablespoons olive oil
                                                                          1 tablespoon champagne vinegar
                                                                          1 tablespoon honey
                                                                          salt and freshly ground black pepper to taste.

                                                                          Salad
                                                                          3-4 cups baby arugala
                                                                          1/4 cup Gorgonzola, crumbled
                                                                          1/4 cup sugared pecans

                                                                          In a large bowl, whisk together all dressing in-
                                                                          gredients. Add arugula and toss to coat. Divide
                                                                          dressed arugula among 4 chilled salad plates.
                                                                          Top each salad with pear slices, Gorgonzola,
                                                                          and pecans. Serve immediately. May substitute
                                                                          apple slices or canned pears if fresh pears are
                                                                          not available.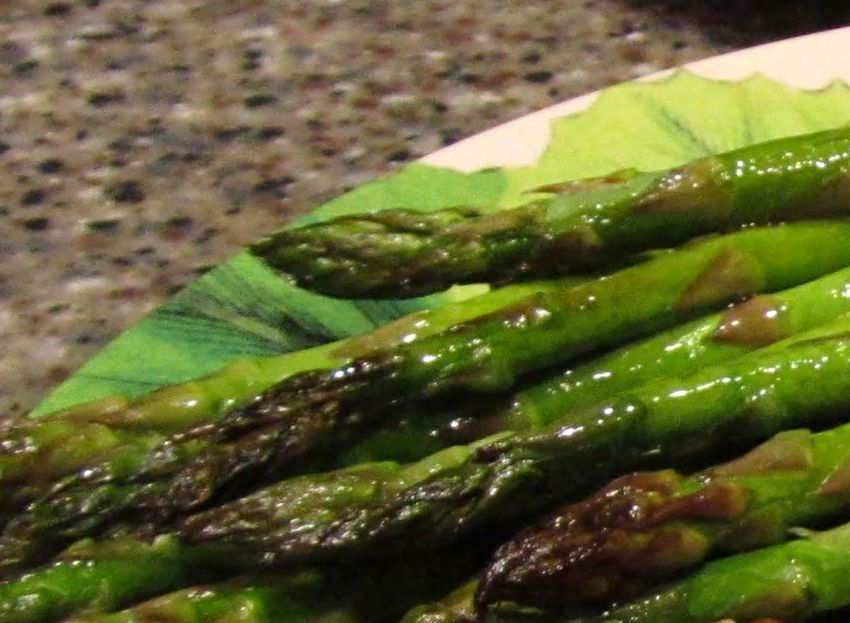
Arugula
Lemon Spaghetti with Arugula
 12 ounces spaghetti (uncooked)
juice and zest of 1 lemon
1/2 lemon cut into half moons for garnish
1 tablespoon butter
1 teaspoon crushed red pepper flakes
1/2 cup freshly grated Parmesan
3 ounces prosciutto
4 cups arugula
salt and freshly ground pepper to taste

Cook pasta to al dente. Reserve 1 cup water from pasta. Drain
pasta and return to pot and add lemon juice and zest, butter,
red pepper flakes, Parmesan, and 1/2 cup pasta water. Stir gen-
tly to combine. Add additional pasta water and stir until
creamy. Add arugula and prosciutto and toss until arugula be-
gins to wilt. Season with salt and pepper. Top with additional
Parmesan. Garnish with lemon slices.

                                                       Arugula and Apple Sandwich
                                                       2 slices good quality sandwich bread
                                                       5-6 apple slices
                                                       1/2 cup arugula coarsely chopped
                                                       Cheddar, enough slices to cover one slice of bread

                                                       This sandwich is equally good with many substitutions—any
                                                       bread or roll; instead of apples try pears or beets, change arugula
                                                       to cress or mustard greens; and use almost any cheese including
                                                       brie, gorgonzola, cheddar, or soft goat cheese. For those who think
                                                       all sandwiches should include meat, add chicken or turkey slices,
                                                       bacon, or prosciutto.

                                                       This sandwich works because it hits so many flavor receptors in
                                                       our mouth; sweet, tart, salty, savory, bitter, and umami (that hot
                                                       peppery flavor similar to horseradish).
Vegg e T ps                                                   by Pat Moszeter

Asparagus (Asparagus officinalis)
                                                                   that are 5 feet apart. Completely fill furrow to original
                                                                   soil level and do not compact. Spears will emerge within
Asparagus is a member of the Amaryllid family originating          one week. Mulch with 3 inches of weed free straw or
in the eastern Mediterranean region. It has been cultivated        leaves to discourage weeds.
for over 2000 years. Grown by the Egyptians, Greeks, and
Romans, asparagus was widely spread by the Roman army              Asparagus is drought tolerant and seeks moisture deep in
throughout most Europe, the Middle East and parts of North         soil. Some watering might be necessary for vigorous
Africa. Asparagus was once believed to have medicinal              growth. The first year asparagus should not be harvested.
qualities. Today asparagus is prized for its unique flavor.        Spears will elongate and reach height of 8 to 9 inches and
                                                                   tips will open. The spear will become woody and form
Asparagus can be planted from the middle of April to late          be small branchlets that become ferns. These ferns pro-
May; after soil has warmed to 50ᵒ. Planting in cold, wet           duce food for the plant and should be allowed grow until
soil could make the plant more susceptible to Fusarium             hard frost causes them to die back. Remove all dead top
crown rot. Asparagus gets 6 feet tall, so plant it where it        growth and debris from around the plants to interrupt the
won’t shade other vegetables. Asparagus craves phospho-            life cycle of asparagus beetles and other pests.
rus. Compost made with manure or kitchen scraps will have
abundant phosphorus. To prepare the bed, dig a furrow 6            Harvest asparagus the second year when shoots are 8 to 9
inches deep and 10 inches wide. Add 2-3 inches weed free           inches with tight tips. Do not cut asparagus below the
compost and work into the soil. If you prefer chemical fer-        soil with a knife as that may injure the crown. Asparagus
tilizer, you may apply 1 pound of a triple superphosphate 0-       can be harvested several times during a 3-4 week period.
46-0 fertilizer or 2 pounds of 0-20-0 fertilizer per 50 foot       This will also stimulate more bud production on the
row.                                                               crown and greater yields for the future.

Plant only healthy, disease free crowns. The root system of        Fresh asparagus can be stored up to a week in the refrig-
a year old asparagus plant is a crown. Each crown can pro-         erator. Cut off about 1/2 inch from the bottom of the as-
duce about a half a pound of spears per year. The all-male         paragus shoots. Stand them upright in a jar with an inch
hybrid varieties such, as Jersey Giant, Jersey Prince or Jer-      of water in the bottom. Wrap the top in plastic wrap or
sey Knight, produce spears. Female plants produce berries          cover tightly with a food safe plastic bag to prevent the
with seed which can become a seedling problem and usually          asparagus from wilting or picking up other food odors. If
results in decreased crop production. Place the crowns into        the water becomes cloudy, cut the ends off the shoots,
furrow on top of fertilizer, spaced 18 inches apart in rows        change the water, and use with in 2 days.

                                            PHOTO JACK VONFELD

Plant crowns in a shallow trench.      Don’t harvest shoots the first year.        Shoots grow tall with wispy, fern-like foliage.
Asparagus
When asparagus isn’t in season try substituting beans or snow peas.

Absurdly Addictive Asparagus

4 ounces prosciutto, dice into 1/4 inch pieces
1 tablespoon butter
1 pound asparagus, sliced into 2 inch pieces
1 ¼ cup green onion, thinly sliced crosswise
2 cloves garlic, minced
1 teaspoon lemon zest
1 teaspoon orange zest
2 tablespoons toasted pine nuts
1 tablespoon parsley, chopped fine
Salt and freshly ground pepper to taste

In a large non-stick pan, sauté pancetta, stirring fre-
quently, over medium heat, until crisp and lightly
golden. Add 1 tablespoon of butter to pan. Add
asparagus pieces and onion and sauté until aspara-
gus is tender crisp, about 3-4 minutes. Add garlic,
lemon and orange zest, toasted pine nuts, and pars-
ley and sauté for about 1 minute, until fragrant. Sea-
son to taste with freshly ground pepper and salt.
Serve immediately.

Recipe source: Food 52

                                                                      Roasted Asparagus
                                                                      I bunch fresh asparagus trimmed (about 1 pound)
                                                                      2 Tablespoon butter (not margarine)
                                                                      1 Tablespoon balsamic vinegar
                                                                      1 teaspoon soy sauce
                                                                      Salt and pepper to taste

                                                                      Preheat oven to 400 degrees.
                                                                      Wash and trim woody ends off asparagus.
                                                                      Arrange asparagus on a non-stick baking sheet.
                                                                      Spray lightly with cooking spray.
                                                                      Bake asparagus 12 minutes or until tender.
                                                                      Brown butter in saucepan over medium heat.
                                                                      Remove from heat.
                                                                      Stir in balsamic vinegar and soy sauce.
                                                                      Pour over baked asparagus serve immediately.
                                                                      Serves 4.
Basil
Pesto is a very basic recipe made with herbs and oil. Pesto is most commonly made with basil, but cilantro, parsley,
mint, fennel, arugula and spinach are all very common ingredients. Parmesan cheese is usually added, but you can leave
the cheese out or substitute other cheeses like; goat cheese, cream cheese. or feta. Same goes for the pine nuts, leave
them out or substitute walnuts, almonds, pistachios or even sunflower seeds. This is one herbal recipe that allows for
much experimentation and also freezes well. Pesto is often used in pasta, soups, dips and appetizers.

Basic Pesto
2 cups fresh basil leaves, packed
1/2 cup freshly grated Parmesan
3 garlic cloves, minced
1/3 cup pine nuts, finely chopped
1/2 cup extra virgin olive oil
Salt and freshly ground black pepper to taste

Put all ingredients except olive oil in food processor. Pulse several times.
While processor is running, very slowly add olive oil until emulsified. If
you add the oil too quickly it will separate rather than emulsify.

                                        Pesto Bean Soup
                                        5 cloves garlic
                                        Pinch of red pepper flakes
                                        4 cups cooked navy beans
                                        1 cup chicken stock or water
                                        4 tablespoons pesto
                                        2 tablespoons grated Parmesan cheese

                                        Sauté garlic and red pepper flakes. Add beans, chicken stock, and pesto.
                                        Simmer until thick. Top with Parmesan cheese.

Pasta with Pesto and Fresh Tomatoes
For a quick, light dinner, add enough pesto to coat cooked pasta and top
with fresh tomatoes and Parmesan cheese. For a heartier main dish top
with slices of grilled chicken.
Vegg e T ps                                                       by Phyllis Pugnetti

Beans
Beans originated and were domesticated in many places
around the world. From the lowland tropical areas of Cen-
tral America and Southeast Asia to the high elevations of
the Andes and Himalayan mountains, beans have been cul-
tivated as food for 10,000 years. Beans are an important
legume crop, providing calories, protein, fiber, and complex
carbohydrates. Dried beans have almost double the calories
of most grains, seeds or vegetables, making them a very
important staple crop throughout human history. Dried
beans are also a reliable food source for long term storage,
helping humans survive during times of famine. Green
beans or snap beans did not gain popularity as green vegeta-
ble in the United States until well into the 1800s. The word
bean is Germanic and came to be used widely to describe
the seeds of most podded legumes including soybeans,
chickpeas, peas, lentils, and even peanuts. This resulted in
many confusing names like black eyed peas and cowpeas
which are actually beans not peas. Beans are eaten plain,
spicy, sweetened, fermented, and ground into paste or flour.
Only three species of beans are widely grown in US home
gardens—common beans, runner beans and long beans.

(Phaseolus vulgaris) are common bush, and pole beans.
Bush beans grow 1-2 feet tall and usually don’t need any
staking. They grow better and set more pods in the heat of
summer than pole beans. Pole beans grow 6-10 feet long
and require staking or trellising. They don’t produce many
pods in extreme heat, often waiting to produce the majority
of their crop in the early fall, after the heat but before cool
weather sets in.

(Phaseolus coccineus) are runner beans. They have very
aggressive vines that can grow up to 20 feet and need very
sturdy support. They grow especially well in cool, foggy,                                 Scarlet Runner Beans
cloudy, wet summers, and will survive very light frost. In
North America runner beans are primarily grown as orna-
mentals. The Scarlet Runner bean has bright red flowers               ny spot in the garden with well drained soil. Beans don’t
that are attractive to bees and humming birds. Runner beans           like to be transplanted. When the weather is warm and
have large, wide, flat pods that are firm and meaty. They             remains consistently above 55ᵒ at night. Direct seed into
take longer to cook, can be julienned, and also hold up well          well drained soil, when soil temperatures are between 60ᵒ
during processing.                                                    and 85ᵒ. Plant seeds about an inch deep, and keep moist
                                                                      until germination. Pole beans should be planted 4-6 inch-
(Vigna unguiculata) are long beans. They can grow 10-15               es apart. Plant bush beans in wide beds or double rows
foot vines with thin, tender pods that grow in pairs and are          with seeds spaced 8-10 inches apart. You should have
1-2 feet long. The pods do not store well so are best eaten           bean pods in approximately 60 days. Pick every other day
within 1-2 days after harvest. They don’t hold up well to             to keep plants producing. To maintain high yields, move
processing, but can be frozen with some loss of texture.              beans to a new location in the garden at least every other
Long beans love the heat and die with the first cold weather.         year.

Beans are one of the easiest vegetables to grow and are as            Unwashed beans placed in a plastic bag or reusable con-
popular as tomatoes and peppers. Beans need a warm, sun-              tainer will store about 5-7 days in the refrigerator.
Beans
 When beans aren’t in season, try substituting asparagus or snow peas.

Long Beans and Steak
1 pound Long Beans
8 ounces flank steak
1 tablespoon corn starch
1 tablespoon soy sauce
2 tablespoon Chinese style black bean garlic sauce
¼ cup chicken stock
1 tablespoon Chinese style ground chili paste (optional)
1 tablespoon peanut or canola oil

Cut flank steak very thin against the grain then cut in 1 inch
pieces. In a bowl, mix thoroughly beef, corn starch and soy
sauce, and place in the refrigerator to marinate 30 minutes.
While meat is marinating, bring 2 quarts of lightly salted wa-
ter to a boil. Cut long beans into 1 inch pieces. Add long
beans and cook for about 2 minutes. Drain and set aside. In a wok or heavy skillet heat oil on high heat until almost smok-
ing. Add beef and stir fry for 1 minute. Add prepared long beans to beef and stir fry another 2 minutes. Add black bean
sauce, chicken stock, and chili paste continue to stir, mix well. Cook an additional minute until sauce thickens. Serve
with steamed rice. When long beans are out of season, you may substitute asparagus or regular green beans.
Recipe Source Jerry Baldoz.

Beans and Sweet Peppers
                                                   1 pound fresh snap beans
                                                   2 tablespoons olive oil
                                                   1 red pepper
                                                   1 yellow pepper
                                                   4 cloves garlic, minced
                                                   1 teaspoon fresh thyme
                                                   hot red pepper flakes to taste (optional)
                                                   salt and freshly ground black pepper to taste
                                                   2 tablespoons fresh lemon juice

                                                   Wash beans and peppers. Trim ends of beans. Remove seeds and
                                                   membranes of peppers, and julienne. In a large sauté pan, heat olive
                                                   oil over medium-high heat. Add peppers, cook for 1 minute. Add
                                                   beans and 2-3 tablespoons water, cook for 3-5 minutes. Add garlic and
                                                   continue cooking for another minute or until vegetables are crisp-
                                                   tender. Remove from heat. Add lemon juice, thyme, and red pepper
                                                   flakes. Toss before serving.
Vegg e T ps                                                 by Phyllis Pugnetti

Beets ( Beta vulgaris)

                                                                                                    Beets are a biennial
                                                                                                    plant, which means
                                                                                                    they grow leaves and
                                                                                                    roots the first year, and
                                                                                                    must survive through
                                                                                                    the winter, to send up a
                                                                                                    flower stalk and devel-
                                                                                                    op seeds in July or Au-
                                                                                                    gust of their second
                                                                                                    year. Where beets
                                                                                                    grow natively they
                                                                                                    drop their seeds in July
                                                                                                    or August. Unfortu-
                                                                                                    nately beets are not
                                                                                                    native of Yakima.
                                                                                                    They don’t grow well
                                                                                                    in the heat of our sum-
                                                                                                    mers and our winters
                                                                                                    are too cold for them to
                                                                                                    survive. Beets are not
                                                                                                    demanding, but under-
standing their growing cycle helps you to know when to plant and harvest. Beets are happiest when planted in August
and allowed to ripen as the weather cools. They will continue to grow as long as the fall weather remains consistently
above 35ᵒ. Fall beets are sweeter than spring beets because they convert starches to sugar as the nights cool.

If you want to plant spring beets you need to plan for them to be ready to harvest before the arrival of hot weather. Beets
get woody and tough, and have a strong flavor in the heat of summer. Most varieties need about 50-70 days to reach ma-
turity. Surprisingly, beets are one of the few root crops that don’t mind being transplanted as long as the seedlings are
still small with no more than 4 real leaves on them. In the spring they can be started indoors and transplanted into the gar-
den, or they can be direct seeded once the soil temperatures remain above 50ᵒ.

Like most root crops, beets don’t do well in heavy clay soil or compacted soil. They need a pH of 6.0-7.0 but will tolerate
slightly more alkaline soils if there is high organic matter in the soil. Plant seeds 2 inches apart and ½ inch deep. Beet
seeds are actually seed pods with 4-5 seeds in each pod, which is why they need to be thinned no matter how carefully
you space the seeds. Seeds should sprout in 7-14 days. The soil should be moist but not water-logged. Beets are modest
feeders needing little nitrogen, but do need a good supply of phosphorus. Fertile soil with about an inch of compost
works well.

Beets come in several colors, white, gold, orange, deep red, and candy striped that turns pink when cooked. Most beets
are round but some are cylindrical or cone shaped. All are sweet with a deep earthy flavor. The leaves are edible and can
be used like chard. Beets and chard are botanically the same. Chard originated in Italy and was selected over centuries for
edible leaves that were cold hardy. It grew so well in the cold mountains of Switzerland that it eventually became known
as Swiss chard. Beet leaves have been eaten since before written history, but beet roots were not widely eaten until the
1800s. Beets have been used to dye fabrics and as cosmetics to stain the cheeks and lips, hence the expression that some-
one ‘turned red as a beet’.

To store beets trim the leafy tops to 2 inches and the taproot to 6 inches. In a plastic bag in the refrigerator they will re-
tain their flavor and texture and store for 3-4 months.
Beets
Roasted Beets
Trim the tops and roots from beets and scrub well. Coat beets lightly with olive oil and wrap in foil. Seal the foil and
place on a baking sheet. Bake at 400ᵒ for approximately 45-60 minutes, until the beets are tender when pierced with a
knife. Check beets after 30 minutes, if they are still hard or dry add a tablespoon of water, re-wrap and continue to
cook. Let beets cool and skin will slip of easily. If roasting more than one color of beet make separate foil packets for
each, or the colors will bleed together. Roasting beets makes them silky and tender, intensifies flavors, and caramelizes
sugars making them very sweet. Roasted beets will store up to a week in the refrigerator. Serve hot or cold.
Golden Beet and Blood Orange Salad
Salad
1 1/2 pounds medium sized gold beets
olive oil
3 tablespoons champagne vinegar
1/2 teaspoon salt
1/4 teaspoon freshly ground black pepper
3 blood oranges
1 cup baby arugula
3 cups baby spinach
1 tablespoon chopped parsley or cilantro
Vinaigrette
1/4 cup freshly squeezed orange juice
1 medium shallot, finely minced
1 tablespoons champagne vinegar
salt and freshly ground black pepper, to taste
1/4 cup extra olive oil
Salad: Coat beets with olive oil and roast until tender. (See recipe for Roasted Beets above) Peel and cut into narrow
wedges. Put in a small bowl, toss with vinegar, salt and pepper, cover and marinate at least 1-2 hours in refrigerator.
Using a knife peel the oranges, removing all the pith. Slice into rounds a 1/4 inch thick. Put in a covered container in
the refrigerator. Wash the arugula and spinach and drain well. Wrap in a clean kitchen towel and place in a covered
container in refrigerator. Vinaigrette: Add all ingredients in a jar and shake well. Taste and adjust seasoning if neces-
sary. If too tart, add more oil. To Assemble: In a bowl add beets and oranges and their juices, toss gently. Place salad
greens in serving bowl or plate, top with citrus and beets, and drizzle with vinaigrette. Serve immediately. If you can’t
find golden beets, substitute red beets and navel oranges.
Beet and Herb Salad
In a jar add:
4 tablespoons olive oil
2 teaspoons each chopped basil, tarragon, chives and mint
1 teaspoon Dijon mustard
1 tablespoon champagne vinegar
Freshly ground black pepper
Shake well and store in refrigerator.
Roast 1 1/2 pounds of beets. Peel, and slice into wedges. Place in a serving bowl. Toss with vinaigrette.Beets
Beet Rosti
4-6 medium sized roasted beets, about 2 pounds
salt and pepper to taste
1/2 cup flour
3 tablespoons butter
garnish chives and sour cream
See recipe for roasted beets on previous page. Toss grated
roasted beets in a bowl with salt and pepper. Add half the
flour; toss well. Add the rest of flour, and toss again. Pre-
heat a 12-inch nonstick skillet over medium heat. Put half
the butter in skillet; heat until it begins to brown. Scrape
beet mixture into skillet, and press with spatula to form a
large round pancake. Cook over medium to medium-high
heat. Pancake should gently sizzle. Shake pan occasional-
ly, until bottom crisp, about 8 to 10 minutes. Invert pan- PHOTO GREENYOURPLATE.BLOGSPOT.COM
cake onto a plate, add the rest of the butter to the pan and
slide pancake back into the pan. Cook about an additional
10 minutes. Garnish, cut into wedges, and serve.
Left over Beet Rosti makes excellent sandwiches. Add
soft goat cheese, arugula or watercress, slivered fennel if
you have it, and ciabatta bread.
Spinach Salad with Beets and Goat Cheese
Vinaigrette
1/4 cup white balsamic vinegar
1/4 cup honey
1/4 cup olive oil
2 teaspoons dry mustard
Salt and pepper to taste
Salad
4 cups fresh spinach leaves
2 small pickled beets, cubed
1/4 cup goat cheese
Combine all ingredients for vinaigrette in a
bottle, shake well, and set aside. Plate spinach
greens. Top with beets and sprinkle feta over
all. Drizzle with vinaigrette.Beets
Pickled Beets
4 pounds beets
3 medium onions, sliced
2 cups sugar
2 sticks cinnamon
1 tablespoon whole all spice
1 teaspoons salt
2 1/2 cups vinegar, 5% acidity
1 1/2 cups water
Wash and scrub beets under cold running water. Leave 2 inches of the
stem and taproots attached. Place in a large pot and cover with boil-
ing water. Cook until tender but still slightly firm. (Do not over cook
as beets continue to cook during processing.) Drain. Let cool until
comfortable to handle beets. Peel and trim ends. Cut into slices or
cubes. Combine remaining ingredients in a large pot and bring to a
boil. Reduce heat and simmer 5 minutes. Add beets and cook until
heated through. Remove cinnamon sticks. Pack hot beets into hot
jars, leaving 1/4” headspace. Ladle hot liquid over beets leaving 1/4
inch headspace. Remove air bubbles. Adjust 2 piece caps. Process
30 minutes in a boiling water canner. Makes 4 pints.
Important! Do not alter the proportions of vegetables to acid as it could make pickles unsafe.
Recipe source: Ball Blue Book Guide to Preserving 2010
Chocolate Beet Cake
1 package chocolate cake mix
1 cup pureed red beets
1 1/2 cups water
3 eggs (one whole egg, two egg whites)
Heat oven to 350° F. Grease a 9x13 sheet pan or 2 round 8 inch pans.
Wash 2 medium beets under cold running water, scrub well. Trim tops
and taproot. Place in a pan and cover with water. Bring to a slow boil
and cook until soft. Puree beets using a food processor. (You may sub-
stitute a 15 ounce can of salt free beets, drained well, and pureed in-
stead of fresh beets.)
In a large bowl, add cake mix, water, eggs, and beet puree. Mix about 2
minutes with a handheld mixer. Pour into prepared pan.
Bake until a toothpick inserted in center comes out clean, about 30-35
minutes. When cake has cooled, frost with chocolate fudge frosting or
dust with powdered sugar.
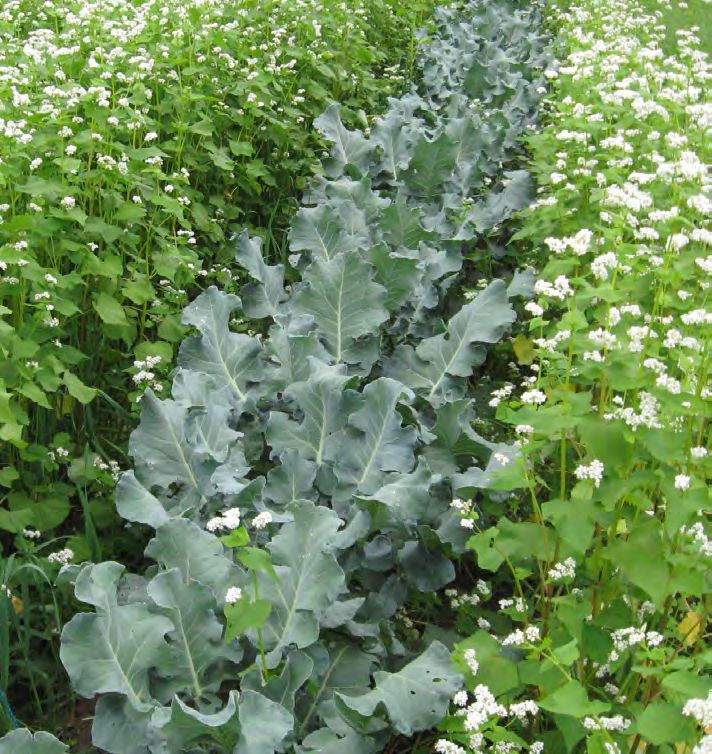
Recipe source: Cornell Extension, Schenectady County NYVegg e T ps by Patty Ferguson Broccoli (Brassica oleracea) Over thousands of years farmers have selected for widely diverse plant traits of the Brassica oleracea species which includes the edible leaves of collards, kale, cabbage, Brussels sprouts; the stems of kohlrabi; the flower buds of cauli- flower, and of course, broccoli. Broccoli is a cool-season crop that can be grown in the spring or fall. If you prac- tice succession gardening, you may be able to get a continual harvest throughout the summer and fall. Broccoli can germi- nate in soil when temperatures are as low as 40ᵒ but prefers temperatures closer to 60ᵒ. It requires full sun and moist, fertile, slightly acidic soil. It’s advised to work in 2 – 4 inches of compost or a thin layer of manure before planting. For spring planting, seed or set trans- plants 2 to 3 weeks before last spring frost date. For fall plantings, seed 85 to 100 days before your average first fall frost. In Yakima, plant seeds in late June for a late fall harvest. Plant seeds ½ inch deep, or set transplants slightly deeper than they were grown originally. Within a row, space your plants 12 to 24 inches apart with 36 inches between each row. Broc- coli needs room to grow and doesn’t like to be crowded. Fertilize three weeks after transplanting. Provide consistent soil moisture with regular watering, especially in drought conditions. Some varieties of broccoli are heat tolerant, but all need moisture. Do not get developing heads wet when watering. Roots are very shal- Broccoli planted with buckwheat for organic insect control. low. Use mulch to retain moisture, keep soil temperatures cool, and suffocate weeds. Broccoli is attractive to many pests—flea beetles, aphids, cabbage loopers, cabbage worms, and white flies. Planting flowers or blooming cover crops like agricultural mustard or buckwheat may reduce these pests by attracting predators. Harvest broccoli when the buds of the head are firm and tight, but before the heads flower. If you do see yellow petals, harvest immediately. For best taste, harvest in the morning before the soil heats up. Cut heads from the plant, taking at least 6 inches of stem. Most varieties have side-shoots that will continue to develop after the main head is harvested. You can harvest from one plant for many weeks, in some cases, from spring to fall, if the summer isn’t too hot. Store broccoli in the refrigerator for up to 5 days. If you wash before storing, make sure to dry it thoroughly. Broccoli can be blanched and frozen for up to one year. Recommended varieties include: ‘Green Goliath’ for heat-tolerance and side shoots; ‘Calabrese’ a prolific Italian heir- loom that is good for fall planting; ‘Flash’ a fast-growing, heat-resistant hybrid; ‘Paragon’ a popular variety in Canada; and ‘Umpqua’ a variety that resists premature bolting.
Broccoli
Pan-Roasted Broccoli
3 tablespoons water
1
⁄4 teaspoon salt
1
⁄8 teaspoon pepper
2 tablespoons vegetable oil
1 1 ⁄4 pounds broccoli
Rinse broccoli under cool running water, sepa-
rate into florets, and sliced stems (about 5
cups). Stir water, salt, and pepper together in
small bowl, until salt dissolves. In a large skil-
let, heat oil over medium high het then add the
broccoli stems in an even layer. Don't stir for
about two minutes until they get light
browned. Add the florets and toss to combine
and don't stir for another two minutes, until
they just begin to brown. Add water spice mix-
ture and cover pan with lid, cooking for two
additional minutes. Uncover and cook until
desired doneness. Recipe Source: Food.com
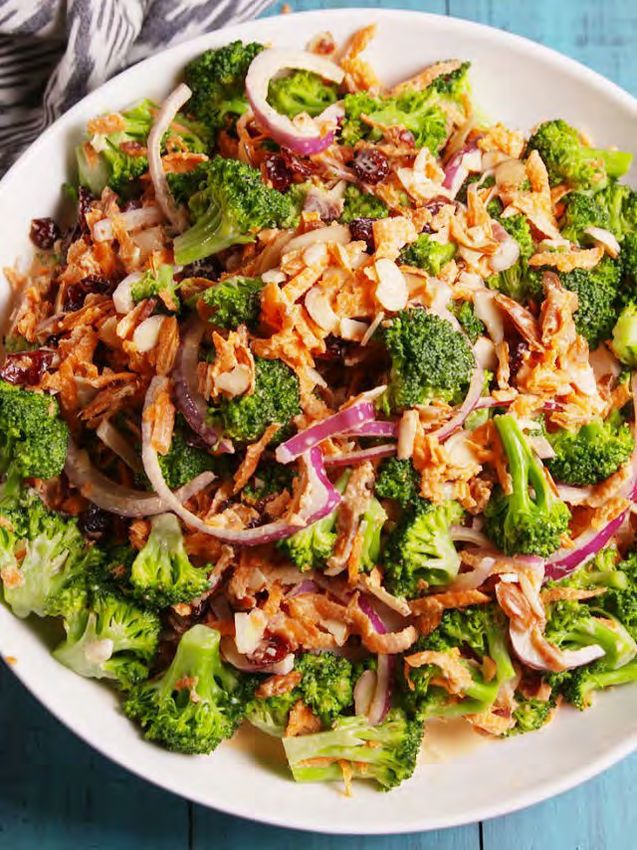
Broccoli Bacon Salad
Salad
3 heads broccoli, cut into bite sized pieces
2 carrots, shredded
1/2 red onion, thinly sliced
1/2 cup dried cranberries
1/2 cup sliced almonds
6 slices bacon, cooked until crisp and crumbled
Dressing
1/2 cup mayonnaise
3 tablespoons apple cider vinegar
Salt and freshly ground pepper to taste
Wash vegetables under cool running water then slice as indicated
above. Add broccoli, carrots, red onion, cranberries, nuts and ba-
con to a large bowl. In a small bowl, whisk together mayonnaise
and vinegar and season with salt and pepper.
Pour dressing over salad mixture and toss to combine. This salad is
best when made a few hours ahead and refrigerated until served.
Recipe source: Delish.comVegg e T ps by Cindy Smith
Brussels Sprouts (brassica oleracea)
If I felt sorry for a vegetable, it would be Brussels
sprouts. It isn’t a food that makes top billing at any pot
luck. A survey conducted by Heinz in 2008 revealed that
Brussels sprouts are the most hated vegetable in the Unit-
ed States.
Many people hate Brussels sprouts because of the sulfer
smell when cooked. This compound is also responsible
for repelling insects and fighting cancer. Brussels
sprouts are an excellent source of vitamins A, C (even
more than oranges) and K, beta-carotene, folic acid, mag-
nesium, fiber, and more protein than most vegetables.
Like cabbage, Brussels sprouts are a member of the Bras-
sica oleracea. Forerunners to Brussels sprouts were like-
ly cultivated in ancient Rome. Brussels sprouts as they
are now known were grown possibly as early as the 13th
century in what is now Belgium (thus the reference to
Brussels.) The first written reference dates to 1587 abd
were introduced to the US in the 1800s.
Most American production is in California, with a small-
er percentage of the crop grown in Skagit Valley, Wash-
ington, where cool springs, mild summers and rich soil
abounds. Brussels sprouts are a hearty winter vegetable
usually in season from fall through late winter.
The ‘sprouts’ are small heads that resemble miniature About 3 weeks before harvest, the plants may have the
cabbages and are produced in the leaf axils, starting at the tops cut off to speed the completion of sprout develop-
base of the stem and working upward. Brussels sprouts ment. Harvest Brussels sprouts after the first or second
should be planted in early summer for a crop that matures frost. The entire stalk may be cut; or sprouts may be
in the fall. The small heads mature best in cool and even picked or cut off the stem when they are firm, bright
in light frosty weather. They like fertile, well-drained, green, and about one inch in size. The lower sprouts ma-
moist soils with plenty of organic matter. The soil pH ture first.
should be about 6.8, for optimum growth.
Brussels sprouts are sweetest right after harvest. The key
Seeds should be sown in a protected space 4-5 weeks to cooking Brussels sprouts is— do not overcook! De-
before transplanting. Transplant seedlings when they are pending on size, cooking time should not exceed 7 to 10
about 3 inches tall at least 100 days before the first frost minutes whether you are steaming, braising, roasting, or
in an area that will receive at least 6 hours of sun during boiling. Select sprouts of even size for uniform cooking.
the fall. Space plants 24-36 inches apart. Sprouts matur- Large sprouts should be cut in half. If the sprouts are no
ing in hot, dry weather are more likely to develop an un- longer bright green they have been overcooked.
pleasant bitter flavor.
Brussels sprouts keep longest if left attached to the stalk.
Some gardeners believe that the sprouts develop better if Whether attached to the stalk or cut off the stalk, wrap in
the lowermost six to eight leaves are removed from the plastic and refrigerate to prevent wilting. Do not wash or
sides of the stalk as the sprouts develop. Two or three trim outer leaves until immediately before cooking. Brus-
additional leaves can be removed each week, but several sels sprouts will store this way for several weeks, but
of the largest, healthiest, fully expanded upper leaves with a gradual loss of sweetness.
should always be left intact on top to continue feeding
the plant.Brussels Sprouts
Stir Fried Brussels Sprouts
4 slices thick bacon
1½ pounds fresh Brussels sprouts, shredded
2½ tablespoons water
1 teaspoon soy sauce
2 teaspoons cider vinegar
1 teaspoon brown sugar
3 tablespoons dried cranberries, coarsely chopped
Shred Brussels sprouts with a food processor or cut very thin with a knife. Set
aside. Cut bacon into small pieces and fry until crisp. Drain on paper towels.
Leave fat in pan, turn the heat to medium high, add shredded Brussels sprouts.
Stir continuously while frying for about 2 minutes, making sure all pieces are
coated with a little bacon fat. Add the water to the pan all at once and stir gen-
tly once or twice. Let the sprouts cook for another 2 minutes until water evap-
orates. Sprouts should be crisp-tender but not raw. Add bacon pieces, and
cranberries. Mix soy sauce, vinegar, and sugar. Add to pan and toss to evenly
distribute everything. Serve hot. Recipe adapted from Steamy Kitchen.
Honey Roasted Brussels Sprouts
1 1/2 pounds Brussels sprouts
3 tablespoons olive oil, divided
1/2 teaspoon salt
1/4 teaspoon freshly ground black pepper
1 tablespoon balsamic vinegar
1 teaspoon honey
Line a baking sheet with aluminum foil. Wash, trim, and cut Brussels sprouts
in half. In a large bowl, toss Brussels sprouts with 2 tablespoons olive oil,
salt and pepper. Transfer to baking sheet and roast at 425ᵒ, stirring occasional-
ly to ensure even browning, until tender and caramelized, about 20 minutes.
Place Brussels sprouts back in bowl. Add remaining olive oil, balsamic vine-
gar, and honey. Toss to coat evenly. Taste and adjust seasoning if necessary.
Serve hot.
Easy Roasted Brussels Sprouts
This is an easy recipe. Amounts of all ingredients can be adjusted to personal taste. Use about 6-8 sprouts per person.
Wash, trim, and cut Brussels sprouts in half. Place in bowl and sprinkle with cayenne pepper, salt, and freshly ground
black pepper, then drizzle with either bacon fat or olive oil. Toss to coat evenly. Place in a single layer on a foil lined
baking sheet. Roast at 425ᵒ for 10 minutes. Stir and continue to roast about an additional 10-15 minutes until outside is
crispy and browned and inside is tender. Sprinkle with fresh lime juice. Serve hot.Cabbage
Crunchy Napa Cabbage Slaw and Creamy Soy Dressing
Slaw
2 quarts Napa cabbage, coarsely chopped (about 1 pound)
12 ounces snow peas, thinly sliced
1 ⅓ cups radishes, thinly sliced
1 ⅓ cups green onions, thinly sliced
1 ⅓ cups cilantro leaves, chopped and lightly packed
⅔ cups slivered almonds
Toss all ingredients together and top with about ¾ of the
Creamy Soy Dressing. Taste and add more if necessary.
Dressing
3 tablespoons sugar
3 tablespoons white wine vinegar
1 tablespoon soy sauce
1 clove garlic, minced
½ teaspoon ground ginger
½ teaspoon toasted sesame oil
1 cup mayonnaise
Whisk together all ingredients except mayonnaise. Add mayonnaise and continue to whisk until creamy.
Recipe source: Diana Pieti
Crunchy Asian Chicken Salad
Salad
3 cups cabbage, shredded
3 cups red cabbage, shredded
2 large carrots, julienned
3 cups bean sprouts
3 green onions, finely sliced
2 cups cooked chicken, shredded
¼ cup fresh cilantro leaves, coarsely chopped
Dressing
3 tablespoon rice vinegar
3 tablespoon soy sauce
2 tablespoon lime juice
3 tablespoon peanut oil
1½ tablespoon sugar
½ small jalapeno, finely diced
2 garlic cloves, minced
In a large bowl combine all salad ingredients. In a
jar, add all dressing ingredients and shake well.
Pour over salad. Toss and serve.Cabbage
Sweet and Sour Red Cabbage
4 cups shredded red cabbage
1 medium red onion chopped
1 medium apple peeled and chopped
1/2 cup brown sugar
1/2 cup cider vinegar
1/2 teaspoon maple flavor
1/2 teaspoon salt
Place shredded cabbage, chopped red onion, and
chopped apple in a slow cooker. In a small bowl mix
together brown sugar, vinegar, maple flavor and salt.
Pour over cabbage mixture and stir to mix. Simmer in
slow cooker on low for 6-8 hours. Good served as a
side dish with mashed potatoes and bratwurst.
If you have an abundance of red cabbage, this freezes very well. Follow all directions but instead of using a slow cook-
er, cook on stove top until veggies are tender-crisp, then freeze. When you are ready to use cabbage, defrost in the re-
frigerator, and cook on low in a slow cooker for 5-6 hours. Recipe source: Phyllis Pugnetti
Cabbage Roll Casserole
1/2 pound bulk sausage
1/2 pound ground beef
1 small onion, chopped
2 cloves garlic, minced
1 cup cooked rice
1 small head cabbage, chopped or shredded
1 tablespoon olive oil
1/2 cup water
Sauce
14 ounce can stewed tomatoes
16 ounces tomato sauce
1 tablespoon brown sugar
1 tablespoon Worcestershire sauce
1/4 teaspoon nutmeg
salt and pepper to taste
Sauté onion and garlic about 2 minutes, add meat and continue
cooking until meat is no longer pink. Stir in rice and set aside. In
a large skillet with olive oil and water, sauté cabbage until wilted
and tender, and water has evaporated. In a large bowl mix together all ingredients for sauce. Pour 1/3 of the sauce mix-
ture in the bottom of a 10”x13” baking dish. Top with a layer of 1/2 the cabbage, then all the meat mixture, and another
layer of cabbage. Pour the remaining sauce over the top. Bake at 350ᵒ for 35-45 minutes until hot and bubbly.Vegg e T ps by Patty Ferguson Cauliflower Cauliflower (Brassica oleracea) is a cool-season crop that doesn’t tolerate the heat or cold, needing consistently cool weather with temperatures in the 60’s. If temperatures are too warm cauliflower may prematurely ‘button’, forming very small heads rather than a single, large, white head. When the weather is too cold it stops growing. It is a challenging crop in Yakima where cool spring and fall weather is short lived . In order to form large heads, cauliflower needs fertile soil, rich in nitrogen and potassium, and high in organic matter, for steady uninterrupted growth. Cauliflower also needs consistent soil moisture. Adding a thick layer of mulch will help to retain moisture and keep the soil cool. Soil pH should be between 6.5-6.8. Cauliflower needs a planting site that re- ceives at least 6 hours of full sun, but has shade during the heat of the day. Cauliflower seedlings are not frost tolerant. If you are able to provide cover for your seedlings in the spring, you may plant outside 2 -4 weeks before the frost-free date. Space 18-24 inches apart with 30 inches between rows. The plants will get very large. Do not crowd them. Most varieties will take 75 to 85 days to mature. Common pests are cabbage worms, cabbage root maggots, and aphids. Cauliflower will start out with a loose head. It takes time for the head to fill out. When it is 2-3 inches across, blanch the heads by tying the outer leaves together over the head to protect from sunlight. Some cauliflower varieties come in green, purple, or yellow; and these do not need to be blanched. Cauliflower that is exposed to the sun will become dis- colored due to chlorophyll which may affect the taste. Ideally, the heads should be firm and white, growing to 6-8 inch- es in diameter. Once the heads start to open up, they will not improve in appearance or flavor, and should be harvested immediately. Cauliflower with a coarse appearance is overly mature and will have a poor taste. It’s best to add these plants to the compost pile. To harvest cauliflower, cut the heads off with a large, sharp knife. Leave some of the blanch- ing leaves around the head to protect it. Cauliflower can be stored in the refrigerator for about a week.
Cauliflower
Cauliflower and Squash Swirl
1 head cauliflower
1 winter squash
1/4 cup milk, divided
1 teaspoon garlic powder, divided
1/4 cup Parmesan cheese, divided
salt and pepper to taste

Break cauliflower into florets and microwave about 10 minutes until
tender. Place in blender with half the milk, garlic powder, and Parme-
san cheese. Blend until smooth. Add salt and pepper to taste. Bake
squash (any sweet winter squash will work) about 40 minutes at 350ᵒ
until tender. Scoop flesh out of skin. Place in blender with the other
half of the milk, garlic powder and Parmesan cheese. Blend until
smooth. Add salt and pepper to taste. You should have 3-4 cups of
cauliflower puree and 2-3 cups of squash puree. Add alternating
scoops of each to a large bowl and swirl lightly to blend. You should
still be able to see swirls of each.

Recipe source: thrillist.com

Cauliflower Steaks

                                                                1 large head of cauliflower
                                                                1 tablespoon olive oil
                                                                1 1/2 teaspoons soy sauce
                                                                2 teaspoons water
                                                                Pinch of sugar
                                                                1 green onion, finely minced
                                                                1 teaspoon finely grated fresh ginger
                                                                2 teaspoons toasted sesame seeds

                                                                Heat oven to 400ᵒ. Remove any outer leaves from the
                                                                cauliflower head. Trim the bottom of the stem off. Cut
                                                                cauliflower into 3/4-inch slices; cut lengthwise from
                                                                top to bottom. Place on a large baking sheet. Drizzle
                                                                with olive oil. Roast for 25 minutes, or until the tops
                                                                are lightly browned in places and the stems are easily
                                                                pierced with a fork. Whisk together the remaining in-
                                                                gredients and pour over the cauliflower to serve.

                                                                Recipe source: twopeasintheirpod.com
Vegg e T ps by Patty Ferguson
Carrots are jammed with a wealth of nutrients, and medium-
sized sticks are only 25 calories. Standard orange carrots
contain vitamin A. Carrots come in a rainbow of colors that
are equally healthy. Although there is much we don’t know
about phytonutrients found in various colors of food, they do
seem to play important roles in overall health.
Orange: Beta and alpha carotene pigment. This promotes
vitamin A production by the body, which is essential for
healthy immune and reproductive systems, and overall eye
health.
Purple: Anthocyaninin the purple pigment may play a role
in fighting heart disease and stroke, lower the risk of some
cancers, and reduce the risk of macular degeneration which
is a leading cause of blindness in people over the age of 60.
Red: Lycopene and beta-carotene pigment. Lycopene is the
same red pigment that gives tomatoes their deep color and is
linked to a lower risk of certain cancers, such as prostate
cancer.
Yellow: Xanthophyll and lutein. Both are linked to cancer
prevention, healthy immune systems, and better eye health.
White: the nutrients don’t come from the pigment but from
the fiber, which promotes healthy digestion.
Carrots can be planted in early spring to ripen in summer.
However, carrots germinate best in warm weather, around
85ᵒ, and prefer to mature in gradually cooling weather.
With a thick layer of mulch and a cover to prevent cold wa-
ter logged soil, mature carrots will often survive Yakima
winters. They actually taste much better after a couple of
frosts, as the carbohydrates convert to sugars. prevent damage to the roots of the remaining plants. Wa-
ter at least 1 inch every week. Mulching will help con-
Carrots are grown from seed and take about 2-3 months to serve water and keep the soil cool. If your soil is not rich
mature depending on variety. Carrot roots are rich in sugar, in organic matter, supplemental feeding will be necessary
and a great source of vitamins and carotene. Growing car- about 2 weeks after the carrots emerge.
rots can be tricky, since you can’t see what’s going on until
you harvest. So often carrots can disappoint with bland, Carrots do not grow well in highly acidic soil. A soil Ph
misshapen, tough roots. The soil will make the difference. in the range of 6.0- 6.8 is recommended. And because
Heavy soils cause the carrots to mature slowly and the roots they are grown for their roots, don’t use too much nitro-
end up unattractive and rough. Carrots need loose, sandy, gen fertilizer. Keep carrots free of weeds. This is most
deep and well-draining soil. Rocks and clumps will cause important when they’re small. The weeds will take nutri-
the carrot roots to split and deform. Growing carrots in ents away from the carrots. This will cause poor carrot
raised-beds is the ideal situation. For spring planting sow development. Even though the roots are growing under-
seed as soon as the soil can be worked 2-3 weeks before last ground, carrot tops need full sun to light shade, for the
frost. You can succession plant carrots every couple of carrots to grow quickly and develop their sugars. Some-
weeks, throughout the spring. Sow the seeds thinly, depend- times carrots can bolt, producing foliage and flowers but
ing on variety. Cover with ¼ inch thick layer of soil. For little root. To avoid this, keep the soil moist in dry
fall planting, sow seed about mid-July or early August so weather. Carrots can be harvested at any size. To har-
carrots are mature by the time hard frost arrives. Except for vest, gently lift the carrot from the soil.
the coldest of winters, carrots can remain in the ground all
winter.
Once plants are 1 inch tall, thin so that they stand 3 inches
apart. Snip them with scissors instead of pulling them out toCarrots Pan Roasted Carrots 2 pounds carrots 1 small onion chopped Fresh ground pepper 2 tablespoons olive oil Juice of one orange 1 tablespoon rosemary, finely chopped Peel and cut carrots into 2 inch lengths, slice thick carrots in half length- wise. In a large bowl whisk together remaining ingredients. Add carrots and toss to coat. Heat a large sauté pan on medium heat. Add carrots and cover. Cook for 30 minutes until liquid is evaporated and carrots are be- ginning to caramelize. Maple Dill Carrots 3 cups peeled and sliced carrots 2 tablespoons butter 2 tablespoons brown sugar 1 1/2 tablespoons chopped fresh dill salt and pepper to taste Place carrots in a skillet and pour in just enough water to cover. Bring to a boil over medium heat; simmer until water has evaporated and the carrots are tender. Stir in butter, brown sugar, dill, salt, and pepper. Marsala Glazed Carrots 1/2 cup coarsely chopped hazelnuts, toasted 1 pound baby carrots, peeled and sliced diagonally 1/2 cup water 1/4 cup Marsala wine 1tablespoon olive oil salt and freshly ground pepper to taste 1 tablespoon parsley, chopped fine Preheat oven to 300ᵒ. Toast hazelnuts until browned and fragrant, about 5 minutes. In a saucepan combine water, carrots, Marsala, and oil. Bring to a boil. Cover and reduce heat and simmer for 10-15 minutes until tender but still slightly firm and sauce has thickened slightly. Sprinkle with hazelnuts and parsley. Serve immediately.
Vegg e T ps                                                        by Patty Ferguson

Celery (Apium graveolens)
Celery is a vegetable that is popular with the health conscious.
The stalks are almost absent of calories, yet contains important
vitamins and minerals. Many herbal remedies claim that celery
helps balance blood pH., lowers cholesterol, relieves constipation,
normalizes body temperature, and promotes normal healthy kid-
ney function, although there is not much science based infor-
mation to substantiate these claims.

Celery has a very mild flavor. Fresh garden grown celery usually
has a stronger, yet pleasant flavor. The mild taste is what makes
celery such a great tool for dipping into your favorite dip, salad
dressing, or sauce. It also adds a little crunch to recipes.

Celery originated 3000 years ago in wild wetland areas of Eu-
rope, especially the Mediterranean, and is related to parsley. Orig-
inally, it was used for medicinal purposes and had religious sig-
nificance in some cultures. It requires a very long growing sea-
son but has a very low tolerance for both heat and cold. The de-
manding growing conditions makes it an ultimate growing chal-
lenge and not for the faint of heart. Although some gardeners rise
to the challenge, many growers look for different edible plants
such as bulb fennel which has the look and crunch of celery but
not the flavor; or lovage, a leafy perennial herb with a strong cel-
ery flavor but not the crunch of celery.
                                                                             Celery is native to wetlands near streams and marshes.
If you’re up for a challenge, why try growing celery? With that
said, there are a limited number of varieties on the market. Varie-       taste of the celery. Add plenty of compost and mulch
ties that require blanching are used very little in the home garden,      around the plants to help retain moisture and fertility. Add
as they require a lot of extra work. It usually is difficult to find in   general purpose fertilizer before planting, and fertilize reg-
seed catalogues, but seedlings are sometimes available in garden          ularly throughout the growing season. Harvest stalks from
stores.                                                                   the outside in. You may begin harvesting when stalks are
                                                                          about 8 inches tall. Celery will tolerate a light frost, but not
Celery has a long maturity time, 120 to 140 days. If you want to          consecutive frosts or hard frost.
start from seeds, sow indoors at least 10 weeks before the last
frost date. Celery seeds are tiny and tricky to plant. Try mixing         Many gardeners prefer to blanch their celery. This means
them with sand and then sprinkle the sand-seed mix over the pot-          to make them lighter in color and more tender. When
ting soil. Celery seeds like to be planted shallowly. Cover the           blanching celery, you are reducing the amount of vitamins
seeds with just a little bit of soil. Once the celery seeds have          in the plant. Blanching celery can be done one of two
sprouted and are large enough, thin the seedlings down to 2 or 3.         ways. The first way is to just slowly build a mound around
As they continue to grow, thin to one per pot. Once the tempera-          a growing celery plant. Every few days add a little more
tures outside are consistently above 50ᵒ you can transplant into          soil or mulch and at harvest the celery plant will be
your garden. Celery is very temperature sensitive; don’t trans-           blanched. The other method is to cover the lower half of
plant too early or you will kill or weaken the plant. Space plants        the celery plant with thick brown paper or cardboard a few
one foot apart, in rows 2 -2 ½ feet apart.                                weeks before you plan to harvest the celery.
Celery grows best in evenly moist, nutrient-rich soil with a pH of        A broad range of insects and pests are attracted to celery,
6.0 – 7.0. It needs at least 6 hours of sun, but also needs to be         including slugs, aphids, leafhoppers, celery flies, and more.
shaded during the hottest part of the day. A growing celery plant         Diseases can also be problematic, especially leaf spot and
needs lots of water and can’t tolerate drought of any kind. If the        blight. Splitting of stalks is a result of dry weather and too
ground isn’t kept consistently moist, it will negatively affect the       little moisture.
Celery
A head of celery is called a stalk and one stem of celery is called a rib. Many recipes, especially from the internet, mis-
takenly use the word stalk when they actually mean rib. Use care when deciding how much celery you need.
Thai Celery Salad
3 tablespoons vegetable oil
2 tablespoons fresh lime juice
2 teaspoons fish sauce
6 celery ribs, thinly sliced on a diagonal
3 scallions, thinly sliced
1 red chili, thinly sliced
1 cup fresh cilantro leaves with tender stems
¼ cup chopped roasted, salted peanuts
Whisk together oil, lime juice, and fish sauce. Toss
with celery, scallions, chili, cilantro, and peanuts.
Recipe source: Bon Appetit
Broccoli and Celery Slaw
1 medium head broccoli, stalks sliced and florets chopped
4 celery ribs, thinly sliced on the diagonal
½ medium red onion, thinly sliced
½ cup mayonnaise
1 lime, zested and juiced
½ teaspoon ground cumin
½ teaspoon chili powder
2 teaspoons sugar
Kosher salt and freshly ground black pepper to taste
½ cup golden raisins
Wash broccoli and celery under cool running water. Com-
bine the broccoli, celery, and red onion in a large mixing
bowl and set aside. To prepare the dressing, in a small bowl
combine the mayonnaise, lime juice and zest, cumin, chili
powder, sugar, salt and pepper. Whisk to combine. Pour the
dressing over the vegetables and toss. Cover and place in
refrigerator for at least 30 minutes, tossing occasionally to
combine well. Top with raisins before serving.
Recipe source: Food NetworkVegg e T ps by Phyllis Pugnetti
Cilantro (Coriandrum sativum)
Cilantro can be difficult to grow in Yakima because it bolts very quickly in warm weather. However, when planted in the
late summer, in a sheltered sunny place, cilantro can actually grow all winter with just a bit of mulch to protect the roots
from freezing. Cilantro has a long taproot that doesn’t like being transplanted. For this reason, seedlings will often times
bolt immediately after transplanting. Cilantro has a light, fresh flavor similar to a combination of citrus and parsley which
many people love. There a those who do not to like cilantro because of a soapy taste. Few people have the genetic ability to
taste the soapy flavor. If you are one, don’t give up on cilantro until you grow your own! Before cilantro bolts the plant
doesn’t have the soapy trait. As soon as cilantro begins to bolt the entire plant will taste soapy almost immediately. Obvi-
ously much cilantro in grocery stores has already started to bolt. When cilantro bolts it sends up frond-like leaves in the
center that look wispy and a bit like carrot tops. The best cilantro is picked before this stage.
After bolting, if you leave a couple plants in the garden they will grow to 3 feet tall with small attractive white flowers that
are edible and also attractive to pollinators. Leave the plants longer, and they will set golden-brown seeds which are corian-
der and when ground into a fine powder it tastes similar to cilantro leaves but with a more herbal flavor. The seeds should
not be ground until you are ready to use them, as they loose their flavor very quickly. Coriander found in stores is usually
so old has virtually no identifiable flavor. If you think you don’t like cilantro or coriander, consider growing your own so
that you can harvest at the exact right time. It is quite possible the fresh flavor will make a cilantro lover out of you!
Cilantro ready to harvest Cilantro flowers and frond-like leaves Cilantro seeds
Cilantro Chutney
1 cup cilantro stems and leaves, roughly chopped
2 cloves garlic
1-2 jalapeños
1/2 cup walnuts, coarsely chopped
1/4 lemon juice
Salt to taste
1-2 tablespoons olive oil
Place all ingredients in a blender and puree until smooth. Many varia-
tions of this recipe can be made by adding raisins, other nuts, flavored
vinegar, coconut, mint, and other spices. Chutney is very versatile and
can be used as a dip, or a spread for sandwiches and bruschetta, or added
to pasta or soup. Recipe source Christina Zaragoza.Vegg e T ps By Elaine Krump Cucumber (Cucumis sativus) Cucumbers originated in India and West Asia over 3,000 years ago. It is believed that the cucumber spread across Europe with the spread of the Roman Empire. Because cu- cumbers are easy to grow and provide high yields of fruits, is was rapidly embraced by most cultures. Today, they are grown throughout most of the world and are the fourth most commonly grown vegetable in the world. China and India are still the leading producers of cucumbers. Looking at recipes from various parts of the world shows that cucumber recipes are quite similar from one country to another. Cu- cumbers are nearly always eaten raw in salads, salsas, or on sandwiches. When cooked, cucumbers are nearly always some form of pickles or relish. There are three main varieties of cucumbers, slicing, pick- ling, and burpless. Within these varieties there are many different cultivars. English cucumbers are long and thin with dark green skin, have a mild flavor and minimal seeds. They are sometimes labeled as burpless. Garden cucumbers are the most common. They are dark green and have smooth skin. Kirby cucumbers are short and always bumpy. They can range in color from yellow to dark green, are great for eating raw and are also used as for pickling. Lemon cucum- bers are the size of a fist and yellow in color. They are sweet tasting and have minimal soft seeds. They can also be used for pickles. Botanically, Armenian cucumbers are melons (cucumis melo) but are used as cucumbers. They are large, have very pale green thin skin, relatively dry flesh, and keep longer in the refrigerator than most cucumbers. They are eaten raw and are also used for pickles. Cucumbers thrive when the weather is hot. They are very frost tender and should not be planted until soil temperatures are in the 70ᵒ degree range. They grow in two forms: vining and bush. Use a trellis for vines, or they will scramble along the ground and many fruits will suffer insect damage, mold, or rot. Bush types form a compact plant and allow you to plant in a small space or a container. When planting cucumbers, select a site with full sun. Soil should be neutral or slightly alkaline with a pH of 7. Before planting, add 2 inches of compost and work into the soil to a depth of 6-8 inches. Soil should be moist and well drained. You may use seeds or seedlings. Sow seeds in rows 1 inch deep and 6-10 inches apart. Plant seedlings 12 inches apart. Water consistently and avoid the leaves, or water early in the day so leaves have a chance to dry. Spread mulch around plants to retain moisture. Straw mulch is beneficial to limit slugs and cucumber beetles, and will keep fruits dry preventing rot and mold. At peak harvesting time you should pick cucumbers every other day as this will encourage further production. If cucumbers are allowed to become oversized they will taste bitter and both skins and seeds will become tough. Once the color of the fruits starts to change from green to a spot of yellow or white the cucumbers begin to turn bitter. Cucumbers are low in calories and fat and have a high water content. Most of the nutrients in cucumbers are in the skin. For fresh eating thin skinned cucumbers, like Japanese Suyo or English Tall Telegraph, can be used without peeling, retaining most of the nutrients. Cucumbers should be used immediately after harvest as they do not have a long shelf life. To store fresh cucumbers, make sure they are dry then wrap in plastic wrap. They should store 7-10 days in the refrigerator.
Cucumber
Mexican Cucumber Salad
2 medium cucumbers
1 cup fresh or canned corn
2 tomatoes
1 green pepper
1 red pepper
1 sweet onion
2 tablespoons wine vinegar
1/2 teaspoon garlic, minced
1/2 teaspoon cumin
2 tablespoons fresh cilantro
1/2 teaspoon red pepper flakes
salt and fresh ground black pepper to taste

Chop cucumbers, tomatoes, and peppers to bite size pieces. Finely chop onion
and cilantro. Toss all ingredients together. Cover and refrigerate for 1-2 hours before serving.

Thai Cucumber Salad
3 cucumbers, peeled, halved, and sliced
½ cup rice vinegar
½ teaspoon salt
½ cup sugar
2 jalapeno peppers, seeded and chopped
¼ cup fresh cilantro
½ cup peanuts, chopped

In a medium size bowl, mix vinegar, salt, sugar, jalapenos, and cilantro. Add
cucumber slices, stir to coat vegetables. Cover and refrigerate for 1-2 hours.
Sprinkle with pea nuts before serving.

Japanese Cucumber Salad
2 Japanese cucumbers, thinly sliced, unpeeled
⅓ cup carrots cut into thin match sticks
⅓ cup rice vinegar
3 teaspoons sugar
½ teaspoon salt
1 teaspoon grated fresh ginger
cracked black pepper to taste
sesame seeds (optional)

Mix vinegar, sugar, salt, ginger and pepper in a bowl that has a tight fitting lid.
Add sliced vegetables, cover and shake to coat the vegetables. Refrigerate for
1-2 hours. Shake well and sprinkle with sesame seeds before serving.
You can also read