Wi-Fi Pan & Tilt Camera AlwaysSafe App Manual - iOS and Android - Swann
←
→
Page content transcription
If your browser does not render page correctly, please read the page content below
Wi-Fi Pan & Tilt Camera
AlwaysSafe App Manual
iOS and Android

                          English
Contents

        Contents

Getting Started
Adding a Camera                                        4
Setting Date and Time                                  6
Setting up Email Alerts                                7
Customizing Email Alerts Schedule                     10
Setting up a MicroSD Memory Card                      12
Sharing Access to your Camera                         14

About the App Interface
Devices Home Screen                                   17
Live View Screen                                      18
Live View Screen: Using Pan & Tilt Controls           19
Live View Screen: Saving & Calling Preset Positions   20
Live View Screen: Using Two-Way Talk                  21
Playback Screen                                       22
Device Settings Screen                                23
Device Settings: Display                              25
Device Settings: MD Settings: Sensitivity Schedule    28
Device Settings: MD Settings: Motion Zones            29
Device Settings: Record: Record Settings              30
Device Settings: Record: Schedule                     31
Device Settings: Alarm Sound                          32
Device Settings: Email                                33
Device Settings: More Settings                        34

Appendix
Adding a Camera via Ethernet                          36
Frequently Asked Questions                            38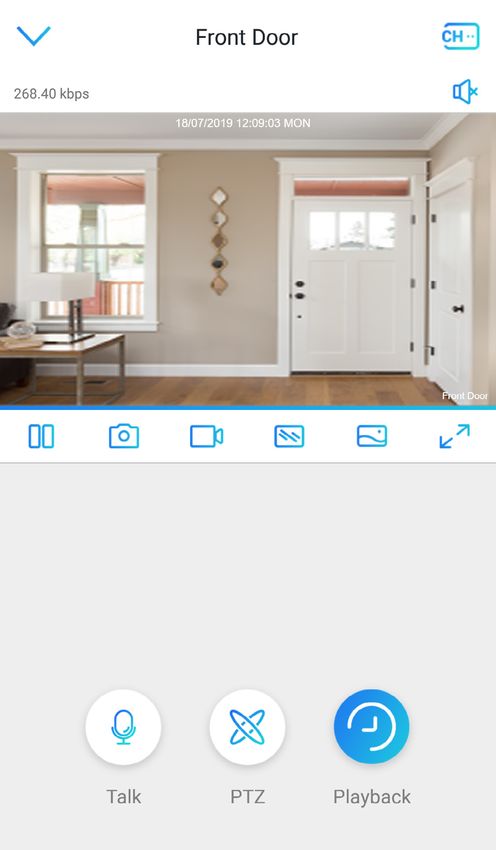
Getting Started

       3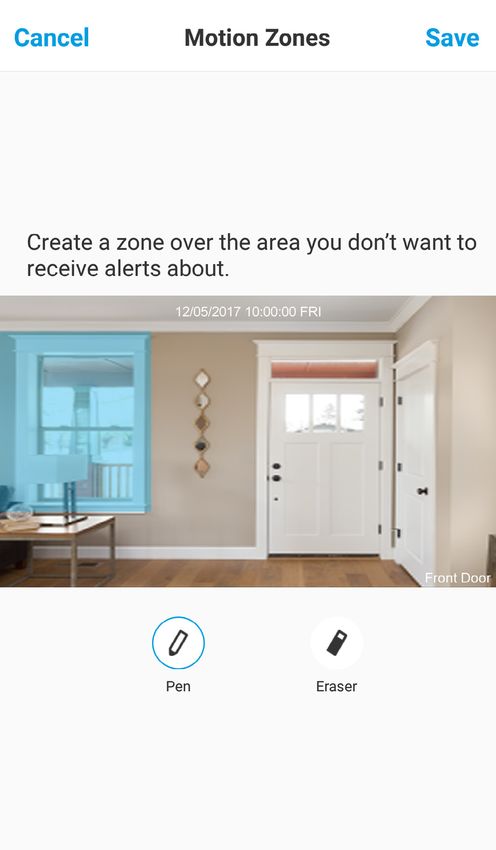
Adding a Camera

                                                               Power Adapter

          Micro-USB Connector                                  USB Cable

     If you have not already done so, connect the camera to power using the supplied USB cable and power adapter.

                                                                       Wait ~30s

     The camera will begin rotating as part of its startup sequence.

                                                                                         (Continued on the next page)

                                                          4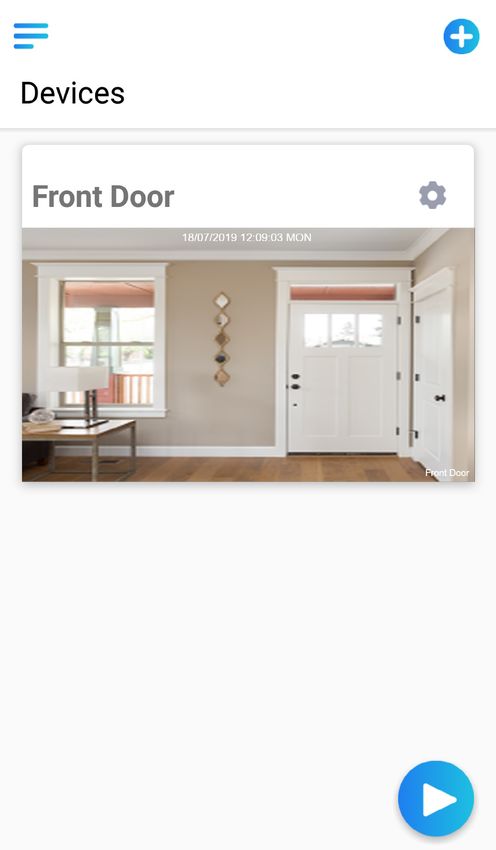
Adding a Camera

                                                              Please open the Wi-Fi settings
                                                              option on your smartphone and
                                                              connect to your camera’s network
                                                              ........................................................................
                                                                  ..................................................................
                                                                         ....................................................

   Once the camera has finished starting up, it will go into Wi-Fi configuration mode and guide you through
   the Wi-Fi setup process.
   Listen carefully and follow the voice prompts from the camera. You’ll need to connect your smartphone to
   the camera’s temporary Wi-Fi hotspot.

   Open the AlwaysSafe app when prompted (your smartphone should now be connected to the camera’s Wi-Fi hotspot),
   then wait for the Setup box to be displayed as shown above.
   Tap OK then follow the on-screen instructions to configure your home Wi-Fi network settings for the camera.
   Once Wi-Fi setup is finished, the camera is ready to stream live video.
   Before using the camera any further, make sure to set the date and time. See “Setting Date and Time” on page 6.

                                                          5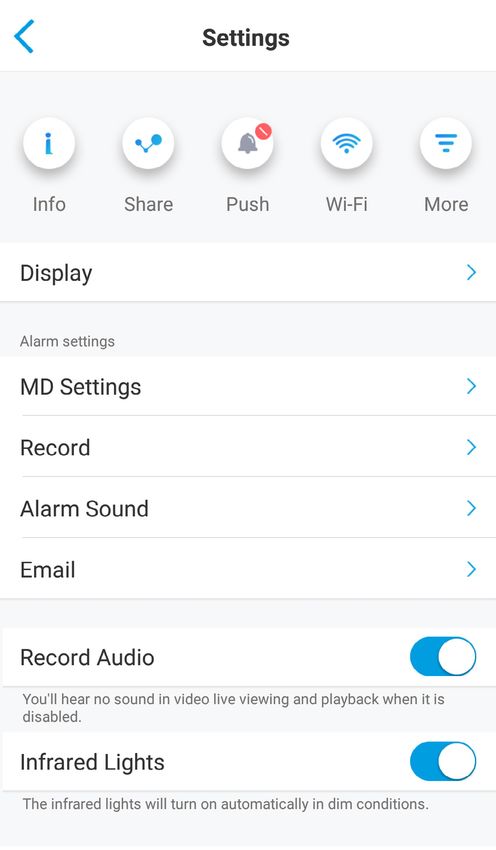
Setting Date and Time

                                                                               Tap the More button.
From the Devices screen, tap the     Settings icon on
the camera tile to access camera settings.

                 Tap Date & Time.                           Tap Synchronize phone time. This allows the camera to
                                                            automatically sync its date, time and timezone to the clock
                                                            on your smartphone.
                                                            You can also change how the date and time is displayed
                                                            using the Date Format and Time Format options.
                                                            If “Daylight Saving Time” is observed in your locale, turn
                                                            Enable DST on then configure when DST starts and ends.

                                                        6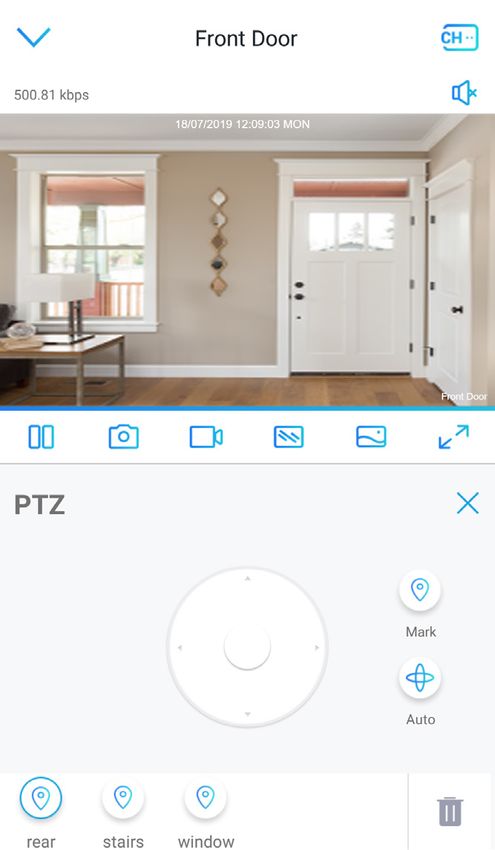
Setting up Email Alerts

                                                                              Tap Email.
 From the Devices screen, tap the     Settings icon
 on the camera tile to access camera settings.

 Make sure Enabled is turned on, then tap Email           Tap Add Sender. This lets you configure the email
 Settings.                                                account that will be used to send email alerts about
                                                          motion activity.

                                                                                      (Continued on the next page)

                                                      7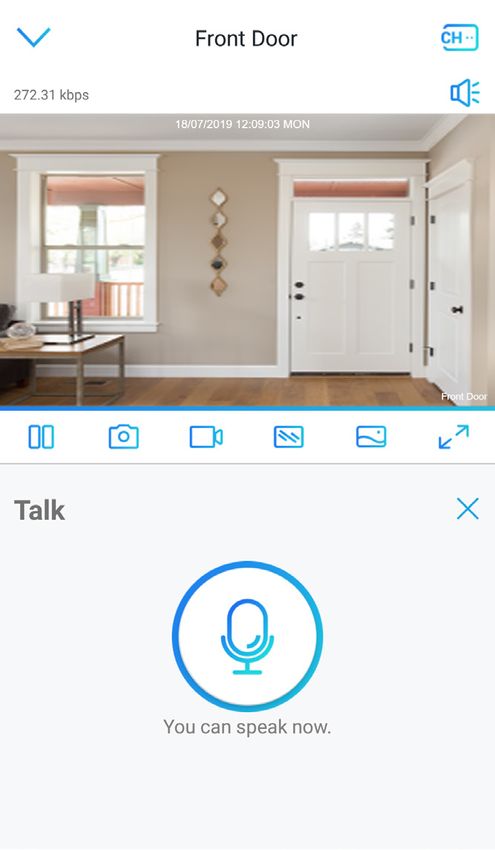
Setting up Email Alerts

  Tap SMTP Server to select your email provider.             Tap the name of your email provider—Gmail, Yahoo or
                                                             Outlook/Hotmail. Server settings for these email services
                                                             have already been preconfigured. Tap the Left arrow at
                                                             the top left to return to the previous screen.
                                                             If your email provider is not any of the above, tap Other.

If Other is selected, manually enter the SMTP server         Enter the Sender Name, Sender Email and Sender
address and port number of your email provider. If you       Email Password. The Sender Email is the email address
don’t know the details, contact your email provider or       that the camera will use to send alerts.
try googling first.                                          Tap Save at the top right once done.
Tap Save at the top right once done.

                                                                                              (Continued on the next page)
                                                         8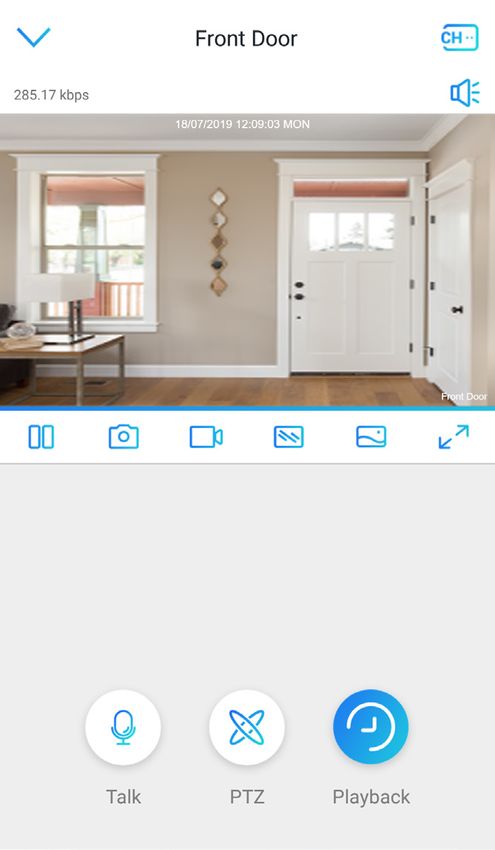
Setting up Email Alerts

Tap Add Recipient. This lets you configure the email   Enter up to 3 email addresses that will receive         Tap Email Content and select what to include in the
addresses that will receive email alerts.              email alerts. You can even send alerts to yourself;     email alerts. The following options are available:
                                                       just tap Sender and the field will be populated         Text, Picture, Text with Picture (default), Text with
                                                       automatically with the Sender’s email address.          Video (30 seconds long)
                                                       Tap Save once done.

     Tap E-mail Interval and select the time —30 seconds, 1                                 Check your (recipient) inbox for the test email.
     minute, 5 minutes, 10 minutes or 30 minutes—in between                                 Not getting the test email?
     email alerts arriving in your inbox. If you’re getting too                             • Check your sender email address and password as well
     many emails, you might want to increase the interval to                                  as the recipient email address in the Email Settings.
     suit your situation.                                                                   • If using Gmail, look for a “Sign-in attempt was blocked”
     Tap the Left arrow at the top left once done. A test email                               email from Google. You’ll need to review your Google
     will be sent to the recipient(s) that you’ve specified.                                  account activity, then go to the Less secure app access
                                                                                              section of your Google account and turn Allow less
                                                                                              secure apps on to start getting email alerts.

                                                                                9
Customizing Email Alerts Schedule

   Go to the camera’s settings then tap Email.              Make sure Enable is turned on, then tap Schedule.
                                                            If you haven’t set up email alerts yet, see “Setting up
                                                            Email Alerts” on page 7.

By default, the camera is scheduled to send emails          To customize the email alerts schedule (i.e., when you
when motion events occur as shown by the blue time          want to get email alerts, instead of all the time), first
bars representing each day of the week.                     choose the day of the week by tapping the time bar
Do not edit the email alerts schedule if you want to        corresponding to the day that you want to customize.
receive emails about motion detection at all times.

                                                                                           (Continued on the next page)

                                                       10
Customizing Email Alerts Schedule
To start creating the schedule for the day (Monday for After selecting the hour or hourly time range (shown with
this example), either: a green outline), select the type of action required.
• Tap an individual hourly bar, or • Alarm (blue): Send email alerts for motion events
• Tap and drag across several hours for a longer time • None (grey): Do not send email alerts for motion events.
range. (Note: The camera will still record motion events but
not send email alerts)
In the example above, “None” was the selected action for The email alerts schedule is updated to reflect the
the hours between midnight and 7am. This means email schedule that you have created for Monday. You can
alerts will not be sent during this time period (grey bars). create unique schedules for each day of the week.
Repeat the steps above to continue customizing the Simply perform the same steps as described.
schedule for Monday. Tap Save at the top right once done.
11Setting up a MicroSD Memory Card
MicroSD
card
Insert a microSD memory card into the microSD card slot on the back of the camera, with the gold contacts facing down,
until it clicks into place. To ensure smooth performance and plenty of space for recording motion events, we recommend
using a fast memory card (class 6 or higher), with at least 16 GB of capacity.
Note: We do not guarantee compatibility with microSD cards from all manufacturers. Only use good quality microSD
cards from well-known manufacturers.
From the Devices screen, tap the Settings icon on Tap the More button.
the camera tile to access camera settings.
(Continued on the next page)
12Setting up a MicroSD Memory Card
Tap Storage. Before using a microSD card for the first time, you’ll
need to format it. Tap the Format button.
The camera will format the memory card and restart
automatically for the memory card to take effect.
When the camera has finished restarting (i.e., the camera stops
rotating), the installed microSD card is ready for use. You can view the
microSD card’s total capacity and the amount of space currently used
to store the camera recordings.
13Sharing Access to your Camera
Tap the Share button.
From the Devices screen, tap the Settings icon
on the camera tile to access camera settings.
A QR code containing your camera’s UID data is On your family member’s smartphone, download the
displayed. Important: Only share this code with the latest version of the AlwaysSafe app from the Apple
people you trust completely to have access to your App Store or Google Play Store.
camera, for example, a close family member. Once installed, open the app and tap + icon at the top
right of the screen.
(Continued on the next page)
14Sharing Access to your Camera
Family’s smartphone
Your smartphone
Using your family member’s smartphone, scan the QR code of the camera that is being shared (on your smartphone) as
shown above.
To log into your camera, provide your camera’s admin Your camera can now be accessed at any time from
login password (this is the password created during the your family member’s smartphone using the app.
Wi-Fi setup wizard), then tap the Login button.
Note: A Guest account can also be created (via Settings
> More > User Management > Add Users) to provide
limited access to your camera such as Live View and
Playback only.
15About the App Interface
16Devices Home Screen
1 2
3
4 5
6
7
1 Configure app startup settings, view general information about the app, and more.
2 Add a camera manually by scanning the QR code.
3 Displays all of the connected cameras on your network (i.e., router).
4 The camera name. You can change this by going to Settings > Info.
Manage the camera’s settings such as the motion detection sensitivity, email alerts, microSD storage, and more.
5 To learn about the camera settings available, see “Device Settings Screen” on page 23.
6 The camera preview window. Tap anywhere on the window to start live view from the camera.
7 Quickly start live view of the last watched camera. This is useful when you have more than one camera installed.
17Live View Screen
1 2
3
4 5 6 7 8 9
10 11 12
1 Tap to return to the Devices home screen.
2 Select multiple cameras, if available, to view live video simultaneously or on separate video windows.
Tap to unmute/mute the live video. If more than one camera is streaming using the multi-camera window option, only
3 audio from the highlighted (blue) camera is heard.
4 Tap to stop/start live video from the camera.
Tap to capture a snapshot. Photos are automatically saved to your smartphone’s internal memory—look for the
5 “AlwaysSafe” folder via the file manager app on your smartphone.
Tap to start recording the live video. Tap again to stop recording. Recordings are saved to your smartphone’s internal
6 memory—look for the “AlwaysSafe” folder via the file manager app on your smartphone.
Tap to change the video stream quality between Fluent (smoother movement) and Clear (higher quality).
7 Note: If streaming in “Clear” quality, only live video from one camera will be streamed on a single window at a time.
8 Tap to change the color setting of the camera - Color, Black & White or Auto.
9 Tap for a landscape (fullscreen) display of the live view window
10 Tap to enable the talk function. See “Live View Screen: Using Two-Way Talk” on page 21.
11 Tap to enable pan & tilt controls. See “Live View Screen: Using Pan & Tilt Controls” on page 19.
Tap to access the Playback screen where you can search and review motion detection recordings from the camera. See
12 “Playback Screen” on page 22.
18Live View Screen: Using Pan & Tilt Controls
Tap the PTZ button at the bottom of the screen.
Pan and tilt the camera using the joystick. Drag and release quickly for incremental movements, or drag and hold for
continuous pan or tilt. You can also set your camera to automatically pan for 60 seconds by tapping the Auto icon.
To stop automatic panning at any time, tap the Auto button again.
Do not manually pan or tilt the camera with your hands. Doing so will damage the camera.
19Live View Screen: Saving & Calling Preset Positions
You can save multiple camera viewpoints as preset Preset camera positions that have been saved are
positions to call upon later. displayed at the bottom of screen. Simply tap a
To define a camera position, pan/tilt the camera to the position to move the camera’s view automatically to
desired position, then tap the Mark button and give the the marked position.
preset an appropriate name.
You can delete preset positions by tapping the icon. Tap a preset position to delete it.
Tap Done once you’ve finished.
20Live View Screen: Using Two-Way Talk
Tap the Talk button at the bottom of the screen.
Tap the Mic button to start talking.
To stop talking at any time, tap the Mic button again.
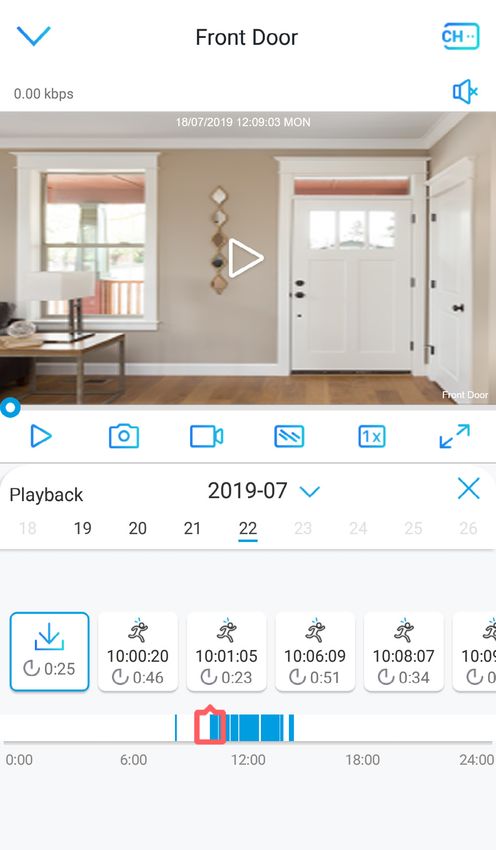
21Playback Screen
1 2
3
4
5
6
7 8
9
10
1 Tap to return to the Devices screen.
2 Tap to select a different camera, if available.
3 Tap to unmute/mute the video.
Tap to start playback of all motion events for the day starting from the first selected motion event in the motion event
4 history timeline below.
5 Drag the marker along the timeline to quickly skip forward or back to a specific point in the clip.
Tap the corresponding icon to start/stop video playback, capture a photo, start/stop clip recording, change video stream
6 quality, or maximize the video window to fullscreen (landscape view).
7 Tap to open the calendar and change the date to search for motion events.
8 Tap to exit Playback and return to Live View.
History of motion events showing the time of occurrence and the length of the recording. Scroll left or right to see more.
9 Tap once to select and playback the motion event automatically. Tap the selected event (blue border) again to display the
Download screen where you can download a clip of the recording to your smartphone. The maximum length of the clip that
you can download is limited to 30 seconds. Use the Start and End markers to alter the duration to just the portions of the
recording that you need. For long recordings, you can repeat the same step to download another 30- second portion of the
recording.
Drag left or right to show motion event history from a particular period of time. Highlighted parts in blue represent when
10 the camera recorded motion activity.
22Device Settings Screen
1 2 3 4 5
6
7
8
9
10
1 Tap to edit the camera’s name and view technical details such as network connection and system hardware status.
Tap to generate a QR code that will allow you to share access to the camera with other people. To learn how, see “Sharing
2 Access to your Camera” on page 14.
3 (For compatible Swann DVR models only) Tap to enable or disable push notifications on your phone.
Tap to view the Wi-Fi network that the camera is currently connected to. You can also connect the camera to a different
4 Wi-Fi network, if available. The camera supports both 2.4GHz and 5GHz Wi-Fi networks.
5 Tap to access more system settings for the camera such as date & time, video standard and user management.
6 Tap to adjust image and video display settings.
Tap to adjust the motion detection sensitivity. You can also customize up to 4 time periods for the day and assign different
7 sensitivity to each time period as well as create masking zones to ignore motion activity occurring in certain parts of the
scene.
Tap to configure recording schedules and customize the times and days in which the camera is allowed to record videos to
8 the microSD card when motion is detected. NOTE: For the Record settings to be made available, the camera must have a
microSD memory card installed. To learn how, see “Setting up a MicroSD Memory Card” on page 12.
Tap to configure the camera’s built-in siren function including the alarm schedule and enable the camera to sound the
9 siren when motion is detected. The siren will stop automatically about 10 seconds after complete absence of motion in the
scene.
Tap to set up and configure email alerts so you can be easily notified when motion is detected. To learn how, see “Setting
10 up Email Alerts” on page 7.
23Device Settings Screen
11
12
13
11 You can disable audio completely in the video stream. Leave this setting ON to listen to and record ambient sound.
You can disable the camera’s built-in infrared LEDs completely. If you disable this setting, make sure there is enough
12 ambient light to obtain a good image during the night.
Tap to delete the camera from the app. To also ensure your camera is completely removed from your network, you should
13 perform a camera factory reset. Simply press and hold the Reset button on the camera for 10 seconds with the supplied
reset pin tool.
24Device Settings: Display
1
2
3 4
5
1 The camera preview window will reflect real-time changes made to the display settings here.
If the camera is mounted upside down, you can flip the camera’s video, including any future motion recordings, right side
2 up by tapping the Rotation button. If you need to flip the camera’s video back to its original orientation, tap the Rotation
button again.
3 Tap to change the position of the camera name in the video window. You can also choose to hide the camera name, if necessary.
4 Tap to change the position of the date and time in the video window. You can also choose to hide the date and time, if necessary.
Advanced image settings. Scroll left or right to display more available settings. Tap to expand and make adjustments to the
5 image setting.
• Anti-flicker: If lights are flickering in the video, try changing the refresh rate to either 50Hz (Australia/UK), or 60Hz (North
America).
• Exposure: By default, the camera sets the appropriate exposure values automatically according to the surrounding lighting
environment. You can also choose the exposure level of the camera based on predefined conditions. Select Manual to
adjust shutter range and gain value of the camera manually for exposure compensation, if, for example, the image appears
too dark (underexposed) or too light (overexposed) during daylight depen ding on the scene.
• White Balance: By default, the camera sets the white balance automatically according to the surrounding lighting
conditions so that the most natural reproduction of color tone can be obtained in the image. You can select Manual to
adjust the gain (amplification) of the red and blue channels according to your preferences.
• Day and Night: Change how the camera handles color and manages the transition from daytime to nighttime and vice-
versa. In the Color mode option, the camera does not operate the infrared LEDs at all (even at night). This mode can let you
to capture color night images and videos, provided the scene has ample ambient light available (for example, a lit porch
light). Without sufficient lighting, however, the scene will appear dark and objects may not be clearly visible.
• Backlight: Change between Backlight and Dynamic modes to improve image clarity and capture better object details in
high contrast and extremely bright and dark scenes.
• 3D DNR: Digital Noise Reduction (DNR) is a method by which noise is digitally removed from the image. Noise is most
commonly seen in low-light conditions. The default mode is On.
25Device Settings: Display
6
Tap to adjust video quality settings related to the Fluent and Clear video streams. The following settings are available:
6 • Resolution The video resolution to be used.
• Frame Rate(fps) The speed at which the images from the camera are refreshed. The higher the frame rate, the
smoother the movement of people and objects will be, however, images displayed may appear
delayed and the audio may get out of sync when talking to the camera over a slow or congested
connection. Reducing the number of fps can potentially improve the data-rate per frame and
lower the amount of bandwidth required by the camera.
• Max Bitrate(kbps) The maximum data rate that can be utilized by the camera to stream video. The higher the
bitrate, the better (finer detail and sharper) the quality of the streaming video but a good, strong
and fast internet connection with adequate bandwidth will be needed.
NOTE The preconfigured Clear and Fluent video quality settings are optimized for streaming video over a typical fast
internet connection. If you experience streaming problems, for example the camera’s video is stuck loading or not playing
smoothly, this may be due to your internet connection speed being inadequate or not having the proper bandwidth to
support the required video quality. Try modifying the video quality settings described above such as selecting a lower
bitrate and frame rate for the video stream that you’ll be using. This will reduce the amount of video data being transmitted
resulting in a more consistent, steady stream with slightly lower resolution. You can also contact your internet service
provider regarding your slow internet connection and get help to increase the bandwidth.
26Device Settings: MD Settings: Sensitivity
2 3
4
1
5
1 Tap to adjust the sensitivity level of the motion detection.
2 Tap to cancel changes and return to the previous screen.
Tap to turn on or off customized sensitivity levels for different time periods in a 24-hour day. See “Device Settings: MD
3 Settings: Sensitivity Schedule” on page 28.
4 Tap to save changes made to the motion detection sensitivity level and return to the previous screen.
Drag the slider up or down to adjust the all day motion detection sensitivity level between 1and 50, with 1 being the lowest
5 sensitivity and 50 being the highest. The lower the sensitivity level, the more movement is required to trigger an event. As
every home environment is unique, so we recommend experimenting with the sensitivity level to find what works best for you.
27Device Settings: MD Settings: Sensitivity Schedule
2 3
1
5
4
Tap to turn on or off customized sensitivity levels for different time periods in a 24-hour day. If off, the all day motion
1 detection sensitivity level is used.
2 Tap to cancel changes and return to the previous screen.
3 Tap to save changes to the motion detection sensitivity schedule and return to the previous screen.
Tap the highlighted (blue) end time of the first, second or third time period to define the time periods in a day (24-hour
4 format). The end time of the first period, for example, 06:00 as shown above, will also be the start time of the 2nd period
and so on.
Tap to adjust the motion detection sensitivity level for the corresponding time period by dragging the slider up or down
5 between 1 and 50, with 1 being the lowest sensitivity and 50 being the highest. The lower the sensitivity level, the more
movement is required to trigger an event.
28Device Settings: MD Settings: Motion Zones
2 3
1
4
5 6
1 Tap to block out or mask certain areas in the scene from motion detection (i.e. camera will ignore motion activity).
2 Tap to cancel changes and return to the previous screen.
3 Tap to save and return to the previous screen.
4 The drawing area. Blue shaded parts indicate the areas where the camera will not monitor for motion activity.
Tap to use the Pen tool. Drag your finger over the drawing area to highlight the parts of the scene where you do not want
5 the camera to monitor for motion activity. Note: You can only use the Pen or the Eraser tool at a time.
Tap to use the Eraser tool. Drag your finger over existing highlighted areas to remove (unshade) them from the drawing
6 area. Note: You can only use the Pen or the Eraser tool at a time.
29Device Settings: Record: Record Settings
1 3
2
4
5
NOTE: For the Record settings to be made available, the camera must have a microSD memory card installed. To learn how, see
“Setting up a MicroSD Memory Card” on page 12.
1 Motion detection recording is enabled by default.
2 Tap to configure how motion events are recorded to the microSD card.
Whether to allow the camera to overwrite the oldest video files on the microSD card when memory space is insufficient.
3 Leave this setting ON so that the camera can continue to record new events but make sure that you regularly transfer to a
computer (via a memory card reader) or another storage device before any video file gets deleted automatically.
Whether to allow the camera to start recording to the video clip approximately 4 seconds before an event. Leave this
4 setting ON to get additional footage showing the scene prior to the motion event.
Tap to select the amount of time—15 seconds, 30 seconds, 1 minute—that the camera should continue recording to the
5 video clip after the complete absence of motion in the event.
30Device Settings: Record: Schedule
2
1
Tap to manage the recording schedule and customize the times and days in which the camera is allowed to record to the
1 microSD card when motion is detected. By default, the camera is scheduled to record motion detection events at all times.
2 You can customize the recording schedule for a particular day of the week by tapping the corresponding time bar.
31Device Settings: Alarm Sound
1
3
2
Tap to enable or disable (default) the camera’s built-in siren function. If enabled, the camera will sound the siren when
1 motion is detected. The siren will stop automatically about 10 seconds after complete absence of motion in the scene.
2 If enabled, tap to manage the alarm schedule.
You can customize the times and days in which the camera can sound the siren when motion is detected by tapping the
3 corresponding time bar.
32Device Settings: Email
1
2
3
1 Tap to enable or disable (default) email alerts. If enabled, the camera will send you an email alert when motion is detected.
If enabled, tap to configure settings for email alerts such as the details of your email server settings, recipient email
2 addresses, frequency of alerts, and more. To learn how, see “Setting up Email Alerts” on page 7.
Tap to customize the email alerts schedule. You can, for example, schedule the camera not to send email alerts during
3 certain hours at night. To learn how, see “Customizing Email Alerts Schedule” on page 10.
33Device Settings: More Settings
1
2
3
4
5
6
7
8
Tap to change the camera’s admin login password. You can also create additional users to share camera access with
1 guests. Note: If the password has been changed, you’ll be prompted to log in to the camera again with the new password.
Tap to synchronize the date & time and timezone on the camera to the clock on your smartphone, change the date and time
2 formats, and turn DST (Daylight Saving Time) on or off.
Tap to view details about the installed microSD card, including the total capacity and the amount of free space remaining.
3 You can also format the memory card to completely erase all video recordings.
Tap to change the video standard between NTSC (broadcast format used in North America) and PAL (broadcast format
4 used in Australia/UK), if you’re having display issues such as flickering lights.
(For advanced users) Tap to configure your FTP server settings and enable motion event clips from the camera to be
5 transferred to your FTP server periodically.
Tap to configure how the camera upgrades the firmware. By default, the Auto Upgrade option is ON so that the camera can
6 automatically download and install any firmware update when available. Firmware updates are periodically released for
the camera to improve features and functionality including bug fixes. If you prefer to manually update the camera, simply
turn Auto Upgrade OFF.
Tap to factory reset the camera to the default settings. Previously configured settings such as Wi-Fi and email alert
7 settings will be lost. After the camera has been factory reset, it will need to be set up again.
Note: You can also factory reset the camera by pressing the Reset button on the camera for 10 seconds with the supplied
reset pin tool.
Tap to reboot the camera. If you are having difficulties with your camera, try rebooting it. A simple reboot can often fix
8 connectivity issues quickly.
34Appendix 35
Adding a Camera via Ethernet

     If, for any reason, you’re having trouble joining the camera to your Wi-Fi network using the assistance of the
     camera’s Wi-Fi configuration mode, try connecting first with Ethernet.

                                                                                          Wi-Fi Router

                                Ethernet Cable                                    LAN

         Connect the camera to your Wi-Fi router using the included Ethernet cable.
         Note: You will not hear instructions from the camera when the Ethernet connection is being used.

Open the AlwaysSafe app, and wait a moment                                Create an login password then confirm the login
for the camera to be detected. Once displayed,                            password. This password enables you (as the admin)
tap the camera preview window which will show                             to securely access and manage the camera.
“Uninitialized device”.                                                   Tap the Next button to continue.

                                                             36
Adding a Camera via Ethernet
Enter a name for the camera (for example, you can Select your Wi-Fi network from the list of available
name it after its intended location in your home). nearby networks that the camera has found.
If “Daylight Saving Time” is observed in your locale, If your Wi-Fi network name is hidden, you’ll need to
turn Enable DST on then configure when DST starts manually enter your Wi-Fi network information by
and ends. selecting Manual Input.
Tap the Next button to continue.
Enter the password for your Wi-Fi network, then tap Once the camera has paired to your Wi-Fi, you will
Save to pair the camera to your Wi-Fi. receive a confirmation. Tap the Finish button.
Note: Your Wi-Fi network password is case sensitive, You can now unplug the Ethernet cable and move
so enter it exactly the same as it was created or as the camera to the desired location—as long as it is
found on your router. Use the toggle to ensure that within range of your Wi-Fi router, the camera will
you have entered your Wi-Fi password correctly. automatically reconnect.
37Frequently Asked Questions
Where do I download the AlwaysSafe • If you have an Apple iPhone, you can get
app for iOS and Android devices? the latest version of the AlwaysSafe app
from the Apple App Store.
• If you have an Android smartphone,
you can get the latest version of the
AlwaysSafe app from Google Play (tap
Apps > Play Store).
My camera is mounted upside down. Go to your camera’s settings, tap Display then
How do I flip the camera’s video tap the Rotation button. Your camera’s live
orientation? video, including any future recordings, will
now be the right-side up. To revert the camera
to its original orientation, tap the Rotation
button again.
Will I be able to clearly see what’s When there is not enough ambient light,
going on when the lights are off? your camera’s light detection sensor will
automatically activate the built-in infrared
LEDs (you can see the visible faint red glow
coming from the LEDs), illuminating the area
in front of it, so that you can have a clear and
proper view of the scene. In night vision mode,
the video will appear in black and white.
Why is there sometimes lag or delay You may have a slow or unstable connection
when loading the live stream from my to the internet. Whether you use a Wi-Fi
camera? connection or cellular connection to stream
live video can also make a big difference. As
a general rule, streaming from a smartphone
that is connected to the same Wi-Fi network
as your camera will make the video start
more quickly, whereas streaming using a
cellular connection is often reliant on the
cellular coverage and signal conditions, which
may not be good at the time you want to start
live streaming.
38Frequently Asked Questions
Will my camera still record activity Yes. Your camera will continue to detect and
to its microSD card if my home Wi-Fi record motion activity to its microSD card,
network lost internet connection? as long as recording has been scheduled for
that particular time period. You can stream
live video from the camera and playback
recordings once your internet connection is
restored.
Is it possible to turn off the infrared Yes, if, for some reason, you’d like the infrared
LEDS around the camera lens at LEDs disabled, simply go to your camera’s
night? settings and turn the Infrared Lights
setting OFF. Please note that turning off the
infrared LEDs may result in poor night vision
performance.
How do I copy recordings from the Simply remove the microSD card from the
microSD card to my computer? camera, insert it directly into a USB card
reader then plug the USB card reader into
your computer. In the folder that opens, you’ll
see all of the video files (in .mp4 format)
that your camera has recorded. Each video
file’s name includes the date and time which
indicates when the recording of the motion
detection event was started.
Why has my camera stopped If you’ve recently ejected your microSD card
recording motion activity to the from the camera, for example, to copy files to
microSD memory card? your computer, and then re-inserted the card
back in, the camera may not have recognized
and mounted your microSD card properly.
Try restarting your camera. To restart your
camera, go the camera’s settings, tap the
More button, then tap Reboot.
39Frequently Asked Questions
Why do I hear audio feedback while This is not unusual and could occur for
talking through the app? a number of reasons depending on your
environment (for example, background noise,
proximity between your smartphone and
the camera, noise interference from other
nearby electronic devices, etc). If you hear
audio feedback, try plugging in your headset
or earphones, or lowering your smartphone’s
speaker volume to reduce the audio feedback.
How do I reconnect my camera if I’ve If you’ve recently changed your network
changed my Wi-Fi network settings? settings or installed a new wireless router,
you’ll need to reset your camera and set it up
again. To reset the camera, press the Reset
button on the camera for 10 seconds using
the supplied reset pin tool.
The app still detects the camera The camera remembers the wireless network
which I’ve just removed from the settings that it was connected to, and will
Devices screen. How do I completely automatically connect to the same network
delete it? when it is powered. To completely delete the
camera from your Wi-Fi network and stop
it from being detected while your phone is
on the same network, simply factory reset
the camera - press the Reset button on the
camera for 10 seconds using the supplied
reset pin tool.
How do I know if my camera has the To check if your camera has the latest
latest firmware? firmware, go to your camera’s settings, tap
More and tap Upgrade.
40Apple and iPhone are trademarks of Apple Inc., registered in the U.S. and other countries.
Google, Android, and Google Play are trademarks of Google Inc.
© 2019 Swann Communications
MALWAYSSAFEAPP
APP VERSION: 4.14.2.0
41You can also read