2019-2020 FIRST Tech Challenge Field Assembly Guide - Rev 1.1
←
→
Page content transcription
If your browser does not render page correctly, please read the page content below
2019-2020 FIRST® Tech Challenge
               Field Assembly Guide
                                                         Rev 1.1

AndyMark® Field Components for 2019-2020 FIRST® Tech Challenge

                            1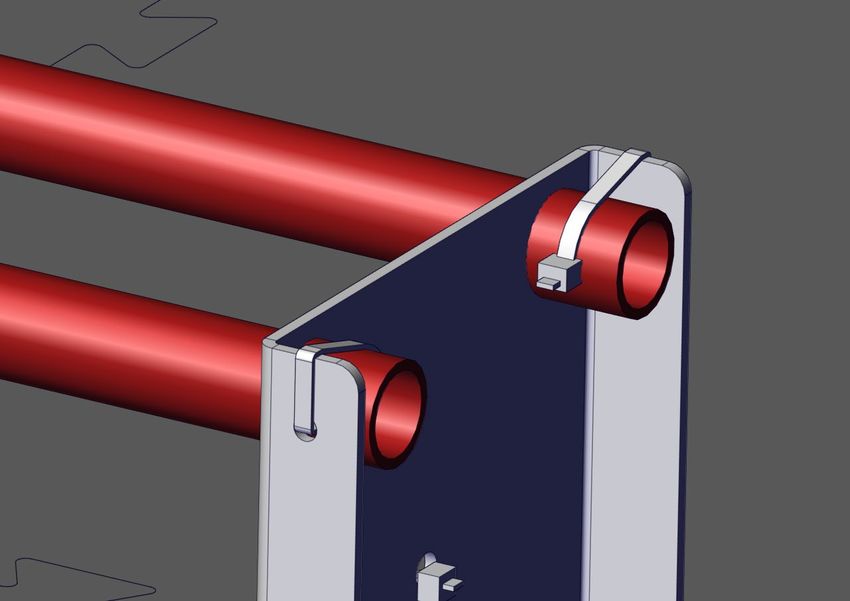
This guide contains instructions for assembling the Field Elements for the 2019-2020 FIRST® Tech Challenge
                                                   Game

                                 SKYSTONESM Presented by Qualcomm®

        Read through all the instructions and take inventory before you
                   begin to assemble the game elements!

REVISION HISTORY
Rev.               Date           Description

1.0                8/21/19        Initial Release

1.1                9/5/19         Updated sticker part numbers, Changed cable tie orientation, Minor text fixes.

                        ASSEMBLY VIDEOS CAN BE FOUND ON OUR WEBSITE:
                                     AndyMark.com/FTC

               CAUTION!
               Edges of field parts may be sharp. File or deburr sharp corners or edges as
               needed.

                                                    2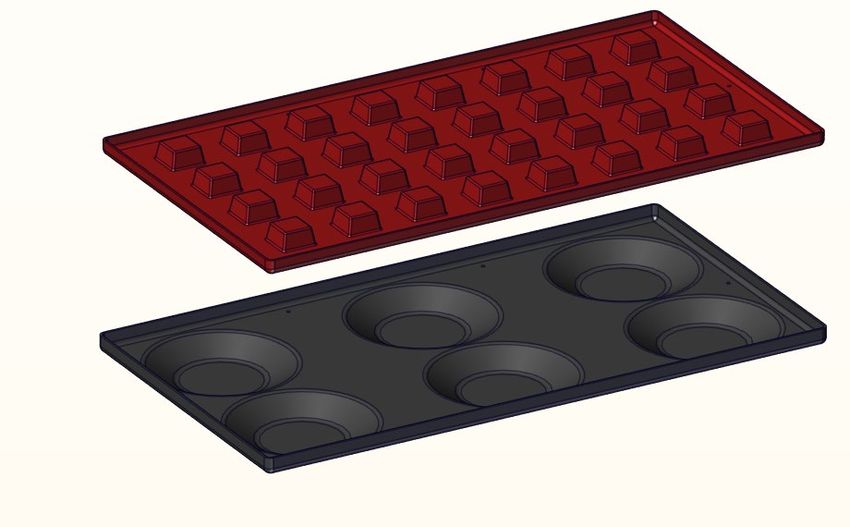
TOOLS NEEDED
         Component                    QTY                           Part Photo

        Safety Equipment

               Drill                    1

        Ratchet (Optional)              1

    3/8” Nut Driver or Socket           1

          Zip Tie Cutters               1

    3/8” Combination Wrench             1

   7/16” Combination Wrench             1

          5/32” Hex Key                 1

               File                     1

           Utility Knife                1

        25’ Tape Measure                1

ADDITIONAL REQUIRED ITEMS
       2” RED Gaffers Tape              1

      2” BLUE Gaffers Tape              1

White 8.5x11” or A4 (international)
 Cardstock for Navigation Target
                                       16
  (Printed from FIRST Resource
             Library)

           Velcro® Dots               1-pack

  Clear Page Protection Sleeves
        (Similar to Staples             8
           P/N 40713)

                             Tools and tape can be purchased as a set from AndyMark
                                                    3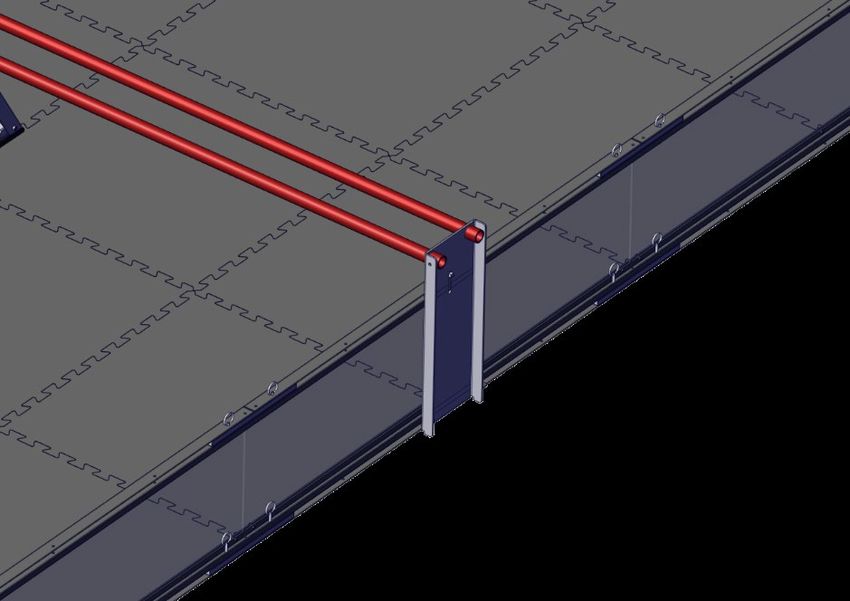
GAME PIECES and ELEMENTS
    Component                  Part #        QTY                     Part Photo

         Stones               am-4018        64

  Skybridge Sticker Set    am-4052_sticker    1

  Skystone Sticker Set     am-4018_sticker    4

                          See Field Setup Guide for placement information.

SKYBRIDGE
     Component                 Part #        QTY                     Part Photo

   Middle Pipe - GOLD       am-4050_gold      2

     End Pipe - RED         am-4050_red       2

     End Pipe - BLUE        am-4050_blue      2

       Floor Plate            am-4051         1

     Under Tile Disk        am-2835_disk      4

                                              4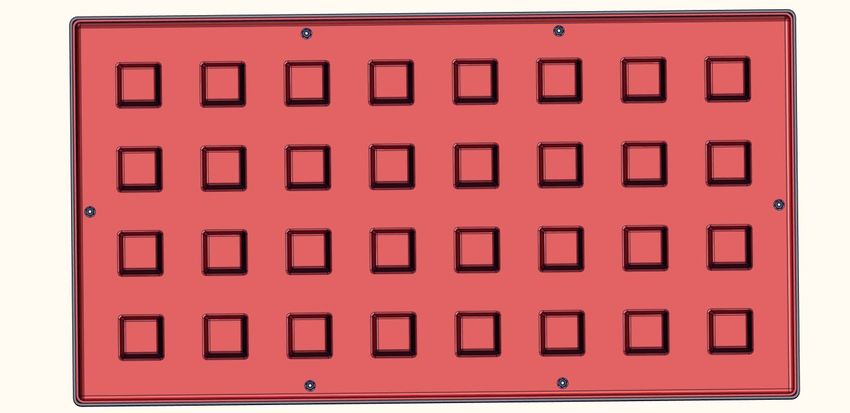
Bridge Support           am-4052     2

        Foot Bracket            am-4046     4

      Closed End Cap            am-4042     4

       Open End Cap             am-4043     4

          Book End              am-4045     2

     Cable Tie, 8” Nylon        am-1189_1   20

SKYBRIDGE HARDWARE PACK

         ¼” Drill Bit           am-4048     1

 1/4-20 x 1.500 Elevator Bolt   am-1521     4

         1/4-20 Nut             am-1487     4

      10-32 x 2.250
                                am-1156     4
  Socket Head Cap Screw

      10-32 x 3.000
                                am-1522     12
  Socket Head Cap Screw

   10-32 Nylon Lock Nut         am-1042     16

RED FOUNDATION

                                            5
Foundation Top – Red    am-4035R   1

  Foundation Bottom      am-4036    1

     10-32 x 0.625
 Socket Head Cap Screw   am-1007    6

  10-32 Nylon Lock Nut   am-1042    6

      #10 Washers        am-1026    12

BLUE FOUNDATION

 Foundation Top – Blue   am-4035B        1

  Foundation Bottom      am-4036         1

     10-32 x 0.625
 Socket Head Cap Screw   am-1007         6

  10-32 Nylon Lock Nut   am-1042         6

      #10 Washers        am-1026        12

                                         6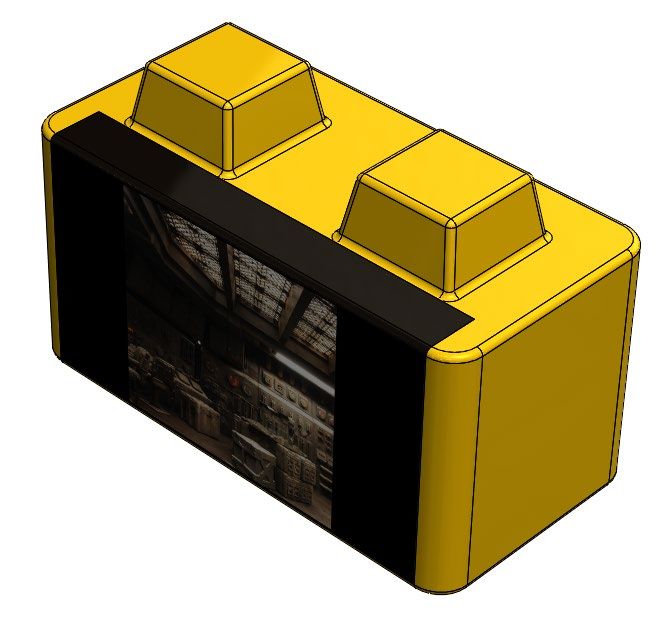
Foundation Assembly Instructions
Each playing field has one Red Foundation and one Blue Foundation. Assembly steps are the same for both
colors.
    1. Align the Foundation Bottom to the Foundation Top.

    2. Using one 10-32 x 0.625” SHCS, two washers, and a 10-32 Lock Nut, attach the bottom to the top. The
       screw should be inserted from the bottom.

    3. Repeat for each of the 6 holes in the Foundation.

    4. Repeat steps 1-3 for the Blue Foundation.

Note: The Foundations are designed to sit flat on the floor. If they don’t sit flat, the screws may need to be
loosened a small amount as not to warp the plastic panels.

                                                     7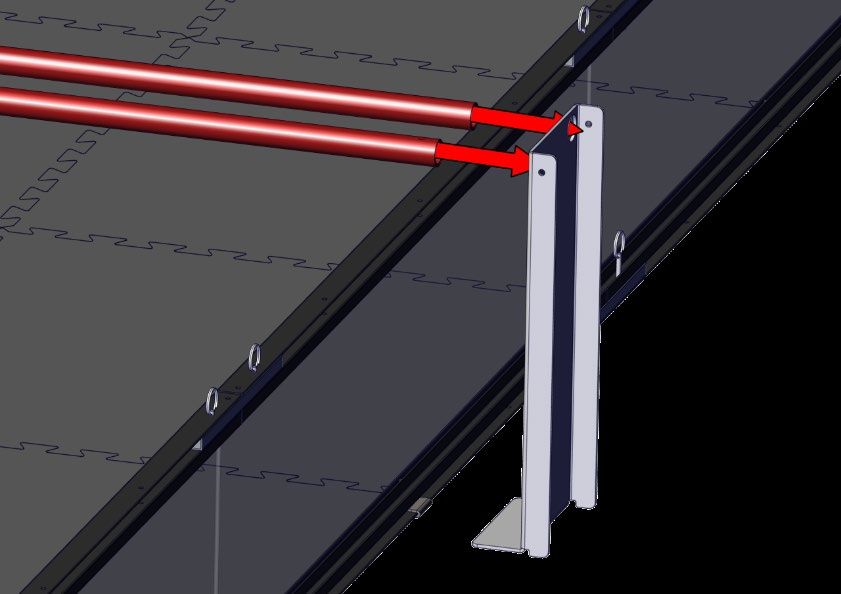
Skybridge Assembly Instructions

   1. There are two types of End Caps, closed and open. The Open End Cap has two through holes for the
      pipes to pass through. There should be two of each type on each Bridge Support.

                    x2 Closed End Cap                                   x2 Open End Cap

   2. Use 3x 10-32 x 3.00 SHCS and Lock Nuts to attach a Closed End Cap and an Open End Cap to the top
      of the Bridge Support. Insert Screws from the Closed End Cap side.

 Note: The three holes for the screws should align, but if the fit is too tight, the components can be forced, twisted,
 or drilled out to allow the screws to fit through.

                                                        8
3. Place another End Cap pair on the lower set of holes on the Bridge Support with the open End Cap
   on the opposite side of the Bridge Support.

4. Use 3x 10-32 x 3.00 SHCS and Lock Nuts. Attach the second set of Closed End Cap/Open End Cap
   onto the lower set of holes near the center of the Bridge Support. Insert Screws from the Closed End
   Cap side.

                                                                  Note: The three holes
                                                                  for the screws should
                                                                  align, but if the fit is
                                                                  tight force, twist, or
                                                                  drill out the holes to
                                                                  allow the screws to fit
                                                                  through.

5. Repeat steps 2-4 for the second Bridge Support.
6. Place an Elevator Bolt in each of the 4 Under Tile Disks.

                                                9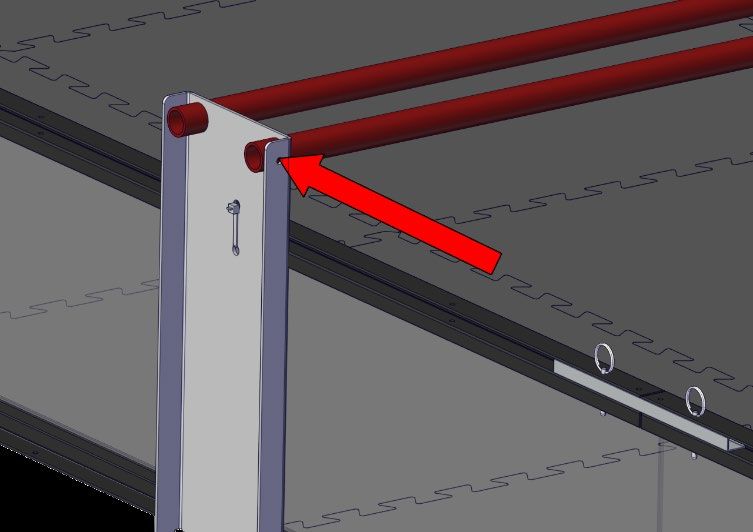
Note: On the official playing field, the Bridge Support and Skybridge will span across the center of the
playing field. The Soft Tiles will be between the bottom of the Floor Plate and the Under Tile Disk.
For specific detail please check the Field Setup Guide.

    7. Place the Floor Plate on top of the Under Tile Disks. The beveled edge of the Floor Plate should face
       up. Each Elevator Bolt should extend through the corner holes on the Floor Plate.

    8. Add a Foot Bracket to each corner on the Elevator Bolt. The long edge of the bracket should be
       parallel with the short side of the Floor Plate and the bracket should point outwards as shown.

           Tiles not shown for illustrative purposes.

                                                    10
9. Secure each bracket with a ¼-20 Nut so that the nut is finger tight. The platform should not wobble
when all four bolts are tightened.
10. Place one Bridge Support onto the brackets on one side of the Floor Plate and secure with a 10-32 x
2.250 screw and Lock Nut. The opening on the top End Cap should face toward the center of the
Floor Plate.
11. Place the other Bridge Support onto the brackets on one side of the Floor Plate and secure with a 10-
32 x 2.250 screw and Lock Nut. The opening on the top End Cap should face toward the center of the
Floor Plate.
1112. Insert the two Gold Pipes into the top End Caps between the Bridge Supports.
13. Add the Red and Blue Pipes to the Lower End Caps. On the competition field, the Red Pipes should
be on the right when viewed from the audience.
14. Slide the ends of the Pipes through the holes on the Book Ends.
On the competition field, the Book End sits outside the perimeter wall. The foot should face towards
the Pipe and sit underneath the perimeter wall and Soft Tile.
Note: When using a perimeter with strap, the strap may need to be moved off-center to allow the Book End to sit in
the correct location.
1215. Attach the Book End onto the field perimeter wall using a cable tie. The tail of the cable tie should be
on the outside of the field.
16. Repeat steps 14 and 15 to attach the Book End to the side of the field.
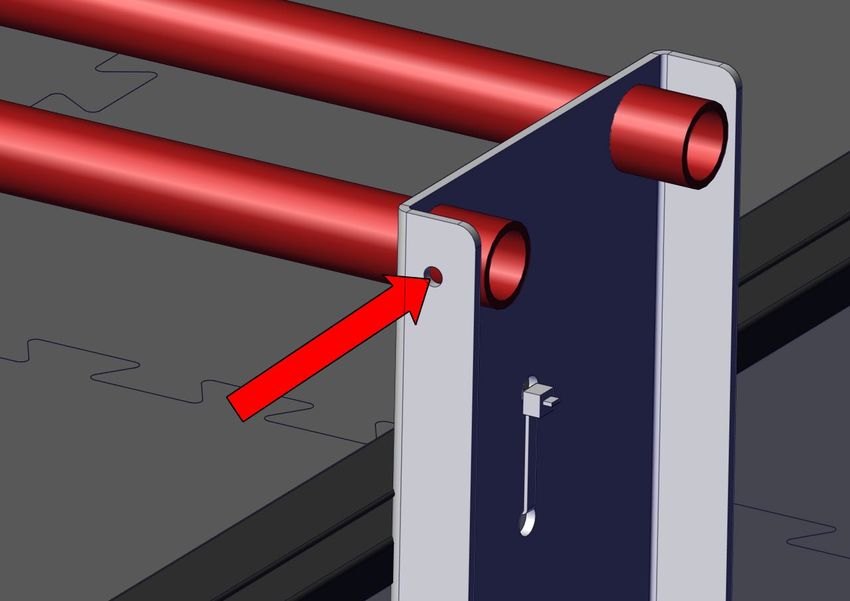
17. Ensure that the Pipes are fully inserted into the End Caps and the Book Ends are against the field
perimeter. Use the window as shown to verify the Pipes are fully inserted.
Window
1318. Using the supplied drill bit and a drill, drill through the hole in the Book End all the way through the
Red Pipe.
19. Repeat on the other Red Pipe.
20. Secure both Pipes to the Book End using cable ties. The cable tie should wrap around the Pipe and
top of the Book End as shown.
1421. Ensure the Pipes are still fully inserted into the Bridge Support End Caps using the window to verify.
22. Using a drill and the supplied drill bit, drill through the top of the Open End Cap, and all the way
through the Pipe on each side. It’s recommended that the hole be drilled as close to vertical as
possible.
Note: At this point, it may be helpful to label the Pipes and End Caps to help ensure the pipe is installed in
the correct location and orientation during future builds.
23. Secure each Pipe using a cable tie. The head of the cable tie should sit on the top of the End Cap.
1524. Repeat steps 17-23 to secure the Blue Pipes.
25. Cut the tails of all the cable ties to ensure they don’t interfere with game play.
26. Vision target stickers will need to be applied to Bridge Supports. Each sticker is labeled with the
location and text to indicate the “top”. The red stickers should be put on the Bridge Support closest
to the red Pipes and the blue stickers should be put on the Bridge Support closest to the Blue Pipes.
The “front” of the Bridge Support is the side facing the audience.
The stickers should be placed so that they are centered horizontally on each support and vertically
between the bottom of the support and the bend in the support.
Rear
Front
16Skystone Assembly Instructions
Each Full Game Set includes 64 Stones. For the competition, 56 Stones and 4 Skystones will be used on the
field at a time. To prepare the Skystone, apply the vision target sticker to the front and top of a Stone as shown.
Each sticker should be centered horizontally on the Stone. The top of the sticker should start at the flat edge
of the top of the Stone and wrap around the front of the Stone.
x4
Note: The Game Sets contain enough cable ties for two field assembly. Additional cable
ties will be needed for subsequent field builds.
Additional instructions on the following can be found in the
Field Setup and Configuration Guide Available on AndyMark.com/FTC
• Setting up the Floor and Field Perimeter
• Instructions for Field Layout and Orientation
• Tournament Setup
More resources on this year’s challenge can be found on
http://www.firstinspires.org/resource-library/ftc/game-and-season-info
17You can also read