AIM XTRA/BASE v2.xx Manual - February 9, 2014
←
→
Page content transcription
If your browser does not render page correctly, please read the page content below
AIM XTRA/BASE v2.xx Manual

       February 9, 2014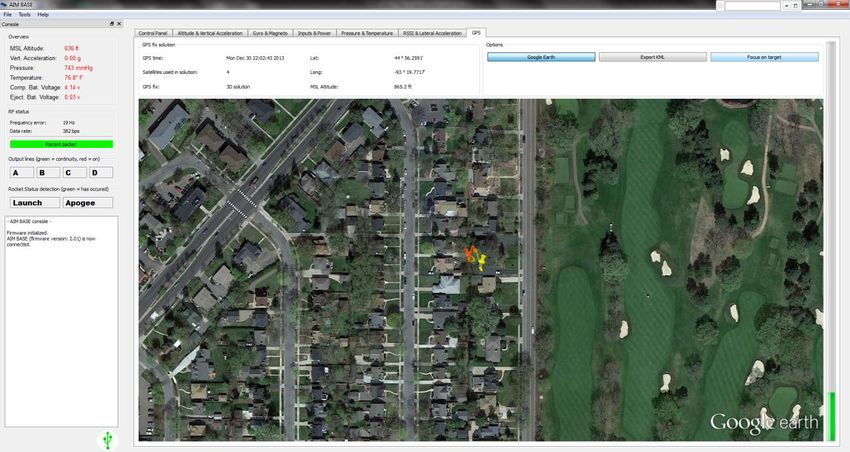
Table of Contents
1  Introduction ......................................................................................................................... 1
 1.1    Computing Requirements ............................................................................................ 1
   1.1.1     Minimum Requirements ........................................................................................ 1
 1.2    The System.................................................................................................................. 1
   1.2.1     Hardware .............................................................................................................. 1
   1.2.2     Firmware............................................................................................................... 1
   1.2.3     Software ............................................................................................................... 2
 1.3    Supported Versions ..................................................................................................... 2
   1.3.1     Manual Supports AIM XTRA Versions .................................................................. 2
   1.3.2     Manual Supports AIM BASE Versions .................................................................. 2
 1.4    System Features .......................................................................................................... 2
   1.4.1     Features Inventory ................................................................................................ 2
   1.4.2     Release Changes ................................................................................................. 4
2 Installation........................................................................................................................... 6
 2.1    Overview ...................................................................................................................... 6
 2.2    Basic Configuration ...................................................................................................... 7
   2.2.1     Software Installation/Updates ............................................................................... 7
   2.2.2     Initial Connections ................................................................................................ 7
   2.2.3     Firmware Updates ................................................................................................ 8
 2.3    Battery Power .............................................................................................................. 8
   2.3.1     Computer Battery.................................................................................................. 9
   2.3.2     Ejection Battery..................................................................................................... 9
   2.3.3     Single Battery ....................................................................................................... 9
 2.4    Igniters/e-Matches ....................................................................................................... 9
 2.5    Board Placement ......................................................................................................... 9
 2.6    Static Port(s) ...............................................................................................................10
 2.7    Data Transmission/Reception .....................................................................................10
   2.7.1     Channel Selection ................................................................................................11
   2.7.2     Data Rate ............................................................................................................12
   2.7.3     Reception ............................................................................................................12
 2.8    External Inputs ............................................................................................................12
3 Preparing for Launch .........................................................................................................14
 3.1    Configuration ..............................................................................................................14
   3.1.1     XTRA Tools Menu ...............................................................................................14
   3.1.2     XTRA Settings Tab ..............................................................................................14
 3.2    Operation Verification .................................................................................................18
   3.2.1     XTRA Control Panel Tab .....................................................................................18
   3.2.2     Basic System Test ...............................................................................................20
 3.3    Achieving Faster GPS Lock ........................................................................................26
 3.4    Graph Navigation ........................................................................................................27
   3.4.1     Menu Navigation ..................................................................................................27
   3.4.2     Mouse Navigation ................................................................................................27
4 Pre-Launch ........................................................................................................................29
 4.1    Normal Flight Operations ............................................................................................29
   4.1.1     Computer .............................................................................................................29
   4.1.2     AIM BASE ............................................................................................................29
   4.1.3     AIM XTRA............................................................................................................29
   4.1.4     Launch Detection .................................................................................................30
 4.2    Flight ...........................................................................................................................30
 4.3    Retrieval .....................................................................................................................30

                                                                     i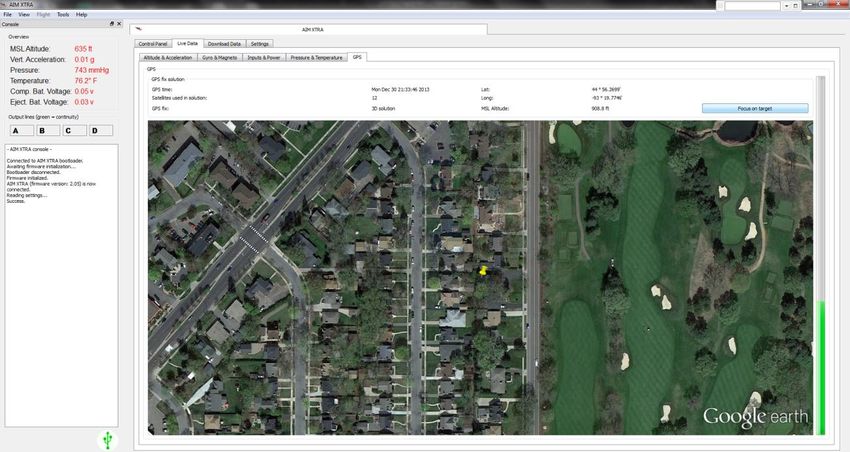
Table of Contents
5  Post Launch .......................................................................................................................32
 5.1    Data Download ...........................................................................................................32
 5.2    Data Analysis ..............................................................................................................34
6 Important Notes & FAQs ....................................................................................................36
 6.1    Disclaimer ...................................................................................................................36
 6.2    Vital Details .................................................................................................................36
 6.3    FAQs ..........................................................................................................................36
7 Warranty ............................................................................................................................38
 7.1    Limited Warranty .........................................................................................................38
   7.1.1     Limited Warranty Coverage .................................................................................38
   7.1.2     Carry-in or Mail-in Service....................................................................................38
 7.2    Authorized Service Centers ........................................................................................39
   7.2.1     United States .......................................................................................................39
   7.2.2     International/South Africa .....................................................................................39

                                          Table of Tables
Table 1: Channel/Frequency Map .............................................................................................11
Table 2: Excel export data format..............................................................................................34

                                         Table of Figures
Figure 1: Standard Configuration ............................................................................................... 6
Figure 3: Turning on the RF Transmitter ...................................................................................11
Figure 4: AIM BASE Control Panel............................................................................................12
Figure 5: XTRA Ejection Line Settings ......................................................................................13
Figure 6: Settings Pop-up Window ............................................................................................14
Figure 7: XTRA General Settings ..............................................................................................15
Figure 8: XTRA Sampling Intervals Settings .............................................................................17
Figure 9: XTRA Control Panel ...................................................................................................19
Figure 10: Altitude & Acceleration Live Data .............................................................................20
Figure 11: Gyro & Magneto Live Data .......................................................................................21
Figure 12: Inputs & Power Live Data .........................................................................................22
Figure 13: Pressure & Temperature Live Data ..........................................................................22
Figure 14: GPS Live Data .........................................................................................................23
Figure 15: GPS Focused on Target...........................................................................................24
Figure 16: BASE Altitude & Vertical Acceleration ......................................................................25
Figure 17: BASE RSSI & Lateral Acceleration ..........................................................................26
Figure 18: BASE GPS View ......................................................................................................30
Figure 19: XTRA Download Data ..............................................................................................32
Figure 20: Downloaded Flight ...................................................................................................33
Figure 21: AIM XTRA Notes Tab ...............................................................................................34
Figure 22: Google Earth Export .................................................................................................35

                                                                   ii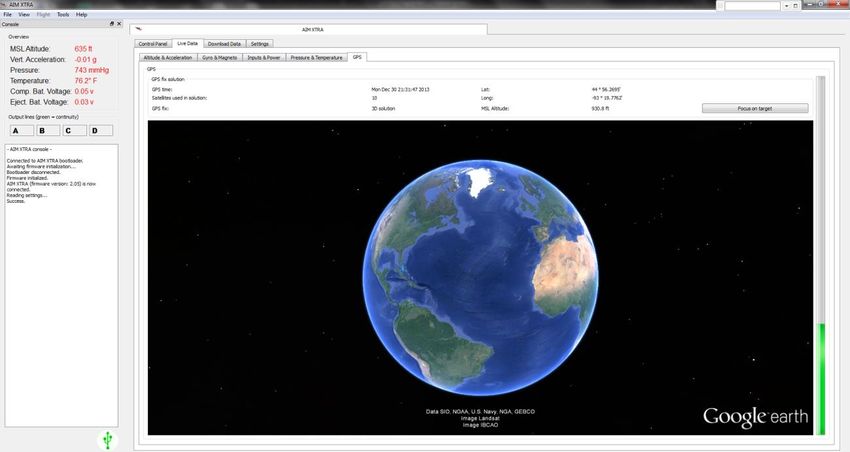
AIM XTRA/BASE v2.0 Manual Introduction
1 Introduction
Thank you for purchasing an AIM XTRA flight computer! The AIM XTRA is a fully integrated
GPS flight control, simulation, tracking and data recording computer. By using the AIM BASE
receiver connected to a laptop, a full telemetry and tracking system is available. The AIM XTRA
is fully USB compliant and is a plug-n-play device.
Please download the AIM XTRA/BASE software from an Authorized Service Center (see
section 7.2) to access all the features of your flight computer.
1.1 Computing Requirements
1.1.1 Minimum Requirements
Computer:
Windows XP/Vista/7/8
3D Graphics Accelerator supporting DirectX 9
Screen Resolution 1024x768 pixels
512 Megabytes RAM
50 Megabytes free disk space
One 1.1 (or higher) USB port
Google Earth (free version)
Note that Apple products are currently not supported.
Accessories:
One USB Cable with a male Type A (Standard) and a male Mini-B Type connector
One three meter (nine foot) or longer USB Cable with a female Type A and a male
Type A connector (optional but preferred for BASE unit operation)
Two button wheel/rollerball mouse (optional but preferred for the manipulation of
graphs)
1.2 The System
1.2.1 Hardware
AIM XTRA: This is a GPS flight computer with a Radio Frequency (RF) transceiver.
AIM BASE: A radio transceiver which connects to your laptop.
Helical Antennas: Two supplied for use with the AIM XTRA.
Quarter Wave Antenna: One is supplied for use with the AIM BASE but may be used on the
AIM XTRA. Extra quarter wave antennas may be acquired from your closest Authorized Service
Center (see section 7.2).
Note: The antennas should only be hand tightened when attaching them to AIM XTRA/BASE
units. Do not use a wrench to attach the antennas!
1.2.2 Firmware
This is the software that runs on the device (AIM XTRA/BASE) which is preloaded. Updates
may be downloaded and installed by the user from the internet.
1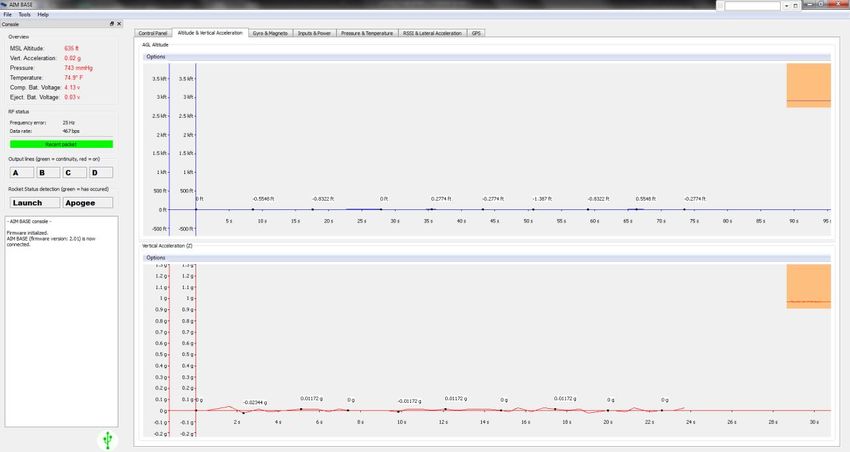
AIM XTRA/BASE v2.0 Manual Introduction
1.2.3 Computer Software
AIM XTRA: Is used to test, configure, download, view flight data, and simulate flights with the
AIM XTRA hardware.
AIM BASE: Is used to monitor and collect live flight data sent from the AIM XTRA via the AIM
BASE hardware.
1.3 Supported Versions
This manual supports all version 2 releases of the AIM XTRA/BASE system. It is recommended
that you always use the correct manual for your hardware and firmware version. If your
hardware or firmware is of an earlier version, diagrams among other items may differ. If a new
firmware version is available when shipping, it will generally be preloaded, but the associated
changes may not be reflected in the preprinted manual.
1.3.1 Manual Supports AIM XTRA Versions
Hardware v2.00
Firmware v2.04
Software v2.05
1.3.2 Manual Supports AIM BASE Versions
Hardware v2.00
Firmware v2.00
Software v2.02
1.4 System Features
1.4.1 Features Inventory
Hardware
100% USB connectivity - no drivers needed!
Swiss engineered aeronautical GPS (uBlox MAX-7Q)
50 mW 432 MHz up to 435 MHz band digitally synthesized transceiver
1.5 ppm TCXO for ultra-narrow band long range operation
100,000 foot barometric sensor
105g linear accelerometer
16g triple axis accelerometer
2000 degree/second triple axis gyroscope
Triple axis magnetometer
Four MB non-volatile flash memory (enough for hours of data)
Up to four 40 amp (continuous) outputs (software selectable)
Up to four auxiliary inputs (software selectable)
On-board temperature sensor
High sample rates (~100/s)
Antennas included - no need for expensive Yagi antennas
Two helical antennas included (medium and short) for the AIM XTRA
One Quarter wave antenna included for the AIM BASE
XTRA Dimensions: 109.6mm L x 30mm W x 15.25mm D (4.315"L x 1.181"W x
0.6"D) without antennas, approximately 152.4mm (6”)L with short antenna, 215.9mm
(8.5”)L with medium antenna, 276.86mm (10.9”)L with long antenna
2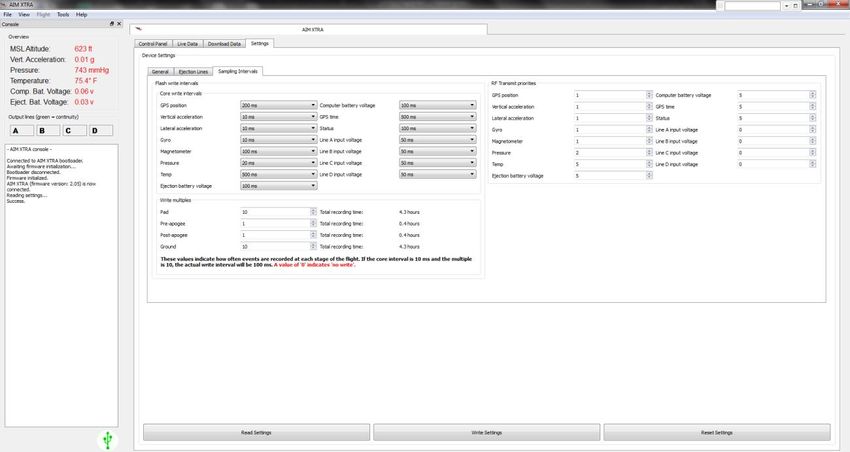
AIM XTRA/BASE v2.0 Manual Introduction
BASE Dimensions: 80mm L x 40mm W x 20mm D (3.15"L x 1.575"W x 0.79"D)
without the antenna, 254mm (10")L when the antenna is attached.
Software
Free custom designed software for setting parameters, simulation, viewing and
downloading data
Support for metric and imperial units
Ejection line settings
Apogee
Time
Accent altitude
Decent altitude
Peak velocity
Input
16 user selectable radio transmission channels
HAM Callsign support
GPS Position, Time, Satellites Locked, and Altitude
Graphical display of critical flight data over time including:
Altitude
Vertical Acceleration
Lateral (X & Y axes) Acceleration
Rotational Rate of Change (X, Y, & Z axes)
Magnetometer Rate of Change (X, Y, & Z axes)
Atmospheric Pressure
Temperature
Computer and Ejection Voltage Levels
Ejection and Input Line Voltage Levels
Received Signal Strength Indicator
Ejection Line Continuity
Launch Detect
Apogee Detect
Google Earth integration for real time vehicle tracking and visual location
User specified data write and transmission rates for each sensor/line during pre-
launch, pre-apogee, post-apogee, and ground time intervals
Low voltage power source protection – critical for preventing LiPo battery damage
Capabilities
Kalman filtered ejection using GPS, barometric sensor and two accelerometers -
high altitude ejection!
For sealed altimeter bays user may disengage Barometric sensor from
Kalman filter algorithm
Ejection upon ascent – useful for altitude competitions, boost glider
separation, etc.
>30km (≈18 ¾ miles) line of sight range with AIM BASE receiver using provided
antennas!
XTRA range with the short helical antenna is approximately 20km (12 ½
miles).
XTRA range with the long helical antenna is approximately 30 km (18 ¾
miles)
3
AIM XTRA/BASE v2.0 Manual Introduction
XTRA range with the quarter wave antenna is extended to approximately
40km (25 miles).
Use of Yagi antennas on the BASE will extend the range to over 100km (≈62
miles)!
Complies with International Traffic in Arms Regulations (ITAR) Requirements which
demands that commercial GPS units disable writing/transmission of data when the
altitude exceeds 18 km (≈60,000 feet) and (inclusive) the velocity is in excess of
1,900 km/h (≈1,200 mph) (i.e. no specific altitude restriction).
Maintains GPS lock up to approximately 10g with rapid lock reacquisition (e.g. a
flight on an CTI O25,000 to over 30,000 feet (≈79g boost for 1.2 sec) lost and
reacquired lock within 5.4 sec).
Recommendations
Recommended battery: 3.7V or 7.4V 1000mAh LiPo which provides approximately
five (5) hours of operation. Use of a separate battery for ejection activation is
recommended based on your igniter/e-match requirements.
One three meter (nine foot) or longer USB Cable with a female Type A and a male
Type A connector (facilitates AIM BASE operation).
1.4.2 Release Changes
1.4.2.1 Changes since Firmware v2.04 Software v2.05 Release
Fixed time based ejection setting (in order to ground test this setting emulations must be
run in real-time).
Improved Windows 8.1 integration
Fixed XTRA/BASE software crashes which occasionally occurred if there was a long
delay before receiving a USB packet.
Fixed Fahrenheit conversion
Vastly improved GPS data usage for initial pressure calibration within the control loop
Reduced AIM BASE latency
Improved AIM BASE USB connection indicator
Added AIM BASE RF received data rate display
Added RF TCXO frequency offset between XTRA and BASE display
Added imperial unit conversions for temperature and pressure
1.4.2.2 Changes since Firmware v2.03 Software v2.04 Release
Notes tab now includes useful flight information
Improved prevention of false launch detects
Improved support for imperial units
1.4.2.3 Changes since Hardware 1.11 Firmware 1.20 Software 1.20 Release
The AIM XTRA v2.00 now includes the latest MAX7Q GPS module
Ultra-sensitive RF front end transceiver, offering a link budget of over 145 dB
Multiple radio channels for interference free operation
1.5 ppm TCXO for ultra-narrow band operation
Lower power requirements (< 150 mA peak)
Improved GPS sensitivity (better and faster fixes)
Operation from a single cell Lithium polymer battery (3.7 volt nominal)
Four (4) output lines capable of 40 amps
4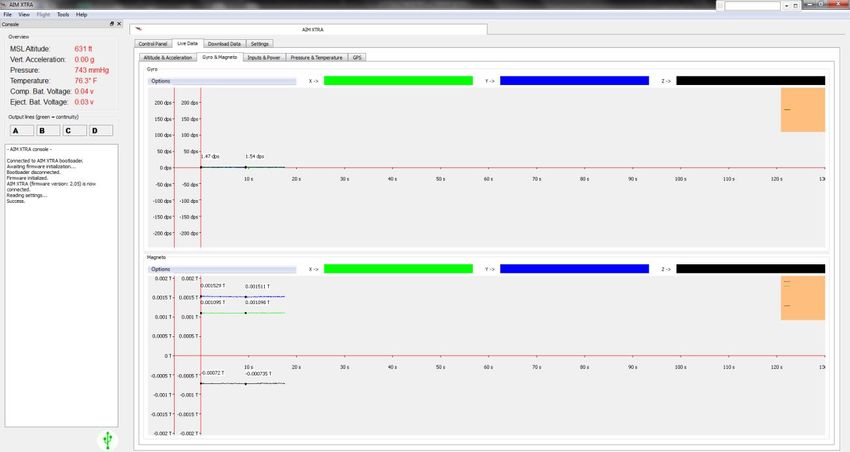
AIM XTRA/BASE v2.0 Manual Introduction
All output lines software reconfigurable as input lines
Now only 30mm wide!
5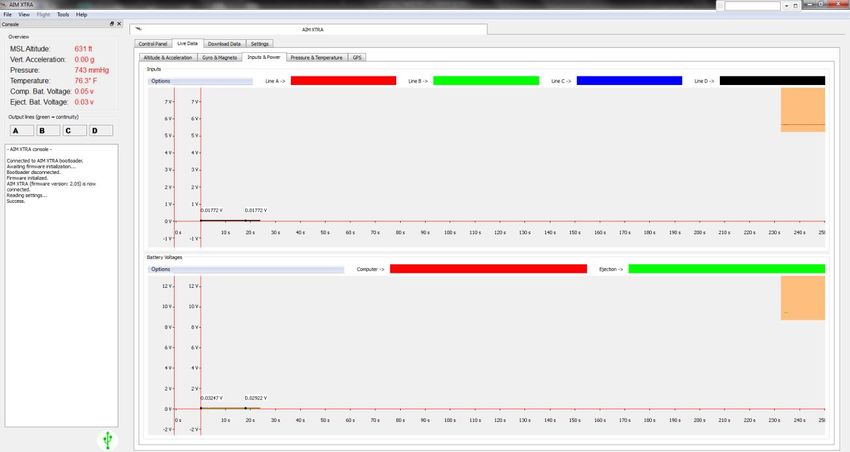
AIM XTRA/BASE v2.0 Manual                                                           Installation

2 Installation

                            Switch

                                                      Igniter
                 Computer        Ejection

                                            Figure 1: Standard Configuration

2.1 Overview
Typically the AIM XTRA is used for flight control, data recording, and vehicle tracking. For
tracking, the user should set up a laptop or similar device capable of running Windows
XP/Vista/7/8 with the AIM BASE on the launch field.

In order to setup the AIM system you will need to download and install the AIM XTRA and BASE
software (a single zip file which includes this manual).

When the AIM XTRA is turned on it will faintly beep once (USB powered) or twice (battery
powered). The first beep indicates power up and the second beep (if applicable) indicates
successful completion of pre-launch checks.

The AIM BASE is powered through the USB connection to your computer. When it is plugged in
you will see a Red light activate which indicates that the AIM BASE is receiving power and is
active.

                                                                6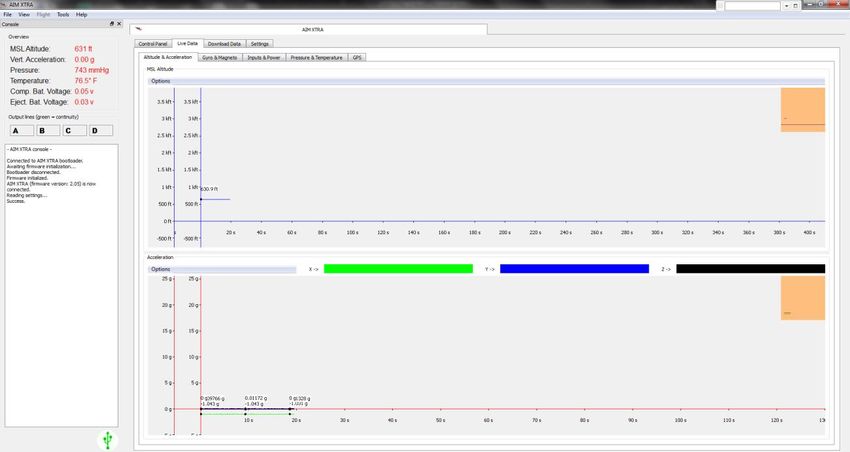
AIM XTRA/BASE v2.0 Manual                                                               Installation

2.2 Basic Configuration
 2.2.1 Software Installation/Updates
The AIM XTRA/BASE is not delivered with the computer software however it is available over
the internet from our Authorized Service Centers (see section 7.2). Please go to the site and
download the software (including updates) at your convenience. All the software/updates are
contained within a zip file. Once downloaded you will need to extract all the files from the zip file
and insert them into a directory of your choosing where the software will run and your flight data
will be stored. Once extracted you will need to go into the directory where the files are stored
and find the following two files: “AIM BASE.exe” and “AIM XTRA.exe”. For each of these files
you will need to do the following:
     1. Right Click on the file
     2. Select from the Menu one or more of the following:
            a. Send to Desktop (shortcut)
            b. Pin to Taskbar
            c. Pin to Start Menu
     3. Go to the location where you have placed the shortcut to start the application and verify
        that it starts.

If you do not have Google Earth installed on your computer you will need to download and
install it. Google Earth may be downloaded at: http://www.google.com/earth/explore/products/
Follow the instructions downloading and installing the free version onto your computer.

 2.2.2 Initial Connections
AIM XTRA
In order to configure the AIM XTRA you will need to start the AIM XTRA software and then
connect the AIM XTRA to your computer/laptop. Please note that when you make this
connection the AIM XTRA will be powered via the USB connection so you should not have the
AIM XTRA Comp terminals powered with a battery. If the AIM XTRA is powered by a battery
when you plug it into your computer’s USB port the AIM XTRA will be in a “waiting for launch
state” and will not accept any configuration settings, download requests, updates, etc. that you
may attempt to apply from your computer.

The first time you connect the AIM XTRA to your computer, it might take some time to recognize
the device. You may be asked to restart your computer, but this is not necessary and can be
ignored.

You will be able to tell that the AIM XTRA has successfully connected to the AIM XTRA
software if the USB symbol in the Console section of the screen changes color from Red to
Green (see bottom left circle in Figure 2). Additionally, you will hear the AIM XTRA beep once
which indicates power up.

Once connected and recognized a message will appear in the Console indicating successful
initialization along with the firmware version (see leftmost circle in Figure 2). At this point the
device can be tested, settings and satellite almanacs loaded and flight simulations run.

AIM BASE
In order to collect telemetry and track the AIM XTRA you will need to start the AIM BASE
software and then connect the AIM BASE to your computer/laptop. Please note that when you

                                                  7
AIM XTRA/BASE v2.0 Manual Installation
make this connection the AIM BASE will be powered via the USB connection. No additional
power source is required.
The first time you connect the AIM BASE to your computer, it might take some time to recognize
the device. You may be asked to restart your computer, but this is not necessary and can be
ignored.
You will be able to tell that the AIM BASE has successfully connected to the AIM BASE
software if the USB symbol in the Console section of the screen changes color from Red to
Green (see bottom left circle in Figure 3). Additionally, you will see a Red light come on within
the AIM BASE case which indicates that it is receiving power.
Once connected and recognized a message will appear in the Console indicating successful
initialization along with the firmware version (see leftmost circle in Figure 3). At this point the
device may be used to receive transmissions from the AIM XTRA.
2.2.3 Firmware Updates
Warning: Prior to updating the firmware any flight data on the AIM XTRA should be
downloaded and saved. If not done this flight data will be lost during the firmware updating
process.
Firmware updates are included in the software updates you’ve downloaded from an Authorized
Service Center (see sections 7.2 & 2.2.1). When the AIM XTRA software is started the software
opens up on the Control Panel tab. Once you’ve successfully connected the AIM XTRA look for
the Update firmware button in the Firmware update section. In order to perform the update, just
select the Update firmware button (see Figure 8). During this process do not disconnect the
AIM XTRA or you will corrupt the firmware on the device. Note that during the update progress
is reported in the Console screen. Once the update is completed you should see a “Success”
message (note you may need to scroll down the Console screen to fully see the progress and
completion messages).
Similarly, when starting the AIM BASE software it also opens in the Control Panel tab and also
has a section labeled Firmware update. Select the Update firmware button to perform the
firmware update (see Figure 3). During this process do not disconnect the AIM BASE or you will
corrupt the firmware on the device. Note that during the update progress is reported in the
Console screen. Once the update is completed you should see a “Success” message (note you
may need to scroll down the Console screen to fully see the progress and completion
messages).
2.3 Battery Power
Figure 1 shows the standard setup for the AIM XTRA device. The AIM XTRA features a dual
power system, allowing you to have separate batteries for the flight computer and the ejections.
This can be bypassed by simply connecting the two positive terminals together with a short wire.
A single battery is not recommended unless you are not using ejections with the AIM XTRA, or
you are using a battery with a high current discharge capability. The left pair of terminal blocks
are for the computer and the adjacent pair for the pyro/ejection batteries. Note that the terminal
blocks are designed to accept 18 gauge or smaller wires.
8AIM XTRA/BASE v2.0 Manual Installation
2.3.1 Computer Battery
The input voltage range for the AIM XTRA computer is from 3.5 volts to 8.4 volts inclusive. It is
recommended that either a single cell LiPo, a two cell LiPo, or a two cell LiFePo4 battery be
used as a power source. Because the AIM XTRA is designed to work with single cell LiPo
batteries, it is not recommended to use 9 volt batteries. The AIM XTRA has to convert the
excess voltage to heat, which could cause reliability issues. However, if there is a desire to run
off of 9 volt batteries, a single high current LED (or ~22 Ohm resistor) in series with the positive
terminal will provide enough of a voltage drop to ensure trouble free operation. The minimum
capacity for the computer battery is 200 mAh (approximately one and a half hours of use). The
recommended capacity is 1,000 mAh or larger.
2.3.2 Ejection Battery
The ejection battery should be chosen appropriately based on your igniter/e-match current
requirements. The ejection battery voltage should not exceed 10 volts.
2.3.3 Single Battery
A single battery can be used to power both the computer and for firing the ejections. This should
only be done when the battery can supply enough current such that the voltage does not drop
while the ejections are being fired. A high discharge LiPo battery is recommended.
2.4 Igniters/e-Matches
The four terminal block pairs on the right of the two power terminal block pairs may be used for
igniters/e-matches. Wire your igniters/e-matches as shown in Figure 1Error! Reference source
not found.. Please ensure that your igniters/e-matches do not draw more than 40 amps as an
absolute maximum, and that they do not short out after being fired. If these precautions are not
followed, the transistor switches might be damaged. Note that the terminal blocks are designed
to accept 18 gauge or smaller wires.
2.5 Board Placement
There are four mounting holes that accept standard M3 sized bolts, with enough room for
spacers. Because the board has components on both sides, it is recommended that spacers be
used to create a gap between the board and the mounting plate. The board should be placed
vertically (z axis – see Figure 1) inside the rocket, with the transmitting antenna either pointing
upwards or downwards. The ideal alignment is for the antenna to face towards the tail of the
rocket. If the antenna is facing upwards in your rocket, the firmware includes an auto-detection
feature that will automatically correct the acceleration readings accounting for the inversion.
Furthermore in order to obtain the most accurate readings from the altimeter you should adhere
to the following recommendations:
The mounting plate material should be transparent to radio frequencies which
eliminates the use of metal or carbon fiber materials.
The supports for the mounting plates should not be metallic in order to avoid GPS
reception issues.
The AIM XTRA should be aligned with the vehicle’s z axis to provide the most
accurate vertical acceleration readings.
The mounting plate should be positioned so that the AIM XTRA’s axis is centered on
the vehicle’s Z axis in order to give the most accurate lateral acceleration and gyro
rotational values.
9AIM XTRA/BASE v2.0 Manual Installation
The avionics bay containing the AIM XTRA should be transparent to radio
frequencies.
The AIM XTRA transceiver and GPS antennas should not be located near any RF
oblique materials or other sensitive circuitry.
2.6 Static Port(s)
Unless you choose not to use barometric sensor data for your flight make sure to include a
static port(s) so that external pressures may be sensed by the device.
During flight the pressure within the avionics bay must rapidly equalize with the external
atmospheric pressure in order to provide an accurate altitude reading. As the volume of the
avionics bay changes the volume of air flow required for pressure equalization changes
proportionally. Assuming that pressure equalization should occur within the same time period
regardless of volume (in order to maintain reading accuracy) then the area of the hole(s)
needed for pressure equalization must be directly proportional to the volume of the chamber
where the altimeter is located. We have determined that the following equation accurately
models the size of the static port hole(s) required for accurate barometric sensor readings:
( ) √
Where d is the diameter of the hole, n is the number of holes, k is a constant, dt is the diameter
of the body tube and l is the length of the chamber. We have found that a value for k of 500mm
(19.68498in) works well with the AIM XTRA. For best results we recommend n be greater than
or equal to three (3) and that the static ports be placed equidistant around the perimeter of the
avionics bay. A derivation of the static port diameter calculation can be obtained from Entacore.
2.7 Data Transmission/Reception
By default the AIM XTRA transceiver is configured not to transmit to allow it to be sold without
requiring the purchaser to possess a radio license. Based on local laws you may be required to
obtain a radio license in order to operate the AIM XTRA as a RF transmitting device. The user
may activate/deactivate the transceiver by checking/unchecking the “RF Transmitter on”
checkbox (see rightmost circle in Figure 2). Once the RF transceiver is activated you should
also enter your HAM Callsign so that your transmissions are prefixed with this designator as
required by the communications agencies of many countries for amateur radio communications.
When settings are changed in the XTRA software they are not automatically saved to the AIM
XTRA unit. Once you have adjusted the settings to the desired values you must select the
“Write Settings” button in order to have them saved to the AIM XTRA unit. The Console will
indicate if your settings have been written successfully to the AIM XTRA unit.
10AIM XTRA/BASE v2.0 Manual Installation
Figure 2: Turning on the RF Transmitter
2.7.1 Channel Selection
The channel allows you to choose from a set of unique channels for your radio link (see Table
1). Only transmissions matching the channel set in the AIM BASE software will be received (see
rightmost circle in Figure 3). You can change the transmission channel for the AIM XTRA on the
settings tab (see rightmost circle in Figure 2).
Channel Frequency (MHz)
0 432.000
1 432.200
2 432.400
3 432.600
4 432.800
5 433.000
6 433.200
7 433.400
8 433.600
9 433.800
10 434.000
11 434.200
12 434.400
13 434.600
14 434.800
15 435.000
Table 1: Channel/Frequency Map
11AIM XTRA/BASE v2.0 Manual Installation
Figure 3: AIM BASE Control Panel
2.7.2 Data Rate
You can change the rate at which data is transmitted to the AIM BASE (future implementation).
Lower data rates increase the reliability of your transmission. If you change this setting on the
AIM XTRA, you also have to select the same data rate on the AIM BASE software.
The AIM BASE Control Panel tab and Console both contain RF status sections (see rectangle
boxes in Figure 3). In these sections the transmission data rate is displayed in bits per sec (bps)
along with Frequency error (difference between transmitter and receiver frequencies) in hertz
(Hz) and a Recent packet graphic which is Green if a data packet is received gradually turning
to Red over time if data packets are not received. Provided the Frequency error is between -400
Hz and 400 Hz you should not have any reception issues.
2.7.3 Reception
For the best reception the AIM BASE should be raised as high as possible off the ground. The
recommended minimum height above the ground is 3 meters (9 feet). The AIM BASE
supporting structure should not be made out of a RF oblique material and the AIM BASE
antenna should not be adjacent to the structure but rather projecting above it. A USB extension
cable can be used to connect the AIM BASE to your computer in the field.
2.8 External Inputs
All four ejection lines can be used as input lines if configured as such in the AIM XTRA software
(see Figure 4). Simply connect the positive sensor output to the negative terminal on the
appropriate AIM XTRA line and the negative sensor output to either the Comp or Pyro
negative terminal. The inputs are protected against over-voltage (maximum of 12 volts), but
will only display values from 0 up to ≈3.3 volts. If your input is not within this range, you can use
a resistive potential divider. Inputs cannot be negative as this will damage the device. Again,
note that these terminal blocks are designed to accept 18 gauge or smaller wires.
12AIM XTRA/BASE v2.0 Manual Installation
Figure 4: XTRA Ejection Line Settings
13AIM XTRA/BASE v2.0 Manual Preparing for Launch
3 Preparing for Launch
3.1 Configuration
In order to configure the AIM XTRA for flight you will need to connect it to your computer
running the AIM XTRA software as described in section 2.2.2. Similarly you will need to do the
same when configuring the AIM BASE. Note that if an item is greyed out it is unavailable in the
current system configuration or the feature is unavailable at this time.
3.1.1 XTRA Tools Menu
The Settings menu item under the Tools Menu is used to select the GPS coordinates format
and the unit system displayed within the XTRA application (see pop-up window in Figure 5). The
options are to display GPS coordinates in one of the following formats: decimal degrees;
degrees, minutes, seconds; or degrees and decimal minutes (default). The unit options are
either metric or imperial.
Figure 5: Settings Pop-up Window
3.1.2 XTRA Settings Tab
This area of the interface is where all the AIM XTRA settings may be viewed and adjusted (see
Figure 6). Whenever the AIM XTRA unit is connected to the AIM XTRA software the unit’s
current settings are read and stored into the software. There are three buttons at the bottom of
the Settings tab: Read Settings, Write Settings, and Reset Settings. Read Settings will read
the configuration of the AIM XTRA unit and adjust the software to reflect those values. If you
make any changes to the settings in the software they will not take effect until you select the
Write Settings button which stores the configuration on to the AIM XTRA unit. Finally the Reset
Settings button resets the AIM XTRA unit to the factory settings. The Console will reflect the
status of the Read, Write, and Reset processes.
14AIM XTRA/BASE v2.0 Manual Preparing for Launch
Figure 6: XTRA General Settings
3.1.2.1 General
There are four sections within this tab: Power, Kalman filter, Transmitter and Flash memory (see
Figure 6).
Power Section
The Power section is used to control battery usage and contains two check boxes:
Auto shutdown after landing – when checked shuts the altimeter off upon landing
Low voltage cut-off after landing – when checked monitors the computer battery and
shuts the altimeter off when the cut-off voltage is reached.
The spinner control labeled Cut-off voltage allows you to set the voltage at which the altimeter
will shut down provided that the Low voltage cut-off after landing is checked. Note that this
setting should be used to protect your LiPo batteries. The recommended settings are as follows:
For a 7.4v LiPo – 6.0v or higher
For a 3.7v LiPo - 3.5v (the voltage must not fall below 3.4v for the altimeter to operate
so to preserve the data collected and allowing for a margin of error this value is the
minimum permitted)
Allowing a LiPo battery to discharge below 3.0v per cell will damage the battery so when using
LiPo’s use of the cut off voltage controls is strongly recommended.
Kalman Filter Section
This section is used to control altimeter computations and is comprised of two check boxes:
Ignore pressure sensor on ascent – if checked the barometric sensor data is not used
in the computation of variables such as altitude during ascent. This setting is used if your
avionics bay is totally enclosed during ascent (e.g., no static ports).
Ignore pressure sensor on descent – if checked the barometric sensor data is not used
in the computation of variables such as altitude during descent. This setting is used if
your avionics bay is totally enclosed during descent (e.g., no static ports).
15AIM XTRA/BASE v2.0 Manual Preparing for Launch
Transmitter Section
This section is used to configure RF transmissions and is comprised of one checkbox: RF
Transmitter on. If checked the unit will transmit the data it is capturing. In addition, there is a
text box entitled HAM Callsign. The text placed in this box is sent with each transmission in
order to be compliant with communication agency requirements. This is where you would enter
your unique identification code provided to you by your local government agency for amateur
radio communications. The Channel spinner control allows you to select the channel you wish
to use for your transmission. Acceptable values are 0 to 15 (see Table 1). The Data Rate
spinner control is currently unavailable but will be used to specify the rate at which data is
transmitted from the XTRA to the BASE unit.
Flash Memory Section
This section is to control data recording and is comprised of one checkbox: Write to flash.
When checked all data collected by the altimeter is stored in flash memory. If you do not check
this box no data will be stored internally in memory, hence, no data will be able to be viewed or
downloaded from the altimeter.
3.1.2.2 Ejection Lines
Under this tab are sets of spinner controls used to configure each output/input line. Since the
options for all four lines are identical we will only cover one set of these controls (see Figure 4).
The Mode spinner control consists of the following seven options:
Disabled – When selected the line is non-functional. All other spinner controls are
unavailable.
Input – When selected the line is configured to accept data from an external source via
the associated negative terminal. The acceptable voltage range is between 0v and 3.3v.
Negative voltages will damage the unit. All other spinner controls are unavailable.
Time – When selected the line will act as an output line and fire the specified amount of
time after launch. When selected the following spinner controls are also available: Time,
On Time and Time Delay.
Peak velocity – When selected the line will act as an output line and fire when the
velocity of the rocket begins to decrease after launch. This will occur near or after motor
burnout so is used for staging or air starting. When selected the following spinner
controls are also available: On Time and Time Delay.
Climb altitude - When selected the line will act as an output line and fire when the
altitude of the rocket reaches the specified altitude prior to apogee. This can be used to
eject a boost glider or ejecting parachutes at a specific altitude in competitions. When
selected the following spinner controls are also available: Altitude, On Time and Time
Delay.
Apogee – When selected the line will act as an output line and fire when the rocket
reaches apogee. Typically, this setting is used to eject a drogue chute in dual deploy or
main parachutes in single deploy recovery systems. When selected the following spinner
controls are also available: On Time and Time Delay.
Altitude after apogee - When selected the line will act as an output line and fire when the
altitude of the rocket reaches the specified altitude following apogee. Typically, this
setting is used to eject a main parachute in dual deploy recovery systems. When
selected the following spinner controls are also available: Altitude, On Time and Time
Delay.
16AIM XTRA/BASE v2.0 Manual Preparing for Launch
The Time spinner is used to set a time following the launch at which the output line will activate.
The Altitude spinner specifies the above ground level (AGL) altitude (metric units only) at which
the output line will activate. Note that whether this occurs before or after apogee is dependent
upon the Mode spinner.
The On Time spinner specifies the duration for which the output line is active. Unless testing of
your igniters/e-matches has demonstrated otherwise it is recommended that a setting of two
seconds or longer be used. Note that since a long time duration may be specified this setting
can be used to operate motors, servos or other devices.
The Time Delay spinner specifies the amount of time to wait after the Mode spinner setting has
been reached before activating the output line.
3.1.2.3 Sampling Intervals
This tab is broken up into two sections: Flash write intervals and RF Transmit priorities (see
Figure 7).
Figure 7: XTRA Sampling Intervals Settings
Flash Write Intervals Section
This section is divided into two subsections: Core write intervals and Write multiples.
Core Write Intervals Subsection
This subsection consists of 15 drop down list boxes each of which specifies the frequency in
milliseconds at which sensor data is written to flash memory for the following data items: GPS
position, Vertical acceleration (Z axis), Lateral acceleration (X & Y axes), Gyro (X, Y & Z axes),
Magnetometer (X, Y & Z axes), Pressure, Temp, Ejection battery voltage, Computer battery
voltage, GPS time, Status (output line continuity), Line A input (and output) voltage, Line B input
(and output) voltage, Line C input (and output) voltage, and Line D input (and output) voltage.
17AIM XTRA/BASE v2.0 Manual Preparing for Launch
Write Multiples Subsection
This subsection consists of four spinner controls each of which specifies a multiplicative factor
used to compute how frequently sensor data is written to flash memory in each of the following
states: Pad (Pre-launch), Pre-apogee, Post-apogee, and Ground (Landing). The spinner values
consist of non-negative integers. While the rocket is in each of the spinner control states the
value of the control is multiplied times the sensor value in the Core Write Intervals subsection.
The resulting number is the frequency at which the sensor data is written. For example if
Vertical acceleration is set to 10ms and Pad is set to 10 then while the rocket is on the Pad this
data is written once every 100ms (10ms*10), if Pre-apogee is set to 1 then the data is written
once every 10ms after launch to apogee, if Post-apogee is set to 5 then the data is written once
every 50ms after apogee to landing, and if Ground is set to 0 then the data is not written at all
after landing.
Note that given the Core Write Interval and the Write Multiples settings the amount of data that
can be stored in flash memory is specified for each state in terms of time.
RF Transmit Priorities Section
This section consists of 15 spinner controls each of which specifies the priority in which sensor
data is transmitted to the BASE unit for the following data items: GPS position, Vertical
acceleration (Z axis), Lateral acceleration (X & Y axes), Gyro (X, Y & Z axes), Magnetometer (X,
Y & Z axes), Pressure, Temp, Ejection battery voltage, Computer battery voltage, GPS time,
Status (output line continuity), Line A input (and output) voltage, Line B input (and output)
voltage, Line C input (and output) voltage, and Line D input (and output) voltage. The highest
priority is 1 which implies that the data will be sent the most often followed by 2, then 3, etc.
Zero means that the data will not be transmitted to the BASE unit. The actual frequency of
transmission will depend on computational activity, signal strength, and data rates (when
implemented) among other factors.
3.2 Operation Verification
Please ensure that you have fully tested the AIM XTRA and also its integration into your rocket.
Although all units are fully tested before shipping, it is essential that you test all aspects of the
device, especially the ability to supply enough current to the igniters/e-matches. You should also
ensure that all settings are correct, even if you didn’t change them yourself. Please also ensure
that the radio link to the AIM BASE is working as expected. You should be able to achieve a link
with both antennas disconnected when the devices are placed within a meter or so (few feet) of
each other (when activated).
3.2.1 XTRA Control Panel Tab
The Control/Diagnostic section in this tab consists of five subsections three of which are used to
verify altimeter operations: High current output lines, Calibration, and Emulation (see Figure 8).
18AIM XTRA/BASE v2.0 Manual Preparing for Launch
Figure 8: XTRA Control Panel
In the High current output lines subsection there is a button for each of the AIM XTRA output
lines. When the AIM XTRA is connected to your computer these buttons are active and may be
selected to test your pyro battery and igniters/e-matches. Just connect an igniter/e-match to the
line(s) you want to test along with your pyro battery to the AIM XTRA then select the button for
the line you want to test. When selected the igniter/e-match should fire if the battery has the
power to initiate ignition. Warning: Igniters/e-matches generate significant amounts of heat and
should be placed on non-flammable surfaces when tested. They should never be placed on the
AIM XTRA unit during testing.
The Calibration subsection is used to adjust the altitude readings from the barometric sensor
data. The altimeter uses Standard Atmospheric table data combined with the barometric sensor
data to compute its altitude. Since atmospheric pressure varies not only with altitude but also
with temperature as well as low and high pressure weather fronts the altitude specification from
the barometric sensor may vary from day to day (or within the same day) as temperature
changes and weather fronts move through an area. Therefore, the Approximate ground
altitude spinner control may be used to set the altitude (if you know what it is) or you may select
the From GPS button to fill the spinner control with the current GPS altitude (you will receive a
warning message if the GPS altitude is not within an internally specified accuracy range – e.g.,
no GPS lock). When the spinner control contains the value you desire (metric units only) select
the Calibrate pressure altitude button to set the interpretation of the current barometric sensor
data to the ground altitude. In order to improve correlation between the barometric sensor and
GPS data it is recommended that you perform this calibration each day prior to launch.
The Emulation subsection allows you to test the operation of the AIM XTRA under simulated
flight conditions. Any previous AIM XTRA flight may be used in the emulation provided that the
flight has been exported into a *.csv file. When the AIM XTRA is connected to your computer
the Emulate launch… button is active. Once selected a pop up window appears which allows
you to select csv file to use for the emulation. Once you have selected the emulation file another
pop up window appears requesting you to specify a file name and location to save the results of
19AIM XTRA/BASE v2.0 Manual Preparing for Launch
your emulation (also in csv format). Finally, a pop up window will appear which asks whether
you would like to perform a real time emulation or not:
Real time: emulation is run in normal time for accurate testing of pyro line firing, etc.
Non-real time: the emulation is accelerated (useful if you just need emulation data).
Once you make your real time selection the emulation will begin. While the emulation is running
you will receive progress messages in the AIM XTRA console. If you desire to discontinue the
emulation prior to completion the Stop emulation button is active and may be selected. Once
completed you may look at your emulation results file to assess the AIM XTRA operation.
Additionally, during the emulation if any the ejection charges were connected they should have
fired. Warning: Igniters/e-matches generate significant amounts of heat and should be placed
on non-flammable surfaces when tested. They should never be placed on the AIM XTRA unit
during testing.
3.2.2 Basic System Test
Prior to checking the telemetry link you should validate operation of the AIM XTRA.
3.2.2.1 AIM XTRA
Run the AIM XTRA software and connect the AIM XTRA hardware to your computer (note that
the Comp battery should not be connected or turned off). Verify that the XTRA is configured as
you have set it (the values are read from the AIM XTRA when it is attached to your computer).
Once verified select the Live Data tab (see Figure 9). Under this tab are five subtabs each of
which depicts graphs of different AIM XTRA sensor data. When examining the data in each
graph you should move/rotate the device to see the values changing. The AIM XTRA is marked
with X, Y (perpendicular to the board), and Z axes to assist in this verification (see Figure 1). It
is imperative that all sensor data is checked as sensor failure will result in incorrect operation.
Figure 9: Altitude & Acceleration Live Data
20AIM XTRA/BASE v2.0 Manual Preparing for Launch
Altitude & Acceleration Subtab
The two graphs available on this tab are MSL Altitude and Acceleration. The MSL altitude
shows the altitude above sea level (meters or feet) while the Acceleration graph depicts the
accelerations along the X, Y, and Z axes in G’s (see Figure 9).
Gyro & Magneto Subtab
The two graphs available on this tab are Gyro and Magneto. The Gyro graph depicts rotations
around the X, Y, and Z axes in degrees/sec while the Magneto graph portrays the magnetic field
variations around the X, Y and Z axes measured in Tesla’s (see Figure 10).
Figure 10: Gyro & Magneto Live Data
Inputs & Power Subtab
The two graphs available on this tab are Inputs and Battery Voltages. The Inputs graph shows
the voltage values of each of the four input/output lines while the Battery Voltages graph
describes the voltages for the Computer and the Ejection batteries (see Figure 11).
21AIM XTRA/BASE v2.0 Manual Preparing for Launch
Figure 11: Inputs & Power Live Data
Pressure & Temperature Subtab
The two graphs available on this tab are Temperature and Pressure (see Figure 12). The
Temperature graph represents the measured temperature (in degrees C or F) while the
Pressure graphs displays the barometric pressure (in kPa or inHg).
Figure 12: Pressure & Temperature Live Data
GPS Subtab
This subtab is different in that it presents a number of specific data values (see Figure 13):
GPS Time: Time reported by the GPS satellites
22AIM XTRA/BASE v2.0 Manual Preparing for Launch
Satellites used in solution: The number of satellites detected by the AIM XTRA
GPS fix: Type of GPS solution available which should be “3D solution”
Lat: The AIM XTRA’s current latitude
Long: The AIM XTRA’s current longitude
MSL Altitude: The AIM XTRA’s current altitude
Figure 13: GPS Live Data
Below these values an image of the Earth will appear (the software automatically connects to
Google Earth) if you are connected to the internet or have previously loaded a Google Earth file
for your location (Google Earth must be loaded on your computer to support this function see
section 2.2.1). Otherwise, an X/Y graph will appear with the X axis aligned with east and west
while the Y axis will be aligned with north and south. Along the right side of the image is a
vertical Green bar which graphically depicts the quality of the GPS satellite locks. Finally, there
is a Focus on target button which when selected zooms the image onto The AIM XTRA’s
current location (see Figure 14).
23AIM XTRA/BASE v2.0 Manual Preparing for Launch
Figure 14: GPS Focused on Target
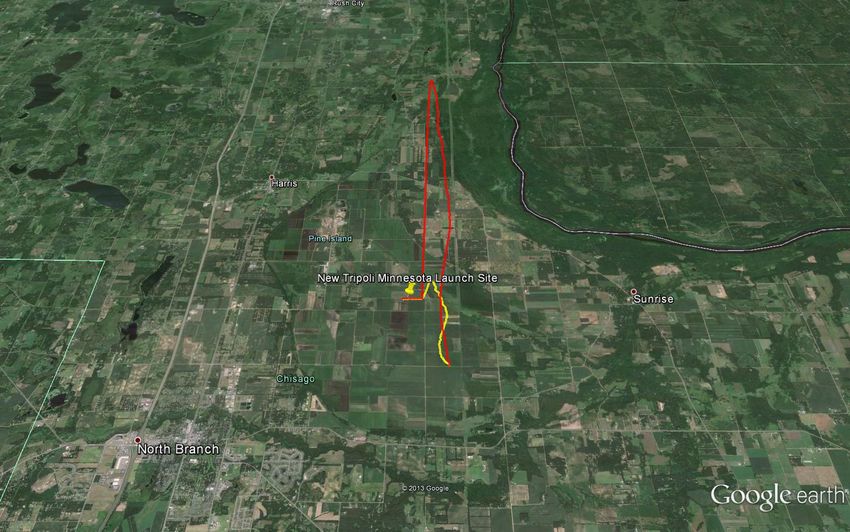
A push pin marks the current position of the AIM XTRA on the map while a Red line
marks the flight path and a line marks the projection of the flight path over the ground.
3.2.2.2 AIM BASE
Start the AIM BASE software, connect the quarter wave antenna to the AIM BASE, and then
connect the AIM BASE receiver to your computer/laptop. You will be able to tell that the AIM
BASE has successfully connected to the AIM BASE software if the USB symbol in the Console
section of the screen changes color from Red to Green (see bottom left circle in Figure 3).
Additionally, you will see a Red light come on within the AIM BASE case which indicates that it
is receiving power. Additionally, a pop up window will appear asking for the name of a file and
location to store the data collected from the AIM XTRA. Finally, make sure that the Channel
setting is identical to the AIM XTRA Channel setting. The AIM BASE will not receive any data
unless you have activated the AIM XTRA RF Transmitter (see section 3.1.2.1).
3.2.2.3 AIM XTRA/BASE System
To test that the AIM XTRA/BASE system is working together correctly connect one of the helical
antennas and the main computer battery to the AIM XTRA (with no ejection explosives
attached) then turn it on. The device will beep twice: once to indicate power up and the second
time to indicate that it has run through its pre-launch checks (see section 4.1.3). In order to
ensure that you lock onto a sufficient number of GPS satellites conduct this test with the AIM
XTRA outside in the open free from obstructions. The AIM BASE should now be receiving a
steady stream of data which will be displayed in the AIM BASE software.
With two minor differences the AIM BASE graphs are identical to those described for the AIM
XTRA (see section 3.2.2.1). The exceptions are in the Altitude & Vertical Acceleration and the
RSSI & Lateral Acceleration tabs.
Altitude & Vertical Acceleration Tab
The Vertical Acceleration (Z) graph only depicts the Z axis acceleration (see Figure 15).
24AIM XTRA/BASE v2.0 Manual Preparing for Launch
Figure 15: BASE Altitude & Vertical Acceleration
RSSI & Lateral Acceleration Tab
This tab does not exist in the XTRA software. It contains two graphs (see Figure 16). The
Lateral Acceleration (X/Y) graph is similar to the XTRA Acceleration graph except that it only
depicts the X & Y accelerations. The Received Signal Strength Indicator (RSSI) graph has no
corresponding equivalent in the XTRA software since it does not receive RF signals. The graph
depicts the strength of the RF signal received in decibels (dBm).
Look at the BASE graphs and move/rotate the XTRA to make sure that the received data is
reasonable. The GPS location should also be accurate to within at least 20m (once more than
four satellites are locked).
Once you have confirmed that the BASE is operating as designed you can exit the BASE
software application and disconnect the BASE unit from your computer. You can then turn off
the XTRA unit and connect it to your computer. Once connected select the Download Data tab,
then select the Download Flights button. When the flights are downloaded they appear in the
flights section and you may now select the test in the Flights section. When you select a flight
you have the option of loading the test data into the AIM XTRA software (see section 5.1). Once
loaded, make sure all the data is reasonable.
25You can also read