AL13 Panel System Installation Guide
←
→
Page content transcription
If your browser does not render page correctly, please read the page content below
AL13®
Panel System
Installation
Guide

                                    ®

Patented

get more info at al13.com/patents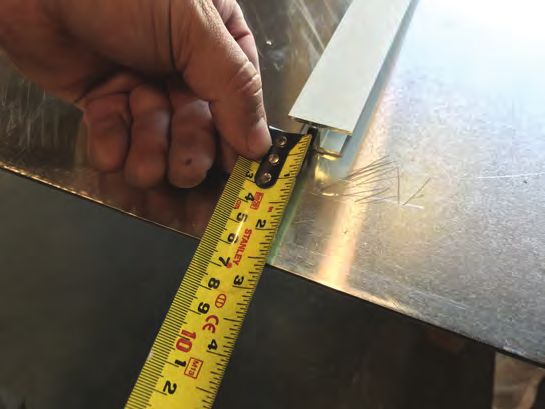
01
Installation
Guidelines 1

IMPORTANT: Failure to follow the guidelines herein will void the AL13® warranty

Please read and understand this guide. Any questions or inconsistencies should be directed to info@al13.ca

Guidelines may vary depending on project particulars and conditions. Contact AL13® with
questions regarding variance from this guide. Standard carpentry skills are required for optimum results. Good
health and safety practices must be followed when installing AL13® ACM System.
Please refer to the AL13® Material Safety Data Sheets for more info.

Key steps for a successful installation

01 Understand the various elements of the system
02 Plan the installation, work schedule, layout, and material usage
03 Ensure everyone working has read the installation guidelines
04 Execute work in the sequence set forth in the installation guidelines
05 Protection should be worn; gloves, ear protection, steel toe boots, safety glasses and hard hat
06 Protect the product by storing the material in a dry and clean environment

Pre-installation: Receiving materials

When materials arrive on site, ensure that all panels, extrusions and other component packaging are in good condition,
free of any defects, and verify that the materials match the order / shop drawings.

> Shipping or packaging issues should be noted on the waybill and then reported to the distributor.

>
    within 24 hours of receiving product.

> Defective materials should be reported to the distributor from which the product was dispatched from.

                                                                                                                         P01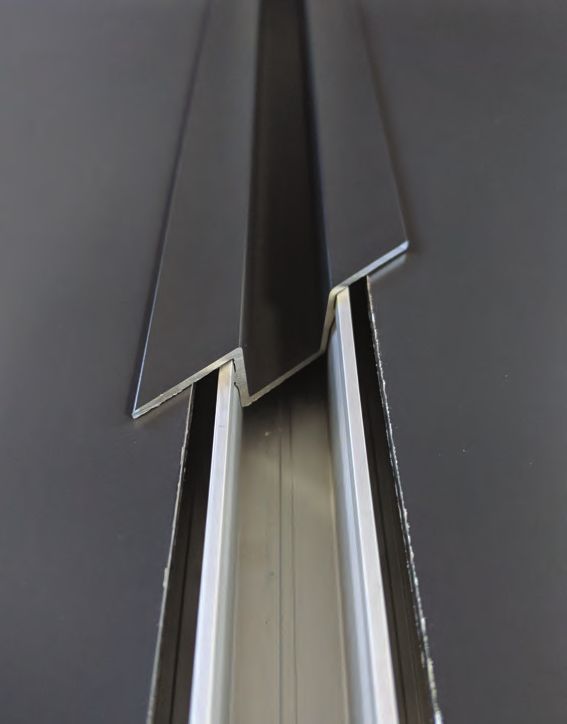
01
Installation
Guidelines 2
Product Legend: This installation guide will discuss various components of the system and use component reference blocks.
Please refer to the following to verify the correct component.

    Component                                                Size / piece           Material

                                                             4’ x 8’ sheet          AAMA 2605 coated
                 3mm ACM Panel
                                                                                    with PE core or
                                                                                    FR core

                                                                                    AAMA 2605 coated
                 4mm ACM Panel                               4’ x 8’ sheet
                                                                                    with PE core or
                                                                                    FR core

                  End Frame                                  8’ length              AAMA 2605
                                                                                    coated aluminum
                                                                                    extrusion

                 Inside Corner                               8’ length              AAMA 2605
                                                                                    coated aluminum
                                                                                    extrusion

                 Outside Corner                              8’ length              AAMA 2605
                                                                                    coated aluminum
                                                                                    extrusion

                 Half Back Plate                             8’ length             Anodized aluminum
                                                                                   extrusion

                 Full Back Plate                             8’ length             Anodized aluminum
                                                                                   extrusion

                 Reveal Cap                                                        AAMA 2605
                                                             8’ length
                                                                                   coated aluminum
                                                                                   extrusion

                 Perimeter Reveal Cap
                                                             8’ length              AAMA 2605
                                                                                    coated aluminum
                                                                                    extrusion

                 Flat Cap
                                                                 8’ length         AAMA 2605
                                                                                   coated aluminum
                                                                                   extrusion

                                                                                                                            P02
01
Installation
Guidelines 3
Component Size / piece Material
Perimeter Flat Cap 8’ length AAMA 2605 coated
with PE core or
FR core
I-Beam 8’ length Aluminum Extrusion
4mm Panel box (100) Fiberglass
System Clip reinforced
plastic
3mm Panel box (100) Fiberglass
System Clip reinforced
plastic
Wood 500/package Wood Substrate: #
Fastener 12 – 14 x 1 ½” mini
1-1/2” long
drill-point fasteners
with EPDM washers and
corrosion-resistant coating
Concrete 100/package Concrete Walls:
Fastener 1-1/4” long #11 x 1 ¼” concrete screw
anchor with
corrosion-resistant coating.
Metal 500/package Steel Substrate:
Fastener 3/4” long #10-16 x ¾” self-drilling,
self-tapping screws with
corrosion-resistant coating
Suction
Cup each coated aluminum
P0301
Installation
Guidelines 4
Component Size / piece Material
80T
Non ferrous 10 ” - each carbide tip /
Saw Blade high-speed steel
60T
Non ferrous 6-1/4” - each carbide tip /
Saw Blade high-speed steel
AL13® each rubber / lyca
Gloves
Flat each plastic and rubber
SLED
Reveal
each plastic and rubber
SLED
AL13® 108’ roll AL13® double sided
Tape acrylic adhesive tape
P0401
Installation
Guidelines 5
Inventory
materials - panel, extrusion, fasteners, and adhesive tape - and quantities are present.
Material handling
AL13® ACM System panels are shipped on pallets in 50 sheets (or less). The sheets are secured in place with metal
strapping and covered with protective wrap. Panels should be kept in their original packaging or similar and moved by a
forklift or pallet jack.
Once a pallet is unwrapped and metal straps are cut, panels may be moved individually. Ensure to use clean work gloves
DO NOT DRAG OR SLIDE panels.
Store all materials in a clean and dry environment, both before and after materials are unpacked.
Wear gloves when handling materials, and use suction cups when mounting panels to wall. Ensure to wear eye and ear
protection when cutting materials. Always wear approriate personal protective equipment.
Tools
Our Panel System is made to be installed with general tools, a recommended tool list is as follows:
> Sawhorses/work table > Jigsaw
> Circular saw, handheld with guide > File (for de-burring cut sheets)
> Table saw > Level/plumb line
> Cordless electric impact with > Chalk line
appropriate bits > Cordless electric drill
> AL13® saw blades > Drill bit set
> AL13® SLED tool
> AL13® suction cups
P0501
Installation
Guidelines 6
Panel layout
It is important to commence work with good construction practice and schedule work with other trades to avoid delays.
Once installation begins it must not be delayed for any length of time as damage may occur to the system, substrate
or both due to exposure to the elements. Before any installation begins, it is imperative to plan the layout of the system.
The architectural plans/elevations should be reviewed to determine the appropriate ‘grid’ for the system. Should no such
plans be available, measure areas to develop a pattern that will maximize panel size, aesthetics and minimize fabrication.
Standard panel size is 4’ x 8’
(1220mm x 2440mm). Do not use these
dimensions for determining layout lines,
1 5/16” approx. panel dimension
adequate space must be left between
VERTICAL JOINT
layout dimension panels for extrusions.
Material use
Once the layout has been determined, double check that there is an adequate amount of materials present for the
application at hand. Since estimation takeoffs and quantities are based on panel layout, any installation varying from the
original plan may affect quantities and cause material shortages. Make sure to check the cut plan to determine if this will
result in any further shortages. When calculating material usage, note that vertical extrusions - in most cases - will carry
through continuously, while the horizontals tuck and terminate under the tabs of the verticals.
P06AL13® Panel
System.
AL13
Architectural
Systems
®
Full Back Plate
3.25" backplates installed
16" on center.
Structural Framing
note: if install on girt,
segmenting is not
necessary
Panel
System
Clip
Reveal Cap
Membrane
ACM Panel
I-Beam
Flat Cap
The backplates and various caps use *
an interference fit and require an
impact to engage the two
components. Ensure that the
substrate is solid enough to sustain
this impact.
P0702
Panel Install 01
Example wall
The building envelope, which includes
weather barrier and all applicable
illustrated above in its completed form.
The subsequent sections will building code before any AL13®
outline more intricate details like inside component is to be laid-out or installed.
corners, outside corners, windows,
doors, overhangs and build-outs.
(Please be sure to have read the
P0802
Panel Install 02
IMPORTANT!
Laying out the grid Sucessful install relies on a properly built
and preppared substrate - substrate
flatness is especially critical.
Using the chosen layout, determine
the best suited datum - or starting
point - shown here as the lower left
corner. Lay out the panel grid using
chalk lines (or similar) from the datum
point, ensuring that all lines are plumb
and level. These lines are to indicate
the locations of the extruded frame
components that will secure and frame
the ACM panel.
P0902
Panel Install 03
Fasten vertical perimeter extrusions
End Frame
End Frame
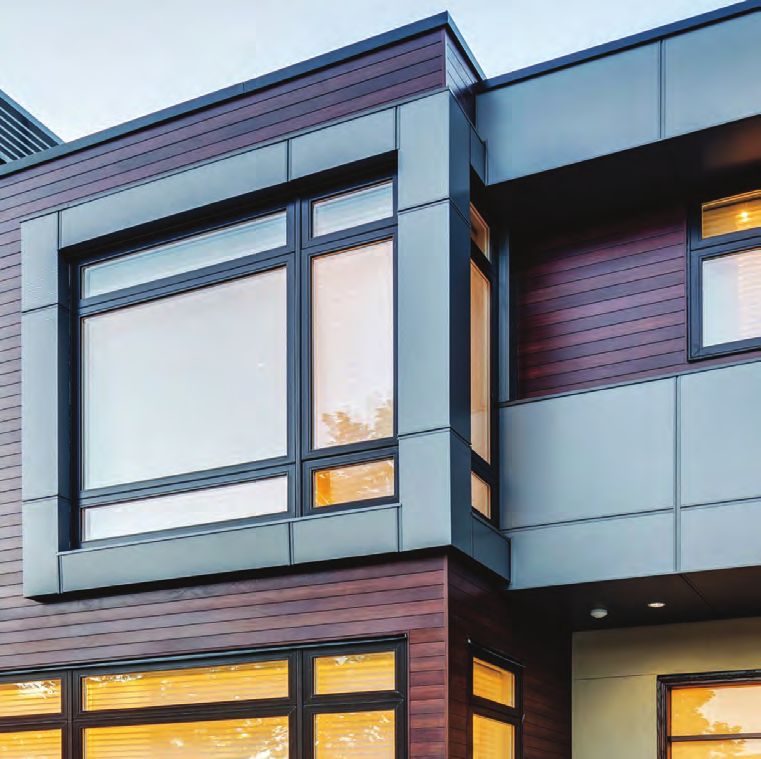
Measure and cut the vertical End It is the preferred method to fasten the *An Outside Corner Frame,
Frames according to the marked grid Inside Corner Frame, or a
lines. If the top of the vertical End then the bottom (lower 3”), followed by Perimeter Frame Assembly may
Frame is to meet another horizontal all fasteners in between. Typical Fastener be used in place of the End
End Frame at 90 degrees, a 45-degree spacing on all extrusions with the 4mm Frame in this situation. The
mitre cut is to be made on both parts ACM Panel system is to be no greater End Frame is shown here only
to complete the angle. This will than 24” with a minimum of 2 fasteners to keep the scope of this guide
eliminate the need to notch extrusions. per extrusion. Fastener spacing may be relatively simple.
decreased, to add additional pull out
back plate and perimeter cap, the capacity. Consult the product
45-degree mitre is not necessary, as specifications to determine fastener
the horizontal cap will tuck behind the type and spacing.
vertical end frames. P1002
Panel Install 04
Fasten top horizontal extrusion
End Frame
intersection
The upper End Frame is next to be If one length of the End Frame
measured and cut-to-size. A double extrusion is not long enough to span the
mitre could be required if the vertical distance required, it is necessary to
End Frames are mitered at 45-degrees use a second piece and butt the two
(as outlined in the previous step). together. Take care in aligning joints
so that
P1102
Panel Install 05
Fasten baseline extrusion backplates
Half Back Plate
Segmented 3.25" pieces,
at 16" on center
intersection
note: if install on girt,
segmenting is not
necessary
AL13’s Panel System is a rain The bottom row is comprised of
screen system that does not require segmented half back plate
any strapping. sections, cut to a length of 3.2” and
installed every 16”. This ensures that,
at any given horizontal cutaway, only
20% of the material is attached to the
wall to an 80% open cavity. This
provides neccessary capillary break
P1202
Panel Install 06
Fasten baseline extrusion
Reveal Cap
Measure and cut the bottom Engage the top cap into the
segmented back plates using an
ensure that either end may be tucked AL13® SLED with a rubber mallet. It
into the vertical endframes, leaving a is imperitive to only make contact
minimum 1/8” gap to allow for proper where back plates are present so as
contraction and expansion of the not to damage or warp the top cap.
extrusion.
P1302
Panel Install 07
Fasten vertical back plate
Full Back Plate
Measure and cut the vertical full back
plate. Allow for approximately 2” gap
from horizontal upper and lower
extrusions to allow for proper top cap
installation. Begin by fastening the top
followed by the bottom (lower 3”),
then the intermediate fasteners.
P1402
Panel Install 08
Fasten horizontal full back plate segments
Full Back Plate
Segmented, 3.25"
installed on 16" centers.
note: if install on girt,
segmenting is not
necessary
Measure and cut horizontal back It is important to install the segments
plates in 3.25” segments and install ensuring they are completely plumb
them every 16” as per the layout. and straight. A Level or straight edge
If you are fastening to a minimum of may be used to assist with alignment.
½” ply or OSB sheeting, it is not
necessary to fasten segments to a
stud. It is reccomended to pre-drill the
holes in the segmented back plate
pieces. This will prevent the small
pieces from spinning while fastening
- which aides in eliminating the
possibility of a cut hazzard.
P1502
Panel Install 09
Attach system clips
Panel
System
Clip
Once all extrusions have been Sytem clips are to be attached at a System clips are intendeded to be a
installed it is time to attach system minimum every 16”, or 1 system clip
clips to all the extruded frame per tab on the smaller segmented attempts pulling the clip off and
components. Systems clips act as horizontal pieces. Position system snapping it back on may weaken the
spacers and are installed with the clips 6-8” away from corners and integrity of a clip. Once a clip has been
thin tab pointing towards the wall intersections. snapped in place, it should not be
and the thicker portion facing away repeatedly taken off an snapped
from the wall. System clips keep the back on. If any clip is found to have
panels tight to the frame without the been weakened through repetitive use,
need for adjusment. it should be discarded and a new one
P1602
Panel Install 10
I-beam installation (optional)
Standard 4’ x 8’ sheet
2.5”
2.5”
12” 12”
Center line
Cut sheet
2.5”
2.5”
I-beams may be used in conjunction Step 1 Step 3 - Apply double sided adhesive
with the panels to provide Appropriate sizing should be offset the full length of the narrow leg of the
additional panel rigidity. from either edge of the panel 2 1/2". I-beam. Remove the protective backing
Full 4’x8’ panels will require 2 and carefully attach to the cleaned
I-beams set back 12" from center. back side of the panel. Once set in
Panels 6' or below only require 1 position, apply pressure along the length
I-beam, running in the narrow of the Ibeam to ensure even full contact
direction, at the center of the panel. with the back side of the panel.
Step 2 - Ensure both of the surfaces
are free of dirt, debris or contaminates
to ensure full adhesion. For best
performance it is suggested to clean
both surfaces using Isopopyl Alcohol,
which is free of solvents and will not
P1702
Panel Install 11
IMPORTANT!
It’s ciritcal AL13® Panels are not cut too
small relative to their frame components.
Only a max 1/8 inch gap is allowed
around the perimeter of the Panel.
ACM Panel
workflow
The ACM Panel may need to be cut * Suction cups are recommended
down if a smaller size from the may be taken off the stack. Make for installing panels as they allow
standard 4’ x 8’ (1220 x 2440 mm) is sure not to drag sheets across, for much greater grip and free your
required. This may be done on a rather lift the sheet up off the stack, hands from a potential pinch hazard.
standard circular saw, panel saw or then away. Although the panels have
table saw - so long as an AL13® blade Step 1 - position panel on its long
is used. Use a guide to ensure cuts factory, reckless panel handling may edge, lift it up and place in position.
are straight and clean. cause damage to panel through the
wrap. It is recommended that at least
account for approximately a 1/8” two persons carry one sheet. The Step 2 - shift the panel towards
gap on all sides to allow for expansion the wall.
and contraction of the metal. approximately 1” (25 mm) from the
edges, but should remain on the panel Step 3
otherwise. Gloves should be worn to slide it under the tab of the vertical
keep panel clean and to protect hands End Frame.
from sharp edges. P1802
Panel Install 12
IMPORTANT!
Install reveal cap and lock into place with AL13® sled Make sure Top Caps are fully engaged.
Hammer the AL13® SLED firmly to
engage with Back Plate. When
backplate is segmented only hammer on
top on the Back Plate segments.
Reveal Cap
After the ACM Panel has been shifted Once the top cap is cut to the
into the correct position you must appropriate length, it may be engaged
securely fasten it in place with a top with a rubber mallet and the AL13®
cap. The top cap is the second part SLED. Where a horizontal top cap
of the two-part Panel Frame Assembly intersects a vertical End Frame, it
which is snapped into place with a should slide under the tab of the End
rubber mallet and the AL13® SLED. Frame. Be cautious to only impact the
top cap where a back plate is present
to prevent any deformation of the frame
components. The horizontal top cap
should sit halfway under the tabs of the
vertical frame components, in the same
manner as the panel. Therefore, the
horizontal top cap may be cut and
positioned to match the panel.
P1902
Panel Install 13
Repeat previous two steps for the next panel
Reveal Cap
Full Back Plate
ACM Panel
repeat previous steps for remaining
P2002
Panel Install 14
install top two panels
The top two panels in a column must Step 1 - Install lower panel and hold
be installed simultaneously. Since the
top of the wall terminates under the
Step 2 - Slide upper panel upwards
horizontal End Frame, it would be
under the tab of the horizontal End
impossible to place the upper panel
Frame.
if the below top cap was already
secured. Step 3 - Slide the panel underneath
the vertical End Frame.
P2102
Panel Install 15
Lock top panels into place with the top cap
After the ACM Panels have been
shifted into the correct position, the
horizontal top cap will secure the
panels in place. Once the top cap is
cut to the appropriate length, it
place, with each end under the tabs
of the horizontal End Frames. Once
in the correct position it is to be
hammered into place with a rubber
mallet and AL13® SLED.
P2202
Panel Install 16
Repeat for the other side and lock into place
repeat previous steps for remaining
panels on the top row.
P2302
Panel Install 17
IMPORTANT!
Install vertical top cap and lock into place It is critical when two Top Caps meet the
joint should take place on the same
Back Plate, and at least 6 inches away
fom any intersection.
Reveal Cap
Once two adjacent columns of panels If one length of the top cap extrusion
have been installed, the top cap may is not long enough to span the
be installed. Once the top cap is cut distance required, it is necessary to
to the appropriate length it should be use a second piece and butt the two
together. Take care in aligning butt-
with each end under the tabs of the joints so that they share the same
horizontal End Frames. Once in the back plate. Do not butt two top caps
correct position it is to be hammered at an intersection, where no back
into place with a rubber mallet and plate is present.
AL13® SLED.
P2402
Panel Install 18
Wall installation is complete
P2502
Panel Install 19
Finishing and inspection
Once the install is complete, work
from the top down to remove the once install in complete.
protective plastic film and clean the
panels as required. Take note of any
installation flaws and ensure all top
caps are fully hammered into place.
P2602
Panel Install 20
Further situations
This General Install guide is intended to show the best practices for a basic install and how the various components work
together. It is outside the scope of this manual and impossible to anticipate & outline every installation situation that may
be encountered. In order to present the install in the most clear and direct manner, there are a few standard situations
that are not covered in this guide. These situations are shown in detail in the following Drawings section, however the
below guide will describe how they would install relative to this guide.
Component
Generally installed in a vertical or horizontal orientation and is used to terminate
End Frame
the wall system or butt/transition to another wall surface. May be used to butt
up to the frames of windows, doors or any other protrusions and recesses in
the wall surface.
Inside Corner Generally installed in a vertical orientation and is used to transition the wall
system across a 90° inside corner. May be installed in the same sequence and
manner as the Vertical End Frame.
Generally installed in a vertical orientation and is used to transition the wall
Outside Corner
system across a 90° outside corner. May be installed in the same sequence
and manner as the Vertical End Frame.
Flat Cap This extrusion is installed both horizontally and vertically. It is generally installed between
adjacent panels to connect them. Mates with Half or Full Backplate.
Generally installed horizontally or vertically to terminate the panel system on the wall. It
Perimeter Flat Cap is to be used at the bottom-of-wall panel termination if it is visible from the underside. It
can also be used as an alternate to the End Frame or Inside Corner and Outside Corner
Frame extrusions. Mates with Half or Full Backplate.
Reveal Cap This extrusion is installed both horizontally and vertically. It is generally installed between
adjacent panels to connect them. Mates with Half or Full Backplate.
Perimeter Reveal Cap Generally installed horizontally or vertically to terminate the panel system on the wall. It
is to be used at the bottom-of-wall panel termination if it is visible from the underside. It
can also be used as an alternate to the End Frame or Inside Corner and Outside Corner
Frame extrusions. Mates with Half or Full Backplate.
P2702
Panel Install 21
Component
Generally installed in a vertical or horizontal orientation and is used to terminate the panel
Half Back Plate
. Mates with Cap profiles.
Full Back Plate Generally installed in a vertical or horizontal orientation and is used to terminate the panel
. Mates with Cap profiles.
I-beams may be used in conjunction with the ACM panels to provide additional
I-Beam
panel rigidity.
4mm Panel Systems clips act as spacers and are installed every 16” - keeping the panels tight
System Clip
to the frame and away from the wall without the need for adjustment.
3mm Panel Systems clips act as spacers and are installed every 16” - keeping the panels tight
System Clip to the frame and away from the wall without the need for adjustment.
In general, the vertical extrusions carry through and the horizontal extrusions are segmented and tuck under the tab of the
verticals. Please consult AL13®
this installation guide or in the drawing section.
P2803
Fastener
AL13® general installation AL13® panels
Panels are fastened by the frame tabs
For sheathed wood frame, around the entire perimeter. No
AL13® installs directly on building traditional mechanical fasteners are
wrap. The mechanical fasteners required in the panel itself.
anchor into building sheathing and
studs where available.
P2903
Fastener
Typical Fastener Install in sheathing - End Frame Typical Fastener Install in sheathing - Half Backplate
P30You can also read