BksbLIVE Admin User Guide (Rev.2.3) - bksblive.co.uk
←
→
Page content transcription
If your browser does not render page correctly, please read the page content below
bksbLIVE®
Admin User Guide   (Rev.2.3)
bksbLIVE user Guide
Published by
bksb Limited
i2 Centre
Hamilton Court
Hamilton Way
Mansfield
NG18 5FB

www.bksb.co.uk

Copyright © 2014 Vision West Notts College, Mansfield, Nottinghamshire.

Trademarks: bksb and bksbLIVE are registered trademarks of bksb Limited and may not be
used without written permission. All other trademarks are the property of their respective
owners. bksb Limited is not associated with any product or vendor mentioned in this book.

LIMIT OF LIABILITY/DISCLAIMER OF WARRANTY:
THE PUBLISHER AND THE AUTHOR MAKE NO REPRESENTATIONS OR WARRANTIES WITH RESPECT TO THE ACCURACY OR
COMPLETENESS OF THE CONTENTS OF THIS WORK AND SPECIFICALLY DISCLAIM ALL WARRANTIES, INCLUDING WITHOUT
LIMITATION WARRANTIES OF FITNESS FOR A PARTICULAR PURPOSE. NO WARRANTY MAY BE CREATED OR EXTENDED BY
SALES OR PROMOTIONAL MATERIALS. THE ADVICE AND STRATEGIES CONTAINED HEREIN MAY NOT BE SUITABLE FOR
EVERY SITUATION. THIS WORK IS SUPPLIED WITH THE UNDERSTANDING THAT THE PUBLISHER IS NOT ENGAGED IN
RENDERING LEGAL, ACCOUNTING, OR OTHER PROFESSIONAL SERVICES. IF PROFESSIONAL ASSISTANCE IS REQUIRED, THE
SERVICES OF A COMPETENT PROFESSIONAL PERSON SHOULD BE SOUGHT. NEITHER THE PUBLISHER NOR THE AUTHOR
SHALL BE LIABLE FOR DAMAGES ARISING HEREFROM. THE FACT THAT AN ORGANIZATION OR WEBSITE IS REFERRED TO IN
THIS WORK AS A CITATION AND/OR A POTENTIAL SOURCE OF FURTHER INFORMATION DOES NOT MEAN THAT THE
AUTHOR OR THE PUBLISHER ENDORSES THE INFORMATION THE ORGANIZATION OR WEBSITE MAY PROVIDE OR
RECOMMENDATIONS IT MAY MAKE. FURTHER, READERS SHOULD BE AWARE THAT INTERNET WEBSITES LISTED IN THIS
WORK MAY HAVE CHANGED OR DISAPPEARED BETWEEN WHEN THIS WORK WAS WRITTEN AND WHEN IT IS READ.

For general enquiries, sales or technical support, please telephone 01623 413333.
bksbLIVE User Guide       Copyright © 2013 Vision West Notts College                  Support: 01623 413333

Contents

                Creating a desktop shortcut/Add bksbLIVE to your favourites. ...... 3
                Logging in to bksbLIVE for the first time (as an Admin/Tutor) ........ 4
                Overview of the Admin page ........................................................... 6
                    Settings Tab .............................................................................. 6
                            Username term ............................................................ 7
                            Show Initial/Diagnostic retake links ............................. 7
                            Allow a tutor to create students .................................. 7
                            Allow tutor to create groups ........................................ 7
                            Allow tutor to add students to groups ......................... 7
                            Additional Details ......................................................... 7
                    Courses Tab .............................................................................. 9
                            Configure default courses for all NEW students .......... 9
                    User Permissions Tab ............................................................. 11
                            Changing user permissions......................................... 11
                    Add User Tab .......................................................................... 12
                            Step 1 – Add user details ............................................ 12
                               First name field ....................................................... 12
                               Last name field ....................................................... 13
                               Email field ............................................................... 13
                               Password field ........................................................ 13
                               Email login details to the learner field ................... 13
                               Date of birth field ................................................... 13
                               User type field ........................................................ 13
                               Additional details field(s) ....................................... 14
                            Step 2 – Configure course .......................................... 14
                            Step 3 – Add user to a group ...................................... 15
                    Add Group Tab ....................................................................... 17
                            Group ID field ............................................................. 17
                            Description field ......................................................... 17
                            Additional details field(s) ........................................... 17
                            Add this group to ‘My Groups’ checkbox ................... 18
                            Add students to a group ............................................. 18
                            Make this group private ............................................. 19
                    Manage Groups Tab ............................................................... 20
                            Searching for a group ................................................. 21
                            Advanced group search .............................................. 21
                            Make a group private ................................................. 22
                            Add a tutor to a group ................................................ 22
                            Remove a tutor from a group .................................... 23
                            Edit a group’s details .................................................. 23
                            Delete (remove) a group ............................................ 23

                                                        [1]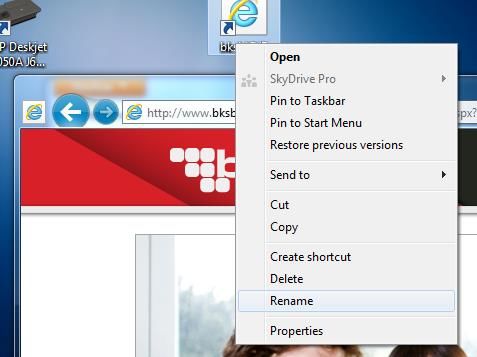
bksbLIVE User Guide      Copyright © 2013 Vision West Notts College                   Support: 01623 413333

                  Databridge Tab ....................................................................... 24
                         Databridge installer .................................................... 24
                         Databridge status indicator ........................................ 25
                         Webservice status ...................................................... 25
                         Databridge URL........................................................... 25
                         Databridge password ................................................. 25
                         Pull learners ................................................................ 25
                         Push results ................................................................ 26
                         Synchronise groups on login ...................................... 26
                         Technical contacts ...................................................... 26
                         Webservice upload errors .......................................... 26
                  Mass Upload Tab .................................................................... 27
                         Mass upload procedure ............................................. 27
                  Archive Tab ............................................................................. 31
                         Create a NEW archive group ...................................... 31
                         Archiving a user(s) ...................................................... 32
                                   Method 1 ........................................................ 33
                                   Method 2 ........................................................ 33
                         Restoring an archived user(s) ..................................... 35
                                   Method 1 ........................................................ 35
                                   Method 2 ........................................................ 35
                         Add a whole user group to an archive ....................... 36
                         Creating a named archive from an existing group ..... 37
                         Rename an archive group .......................................... 39
                         Delete (remove) an archive group ............................. 39

                                                    [2]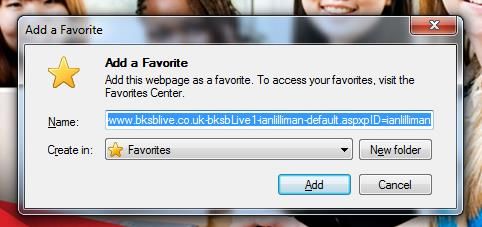
bksbLIVE User Guide   Copyright © 2013 Vision West Notts College   Support: 01623 413333

Creating a desktop shortcut/add bksbLIVE to your favourites
     To make it easy for you to access the bksbLIVE assessment platform, it is advised you
     create a desktop shortcut or browser favourite/bookmark.

     To create a desktop shortcut (using Internet Explorer) – type the web address
     provided into the address bar of your web browser and press return on the keyboard
     to load the bksbLIVE log-in page. Next, click on the   icon to the left of the ‘http’ in
     the address bar with your mouse and drag it onto your desktop. Finally, right-click on
     the newly-created desktop icon, select ‘Rename’ from the drop-down menu and
     rename the shortcut to something like ‘bksbLIVE’.

     To add the log-in page to your web browser favourites – If using Internet Explorer as
     your preferred web browser, press Ctrl+D on your keyboard to launch the ‘Add a
     Favourite’ dialog box. Then simply amend the ‘Name’ field to suit your needs (such
     as ‘bksbLIVE’) and click the ‘Add’ button.

                                               The web address will now be saved to your
                                               favourites and is accessible via the relevant
                                               option in your browser.

                                               Note that the Apple Safari and Mozilla Firefox
                                               web browsers also support the Ctrl+D
                                               keyboard shortcut. Other web browsers may
                                               have alternative methods to saving a website
                                               to your favourites. Refer to the manual or
                                               on-line help for your particular web browser.

                                             [3]
bksbLIVE User Guide       Copyright © 2013 Vision West Notts College          Support: 01623 413333

Understanding user Permissions
      When a user account is created, the user can be configured as an Administrator or
      Tutor or Student, or can be a combination of these such as Admin/Student, or
      Tutor/Student or the user can be all three. By default, all users of bksbLIVE have
      student access. Note that throughout this manual, the terms user, learner or
      student are interchangeable as any user of the bksbLIVE system is automatically
      granted student/learner access.

Logging-in to bksbLIVE as an Administrator or Tutor (for the first time)
      Step 1 - To log-in to bksbLIVE
      First open a web browser and in the address bar, type the web address supplied to
      you.

      Ensure that you use the correct web address assigned to you. Using a search engine to access a
      bksbLIVE log-in page will be fruitless as your user account details will only apply to your specific
      account.

      Step 2 - Log-in to your account
      On the log-in page, you will see two fields; in the
      left field, type your username, reference or
      student ID supplied to you. Note that this field is
      NOT case sensitive, therefore you can use upper
      or lower case characters. In the password field,
      type the password supplied to you. Please note
      that the password IS case sensitive.

      Step 3 - Confirm your account
      A dialog box will appear asking you to confirm this is your account. If the details are
      correct, select the ‘CONFIRM’ button. If the account is not yours, then select the link
      ‘This is not my account’ and check your log-in details are correct.

                                                     [4]
bksbLIVE User Guide   Copyright © 2013 Vision West Notts College   Support: 01623 413333

  Step 4 – Change your password
  If the tick box ‘User must change
  password on first login’ was ticked
  when the account was originally
  created then, after confirming your
  account, another dialog box may
  appear asking you to change your
  password. The ‘old’ password was the
  one just used to log-in using Step 2 above. After completing all fields, click the
  ‘Change Password’ button.

  Step 5 - Register your e-mail address
  bksbLIVE incorporates a password and username recovery system should you forget
  your log-in details. It is highly recommended you enter an e-mail address as this will
  enable you to recover your log-in details without having to contact bksb support (or
  administrator if another administrator has been created for your account).

  If, when your account was created, an e-mail address was NOT entered into the
  password field, you will be given the option to add an e-mail address at this stage. To
  register an e-mail address, type an e-mail address into the email field and click the
  ‘Save email address’ button.

  If you do not wish to provide an e-mail address, select the hyperlink ‘click here’ to
  skip this section.

  If you choose not to enter an e-mail address, a final dialog box will appear warning
  you that you have chosen not to enter an e-mail address. To continue, select the ’OK’
  button or select the ‘Cancel’ button if you would prefer to go back and enter an e-
  mail address.

  A user can enter or amend their e-mail address at any time by clicking the ‘View
  Profile’ button on their student home page.

                                          [5]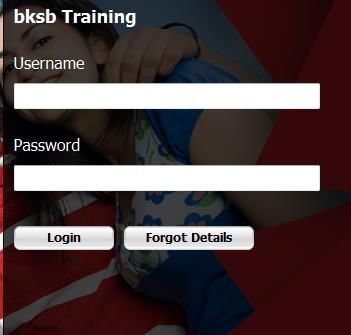
bksbLIVE User Guide        Copyright © 2013 Vision West Notts College       Support: 01623 413333

Overview of Admin page
      Upon logging-in, you will be presented with your
      student home page. Note that in order to access the
      administrator or tutor pages, you will need to access
      the relevant mode. To do this, simply hover your
      mouse over your name in the top-right corner of the
      screen and a drop-down menu should appear. If the
      menu contains other options (such as ‘Admin’ or
      ‘Tutor’), then these options are accessible to you. If
      they are not displayed, then you do not have the
      relevant permissions. In this instance, click on the word ‘Admin’ in the menu and the
      page will refresh to show the Admin page.

      Along the upper part of the screen, you will notice a row of 9 tabs.

Settings Tab
      Under General Settings, you are presented with 6 options as follows:
          1. User Name Term – The User Name Term is the UNIQUE identifier for all of the
             users of the bksbLIVE system, be they administrators, tutors or students. The
             bksbLIVE system permits this term to be changed to tailor it to your
             organisation. For example, you may change it to say ‘Reference’ or ‘Student
             ID’.

               Log-in set to ‘Username’            Log-in set to ‘Student ID’

                                                   Note that throughout this manual, the terms
                                                   ‘Username’ and ‘Reference’ are interchangeable and
                                                   should be considered as referring to the UNIQUE
                                                   identifier for each user of your bksbLIVE account.
               Log-in set to ‘Reference’

                                                   [6]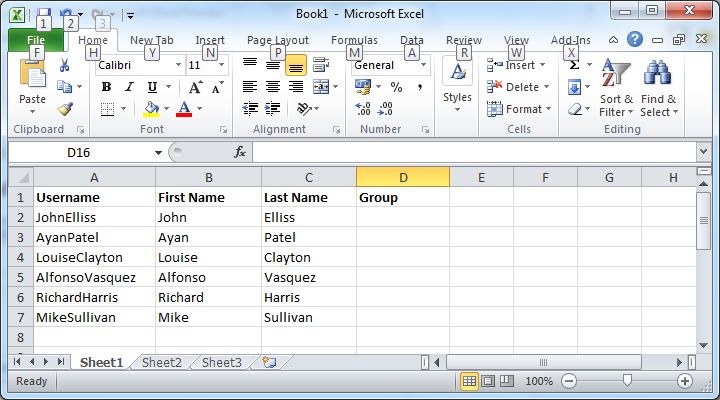
bksbLIVE User Guide   Copyright © 2013 Vision West Notts College   Support: 01623 413333

          To change the User Name Term, simply change the text in the field and click
          the ‘update’ button.

      2. Show Initial/Diagnostic Retake Links – When set to YES, all users can retake
         the Initial and Diagnostic Assessments multiple times. When set to NO, all
         users are permitted to take the Initial and Diagnostic Assessments once only.
         Note that this action is global across all users.

      3. Allow Tutors to create Students - When set to YES, all tutors are authorised
         to create student accounts. When set to NO, the ‘Add Students’ tab is
         disabled and hidden from view, preventing tutors from creating Student
         accounts.

          This feature is useful if you want to ensure that each student is given a unique
          identifier by the administrator ONLY, thus removing any opportunities for
          Tutors to input incorrect learner data. Also, if you have linked your bksbLIVE
          account to your Management Information Systems (MIS), then it may also be
          appropriate to set this radio button to NO to prevent tutors adding students
          ‘on-the-fly’ and creating erroneous data within your account.

      4. Allow Tutors to create Groups - When set to YES, any tutors are authorised to
         create their own Groups. When set to NO, the ‘Add Groups’ tab is disabled
         and hidden from view, preventing Tutors from creating Groups.

      5. Allow Tutors to add Students to Groups - When set to YES, any tutors are
         authorised to add students to groups. When set to NO, tutors are not
         permitted to add students to groups; only administrators would add students
         to groups.

      6. Additional Details
         The Additional Details section comprises 2 extra tabs. These tabs allow the
         administrator to add additional information (or ’tags’) which can be useful for
         account management purposes. The tag can either be assigned as a ‘user’ tag
         or a ‘group’ tag. Once a tag has been created, you will be able to populate the
         tag and search for information within it. For example, if you are a single
         organisation with a bksbLIVE account which is shared with many
         geographically-dispersed training centres, it would be very useful to have the
         ability to search for all users at a particular site. In this example, you could
         therefore create a tag called ‘Centre Location’. If the tag was a ‘user’ tag,
         then, during account activation for a user, you would add the usual username,
         first name/last name, etc. but then in the ‘Additional Information’ section
         would appear an extra field; the one you have created and named ‘Centre
         Location’. Into this field you would type the relevant site information such as
         ‘Manchester’ or ‘London’. If this action is repeated for all users as their
         accounts are created, then you are able to use this tag as additional criteria
         when searching for users within your bksbLIVE system. Similarly, you are able
         to opt to create a ‘group’ tag, enabling you to search for all groups in the
         system that match a particular search criterion.

                                          [7]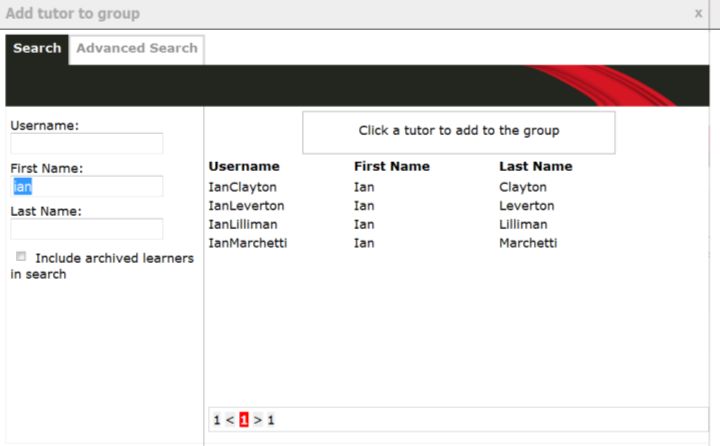
bksbLIVE User Guide    Copyright © 2013 Vision West Notts College   Support: 01623 413333

          Creating a user tag – By default, the ‘User Tags’ tab is highlighted. To create a
          new tag, select the button ‘Add Tags’.

          In the field called ‘Tag Name’, type a name and select the ‘Create Tag’ button.
          Do not use apostrophes or the ampersand (&) symbol.
          A new entry will now appear under the tag name you have chosen.

          Note that access to the tag information is
          dependent on the type of tag created. For
          example, a group tag only appears when
          you are adding or reviewing groups.
          Similarly, a user tag only appears when you are adding/reviewing user
          information. In the screenshot (right) we can see an extra field is now
          available called ‘Centre Location’ into which you can type additional
          information, i.e. London or Manchester, etc.

          Creating a group tag – This process is similar
          to the one already explained for user tags. To
          create a new tag, select the ‘Group Tags’ tab,
          then select the button ‘Add Tags’. In the field
          called ‘Tag Name’, type a name and select the
          ‘Create Tag’ button. Do not use apostrophes
          or the ampersand (&) symbol. A new entry will now appear under the tag
          name you have chosen.

          Editing a Tag
          If you wish to edit the tag, select the magnifying glass icon or ‘Edit Tag’
          hyperlink and edit the tag as necessary.

          Deleting a Tag
          If you wish to delete a tag, select the red ‘X Remove Tag’ hyperlink.

                                           [8]
bksbLIVE User Guide Copyright © 2013 Vision West Notts College Support: 01623 413333
Courses Tab
From the Courses tab, you are able to configure what is termed the DEFAULT course.
Think of the DEFAULT course as the course which all NEW learners will be
automatically directed to take. Note that later in this manual, you will learn how to
modify the subject levels of an individual’s account. This section deals just with the
configuration of the DEFAULT courses for all NEW learners.
IMPORTANT
Should you decide to purchase licences for additional bksb software, bksb has no way
to identify who should have access to the new software, therefore any NEW licensed
software is automatically added to the list of available courses but Auto Enrol is set
to OFF. This leaves the administrator free to manually add the new software to the
DEFAULT course by simply selecting the Auto Enrol to ON for that software.
Where NEW software is only required by a selection of your cohort of students, a
person with tutor access can log-in, search for a specific student, then manually
configure just their specific account with the new software. See Section C (bksbLIVE
Account Management), to learn how to edit an INDIVIDUAL student’s course.
When a customer purchases a licence for the WHOLE bksb process for ENGLISH or
MATHEMATICS (which would comprise of a) Initial Assessment [IA]; b) Diagnostic
Assessment [DA]; c) Learning Resources [LR]; d) Skill Checks [SC] and e) Functional
Skills Scenarios [FSS]), the courses are defined simply as Maths Plus (2013) or English
Plus (2013). If you require variations of this course (i.e. just IA, or DA+LR, etc.),
please contact bksb to have your courses modified.
Under normal circumstances, there would be no need to amend this course.
However, should you wish to change the DEFAULT course for NEW students to
comprise selected elements of the English or maths courses, the system provides the
capacity to tailor the DEFAULT courses to suit your needs.
Changing the Default Course
In the screenshot below, a customer has purchased a licence for the whole bksb
process for English and maths, and hence ‘English Plus (2013)’ and ‘Maths Plus
(2013)’ are set as the default courses for all NEW students (identified as the ONLY
courses in the list with Auto Enrol set to ON.
However, if your account has been configured with other course variations, or
additional products, these will be displayed in this section and you will be able to
select/deselect the Auto Enrol radio buttons to toggle these additional courses ON or
OFF as necessary. Remember, this section deals ONLY with the configuration of the
[9]bksbLIVE User Guide Copyright © 2013 Vision West Notts College Support: 01623 413333
DEFAULT courses for all NEW learners. Changes do not affect EXISTING learners (as
they may have had their courses manually configured).
Examples of course variations available (same rules apply to maths).
English Plus (2013) – Comprises English Initial Assessment, English Diagnostic
Assessment, English Learning Resources, English Skill Checks and English Functional
Skills Scenarios.
English (2013) – Comprises English Initial Assessment, English Diagnostic Assessment,
English Learning Resources and English Skill Checks.
English IA Only (2013)
Comprises just the English Initial Assessment.
English IA, Diag (2013)
Comprises the English Initial and Diagnostic Assessment.
English IA, Diag, Res (2013)
Comprises the English Initial and Diagnostic Assessments plus the English Learning
Resources.
English IA, Diag, SkillChecks (2013)
Comprises the English Initial and Diagnostic Assessment plus the English Skill Checks.
English Diag Only (2013)
Comprises just the English Diagnostic Assessment.
English Diag, Res (2013)
Comprises the English Diagnostic Assessment plus the English Learning Resources.
English Diag, SkillChecks (2013)
Comprises the English Diagnostic Assessment plus the English Skill Checks.
VERY IMPORTANT
When setting the DEFAULT courses, ensure you DO NOT SET OVERLAPPING
COURSES. For example, in the screenshot below, you will see that all of the
courses have been set to Auto Enrol. This is incorrect!
RIGHT
WRONG
WRONG
WRONG
WRONG
WRONG
WRONG
WRONG
Overlapping courses WILL cause your account to display multiple courses to your
students and generate confusion as to which course they should take. Remember to
only assign the course with the relevant COMBINATION of elements to meet your
needs.
[10]bksbLIVE User Guide Copyright © 2013 Vision West Notts College Support: 01623 413333
User Permissions Tab
As the name suggests, in this section, you can change the permissions for any user
within your bksbLIVE account. As ALL users of your bksbLIVE account, by default,
have student access, the only remaining option is for the user to be configured as a
tutor or administrator, or both.
Normally, the user’s permissions are set up during their bksbLIVE account activation
(see next topic – ‘Add users’ – for more information). Occasionally however, it is
necessary to change a user’s account after it has been activated.
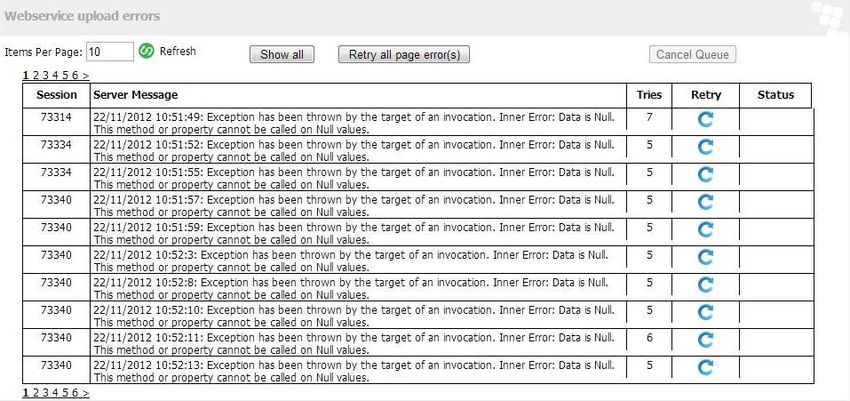
In the screenshot (above), you will see that, after selectiing the ‘User Permissions’ tab, you
are presented with the Unified Search system. This will default to the ‘All Results’ tab and
show all users (both current AND archived) in the system (in alphabetical order).
The additional tabs Learners | Tutors | Administrators | Archived can be used to isolate a
particular group of users. Alternatively, you can use the search field to search for a particlar
user.
Changing user Permissions
If it becomes necessary to changes a user’s permissions, simply search for the user
using the ‘Search’ tab – note you can also use the ‘Advanced Search’ tab to search
for any user ‘tags you may have created. You can search for a full or part-name as the
system will identify all matches to your search criteria. Where an open padlock
symbol is displayed, this is a CURRENT user. Where a closed padlock symbol is
displayed, the user has been locked in the archive by an administrator.
Once the user has been identified, below the columns titled Tutor and Admin, you
will see either a red cross (signifying they DO NOT have that level of access) or a
green tick (indicating that they DO have that level of access). To change a user’s
permissions, simply click on the red cross or green tick to change it from one state to
the other. The change is usually immediate and saved automatically. A user’s
permissions can be changed as often as you wish.
[11]bksbLIVE User Guide Copyright © 2013 Vision West Notts College Support: 01623 413333
Add Users Tab
From the ‘Add users’ tab, an administrator can add new students, tutors or
additional administrators. Note that this form is a replica of the one used by tutors
for creating student accounts, hence the reference to ‘Create Student’ in the black
horizontal bar. Remember, when an account is created, they automatically gain the
student level of access, regardless of any other permissions you may have designated
that user.
(A)
(B)
(C)
(D)
(E)
(F)
(G)
(H)
(I)
(J)
b
Adding a new user to your bksbLIVE account comprises a 3-step process requiring
Step 1) user details, Step 2) subject assignment and Step 3) group assignment.
Before adding a new user, you may wish to first read the next section titled ‘Add
Group’ tab which will explain how to add a user to a group (as the option to a
add a user to a group will appear in step 3).
(A) Username – This is the single most important piece of information when
creating an account and it is vital that each student, tutor or administrator is
given a UNIQUE identifier to ensure data integrity. Also, dependent upon your
company data protection policies, to maintain compliance with the Data
Protection Act (where a company must take all reasonable steps to ensure
privacy of data), it may be necessary to assign a random code or other
reference, rather than simply entering the student’s name and date of birth.
(B) First Name – Enter the First Name with no apostrophes, accent marks or other
unusual characters (e.g. Amélie should be written Amelie without the accent).
Note that hyphenated first names (such as Ella-Rose) ARE permissible.
Apostrophes, accents and other non-alphanumeric characters in names can
cause issues when running reports.
[12]bksbLIVE User Guide Copyright © 2013 Vision West Notts College Support: 01623 413333
(C) Last Name – Enter the Last Name, with no apostrophes, accent marks or other
unusual characters. (O’Sullivan should be written as OSullivan without the
apostrophe. Note that hyphenated surnames (such as Carter-Brown) ARE
permissible. Apostrophes, accents and other non-alphanumeric characters in
names can cause issues when running reports.
(D) Email – Adding an e-mail address here serves two purposes.
Typing an e-mail address here allows the student to be able to recover
their log-in details should they forget them.
If, during the account activation, you have entered an e-mail address and
also ticked the box titled ‘Email login details to the learner’, an email
containing their log-in details and web address to access the bksbLIVE
account will be dispatched to the student upon completion of account
activation. A student can add an e-mail address later if necessary via their
student home page after logging-in.
(E) Password – By default, if this field is left blank AND the tick box titled ‘user
must change password at next login’ is ticked, then the user is given the
generic password of ‘password’ (all lower case) and will be prompted to change
it on first log-in. However, if you decide to give each user the same password,
enter the password AND un-tick the box titled ‘user must change password at
next login’. Please note that passwords are CASE SENSITIVE and should
comprise only of alpha-numeric characters such as A-Z; a-z or 0-9.
(F) Email login details to the learner – If, during account activation, you have
entered an e-mail address and ticked the box titled ‘Email login details to the
learner’, an email with log-in details will be sent to the user upon completion of
account activation.
(G) D.O.B. – This field is optional. If no date of birth is entered, it will default to
01-01-1900 (when the account is viewed by an administrator or tutor) but show
‘NA’ to the student on their home page.
(H) User Type – When creating a user account, this can be left in its default setting
as ‘Student’. However, if you are creating a tutor account or administrator
account, simply tick the relevant box to provide that level of access.
Note that if you are a small organisation, it may be appropriate to give tutor
access to your administrator as some features of bksbLIVE, such as reports,
are only available when logged in as a tutor.
[13]bksbLIVE User Guide Copyright © 2013 Vision West Notts College Support: 01623 413333
Note also that when adding a set of tutors, followed by students and
administrators, the system may remember the previous setting. For example,
in a scenario where you have just added several tutors and are about to add
several students, ensure you un-tick the tutor box to ensure you do not
inadvertently give tutor access to those students. If you do give someone the
wrong access rights, it can be easily corrected via the ‘Permissions’ tab when
logged in as an administrator.
(I) Additional Details – In this section, you may see additional fields. Although it is
not compulsory for these fields to be completed, these will have been created
in order to capture additional user information which may make administration
of your account easier. These extra fields are ‘Tags’, created by the
administrator under the ‘Settings’ tab.
(J) Next button – Click the next button to continue with the user account creation.
As we have only described step 1 of the 3-step process for the ’Add
user’ tab, I will continue with the remaining 2 steps to complete the
process.
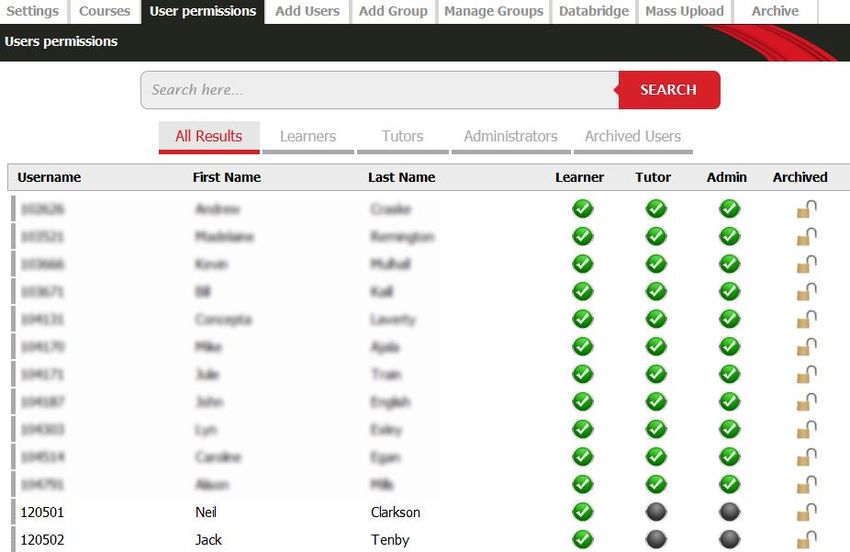
Having entered the user’s details and selected the ‘Next’ button, step 2 of the
process (Select Subjects) is displayed. You are now presented with a screen
spilt into two halves; the right-hand panel (‘Selected Subjects’) shows the
DEFAULT courses assigned to all students, whereas in the left-hand panel
(‘Subject List’) are displayed all the software you have licensed including all
variations of the software.
[14]bksbLIVE User Guide Copyright © 2013 Vision West Notts College Support: 01623 413333
If you are happy with the default course for this user, then select the ‘next’
button in the bottom-right corner of the screen. If, however, you wish to add
another subject to a particular learner’s course, simply scroll through the
available subjects (in the left-hand panel) until you reach the subject you are
looking for.
Next, click on the green + symbol adjacent to the subject; the subject will be
moved over to the right-hand panel and will now appear on the user’s
homepage when they next login.
If you add a subject in error, simply click on the red X symbol to remove that
subject to return back to the left-hand panel.
Should you wish to assign a user a specific course (different to the
default course), the course can be modified by logging in as a tutor,
searching for the user and manually amending their account.
For more information, see Section C – Account Management.
Once you have selected the ‘next’ button in the bottom-right corner of the
screen, a new screen (Step 3 – ‘Select Groups’) will be displayed.
If at this point you have not created any groups, you may skip the next step
and select the ‘done’ button in the bottom-left of the screen.
By default, the ‘My Groups’ tab will be highlighted and any groups that were
added to your ‘My Groups’ (when the group was created) will automatically
appear on the right of the screen.
[15]bksbLIVE User Guide Copyright © 2013 Vision West Notts College Support: 01623 413333
If you do not have any groups assigned to your ‘My Groups’, then no groups
will appear. Therefore, select the ‘Simple Group Search’ tab to reveal a search
field called ‘Group Name’. Type the name of the group into the search field.
You will note that, as you type, options that match your search criteria will
appear. In the example below, I have only typed the letter ‘m’ but the system
has already identified all groups beginning with that letter. Typing more
characters will narrow the search criteria further.
Note that when a large number of groups is displayed, it will only show a
fraction of the total number. Hyperlinks (1, 2, 3, 4 etc.) will appear underneath
the search results to provide access to the remaining groups not displayed.
Once you have the group(s) displayed, you will note that to the right of each
group name is a green + symbol. To add a user to a specific group, click on the
green + symbol and the group’s name will be moved to the lower section of the
screen called ‘Selected Groups’.
Users can belong to more than one group if necessary. Remember,
when a user is removed from a group, they are not lost but merely
removed from that group. The user still exists in the system and may
(if assigned to another group) appear elsewhere in a different group.
Below, you can see that the user has been added to a group called ‘Motor
Vehicle 2012’.
If you make a mistake, simply click on the red X on the far right of the screen.
The group will be removed and returned back to the list of available groups.
Once you have assigned the user to a group(s), select the ‘Done’ button and
you will be returned back to the ‘Add User’ screen. The user’s account is now
created and they can be directed to log in.
The user will always be directed to the student home page on first log-in
(regardless of their account status). Should the user have been assigned tutor
or administrator access, then the user will have to change their status after first
logging in.
[16]bksbLIVE User Guide Copyright © 2013 Vision West Notts College Support: 01623 413333
Add Group Tab
Groups are a vital feature when you need to run reports on groups of learners.
Therefore, before adding users (be they students, tutors or administrators) into
your account, think carefully about what you need to achieve in terms of learning
outcomes and the production of records to show progress and distance travelled.
IMPORTANT
Note that in this section, you are learning to add groups on an individual basis.
However, it is possible to add students and groups en masse using the Mass Upload
tab which is explained later in this guide..
(A)
(B)
(C) (D)
(E)
(A) Group ID – Type your group name here, using only alpha-numeric characters
(A-Z; a-z; 0-9) and ensure that group names do not exceed 50 characters in
length. Do not use apostrophes, the ampersand (&) symbol or accents in
group names (e.g. ‘Ian’s Group’ or ‘C&G Hairdressing’) as this will cause
problems when you try to run reports. In order to create a group, you only
need to complete this field and then you may skip the other parts of the form
and click the ‘next’ button in the bottom-right.
(B) Description – If necessary, type a description of your group here.
(C) Additional Details – In this section, you may see additional fields. Although it is
not compulsory for these fields to be completed, these will have been created
in order to capture additional user information which may make administration
of your account easier. These extra fields are ‘Tags’, created by the
[17]bksbLIVE User Guide Copyright © 2013 Vision West Notts College Support: 01623 413333
administrator under the ‘Settings’ tab, top-left of the screen.
(D) Add this Group to ‘My Groups’ – My Groups are similar in concept to the
favourites in your internet web browser. If you have responsibility for a
number of groups, it is very easy to add any group to your personal ‘My
groups’, then, when running reports, it is very easy for you to locate and run
reports on those groups of most interest to you.
Before discussing the tick box titled ‘Make this Group private’, I will
continue with the process of creating a group and adding learners to
the group.
After adding, a group name and possibly adding a description and selecting the
‘My Groups’ tick box, click on the ‘next’ button in the bottom-right of the
screen. In the next screen, you are now asked to select a student(s) to add to
this newly created group.
If you have NO students currently in the system, or wish to add
students later, simply skip the remainder of this section by selecting
the ‘Done’ button in the bottom-right of the screen. Alternatively, if
you wish to now add students, continue reading below.
Adding Students to a Group
The group is now ready to accept students. If you wish to add a student(s),
simply search for the learner using their Username, First or Last Name.
As you type, you will notice the bottom-right pane changes to reflect the
students found in the search. To quickly show all users, click in either the User
ID, First Name or Last Name fields and press enter on your keyboard.
-
[18]bksbLIVE User Guide Copyright © 2013 Vision West Notts College Support: 01623 413333
Once the student has been identified, select the green + symbol to the right of
the students’ details and they will be removed from the bottom-left pane to
the upper pane, ready to be added to the group.
If you make a mistake, simply click on the red x symbol to remove the student
from the upper-pane and return them back to the lower-right pane. Repeat this
procedure for all students you wish to add to the group and then select the
‘Done’ button in the bottom-right of the screen and a dialogue box will appear
confirming the group creation.
(E) Make this Group private – Under normal circumstances, when creating groups,
you should leave them open to all tutors in case they need access to the learner
data or for running reports. However, there may be occasions where you might
need to keep certain student results private, for example, you may work with
ex-offenders and wish to maintain higher than normal levels of security; you
may be assessing your own tutors as part of a plan to up-skill them and hence
wish to ensure that tutors cannot see other tutors’ results; or you may be
assessing your workforce and wish to keep managerial staff results private. In
these instances, by selecting the tick box titled ’Make this Group Private’, the
administrator restricts access to the group to:
a) ALL administrators, and
b) Any tutors who are given permissions by the administrator to view the
private group.
If you select the tick check box ‘Make this group private…’, a warning box will
pop-up to alert you that unless you also add the group to your ‘My Groups’,
you will not be able to access the private group. Selecting the ‘OK’ button will
automatically enable the check box ‘Add this group to My Groups’.
[19]bksbLIVE User Guide Copyright © 2013 Vision West Notts College Support: 01623 413333
Manage Groups Tab
Under this tab, the administrator can:
Add a tutor to a group (so the tutor has access to that group via their ‘My
Groups’). Also permits access to a group if that group has been set to private.
Remove a tutor from a group (this action removes the group from the tutor’s
‘My Groups’).
Edit a group (such as change the name, edit the group description or delete a
group).
Make a group private.
Upon selecting the ‘Manage Groups’ tab, by default, the ‘My Groups’ tab will be
highlighted and any groups that were added to your ‘My Groups’ (when the group
was created) will automatically appear on the right of the screen. If you do not have
any groups assigned to your ‘My Groups’, then no groups will appear.
By selecting the name of a group, a
window will rise up on the right of the
screen to reveal additional information
and options for that group, including:
Private – whether or not the
group is set to private (Yes/No).
Group Tutors – a list of all
tutors assigned to that group
(First Name/Last
Name/(username))
‘Add Tutor’ button – add
additional tutors to this group
so they can see the student’s results and run reports, etc, even if they have
been made private
‘Edit Group’ button – edit the name of a group, the group description, the
‘Additional details’ section or delete the group (note that deleting a group
DOES NOT delete the learners in that group. They still remain in the system
but are now no longer a member of that particular group).
[20]bksbLIVE User Guide Copyright © 2013 Vision West Notts College Support: 01623 413333
Searching for a group
If the group you seek is not already displayed under the ‘My Groups’ tab, select the
‘Simple Group Search’ tab to reveal a search field called ‘Group Name’. Type the
name of the group into the search field. You will note that as you type, options that
match your search criteria will appear. Typing more characters will narrow the search
criteria further.
If hyperlinks (1, 2, 3, 4, etc.) are displayed at the bottom of the search window, then
this means that your search has found more results than can be displayed on a single
screen. Therefore, you may have to select the hyperlinks to show additional results to
locate the group you seek.
Advanced Group Search
Under the ‘Advanced Group Search’ tab, you can carry out additional searches for
any group tags that may have been added to the account by an administrator. In the
example screenshot below, a group was created to hold the assessment results of
users who were being assessed for recruitment purposes for a particular position.
When the group called ‘Office Manager 12.05’ was created, a group tag (which had
already been created called ‘Vacancies’) was used to add additional information to
this group in the form of a word to describe the nature of the position (in this case
‘Office’). By adding this information in advance to the group, it allows for searches of
any group in the system where the additional information area was tagged with the
word ‘Office’.
So, to carry out a search, select the ‘Advanced Group Search’ tab, type into the field
the word you wish to search for and select the ‘search’ button.. Note that you must
type the full search term correctly in the field. This field does not search for
incomplete search terms.
[21]bksbLIVE User Guide Copyright © 2013 Vision West Notts College Support: 01623 413333
Make a group private
On occasion, it may be necessary
to make a group private, one which
is only visible to administrators and
selected tutors. To do this, simply
select the radio buttons to turn
group privacy ON or OFF.
By making the group private, it
means that all members of the group will be hidden in any search by other tutors.
Tutors added to the’ Group Tutors’ list will have the group added to their ‘My
Groups’ list so they can view the learner’s results.
Add a tutor to a group
To assign a tutor to a group,
search for the group as
described in the previous
sections. Then select the
group name and the settings
panel will rise up on the right
of the screen to reveal
additional information and
options for that group.
Next, select the ‘Add Tutor’ button and a search dialog box will appear. The system
provides many ways to search for the tutor. You can search by Username, First Name
or Last Name. You will note that as you type, results that match your search criteria
will appear. Typing more characters will narrow down the search. If the search does
not bring any results, it may be possible that the tutor’s account has been moved to
the archive.
By selecting the tick box ‘Include
archived learners in search’, the
search will be expanded to any
users within the archive. From the
search results you can add one or
more tutors to a group by selecting
their name(s).
Each time you select a name, you
will be immediately taken back to
the settings panel where the name
of the tutor selected will now
appear. To add another tutor, select the ‘Add Tutor’ button again and you will be
taken back to the search results to repeat the process.
[22]bksbLIVE User Guide Copyright © 2013 Vision West Notts College Support: 01623 413333
Remove a tutor from a group
To remove a tutor from a group, search for the group then select the group. Once the
‘Group Settings’ panel has appeared, click on the grey X to the left of a name in the
list to remove it from the group.
To close the ‘Group Settings’ panel, select the arrow in the top-right of the panel.
Edit a group’s details
To edit a group’s details, search
for the group as discussed
previously and select the ‘Edit
Group’ button.
From this window you can:
Edit the ‘Group Name’ –
edit the name and select
the ‘Update Group’
button. Avoid using
characters such the
ampersand (&) and
apostrophes as this will
cause issues when running reports.
Edit the ‘Group Description’ – edit the text in the group description field and
select the ‘Update Group’ button.
Edit the ‘Additional Details’ section – select the tick box ‘Update Additional
Details’ then edit the relevant field(s). Once the change has been completed,
select the ‘Update Group’ button.
Delete (Remove) a group
To delete a group, search for the group as discussed previously and select the ‘Edit
Group’ button. At the bottom of the pop-up screen, select the ‘Remove Group’
button. A warning dialog box will appear, alerting you that deletion of the group will
not delete any users or their data from the system.
To complete this task, select the ‘OK’ button and the group will be permanently
deleted.
[23]bksbLIVE User Guide Copyright © 2013 Vision West Notts College Support: 01623 413333
Databridge Tab
The bksb Databridge is a small ASP.NET web service (supplied free to bksb licence
holders) that can be installed onto a server within your organisation to provide 2-way
communication between the bksbLIVE server and your organisation. Once a
connection is made between the databridge’s SQL server and your MIS server, you
can:
Pull learners from your MIS system to your bksbLIVE account.
Push learner results back to your server for reporting to your MIS or other
custom applications.
Synchronise group information on each login, ensuring data integrity with all
of your courses.
(A)
(B)
(C)
(D)
(E)
(F)
(G)
(H)
(I)
(J)
(A) Databridge Installer
Before configuring the databridge options, you need to first install the
databridge on your server. To access the installer, select the hyperlink ‘click
here’ to register and download the installer.
For technical assistance, please telephone 01623 627191 x8310 or e-mail
support@bksb.co.uk.
[24]bksbLIVE User Guide Copyright © 2013 Vision West Notts College Support: 01623 413333
(B) Databridge Status Indicator
The Databridge Status Indicator shows the current status of the web service.
When the web service is inactive, it will display a message similar to the one
below.
If the Databridge is active, it will show a message similar to the one below.
The following 7 sections all include a show/hide help link which,
when selected, will drop down and reveal additional
information to assist with the Databridge configuration.
(C) Webservice Status
This turns the databridge ON or OFF. When on, it will show more settings below
which configure what actions the databridge should take when learners log in
or complete assessments.
(D) Databridge URL
The databridge URL is used to define the location of your databridge. The name
of the file bksbLIVE looks for is service1.asmx’.
Example value:
http://databridge.company.com/bksb_databridge/service1.asmx
(E) Databridge password
This password is used for connections to the databridge. Every request sends
this password to your service to authenticate. As well as a password, you can
also limit connections to our server IP range 31.3.240.226 ~ 31.3.240.238
(31.3.240.224/28). A random password can be generated in the Databridge
configuration tool as we don't recommend using passwords that you generally
use for admin accounts and so on.
Example value: any string
(F) Pull learners
When set to ON, if a learner doesn't already exist in the bksbLIVE database, it
will contact the databridge to see if the username exists on your system. If it
does, then the learner will be setup with a default password of ‘password’ and
[25]bksbLIVE User Guide Copyright © 2013 Vision West Notts College Support: 01623 413333
their username, first name, last name, D.O.B. and e-mail details will be pulled
across from your system.
(G) Push results
When set to ON, on completion of an assessment, the result will be sent to, and
stored in, the databridge.
(H) Synchronise groups on login
When set to ON, group information will be synchronised for every user, each
time they log-in to bksbLIVE. Warning: This will override any group
information already in bksbLIVE. Users will be removed from any groups in
bksbLIVE which do not correspond to the information in the databridge.
(I) Technical contacts
Please enter any technical contacts (separated by a comma) that you'd like to
be emailed on the following events:
New update to the Databridge
Result sent to the Databridge has failed to be written (most common
cause would be the Databridge server is down)
Example value: support@company.com; engineer.name@company.com
(J) Web service Upload Errors
Selecting the ‘Show all’ button will show all errors on 1 page
Selecting ‘Retry all page error(s)’ button will resend the failed result to
the web service for every error showing
Selecting the blue circle on an item will retry the result sent for that
particular item
[26]bksbLIVE User Guide Copyright © 2013 Vision West Notts College Support: 01623 413333
Mass Upload Tab
The mass upload feature is a real time-saver when you have a large number of
students, tutors or even administrators to add to your account. By using a (correctly-
formatted) spreadsheet, an administrator can upload users to their account, even
assigning them directly to a group if necessary. The process is very straightforward;
however, it may be practical to create your spreadsheet first before logging in to your
account as this will prevent issues with your account timing out whilst you create the
spreadsheet.
Mass upload procedure
Step 1 - Create a spreadsheet with the column headers as:
Username | First Name | Last Name | Group
(Note that Group is optional).
Step 2 - Enter the data into the relevant columns. Please ensure you only use alpha-
numeric characters (A-Z; a-z; 0-9) and DO NOT insert any apostrophes in any cells,
for example, where a name is Sarah O’Dowd, remove the apostrophe so that the
surname is ODowd. Apostrophes will not prevent the activation of an account but
may cause issues when running reports.
Step 3 - Highlight ALL the data in your spreadsheet (except any headers) and COPY
the data (using CTRL+C on your keyboard or by right-clicking the mouse and selecting
Copy from the pop-up menu).
[27]bksbLIVE User Guide Copyright © 2013 Vision West Notts College Support: 01623 413333
Step 4 - Log-in to your bksbLIVE account as an administrator and select the ‘Mass
Upload’ tab. Within the mass upload screen, click on the button called ‘Click Here’.
The button text will change to ‘Hold ctrl + v or right-click and paste’ (see screenshots
below).
Step 5 – Select CTRL+V on your keyboard (or right-click with your mouse and select
‘Paste’ from the pop-up menu) to paste the data into your bksbLIVE account. After
pasting the data, a dialog box will appear, indicating that the data is being processed.
s
Step 6 – After processing, the data will appear on screen.
c
If you paste a spreadsheet of user data into the mass upload system, then realise you
have made a mistake and that one or more users do not require uploading, you can
simply select the button ’Start again’ at the top-left of the screen, or locate the
user(s) on screen that you wish to remove and manually select the red X to the left of
their username. This action will remove them from the list.
[28]bksbLIVE User Guide Copyright © 2013 Vision West Notts College Support: 01623 413333
Step 7 – Edit the user type by selecting the relevant option (‘Learner’ or ‘Tutor’ or
‘Admin’) from the drop down list located upper-centre of the screen. Note that
whichever option you select, the option will be applied to ALL users about to be
uploaded, therefore please ensure that the group of users you are uploading have
ALL been given the relevant level of access.
B
It is recommended that when attempting a mass upload and you have separate
spreadsheets of students, tutors and administrators, you upload the students first,
then tutors and finally the administrators. This way, if you forget to change the level
of access, you will not inadvertently give any students the same rights as a tutor or
administrator.
Note also that ALL users of bksbLIVE have student access. Therefore, if you upload
a user as a tutor, they are given that level of access PLUS student access. However,
if you upload a user as an administrator via the Mass Upload feature, they are
automatically given administrator PLUS tutor PLUS student access.
Remember that should you wish to amend the permissions for any user once
uploaded, this can be achieved by an administrator under the ‘user permissions’
tab.
Step 8 – Quickly review the data you are about to upload, paying particular
attention to ensure you have not imported data with fields such as First Name and
Last Name reversed. Once you are happy the data is ready for upload, select the
‘Upload Learner’ button. The upload process will commence.
Once completed, in the upper part of the screen will be displayed information
regarding the status of the upload.
a
If an error is detected during the upload, any user(s) with errors will be automatically
[29]bksbLIVE User Guide Copyright © 2013 Vision West Notts College Support: 01623 413333
excluded as the upload progresses, with errors highlighted under the ‘status’ column.
For example, in the screenshot below, I have attempted to upload 6 users to an
account, except that the account already contains 4 of these users. The system has
therefore identified I am attempting to register existing usernames and has
highlighted the errors.
v
Selecting the ‘View error’ button will show a dialog box which identifies the nature of
the error; in this case, for all of the users with errors, they already exist in the system.
b
When uploading large numbers of users, it may be impractical to review the data to
see whether any errors have occurred. Therefore, in the upper-part of the screen are
4 buttons to assist you with the mass upload process.
n
a. ‘All rows’ button – this will display all rows (rows uploaded, any rows deleted
and those with errors)
b. ‘Show errors’ button – this will display any rows with errors.
c. ‘Show Uploaded’ button – this will display all users that were uploaded.
d. ‘Show deleted rows button – this will display any users that you have
manually deleted from the imported list of users.
All of the uploaded learners will now have accounts created as per the username
assigned in the spreadsheet, with a default password of ‘password’ (all lower case).
If you wish to upload another spreadsheet of users, simply select the button in the
top-left of the screen called ‘Start again’.
[30]You can also read