GETTING STARTED ACCOUNTEDGE ACCOUNTEDGE PLUS ACCOUNTEDGE PLUS NETWORK EDITION
←
→
Page content transcription
If your browser does not render page correctly, please read the page content below
Getting Started

AccountEdge

AccountEdge Plus

AccountEdge Plus Network Edition
Mamut Software Ltd
    90 Long Acre
    Covent Garden
    London
    WC2E 9RZ
    0800 032 5616
    United Kingdom
    Website www.visma.co.uk
    © 2019 Acclivity LLC
    All rights reserved.
    Disclaimer
    Information supplied (whether in user documentation and other literature, video or
    audio material, training courses, websites, advice given by staff, or provided by other
    means) is intended only to illustrate general principles, and may not be complete,
    accurate or free of error. As accounting standards, taxation requirements, legislation and
    the circumstances of individual businesses vary widely, this information cannot be
    considered authoritative and may not apply to your specific situation. You should obtain
    competent advice from a qualified accounting, taxation, information-technology or
    legal professional before acting on such information. To the extent permitted by law,
    Mamut Software and Acclivity LLC are not liable for any special, consequential, direct or
    indirect damages arising from loss of function, profits or data resulting from your
    application of such information. In the event that any of the above limitations are found
    to be unenforceable, the company's liability is limited to the return of any fees or monies
    paid for the purchase of the product or service.
    Trademarks
    AccountEdge is a registered trademark of Acclivity Group LLC. Mamut and the Mamut
    logo are registered trademarks for Mamut. Apple®, AddressBook, iCal, and Macintosh®
    are registered trademarks of Apple Computer, Inc. Mac and the Mac logo are trademarks
    of Apple Computer, Inc. used under licence. Microsoft, Excel, Entourage, Office,
    Outlook, and Word are registered trademarks or trademarks of Microsoft Corporation in
    the United States or other countries. VISA® is a registered trademark of Visa International
    Service Association. Other products mentioned may be service marks, trademarks or
    registered trademarks of their respective owners.

2                                                               GETTINGSTARTED
Fast start

This Getting Started guide contains instructions on how to install,
register, and set up AccountEdge, AccountEdge Plus and
AccountEdge Plus Network Edition products.
Follow the tasks below to install and begin using your software.

 Task

 1        Check the system requirements
 2        Install your software
 3        Register your software
 4        Upgrade your files (existing users only)
 5        Set up a company file (new users)
 6        Check for software updates
 7        What’s new

For information on support plans, see Mamut Support.

Check the system requirements

Hardware and software requirements will vary depending on your
operating system. Before installing your software, make sure your
computer is able to run AccountEdge, AccountEdge Plus or
AccountEdge Plus Network Edition.
Please visit www.visma.co.uk/accountedge/systemrequirements for
the most recent and up-to-date AccountEdge system requirements.

                                                                      3
Install your software
If you are upgrading from a previous version, we recommend:
1 you optimise, verify and backup your company file before you
begin the upgrade process.
2 if you don’t already have a record of it, that you note your
AccountEdge serial number, which will be required to register
your 2019 product. To locate your serial number in your current
product, click the AccountEdge menu at the top left of your
screen, and select Registration.
3 you note the name and location of each of your current
AccountEdge company files. In each of your company files, go to
the Accounts command centre and select Company Data
Auditor. Record both the File Name and File Location. This
information will be required when upgrading your companies to
AccountEdge 2019.
To install AccountEdge and AccountEdge Plus
1 If your computer allows only users with administrator privileges
to install programs, log in as an administrator.
2 Double-click the downloaded AccountEdgeDMG file to open.
3 Drag and drop the AccountEdge icon into the Applications
folder icon.
4 Double-click the Applications folder icon to view your
applications and confirm that Version 19 has been placed in the
folder.
To Install AccountEdge Plus Network Edition
1 If your computer allows only users with administrator privileges
to install programs, log in as an administrator.
2 If you are upgrading from an earlier version of AccountEdge
Network Edition, stop FileConnect:
4 GETTINGSTARTEDUsually only required on the AccountEdge Plus NE host
NOTE :
computer.
a Ensure all users have quit and closed their AccountEdge Plus NE
application on all computers.
b Go to your Mac OS X System Preferences.
c Click the AccountEdge icon in the Other section of the System
Preferences window. The AccountEdge system preferences appear.
d If FileConnect is running, click Stop FileConnect.
e Enter the Administrator password and click OK.
3 Double-click the downloaded AccountEdgeDMG file to open.
The Finder appears, displaying the disk image contents.
4 Double-click the AccountEdge disk image.
5 Follow the on screen instructions to install AccountEdge Plus NE.
NOTE :Installing AccountEdge Network Edition If you are installing
AccountEdge Network Edition on the host computer for the first time,
do not customise the installation. This ensures that all critical
components are installed.
6 When the installation is complete, if prompted click Restart. Your
computer will restart.
7 [AccountEdge Plus Network Edition users only] For each
workstation in the network, repeat from step 1 above.
NOTE : You need to run FileConnect on only the host computer.
8 [AccountEdge Plus Network Edition users only] On the host
computer, Start FileConnect:
a Go to your Mac OS X System Preferences.
b Click the AccountEdge icon in the Other section of the System
Preferences window. The AccountEdge system preferences appear.
c Click Start FileConnect.
d Enter the password for Administrator and click OK.
5Register your software
You will be required to register your software online on each
computer you install and use your AccountEdge Version 19 product.
Registration identifies you as the legal owner of the software. Once
registered you’ll receive information about product upgrades,
updates, new products, and other services.
After installing your AccountEdge Version 19 product, you will have
30 days to register. If registration has not been completed within 30
days, you will not be able to access your company file or sample files.
Each installation of the software will require you to register. Your
serial number has attached to it the number of allowed computer
registrations. Each serial number allows for one registration unless
additional workstation licenses have been purchased.
To move your software licence from one computer to another, you
will need to de-activate your registration on one computer in order
to register on another.
How to register
To register, you will need your serial number. Your serial number is
included in your software package. If you downloaded your software
after purchasing online, your serial number is in the email
confirmation you received when you purchased your software.
To register your software
Registering your software is easy:
NOTE : You must be logged onto your computer as an Administrator
to activate your software.
1 Locate and launch your AccountEdge, AccountEdge Plus or
AccountEdge Plus NE application from your computer’s
Applications.
6 GETTINGSTARTED2 Click the Please Register link on the top of the Welcome window
or if you are already in your company file, choose Registration
from the AccountEdge, AccountEdge Plus or AccountEdge Plus
NE menu at the top left corner of your screen.
3 Once all required information has been entered, click Register.
When the registration is complete a confirmation window will
appear.
4 The date that your license expires will be displayed on the
Welcome window. You will need to Renew your licence prior to
expiration in order to continue to use the software.
5 To Renew your Service Agreement, click Renew License on the
Registration window.
Upgrade your files (existing users only)
Company files created with a previous version of your AccountEdge
or AccountEdge Plus software need to be upgraded to operate with
your Version 19 product. You also need to upgrade all customised
reports, forms, letters, and spreadsheets that you used with your
previous version of the software.
Once you upgrade your company file, you can open it only in the
Version 19 version of AccountEdge, AccountEdge Plus or
AccountEdge Plus Network Edition, depending upon which software
you use.
Task Action
1 Upgrade your customised templates
2 Upgrade your company files
7Task 1: Upgrade your customised templates
If you previously customised reports, forms, letters, graphics, or
spreadsheets, you need to upgrade these templates to use with the
AccountEdge Version 19 product. This task should be performed on
each computer on which you use your AccountEdge product.
You can automatically upgrade your custom templates using a
migration assistant (see ‘To automatically upgrade your customised
templates (recommended)’), or upgrade them manually by copying
your customised templates to your AccountEdge Version 19 product
support folder (see ‘To manually upgrade your customised
templates’).
To automatically upgrade your customised templates
(recommended)
1 Locate and launch your AccountEdge, AccountEdge Plus or
AccountEdge Plus NE 2019 application from your computer’s
Applications.
2 In the Welcome window, click Company File Maintenance and
select Migrate previous version from the menu. The Migration
Assistant window appears.
3 The path to the previous application is displayed.
NOTE : If ‘Please select your previous AccountEdge application’ is
displayed If your software was not able to locate a previous
version, Please select your previous AccountEdge
application will appear in the previous application field. Click
Browse and select the location. Next, select the application file (for
example, AccountEdge 2018) and then click Open. The correct
path should now be displayed in the Previous Application field.
4 Select Copy Spreadsheets if you have customised Excel
spreadsheets in addition to forms, reports and letters in your
previous version.
5 Click Start. The upgrade process begins.
When the process is complete, the Finished window appears.
8 GETTINGSTARTEDNOTE : Using AccountEdge on more than one computer If you
are using your AccountEdge product on more than one computer,
repeat the above steps for upgrading your custom templates on
each computer.
To manually upgrade your customised templates
6 Find the AccountEdge 2018 GB support folder located in your
Documents folder and open it.
NOTE : Pre-2012 users The customised forms folders can be found
in the installation folder, (for example
/Applications/AccountEdge Plus 2011 (v11)).
7 Open a folder containing the customised templates you wish to
move to your new product.
Folder File extension Description
Custom *.rpt User-customised report templates
Reports
Custom Forms *.frm Standard and user-customised form
templates, including Invoices,
Statements, Remittances, and Payslips.
Letters *.dot, *.docm Standard and user-customised Microsoft
Word document templates
Spreadsheet *.xlt Standard and user-customised Microsoft
Excel spreadsheets
Graphics *.bmp, *.gif, Any graphics such as company logo,
*.jpg, *.tif, *.png employee or item photos, etc.
8 Select only your custom template files and copy them.
NOTE : Avoid overwriting standard templates The standard
templates included with the latest version of your software have
improved features. To avoid overwriting the new templates with old
versions, select only the template files that you created or
customised
99 Paste the template files in each corresponding folder (for
example, Custom Forms) in the 2019 GB support folder.
10 Repeat from steps 2 - 4 above for each folder containing
customised templates.
NOTE : Using AccountEdge on more than one computer If you
are using your AccountEdge product on more than one computer,
repeat the above steps for upgrading your custom templates on
each computer.
Task 2: Upgrade your company files
NOTE : Upgrading AccountEdge Plus NE Company Files If you are
using AccountEdge Plus Network Edition, and users access company files
from a shared location, you need to perform the company file upgrade
process on the host computer. In step 14 below: AccountEdge Plus NE
company files can be found on your computer’s hard disk in the
following folder: Library>Application Support>AccountEdge
NE>Databases.
Perform the following steps for each of the company files you wish to
upgrade for use with your new AccountEdge Version 19 product.
11 Locate and launch your AccountEdge, AccountEdge Plus or
AccountEdge Plus NE 2019 application from your computer’s
Applications.
12 In the Welcome window, click Company File Maintenance and
select Upgrade Company File from the menu. A welcome
window appears.
13 Click Next. The Find File to Upgrade window appears.
14 Click Find File. The Open window appears. AccountEdge &
AccountEdge Plus users can find their company file(s) in the
location they noted in their previous version of AccountEdge,
described on Install your software. AccountEdge Plus NE users
will find their company files in the following location:
Library>Application Support> AccountEdge NE.
15 Select the company file you want to upgrade and click Open.
The Find File to Upgrade window reappears.
10 GETTINGSTARTEDThe current path and file name of the selected company file
appears below the Find File button. The default path and name
for the upgraded company file appears below the Save As
button.
16 If you want to change the location or name of the upgraded
company file:
a Click Save As. The Save As window appears.
b Specify a new location or type a new name and click Save.
NOTE : Save As location for AccountEdge Plus Network Edition
users The upgraded file must be saved to Library>Application
Support>AccountEdge NE>Databases folder found on your
AccountEdge Plus NE host computer’s hard drive. When saving the
upgraded file into this folder, we recommend that you additionally
include ‘2019’ in the filename, for example ‘XYZ Ltd 2019’. In this way,
you will be able to easily identify your newly upgraded file for use with
your Version 19 product.
17 Click Next. The Confirm window appears.
18 Click Next to start the upgrade. When the upgrade is finished,
the Complete window appears.
19 If you want to upgrade another company file, click Next and
repeat from step 13 on page 10.
20 Click Finish to close the Upgrade Assistant.
Set up a company file (new users)
When you create a company file, you record basic information about
your business, such as the business name and contact details. You
must also specify the month and financial year of the earliest
transactions you want to record.
Depending on the features you want to use, there are some
additional tasks that you may need to do.
11The tasks you need to do depend on whether your
Essential tasks
accountant has created and set up a company file for you, the
information you currently have, and when your business started.
Advanced tasks When you have completed the essential tasks, you
can start recording transactions. However, if you need to use the
advanced features of this software, (such as the payroll features) you
will need to do further setup tasks. These tasks are covered in the
Online Help files.
Task
1 Create a company file
2 Easy setup assistant
3 Set up preferences
4 Set a password for the Administrator
user ID
5 Set up accounts
6 Enter the account opening balances
Task 1: Create a company file
When you make entries in your software, the information is stored in
a file called a company file.
NOTE : Do you already have a company file? If your accountant has
provided you with a company file, or if you want to use a file created
with a trial version of this software, you don’t need to create a company
file.
12 GETTINGSTARTEDBefore you start, you need to know:
Your current This is the financial year for which you want to start
financial year recording transactions in your company file. Note
that a financial year is represented by the calendar
year in which the financial year ends. For example, if
your financial year ends in March 2019, your financial
year is 2019.
The last month This is the month in which your financial year ends.
of your
financial year
Your conversion This is the earliest month for which you want to
month record transactions. For example, if you want to enter
transactions dated September 1 or later, your
conversion month is September.
You cannot enter transactions dated before the
conversion month.
The number of You can choose to have 12 or 13 accounting periods.
accounting A 13th period is a period for recording entries which
periods in your you do not want included in the accounting figures
financial year for a particular month. For example, you can use it to
record year-end adjustments that are attributed to all
months. If in doubt, choose 13 periods.
The default list Accounts are categories to which you allocate each of
of accounts your transactions. When you create a company file,
you need to specify a default list of accounts. You can:
• start with an accounts list provided by AccountEdge.
You can select a predefined accounts list suitable for your
business.
• import a list of accounts. You can import an accounts
list from another company file, or one that has been
provided by your accountant or Mamut Partner.
• build your own list. You can start with an accounts list
that has the minimum accounts required by your
software and then add to it.
Note that you can modify your accounts list after
creating your company file.
13NOTE : Some company file information cannot be changed Take
care when creating your company file as some information—such as
your current financial year, last month in financial year, conversion
month, and accounting periods—cannot be changed once you have
created your company file.
To create a new company file
1 Start your software. A welcome window appears.
2 Click Create new company file. The introduction page of the
New Company File Assistant appears.
If you have an Open option instead of a Create option, then go to
the Company File Maintenance menu and select Create company
file.
3 Read the information in this page and then click Next. The
Company Information page appears.
4 Enter the business details as indicated.
5 Click Next. The Accounting Information page appears.
6 Enter your financial year details and conversion month.
TIP : Current financial year This is the financial year for which you want to
start recording transactions in your company file. It does not need to be the
financial year that your business is currently operating in.
7 Click Next. A confirmation page appears.
8 Check the financial year and conversion month and then click
Next. The Accounts List page appears.
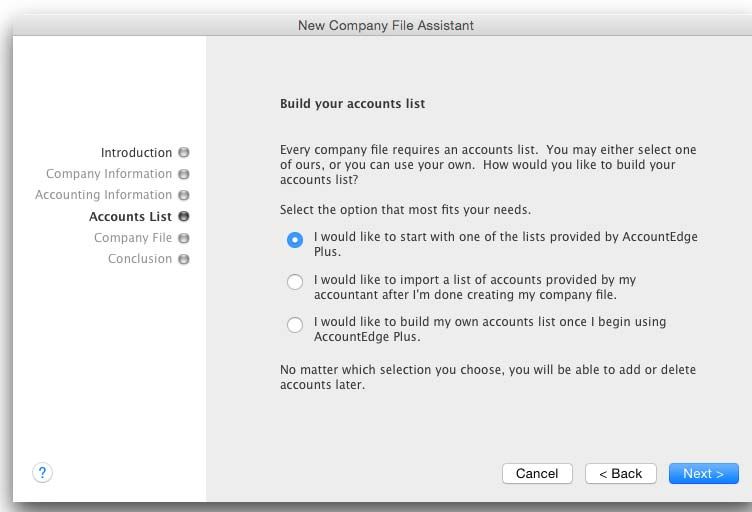
14 GETTINGSTARTED9 Select the default accounts list you want to start with.
If you choose to... Continue with...
start with an accounts list provided by step 10 below
AccountEdge
import a list of accounts step 12
build your own list step 12
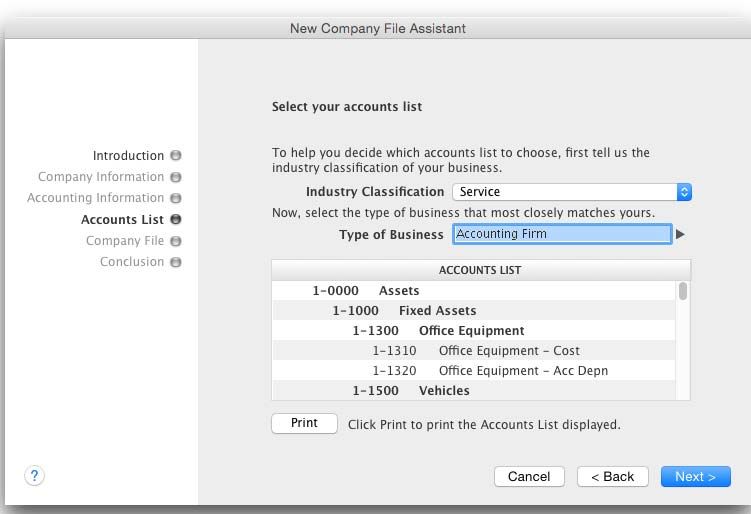
10 Click Next. An accounts list selection page appears.
1511 Select the industry and type of business that best matches your
business.
A suitable accounts list for the business type you selected appears. If you
want to print the list, click Print. Later, you can tailor the list to meet the
needs of your business.
12 Click Next. The Company File page appears.
13 If you want to change your company file name and location:
a Click Change. The Save window appears.
b Select the required location.
c If necessary, type a new file name in the Save As field.
14 Click Next. Your company file is created and the Conclusion
page appears.
15 Click Command Centre to display the Command Centre
window or Click Setup Assistant to continue to customise your
company file setup.
Task 2: Easy setup assistant
You can setup your preferences by using the Easy Setup Assistant.
This assistant guides you through setting up some key preferences.
16 GETTINGSTARTEDTo begin using the Easy Setup Assistant, click Customise. After you
have finished each section beginning with Customise, Accounts,
Sales, Purchases, Payroll [AccountEdge Plus users only] click Close.
If you have completed each section, you can select ‘Do not show me
the Easy Setup Assistant when I open my file’.
Task 3: Set up preferences
Preferences are settings that enable you to tailor your software to
your business requirements.
NOTE : Do you need to complete this task? While you can complete
this task later, you should review the default preferences that have been
set before you start entering transactions.
You can set preferences to customise the way your software operates.
For example, you can choose to automatically print invoices after
recording them, or prevent transactions from being edited.
You can set up your preferences using the:
Customise Easy Setup Assistant. This assistant guides you through
setting up some key preferences. To access the assistant, go to the Setup
menu, choose Easy Setup Assistant, and then click Customise.
Preferences window. This window lists all of the preferences. To view
this window, go to the Setup menu and choose Preferences.
Some preferences you should consider choosing include:
Use Audit Trail Tracking If you want to keep a record of
transactional, tax, account, payroll, and system changes, select this
option. For more information about audit trail tracking, see your Online
Help.
Transactions CAN’T be Changed; They Must be Reversed If
you want to prevent transactions from being edited or deleted, select this
option. When you do want to change or delete a transaction, you will
need to record a reversal transaction. For more information, see your
Online Help.
I Deal in Multiple Currencies If you want to enable multi-currency
accounting, select this option. For more information about working with
multiple currencies, see your Online Help.
17Task 4: Set a password for the Administrator user ID
A user ID is the means for:
controlling access to a company file
tracking a transaction record history
saving individual preferences
When you created your company file, a user ID called Administrator
was automatically created.
By default, the Administrator user ID does not have a password
assigned to it. Anyone who signs on with the Administrator user ID
will have complete access to all command centres, functions, and
windows and will be able to create, edit, and delete other user IDs.
For that reason, as soon as you create a company file, you should
assign a password to the Administrator user ID; otherwise, anyone
can sign on and then enter, edit, and delete transactions in your file.
To set a password for the Administrator user ID
1 Start your software. The Welcome window appears.
2 Open your company file using the Open or Browse option and
bring yourself to the Sign-on window.
3 Click Change Password. The Change Password window
appears.
4 In the Change Password window, leave the Existing Password
field blank, type the password in both the New Password and
Confirm Password fields.
5 Click Record.
NOTE : User access restrictions If you want to restrict other users from
accessing certain features or information, you can create additional user
IDs and specify their access restrictions. For more information, see the
‘Managing user accounts and company files’ chapter in the Online Help.
Task 5: Set up accounts
Accounts provide a means for grouping similar transactions. For
example, if your business pays rent for the use of its premises, you
18 GETTINGSTARTEDwould create a rent account and then allocate all rent payments to
that account.
The accounts you use for your business are grouped in an accounts
list.
NOTE : Do you need to complete this task? If your accountant or
Mamut Partner has provided you with a company file, this task may
have been completed for you. In this case, go to ‘Enter the account
opening balances’.
When you created your company file, you selected a default
accounts list to start with. This list may already have the accounts you
need. If not, you can change the list to suit your needs. If you are
unsure, ask your accountant which accounts you should create, edit
or delete.
If you chose to import a list of accounts, you should import this list
now. For information about importing data into your company file,
click the Help button in this window.
Account numbers Each account is identified by a unique five digit
number. The first digit indicates the account’s classification (for
example, accounts starting with 1 are asset accounts). The
remaining four digits determine its location within the classification.
The lower the number, the higher up in the list it appears. For
example, account 1-1100 appears above 1-1200.
Account classifications and types The accounts list groups accounts
into eight classifications—Assets, Liabilities, Capital, Income, Cost of
Sales, Expenses, Other Income, and Other Expenses. Within each
account classification there is at least one account type.
Account classifications and types are described in the following table.
Classification Type Description
Asset Bank Money in the bank, for example, in a
(1-xxxx) Current chequing or savings account.
Accounts Money owed to you by your
Receivable customers.
19Classification Type Description
Other Assets that, if required, can be turned
Current into cash within a year. These may
Asset include your term deposits.
Fixed Asset Assets which have a long life, for
example, buildings, cars, or
computers. Fixed assets are usually
depreciated.
Other Asset Other assets you own, such as loans
made to others and goodwill.
Liability Credit Card Repayments to service credit card
(2-xxxx) debt.
Accounts Money owed by you to your
Payable suppliers.
Other Money owed by you that is due in
Current less than a year, for example, tax.
Liability
Long Term Money owed by you that is due in
Liability more than one year, like a business
loan.
Other Other money you owe.
Liability
Capital Capital The business’s net worth, that is, its
(3-xxxx) assets minus its liabilities. Common
capital accounts are current year
earnings, retained earnings, and
shareholders’ capital.
Income Income Revenue from the sale of goods and
(4-xxxx) services.
Cost of Sales Cost of The direct cost of selling your goods
(5-xxxx) Sales and providing services, for example,
purchase costs and freight charges.
20 GETTINGSTARTEDClassification Type Description
Expense Expense The day-to-day expenses of running
(6-xxxx) your business, for example, utility
bills, employee wages, and cleaning.
Other Other Other revenue, for example, interest
Income Income earned on savings and dividends paid
(8-xxxx) from stocks.
Other Other Other expenses, for example, interest
Expense Expense charged.
(9-xxxx)
Header accounts Your accounts list consists of detail accounts (the
accounts to which you allocate transactions) and header accounts.
Header accounts group related detail accounts to help you organise
your accounts list.
For example, you could group your telephone, electricity, and gas
expense accounts using a Utilities header account. This makes it
easier for you to locate the utility expense accounts in the accounts
list and to see your combined utility expenses.
You group accounts by indenting the detail accounts located directly
below a header account.
Header
accounts
Detail
Note that:
You cannot allocate transactions to a header account.
The balance of a header account is the sum of the detail accounts
indented directly below it.
You can create up to three header account levels.
21Setting up accounts
If you want to... See
Create an account below
Group detail accounts with a header account To group
detail
accounts
with a header
account
Delete an account Online Help
Change the details of an account Online Help
Import an accounts list Online Help
To create an account
1 Go to the Accounts command centre and click Accounts List.
The Accounts List window appears.
2 Click New. The Edit Accounts window appears.
3 If you want to create a header account, select the Header
Account option.
22 GETTINGSTARTED4 Select the account type from the Account Type list. The Account
Classification field changes according to the selection you make.
For more information on account classifications, see ‘Account
classifications and types’.
5 Enter a four-digit number for the account in the Account
Number field. The number must be unique within each account
classification.
6 Press TAB and type a name for the account.
7 Click the Details tab.
8 If you want, type a brief description of the account in the
Description field.
9 If you are creating an asset, liability, or capital account (other
than an asset that has the account type of Bank), select an option
from the Classification for Statement of Cash Flows list.
Classifying accounts allows you to generate a statement of cash
flows. This report shows how your cash position has changed
over time, profit earned, and where your cash was spent. If you’re
unsure about which classification to use, consult your accountant
or a Mamut Partner.
2310 If you are creating a bank or credit card account, and you want to
keep a record of your bank account details, click the Banking tab
and enter your account details.
11 [Detail accounts only] If you want to enter historical balances,
click the History tab and complete the Last FY column. That way
you can compare the year’s monthly account balances with those
of the corresponding months last year.
12 [Detail accounts only] If you want to set up a budget:
a Click Budgets. The Prepare Budgets window appears.
b Type the budget amounts in the monthly columns.
c Click Close.
For more information about budgets, see your Online Help
13 Click OK when you have finished. The account you created now
appears in your accounts list.
To group detail accounts with a header account
You group accounts by indenting the accounts located below a
header account. You do this by clicking the Up button or the Down
button located at the bottom of the Accounts List window.
1 Go to the Accounts command centre and click Accounts List.
The Accounts List window appears.
2 Select the detail account you want to group.
3 If you want to group the account with the header account
located immediately above it, click Down.
4 If you want to group the account with a header account above
the current header account, click Up.
Task 6: Enter the account opening balances
Account opening balances are the balances of your accounts as at
the first day of your conversion month.
NOTE : Do you need to complete this task? If you were in business
prior to your conversion month, most of your accounts probably already
have balances. If you want to produce financial reports that included
these balances (such as a balance sheet), or you want to track the
24 GETTINGSTARTEDbalance of accounts with a cumulative balance (such as your bank
account), you need to enter these balances.
You can find your account opening balances on a trial balance
report, a balance sheet or a profit & loss report prepared for the
period immediately prior to your conversion date. You can ask your
accountant to prepare these reports. You may also be able to find
your account opening balances using your previous software or
paper-based records.
The balances you enter in your accounting software depend on
whether your conversion month is also the first month of your
financial year.
If your conversion month:
is the first month of your financial year, enter the opening balances of
your asset, liability, and capital accounts only. The opening balances of
your income, cost of sales, and expense accounts should be zero.
is not the first month of your financial year (for example, if your
financial year starts in April but your conversion month is August), enter
the opening balances of all your accounts.
Opening bank account balances You can enter either of the following
amounts as the opening balance of a bank account:
the bank account balance that appears on your balance sheet or trial
balance reports as at the day prior to your conversion date. For example,
if your conversion date is January 1, 2019, this is the bank account
balance as at December 31, 2019.
These reports can be provided by your accountant, or you can obtain the
balances using your previous software or paper-based records.
the chequebook balance of the account as at the end of the day prior to
your conversion date. You can calculate your chequebook balance by
taking into account the transactions not yet cleared by your bank as of
the conversion date and the balance that appears on your bank
statement at that date.
For example, assume that £500 worth of deposits and £1000
worth of payments were unpresented as at your conversion date
25(that is, they had not appeared on a bank statement). The
chequebook balance would be calculated as shown below:
Bank statement balance as at the conversion £21,000.00
date
ADD uncleared deposits + £500.00
SUBTRACT uncleared payments – £1,000.00
Chequebook balance as at the conversion date £20,500.00
To enter opening balances
1 Go to the Setup menu, choose Balances and then Account
Opening Balances. The Account Opening Balances window
appears.
2 Enter the balances in the Opening Balance column.
NOTE : Enter opening balances as positive numbers Don’t, for
example, enter liability account balances as negative numbers. Enter negative
amounts only if accounts truly have negative balances.
3 Check that the amount in the Amount left to be allocated field
at the bottom of the window shows £0.00.
If this field displays an amount other than £0.00, check your
opening balances again because they are either incomplete or
26 GETTINGSTARTEDincorrect. However, you can continue the setup process if there is
an amount in the Amount left to be allocated field. The amount
will be assigned to a special capital account called Historical
Balancing.
4 Click OK.
Check for software updates
To make sure you are using the current version of your accounting
software, you should check every so often to see if any updates or
upgrades are available.
To check for updates, open your company file, then go to the
AccountEdge menu and click Check for Updates.
27What’s new
The following new features and enhancements have been included
in this release:
Feature Description
Date Range on Sales, Purchases, Item and Bank
Registers registers now have a date range for
better searching abilities.
User Preferences New User Access options have been
- Buying/ Selling added to the User Access window.
Details
Prepare Bank You can now sort deposits by the ID#,
Deposit - Date, Memo, Payment Method,
Sortable columns and Amount to make
Columns grouping them much easier.
Link to Deposit A new field, Deposit ID, will be added to
ID the following windows:
Receive Payment
Receive Money
Settle Returns and Debits
Credit Limit & Easy access to the Credit Limit& Hold
Hold window window.
Auto Fill on Using the action menu to receive
Sales and payment on an invoice or pay a bill
Purchases automatically enters it.
Payments
Sortable The Pay Bill and Receive Payment
Columns for Pay windows now can sort by column to
Bills and Receive make searching for the Bills or Invoices
Payments organized.
28 GETTINGSTARTEDFeature Description
Save Custom Save a custom note for repeated use.
Notes
Customer AccountEdge now has the ability to give
Statements for the options to filter for and generate
Overdue statements for customer who have
Invoices overdue invoices.
Tax Rate Sales Tax Rates can now be set out to
changes include 5 decimals.
New VAT Code A new VAT Type, Reverse Charge
added Purchase, has been added to the VAT
code list.
Making Tax Easily produce and submit VAT returns
Digital directly from AccountEdge to HMRC.
HMRC Payroll [For AccountEdge Plus and Network
Compliance Edition users only]
Reports • Business Insight reports
• Job Status - Report filters
Date Range on Registers
Date Range filters have been added to the Sales, Purchases, Item
and Bank registers to allow for better searching abilities. To view
transactions within a specific date range, select the Date Range from
the drop down list.
29When selecting either Month to Date, Year to Date, This Month,
Last Month, This Quarter, Last Quarter, This Year, or Last Year the
dates will be automatically be entered in the date fields. Select User
Entered to enter specific dates. If you’d like to enter a date using a
calendar, click the calendar icon or press the space bar to open the
calendar window.
If This Year and Last Year is selected, the dates will automatically be
entered based on the current fiscal year set in the company file. If
Year to Date is selected, the dates used in the from date is
determined by the Fiscal Year in the file and the To date is the
AccountEdge Date.
If This Month, Last Month, This Quarter and Last Quarter is
selected, the date will automatically be entered based on the
AccountEdge Date. If a date is entered either manually or by using
the calendar icon the Date Range will be changed to User Entered.
If thirteen fiscal period is selected in the company file the date boxes
for This Year and Last Year will automatically be entered using the
first day if that fiscal year to the last day of the fiscal year using the “*”
in the Date Range fields. Filtering for thirteen period transactions is
available in the Bank Register, Transaction Journal, Find
Transactions and Job Information>Transactions windows.
30 GETTINGSTARTEDUser Preferences - Buying/ Selling
Details
New User Access options have been added to the User Access
window. In the Card File section if the Selling Details, Customer
Terms (view only) or the Buying Details, Vendor Terms (view only) is
selected the user will be able to view the terms but will not be able to
edit the information.
Prepare Bank Deposit - Sortable
Columns
The Prepare Bank Deposit window now has sortable columns to
make grouping the deposits by ID#, Date, Memo, Payment
Method, and Amount much easier. Once you have found the
transaction you want to deposit simply click the Deposit column
adjacent to the transaction. In some cases you may only have a date
31or a payment method. Each time you select a column to sort by the
selections previously made will remain selected.
Link to Deposit ID
A new field, Deposit ID, will be added to the following windows:
Receive Payment
Receive Money
Settle Returns and Debits
This field will only display if the Receive Payment, Receive Money or
Settle Returns and Debits transaction was included in the deposit
recorded through the Prepare Bank Deposit window.
The Deposit ID will be displayed on the Receipt.
Watch Video
32 GETTINGSTARTEDCredit Limit & Hold window
A zoom arrow has been added to the right of the Credit Limit field on
the right side of the Selling Details tab on the Customer and Lead
cards. You can click on the zoom arrow to open the Credit Limit &
Hold window.
If you select the Credit Limit preference in the User Access window,
your User ID profile will not allow you to access this window.
Auto Fill on Sales and Purchases
Payments
If payment is made using Receive Payment from the Action menu
on the sale and Pay Bill from the Action menu on a purchase, the
amount due in the Payment window will be automatically entered.
33Sortable Columns for Pay Bills and
Receive Payments
The Pay Bill and Receive Payment windows now has sortable
columns to make searching for the Bills or Invoices organized. The
columns that are sortable are by Purchase#/Invoice#, Status, Date
and Amount much easier. Once you have found the transaction you
want to pay simply click the Amount Applied column adjacent to
the transaction.
34 GETTINGSTARTEDSave Custom Notes
Save a note on a sale or a purchase to be used again later.
To save a note on a sale or purchase
1 Go to the List menu and select Sales & Purchases Information
then Notes.
2 Click New. The Edit Note window appears.
3 Enter the note.
4 Click OK.
Customer Statements for
Overdue Invoices
AccountEdge 2019 now has the ability to give the options to filter for
and generate statements for customer who have overdue invoices.
Select this option to display a list of customers with overdue invoices.
If an Activity statement is selected the customers that have overdue
invoices dated between the activity dates selected will display.
To print or email a statement for a customer with
overdue invoices
1 Go to the Sales command center and select Print/Email
Statements. The Review Statements Before Delivery opens.
2 Select the To Be Printed tab or To Be Emailed tab.
353 Select the options to filter your statements including Only
Overdue Customers to display a list of customers with overdue
invoices.
4 Select the customers you want to either print or email a
statement for.
5 Click Print or Send Email.
Watch Video
Tax Rate changes
Sales Tax Rates can now be set out to include 5 decimals. This is
useful in states where they are beginning to use longer rates.
New VAT Code added
A new VAT Type, Reverse Charge Purchase, has been added to the
VAT code list. This code is available for any new or upgraded file.
36 GETTINGSTARTEDWhen the Reverse Charge Purchase VAT code is selected from the
VAT Type drop down list the Reported Rate on VAT Return field
becomes available. Enter the percentage rate being reported on the
VAT Return.
A new option VAT Return Info has been added to the VAT Code
Information window. Click this button to open the VAT Return
Information window. Select the appropriate options available for
that VAT Type.
The Reverse Charge Purchase will be included in the Output
Value/Input Value and the VAT Collected/Paid on the VAT Return.
Making Tax Digital
For businesses within the scope of HMRC's new Making Tax Digital
requirements, easily produce and submit VAT Returns directly from
AccountEdge to HMRC.
Starting in April 2019, the government's new Making Tax Digital
(MTD) initiative will see important changes to the way in which
businesses report their VAT information to HMRC.
MTD doesn't change what you submit to HMRC, it changes how you
submit it.
MTD aims to provide businesses the ability to keep records of their
income and expenditure digitally, and to send VAT summary updates
to HMRC from their software. In turn this will provide a more timely,
efficient and simpler tax system, reducing the likelihood of errors and
giving businesses more certainty of their position throughout the
year.
VAT registered businesses (including self-employed and landlords)
with turnover above the VAT registration threshold (currently
£85,000) will have to:
keep their records digitally (for VAT purposes only)
37 provide their VAT return information to HMRC through Making
Tax Digital compatible software
Smaller businesses will not be required to use the system,
although they can do so voluntarily.
Making Tax Digitial compatibility will be introduced in AccountEdge
2019, which will be released 4th week of March 2019.
AccountEdge 2019 will require macOS 10.11 El Capitan as a
minimum requirement.
The new VAT Information window provides a simple way to allow
AccountEdge to submit VAT returns to HMRC on your behalf.
The new VAT Submission feature allows you to quickly generate your
VAT return and submit it directly to HMRC.
HMRC Payroll Compliance
[For AccountEdge Plus and Network Edition users only]
Student Loan Deduction changes
From April 2019 the Annual Threshold for Plan 1 has increased to
£18,935, for Plan 2 to £25,725 and for PGL to £21,000. The
deduction rate remains the same at 9% for Student Loans and
6% for Graduate Loan.
Tax Tables
The Emergency for 2019/2020 is 1250L (W1/M1).
PAYE tax and Class 1 National Insurance contributions
Tax thresholds, rates and codes
38 GETTINGSTARTEDThe amount of Income Tax you deduct from your employees
depends on their tax code and how much of their taxable income
is above their Personal Allowance.
England and Northern Ireland
PAYE tax rates and thresholds2019 to 2020
Employee personal allowance£240 per week
£1,042 per month
£12,500 per year
English and Northern Irish basic tax rate20% on annual earnings
above the PAYE tax threshold and up to £37,500
English and Northern Irish higher tax rate40% on annual
earnings from £37,501 to £150,000
English and Northern Irish additional tax rate45% on annual
earnings above £150,000
Scotland
PAYE tax rates and thresholds2019 to 2020
Employee personal allowance£240 per week
£1,042 per month
£12,500 per year
Scottish starter tax rate19% on annual earnings above the PAYE
tax threshold and up to £2,049
Scottish basic tax rate20% on annual earnings from £2,050 to
£12,444
Scottish intermediate tax rate21% on annual earnings from
£12,445 to £30,930
Scottish higher tax rate41% on annual earnings from £30,931 to
£150,000
Scottish top tax rate46% on annual earnings above £150,000
Wales
PAYE tax rates and thresholds2019 to 2020
Employee personal allowance£240 per week
39£1,042 per month
£12,500 per year
Welsh basic tax rate20% on annual earnings above the PAYE tax
threshold and up to £37,500
Welsh higher tax rate40% on annual earnings from £37,501 to
£150,000
Welsh additional tax rate45% on annual earnings above
£150,000
Business Insight reports
Prior to AccountEdge 2019, the Business Insights report allowed
users to select which “Ratio” report they would like to generate
based on a pop list on the Advanced Filters. Beginning with
AccountEdge 2019, each Ratio report will be listed separately in the
Report list under the Business Insights heading.
The Business Insights reports will also be added to AccountEdge for
Windows.
Business Insights reports
The following business analysis reports are available:
Gross Profit Margin Ratio report
Operating Profit Ratio report
Net Profit to Sales Ratio report
Trade Debtors Days report
Trade Creditors Days report
Stock Turnover Days report
Current Ratio report
Profitability Ratios report
40 GETTINGSTARTEDJob Status - Report filters
Job Status has been added to selected Jobs reports giving you more
options to filter related information.
The Job reports receiving this new filter are as follows:
Activity Summary
Activity Detail
Budget History (OfficeLink)
History (OfficeLink)
Jobs Transaction Summary
Jobs Transaction Detail
Profit & Loss
Reimbursable Expenses
Budget Analysis
Jobs List (Summary)
Jobs List (Detail)
41Mamut Support
Mamut Support Centre
The Mamut Support Centre offers an extensive personal service to
assist you whenever you may need help.
As a valued customer of Mamut you are entitled to access a wide
array of resources giving you the opportunity to benefit from the
knowledge and experience of thousands of Mamut customers. We
are confident that this will help you to be prepared for the day ahead
and to be in total control of any situation faced by you and your
business.
Mamut Service Agreement ensures a simpler
working day!
The Mamut Service agreement ensures that you are prepared and
have full control of all challenges you or your business might
encounter.
Updates following legislation changes We make sure that your
Mamut system is always fully up-to-date with new laws and
regulations, changes to tax-rates and official forms. Extensive user
documentation for all such changes ensures that you can adapt to
them quickly and easily.
New functionality Mamut systems are developed and improved
continuously in tune with technological advances, new industry
standards and trends and feedback from our customers. You are
always guaranteed a modern solution, which will simplify your
working day.
Mamut Support Centre We place great importance on providing a
responsive and professional support department, which can
promptly provide answers to your questions. Your Mamut Service
Agreement entitles you to user support via telephone, e-mail or the
internet.
42 GETTINGSTARTEDSpecial offers Mamut gives you special offers on Mamut products as
well as on suitable products from other market-leading software
vendors.
Purchase a Mamut Service Agreement
To purchase or renew a Mamut Service Agreement, please contact
your sales consultant or Mamut’s sales department on 0800 032
5616.
How to get in touch with the Mamut Support
Centre
Get in touch via Mamut website Mamut offers Online Support that is
available 24/7 and will quickly provide you with the answers you
require. The site has an FAQs facility which allows you to search our
large range of Support Articles.
Visit Mamut Online Support at
www.visma.co.uk/accountedgesupport
Get in touch by e-mailIf you cannot find the answer your are
looking for on the Mamut website you can send an e-mail to
support@mamut.co.uk.
Get in touch over the phone: 020 7153 0900 Most questions can
usually be answered in the course of a phone call but in special cases
we may need to record the question and contact you once we have
found the solution to your problem.
Letters may be sent to:
Mamut Software Ltd
90 Long Acre
Covent Garden
London
WC2E 9RZ
4344 GETTINGSTARTED
You can also read