Connecting AudioCodes' SBC to Microsoft Azure Communication Services - Configuration Note
←
→
Page content transcription
If your browser does not render page correctly, please read the page content below
Configuration Note

AudioCodes Mediant™ Family of Media Gateways & Session Border Controllers

Connecting AudioCodes' SBC to
Microsoft Azure Communication
Services

Configuration Note                                                                                                           Contents

                                                Table of Contents
1   Introduction .........................................................................................................9
    1.1    About Microsoft Azure Communication Services .................................................... 9
    1.2    About AudioCodes SBC Product Series ................................................................. 9
    1.3    Validated AudioCodes Version ............................................................................. 10
2   Topology Example ............................................................................................11
    2.1    Environment Setup ............................................................................................... 12
    2.2    Infrastructure Prerequisites................................................................................... 12
3   Configuring Azure Communication Services direct routing .........................13
4   Deploying Mediant VE Via Azure Marketplace ................................................15
5   Configuring AudioCodes' SBC ........................................................................23
    5.1    SBC Configuration Concept with ACS .................................................................. 23
    5.2    IP Network Interfaces Configuration ..................................................................... 24
           5.2.1      Configure VLANs................................................................................................. 25
           5.2.2      Configure Network Interfaces .............................................................................. 25
           5.2.3      Configure NAT Translation .................................................................................. 25
    5.3    SIP TLS Connection Configuration ....................................................................... 26
           5.3.1      Configure the NTP Server Address ...................................................................... 26
           5.3.2      Create a TLS Context for ACS (same as for Teams Direct Routing) ..................... 27
           5.3.3      Generate a CSR and Obtain the Certificate from a Supported CA ........................ 28
           5.3.4      Deploy the SBC and Root / Intermediate Certificates on the SBC ........................ 30
           5.3.5      Method of Generating and Installing the Wildcard Certificate ................................ 32
           5.3.6      Deploy Baltimore Trusted Root Certificate ........................................................... 32
    5.4    Configure Media Realm ........................................................................................ 33
    5.5    Configure SIP Signaling Interfaces ....................................................................... 34
    5.6    Configure Proxy Sets and Proxy Address ............................................................. 35
           5.6.1      Configure Proxy Sets........................................................................................... 35
           5.6.2      Configure Proxy Addresses ................................................................................. 36
    5.7    Configure Coder Groups....................................................................................... 38
    5.8    Configure IP Profiles............................................................................................. 39
    5.9    Configure IP Groups ............................................................................................. 41
    5.10   Configure SRTP ................................................................................................... 43
    5.11   Configure Message Manipulation Rules ............................................................... 44
    5.12   Configure Message Condition Rules .................................................................... 45
    5.13   Configure Classification Rules .............................................................................. 46
    5.14   Configure IP-to-IP Call Routing Rules................................................................... 47
    5.15   Configure Number Manipulation Rules ................................................................. 48
    5.16   Miscellaneous Configuration................................................................................. 49
           5.16.1 Optimizing CPU Cores Usage for a Specific Service (relevant for Mediant 9000 and
           Software SBC only) ......................................................................................................... 49
6   Verify the Pairing Between the SBC and ACS ................................................50
A   Syntax Requirements for SIP Messages 'INVITE' and 'OPTIONS' .................53
    A.1    Terminology.......................................................................................................... 53
    A.2    Syntax Requirements for 'INVITE' Messages ....................................................... 53

                                                                 3                                               AudioCodes SBC
Generic

    A.3   Requirements for 'OPTIONS' Messages Syntax ................................................... 54
    A.4   Connectivity Interface Characteristics ................................................................... 55
B   SIP Proxy Direct Routing Requirements .........................................................57
    B.1   Failover Mechanism ............................................................................................. 57

Configuration Note                                         4                                Document #: LTRT-39471
Configuration Note                                                                                                              Contents

                                                       List of Figures
Figure 2-1: Azure Communication Services direct routing .................................................................. 11
Figure 2-2: Interoperability Test Topology ......................................................................................... 11
Figure 4-1: Azure Marketplace .......................................................................................................... 15
Figure 4-2: Mediant VE SBC Product Overview ................................................................................. 15
Figure 5-1: SBC Configuration Concept............................................................................................. 23
Figure 5-2: Network Interfaces in the Topology with SIP Trunk on the LAN ........................................ 24
Figure 5-3: Network Interfaces in the Topology with SIP Trunk on the WAN ...................................... 24
Figure 5-4: Configuration Example of the Network Interface Table..................................................... 25
Figure 5-5: Example of the NAT Translation Table ............................................................................ 25
Figure 5-6: Configuring NTP Server Address..................................................................................... 26
Figure 5-7: Configuration of TLS Context for ACS ............................................................................. 27
Figure 5-8: Configured TLS Context for ACS and Interface to Manage the Certificates ..................... 28
Figure 5-9: Example of Certificate Signing Request – Creating CSR.................................................. 29
Figure 5-10: Uploading the Certificate Obtained from the Certification Authority................................. 30
Figure 5-11: Message Indicating Successful Upload of the Certificate ............................................... 30
Figure 5-12: Certificate Information Example ..................................................................................... 31
Figure 5-13: Example of Configured Trusted Root Certificates........................................................... 31
Figure 5-14: Configuration Example Media Realms in Media Realm Table ........................................ 33
Figure 5-15: Configuration Example of SIP Signaling Interfaces ........................................................ 35
Figure 5-16: Configuration Example Proxy Sets in Proxy Sets Table ................................................. 36
Figure 5-17: Configuring Proxy Address for Azure Communication Services direct routing................. 36
Figure 5-18: Configuring Proxy Address for SIP Trunk....................................................................... 37
Figure 5-19: Configuring Coder Group for ACS ................................................................................. 38
Figure 5-20: Configured IP Groups in IP Group Table........................................................................ 42
Figure 5-21: Configuring Media Security Parameter .......................................................................... 43
Figure 5-22: Configuring Condition Table .......................................................................................... 45
Figure 5-23: Configuring Classification Rule ...................................................................................... 46
Figure 5-24: Configured IP-to-IP Routing Rules in IP-to-IP Routing Table .......................................... 47
Figure 5-25: Example of Configured IP-to-IP Outbound Manipulation Rules....................................... 48
Figure 6-1: Proxy Set Status ............................................................................................................. 51
Figure A-1: Example of an 'INVITE' Message .................................................................................... 53
Figure A-2: Example of 'OPTIONS' message .................................................................................... 54

                                                                     5                                              AudioCodes SBC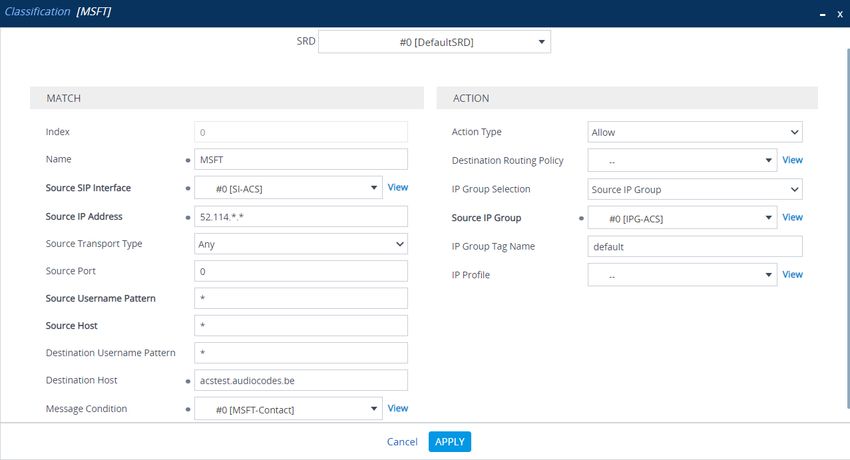
Generic

                                                       List of Tables
Table 2-1: Environment Setup ........................................................................................................... 12
Table 2-2: Infrastructure Prerequisites............................................................................................... 12
Table 5-1: NAT Translation Rule ....................................................................................................... 25
Table 4-2: New TLS Context ............................................................................................................. 27
Table 4-3: Configuration Example Media Realms in Media Realm Table ........................................... 33
Table 4-4: Configuration Example of SIP Signaling Interfaces ........................................................... 34
Table 4-5: Configuration Example Proxy Sets in Proxy Sets Table .................................................... 35
Table 4-6: Configuration Proxy Address for ACS ............................................................................... 36
Table 4-7: Configuration Proxy Address for SIP Trunk ....................................................................... 37
Table 5-8: Configuration Example: ACS IP Profile ............................................................................. 39
Table 5-9: Configuration Example: SIP Trunk IP Profile ..................................................................... 40
Table 5-10: IP-to-IP Call Routing Rules ............................................................................................. 47
Table A-1: Syntax Requirements for an 'OPTIONS' Message ............................................................ 54
Table A-2: Teams Direct Routing Interface - Technical Characteristics .............................................. 55

Configuration Note                                                  6                                  Document #: LTRT-39471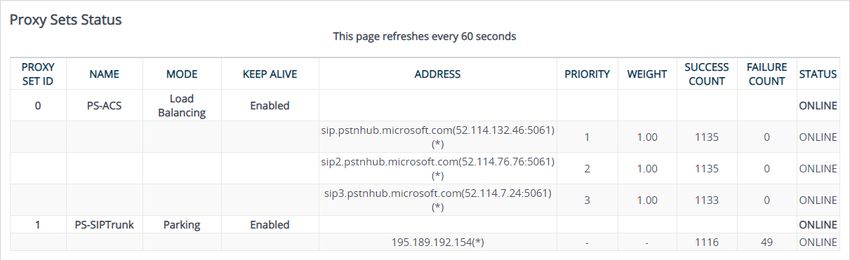
Configuration Note                                                                                    Notices

Notice

                                                   Notice
         Information contained in this document is believed to be accurate and reliable at the time of
         printing. However, due to ongoing product improvements and revisions, AudioCodes cannot
         guarantee accuracy of printed material after the Date Published nor can it accept responsibility
         for errors or omissions. Updates to this document can be downloaded from
         https://www.audiocodes.com/library/technical-documents.
                             This document is subject to change without notice.
                                       Date Published: August-10-2021

WEEE EU Directive
              Pursuant to the WEEE EU Directive, electronic and electrical waste must not be disposed of
              with unsorted waste. Please contact your local recycling authority for disposal of this product.

Customer Support
              Customer technical support and services are provided by AudioCodes or by an authorized
              AudioCodes Service Partner. For more information on how to buy technical support for
              AudioCodes products and for contact information, please visit our website at
              https://www.audiocodes.com/services-support/maintenance-and-support.

Stay in the Loop with AudioCodes

Abbreviations and Terminology
              Each abbreviation, unless widely used, is spelled out in full when first used.

                                                       7                                   AudioCodes SBC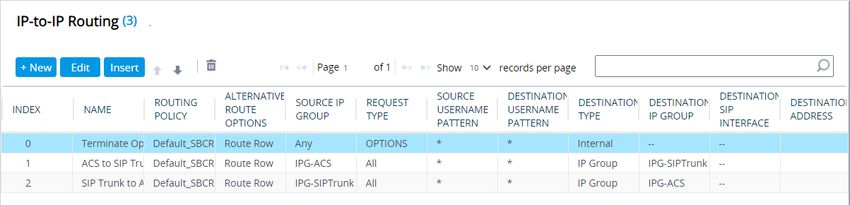
Generic

Related Documentation

                                             Document Name

Mediant 500 Gateway & E-SBC User's Manual
Mediant 500L Gateway & E-SBC User's Manual
Mediant 800 Gateway & E-SBC User's Manual
Mediant 1000B Gateway & E-SBC User's Manual
Mediant 2600 SBC User's Manual
Mediant 4000 SBC User's Manual
Mediant 9000 SBC User's Manual
Mediant Software SBC User's Manual
Gateway and SBC CLI Reference Guide
SIP Message Manipulation Reference Guide
AudioCodes Configuration Notes

Document Revision Record

     LTRT
     47B                                               Description

     39470        Initial document release
                  Change "ACS SIP interface" to "Azure Communication Services direct routing" per
     39471
                  Microsoft request and add links to Microsoft docs in Section 3

Documentation Feedback
           AudioCodes continually strives to produce high quality documentation. If you have any
           comments (suggestions or errors) regarding this document, please fill out the Documentation
           Feedback form on our website at https://online.audiocodes.com/documentation-feedback.

Configuration Note                                 8                       Document #: LTRT-39471
Configuration Note                                                                         1. Introduction

1         Introduction
          This document describes how to connect AudioCodes' SBC to the Microsoft Azure
          Communication Services (ACS) and refers to the AudioCodes SBC configuration only. For
          more information about Microsoft Azure Communication Services, please refer to
          https://docs.microsoft.com/en-us/azure/communication-services/.
          This document is intended for IT or telephony professionals.

               Note: To zoom in on screenshots of example Web interface configurations,
               press Ctrl and +.

1.1       About Microsoft Azure Communication Services
          Azure Communication Services allows you to easily add real-time voice, video, and telephone
          communication to your applications. Communication Services SDKs also allow you to add
          SMS functionality to your communications solutions. Azure Communication Services is
          identity agnostic; you have complete control over how end users are identified and
          authenticated. You can connect people to the communication data plane or services (bots).
          Applications include:
          ◼    Business to Consumer (B2C). Business employees and services can interact with
               consumers using voice, video, and rich text chat in a custom browser or mobile
               application. An organization can send and receive SMS messages, or operate an
               interactive voice response system (IVR) using a phone number acquired through
               Azure. Integration with Microsoft Teams allows consumers to join Teams meetings
               hosted by employees; ideal for remote healthcare, banking, and product support
               scenarios where employees might already be familiar with Teams.
          ◼    Consumer to Consumer. Build engaging social spaces for consumer-to-consumer
               interaction with voice, video, and rich text chat. Any type of user interface can be built
               on Azure Communication Services SDKs. Complete application samples and UI
               assets are available to help you get started quickly.

1.2       About AudioCodes SBC Product Series
          AudioCodes' family of SBC devices enables reliable connectivity and security between the
          enterprise's VoIP network and the service provider's VoIP network.
          The SBC provides perimeter defense as a way of protecting enterprises from malicious VoIP
          attacks; mediation for allowing the connection of any PBX and/or IP-PBX to any service
          provider; and Service Assurance for service quality and manageability.
          Designed as a cost-effective appliance, the SBC is based on field-proven VoIP and network
          services with a native host processor, allowing the creation of purpose-built multiservice
          appliances, providing smooth connectivity to cloud services, with integrated quality of service,
          SLA monitoring, security and manageability. The native implementation of SBC provides a
          host of additional capabilities that are not possible with standalone SBC appliances such as
          VoIP mediation, PSTN access survivability, and third-party value-added services
          applications. This enables enterprises to utilize the advantages of converged networks and
          eliminate the need for standalone appliances.
          AudioCodes' SBC is available as an integrated solution running on top of its field-proven
          Mediant Media Gateway and Multi-Service Business Router platforms, or as a software-only
          solution for deployment with third-party hardware. The SBC can be offered as a Virtualized
          SBC, supporting the following platforms: Hyper-V, AWS, AZURE, AWP, KVM and VMWare.

                                                   9                                    AudioCodes SBC
Generic

1.3       Validated AudioCodes Version
          Recommended AudioCodes' Mediant SBC firmware version for interconnect with ACS is Ver.
          7.40A.100. This version is currently in the validation process by Microsoft.
          For an updated list, refer to List of Session Border Controllers certified for Direct Routing.

             Note: For implementing Microsoft Azure Communication Services based on the
             configuration described in this document, AudioCodes SBC must be installed with a
             License Key that includes the following features:
             • MSFT (general Microsoft license)
               Note: By default, all AudioCodes media gateways and SBCs are shipped with this
               license (except MSBR products, Mediant 500 SBC, and Mediant 500 Media
               Gateway).
             • SW/TEAMS (Microsoft Teams license)
             • Number of SBC sessions (based on requirements)
             • Transcoding sessions (only if media transcoding is needed)
             • Coders (based on requirements)
             For more information about the License Key, contact your AudioCodes sales
             representative.

Configuration Note                               10                          Document #: LTRT-39471
Configuration Note 2. Topology Example
2 Topology Example
ACS PSTN Telephony Voice Calling allow users to interact with a traditional telephone
number, facilitated by PSTN (Public Switched Telephone Network) for voice calling. ACS
supports a “SIP Interface”. This allows you to connect, via a certified SBC, PBXs, Analog
Telephony Adapters, or another PSTN carrier.
Figure 2-1: Azure Communication Services direct routing
Figure 2-2: Interoperability Test Topology
Session Border Controller
Azure
Communication
Services
Enterprise Network
LAN Firewall Internet
SIP TRUNK
ITSP
PSTN
Management Mobile App
Web App User
Station (OAMP) User
Note: This document shows how to configure the connection between AudioCodes'
SBC and the Microsoft Azure Communication Services (ACS) with a generic SIP Trunk.
For detailed configuration of other entities in the deployment such as the SIP Trunk
Provider and the local IP-PBX, refer to AudioCodes' SIP Trunk Configuration Notes (in
the interoperability suite of documents).
11 AudioCodes SBCGeneric
2.1 Environment Setup
The topology example includes the following environment setup:
Table 2-1: Environment Setup
Area Setup
▪ Both, Company SIP Trunk and ACS environment, are located on
Network
the Enterprise's (or Service Provider’s) WAN
Signaling ▪ ACS operates with SIP-over-TLS transport type
Transcoding ▪ Generic SIP Trunk operates with SIP-over-UDP transport type
▪ ACS supports G.711A-law, G.711U-law, G.722, G.729 and SILK
Codecs (NB and WB) coders
Transcoding ▪ Generic SIP Trunk supports G.711A-law, G.711U-law, and
G.729 coders
▪ ACS operates with SRTP media type
Media Transcoding
▪ Generic SIP Trunk operates with RTP media type
2.2 Infrastructure Prerequisites
The table below shows the list of infrastructure prerequisites required for deploying
connection to Azure Communication Services. These are the same requirement as for
interconnect with Teams Direct Routing.
Table 2-2: Infrastructure Prerequisites
Infrastructure Prerequisite Details
Certified Session Border Controller (SBC)
SIP Trunks connected to the SBC
Enterprise Office 365 Tenant
Domains
Public IP address for the SBC
Fully Qualified Domain Name (FQDN) for the SBC
See Microsoft's document Plan Direct Routing.
Public DNS entry for the SBC
Public trusted certificate for the SBC
Firewall ports for Direct Routing Signaling
Firewall IP addresses and ports for Direct Routing Media
Media Transport Profile
Firewall ports for Teams Clients Media
Configuration Note 12 Document #: LTRT-39471Configuration Note 3. Configuring Azure Communication Services direct routing
3 Configuring Azure Communication
Services direct routing
Currently, a configuration description of the Microsoft Azure Communication Services direct
routing is not available, it will be added in the future. The following links can be used to start
working with the SIP Interface for interconnect to Microsoft Azure Communication Services:
◼ About Direct Routing
◼ Azure direct routing infrastructure requirements
◼ Provision SBC and configure voice routing
◼ What is Azure Communication Services
◼ How to create an ACS resource
◼ Build your own app quickstart
◼ Web app with calling capabilities
13 AudioCodes SBCGeneric
This page is intentionally left blank.
Configuration Note 14 Document #: LTRT-39471Configuration Note 4. Deploying Mediant VE Via Azure Marketplace
4 Deploying Mediant VE Via Azure
Marketplace
This section describes the deployment of a standalone Mediant VE through the Azure
Marketplace. This deployment method uses a graphical user interface and is therefore, most
suited if you are not familiar with the Azure cloud environment.
➢ To deploy a standalone Mediant VE through Azure Marketplace:
1. Open the Azure Marketplace at https://azuremarketplace.microsoft.com/.
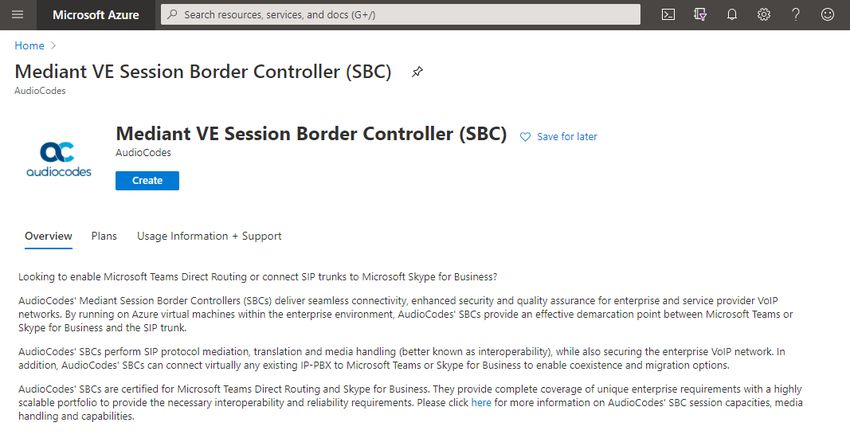
2. Search for the product "Mediant VE Session Border Controller (SBC)" published by
AudioCodes.
Figure 4-1: Azure Marketplace
3. Click GET IT NOW; the Azure portal and Mediant VE SBC Product Overview screen
appears:
Figure 4-2: Mediant VE SBC Product Overview
4. Click Create to start a new Mediant VE deployment.
The Create AudioCodes Mediant VE SBC for Microsoft Azure dialog appears. The dialog
contains multiple steps. Complete each step according to the description below.
15 AudioCodes SBCGeneric
Figure 4-3: Basics Step
5. In the Basics step, do the following:
a. In the ‘Subscription’ field, select a proper subscription for your deployment.
b. In the ‘Resource group’ field, click Create new and then enter a unique name for
the new resource group. Alternatively, you may select an existing empty resource
group from the list.
c. In the ‘Region’ field, select a proper region for your deployment.
d. In the 'Virtual Machine name' field, enter a unique name for the new VM.
e. In the 'Username' field, enter a username.
f. For 'Authentication type', select Password.
g. In the 'Password' field, enter a password, and then enter it again in the ‘Confirm
password’ field.
These credentials are used to connect to the management interface of the
deployed Mediant VE (instead of the default Admin/Admin credentials used in
other environments).
Configuration Note 16 Document #: LTRT-39471Configuration Note 4. Deploying Mediant VE Via Azure Marketplace
Note: Azure imposes some limitations on username and password. For example, it
prohibits the use of "Admin" for username and requires you to use a strong password that
meets the following policy:
• A minimum of 12 characters
• Use three out of the following characters:
√ lowercase characters
√ uppercase characters
√ numbers
√ symbols
h. Click OK.
6. In the Virtual Machine Settings step, do the following:
a. Choose the virtual machine size.
For a list of supported virtual machine sizes and corresponding capacity figures,
refer to the SBC-Gateway-MSBR Series Release Notes.
b. Choose the disk type for the virtual machine.
As SBC software typically doesn’t perform extensive disk activity, Standard HDD
disk type is adequate for most deployments. However, if you plan to use SBC for
transcoding, then a virtual machine should have a minimum of 2 vCPUs.
c. Choose the OS version for the deployed SBC software:
6 – this version corresponds to the 7.20A stream, which is based on CentOS
6.
8 – this version corresponds to the new 7.40A stream, which is based on
CentOS Stream 8 and provides significantly better performance and capacity
(refer to the SBC-Gateway Series Release Notes for details).
d. Choose whether to enable virtual machine’s boot diagnostics.
e. (Optionally), provide Mediant VE automatic configuration script (cloud-init file).
For more information, refer to the Automatic Provisioning of Mediant VE SBC via
Cloud-Init Configuration Note.
f. Click OK.
17 AudioCodes SBCGeneric
Figure 4-4: Virtual Machine Settings Step
7. In the Network Settings step, do the following:
a. Choose the number of network interfaces for the new virtual machine.
Deployment via Azure Marketplace supports up to two network interfaces. If you
need more interfaces, perform deployment via the PowerShell CLI, as described
in the Mediant Virtual Edition SBC for Microsoft Azure Installation Manual.
b. Configure the virtual network where the new VM will be deployed.
You may either create a new virtual network or select an existing one. Azure
virtual machine is always connected to a single virtual network, regardless of the
number of its network interfaces.
c. Configure the subnet for each network interface.
You may either create a new subnet (for new virtual network) or select an existing
one.
If you choose two network interfaces, you must connect each interface to a
different subnet. This is a limitation of Azure Marketplace UI and may be
overcome by performing the deployment via the PowerShell CLI, as described in
the Mediant Virtual Edition SBC for Microsoft Azure Installation Manual. You can
then access the SBC management interfaces (Web and SSH) through the 1st
network interface only.
d. Configure the virtual machine’s Public IP Address.
You may either create a new Public IP Address or select an existing one.
If you create a new Public IP Address, select Static Assignment. This
ensures that the IP address remains unchanged if you stop the virtual
machine.
If you choose two network interfaces, the public IP address will be attached
to the 1st network interface.
e. Click OK
Configuration Note 18 Document #: LTRT-39471Configuration Note 4. Deploying Mediant VE Via Azure Marketplace
Figure 4-5: Network Settings Step
8. In the Review + create step, review the Mediant VE SBC terms of use and virtual
machine configuration, and then click Create.
19 AudioCodes SBCGeneric
Figure 4-6: Review + Create Step
Configuration Note 20 Document #: LTRT-39471Configuration Note 4. Deploying Mediant VE Via Azure Marketplace
9. Wait until the virtual machine deployment is complete, and then determine the IP
address that is assigned to your virtual machine that can be used to access management
interface:
If you assigned a public IP address to the VM, you may use it to access the
management interface.
Alternatively, you may use a private IP address of the 1st network interface.
Figure 4-7: Determining IP Address of Deployed VM
10. Log in to the management interface (through Web or SSH) using the credentials that
you configured during the virtual machine set up.
21 AudioCodes SBCGeneric
This page is intentionally left blank.
Configuration Note 22 Document #: LTRT-39471Configuration Note 5. Configuring AudioCodes' SBC
5 Configuring AudioCodes' SBC
This section provides example of step-by-step procedures on how to configure AudioCodes
SBC for interworking between Microsoft Azure Communication Services (ACS) and the
Generic SIP Trunk. These configuration procedures are based on the topology example
described in Section 2.1 on page 12, and includes the following main topics:
◼ SBC LAN interface – administrator's management station and Generic SIP Trunking
(depend on topology) environment
◼ SBC WAN interface - Generic SIP Trunking (depend on topology) and Teams Direct
Routing environment
This configuration is done using the SBC's embedded Web server (hereafter, referred to as
Web interface).
Notes:
• For implementing connection to ACS based on the configuration described in this
section, AudioCodes SBC must be installed with a License Key. For more
information, see Section 1.3 on page 10.
• The scope of this document does not cover all security aspects for configuring this
topology. Comprehensive security measures should be implemented per your
organization's security policies. For security recommendations on AudioCodes’
products, refer to the Recommended Security Guidelines document, which can be
found at AudioCodes web site.
5.1 SBC Configuration Concept with ACS
The diagram below represents AudioCodes’ device configuration concept.
Figure 5-1: SBC Configuration Concept
SIP SIP
Proxy Set IP Group
Interface SBC Interface
IP Group Proxy Set
SIP
Azure
Trunk
Communication
Services
23 AudioCodes SBCGeneric
5.2 IP Network Interfaces Configuration
This section describes how to configure the SBC's IP network interfaces. There are several
ways to deploy the SBC:
◼ SBC interfaces with the following IP entities:
• ACS - located on the WAN
• SIP Trunk - located on the LAN (or WAN)
◼ SBC connects to the WAN through a DMZ network
◼ Physical connection: The type of physical connection depends on the method used to
connect to the Enterprise's network. In the interoperability test topology, SBC connects
to the LAN and DMZ using dedicated Ethernet ports (i.e., two ports and two network
cables are used).
◼ SBC also uses two logical network interfaces:
• LAN (VLAN ID 1)
• DMZ (VLAN ID 2)
Figure 5-2: Network Interfaces in the Topology with SIP Trunk on the LAN
LAN Port Session Border Controller LAN Port
Vlan ID 1 Vlan ID 2
LAN DMZ
Management
Station (OAMP)
WAN
Firewall Azure
Communication
ITSP Services
Figure 5-3: Network Interfaces in the Topology with SIP Trunk on the WAN
LAN Port Session Border Controller LAN Port
Vlan ID 1 Vlan ID 2
LAN DMZ
Azure
Communication
WAN
Services
Management Firewall
Station (OAMP)
ITSP
This document provides an example of the following deployment method:
◼ SBC implemented in the Azure with one IP interface, used for all purposes:
• Management (OAMP)
• Signaling and media connectivity to Generic SIP Trunk and ACS
Configuration Note 24 Document #: LTRT-39471Configuration Note 5. Configuring AudioCodes' SBC
5.2.1 Configure VLANs
Since default VLANs configuration was used in this interoperability test topology, no
additional configuration is needed.
5.2.2 Configure Network Interfaces
Network Interfaces are configured automatically in the Azure implementation. Refer to the
Mediant Virtual Edition SBC for Microsoft Azure Installation Manual document, which can be
found at AudioCodes web site. The example of the configured IP network interface are shown
below:
Figure 5-4: Configuration Example of the Network Interface Table
5.2.3 Configure NAT Translation
The SBC, located in the Azure Cloud, implements private IP addresses. The NAT Translation
table lets you configure network address translation (NAT) rules for translating source IP
addresses into NAT IP addresses (global - public). These are used in front of the Azure
firewall facing the Generic SIP Trunk and the ACS.
A NAT Translation Table is created automatically during the implementation process (as
described in step 7 on page 18 above.) But if it is required to configure manually, follow next
steps.
➢ To configure the NAT translation rules:
1. Open the NAT Translation table (Setup menu > IP Network tab > Core Entities folder
> NAT Translation).
2. Add a new NAT Translation rule by clicking +New at the top of the interface, and then
configure the parameters using the table below as reference.
Table 5-1: NAT Translation Rule
Source Source Source Target IP Address Target Target
Index
Interface Start Port End Port Start Port End Port
0 eth0 1 65535 1 65535
3. Click Apply.
Figure 5-5: Example of the NAT Translation Table
25 AudioCodes SBCGeneric
5.3 SIP TLS Connection Configuration
This section describes how to configure the SBC for using a TLS connection with the ACS.
This configuration is essential for a secure SIP TLS connection. The configuration instructions
example in this section are based on the following domain structure that must be
implemented as part of the certificate which must be loaded to the host SBC:
◼ CN: acstest.audiocodes.be
◼ SAN: acstest.audiocodes.be
This certificate module is based on the Service Provider's own TLS Certificate. For more
certificate structure options, see Microsoft Teams Direct Routing documentation.
The Azure Communication Services direct routing allows only TLS connections from SBCs
for SIP traffic with a certificate signed by one of the Trusted Certification Authorities.
Currently, supported Certification Authorities can be found in the following link:
https://docs.microsoft.com/en-us/microsoftteams/direct-routing-plan#public-trusted-
certificate-for-the-sbc
5.3.1 Configure the NTP Server Address
This section describes how to configure the NTP server's IP address. It is recommended to
implement an NTP server (Microsoft NTP server or another global server) to ensure that the
SBC receives the current date and time. This is necessary for validating certificates of remote
parties. It is important, that NTP Server will locate on the OAMP IP Interface (LAN_IF in our
case) or will be accessible through it.
➢ To configure the NTP server address:
1. Open the Time & Date page (Setup menu > Administration tab > Time & Date).
2. In the 'Primary NTP Server Address' field, enter the IP address of the NTP server
(e.g., time.windows.com).
Figure 5-6: Configuring NTP Server Address
3. Click Apply.
Configuration Note 26 Document #: LTRT-39471Configuration Note 5. Configuring AudioCodes' SBC
5.3.2 Create a TLS Context for ACS (same as for Teams Direct Routing)
The section below shows how to request a certificate for the SBC WAN interface and to
configure it based on the example of SSL.com Global Root CA. The certificate is used by the
SBC to authenticate the connection with ACS.
The procedure involves the following main steps:
a. Create a TLS Context for ACS
b. Generate a Certificate Signing Request (CSR) and obtain the certificate from a
supported Certification Authority
c. Deploy the SBC and Root / Intermediate certificates on the SBC
➢ To create a TLS Context for ACS:
1. Open the TLS Contexts page (Setup menu > IP Network tab > Security folder > TLS
Contexts).
2. Create a new TLS Context by clicking +New at the top of the interface, and then
configure the parameters using the table below as reference.
Table 4-2: New TLS Context
Index Name TLS Version
1 Teams (arbitrary descriptive name) TLSv1.2
All other parameters can be left unchanged with their default values.
Note: The table above exemplifies configuration focusing on interconnecting SIP and
media. You might want to configure additional parameters according to your
company's policies. For example, you might want to configure Online Certificate Status
Protocol (OCSP) to check if SBC certificates presented in the online server are still
valid or revoked. For more information on the SBC's configuration, see the User's
Manual, available for download from https://www.audiocodes.com/library/technical-
documents.
Figure 5-7: Configuration of TLS Context for ACS
27 AudioCodes SBCGeneric
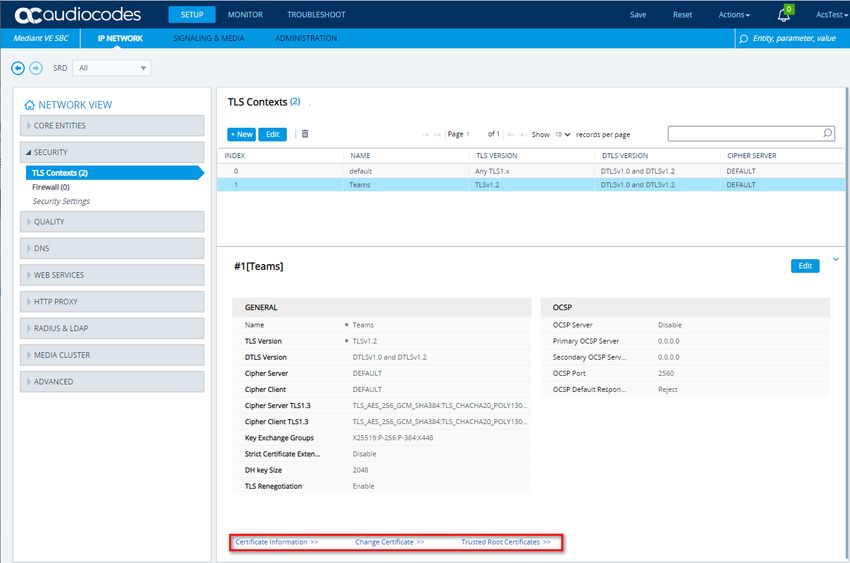
3. Click Apply; you should see the new TLS Context and option to manage the certificates
at the bottom of 'TLS Context' table.
Figure 5-8: Configured TLS Context for ACS and Interface to
Manage the Certificates
5.3.3 Generate a CSR and Obtain the Certificate from a Supported CA
This section shows how to generate a Certificate Signing Request (CSR) and obtain the
certificate from a supported Certification Authority.
➢ To generate a Certificate Signing Request (CSR) and obtain the certificate from a
supported Certification Authority:
1. Open the TLS Contexts page (Setup menu > IP Network tab > Security folder > TLS
Contexts).
2. In the TLS Contexts page, select the Teams TLS Context index row, and then click the
Change Certificate link located below the table; the Context Certificates page appears.
3. Under the Certificate Signing Request group, do the following:
a. In the 'Common Name [CN]' field, enter the SBC FQDN name (based on example
above, acstest.audiocodes.be).
b. In the '1st Subject Alternative Name [SAN]' field, change the type to ‘DNS’, and
then enter the SBC FQDN name (based on the example above,
acstest.audiocodes.be).
c. Change the 'Private Key Size' based on the requirements of your Certification
Authority. Many CAs do not support private key of size 1024.
Configuration Note 28 Document #: LTRT-39471Configuration Note 5. Configuring AudioCodes' SBC
d. To change the key size on TLS Context, go to: Generate New Private Key and
Self-Signed Certificate, change the 'Private Key Size' to 1024 (if this required by
CA) and then click Generate Private-Key. To use 2048 as a Private Key Size
value, you can click Generate Private-Key without changing the default key size
value.
e. Enter the rest of the request fields according to your security provider's
instructions.
f. Click the Create CSR button; a textual certificate signing request is displayed in
the area below the button:
Figure 5-9: Example of Certificate Signing Request – Creating CSR
4. Copy the CSR from the line "----BEGIN CERTIFICATE" to "END CERTIFICATE
REQUEST----" to a text file (such as Notepad), and then save it to a folder on your
computer with the file name, for example certreq.txt.
5. Send certreq.txt file to the Certified Authority Administrator for signing.
29 AudioCodes SBCGeneric
5.3.4 Deploy the SBC and Root / Intermediate Certificates on the SBC
After obtaining the SBC signed and Trusted Root/Intermediate Certificate from the CA, install
the following:
◼ SBC certificate
◼ Root / Intermediate certificates
➢ To install the SBC certificate:
1. In the SBC's Web interface, return to the TLS Contexts page and do the following:
a. In the TLS Contexts page, select the required TLS Context index row, and then
click the Change Certificate link located below the table; the Context Certificates
page appears.
b. Scroll down to the Upload certificates files from your computer group, click the
Choose File button corresponding to the 'Send Device Certificate...' field,
navigate to the certificate file obtained from the CA, and then click Load File to
upload the certificate to the SBC.
Figure 5-10: Uploading the Certificate Obtained from the Certification Authority
2. Validate that the certificate was uploaded correctly: A message indicating that the
certificate was uploaded successfully is displayed in blue on the lower part of the page:
Figure 5-11: Message Indicating Successful Upload of the Certificate
Configuration Note 30 Document #: LTRT-39471Configuration Note 5. Configuring AudioCodes' SBC
3. In the SBC's Web interface, return to the TLS Contexts page, select the required TLS
Context index row, and then click the Certificate Information link, located at the bottom
of the TLS. Then validate the Key size, certificate status and Subject Name:
Figure 5-12: Certificate Information Example
4. In the SBC's Web interface, return to the TLS Contexts page.
a. In the TLS Contexts page, select the required TLS Context index row, and then
click the Trusted Root Certificates link, located at the bottom of the TLS
Contexts page; the Trusted Certificates page appears.
b. Click the Import button, and then select all Root/Intermediate Certificates
obtained from your Certification Authority to load.
5. Click OK; the certificate is loaded to the device and listed in the Trusted Certificates
store:
Figure 5-13: Example of Configured Trusted Root Certificates
31 AudioCodes SBCGeneric
5.3.5 Method of Generating and Installing the Wildcard Certificate
To use the same certificate on multiple devices, you may prefer using 3rd party application
(e.g. DigiCert Certificate Utility for Windows) to process the certificate request from your
Certificate Authority on another machine, with this utility installed.
After you've processed the certificate request and response using the DigiCert utility, test the
certificate private key and chain and then export the certificate with private key and assign a
password.
➢ To install the certificate:
1. Open the TLS Contexts page (Setup menu > IP Network tab > Security folder >
TLS Contexts).
2. In the TLS Contexts page, select the required TLS Context index row, and then click the
Change Certificate link located below the table; the Context Certificates page appears.
3. Scroll down to the Upload certificates files from your computer group and do the
following:
a. Enter the password assigned during export with the DigiCert utility in the 'Private
key pass-phrase' field.
b. Click the Choose File button corresponding to the 'Send Private Key...' field and
then select the SBC certificate file exported from the DigiCert utility.
5.3.6 Deploy Baltimore Trusted Root Certificate
Note: Loading Baltimore Trusted Root Certificates to AudioCodes' SBC is mandatory
for implementing an MTLS connection with the Microsoft Teams network.
The DNS name of the Teams Direct Routing interface is sip.pstnhub.microsoft.com. In this
interface, a certificate is presented which is signed by Baltimore Cyber Baltimore CyberTrust
Root with Serial Number: 02 00 00 b9 and SHA fingerprint: d4:de:20:d0:5e:66:fc:
53:fe:1a:50:88:2c:78:db:28:52:ca:e4:74.
To trust this certificate, your SBC must have the certificate in Trusted Certificates storage.
Download the certificate from https://www.digicert.com/kb/digicert-root-certificates.htm and
follow the steps above to import the certificate to the Trusted Root storage.
Note: Before importing the Baltimore root certificate into AudioCodes' SBC, make sure
it's in .PEM or .PFX format. If it isn't, you need to convert it to .PEM or .PFX format,
otherwise the 'Failed to load new certificate' error message is displayed. To convert to
PEM format, use Windows local store on any Windows OS and then export it as 'Base-
64 encoded X.509 (.CER) certificate'.
Configuration Note 32 Document #: LTRT-39471Configuration Note 5. Configuring AudioCodes' SBC
5.4 Configure Media Realm
Media Realms allow dividing the UDP port ranges for use on different interfaces. In the
example below, two Media Realms are configured:
◼ One for the WAN interface, with the UDP port starting at 6000 and the number of
media session legs 100 (you need to calculate number of media session legs based
on your usage)
◼ One for the WAN interface, with the UDP port range starting at 7000 and the number
of media session legs 100
➢ To configure Media Realms:
1. Open the Media Realms table (Setup menu > Signaling & Media tab > Core Entities
folder > Media Realms).
2. Configure Media Realms as follows (you can use the default Media Realm (Index 0), but
modify it):
Table 4-3: Configuration Example Media Realms in Media Realm Table
Topology IPv4 Interface Port Range Number of Media
Index Name
Location Name Start Session Legs
MR-ACS
100 (media sessions
0 (arbitrary Up eth0 6000
assigned with port range)
name)
MR-SIPTrunk
100 (media sessions
1 (arbitrary eth0 7000
assigned with port range)
name)
The configured Media Realms are shown in the figure below:
Figure 5-14: Configuration Example Media Realms in Media Realm Table
33 AudioCodes SBCGeneric
5.5 Configure SIP Signaling Interfaces
This section shows how to configure a SIP Signaling Interfaces. A SIP Interface defines a
listening port and type (UDP, TCP, or TLS) for SIP signaling traffic on a specific logical IP
network interface (configured in the Interface Table above) and Media Realm.
Note that the configuration of a SIP interface for the SIP Trunk shows as an example and
your configuration might be different. For specific configuration of interfaces pointing to SIP
trunks and/or a third-party PSTN environment connected to the SBC, see the trunk /
environment vendor documentation.
AudioCodes also offers a comprehensive suite of documents covering the interconnection
between different trunks and equipment.
➢ To configure SIP interfaces:
1. Open the SIP Interfaces table (Setup menu > Signaling & Media tab > Core Entities
folder > SIP Interfaces).
2. Configure SIP Interfaces. You can use the default SIP Interface (Index 0), but modify it
as shown in the table below. The table below shows an example of the configuration.
You can change some parameters according to your requirements.
Note: The Azure Communication Services direct routing can only use TLS for a SIP
port. It does not support using TCP due to security reasons. The SIP port might be
any port of your choice.
Table 4-4: Configuration Example of SIP Signaling Interfaces
Enable Classification TLS
Network Application TCP Media
Index Name UDP Port TLS Port TCP Failure Context
Interface Type Port Realm
Keepalive Response Type Name
0
(Phone 5061 (as
0
SI-ACS System configured
(Recommended
0 (arbitrary eth0 SBC does not 0 in the Enable MR-ACS Teams
to prevent DoS
name) use UDP or Office
attacks)
TCP for SIP 365)
signaling)
5060
SI- Disable 0
(according
SIPTrunk (leave (Recommended MR-
1 eth0 SBC to Service 0 0 -
(arbitrary default to prevent DoS SIPTrunk
Provider
name) value) attacks)
requirement)
Note: For implementing an MTLS connection with the Microsoft Teams network,
configure ‘TLS Mutual Authentication’ to “Enable” for the Azure Communication
Services direct routing.
Note: Loading Baltimore Trusted Root Certificates to AudioCodes' SBC is mandatory
for implementing an MTLS connection with the Microsoft Teams network. Refer to
Section 5.3.6 on page 32.
Configuration Note 34 Document #: LTRT-39471Configuration Note 5. Configuring AudioCodes' SBC
The configured SIP Interfaces are shown in the figure below:
Figure 5-15: Configuration Example of SIP Signaling Interfaces
5.6 Configure Proxy Sets and Proxy Address
5.6.1 Configure Proxy Sets
The Proxy Set and Proxy Address defines TLS parameters, IP interfaces, FQDN and the
remote entity's port. Proxy Sets can also be used to configure load balancing between
multiple servers. The example below covers configuration of a Proxy Sets for ACS and SIP
Trunk. Note that the configuration of a Proxy Set for the SIP Trunk shows as an example and
your configuration might be different. For specific configuration of interfaces pointing to SIP
trunks and/or the third-party PSTN environment connected to the SBC, see the
trunk/environment vendor's documentation. AudioCodes also offers a comprehensive suite
of documents covering the interconnection between different trunks and the equipment.
The Proxy Sets will later be applied to the VoIP network by assigning them to IP Groups.
Note: For devices with PSTN interface (Hybrid SBC) it is highly recommended that
you do not configure Proxy Set ID 0 and IP Group ID 0. The only time that you should
configure this specific Proxy Set and IP Group is when it is used for the Gateway
Interface (e.g., PSTN fallback).
➢ To configure a Proxy Sets:
1. Open the Proxy Sets table (Setup menu > Signaling & Media tab > Core Entities folder
> Proxy Sets).
2. Configure Proxy Sets as shown in the table below:
Table 4-5: Configuration Example Proxy Sets in Proxy Sets Table
Proxy
SBC IPv4
TLS Context Proxy Proxy Hot Load
Index Name SIP
Name Keep-Alive Swap Balancing
Interface
Method
PS-ACS Using Random
0 SI-ACS Teams Enable
(arbitrary name) Options Weights
PS-SIPTrunk SI- Using
1 Default - -
(arbitrary name) SIPTrunk Options
35 AudioCodes SBCGeneric
The configured Proxy Sets are shown in the figure below:
Figure 5-16: Configuration Example Proxy Sets in Proxy Sets Table
5.6.2 Configure Proxy Addresses
This section shows how to configure a Proxy Address.
➢ To configure a Proxy Address for ACS (same as for Teams Direct Routing):
1. Open the Proxy Sets table (Setup menu > Signaling & Media tab > Core Entities folder
> Proxy Sets) and then click the Proxy Set PS-ACS, and then click the Proxy Address
link located below the table; the Proxy Address table opens.
2. Click +New; the following dialog box appears:
Figure 5-17: Configuring Proxy Address for Azure Communication Services direct routing
3. Configure the address of the Proxy Set according to the parameters described in the
table below:
Table 4-6: Configuration Proxy Address for ACS
Transport Proxy Proxy Random
Index Proxy Address
Type Priority Weight
0 sip.pstnhub.microsoft.com:5061 TLS 1 1
1 sip2.pstnhub.microsoft.com:5061 TLS 2 1
2 sip3.pstnhub.microsoft.com:5061 TLS 3 1
4. Click Apply and then save your settings to flash memory.
Configuration Note 36 Document #: LTRT-39471Configuration Note 5. Configuring AudioCodes' SBC
➢ To configure a Proxy Address for SIP Trunk:
1. Open the Proxy Sets table (Setup menu > Signaling & Media tab > Core Entities folder
> Proxy Sets) and then click the Proxy Set SIPTrunk, and then click the Proxy Address
link located below the table; the Proxy Address table opens.
2. Click +New; the following dialog box appears:
Figure 5-18: Configuring Proxy Address for SIP Trunk
3. Configure the address of the Proxy Set according to the parameters described in the
table below:
Table 4-7: Configuration Proxy Address for SIP Trunk
Transport Proxy Proxy Random
Index Proxy Address
Type Priority Weight
SIPTrunk.com:5060
0 UDP 0 0
(SIP Trunk IP / FQDN and port)
4. Click Apply.
37 AudioCodes SBCGeneric
5.7 Configure Coder Groups
This section describes how to configure coders (known as Coder Groups). ACS supports the
SILK and G.722 coders while the network connection to the SIP Trunk may restrict operation
with a dedicated coders list. You need to add a Coder Group with the supported coders for
each of the following leg, the ACS and the SIP Trunk.
Note
Note: The Coder Group ID for this entity will be assigned to its corresponding IP Profile
in Section 5.8.
➢ To configure a Coder Group:
1. Open the Coder Groups table (Setup menu > Signaling & Media tab > Coders &
Profiles folder > Coder Groups).
2. From the 'Coder Group Name' dropdown, select 1:Does Not Exist and add the required
codecs as shown in the figure below.
Figure 5-19: Configuring Coder Group for ACS
3. Click Apply, and then confirm the configuration change in the prompt that pops up.
Configuration Note 38 Document #: LTRT-39471Configuration Note 5. Configuring AudioCodes' SBC
5.8 Configure IP Profiles
This section describes how to configure IP Profiles. An IP Profile is a set of parameters with
user-defined settings related to signaling (e.g., SIP message terminations such as REFER)
and media (e.g., coder type). An IP Profile needs to be assigned to the specific IP Group.
➢ To configure an IP Profile:
1. Open the Proxy Sets table (Setup > Signaling and Media > Coders and Profiles >
IP Profiles).
2. Click +New to add the IP Profile for the Azure Communication Services direct routing.
Configure the parameters using the table below as reference.
Table 5-8: Configuration Example: ACS IP Profile
Parameter Value
General
Name ACS (arbitrary descriptive name)
Media Security
SBC Media Security Mode Secured
SBC Early Media
Remote Early Media RTP Detection By Media (required, as Teams Direct Routing does not send
Mode RTP immediately to remote side when it sends a SIP 18x
response)
SBC Media
Extension Coders Group AudioCodersGroups_1
RFC 2833 Mode Extended
Generate Always (required, as some ITSPs do not send
RTCP Mode
RTCP packets during Hold, but Microsoft expects them)
ICE Mode Lite
SBC Signaling
SIP UPDATE Support Not Supported
Remote re-INVITE Support Supported Only With SDP
Remote Delayed Offer Support Not Supported
SBC Forward and Transfer
Remote REFER Mode Handle Locally
Remote Replaces Mode Handle Locally
Remote 3xx Mode Handle Locally
SBC Hold
Inactive (some SIP Trunk may answer with a=inactive and
IP=0.0.0.0 in response to the Re-Invite with Hold request from
Remote Hold Format
Teams. Microsoft Media Stack doesn’t support this format. So,
SBC will replace 0.0.0.0 with its IP address)
All other parameters can be left unchanged at their default values.
3. Click Apply, and then save your settings to flash memory.
39 AudioCodes SBCGeneric
4. Click +New to add the IP Profile for the SIP Trunk. Configure the parameters using the
table below as a reference.
Table 5-9: Configuration Example: SIP Trunk IP Profile
Parameter Value
General
Name SIPTrunk
Media Security
SBC Media Security Mode Not Secured
SBC Signaling
P-Asserted-Identity Header Mode Add (required for anonymous calls)
SBC Forward and Transfer
Remote REFER Mode Handle Locally
Remote Replaces Mode Handle Locally
Remote 3xx Mode Handle Locally
All other parameters can be left unchanged with their default values.
5. Click Apply, and then save your settings to flash memory.
Configuration Note 40 Document #: LTRT-39471Configuration Note 5. Configuring AudioCodes' SBC
5.9 Configure IP Groups
This section describes how to configure IP Groups. The IP Group represents an IP entity on
the network with which the SBC communicates. This can be a server (e.g., IP-PBX or SIP
Trunk) or it can be a group of users (e.g., LAN IP phones). For servers, the IP Group is
typically used to define the server's IP address by associating it with a Proxy Set. Once IP
Groups are configured, they are used to configure IP-to-IP routing rules for denoting source
and destination of the call.
Note: For devices with PSTN interface (Hybrid SBC) it is highly recommended that
you do not configure Proxy Set ID 0 and IP Group ID 0. The only time that you should
configure this specific Proxy Set and IP Group is when it is used for the Gateway
Interface (e.g., PSTN fallback).
➢ To configure an IP Groups:
1. Open the IP Groups table (Setup menu > Signaling & Media tab > Core Entities folder
> IP Groups).
2. Click +New to add the IP Group for the ACS:
Parameter Value
Name IPG-ACS
Topology Location Up
Type Server
Proxy Set PS-ACS
IP Profile ACS
Media Realm MR-ACS
Classify by Proxy Set Disable
Local Host Name
(based on our example, acstest.audiocodes.be).
Always Use Src Address Yes
Enable (Enables the SBC to include Microsoft's proprietary
X-MS-SBC header in outgoing SIP INVITE and OPTIONS
messages in a Microsoft Teams Direct Routing environment.
Teams Direct Routing Mode
The header is used by Microsoft Teams to identify vendor
equipment. The header's value is in the format
'Audiocodes//').
Inbound Message
1
Manipulation Set
Proxy Keep-Alive using IP
Enable
Group settings
All other parameters can be left unchanged with their default values.
41 AudioCodes SBCGeneric
3. Click +New to add the IP Group for the SIP Trunk:
Parameter Value
Name IPG-SIPTrunk
Type Server
Proxy Set PS-SIPTrunk
IP Profile SIPTrunk
Media Realm MR-SIPTrunk
SIP Group Name (according to ITSP requirement)
All other parameters can be left unchanged with their default values.
Note: The configuration of the SIP Trunk example and your configuration might be
different. For specific configuration of interfaces pointing to SIP trunks and/or a third-
party PSTN environment connected to the SBC, see the trunk / environment vendor
documentation.
The configured IP Groups are shown in the figure below:
Figure 5-20: Configured IP Groups in IP Group Table
Configuration Note 42 Document #: LTRT-39471You can also read