COX BUSINESS INTERNET GATEWAY AND GUEST WIFI ADMINISTRATOR GUIDE - APRIL, 2014
←
→
Page content transcription
If your browser does not render page correctly, please read the page content below
Cox Business Internet Gateway
               and Guest WiFi
          Administrator Guide

                      April, 2014
Introduction
This guide provides instructions for configuring your Wireless Gateway. The software’s
Graphical User Interface (GUI) gives you access to settings that were configured at the
factory or by Cox Business for the most common installation configurations. After you
access the GUI, you can customize these settings to meet your needs.
       Important: If you are not familiar with the network configuration procedures
       described in this guide, contact your information technology professional before
       you change any of the settings.

     © 2014 by Cox Communications.
     All rights reserved. No part of this document may be reproduced or transmitted in any form or by any means,
     electronic, mechanical, photocopying, recording, or otherwise, without prior written permission of Cox
     Communications.
Table of Contents

Table of Contents
Cisco 3829AD Gateway Overview .................................................................................. 1
Cox Business Internet Gateway and Guest WiFi Services ........................................... 1
     Internet Gateway Service ........................................................................................................ 1
     Guest WiFi Service .................................................................................................................. 1
Log in to the Gateway ..................................................................................................... 3
     Change Your Username .......................................................................................................... 4
Set Up Basics .................................................................................................................. 5
     Quick Setup Tab ...................................................................................................................... 5
      Changing Your Password ..................................................................................................5
     Configure Wi-Fi Network ......................................................................................................... 6
     Configure LAN Setup .............................................................................................................. 8
      Configure Gateway IP ........................................................................................................8
      Configure Network Address Server Settings .....................................................................9
      Configure Time Settings ...................................................................................................11
     Configure DDNS Settings ..................................................................................................... 12
      Enable and Configure DDNS ...........................................................................................12
      Disable DDNS ..................................................................................................................13
Configure Wireless Settings .......................................................................................... 15
     Configure WPS....................................................................................................................... 15
     Configure Radio Settings ..................................................................................................... 17
     Configure Wireless Security Settings ................................................................................. 20
     Configure Guest Network Settings ...................................................................................... 22
     Configure MAC Filter Settings ............................................................................................. 26
     Configure Advanced Settings .............................................................................................. 28
     Configure WDS Settings ....................................................................................................... 31
     Configure QoS Settings ........................................................................................................ 33
Configure Security .......................................................................................................... 35
     Configure Firewall Settings .................................................................................................. 35
     Configure VPN Pass-through Settings ................................................................................ 38
     Configure VPN Settings ........................................................................................................ 39
Control Access to the Internet ....................................................................................... 43
     Configure IP Address Filtering Settings ............................................................................. 43
     Configure MAC Address Filtering Settings ........................................................................ 44

                                                                           i
Table of Contents
Configure Applications ................................................................................................... 47
Configure Port Filtering Settings ......................................................................................... 47
Configure Port Range Forwarding Settings ....................................................................... 49
Configure Port Range Triggering Settings ......................................................................... 51
Configure DMZ Settings ........................................................................................................ 53
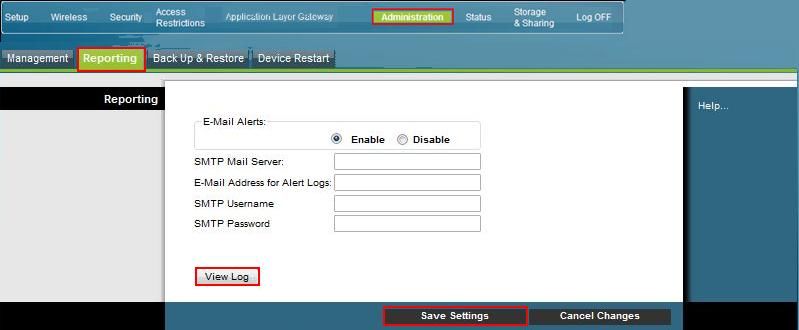
Administration Settings .................................................................................................. 55
Configure Management Settings ......................................................................................... 55
Configure Reporting Settings .............................................................................................. 58
Configure Back Up and Restore Settings ........................................................................... 59
Cox Business MyAccount Backup and Restore ...............................................................60
MyAccount Configuration File Upload and Download .....................................................62
Restart the Device ................................................................................................................. 63
Monitor Device Status .................................................................................................... 65
Gateway Status ...................................................................................................................... 65
Local Network Status ............................................................................................................ 67
Wireless Network Status ....................................................................................................... 68
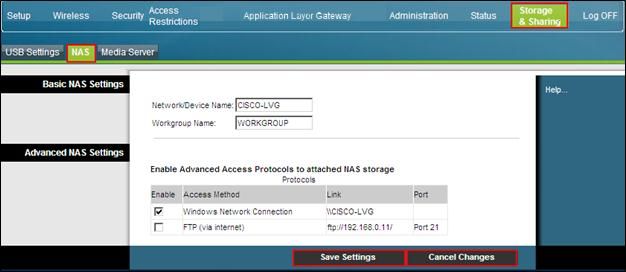
Storage & Sharing ........................................................................................................... 71
USB Settings .......................................................................................................................... 71
Network Attached Storage (NAS)......................................................................................... 73
Media Server .......................................................................................................................... 75
Advanced Gateway Configurations ............................................................................... 77
Virtual Local Area Network ................................................................................................... 77
User Provisioning Details for VLAN Feature ....................................................................78
Bridge Mode ........................................................................................................................... 79
Mixed Mode ............................................................................................................................ 80
Troubleshooting and Frequently Asked Questions...................................................... 81
The wireless gateway does not register an Ethernet connection .................................... 81
The wireless gateway does not register an Ethernet connection after connecting to a hub
................................................................................................................................................. 81
The wireless gateway does not register a cable connection ............................................ 81
Frequently Asked Questions.......................................................................................... 82
I don't understand the front panel status indicators ......................................................... 82
How do I configure the TCP/IP? ........................................................................................... 84
Configure TCP/IP on Windows 7 Systems ......................................................................85
Configure TCP/IP on Windows XP Systems ....................................................................86
Configure TCP/IP on Macintosh Systems........................................................................86
ii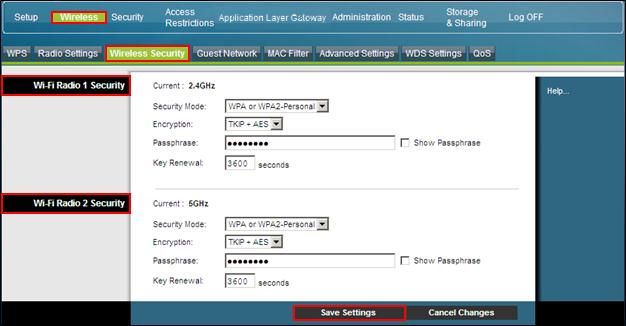
Table of Contents

    How do I renew the IP address on my PC? ......................................................................... 87
     Renew the IP Address on Windows 7 Systems ...............................................................87
     Renew the IP Address on Windows XP Systems ............................................................87
     Renew the IP Address on Macintosh Systems ................................................................87
    How do I arrange for installation? ....................................................................................... 88
    How does the wireless gateway connect to my computer? ............................................. 88
Tips for Improved Performance ..................................................................................... 89
Cox Business Remote Support ...................................................................................... 91
    For More Information ............................................................................................................ 92

                                                                       iii
Overview
Cisco 3829AD Gateway Overview
The Cox Business Internet Gateway and Guest WiFi service is based on the Cisco Wireless
Gateway Model DPC3829AD. It is a high-performance gateway that combines a cable modem,
router, and wireless access point(s) in a single device that provides a cost-effective networking
solution for small to medium businesses.
The gateway incorporates (8) bonded downstream channels along with four (4) bonded
upstream channels. These bonded channels can deliver downstream data rates in excess of
400 Mbps and upstream data rates in excess of 120 Mbps. It provides up to eight (8) times
faster download speeds than conventional single-channel DOCSIS® 2.0 cable modems.
The gateway supports up to 50 simultaneous users for the 2.4 GHz and another 50
simultaneous users for the 5.0 GHz radio for a total of 100 simultaneous users if both
radios are fully utilized. WiFi distance recommendations - 10,000 square feet for the 2.4
GHz radio and 7,500 square feet for the 5.0 GHz radio.
Note: All environments are different and impacted by several real world factors such as
steel walls, microwaves, and other RF interference
The gateway also offers:
Dual band simultaneous 2.4Ghz and 5.0Ghz radios with 3x3 MIMO high power antennas
that deliver 802.11ac with beamforming technology (up to 50 users per radio)
4 Gigabit Ethernet ports
Stateful Packet Inspection firewall technology
Static IP addressing (IPV4 and IPV6)
VPN point-to-point and pass-through
The integrated router features a Dynamic Host Configuration Protocol (DHCP) server, Network
Address Translation (NAT), Network Address Port Translation (NAPT), and a Stateful Packet
Inspection (SPI) firewall. These features allow you to share a single high-speed public Internet
connection and files between devices in the network by attaching multiple wired/wireless
devices to the wireless business gateway.
Cox Business Internet Gateway Admin Guide 1
CBIG and Guest WiFi Services Cox Business Internet Gateway and Guest WiFi Services The Cisco 3829AD Gateway delivers two distinct services; Internet Gateway and Guest WiFi. Customers who purchase both services have two physical gateways deployed in their business location. Internet Gateway Service Internet Gateway service is delivered via a Cisco 3829AD Gateway to provide both wired and wireless networks. The customer administrator has full access to the gateway to configure up to 16 wireless networks and other available feature sets as described in this administrators guide. All networks share bandwidth and priority of IP traffic to and from the various networks and are equal. Customers may choose from any Cox Business Internet Access speed tiers available in their market. Guest WiFi Service A second gateway, second HFC drop, and a guest WiFi option provide dedicated bandwidth to customers so that their business’s internet access is not impacted by WiFi users. This type of configuration ensures that Guest WiFi traffic, such as Netflix or gaming in the waiting room/lobby, does not impact the core business internet needs. The Guest WiFi gateway may also be useful when the geographic location of the Internet gateway and intended Guest WiFi area are far enough apart that a single WiFi access point can’t cover both locations. The customer has three speed tier options to accommodate anticipated peak simultaneous users on the dedicated the Guest WiFi network. The options include: Basic Guest WiFi (5Mbps x 1) Plus Guest WiFi (15 x 3) Premium Guest WiFi (28 x 4) Customers must purchase CBI (Cox Business Internet) to add the Guest WiFi service. Guest WiFi is delivered via a second cable modem/gateway. The Guest WiFi gateway can have one (1) SSID per radio enabled. Many of the other Internet gateway features are removed from the admin interface because this device is dedicated to Guest WiFi users only, and advanced features are rarely needed. The Guest WiFi is unmanaged by Cox. This means the device WiFi Capabilities are not actively monitored for uptime or security events by Cox. Cox does not provide support or configuration for WiFi end points (PC, MAC, Android, iOS, etc.) The customer admin determines if the WiFi network is password-protected or open. Cox is not responsible for customer impacting network or security issues. Cox Business Internet Gateway Admin Guide 1
Login Instructions

Log in to the Gateway{ XE "Logging in to the Gateway" \t "See" }
This section provides instructions for logging in to the Wireless Business Gateway so that you
can customize the gateway to suit your needs rather than using the default (factory) settings.
       Note: It is strongly recommended that you use an Ethernet connection versus Wi-Fi
       when you first connect to the gateway. If you use Wi-Fi during initial configuration and
       you alter the Service Set Identifier (SSID), you will be dropped from the network when
       the change is submitted. You will then have to reconnect using the new SSID.
       The same recommendation applies to changing the wireless passphrase. It is best to
       make these changes over an Ethernet hard-wired connection..
The gateway uses a default IP address of 192.168.0.1. If you have connected to the gateway
correctly and configured your computer properly, use the following procedures to log in to the
gateway as an administrator.
Figure 1.      Login screen

        1. Open your web browser and enter the following IP address: 192.168.0.1.
        2. Press the Enter key.
           Result: The Status DOCSIS WAN login page displays.
        3. Enter your User Name and Password and click the Log In button.
        4. By default the username and password fields are both empty. After initial login the
           admin may create a new username and password. It is highly recommended that
           customers update the username and password and not leave blank.

Cox Business Internet Gateway Admin Guide                                                         3
Login Instructions
Change Your Username
The Cisco application allows you to change your name when needed.
Figure 2. Change Username screen
Section Field Description
Change Password User Name: Displays the user name for the operator User
currently
Name
logged in to the gateway.
Change Password to: Allows you to change your password.
Re-Enter New password: Allows you to re-enter the new
password. You must enter the same password as the one
entered in the Change Password to: field.
Use the following steps to change your username.
1. Log in to the application and click the Log In button.
2. Click the Administration menu option in the toolbar and click the Management tab.
3. Scroll to the Gateway Access / Local Access section and change your user name
and your password and then click the Save Settings button at the bottom of the
screen.
4 Cox Business Internet Gateway Admin GuideSet Up Basics
Set Up Basics{ XE "Set Up Basic Functionality" \t "See" }
This section instructs you on how to configure basic functionality for your gateway settings.
Quick Setup Tab
Use the Quick Setup page to change your password and to configure the WLAN.
Important: The settings on this page are unique to your gateway. You may elect to
modify the setting values or keep the default values. These default settings are all that
you need to operate a secure wireless network. We recommend that you keep your
gateway in a physically secure location away from malicious users who might attempt to
factory reset your gateway.
Changing Your Password
Important: We recommend that you create a new password regularly to protect against
Internet attacks that specifically search for devices operating with well-known or factory
default user names and/or passwords.
Figure 3. Change Password screen
Section Field Description
Change Password Change Password to: Allows you to change your password.
User Name
Re-Enter New password: Allows you to re-enter the new
password. You must enter the same password as the one
entered in the Change Password to field.
Use the following steps when you want to change your password only.
1. Log in to the system and click the Setup menu in the toolbar.
2. Click the Quick Setup tab.
3. Enter your new password in the both the Change Password to: field and the Re-
enter New Password field.
4. Click the Save Settings button at the bottom of the screen.
Cox Business Internet Gateway Admin Guide 5Set Up Basics
Configure Wi-Fi Network
The next two sections on the Quick Setup tab include how to configure the primary network for
the Wi-Fi Radio 1 and Wi-Fi Radio 2.
Figure 4. Wi-Fi Network Configuration
The following table describes what each field means.
Section Field Description
Wi-Fi Radio 1 Network and 802.11 Band: Allows you to choose which Wi-Fi
Wi-Fi Radio 2 Network band you are configuring.
Wireless Interface: Allows you to Enable or
Disable the wireless network.
Network Name (SSID): Allows you to enter a
name for your wireless network or to use the
default value. The value you enter will be viewable
on PCs and other wireless client devices.
Note: The factory default Service Set Identifier
(SSID) is either the last six (6) characters of the
CM MAC Address or the SSID as identified on
the product label.
6 Cox Business Internet Gateway Admin GuideSet Up Basics
Section Field Description
Security Mode: Allows you to select a wireless
Wi-Fi Radio 1 Network and security mode to help protect your network. If you
select Disable, your wireless network is not secure
Wi-Fi Radio 2 Network (continued)
and any wireless device within range may
connect to it.
Note: The factory default Wireless Security Mode
is WPA or WPA2-Personal.
Encryption: Allows you to select a level of
encryption based on the wireless security mode
you choose.
Passphrase: The passphrase key for the gateway.
The key can be from 8 to 63 characters. The
factory default passphrase is equal to the 9-digit
serial number of your gateway, which can be found
on the rating label attached to your wireless
gateway. The Show Key box toggles the
passphrase between hidden characters and clear
text.
Use the following steps to configure the Wi-Fi Radio 1 (2.4GHz) and 2 (5.0GHz) Networks.
1. Log in to the system and click the Setup menu in the toolbar.
2. Click the Quick Setup tab.
3. Scroll to the Wi-Fi Radio 1 Network section and use the information in the Field
Description column in the table above to help you populate the fields.
4. Repeat step 3 for the Wi-Fi Radio 2 Network section.
a. Note that the SSID network names can be configured the same for each
radio. Most devices (phones, tablets and computer) will auto select the best
available network based upon the hardware capabilities of the device. If the
admin wants uses to be aware of the network capabilities the SSIDs could
be labeled to include 2.4 or 5.0 as an example.
5. Click the Save Settings button.
Cox Business Internet Gateway Admin Guide 7Set Up Basics
Configure LAN Setup { XE "Configure LAN Setup Settings" \t "See" }
The LAN Setup page allows you to configure the settings for the Local Area Network (LAN).
These settings include the range of IP addresses that define the LAN itself, as well as how the
addresses are assigned (automatically by DHCP or manually) as new devices are added to the
network.
Configure Gateway IP
Important: Unless you are knowledgeable about administering IP addresses, we
recommend that you do not change these settings. If you change these values
incorrectly, you can lose Internet access.
Figure 5. Configure LAN Gateway IP screen
Section Field Description
Network Setup (LAN) Gateway IP Local IP Address. The base IP address of the private LAN. The
factory default LAN IP Address is 192.168.0.1
Subnet Mask. The subnet mask for your LAN.
Follow these instructions to apply settings to the Configure LAN Setup / Gateway IP:
1. The Setup LAN page appears whenever you log on to the gateway. However, if the
page does not display, click the LAN Setup tab and scroll to the Network Setup
(LAN) Gateway IP section.
2. Use the information in the Field Description column in the table above to help you
populate the fields.
3. After you make your selections, click the Save Settings button to apply your
changes or click the Cancel Changes button to withdraw.
8 Cox Business Internet Gateway Admin GuideSet Up Basics
Configure Network Address Server Settings
Figure 6. Network Address Server Settings
Section Field Description
Network Address Server Settings (DHCP) DHCP Server. Allows you to enable or disable the
DHCP server in the business gateway. The DHCP
server is used to automatically allocate IP
addresses to devices as they are attached to your
network.
Connected Devices Summary. Displays the MAC
Address and IP Address of the devices that are
connected to the gateway.
Pre-assigned DHCP IP Addresses. Click Pre-
assigned DHCP IP Addresses to assign a
specific IP address to a PC or other device when
they request an IP address using DHCP.
Only addresses within the range of the gateway's
DHCP address pool can be reserved with this
feature.
Cox Business Internet Gateway Admin Guide 9Set Up Basics
Section Field Description
Network Address Server Settings Notes:
(DHCP) (continued) The Add Static IP button adds the Static IP address to the list
of factory assigned IP addresses.
The Remove Static IP button removes the Static IP address
from the list of assigned IP addresses
Starting IP Address. Displays the starting address used by the
built-in DHCP server to distribute Private LAN IP addresses.
Because the device default IP address is 192.168.0.1, the
starting IP address must be 192.168.0.2 or greater, but smaller
than 192.168.0.253.
Maximum Number of DHCP Users: Enter the maximum
number of users to which the DHCP server can assign IP
addresses for use in the LAN. This number cannot be greater
than 254 minus the starting IP address described above.
Client Lease Time: The amount of time an IP address is valid.
IP address leases are renewed automatically by your PC and
other devices that use DHCP to obtain IP addresses.
If a lease is allowed to expire, the IP address will be returned to
the pool of available IP addresses that can be assigned by the
DHCP server as new devices are added to your network. The
default is 60 minutes when the gateway is online.
LAN Static DNS (Domain Name Server) 1-3: DNS is used by a
PC or other client devices to locate the public IP address
associated with a URL or the name-based address of a website.
You can manually specify which DNS servers are to be used by
devices in your network by entering the servers’ IP addresses.
Otherwise, the gateway will forward the DNS server information
from the Cox Business Internet service automatically. The
default is to leave these fields blank.
Use the following steps to configure the Network Address Server (DHCP)
1. Log in to the system and click the Setup menu in the toolbar and the LAN Setup
tab.
2. Use the information in the Field Description column in the table above to help you
populate the fields.
3. After you make your selections, click the Save Settings button to apply your
changes or click the Cancel Changes button to withdraw.
10 Cox Business Internet Gateway Admin GuideSet Up Basics
Configure Time Settings
The last section of the Quick Setup tab allows you to set up the correct time zone for the server
in your location.
Figure 7. Time Settings screen
Section Field Description
Time Settings Time Zone: Select the time zone for your location. If your
location follows daylight saving time, select Automatically
adjust clock for daylight saving time.
Provide input/verify descriptions for the following settings:
Daylight Saving time minutes
Time Server: Enter the name of a server to be used as the
Daylight Saving Time (DST) server and click Add Server to add
the server.
Remove Server: To eliminate a server from the list of available
DST servers, select the server and click Remove Server.
NTP. Select Enable or Disable to indicate whether or not a
Network Time Protocol (NTP) server will be used.
Use the following steps to configure Time Settings.
1. Log in to the system and click the Setup menu in the toolbar and the LAN Setup
tab.
2. Use the information in the Field Description column in the table above to help you
populate the fields.
3. When you are done, click the Save Settings button to apply your changes or click
the Cancel Changes button to withdraw.
Cox Business Internet Gateway Admin Guide 11Set Up Basics
Configure DDNS Settings{ XE "Configure DDNS Settings" \t "See" }
Dynamic Domain Name Service (DDNS) provides the gateway—for which the IP address can
change—with a host name or URL that can be deciphered by network applications through
standard DNS queries. DDNS is useful when you host your own website, FTP server, or other
server behind the device.
Note: You must sign up for DDNS service before you can use this feature.
This section describes how to perform the following from the DDNS Setup page:
Disable DDNS
Enable and configure DDNS
Figure 8. Configure DDNS screen
Enable and Configure DDNS{ XE "Enable and Configure DDNS" \t "See" }
To use the DDNS feature, you must first set up an account and establish a URL with
www.DynDNS.org. The DNS feature will not work without a valid account.
Follow the instructions on the website to set up an account. After you have set up a valid
account for DDNS, use the steps below to configure the gateway for DDNS service.
1. From the Setup page, click the DDNS tab.
2. Click the drop-down arrow and select Enable.
3. Enter your User Name, Password, and the name of the Host in the corresponding
fields.
4. Click the Save Settings button to save your changes.
Result: The gateway advises the DDNS service of your current WAN (Internet) IP
address whenever this address changes. (Note: The Status area of the window
displays the status of the DDNS service connection.)
12 Cox Business Internet Gateway Admin GuideSet Up Basics
Disable DDNS{ XE "Disable DDNS" \t "See" }
Follow these instructions to disable DDNS (the factory default setting):
1. From the Setup page, click the DDNS tab.
Result: The DDNS opens and displays available settings.
2. Click the DDNS Service drop-down list and select Disable.
3. After you make your selections, click the Save Settings button to apply your
changes or click the Cancel Changes button to withdraw.
Cox Business Internet Gateway Admin Guide 13Configure Wireless Settings
Configure Wireless Settings{ XE "Configure Wireless Settings" \t
"See" }
Setting up the gateway for wireless communication allows you to connect to the Internet from
any location within range of the wireless application protocol (WAP) without having to use wired
connections.
This section provides procedures for configuring the WAP to meet your needs. These options
are available as tabs on the Wireless.
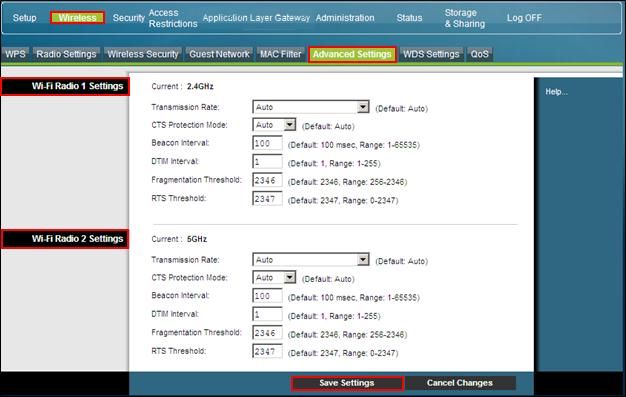
Configure WPS { XE "Configure WPS Settings" \t "See" }
Use this page to configure Wi-Fi Protected Setup (WPS) to attach WPS-enabled devices to your
network. When you select WPS as your wireless configuration, settings are pre-configured.
Figure 9. Wireless WPS screen
Cox Business Internet Gateway Admin Guide 15Configure Wireless Settings
Section Field Description
Wi-Fi Protected Setup Enable / Disable. Select the radio button to activate or
deactivate wirless protection for your gateway.
Click the Wi-Fi Protected Setup icon on the client side at the
same time you press the Wi -Fi Protected Setup button on the
device to automatically establish protection.
Wi-Fi Protected Setup PIN. This is the most secure option to
register a wireless client with the gateway. The Wi-Fi Protected
Setup PIN number is found in the client Wi-Fi Protected Setup
utility. After entering the client's Wi-Fi Protected Setup PIN
number, you can connect to the gateway by clicking the
Register button.
WPS Setup Using the Gateway PIN. Note the gateway's Wi-Fi
Protected Setup PIN number that is displayed on the Wi-Fi
Protected Setup page. Click the Register button (using any Wi-
Fi Protected Setup client utility) and enter the gateway's Wi-Fi
Protected Setup PIN number in the client device to complete the
registration.
To create a new gateway PIN number for use in pairing with a
WPS client, click New PIN Code and a number will be randomly
generated.
Wi-Fi Radio 1 Network Displays the name of the network and the security level chosen
for the Radio 1 network.
Wi-Fi Radio 2 Network Displays the name of the network and the security level chosen
for the Radio 2 network.
Use the following steps to enable or disable the Wi-Fi Protected Setup.
1. From the Wireless menu in the toolbar, click the WPS tab.
2. Scroll to the Wi-Fi Protected Setup section and select the Enable radio button if
you want to use WPS to set up devices that support WPS. Otherwise, select the
Disable radio button.
3. Use the information in the Field Description column in the table above to help you
populate the fields.
4. After you make your selections, click the Save Settings button to apply your
changes or click the Cancel Changes button to withdraw.
Note: When using WPS mode, wired equivalent privacy (WEP) is not supported. If you
must use WEP encryption, select the Disabled button. Cox strongly advises against
using WEP because it is a compromised WiFi security method and can easily be
hacked.
16 Cox Business Internet Gateway Admin GuideConfigure Wireless Settings
Configure Radio Settings{ XE "Radio Settings" \t "See" }
This section describes how to configure the interface on the Wi-Fi Networks for both Radio 1
and Radio 2.
Figure 10. Radio Settings screen
Section Field Description
Wi-Fi Radio 1 Network Wireless Interface. Select Enable or Disable to enable or
disable the wireless network.
802.11 Band. Displays the radio band frequency currently in
operation
Network Mode. Choose one of these options:
B/G only
N Only
B/G/N Mixed
Scan 2.4GHz Aps. Click this button to look for a 2.4GHz
bandwidth access point.
Cox Business Internet Gateway Admin Guide 17Configure Wireless Settings
Section Field Description
Channel Width. Choose one of these options:
20 MHz Only
Auto (20 or 40 MHz)
Channel. Select one of the channels from the drop-down list to
correspond with your network settings. All devices in your
wireless network must broadcast on the same channel in order
to communicate. You can select Auto (factory default) for
automatic channel selection. Note: “Auto” is the preferred setting
and provides the best user experience.
Extended Channel. Select one of the extended channels from
the drop-down list to correspond with your network settings. All
devices in your wireless network must broadcast on the same
channel in order to communicate. You can select Auto (factory
default) for automatic channel selection. Note: “Auto” is the
preferred setting and provides the best user experience.
The following network information status is displayed:
Network Name (SSID). The name or service set identifier
(SSID) of your wireless access point
MAC Address (BSSID). The MAC Address of your gateway's
local wireless access point
SSID Broadcast. The status of the gateway's SSID Broadcast
feature.
Wi-Fi Radio 2 Network Wireless Interface. Select Enable or Disable to enable or
disable the wireless network.
802.11 Band. Displays the radio band frequency currently in
operation
Network Mode. Choose one of these data transmission options:
A only
N Only
A/N Mixed
Channel Width. Choose one of these options:
20 MHz Only
Auto (20 or 40 MHz)
80 MHz for 802.11 AC (Note: To enable AC, the network
mode must be set to A/N)
Channel. Select one of the channels from the drop-down list to
correspond with your network settings. All devices in your
wireless network must broadcast on the same channel in order
to communicate. You can select Auto (factory default) for
automatic channel selection. Note: “Auto” is the preferred setting
18 Cox Business Internet Gateway Admin GuideConfigure Wireless Settings
Section Field Description
and provides the best user experience.
Extended Channel. Select one of the extended channels from
the drop-down list to correspond with your network settings. All
devices in your wireless network must broadcast on the same
channel in order to communicate. You can select Auto (factory
default) for automatic channel selection. Note: “Auto” is the
preferred setting and provides the best user experience.
The following network information status is displayed:
Network Name (SSID). The name or service set identifier
(SSID) of your wireless access point
MAC Address (BSSID). The MAC Address of your gateway's
local wireless access point
SSID Broadcast. The status of the gateway's SSID Broadcast
feature.
Use the following steps to configure the wireless interface for the Wi-Fi Radio 1 and Radio 2
Networks.
1. From the Wireless menu in the toolbar, click the Radio Settings tab.
2. Use the information in the Field Description column in the table above to help you
populate the fields.
3. After you make your selections, click the Save Settings button to apply your
changes or click the Cancel Changes button to withdraw.
Cox Business Internet Gateway Admin Guide 19Configure Wireless Settings
Configure Wireless Security Settings{ XE "Wireless Security Settings" \t
"See" }
The Wireless Security page allows you to configure protection settings for Wi-Fi Radio 1 and
Wi-Fi Radio 2.
Figure 11. Wireless Security screen
Section Field Description
Wi-Fi Radio 1 Security Security Mode. Allows you to select a wireless security mode
to help protect your network. If you select Disable, then your
wireless network is not secure and any wireless device within
range may connect to it. Note: The factory default mode is WPA
or WPA2-Personal. Note: WEP is a well known compromised
security and should not be used.
Encryption. It allows you to select a level of encryption based
on the wireless security mode you choose.
Passphrase. The passphrase key for the gateway. The key can
be from 8 to 63 characters. The factory default passphrase is
equal to the 9-digit serial number of your gateway. The serial
number can be found on the rating label attached to your
wireless gateway. Selecting Show Key toggles the passphrase
between hidden characters and clear text.
Key Renewal. Enter a time period that instructs the device
about how often it should change encryption keys. The default is
3600 seconds.
20 Cox Business Internet Gateway Admin GuideConfigure Wireless Settings
Wi-Fi Radio 2 Security Security Mode. Allows you to select a wireless security mode
to help protect your network. If you select Disable, then your
wireless network is not secure and any wireless device within
range may connect to it. Note: The factory default mode is WPA
or WPA2-Personal. Note: WEP is a well known compromised
security and should not be used.
Encryption. Allows you to select a level of encryption based on
the wireless security mode you choose.
Passphrase. The passphrase key for the gateway. The key can
be from 8 to 63 characters. The factory default passphrase is
equal to the 9-digit serial number of your gateway. The serial
number can be found on the rating label attached to your
wireless gateway. Selecting Show Key toggles the passphrase
between hidden characters and clear text.
Key Renewal. Enter a time period that instructs the device
about how often it should change encryption keys. The default is
3600 seconds.
Follow these instructions to configure Wireless Security settings:
1. From the Wireless menu in the toolbar, click the Wireless Security tab.
2. Use the information in the Field Description column in the table above to help you
populate the fields.
3. After you make your selections, click the Save Settings button to apply your
changes or click the Cancel Changes button to withdraw.
Cox Business Internet Gateway Admin Guide 21Configure Wireless Settings Configure Guest Network Settings The Guest Networks tab is only available in the Cox Business “Internet Gateway” subscription and gateway configuration. This feature is different from the Cox Business Guest Wi-Fi service offering because it allows you to define guest Wi-Fi SSIDs for each radio, even though the Internet service bandwidth tier is shared between all enabled guest Wi-Fi SSIDs. The Guest Network tab allows you to configure up to seven (7) additional SSIDs per radio. Remember that these SSIDs share the same Internet bandwidth. When you subscribe to the Cox Business Guest Wi-Fi service, bandwidth and a second physical gateway is dedicated for guest Wi-Fi users and there is no contingency to the primary gateway’s bandwidth. The second gateway dedicated to “Guest WiFi” network will not have access to the Guest Network tab in the GUI. The “Guest Network” section allows you to set up the Wi-Fi Radio Guest Network for both Radio 1 and Radio 2, which includes naming the network and designating whether you want to enable it as a SSID Broadcast. In the Guest Network Settings section, you provide technical specifications for the DHCP server. When creating additional SSIDs in the “Guest Network” tab, all networks on the gateway share the Internet access bandwidth. There is no priority given to any SSID. Figure 12. Guest Network screen 22 Cox Business Internet Gateway Admin Guide
Configure Wireless Settings

Section                                     Field Description
Wi-Fi Radio Guest Network                   Wireless Interface. Allows you to select the wireless interface
                                            that you want to configure. The options are Radio 1 and Radio
                                            2.
                                            Network Name (SSID) The name that you want to assign to the
                                            Service Set Identifier (SSID).
                                            MAC Address (BSSID). Similar to the SSID, the Basic Service
                                            Set Identifier (BSSID) is the 'name' of the wireless network that
                                            shows up under network connections.
                                            SSID Broadcast. An SSID is the name of a wireless local area
                                            network (WLAN). All wireless devices on a WLAN must use the
                                            same SSID in order to communicate with each other.
                                            The SSID on wireless clients can be set manually, by entering
                                            the SSID into the client network settings or automatically, by
                                            leaving the SSID unspecified or blank. A network administrator
                                            often uses a public SSID that is set on the access point and
                                            broadcast to all wireless devices in range. Some wireless
                                            access points disable the automatic SSID broadcast feature to
                                            improve network security.
                                            By disabling the broadcasting of the SSID, or even the beacon
                                            signal itself, you can hide the presence of your wireless network
                                            or at least obscure the SSID itself which is critical for a device to
                                            connect to your network.
                                            Enable. Check this box to allow the SSID broadcast.

Cox Business Internet Gateway Admin Guide                                                                  23
Configure Wireless Settings
Section Field Description
Guest Network Settings Network Name (SSID). The name of the network that you want
to configure
Security Mode. Select the level of security that you want to
apply to the network that you selected from the Network Name
(SSID) drop-down list.
Wired Equivalent Privacy (WEP) is a security protocol for
wireless networks that encrypts transmitted data. Without any
security your data can be intercepted without difficulty. Note:
WEP is a well known compromised security and should not be
used.
WEP has three settings: Off (no security), 64-bit (weak security),
128-bit (a bit better security). WEP is not difficult to crack, and
using it reduces performance slightly.
If you run a network with only the default security, where WEP is
turned off, others can immediately log on to your network and
use your Internet connection.
Wi-Fi Protected Access (WPA) replaces WEP with a protocol
that is — given current technology — impossible to crack.
DHCP Server. Dynamic Host Configuration Protocol (DHCP) is
a networking protocol that is used by servers on an IP network
to allocate IP addresses to computers. The purpose of DHCP is
to automate the IP address configuration of a computer without
a network administrator.
IP Address. An IP address is assigned to a computer for a set
interval, after which, the computer must renew the IP address or
acquire a new one. In this field, enter the IP address of the
DHCP server.
Subnet Mask. A mask is used to determine what subnet an IP
address belongs to. An IP address has two components, the
network address and the host address. For example, the first
two numbers (150.215) in the IP address 150.215.017.009
represent the network address, and the second two numbers
(017.009) identify a particular host on this network.
Subnetting enables the network administrator to further divide
the host part of the address into two or more subnets.
Lease Pool Start. The first IP address in the scope of
addresses that you will use for the DHCP server. After a DHCP
scope is established changes in the number of nodes that
require DHCP leases may change over time.
Lease Pool End. The last IP address in the pool of addresses
that you use for the DHCP server. a certain address pool and
determine that the address pool range needs to be increased,
you can simply delete the scope and recreate it. Deletion of the
scope will.
Lease Time. The amount of time that the scope of leased IP
addresses are valid until they expire. The value can be hours,
days, weeks, months, etc.
24 Cox Business Internet Gateway Admin GuideConfigure Wireless Settings
Follow these instructions to configure Guest Network settings:
1. From the Wireless menu in the toolbar, click the Guest Network tab.
2. Use the information in the Field Description column in the table above to help you
populate the fields.
3. After you make your selections, click the Save Settings button to apply your
changes or click the Cancel Changes button to withdraw.
Cox Business Internet Gateway Admin Guide 25Configure Wireless Settings
Configure MAC Filter Settings{ XE "Configure MAC Filtering" \t "See" }
Use the MAC Filter feature to allow or block access to your wireless LAN based on the MAC
Address of the wireless client devices. The MAC Filter feature, also known as an access list,
can be used to help protect your wireless network from access by unauthorized users.
Figure 13. MAC Filter screen
Section Field Description
MAC Filter Allows you to Enable or Disable MAC Filtering for the gateway.
Access Restriction Access Restriction. Allows you to permit or block computers
from accessing the wireless network. The choice that you make
here affects the addresses listed on this page. Choose one of
the following options:
Block computers listed below from accessing the wireless
network. Select this option to deny Internet access to the
MAC addresses of the devices you list in the table. All other
MAC addresses will be allowed Internet access.
Permit computers listed below access to the wireless
26 Cox Business Internet Gateway Admin GuideConfigure Wireless Settings
Access Restriction (continued) network. Select this option to allow Internet access only to
the MAC addresses of the devices you list in the table. Any
MAC addresses not listed in the table will be denied Internet
access
MAC Address Filter MAC Address Filter List. The MAC Address Filter List displays
List users whose wireless access you want to control. Click
Wireless Client List to display a list of network users by MAC
address. From the To Sort by drop-down menu, you can
categorize the table by IP Address, MAC Address, Status,
Interface, or Client Name. To view the most up-to-date
information, click Refresh.
Follow these instructions to configure MAC address filtering for your wireless network:
1. From the Wireless menu in the toolbar, click the MAC Filter tab.
2. Use the information in the Field Description column in the table above to help you
populate the fields.
3. After you make your selections, click the Save Settings button to apply your
changes or click the Cancel Changes button to withdraw.
Cox Business Internet Gateway Admin Guide 27Configure Wireless Settings
Configure Advanced Settings{ XE "Configure Advanced Settings" \t "See" }
Important: An expert administrator should be the only person to adjust these settings.
Incorrect settings can reduce wireless performance.
Figure 14. Advanced Settings screen
Section Field Description
Wi-Fi Radio 1 Settings and The rate of data transmission should be set depending on the
Wi-Fi Radio 2 Settings speed of your Wireless-N networking.
Select from a range of transmission speeds, or select Auto to
have the device automatically use the fastest possible data rate
and enable the Auto-Fallback feature. Auto-Fallback negotiates
the best possible connection speed between the device and a
wireless client. The default setting is Auto.
28 Cox Business Internet Gateway Admin GuideConfigure Wireless Settings
Section Field Description
Wi-Fi Radio 1 Settings and Choose one of the following options for transmission rate:
Wi-Fi Radio 2 Settings (continued) Auto (factory default)
Use Legacy Rate
0: 6.5 or 13.5 Mbps
1: 13 or 27 Mbps
2: 19.5 or 40.5 Mbps
3: 26 or 54 Mbps
4: 39 or 81 Mbps
5: 52 or 108 Mbps
6: 58.5 or 121.5 Mbps
7: 65 or 135 Mbps
8: 13 or 27 Mbps
8: 13 or 27 Mbps
9: 26 or 54 Mbps
10: 39 or 81 Mbps
11: 52 or 108 Mbps
12: 78 or 162 Mbps
13: 104 or 216 Mbps
14:117 or 243 Mbps
15: 130 or 270 Mbps
CTS Protection Mode CTS (Clear-To-Send) Protection Mode boosts the device's
ability to catch all wireless transmissions, but can severely
decrease performance. Select Auto if you want the device to
use this feature as needed, when the Wireless- N/G products
are not able to transmit to the device in an environment with
heavy 802.11b traffic. Select Disable if you want to permanently
disable this feature.
Beacon Interval. The Beacon Interval value indicates the frequency interval of
the beacon. A beacon is a packet broadcast by the device to
synchronize the wireless network.
(Default: 100 msec, Range: 20-1000)
DTIM Interval. The Delivery Traffic Indication Message (DTIM) indicates the
interval between Broadcasts/Multi-cast transmissions. DTIM
field is a countdown field informing clients of the next window for
listening to broadcast and multicast messages. When the device
has buffered broadcast or multicast messages for associated
clients, it sends the next DTIM with a DTIM Interval value. Its
clients hear the beacons and awaken to receive the broadcast
and multicast messages.
(Default: 1, Range: 1-255)
Cox Business Internet Gateway Admin Guide 29Configure Wireless Settings
Section Field Description
Fragmentation Threshold Fragmentation Threshold. Specifies the maximum size for a
packet before data is fragmented into multiple packets. If you
experience a high packet error rate, you may slightly increase
the Fragmentation Threshold. Setting the Fragmentation
Threshold too low may result in poor network performance. Only
minor reduction of the default value is recommended.
In most cases, it should remain at its default value of 2346.
RTS Threshold RTS Threshold. Determines at what packet size beyond which
the ready to send/clear to send (RTS/CTS) mechanism is
invoked.
If you encounter inconsistent data flow, only minor reduction of
the default value, 2346, is recommended. If a network packet is
smaller than the preset RTS Threshold size, the RTS/CTS
mechanism will not be enabled.
The device sends Ready to Send (RTS) frames to a particular
receiving station and negotiates the sending of a data frame.
After receiving a RTS, the wireless station responds with a
Clear to Send (CTS) frame to acknowledge the right to begin
transmission. The RTS Threshold value should remain at its
default value of 2347.
Follow the steps below to set up the following advanced wireless functions:
1. From the Wireless menu in the toolbar, click the Advanced Settings tab.
2. Use the information in the Field Description column in the table above to help you
populate the fields.
3. After you make your selections, click the Save Settings button to apply your
changes or click the Cancel Changes button to withdraw.
30 Cox Business Internet Gateway Admin GuideConfigure Wireless Settings
Configure WDS Settings{ XE "Configure WDS Settings" \t "See" }
The Wireless Distribution System (WDS) Settings page allows you to expand the coverage
of your wireless network by deploying signal repeaters.
Figure 15. WDS Settings screen
Section Field Description
Wi-Fi Radio 1 WDS Settings WDS MAC Address. Displays the WDS MAC Address (or
BSSID) of your gateway access point.
Allow Wireless Signal To Be Repeated by a Repeater. Select
this option to allow a wireless client to connect to a repeater and
route traffic between the wireless client and a repeater. A
maximum of three (3) repeaters is allowed.
Remote Access Point's MAC Address (MAC 1 through 3).
Use the three fields (MAC 1, 2, and 3) to enter the MAC address
of the repeaters.
Cox Business Internet Gateway Admin Guide 31Configure Wireless Settings
Follow these instructions to configure WDS Settings.
Important: Make sure the channel settings are the same for all WDS enabled devices.
1. From the Wireless menu in the toolbar, click the WDS Settings tab.
2. Use the information in the Field Description column in the table above to help you
populate the fields.
3. After you make your selections, click the Save Settings button to apply your
changes or click the Cancel Changes button to withdraw.
32 Cox Business Internet Gateway Admin GuideConfigure Wireless Settings
Configure QoS Settings{ XE "Configure QoS Settings" \t "See" }
Quality of Service (QoS) ensures better service to high-priority types of network traffic, which
may involve demanding, real-time applications, such as video conferencing. QoS settings allow
you to specify priorities for different types of traffic. Lower priority traffic will be slowed down to
allow greater throughput or less delay for high priority traffic.
Figure 16. QoS screen
Section Field Description
Wi-Fi Radio 1 QoS and Wi-Fi Radion 2 WMM Support. If WMM (Wi-Fi Multimedia) is supported by
QoS your wireless clients, enabling this feature means that voice
and multimedia traffic will be given higher priority than other
traffic.
Select the desired option:
Enable (factory default)
Disable
No ACK. Abbreviation for Acknowledgement (data networks). It
is a signal to acknowledge the receipt of data. No Ack allows
you to enable or disable No ACK. No ACK is disabled by default.
This feature is recommended for data services where speed of
transmission is important and packet loss is tolerable to a certain
degree.
If you select Disable, an acknowledge packet is returned for
every packet received. This provides a more reliable
transmission, but it increases traffic load, which decreases
performance.
Select the desired option:
Enable
Cox Business Internet Gateway Admin Guide 33Configure Wireless Settings
Disable (factory default)
Follow these instructions to configure QoS priorities for different types of traffic:
1. From the Wireless menu in the toolbar, click the QoS tab.
2. Use the information in the Field Description column in the table above to help you
populate the fields.
3. After you make your selections, click the Save Settings button to apply your
changes or click the Cancel Changes button to withdraw.
34 Cox Business Internet Gateway Admin GuideConfigure Security
Configure Security{ XE "Configure Security" \t "See" }
This section provides procedures on how to establish security for your gateway; such as how to
set the level of protection for the firewall, how to enable or disable a virtual private network
(VPN) pass-through, and how to configure the VPN tunnel.
Configure Firewall Settings{ XE "Configure Firewall Settings" \t "See" }
Use the settings on this page to configure a firewall and filter types of unwanted traffic on the
gateway local network. Advanced firewall technology deters hackers and protects your network
from unauthorized access.
Figure 17. Firewall Settings screen
Cox Business Internet Gateway Admin Guide 35Configure Security
Section Field Description
Firewall SPI Firewall Protection. Stateful firewall (which is any firewall
that performs stateful packet inspection (SPI) or stateful
inspection) is a firewall that tracks the state of network
connections; e.g., TCP streams, UDP communication that travel
across it. The firewall is programmed to distinguish legitimate
packets for different types of connections. Only packets that
match a known active connection are allowed by the firewall;
others are rejected.
Select the desired option:
Off (factory default). No ports are restricted and SPI is “off.”
Low. No ports are restricted and SPI is “on.”
Medium. The following ports are allowed and SPI is “on”:
5190, 546, 547, 53, 989, 990, 80, 8080, 443, 143, 993, 4500,
123, 110, 995, 1812, 25, 22, 465, 1725, 1200, 992, 3074,
3724, 5050
High. The following ports are allowed and SPI is “on.” 53,
80, 443, 993, 4500, 123, 995, 22, 25, 465
Cox Business VoiceManager Toolbar or Receptionist Console
application users must set the gateway firewall to “Low” to
achieve full functionality.
IPv6 Firewall Protection.
Off
On (factory default)
Filters Block fragmented IP packets. Enables/disables filtering of
fragmented IP packets. This feature helps protect your private
local network from Internet based denial of service attacks.
Block Port Scan Detection. Enables/disables the gateway
from responding to Internet based port scans. This feature is
designed to protect your private local network from Internet
based hackers who attempt to gain unsolicited access your
network by detecting open IP ports.
Block IP Flood Detection. Blocks malicious devices that
attempt to flood devices or networks with illegal broadcast
packets. Also referred to as “broadcast storm.”
Note: This is the factory default option.
Block WAN Requests Block Anonymous Internet Requests. Enable this feature to
keep your network from being “pinged” or detected by other
Internet users. It also hides your network ports. Both make it
more difficult for outside users to enter your network.
Note: This is the factory default option.
36 Cox Business Internet Gateway Admin GuideYou can also read