Dirt Cheap DJ Create 2 Bin
←
→
Page content transcription
If your browser does not render page correctly, please read the page content below
Dirt Cheap DJ Create® 2 Bin
Summary:
So you want to impress your friends with a roaming, robotic DJ at your next party, but that speaker that you glued on top of your
Create® 2 keeps getting knocked off. Well, then follow these instructions to put two speakers and a Bluetooth module into your
Create 2 bin for less than $15.

                        Part Description                            Qty                 Where to Buy

   2-Channel 3W PAM8403 Audio Amplifier Board                         1     http://goo.gl/76twRl
   Bluetooth V2.0+EDR USB Drive Audio Receiver
                                                                      1     http://goo.gl/AwTd4o
   w/ 3.5mm Audio Male to Male Cable
                                                                            Here are a couple of options:
   Speaker (2” or smaller in diameter)                                2     http://goo.gl/z8K1V3
                                                                            http://goo.gl/N3pjuc
                                                                            http://goo.gl/y6QnHR
   Battery Holder 4xAA with Cover and Switch                          1
                                                                            http://goo.gl/HRDFIz
   iRobot Create 2 Vacuum Bin                                         1

   4x AA batteries

  © 2014 All Rights Reserved. iRobot, Roomba and Create are registered trademarks of iRobot Corporation.
  Arduino is a trademark of Arduino SA. Raspberry Pi is a trademark of the Raspberry Pi Foundation.
                                                                                                                                    1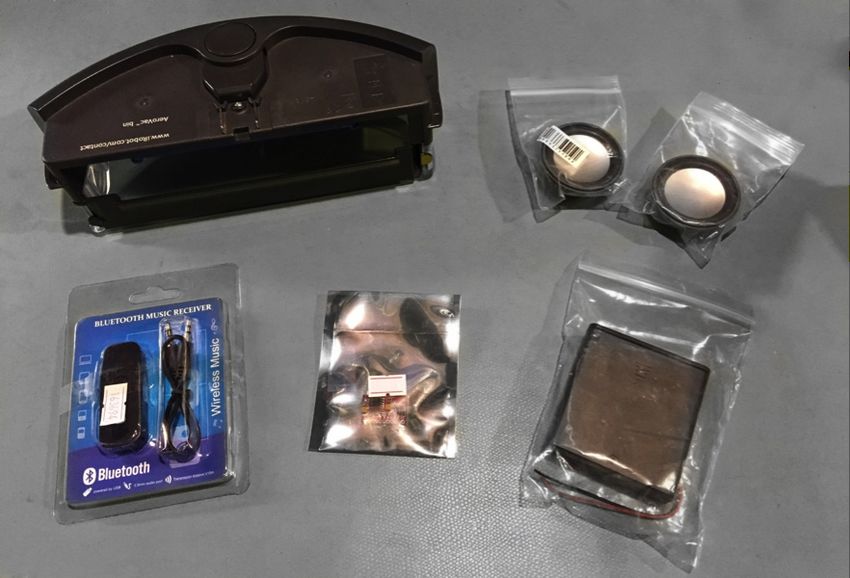
Tools and other equipment c. Choose which speaker will be the left and which
• Soldering Iron will be the right and label them accordingly.
• Hot Glue Gun 2. Wiring the audio amplifier board
• Small Flathead Screwdriver
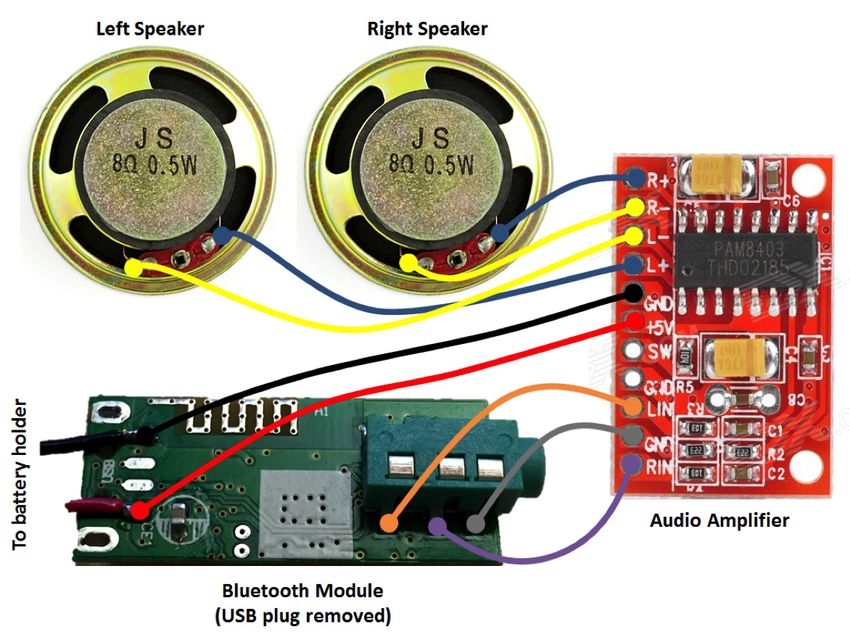
a. Solder short segments (2” or less) of wires to the +
• #1 Phillips Screwdriver and - terminals on the back of the two speakers.
• Heat shrink tubing or electrical tape
• Flexible wire b. Solder the other ends of these wires to the matching
connections on the audio amplifier board (R+, R-, L+, L-).
• Rotary Cutting Tool
• Hook and loop fastener c. Solder short segments (2” or less) of wires to the +5V
and Ground connections on the audio amplifier board.
Procedure Use red and black wire for V+ and Ground connections
1. Preparing your electronics respectively to avoid confusion later.
a. Remove all of your electronics from their packaging and d. Solder short segments (2” or less) of wires to the LIN,
lay them out on your work surface. GND, and RIN connections at the bottom of the audio
amplifier board. Use different colors for each channel.
b. Remove the USB cover from the Bluetooth module
and carefully use a small flat head screwdriver to pry the
plastic housing apart. This won’t take much force.
Discard the plastic housing pieces.
© 2014 All Rights Reserved. iRobot, Roomba and Create are registered trademarks of iRobot Corporation.
Arduino is a trademark of Arduino SA. Raspberry Pi is a trademark of the Raspberry Pi Foundation.
2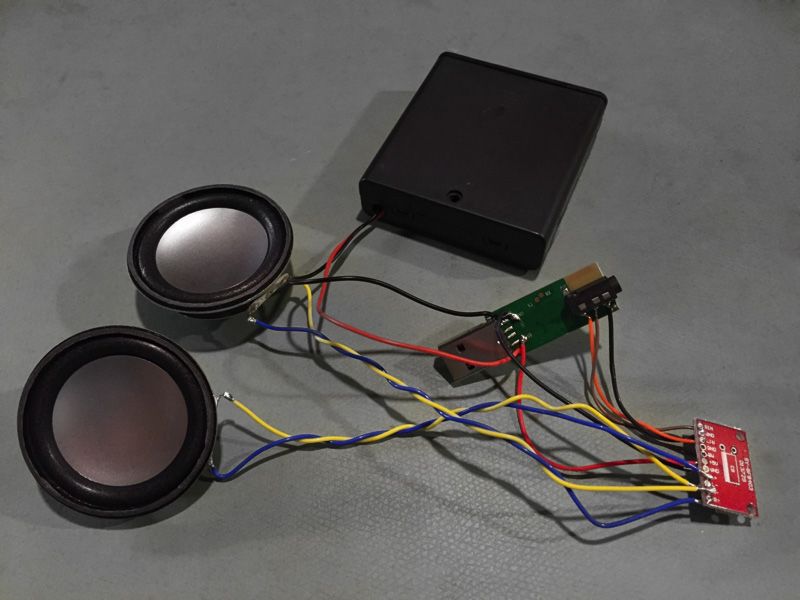
3. Wiring the Bluetooth module board e. Installing the electronics in your vacuum bin
Note: This process can be simplified by using a High
a. Solder short segments (2” or less) of wires to the +5V
Capacity Bin, which doesn’t have a vacuum fan in it. This
and Ground pads at the back of the USB
preserves the bin latch assembly and eliminates the need
plug. Again, use red and black wire for V+ and
to modify the vacuum fan.
Ground connections respectively.
f. Remove the vacuum bin from your robot and flip it
b. Solder the LIN, GND, and RIN wires to the
upside down.
corresponding pads next to the audio jack.
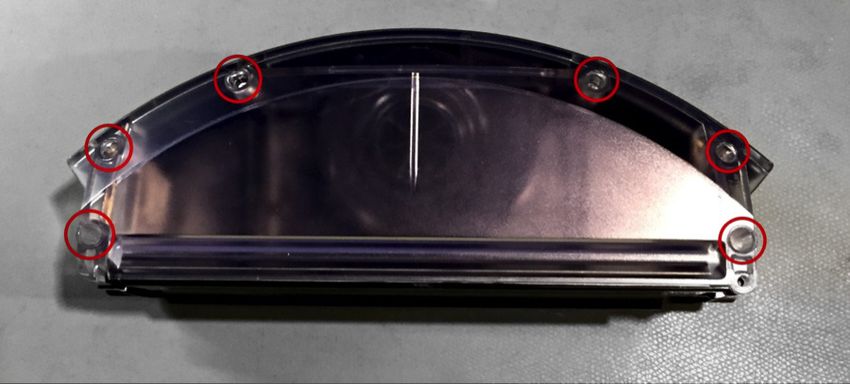
g. Use your #1 Phillips screwdriver to remove the six screws
4. Connecting your battery holder
(circled in the image below) holding the bin together and
a. Take the red, +5V wires from the audio amplifier board, set them aside.
the Bluetooth module board, and the battery holder and
twist the ends together. Apply solder to the bundle to
hold them together.
b. Slip a piece of heat shrink tubing over the connection and
hold the tip of your soldering iron close to it to shrink it
around the wires.
c. Do the same with the three black, ground wires.
h. Separate the upper and lower bin housings.
5. Testing your electronics
a. Install 4x AA batteries into the battery holder and slide
the power switch to ON.
b. A blue LED on the Bluetooth module should start
flashing and the speakers should emit a sequence
of start-up tones.
c. Connect your Bluetooth music player by going to your
settings screen, selecting the new Bluetooth device and i. Remove the screws holding the vacuum fan in place and
entering the PIN 0000. slide it out of the bin.
d. Select a song and make sure your speakers are
playing properly.
© 2014 All Rights Reserved. iRobot, Roomba and Create are registered trademarks of iRobot Corporation.
Arduino is a trademark of Arduino SA. Raspberry Pi is a trademark of the Raspberry Pi Foundation.
3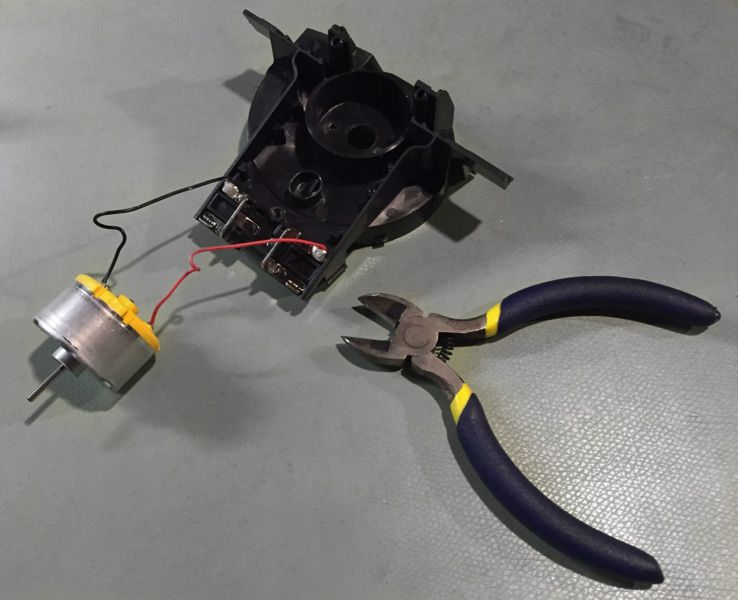
j.   Use a flathead screwdriver to release the four snap clips            k. Remove the two Phillips screws holding the motor in
       holding the top cover on. Remove the cover and pull 		                  place. Remove the motor from the plastic housing, cut
       the vacuum impeller off of the motor shaft. This can 		                 the red and black wires about an inch from the back
       be achieved by twisting and pulling or by prying from 		                of the motor, and put it aside for use in a future project.
       underneath with a flathead screwdriver.

© 2014 All Rights Reserved. iRobot, Roomba and Create are registered trademarks of iRobot Corporation.
Arduino is a trademark of Arduino SA. Raspberry Pi is a trademark of the Raspberry Pi Foundation.
                                                                                                                                       4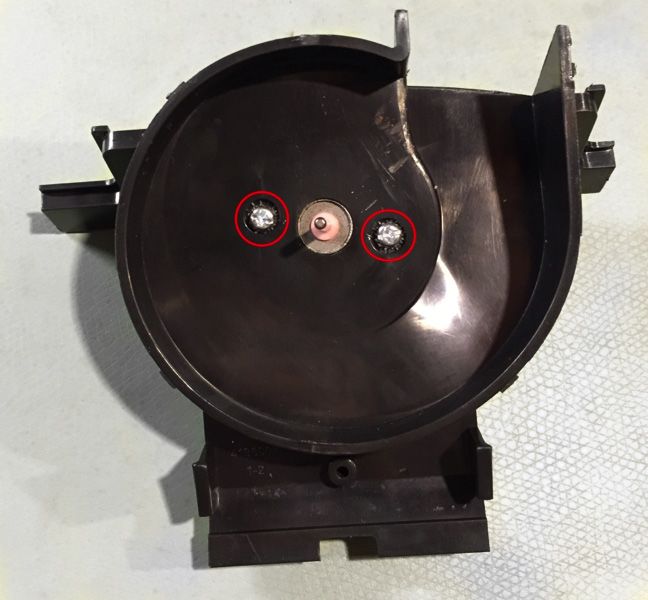
l. Use a rotary cutting tool to trim the vacuum housing
pieces in half to create space in the bin for the speakers.
t. Position the electronics in the bin and fixture them in
place using Velcro or a similar method. This will prevent
the components from rattling around in the bin and
possibly shorting against each other.
6. Install your new DJ Create 2 bin into the robot, turn on the
power, and enjoy the music!
m. Reinstall the smaller plastic piece and the latch spring
into the top bin housing and screw it into place. Make Optional Upgrades
sure you have the plastic latch seated properly too.
n. Turn on your hot glue gun and apply glue to the two pivot Optional Upgrade #1: Upgrade your battery pack
arms on the latch at the back edge of the bin. Replace your 4xAA battery holder with a USB or Lithium
o. Now use your rotary tool to remove the plastic lip at the Polymer battery pack for rechargeable goodness.
rear of the bin bottom as shown in the image below.
Part Name Qty URL
USB Battery Pack - 1800 mAh http://goo.gl/
1
(Optional) n1sI4k
Lithium Polymer USB Charger http://goo.gl/
1
and Battery (Optional) gICfz2
Optional Upgrade #2: Add an audio plug
to connect an on-board music player
Connect a 3.5mm audio plug to the L_in, R_in,
and Ground connections on your audio amplifier board
and connect an audio player (iPod Shuffle, etc.) directly,
instead of using the Bluetooth module. Typically, the plug
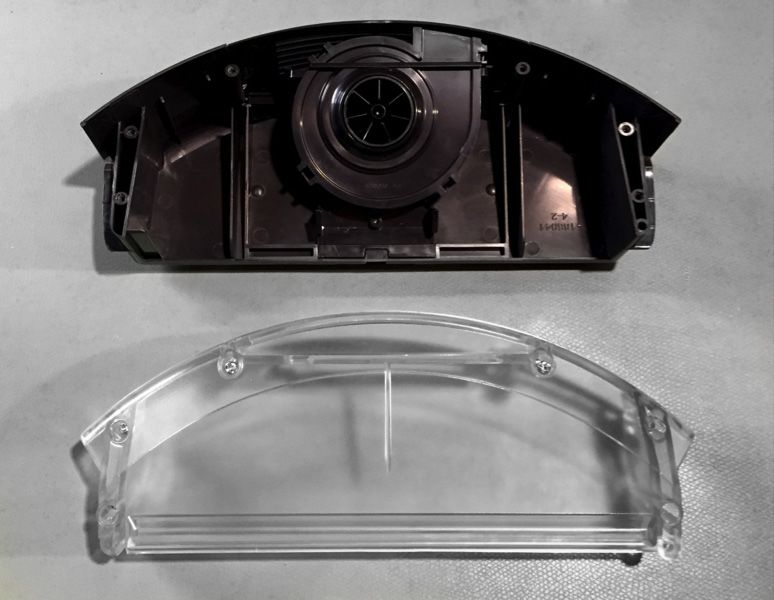
p. Reassemble the bin, being sure to capture the rear grill in tip is Audio Left, the middle ring is Audio Right, and the
place properly. Reinstall the six screws to clamp the bin sleeve is Ground (as shown in the image below).
back together.
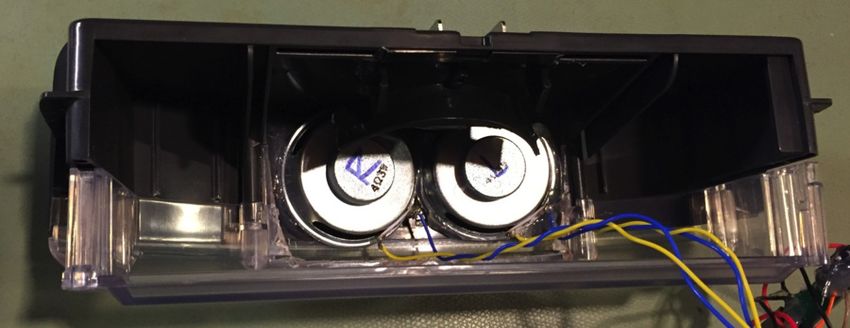
q. Grab your hot glue gun again and position the speakers
up against the plastic grill at the rear of the bin while you
wait for it to heat up. Be sure to position the speakers on
the appropriate side of the bin.
r. When ready, tack both speakers in place with dots
of hot glue. Then, run a small bead of hot glue around
the perimeter of the speakers.
s. While the glue is still hot, clean up any excess glue that Part Name Qty URL
may have leaked through the plastic grill to the outside Audio Plug - 3.5mm 1 http://goo.gl/PU6ayt
of the bin.
© 2014 All Rights Reserved. iRobot, Roomba and Create are registered trademarks of iRobot Corporation.
Arduino is a trademark of Arduino SA. Raspberry Pi is a trademark of the Raspberry Pi Foundation.
5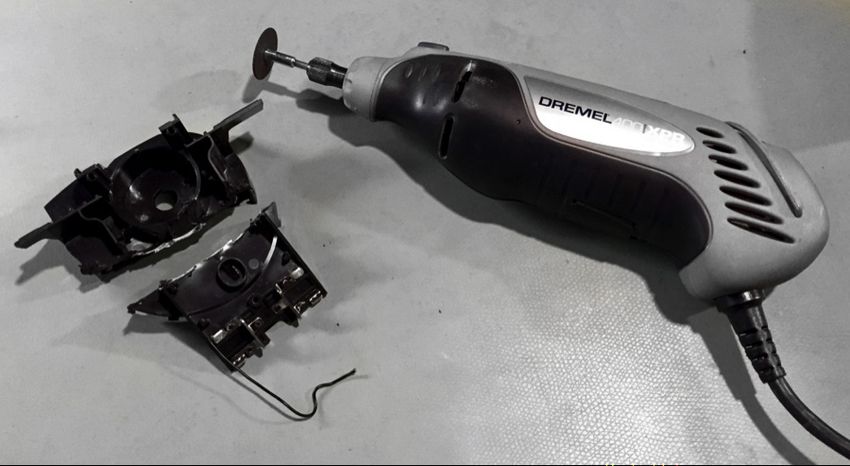
Optional Upgrade #3: Power your electronics                             Why is the inductor necessary?
using Create’s internal battery                                         The motor driver was designed to drive an inductive load
Connect a 5V UBEC (Buck) Converter to the dust bin 			                  (motors have a lot of inductance). The input to the UBEC is a
electrical contacts and use power from your Create 2			                 large capacitor. If you were to connect the input directly to the
internal battery to power your electronics.                             motor driver output then it effectively shorts the UBEC input
                                                                        capacitor to the battery voltage when the motor driver turns on.
                                                                        Since the capacitor is initially discharged, a very large current
                                       Manufacturer Part                flows in quickly and causes the motor driver to trip the current
    Part         Aprox.
                             Qty     Numbers and/or Source              limit and turn off to protect itself. Installing the inductor between
 Description      Cost
                                            Links                       the motor driver and the UBEC adds the inductance back into
UBEC DC/          $5.34       1    • http://goo.gl/aPHMRF               the circuit and limits the rate of current rise so that the input
DC Step-                           • http://goo.gl/ptMfF7               capacitor can be charged without tripping the current limit.
Down (Buck)
Converter                                                               How do inductors work?
- 5V @ 3A                                                               An inductor obeys the following formula: V = L * di/dt
Output
Inductor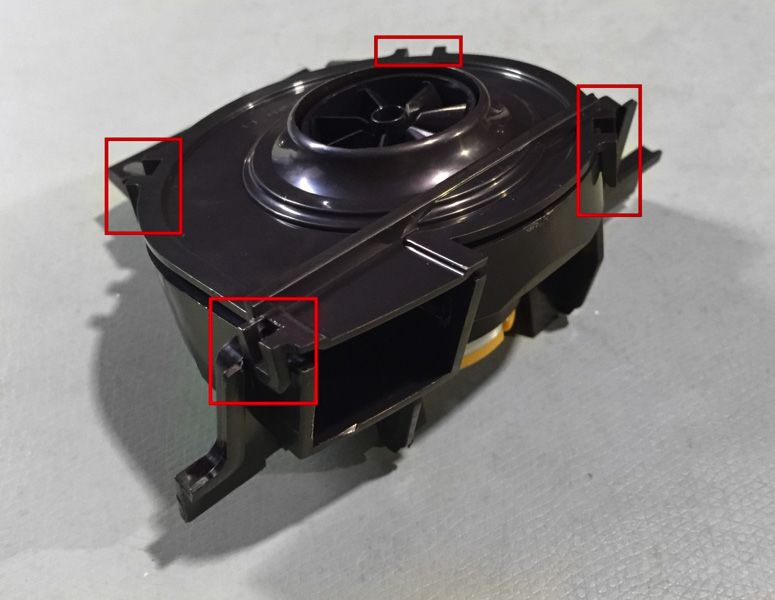
You can also read