Documentation of Floral Secretory Glands in Pleurothallidinae (Orchidaceae) Using Scanning Electron Microscopy (SEM)
←
→
Page content transcription
If your browser does not render page correctly, please read the page content below
Vol 6, Iss 22, Nov 20, 2016
                                           www.bio-protocol.org/e2021           DOI:10.21769/BioProtoc.2021

            Documentation of Floral Secretory Glands in Pleurothallidinae (Orchidaceae)
                                  Using Scanning Electron Microscopy (SEM)
     Adam P. Karremans1, 2, *, Bertie Joan van Heuven2, Rob Langelaan2 and Barbara Gravendeel2

1
Lankester Botanical Garden, University of Costa Rica, Cartago, Costa Rica; 2Naturalis Biodiversity
Center, Leiden, The Netherlands
*For correspondence: adam.karremans@ucr.ac.cr

[Abstract] A clear, step by step description of the treatment of orchid flowers, subtribe Pleurothallidinae,
with Critical Point Drying for SEM is presented. It shows that a simple, short fixation and dehydration
method prior to Critical Point Drying is sufficient to obtain good results.

[Background] Pleurothallidinae (Orchidaceae) have relatively small flowers that exhibit a wide variety
of ornaments on the perianth parts, especially on the sepals and lip. It is clear that most of those play
an important role in attracting and arresting pollinators, which in most cases are known to be small flies.
However, it is difficult to judge just from looking at photographs from the stereoscopic microscope if the
observable thickenings, papillae or hairs are actually secretory glands. Scanning Electron Microscopy
(SEM) can be a powerful tool to explore these flowers in greater detail, aiding to locate, compare and
identify those glands (Karremans et al., 2015).

Materials and Reagents

    1. Snap cap vials (10 ml) (VWR, catalog number: 548-0621)
    2. Gloves (nitrile, powder free)
    3. Petri dish
    4. Double sided ultra-smooth carbon adhesive tape, 12 mm diameter (Electron Microscopy
         Sciences, catalog number: 77827-12)
    5. Plastic box or desiccator with dry silica gel
    6. Ethanol
         Note: For steps using diluted ethanol use a 96% non denatured ethanol with distilled water, for
         steps using pure ethanol use a min. of 99.9%, water free ethanol.
    7. Acetone, HPLC Plus, for HPLC, ≥ 99.9% (Sigma-Aldrich, catalog number: 650501-1L)
    8. Carbon dioxide, technical grade (in gas cylinder with feed pipe)
    9. Argon gas 4.6, technical quality

Equipment

    1. Aluminium specimen mount, JEOL(Ted Pella, catalog number: 16231)

Copyright © 2016 The Authors; exclusive licensee Bio-protocol LLC.                                            1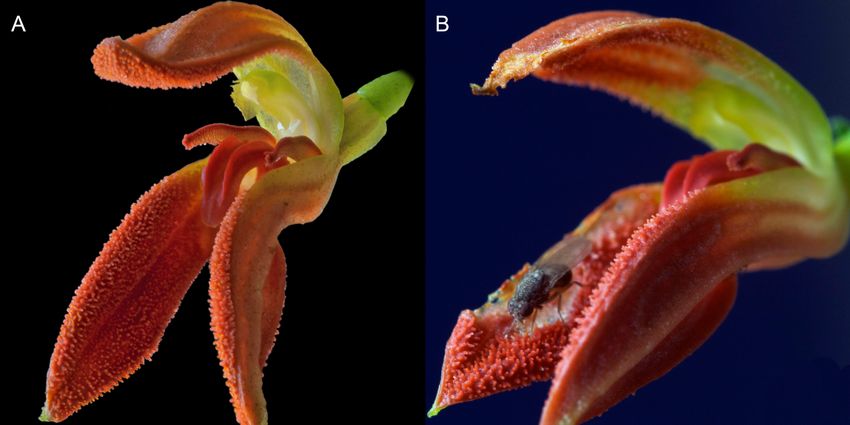
Vol 6, Iss 22, Nov 20, 2016
                                           www.bio-protocol.org/e2021       DOI:10.21769/BioProtoc.2021

    2. Soft pincet (e.g., light forceps, [VWR, catalog number: 232-2119])
    3. SEM specimen mount tweezers (Electron Microscopy Sciences, catalog number: 76800)
    4. Platina/palladium (Pt/Pd) target, 57 x 0.1 mm (Pt/Pd ratio, 80:20)
    5. Automated critical point dryer (Leica Microsystems, model: EM CPD300)
    6. Rotary mixer (Ted Pella, Pelco®, model: R1)
    7. Holders and baskets for Leica critical point dryer (e.g., Fine mesh specimen holder with mesh
         specimen baskets or filter disc holder with 4 wells)
    8. Sputter coater (Quorum Technologies, model: Q150T S) with rotating holder for 6 SEM stubs
         (Q150T S/E/ES Sample Preparation System Instruction Manual), film thickness monitor and
         RV3 Rotary Vane pump (Edwards, model: A65201903)
    9. Field emission scanning electron microscope (JEOL, model: JSM-7600F) (Figure 1)
         Note: This product is discontinued, but any standard scanning electron microscope will do (for
         example JEOL, model: JSM-IT100 InTouchScopeTM)

         Figure 1. Field emission scanning electron microscope in place and ready for use

Software

    1. Jeol PC-SEM version 2.1.0.3

Procedure

A. Preparing the samples for critical point drying
Copyright © 2016 The Authors; exclusive licensee Bio-protocol LLC.                                        2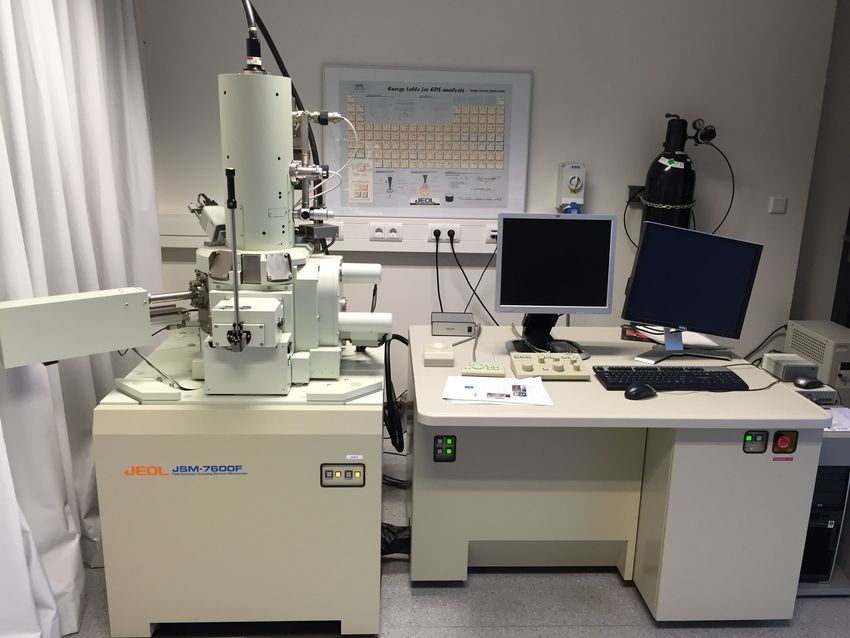
Vol 6, Iss 22, Nov 20, 2016
                                           www.bio-protocol.org/e2021           DOI:10.21769/BioProtoc.2021

    1. Carefully harvest fresh flowers using a conventional pincet. Take care of collecting only young,
         undamaged flowers. It is important to collect material from plants that are in good, healthy
         condition (for example the same day of anthesis; Figure 2). Place the flower in a plastic tube
         containing ethanol (70%), covering it completely. Leave it to soak for at least one week (this is
         highly dependent on the size of the material, and it is likely that a shorter period of a few days
         will also be enough for Pleurothallidinae flowers). The condition of the cell structures observed
         in SEM is mostly dependent on the quality of the collected material.

         Figure 2. Flowers of Specklinia remotiflora. A. Shortly after anthesis, flower in healthy
         condition. B. Damaged flower, a few days after anthesis, not recommended for visualization with
         SEM.

    2. Place flowers directly from ethanol 70% into snap cap vials (10 ml) with acetone pure grade.
         Cover the flower completely. Try to leave as little time as possible between cutting the flowers
         from the plant and placing them in ethanol 70%.
    3. Turn slowly in a rotary mixer for 30 min at room temperature.
    4. Replace the used for fresh acetone, once again covering the flowers immediately. Flowers
         should be exposed to air as short as possible because this damages the cells.
    5. Turn slowly for 30 min once again.
    6. Submerge the holders/baskets for critical point drying in a Petri dish with acetone. Put flowers
         in the holders. Remember not to let them dry up! Add a small (5 mm) piece of paper with (pencil
         written) sample number to each sample well.
    7. Proceed to critical point drying following the Leica EM CPD300 protocol (Leica EM CPD300
         application booklet) (Figure 3).

         Figure 3. Settings used for critical point drying using the Leica EM CPD300

Copyright © 2016 The Authors; exclusive licensee Bio-protocol LLC.                                            3
Vol 6, Iss 22, Nov 20, 2016
                                           www.bio-protocol.org/e2021             DOI:10.21769/BioProtoc.2021

B. Placing and displaying the samples for coating
    1. Take samples out of the dryer. They should be papery, light, brittle and practically colorless. Be
         careful handling them, they can easily get damaged.
    2. Place the aluminum specimen mounts in acetone for 60 sec to clean them. Take them out and
         place on a tissue, allowing the acetone to evaporate completely by exposing to air for a few
         minutes. Handle stubs with gloves from now on. Paste carbon adhesive double sided tape on
         one (top) end. Label stubs on the bottom according to samples
         Note: You might need more than one stub per sample depending on size of the flowers.
    3. Handle flowers carefully using a soft pincet. Consider that every part touched with the pincet will
         be damaged, therefore hold them from a point which is not interesting to visualize later. In most
         pleurothallids the rachis, pedicel or ovary will do as they may not be of interest for the
         visualization.
         Note: You can have multiple flowers dried so that you can have the different organs represented
         once.
    4. Place flower on tape. You will need to open up the flowers as much as possible to allow
         visualisation. Flat flowers like Platystele and Stelis can just be placed entirely (Figure 4), flat on
         the tape, more tubular flowers like Acianthera and Specklinia have to be dismembered (Figure
         5). In those cases, after the synsepal is fixed you can remove the dorsal sepal and petals. It is
         important to touch the segments as little as possible, to place them on the tape in final position
         (you will not be able to change position after it was placed), and to consider all possible viewing
         points you would like.

         Figure 4. Small and flat flowers like that of Stelis can be displayed completely. Scale bar
         = 500 μm.

Copyright © 2016 The Authors; exclusive licensee Bio-protocol LLC.                                              4
Vol 6, Iss 22, Nov 20, 2016
www.bio-protocol.org/e2021 DOI:10.21769/BioProtoc.2021
Figure 5. Stubs showing diverse Pleurothallidinae flowers, dismembered and placed
according to the visualization needs. A. Lankesteriana sp. B, E. Specklinia spp. C, D.
Echinosepala spp.
5. Store stubs in a Petri dish, and in a closed plastic box or desiccator with some dry silica gel until
they will be sputter-coated. Samples can be stored for years at room temperature in a relatively
dry place. In places where the humidity is high samples can be stored together with silica gel. If
necessary sputter-coating can be repeated before the re-visualization.
C. Sputter-coating the samples
1. Open Argon cylinder allowing gas to reach the Q150T S sputter coater (Q150T S/E/ES Sample
Preparation System Instruction Manual). Turn the machine on.
2. Carefully remove the glass chamber and place the stubs in the holder distributing them evenly
so that it is balanced when rotating. Place the glass chamber back on. Lower the cover taking
care that it does not touch the samples. Select a ‘Profile’ on the operating screen. It is
recommended that you use a coating thickness of PT/Pd 20 nm because Pleurothallidinae
flowers are quite irregular. (A PT/Pd 10 nm would probably be enough otherwise.) Run the profile
(Figure 6). Anthers and pollinaria often become charged with electrons during observation in
the SEM, which disrupts the image acquisition. A thicker coating may help prevent this problem.
Copyright © 2016 The Authors; exclusive licensee Bio-protocol LLC. 5Vol 6, Iss 22, Nov 20, 2016
www.bio-protocol.org/e2021 DOI:10.21769/BioProtoc.2021
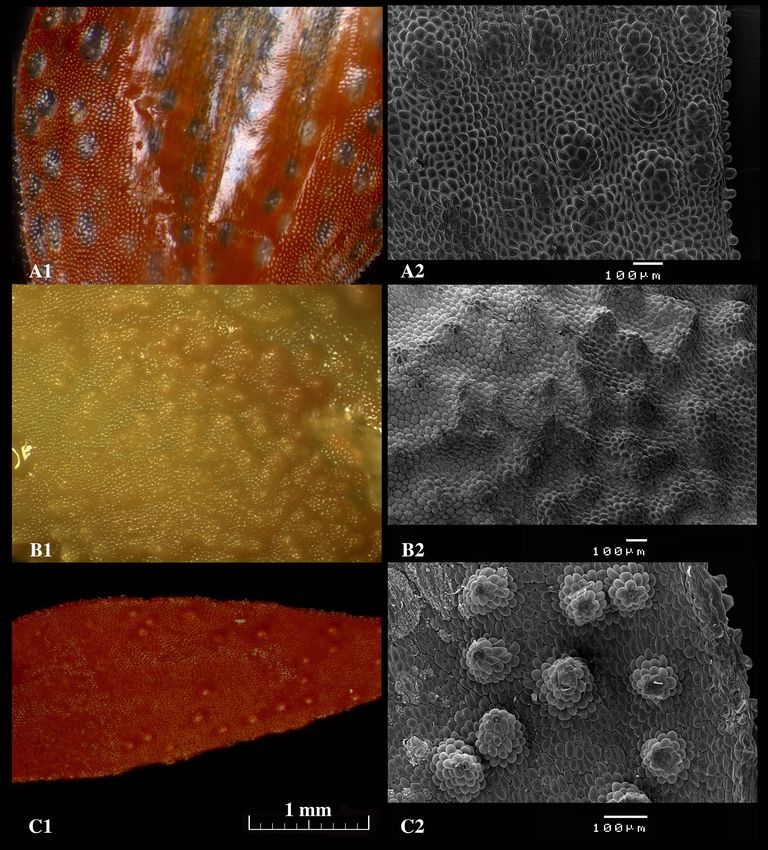
Figure 6. Micrographs of the glandular areas of the sepals of Specklinia species taken
without coating using a stereoscopic microscope (1) and with coating using the scanning
electron microscope (2). A. S. barbae; B. S. pfavii; C. S. tribuloides. Scale bars = 1 mm (A1,
B1 and C1); Scale bars = 100 μm (A2, B2 and C2).
3. After the run has completely finished the vacuum should allow for the opening of the cover. The
samples can be removed using a pincet and returned to the Petri dish.
D. Visualization and photographs
1. Turn the JEOL JSM-7600F field emission scanning electron microscope on, following the
microscope manual.
2. Use the multiple 12 mm stub holder and place up to six stubs tightly. Always use powder free
gloves when handling the holder and the stubs.
3. Follow the microscope manual to place the samples inside using the specimen exchange rod.
4. Follow the microscope manual to visualize the material. Set the parameters for visualization:
Set the work distance (Z) to 15 mm, and set the acceleration voltage to 10 KV. Probe current is
6 and detector mode is SB.
Note: The work distance may be varied, a shorter distance gives higher resolution but lower
focus depth, a higher work distance will give lower resolution but higher focus depth.
Accelerating voltage can be varied, at higher kV the resolution becomes better but there is more
chance of charging. It is advised not to use more than 15 kV for biological samples. Lower kV
Copyright © 2016 The Authors; exclusive licensee Bio-protocol LLC. 6Vol 6, Iss 22, Nov 20, 2016
www.bio-protocol.org/e2021 DOI:10.21769/BioProtoc.2021
can be useful if you need to avoid charging (e.g., 5 kV) or if you want to work without coating
your material (e.g., 2 kV). However, a lower kV gives less resolution and noisier images. For our
work with this specific SEM we always use Probe current 6 and a detector mode SB for our
biological samples. This setting combines collection of side scattered and backscattered
electrons, which gives good image results.
5. When working with magnifications higher than 500x you can switch from ‘Low Mag’ to ‘High Mag’
mode.
6. Save pictures as bitmap (Figure 7).
Figure 7. Scanning electron micrographs of diverse glands found in the flowers of
Pleurothallidinae. A. Possible osmophore on the abaxial surface of the sepals of Echinosepala.
B. Sunken trichome on abaxial surface of Condylago (= Stelis). C. Nectaries on the lip of
Platystele. D. Nectar secreting stomata on adaxial surface of the sepals of Specklinia. The
measurements represent 100, 100, 100 and 50 μm.
Notes
1. If no fresh flowers are available it is possible to use specimens kept in the liquid collections at
herbaria (Procedure A, step 1). Flowers preserved in FAA and its variations will still be suitable
for visualization through the method described here.
2. When Critical Point Drying (Procedure A, steps 2-6), instead of acetone, you can also use 100%
ethanol (absolute). In our experience, this also gives good results.
Copyright © 2016 The Authors; exclusive licensee Bio-protocol LLC. 7Vol 6, Iss 22, Nov 20, 2016
www.bio-protocol.org/e2021 DOI:10.21769/BioProtoc.2021
Acknowledgments
The Alberta Mennega Foundation funded the first author at several stages of the study that resulted
in the protocol here described. This protocol has been modified from the original application booklet
by Leica Microsystems.
References
1. Karremans, A. P., Pupulin, F., Grimaldi, D., Beentjes, K. K., Butot, R., Fazzi, G. E., Kaspers, K.,
Kruizinga, J., Roessingh, P., Smets, E. F. and Gravendeel, B. (2015). Pollination of Specklinia
by nectar-feeding Drosophila: the first reported case of a deceptive syndrome employing
aggregation pheromones in Orchidaceae. Ann Bot 116(3): 437-455.
Copyright © 2016 The Authors; exclusive licensee Bio-protocol LLC. 8You can also read