DR-25 Installation & Operation Manual - Diedrich Roasters
←
→
Page content transcription
If your browser does not render page correctly, please read the page content below
DR-25
Installation & Operation Manual

                                                                     2020

                            Diedrich Roasters LLC, 850 Hawthorne Ave., Ponderay, ID 83852
               Telephone: (208) 904-1989     Toll Free: (844) 343-3742     Fax: (208) 417-1552
                                 Technical Support: support@diedrichroasters.com

   PROPRIETARY RIGHTS NOTICE: All rights reserved. No part of this material may be reproduced or transmitted in any form or by means,
electronic, mechanical or otherwise, including photocopy and recording or in connection with any information storage or retrieval system, without
                                                the written permission of Diedrich Roasters, LLC.
Table of Contents
1. SAFEGUARDS ......................................................................................................................................................................... 3
2. INSTALLATION INSTRUCTIONS ............................................................................................................................................... 5
   2.2 RECEIVING EQUIPMENT.................................................................................................................................................................. 5
   2.3 UNCRATING EQUIPMENT ................................................................................................................................................................ 6
   2.4 POSITIONING / LEVELLING THE ROASTER AND CYCLONE ........................................................................................................................ 9
   2.5 GREEN BEAN HOPPER.................................................................................................................................................................. 11
   2.6 GAS CONNECTION....................................................................................................................................................................... 13
      2.6.1 - Safety Shut-Off valve ................................................................................................................................................... 13
      2.6.2 - Pressure Regulator ...................................................................................................................................................... 13
      2.6.3 - Pipe Sizing .................................................................................................................................................................... 13
   2.7 WATER CONNECTION .................................................................................................................................................................. 14
   2.8 ELECTRICAL CONNECTIONS ............................................................................................................................................................ 15
      2.8.1- Main Electrical Panel - Incoming Power Connection (lower left access door) .............................................................. 15
      2.8.2- Motor / Ancillary Connections ..................................................................................................................................... 16
   2.9 - DUCTING ................................................................................................................................................................................. 17
   2.10 – INSTALLATION INSPECTION ....................................................................................................................................................... 18
3. OPERATION .......................................................................................................................................................................... 18
   3.1 – INITIAL START-UP / SHUTDOWN (REFER TO THE AUTOMATION MANUAL)........................................................................................... 18
   3.2 – POWER LOSS/OUTAGE.............................................................................................................................................................. 18
4. ROASTING ............................................................................................................................................................................ 19
   4.1 – SEASONING THE DRUM ............................................................................................................................................................. 19
   4.2 – ROASTING FOR CONSUMPTION ................................................................................................................................................... 20
5. DESTONER OPERATION (OPTIONAL) .................................................................................................................................... 23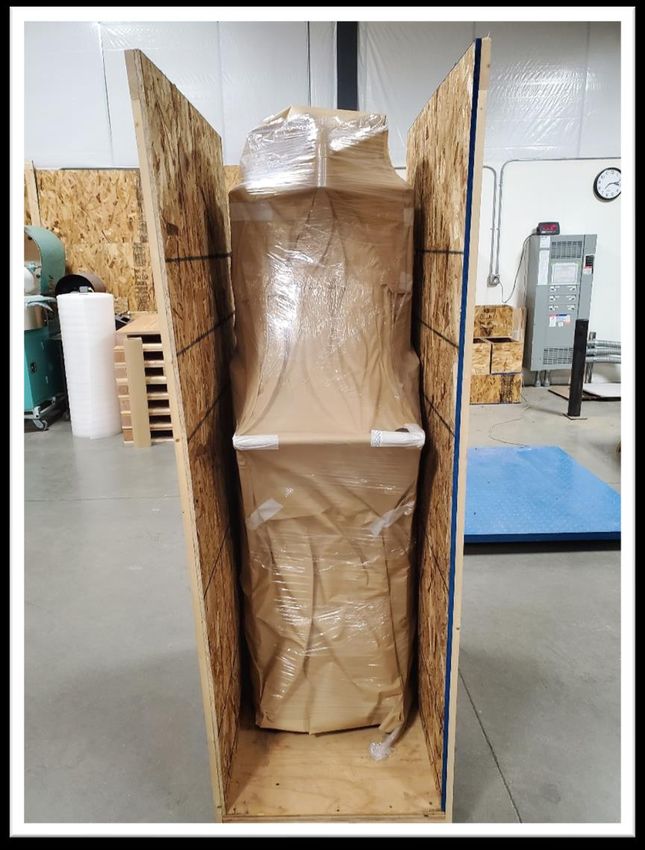
Please read all sections of this manual and retain for future reference.

1. SAFEGUARDS
Safety Information

Before attempting to operate your unit, read the instructions in this manual thoroughly. Throughout this
manual, you will find notations enclosed in bordered boxes similar to the ones below.

Warranty is void unless product is installed and used in accordance with all written instructions.
Do not remove any labels, warnings or rating plates from the roaster or from its components as this may void
manufacturer's and Diedrich Roaster’s warranties.

This manual, along with other manuals in this series, is intended to be a guideline for the installation and operation
for the product lines manufactured by Diedrich Roasters, LLC. The customer is responsible for complying with all
applicable regulations. The customer should refer to a licensed professional contractor or contractors for all
installation details.

Dangers, Warnings, and Cautions

Throughout this manual, the following signal words are used to identify the degree of seriousness in any operation
that presents a potentially hazardous situation.

              DANGER: Indicates a hazard that WILL cause severe personal injury, death, or
              substantial property damage if ignored.

               WARNING: Indicates a hazard that COULD cause severe personal injury,
               death, or substantial property damage if ignored.

              CAUTION: Indicates a hazard that could cause MINOR personal injury or property
              damage if ignored.

               ATTENTION: Indicates an instruction that should be followed.

                                                                                                            Page 3 of 24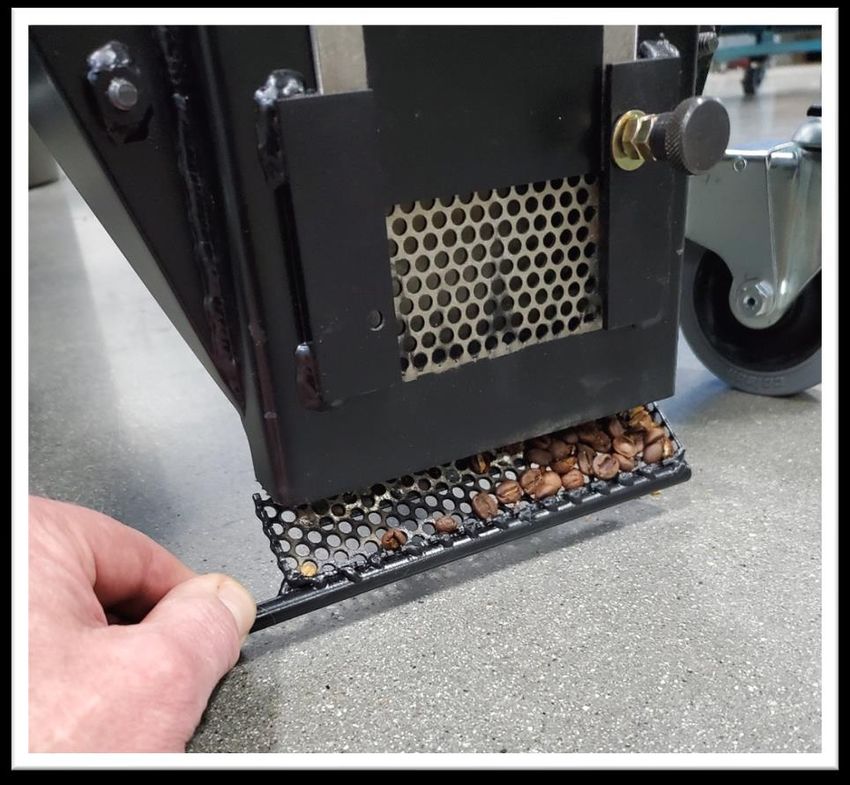
Improper installation, adjustment, alteration, service or maintenance can cause property damage,
injury or death. Read the installation, operating and maintenance instructions thoroughly before
installing or servicing this equipment.

Keep the area around the roaster free and clear from combustibles and always maintain a minimum
of 18-inch clearance around the roaster.

Do not store or use gasoline or other flammable vapors and liquids in the vicinity of this or any
other appliance.

Avoid contact with hot surfaces.

Always be aware of the risk of a fire. Fires are caused by failure to
maintain a clean roaster and its exhaust duct system.

Instructions to be followed in the event the operator smells gas or otherwise detects a gas leak
must be posted in a prominent location. This information can be obtained from the local gas
company or gas supplier.

A fire extinguisher should be located close to the roasting system. Consult with your local fire
department for recommendations on suitable fire extinguishers.

This roaster is intended for professional use only and is to be operated by qualified personnel only.
Never permit an unqualified person to operate the roaster.

ALWAYS disconnect roaster at electrical source
(at the circuit breaker or safety shut-off switch) before servicing.

Proper installation, cleaning, and safe operation of the coffee roaster are the owner’s and
operator’s responsibility.

                                                                                        Page 4 of 24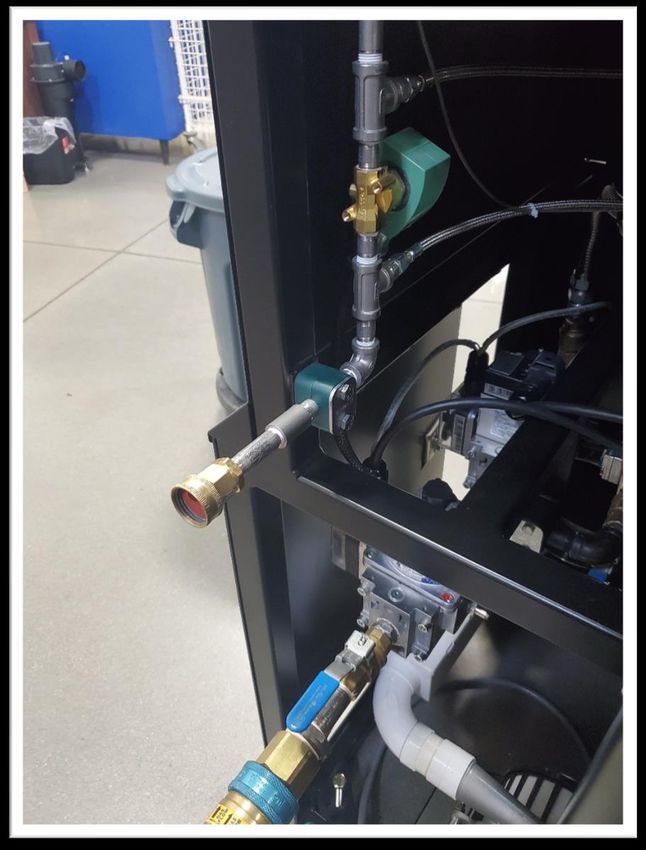
2. INSTALLATION INSTRUCTIONS
             Professional installation is required. Your Diedrich
             Roaster is designed for ease of installation and
             simplicity of operation. Read these instructions
completely before starting installation. Your local building
authority should be contacted to obtain local codes and installation
requirements before installing your roaster.

             The completed roaster installation MUST BE
             INSPECTED for compliance to codes and by your
            local fire department PRIOR TO OPERATING THE
ROASTER. Failure to have these inspections performed will void
the warranty and will relieve Diedrich of any liability associated
with the installation and use of our products.

     2.2 Receiving Equipment
Upon receipt of your roaster immediately check for crate damage.
On larger roasters, there is a “tip tell” indicator shown below in the
upper right corner of the crate. Do not refuse shipment if damage
is evident. Make notes of damage on the appropriate shipping
forms and take photos. Uncrate and look for damage to the roaster;
i.e., dents, scratches or chipped paint, and if found, immediately file
a claim with the appropriate freight carrier. Prepare to have
several capable people/tradesmen and for a forklift and pallet jack (5’ long minimum) to be available
based on the weight stated in the Pre-Installation Guide.
Stage the roaster close to the desired location for uncrating.

                                                                                                Page 5 of 24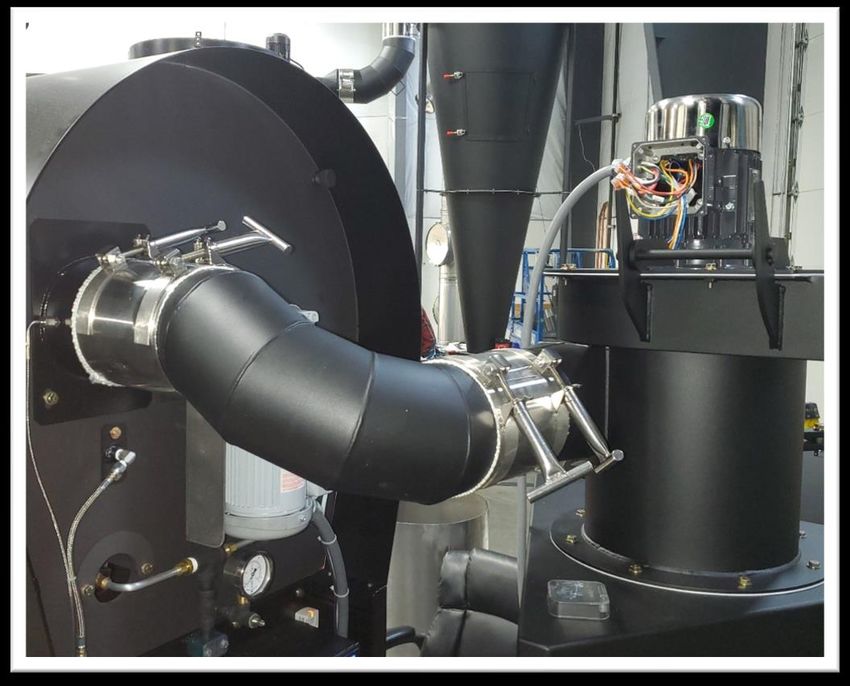
2.3 Uncrating Equipment
             The Roast Air Cyclone should be the first crate to be un-packed and placed as the cyclone exhaust
             will align with the building exhaust ducting.

Using a #2 Phillips screwdriver / screw gun, remove the top and 4 sides of the crate. Carefully remove the shrink wrap
and paper from the roaster. Remove the screws that secure the cyclone to the pallet. Use several people to lift off the
pallet and place in the desired location (see section 2.4 Positioning the Roaster).

                                                                               Connect to building exhaust ducting

                                                                                                           Page 6 of 24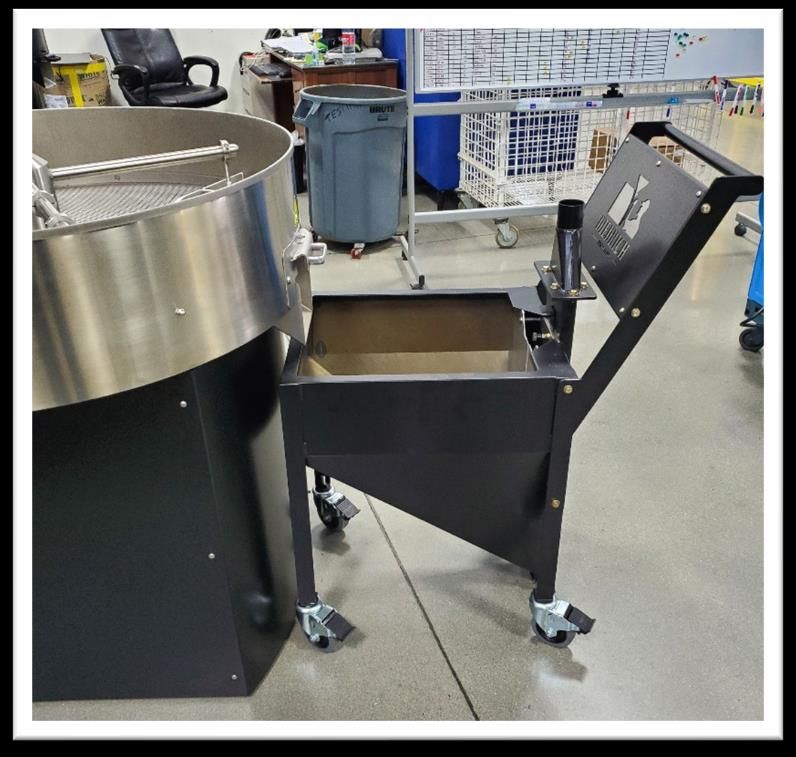
Next, un-pack the roaster crate…

Using a #2 Phillips screwdriver / screw gun, remove the
top and 4 sides of the crate.

Carefully remove the shrink wrap and paper from the
roaster. Remove the wrapped ancillary components
located in the cooling bin and also fixed to the pallet. Set
aside for the moment…

                                                               Locate the (4) outside corner fasteners at the base of the
                                                               roaster. Using a ½” socket and wrench, remove the
                                                               fasteners that secure the roaster to the pallet. You will have
                                                               to reach under the pallet to hold the bolt head.

Using a #2 Phillips screwdriver / screw gun, remove the
fasteners that secure wood support stand for the
computer monitor.

                                                                                                               Page 7 of 24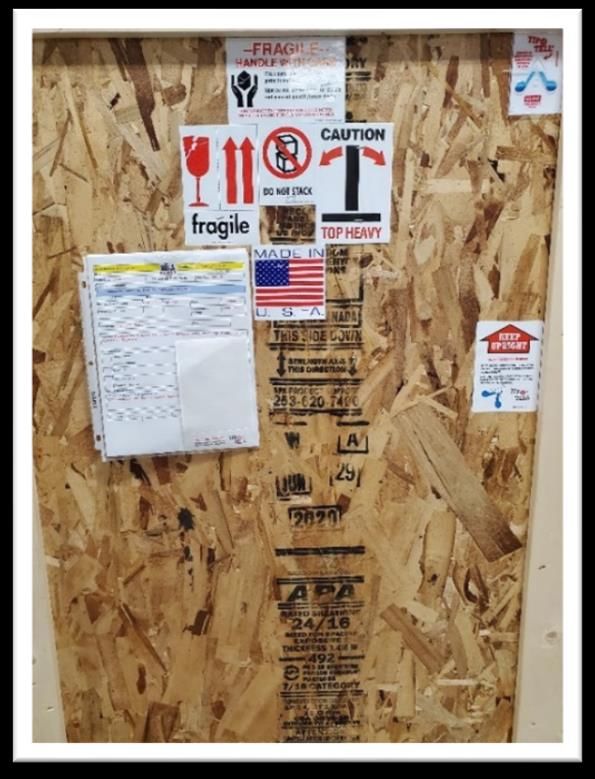
The roaster now has to be raised to accept a forklift for
                                                               removal.

                                                               Using a ¾” socket with impact or air tool, rotate the (4)
                                                               levelling feet (clockwise) EVENLY from front to rear to raise
                                                               the roaster to its maximum level.

                                                                             Failure to rotate evenly could result in the
                                                                             roaster tipping over. Have several people
                                                                             available to assist with this!

Use the appropriate forklift to lift the roaster up and remove the pallet. Using the fork lift or low-profile pallet jack,
locate the roaster to desired location (see section 2.4 Positioning the Roaster).

                                                                                                                   Page 8 of 24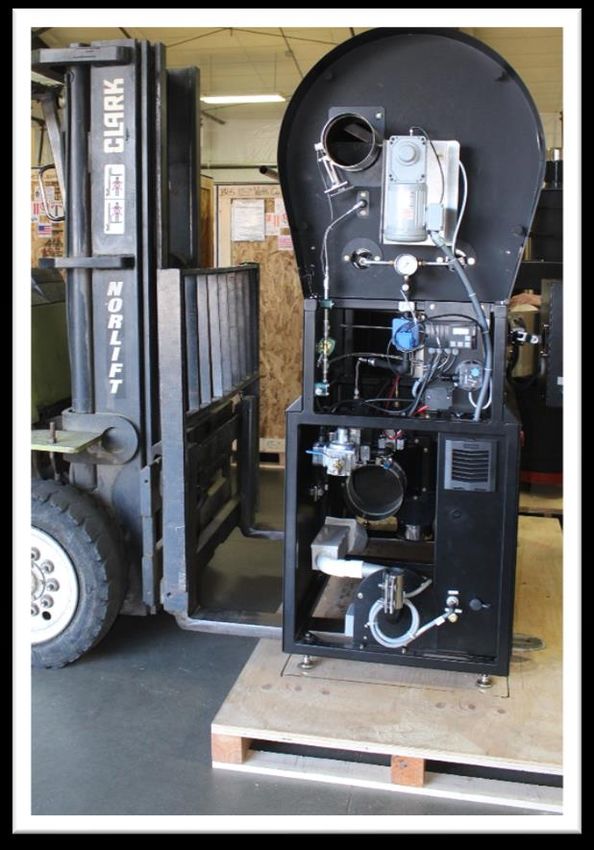
2.4 Positioning / levelling the Roaster and Cyclone

The roaster and cyclone must be placed on a flat, non-combustible floor and meet weight-bearing requirements of
local codes. Refer to the Pre-Installation Guide specifications chart for floor bearing weights.

Place the roaster where operation and coffee roasting can be observed in natural light or under consistent light
conditions. Natural light is essential for best results when observing the true color changes coffees undergo during
roasting. The use of a full-spectrum fluorescent light to simulate the full color of sunlight is recommended for
consistency in roasting.
If you have an afterburner, position that first to align with the exhaust stack. Work your way from rear to front
assembling ducting and final connections to the roaster. Refer to the Pre-Installation Guide for proximity to walls,
etc.

              Clearance from the roaster to adjacent walls, counters or other appliances must be at least 18-
              inches (46 cm) or greater to ensure adequate cooling of the roaster and adjacent walls.

              Failure to abide by required clearances will void your Diedrich warranty. No cabinets or storage
              areas are to be installed over the roaster or near the ducting.

               Make sure all controls, access doors, and inspection panels are accessible and can be opened
               without restriction.

With the roast air cyclone in place, move the roaster close to the cyclone. Locate the short intermediate duct
that connects the roaster exhaust to the cyclone inlet. Connect one side of the duct to the cyclone and align
the roaster as close as possible (be aware the roaster is still raised to its maximum position so the roaster will
be several inches higher).

Next, with the forklift removed and the roaster roughly positioned, the roaster must be lowered to the floor
level.

Use a ¾” socket with impact or air tool, rotate the (4) levelling feet (counter-clockwise) EVENLY from front to rear to
lower the roaster to its minimum level.
             Failure to rotate evenly could result in the roaster tipping over. Have several people available to
             assist with this!

                                                                                                               Page 9 of 24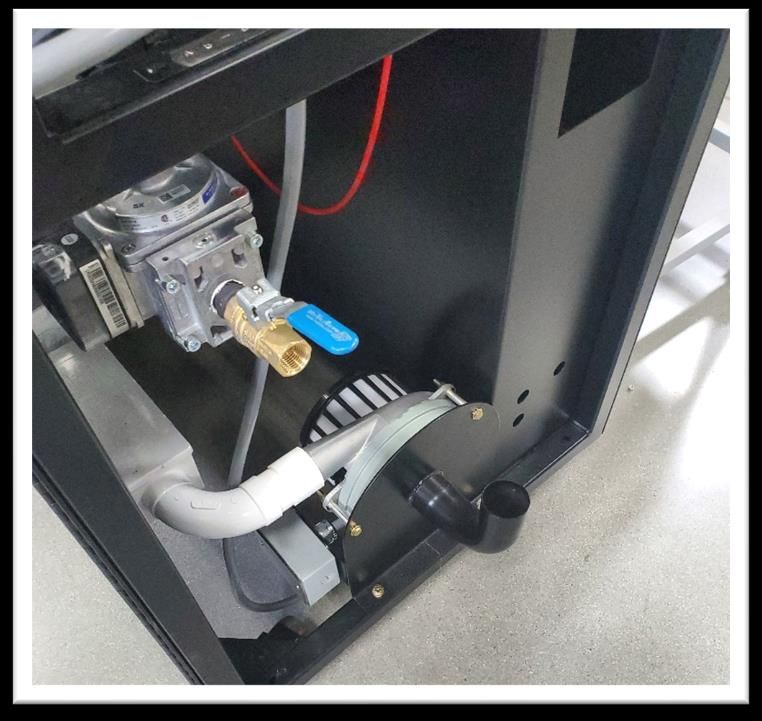
Careful levelling of the roaster is critical not only
for performance but for alignment of the roasting
drum. Using a carpenter’s level, check front to
rear and side to side using the cooling bin as a
reference. Adjust the (4) legs with a ¾” wrench /
socket to achieve the proper level.

With the roaster now level, final intermediate
duct height alignment can be achieved by
raising or lowering the roaster exhaust flange.

Using a ½” socket or wrench, slightly loosen the
(2) bolts that secure the exhaust flange to the
roaster. Slide the flange up or down for fine
adjustment of the duct. Firmly re-tighten.

                                                        Page 10 of 24
2.5 Green Bean Hopper
Using a 7/16” wrench, temporarily remove the (4) bolts and
bracket shown from the front air hopper
Hoist the green bean funnel on top of the air hopper and
replace the (4) bolts and bracket as shown. Tighten
firmly.
Page 11 of 242.5.1 Green Bean loader (Optional)
Locate loader suction tubing and
connect together with supplied tubing clamps.
Connect flexible tubing from load cart to green bean hopper inlet.
Loader Motor
Page 12 of 242.6 Gas Connection
.
Use a licensed gas company for the gas pipe installation.
Refer to the Pre-Installation Guide for specifications.
Gas installation MUST conform to local codes, regulations, and/or laws.
The gas supply line MUST be sized to accommodate the total length of the run and to accommodate any required
elbows. The gas pipe MUST be no less than the roaster's inlet size.
A water trap to collect condensation and loose particles should be installed in the gas supply
line upstream from the roaster.
2.6.1 - Safety Shut-Off valve
A safety shut-off valve MUST be installed in the gas supply line close to the roaster and
pressure regulator and in a location where it can be reached quickly in case of an
emergency. The shut-off MUST be marked to identify it as the gas shut-off.
2.6.2 - Pressure Regulator
If the installation has both a roaster and an afterburner, a separate incoming pressure regulator
MUST be used for each piece of equipment.
The roaster’s factory installed valve is preset for the BTU requirements of the roaster burners. The valve in the
roaster is not intended to reduce incoming pressure. A pressure regulator MUST be installed before the
roaster to reduce the incoming pressure. Your gas technician will be able to provide the correct regulator for the
specific installation.
The valve may experience damage if the incoming line pressure to the roaster exceeds
20-inches WC (50 mbar). An external pressure regulator is required to limit incoming
gas pressure.
Locate the regulator on the incoming gas supply line between the safety shut-off valve and the roaster’s gas inlet.
Diedrich recommends 8 to 14 inches WC (20 – 34.8 mbar) for natural gas and 12 to 14 inches WC (30 – 34.8 mbar)
for liquid propane at the roaster’s gas inlet. These pressures are ideal for optimal performance.
NOTE: The manometer on top of the roaster measures the burner manifold pressure and not the incoming
pressure. When the burners are set at maximum gain the manometer should read approximately 7-inches WC (16
mbar) for natural gas and 11-inches WC (27.4 mbar) for liquid propane.
2.6.3 - Pipe Sizing
Sizing of the gas supply line is critical to the roaster performance. Ensure the gas supply line
is sized in accordance with the maximum BTU demands of the roaster and any other
appliances connected to the gas line.
IMPORTANT: When the gas installation is complete, have your gas technician check the gas pressure at the point
where the gas line connects to the roaster. The roaster and/or afterburner and any other appliances connected to
the gas line should be running at the full flame setting for this test.
Page 13 of 24The roaster must be isolated from the gas supply line by closing the safety shut-off valve
during any pressure testing of the gas supply line.
Before placing the roaster in operation, always check connections for gas leaks with a soapy
water solution or other acceptable method.
2.7 Water Connection
Refer to the Pre-Installation Guide for specifications.
Use a 10-micron water filter prior to connecting water line to roaster inlet (to protect water nozzle(s)
from contaminants and becoming clogged).
Water filter cartridge
examples
Page 14 of 242.8 Electrical Connections
Use a licensed electrician for the electrical installation.
ELECTRICAL DRAWINGS ARE LOCATED IN THE ROASTER PACKET OF INFORMATION
Refer to the Pre-Installation Guide for specifications. Electrical installation must conform to local regulations.
Do not remove any labels, warnings or rating plates from the roaster or from its components as this may void
manufacturer's and Diedrich Roaster’s warranties.
Additional ancillary equipment (i.e., afterburner, loader, destoner, etc.) will require an additional
dedicated circuit separate from the roaster circuit.
All electrical components supplied in the roaster are grounded electrically to the roaster frame.
This roaster must be electrically grounded in accordance with local codes. A severe shock hazard
exists if the electrical source is not grounded or if the polarity is reversed.
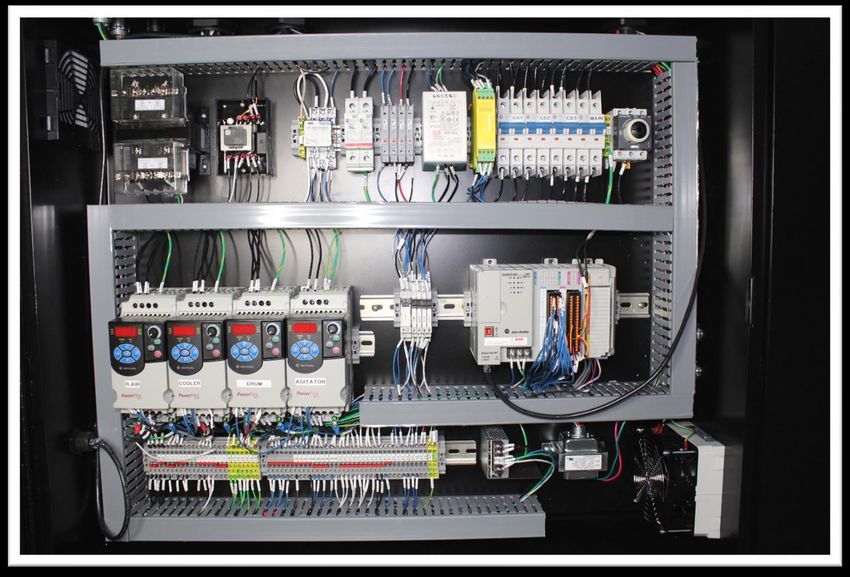
2.8.1- Main Electrical Panel - Incoming Power Connection (lower left access door)
Page 15 of 242.8.2- Motor / Ancillary Connections
Roast Air Motor Connector Cable
1 2
. .
3
.
1. Loader Motor Connector Cable (optional equipment)
2. Cat 5E Connection for remote access to Diedrich (optional - customer discretion)
3. Afterburner Cable Connector cable (optional equipment)
Page 16 of 242.9 - Ducting
Refer to the Pre-Installation Guide for ducting requirements & specifications / layout.
The roaster MUST NOT support the weight of the exhaust system. Ducting must be connected to
the roaster based on the ducting manufacturer’s recommendation.
Fires are caused by failure to maintain a clean roaster and its exhaust ducting system. Regular
cleaning of the roaster and exhaust ducting will prevent the buildup of residues that could cause
fire.
Locate the ducting elbow that
connects the exhaust from the
rear of the roaster drum to the
inlet of the roast air cyclone.
Use the silver “Lorenz” clamps
to attach the elbow at both
ends. Tighten both T-handles
evenly and firm for a snug
connection.
Locate the cooling bin ducting that connects from the outlet of
the cooling bin blower (front right access door) to your building
exhaust ducting.
Use the silver “Lorenz” clamps to attach the elbow at both
ends. Tighten both T-handles evenly and firm for a snug
connection.
Page 17 of 242.10 – Installation Inspection
The completed roaster installation MUST BE INSPECTED for compliance to codes and by
your local fire department PRIOR TO OPERATING THE ROASTER. Failure to have these
inspections performed will void the warranty and will relieve Diedrich of any liability
associated with the installation and use of our products.
3. OPERATION
3.1 – Initial Start-Up / Shutdown (Refer to the Automation Manual)
3.2 – Power Loss/Outage
In the event of a power loss
while roasting, the front of the
drum shaft in designed to
accept a ¾” hex socket. Use
an electric or air impact
wrench to rotate the drum in
a clockwise direction.
Page 18 of 244. ROASTING
A possibility of fire exists if the coffee is not removed from the drum before 500°f (260c).
The coffee may ignite even though the ignition is interlocked to shut down at 485°F (252°C).
The instructions below explain the operation of the roaster. They are not an attempt to teach all
the subtleties and proper techniques of roasting the many varieties of coffee beans. Further
information on roasting is available during the Diedrich Roasters roasting seminars.
Average roasting times are from 14 -15 minutes for a light roast and 15-18 minutes for a darker roast, depending
on the source or type of beans. Reducing the burner flame is one of several ways to lengthen roast times. The
temperature of the roasting system (comprised of the coffee beans, roasting drum, and end plates) reacts slower
than the flame adjustments. Do not expect an immediate temperature change when the heat level is changed.
After a short time, the beans and roasting system will show signs of dissipating heat.
The bean development and color can be observed by using the sample trowel. You can develop a consistent
roast profile by referring to a set of roasted bean samples or color tiles. Sampling of beans should be
consistently viewed under a full-spectrum natural fluorescent lamp to maintain a consistent sample
comparison.
4.1 – Seasoning the Drum
The drum of the roaster must be seasoned before roasted coffee is fit for consumption. Use an inexpensive
coffee for the seasoning process. Robusta coffee does not emit enough oil for the seasoning process.
The new drum requires at least 5 to 10 seasoning roasts to become properly oiled. Each seasoning roast
requires about 50% of roaster capacity of coffee, enough to fully cover the drum's lower surfaces. After
completion of each seasoning roast, discard the roasted coffee after it cools. It may take additional roasts to
achieve the best flavor from your new roaster. Seasoning the roasting drum will give you the opportunity to
become familiar with the roaster's controls and the roasting process itself.
1. Set the Roast Air position to “0” %.
2. Preheat the roaster to 460ºF (237ºC).
i. NOTE: A cold roaster should warm for approximately 30 minutes before seasoning.
3. Load the green coffee beans into the funnel, through the hopper gate and into the drum.
4. Set the flame control to roughly 50%.
i. NOTE: The coffee will change in color from green to a pale yellow. During this
progression look through the drum door view window, you will start to see chaff, the
bean's outer skin, separating from the coffee bean. Unwashed coffee has considerably
more chaff than washed coffees and decaf coffees have almost no chaff.
5. The Roast Air % should be set to 50% when the coffee reaches the yellow stage 270°F (132°C).
i. NOTE: The moisture in the coffee, which was a good conductor of heat early on in the
roast, is now turning to steam. At this stage in the roast, the air flowing through the
roasting drum becomes a more uniform heat medium. The roast will progress from the
yellow to the cinnamon color as the coffee begins to expel a fair volume of carbon
dioxide (CO2) gas.
6. After the cinnamon color stage of the roast is reached, the coffee will start its first cracking. Set the
roast air % to 100% for the remainder of the roast.
i. NOTE: As the coffee reaches a temperature of 340°F (171°C) the chemical changes in
Page 19 of 24the coffee start an exothermic reaction (the chemistry creates its own heat). This
exothermic reaction continues through the remainder of the roast.
7. Allow the roast to progress through the second crack.
8. Turn off the main burners once traces of oil begin to show on the beans.
i. NOTE: At this point you are attempting to slow the rise per minute and coast to an oily
bean temperature but not reach the high temperature limit. This allows you to keep the
roast in the drum while the beans are oily and coat the drum surface. The bean
temperature can cool but adjust the burner to keep them above 350°F (176°C).
9. Once the oil has soaked back into the beans, turn on the agitator, set the cooling air to 100%, and
discharge the coffee into the cooling bin.
10. Repeat this complete dark roasting cycle (50-60 minutes) 5-8 times, then start to develop lighter
(15-18 minutes) roasts. This procedure will properly season the roasting drum.
4.2 – Roasting for Consumption
If any of the following happens: Excessive smoke in the room; smoke coming from
the sample trowel port; longer cool down times; excessive chaff in the burner
compartment - Check for the following: Excessive build-up of residue throughout the
airflow system within the roaster. Excessive build-up of residue in the exhaust ducting.
Diedrich recommends that you maintain roasting and cleaning logs (See example in the
Roast Log at the end of this manual). These logs will aid in tracking the amount of coffee
roasted, roasted bean weight loss, and cleaning intervals.
Type of Coffee: Naturals (unwashed coffees, i.e. Indonesians) have more chaff than washed coffees (i.e.
Central and South American coffees) and decafs have virtually no chaff. EXAMPLE: The chaff box and
burner tray require much more attention if a fair quantity of Sumatra is roasted, but almost no cleaning if
you are roasting decaf.
Weight Loss: The green weight IN minus the roasted weight OUT divided by the green weight equals the
percentage of weight loss. EXAMPLE: 15 lbs. IN minus 12.75 lbs. OUT = 2.25 lbs. = 15% weight loss.
1. Preheat the empty drum until the Bean temp display (1) reads 415º (213ºC) or until you reach your
desired charge temperature.
i. NOTE: A cold roaster should warm for approximately 30 minutes before roasting.
2. Load the green beans into the hopper funnel after the roaster's empty drum has been preheated.
i. NOTE: The charge temperature is the temperature which the beans are loaded into the
drum. Depending on type of coffee, batch size, and roasting technique charge
temperatures will typically be between 350°F (177°C) and 440°F (227°C). The display
temperature will fall drastically after charging. The temperature at which the coffee
stops decreasing and starts rising is known as the bottom out temperature. Charge
temperature and initial fuel setting are determined by, but not limited to, the desired
bottom-out temperature and rate of climb from bottom-out.
3. Do not allow green beans to sit in the hopper for prolonged periods of time. This area of the
roaster becomes very hot and beans sitting in the hopper will result in pre-roasting, uneven
roasting.
Page 20 of 244. Prior to starting the roasting process, set the Roast Air to 0%.
i. NOTE: This also allows sufficient airflow through the drum to gently assist in the heating
process without excessively drying out the coffee. The Diedrich Coffee Roaster utilizes
the moisture that is present in the green coffee to assist in the conduction of heat to the
core of the bean. Our philosophy is to allow the beans to absorb heat at their own
natural potential since various types of coffee have different weight densities and
absorb heat differently.
5. Move the hopper gate handle up to release the green beans from the hopper into the drum.
6. Move the handle down to close the hopper gate.
i. NOTE: If the hopper is not closed after loading, heat will be lost and roasting time will
be longer.
7. Adjust the flame control to an appropriate heat setting for the batch size.
i. NOTE: A larger batch has greater heat absorbing capacity and a higher flame setting
can be used without accelerating the roast too quickly.
ii. The display temperature will fall drastically after charging the drum with beans. The
temperature at which the coffee stops decreasing and starts rising is known as the
bottom-out temperature. Charge temperature and initial fuel setting are determined by
the desired bottom-out temperature and rate of climb from bottom-out.
iii. The beans turning yellow is an easy stage of roast to identify. It makes a good
time/color reference point at about six or seven minutes. The yellow color of varietal
coffees is an off-shade of orange for decaf coffees. The yellow color indicates about
270°F (132C).
iv. The coffee requires more heat if you are at six minutes but far from the yellow color.
The coffee requires less heat if you are at four minutes and the coffee is already
turning yellow. The yellow color of varietal coffees is an off-shade of orange for decaf
coffees.
8. Set the Roast Air to 100%.
i. NOTE: This increased flow of air through the drum exhausts the chaff shedding from
the beans out of the drum.
9. Leave the Roast Air at 100% until the coffee has reached a cinnamon brown color.
10. Return the Roast Air to 50% once the beans have reached a cinnamon brown color.
i. NOTE: The cinnamon brown color is another checkpoint that is easily identifiable. You
should reach this color at 340°F (171°C) in 9 to 11 minutes. Some fine-tuning of the
fuel percentage may be necessary at this point.
ii. Between 11 and 13 minutes the beans will reach the 1st Crack and you will observe a
gradual color change of the beans to brown. This is the most significant stage of bean
development where the beans fully open up. The roasted coffee may be ready to
release into the cooling bin for a lighter roast. The chemical changes in the coffee start
to produce a large volume of carbon dioxide (CO2) gas. This gas will pressurize the
roasting drum.
11. Reduce fuel % and set the roast air to 100% for the remainder of the roast.
The bean development accelerates very rapidly and these last few minutes are very
critical. The operator should pay close attention to the coffee and frequently
sampling is important. While learning to roast, it is advisable to lower the heat to
slow down this stage of the roast.
Page 21 of 2411. Prepare to discharge the roasted coffee into the cooling bin.
12. Turn the Cooling Air on and set to 100%.
13. Turn “ON” the Agitator.
14. Open the drum door to dispense the roasted beans into the cooling bin.
15. When cool, open cooling bin gate and dispense beans in to container.
Weight loss is a good indicator of the degree of roast. Variables such as humidity, coffee storage, and ambient
air temperature will also affect the weight loss. It may go up or down 1% from day to day or month to month, but
you should see 15% +/- 1%. If, after a few months, you start to see the weight loss moving to 16-17%, the roast
is gradually getting darker. On the other hand, if the weight loss starts to drop down to 13-14%, the roast is
gradually getting lighter.
Page 22 of 245. DESTONER OPERATION (optional)
Fig.1 Fig.2
Fig.3
Loosen the knob and adjust the air intake slide gate at the bottom of
the cart to a default value of “2 ½” rows and tighten - Fig.3
Loosen the knob that secures the vertical bean chute and push slide
gate all the way down for a “no bean flow” starting point. (this slide
gate will be slightly opened once beans are in the cart) – Fig.4
Fig.4
Open the roaster cooling bin gate to discharge beans in to the
destoner cart – Fig.1
Wheel the destoner cart to the destoner unit and park under the chute. Connect the transfer hose to the suction port
located on top of the destoner cart – Fig.2
With building electrical power applied to the destoner unit cord, turn on the destoner using the “red” operator knob
located at the top of the destoner – Fig 2
Adjust the bean chute slide gate “up” just enough to get beans to flow (too many beans flowing will clog the chute).
As beans are flowing, adjust the air gate slide chute (Fig. 3) to fine tune the destoning process. The higher the slide
gate is up, the slower the transfer of beans. For best results, the process should be as slow as possible without
stopping the transfer of beans.
When finished, periodically empty the spring-loaded door at the bottom to remove unwanted debris.
Page 23 of 24NOTE: It is normal to find small amounts of good product in this area as well.
Below is an example of the test material used in the factory tests.
Under roasted coffee has been used in the tests along with a series of stones to test the performance of each
destoner.
Page 24 of 24You can also read