From Egg to Chicken Hatchery Manual
←
→
Page content transcription
If your browser does not render page correctly, please read the page content below
From Egg to Chicken

         Hatchery Manual

 From Egg to Chicken       2009-10 Page | 46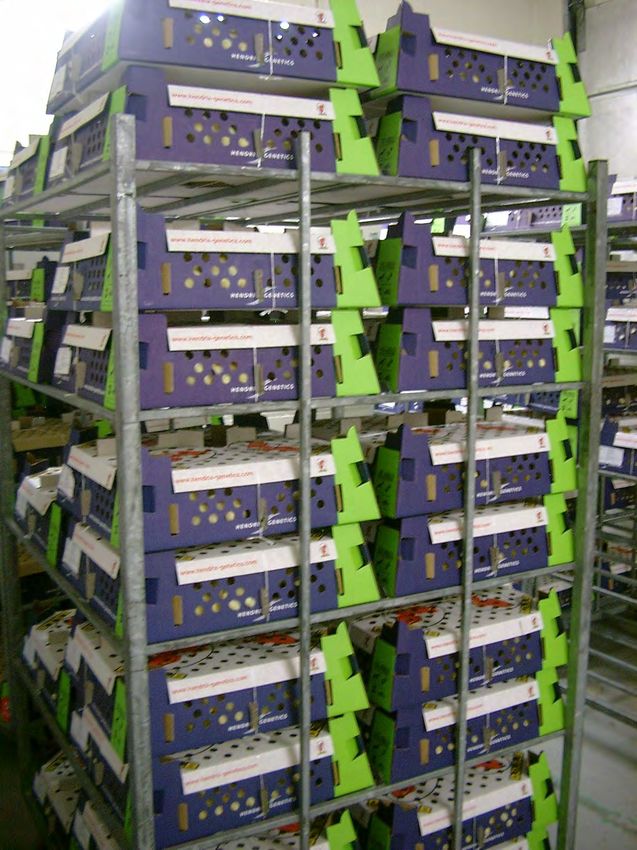
Introduction

“Well begun is half done”
This well-known saying applies certainly to poultry keeping, since the quality of the day old chick
(well begun) tips the scale towards excellent results.
The quality of the day old chicks is the foundation of poultry business.
With this manual “From egg to chicken” we have tried to give the reader management factors for
the production of first class day old chicks. At the same time this manual contains several hints for
the flock owner and the hatchery man who may positively influence the results
An increased hatchability of 1 percent in large hatcheries would mean much better return.
Have a calculation done for your hatchery on “What a 1 percent better hatchability would mean to
you”.
You can be sure that improvements in the hatchery offer great possibilities.
We hope this manual may help you.

Institut de Sélection Animale BV
Villa ‘de Körver’
P.O.Box 114
5830 AC Boxmeer
The Netherlands - EU
Phone:+31 485 319111
Fax: +31 485 319112
e-mail:       info.isa@hendrix-genetics.com
Internet:www.isapoultry.com

                                   From Egg to Chicken                               2009-10 Page | 1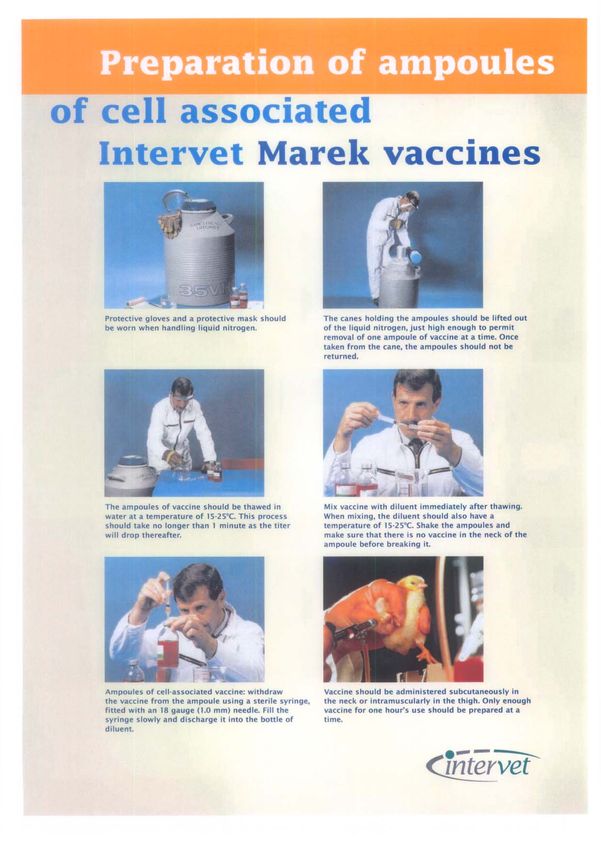
PAGE
Chapter Contents
I Structure of the egg 3-6
II Management factors for hatching eggs 7 - 13
III Efficient hatchery layout and hygiene 14 - 18
IV The development of the embryo 19 - 22
V Management factors for incubation and hatching 23 - 30
VI Chick dispatch 31 - 35
VII Marek prevention, preparation and administration 36 - 37
Appendix 1.
Change of the weight of the hatching egg during
incubation and of the chick weight after hatching 38
Appendix 2. 39
Table to illustrate the relation between the
wet bulb temperature reading and % relative
humidity at temperature of 100F inside the incubator.
Table to determine the % relative humidity by means
of the wet-bulb-thermometer-reading. 39
Appendix 3.
Chicken delivery report 40
Appendix 4.
Hatchery Lay Out 41 - 42
Appendix 5.
Marek vaccine preparation and administration 43 - 44
Appendix 6.
Conversion oC to oF and vv. 45
Appendix 7
Eggshell temperature and humidity 46
From Egg to Chicken 2009-10 Page | 2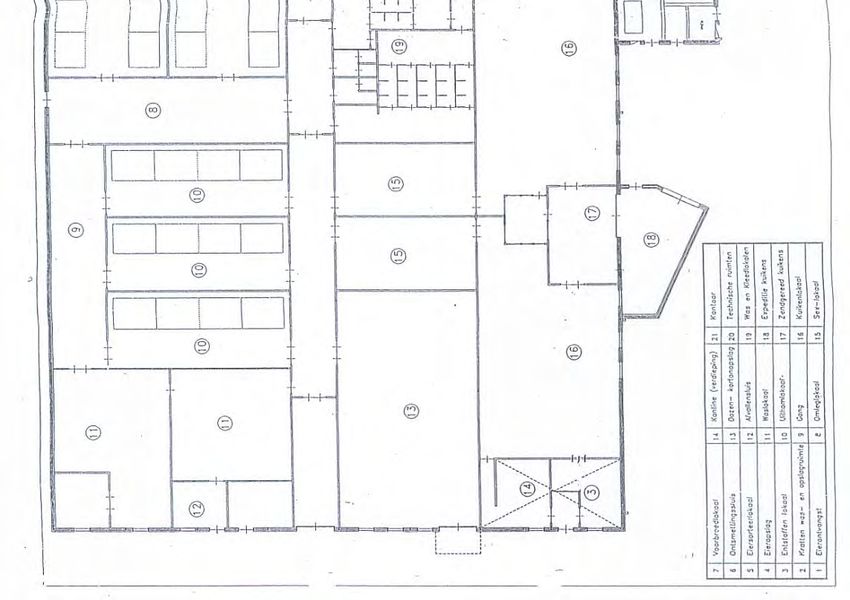
Chapter 1
THE STRUCTURE OF THE EGG
To be well informed of the factors influencing the quality of the egg (both hatching egg and
consumer egg) and those of the incubation and hatching process it is necessary to know the
structure of the egg.
Below you will find a rough enumeration of the most important parts.
A. The Composition
The chemical composition of a fresh egg (approximately 58 grams) expressed in percentages (%)
is as follows:
Ingredient Whole egg including Whole egg excluding Albumen Yolk
shell shell
Water 69.90 77.00 88.40 48.40
Protein 11.20 12.40 10.60 17.00
Fat 8.50 9.40 - 32.60
Carbohydrates 0.30 0.30 0.40 0.20
Ash 10.10 0.90 0.60 1.80
Total 100.00 100.00 100.00 100.00
From this summary it is clear that the yolk contains far more nutrients than the albumen. The gross
weight ratio of the different parts of the eggs are as follows:
Shell and shell membranes 5,4 grams = 9%
Albumen and chalazae 37,3 grams = 64%
Yolk 15,3 grams = 27%
Total 58,0 grams = 100%
Roughly spoken, the albumen: yolk: shell ratio is 6:3:1.
B. The eggshell
The shell consists mainly of calcium carbonate. Other elements are magnesium, phosphorus and
manganese with a small amount of protein which has a connective function.
For the construction of the eggshell vitamin D plays an important part.
Thickness
The average thickness of the shell is 0,35 mm. The small end of the eggshell is thickest while on
the sides the shell is thinnest.
When the environmental temperature is high, the thickness of the shell decreases as is shown
below (egg weight 58 gram):
Temperature 19C: weight of the shell 5,6 gr. (100%)
Temperature 23C: weight of the shell 5,4 gr. ( 96%)
Temperature 32C: weight of the shell 4,9 gr. ( 88%)
From Egg to Chicken 2009-10 Page | 3
Pores
In the shell are many openings, the so called pores which allow the interchange of moisture and
gasses. Roughly speaking each egg has approximately 7500 pores, most of them at the broad end,
very few at the small end.

Cuticula
A thin membrane, the so called cuticula, covers the whole eggshell.
This membrane can be penetrated by gasses but functions as a kind defensive mechanism to
prevent the entry of bacteria.
It is made from the sticky fluid which covers an egg freshly laid and it dissolves due to the
carbondioxyde activity. In this case the shine of the egg disappears and the defensive mechanism
is damaged.
By mechanical means the cuticula can be injured, which results in a break down of the defensive
mechanism whereby the bacteria may penetrate the egg.

C Egg shape
The egg shape is indicated by the shape-index, which is the ratio between egg width and egg
length multiplied by 100:

Width x 100 = shape-index
Length

An optimum shape-index is 74 i.e. an egg (58 gr.) which is 4,2 cm wide and 5,7 cm long.
An egg with a shape index of 72 is too long.
An egg with a shape index of 76 is too round.

D. Shell membranes
Each egg has two shell membranes.
Both lie adjacent to each other and to the shell.
The inner membrane encloses the albumen.
At the broad end of the egg both membranes separate; the inner one comes away to leave an air
space (air cell)
These membranes also protect the egg against bacterial invasion.
Gasses may penetrate them.

E. Air cell
As soon as the egg has been laid, the egg will cool down, the egg contents contract whereby the
air cell is created. It is normal for the air cell to be at the broad end.
There are many more pores per square centimetre here than anywhere else on the surface of the
egg. Most of the time the air cell is larger in winter than is summer (lower temperature). When egg
get old the egg contents decrease, due to water evaporation, in which case the air cell becomes
larger.

                                  From Egg to Chicken                              2009-10 Page | 4
F. The albumen of the egg.
The albumen, or white, is made up of three distinct layers. They are: outer thin white, thick white
and inner thin white, which encloses the yolk. As the egg gets older the thick white is transformed
into thin white.
In the centre of the egg on both sides of the yolk lengthwise, one finds two coils of thick white, the
chalazae.
They arise from the thick white layer at each end and terminate in the chalaniferous layer, a very
thin film of dense white that surrounds the, vitelline membrane which encloses the yolk. These
chalazae hold the yolk, which has a lower gravity weight than the albumen, in the central position.
G. The yolk
The yolk is surrounded by the vitelline membrane and consists mainly of two parts: the yellow yolk
and the white yolk, which lays inside the yellow. The gravity weight of the white yolk is lower than
the yellow one.
The white yolk runs out into the yellow yolk on which end one finds the blastodisc (female germ
cell)
The blastodisc is always on the top of the yolk. If the female cell has been fertilised by the male
germ cell the blastodisc is a little bit larger than it is in the infertile egg (3 to 4 mm). At temperatures
higher than 27 (80 F) the embryonic development (if the egg is fertile) begins.
H. Egg abnormalities
There are two kinds of egg-abnormalities: internal and external.
Internal
loose yolk: the chalazae does not hold the yolk
the yolk sticks to the eggshell: the yolk is loose or the egg has become old. Thick white has
been transformed into thin white whereby it becomes easy for the yolk to start floating.
broken vitelline membrane: the contents of the yolk have penetrates the white. In old eggs the
yolk absorbs moisture, becomes larger whereby the vitelline membrane may burst.
loose air cell: the shell membrane does not remain in contact with the shell.
the egg contains blood or meat spots. This is due to the bursting of blood vessels in the ovary.
External
size of the egg
poor shape
rough, not uniform shell surface
cracks in the shell
eggs without calcareous shell
double yolk egg
From Egg to Chicken 2009-10 Page | 5
Figure 1: Composition and composition changes in time of the egg.

                                 From Egg to Chicken                2009-10 Page | 6
Chapter II

MANAGEMENT FACTORS FOR HATCHING EGG

The following factors are of major importance for the production of hatching eggs that produce high
quality chicks:
a. Genetic make up the parent stock
b. The housing of the flock
c. Flock health and applied vaccination program
d. Feed and water
e. Male to female ratio
f.   Age of the flock
g. Flock performance
h. Egg weight
i.   Shell quality
j.   Nesting arrangements
k. Gathering of the eggs
l.   Egg storage
m. Grading and cleaning of the eggs
n. Disinfection of the eggs

We shall go into details of the fore going subjects:

A. The genetic make up
The genetic make up of the parent stock is very important. The parent stock should be vigorous.
Here again rearing plays an important part. Sexing errors need to bee eliminated as chicks from
false crossings do not posses the predicted characteristics.

B. The housing of the flock
The parent stock flock needs to be housed in well ventilated houses with correct indoor
temperatures, litter in good condition (dry, not dusty, not crusty, without moulds), a well adjusted
lighting program, sufficient feeder and watering space per bird. (see the ISA management guides).
Ventilation is the most efficient method to reduce the amount of micro organisms in the air, which
may contaminate the hatching egg. A correct control of the fans-eliminates draught, maintains an
ambient temperature and supplies sufficient fresh air in the house.
At the onset of lay the dept of litter should not be too deep as this may result in many floor eggs.
Instead of wood shavings coarse sand may be used.
If drinkers stand or hang above the litter wet spots may be found, in which rotting bacteria may
develop giving rise to the explorers.
Concrete floors (asphalt) are essential for a good disinfection and the prevention of repeating worm
infestations.

                                    From Egg to Chicken                            2009-10 Page | 7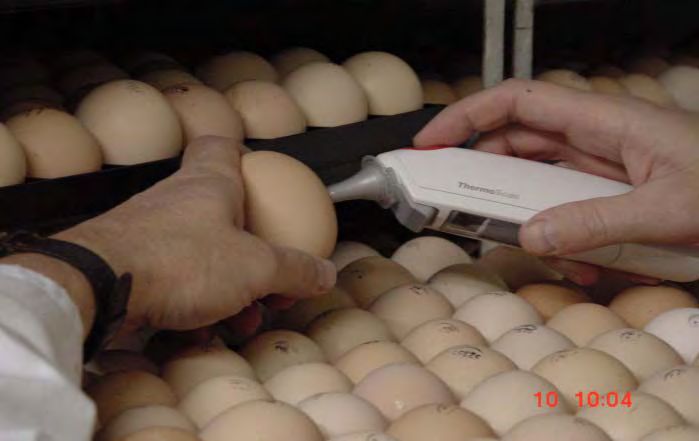
C. Flock health and applied vaccination program
Use only hatching eggs form healthy and vigorous parent stock to whom all recommended
vaccinations have been administered according to schedule and who have undergone the blood
test for Salmonella Pullorum. The vaccination against Epidemic Tremors (Avian Encephalomyelitis)
should be given at least 4 weeks before collecting hatching eggs.
Never vaccinate against Infectious Bronchitis (IB) during the laying period. Parasitic infections such
as coccidiosis, worms and the like have a bad effect on the hatch results. The importance using
only hatching eggs from healthy disease free parent stock will be clear in one realises that a
number of poultry diseases are egg transmitted to the offspring. Use only p.p.l.o. and Salmonella
pullorum free parent stock.
It is well to remember that the temperature and the humidity of the incubator create perfect
conditions for the development of micro-organisms which are the causative agents of many poultry
diseases.
Also the incubator is an ideal place for multiplication and distribution of diseases which are on or
inside the hatching eggs (brooder pneumonia omphalitis)
Some anti-coccidistatica and antibiotics may be harmful to the hatching result if applied during the
laying period.

D. Feed and water
The breeders should be fed according the rules for feeding as defined in the ISA management
guides. At the onset of egg production, special attention should be paid to the vitamin and trace
element contents of the ration as well as to a proper balance in calcium allowances.
Thin shelled eggs lower the hatching result. During stress periods give extra vitamins.
Periodic supplementation of vitamins may prove favourable for a flock.

Unbalanced feed and diseases may cause enteritis, whereby the absorption of the nutritional
compounds decreases, this results in poor hatching eggs, lower hatchability and weak day old
chicks.
Drinkers and feeders need to be cleaned regularly to prevent the growth of moulds and the
development of other micro-organisms.
Pure – non ferrous – drinking water should be provided to obtain a good production and good
hatching results. The water used when vaccinating birds should be clean. Clean the silos frequently
to prevent them getting mouldy.

E. Male to female ratio
As production starts at least 8 males per 100 hens should be present.
Ten males per 100 females represents the utmost limit. An excess as well as a shortage of males
will cause fertility problems in the flock.

F. Age of the flock
It is wrong to expect good hatching results of first quality chicks from birds of 24 weeks or less. One
should not collect hatching eggs from light breeds before 25 weeks of age. The poor hatching
results at the onset of egg production is probably due to the relatively small yolks. Best hatching
results are obtained from eggs collected from birds between the 8 and 13 months of age.

                                   From Egg to Chicken                               2009-10 Page | 8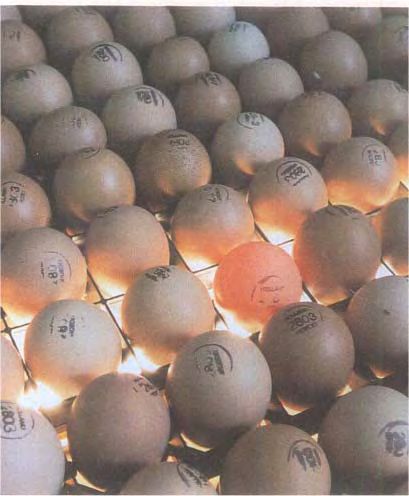
G. Flock performance
Generally, there exists a positive correlation between production and hatchability. Any factor
bringing about a drop in production may affect hatchability as well.

H. Egg-size
In general large eggs do not hatch well. The acceptable weight of hatching eggs range from 50 to
70 grams. During the production egg weight increases.

I. Shell quality

In selecting hatching egg, the requirements regarding shell quality and egg shape will be higher for
layers than for broilers. Thin shelled eggs tend to crack more easily with the consequent risk of
contaminating other eggs and they should, therefore, not be used as eggs for hatching. At peak
production, during periods of extreme temperatures and at the end of the production period, special
attention should be given to a proper balance in calcium allowances (supplementary oyster shell).

J. Nesting arrangements
With individual nest boxes, 1 nest per 5 hens should be provided and a satisfactory layer of clean
nesting material should be available.
The nests, if not automatic or semi automatic, should have clean litter.
Add new if the layer of litter decreases or becomes dirty.
Keep hens from roosting in the nest at night and remove all broody hens quickly.

                                  From Egg to Chicken                              2009-10 Page | 9
Broken eggs and dirty litter must be removed promptly since their contents must be considered as
a potential hotbed of parasitic micro-organisms.
To prevent roll-away nests getting dirty take care that bottom of the nest has a good slope and is
cleaned regularly.
Minimise the quantity of floor eggs by:
1. have all nests ready before production begins.
2. at onset of lay pick up eggs every hour
3. locate a few loose nests boxes in areas with major floor eggs.
And gradually move them to the regular nest boxes
4. put birds into the nests
Since it is the desire of a hen to lay her eggs into a quiet dark spot, the nests need to be sufficiently
deep and not located in full light.
K. Gathering eggs
Frequent egg collections are determined by the season of the year, climatic conditions and the type
of nests.
At the moment an egg is laid it has a temperature of 41C (105F). The body temperature of the
hen.
After an egg has been laid this temperature should decrease gradually till 27C (80F)
within approximately 6 hours. At this temperature the embryonic development slows almost to a
standstill.
If hatching eggs are kept at temperature above 27C the blastodisc development continues and
when cooled down this overdevelopment blastoderm may later on die.
Cooling down too quickly is not good. In this case the blastodisc development is delayed which
may result in a week blastoderm, which may die too.
Those hatching eggs having a chance of gradual cooling-down get strong blastodisc which may
well stand storage and transport.
From the foregoing it is obvious that frequent collections of hatching eggs is a must to obtain high
quality hatching eggs.
Especially large fluctuations in temperature are disastrous.
Always collect eggs into egg tray and keep cracks and dirties apart.
It in not preferable to collect eggs into wire baskets or buckets.
Pack all eggs small end down.
Use key-tray-carriers. Keep egg boxes clean and use new key-trays.
L. The storage of hatching eggs
For the storage of hatching eggs one needs a good egg storage room. This room should have two
compartments. One cleaning and grading eggs and storage of packing material and the other for
the storage of hatching eggs. The latter needs to be fitted with a cooling and heating system and
well insulated to maintain a constant temperature and humidity. The K-value must be 0,4 – 0,5.
For each square meter one may store 22 boxes (each of 360 eggs = 7920 eggs). If practicable,
place the boxes on wood-slat platforms. Dust, draught and mice should not penetrate the egg
storage room.
In general it is recommended to store hatching eggs at a temperature of 18C.
However one needs to distinguish according to the length of the period that the eggs are stored.
From Egg to Chicken 2009-10 Page | 10The optimum temperature for eggs which are stored during 3 to 4 days is probably 18C.
For a period from 4 up to 7 days the optimum temperature should be 16C.
If the storage is for more than 7 days the temperature needs to be 15-16C.
When the temperature is lower, dew on the eggs can occur.
During storage loss of moisture from the egg takes place due to water evaporation.
The lower the relative humidity in the air around the higher the water evaporation.
The correct relative humidity is 72%. Storing conditions however must never reach the dew-point
when condensation on the shell surface would provide favourable conditions for microbial growth.
It is absolutely necessary to maintain a constant temperature, otherwise the relative humidity will
fluctuate too.
The ventilation needs to be restricted to a minimum. If a cooling system is not present, during the
night fresh cool air may be let in, while during the hot periods of the day the egg storage room
should be kept locked.
During the transportation of hatching eggs avoid shocks in order to prevent cracks.
Exercise special care in loading and unloading.
At least twice a week (better daily) the eggs need to be taken from the egg supply farms and
transported to the hatchery if an egg storage room is not available on the farm.
M. Grading and cleaning of hatching eggs
In most cases grading and cleaning of hatching eggs is a simultaneous operation in the hatchery.
In selecting hatching eggs, the requirements regarding shell quality and egg shape will be higher
for layers than for broilers.
Eggs unfit for hatching are:
a. dirty eggs
b. cracks
c. thin shelled eggs
d. eggs with shells, which are rough and not uniform
e. misshapen eggs
f. eggs with abnormal spaces - loose or floating air cells
- to large air cells
g. eggs with large blood or meat spots
Dirty eggs (if not too dirty) may be dry-cleaned with sand paper or wire wool.
Washing of hatching eggs is possible too, but do it in a correct way.
Do not use a cloth which has been dipped into water or vinegar.
For egg washing one should have at one’s disposal a well constructed egg washing machine,
which should be operated in the correct way.
Follow strictly the manufacturers recommendations. If the requirements are not met one may be
faced with “exploders”. Egg washing if well done is not harmful to the hatchability.
From Egg to Chicken 2009-10 Page | 11N. Disinfection of hatching eggs
The contamination with micro-organisms of hatching eggs starts immediately after an egg has been
laid. The on-the-farm disinfection of each day’s production is necessary.
This disinfection should take place in a specially designed cabinet in which temperature, humidity
and the period of disinfection as well as the ventilation can be controlled.
Disinfect on trays, not in boxes.
The disinfection aims to kill bacteria, moulds and some viruses on the eggshell to prevent these
micro organisms penetrate the egg through the hundreds of tiny pores of the eggshell.
As disinfectant formalin can be used either as a powder or as a solution with potassium
permanganate.
Per m3 disinfection room one uses:
a. 6 grams of formaldegen which is heated to 400F in special electrical pans.
Always follow the manufactures recommendation.
b. 20 grams potassium permanganate and 30 cc formalin 40%
From Egg to Chicken 2009-10 Page | 12Use porcelain basins.
Formalin should be added to the potassium permanganate which is in the basin. When using
damaged enamel basins oxidation of the metal might take place, whereby formic acid is liberated
which may be very harmful to the hatching eggs.
Disinfect for 30 minutes at a temperature of 25C and a relative humidity of 75%.
If required after disinfection the formalin mixture may be neutralized with ammonia 40%. (per m3 40
cc ammonia). Store the potassium permanganate in dark bottles, well sealed. Keep the formalin in
a cool place, but free from frost. Potassium permanganate should not be too fine otherwise there
may be a danger of explosion.
From Egg to Chicken 2009-10 Page | 13CHAPTER III
EFFICIENT HATCHERY LAYOUT AND HYGIENE
General requirements
A hatchery rises or falls with the quality of the day old chickens delivered whereby the quality of the
hatchery as well as the hatching eggs has played a dominant part.
Here we will mainly discuss the hatchery (a separate chapter deals with the quality of the hatching
eggs)
Some general requirements which a hatchery needs to meet.
a. a well isolated situation (no other poultry or fowl in the neighbourhood)
b. free of trembling (not near a railway or main road)
c. not high in the mountains (lack of oxygen)
d. separate hatching eggs of the light and the heavy breeds
e. do not allow persons who come into contact with other poultry to enter the hatchery,
keep visitors away
f. be sure of energy supply (electricity, water, oil)
Hatchery layout
The following rooms are necessary (the numbers refer to the hatchery layout in appendix 4, page
41 and 42).
a. The egg-receiving – grading – and storage rooms (1,2,4,5)
Worldwide, a lot of the hatching eggs are transported in carton boxes. Be sure only
clean boxes are used. Do not allow the truck drivers to enter the hatchery. If eggs are
transported on containers, clean and disinfect them before returning to the breeding
farm.
When the eggs are not directly put on trays, place egg boxes on wood-slat-platforms
in the storage compartment.
If the hatching eggs need to be stored for several days keep the temperature at 18C
(64F)
with a relative humidity of 70 – 80%.
After grading dispatch the out-graded and boxed eggs as soon a possible.
Never use egg packing material form poultry salesman (disease risk).
Clean the grading/setting room after every setting and the egg receiving area and
storage room at least once a week.
b. Disinfection room (6)
After the eggs are trayed (for incubation) they need to be fumigated.
This is best done in a special designed room between the egg receiving-grading- and
storage room and the incubator room. This room should function as a sluice. No one
may pass through. On both sides only from outside this sluice need to be opened or
closed.
How to disinfect see page 12.
From Egg to Chicken 2009-10 Page | 14At the top of this room an extractor fan needs to be present. It is important that the fan
shaft can be closed.
Near to the bottom of this room an inlet for fresh air needs to be constructed. When
disinfecting take care of:
1. concentration of the disinfectant
2. time of the disinfecting
3. correct temperature and humidity
4. proper use of the ventilation system
5. people’s safety
c. Incubator room (7)
Apply slightly over-pressure ventilation.
Optimum temperature: 22C (72F) and relative humidity: 50%
For easy handling of trolleys and trays minimum working space of 3 meters should be allowed
in front of the incubator.
Depending on the type of incubator used, a distance of 60 cm should exist between the
incubators and between the back of the incubator and the wall.
For cleaning purpose it is desirable to have 1,5 meter space above the incubator.
The fan capacity depends on the type and capacity of the incubator.
Generally speaking a standard of 57 m3 air per hour for each 10.000 incubated eggs is
recommended.
For the ventilation of the incubator a separate incubator-ventilation-system is preferable.
From Egg to Chicken 2009-10 Page | 15The different departments must be divided up by well insulated parts.
From Egg to Chicken 2009-10 Page | 16In this room the eggs are candled on the 18th day and transferred on the hatching trays
through a shutter to the hatching room.
d. Hatching room (10)
For hygiene reasons it is preferable to have two or more hatching compartments;
Especially if chicks pip more than twice a week.
The optimum temperature in the hatching room is 22C and the relative humidity 60%.
If possible apply too, the separate-hatcher-ventilation-system.
The ventilation capacity depends on the type of incubator. As a general standard 370m3 air
per hour for 10.000 eggs is recommended.
Use for the room exhaust fans (under-pressure-ventilation).
e. Sexing room (15)
Temperature 22C and relative humidity 60%.
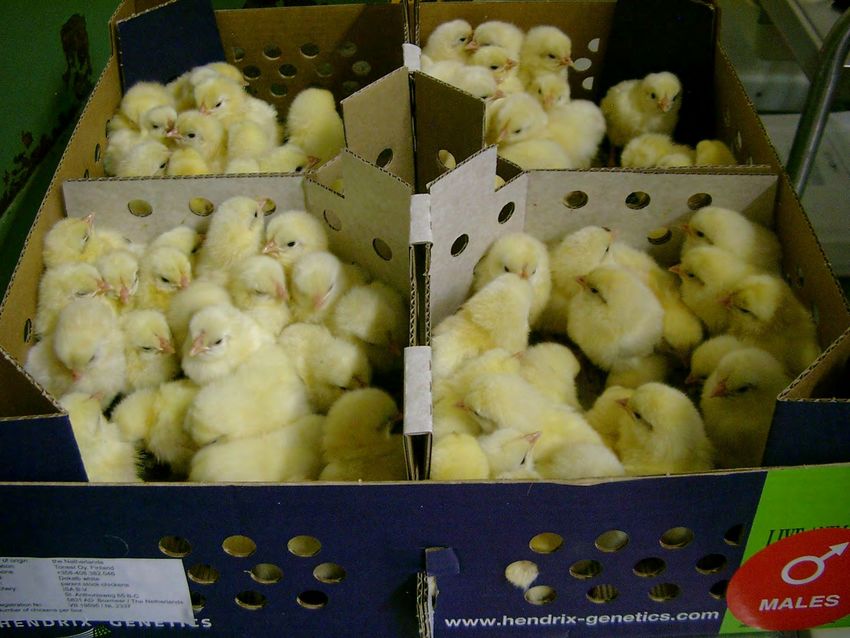
f. Chick room / packing dispatch (16)
In this room the chicks are vaccinated, counted and put in boxes.
g. Chick storage room (17)
The storing is done on racks or trolleys. Keep enough space between the boxes. Prevent
direct sunlight. Optimum temperature 24C and relative humidity 60%. The optimum
temperature is depending how the chicks are stored in the loading room.
h. Washing room (11)
Good facilities are required for soaking, washing and scrubbing of trays etc. it may be very
convenient to have two compartments: one for cleaning and one for disinfection.
i. Disposal room (12)
This room is used for temporary storage of the disposal bins with dead chickens and egg shell.
Put the garbage into plastic bags which are previously placed into the bins.
j. Loading room (18)
This part of the hatchery is used for loading the chicks van (control of rain, sunshine and
temperature). Other possibilities for loading the vans are passing the chick boxes through a
shutter in the wall of the dispatch room or by means of a conveyor (protection against climatic
conditions are necessary)
A raised platform for loading the lorries is very convenient.
k. Hygiene
The necessity of a strictly applied complete hatchery sanitation-program is generally admitted
of one realizes that through the hatchery a great number of diseases can be disseminated.
(salmonellas, C.R.D., colibacilosis, staphylococcus’s, streptococcus’s aspergillus’s, etc.)
Often hygienic measures in the hatchery leave much to be desired.
For sanitary reasons a hatchery should have only two entrances (doors) viz.: one for the
workers and one for the garbage removal.
The following points are important for a good hatchery sanitation program:
From Egg to Chicken 2009-10 Page | 171. Several times a year a medical examination of the hatchery workers and sexers for
Salmonella is necessary. In case of diseases among the workers egg “stomach flu” extra
examination is required New personnel should have been previously examined to know if
they are “non-carriers”.
2. To lower the contamination rate the one-way-traffic rule must be applied. The different
routing lines should not cross each other.
3. The hatchery should be locked all the times.
4. The connection between the incubator room and the hatchery room should be used only
for the transfer of eggs. Keep the door closed.
6. The best way is to divide the hatchery into three zones, each with a different colour for the
clothes and boots of the workers.
Egg receiving, grading-storage-room : khaki
Incubator room : white
Hatching room and other compartments : blue
7. When entering the hatchery the workers should change clothes and shoes and wash and
disinfect hands. In some hatcheries showering is obligatory.
8. In each room facilities for hand washing and disinfection needs to be present. Hands need
to be dried with throw-away paper towels
9. Pay special attention to the sexers (they move from hatchery to hatchery) The clothes and
shoes they wear and the tools they use need to remain in the hatchery. Let them wash
and disinfect hands thoroughly.
10. The frequent cleaning and disinfection of the different hatchery rooms is an absolute
requirement.
Hatching room, sexing room, chick rooms, washing room need to be cleaned and
disinfected after each hatch. Egg receiving room, and incubator room at least once a
week.
Do not forget cleaning and disinfecting the drains. The knobs, taps toilet seat etc. need
daily cleaning and disinfection.
11. Use chick boxes only once.
Prior to chick loading disinfect the lorry.
12. Keep dogs, cats, birds rats and mice out. A control programme to keep rodents out can be
used.
13. The arrival of the hatching eggs need special attention.
Take care of flock owner cleans and disinfects his egg storage room frequently. Use the
packing material only once. In case wooden crates for egg collection are used they should
have been disinfected before arriving at the hatchery.Never use trays or boxes originated
from poultry salesman
For delivery of out graded hatching and candled eggs use your own packing material.
Always use new packing material
l. Important rules for the disinfection
1. To have success in disinfecting be sure all objects are thoroughly cleaned.
2. Keep a suitable detergent and select the disinfectants with the suitable properties
3. When using a combination of a detergent and a disinfectant remember each combination
does not improve the effectiveness of the disinfection.
From Egg to Chicken 2009-10 Page | 184. Quaternary ammonium compounds get inactive with residues of soap which is in contrast
with chlorine compounds
Quaternary ammonium compounds are incompatible with chlorine compounds.
5. Read and apply strictly the manufacture’s recommendations (concentration, temperature,
humidity, time)
6. Observe precautionary measures and follow directions (mask gloves)
7. The best hygiene for hands is washing them with ordinary alkaline soap
8. Prevent recontamination
From Egg to Chicken 2009-10 Page | 19CHAPTER IV
THE DEVELOPMENT OF THE EMBRYO
To distinguish between the factors which play a part during incubation it is useful to know most
important development stages of the embryo.
Below a very rough summary of these different stages is given.
A. The development of the embryo before the egg is laid
1. Most of the time the mating of the hen takes place when no egg is present in the uterus. When
mating the cock produces 0,7 cc semen. The semen which is discharged by the cock into the
cloaca of the hen, within 30 hours moves via the oviduct to its entrance, the trumpet. In the
trumpet the fertilisation of an egg (fusion of the female germ cell with one mal cell) occurs.
2. The first step in embryonic development takes place inside the hen, influenced by the body
temperature. Before the fertile egg is laid the blastodisc (now called blastoderm) consists of two
layers of cells.
As soon as incubation starts, a third layer is produced. The stage in which these layers of cells
appear is called the gastralation stage.
The names of the layers are:
- the endoderm, which gives rise to the respiratory and secretory organs and to the
lining of various parts of the digestive tract.
- The ectoderms, which is the basis for the skin, the beak, cloaca, eye and nervous
system
- The mesoderm (third layer) : from this layer originates the bones, blood excretory and
reproduction organs.
After an egg is laid the egg should be cooled down till at least 27C. At this temperature the
embryonic development slows down and the egg can be stored during 10 days. This is best done
at a constant temperature of 15-18oC (depending on storage time) and a relative humidity of 70-
80%.
Under these conditions of life-processes of the “dormant” embryo is reduced to a minimum.
B. The development of the embryo after the egg is laid
1. Before incubation by judging the size and the appearance of the blastodisc an experienced
hatchery man is able to distinguish between a fertile and an infertile egg.
As soon as incubation starts the development of the embryo continues.
After 24 hours the blastodisc is clearly enlarged; after 30 hours the embryonic hearts beats.
2. There occurs two extra embryonic sacs viz.:
a. the 2nd day the amnion develops, which has enclosed the whole embryo after the 3rd day.
The amnion gets larger by the fluid, which is liberated from the albumen.
The amnion has several functions:
- protects the embryo from drying out
- protects the embryo form shocks
- prevents the embryo getting damaged
- b. The 3rd day the allantois develops. This extra embryonic sac is crowded with blood
vessels, hits the eggshell membranes and gets filled with excretory fluid.
From Egg to Chicken 2009-10 Page | 20The function of the allantois are:
- It takes care of the respiration as long as the pulmonary respiration is not working
- it stores the waste products.
Day 1 Day 4 Day 14
3. The development of the embryo can roughly be divided into the following stages:
a. in the hen: two layers of cells
b. during incubation: 1st - 4th day : initial stage of inner organs
5th - 14th day : initial stage of outer organs
15th - 20th day : growth of the embryo
21st day : hatch of the chicken
4. Besides the stages mentioned, characteristic moments during the embryonic development
are:
a. between the 16th and 18th day amnion fluid and the albumen are completely used up.
b. One the 19th day the yolk sac with-draws through the navel into the body cavity
c. Around the 19th – 20th day the chicks starts to fracture the eggshell
During a pause (13-14 hours) that follows, the chick switches from allantoids respiration to
pulmonary respiration.
d. The chick turns itself in the egg while cutting the eggshell with “egg tooth” on top of the
beak ( 1hour)
When it takes too long a time between the fracturing of the eggshell and the moment the
chick cuts the egg into two parts the slimy material inside the egg may dry out and the
chick may get stuck to the eggshell or gets sticky itself.
To prevent the drying out it is important to increase the humidity in the incubator during
the pipping.
The whole incubation time (including the hatching) takes 20 ½ days.
Hereafter the chick needs a half day to dry and regain its strength.
C. The correct position of the chick in the egg
This is as follows:
- the neck is directed towards the air cell
- the head is bent forward
- the beak is under the right wing
- the legs are resting on both sides of the body
- in most cases legs are in touch with the head
From Egg to Chicken 2009-10 Page | 21D. The weight of the embryo
In the different stages of incubation the weight of the embryo is as follows
(egg weight 60 grams) 5th day 0,5 grams
10th day 3 grams
15th day 12 grams
18th day 20 grams
21st day 40 grams
E. Chemical and physiological processes
During incubation from the different parts of the egg complete new tissue is formed.
Changes in weight of the different parts of the egg occurs as the table below shows
(weight in grams):
Part of the egg Fresh egg Egg after Egg after Egg after
1 week incub. 2 weeks incub. 20 days incub.
Yolk 18.4 20.2 18.0 7.0
Albumen 34.6 13.4 6.8 -
Eggshell 7.0 7.0 7.0 6.9
Amnion - 15.0 6.0 2.0
Allantois - 0.5 5.5 2.0
Embryo with yolk - 0.6 9.7 32.0
Total (gram) 60.0 56.7 53.0 49.9
Remarks
During the first week of incubation much water is withdrawn by the yolk from the albumen.
From 12th till the 16th day of incubation the remaining amount of albumen is absorbed by the
embryo.
From Egg to Chicken 2009-10 Page | 22Summary of the embryonic development from day to day
Important in relation to the fixing of the moment that the embryo, if not hatched died in the shell.
Stage I: Development of the internal organs
1st day : enlargement of the blastodisc
2nd day : hearts starts beating, tiny bloodspots appear
3rd day : initial stage of the beak, legs, wings
4th day : initial stage of the tongue
5th day : shaping on the reproduction organs
Stage II: Development of the external organs
6th day : beak gets shape
8th day : shaping of the feathers
10th day : hardening of the beak
13th day : shaping of the leg scales and claws the size of the allantois reached
its maximum
14th day : the structure of the embryo is completed the embryo settles for
its final position
Stage III: The growth of the embryo
15th day : leg scales and claws become horny from the 15th – 19th day the
intestines are withdrawn into the body cavity. The neck bends
forwards
16th day : the contents of the allantois has disappeared completely
17th day : the beak directs itself toward the air cell the fluid of the amnion
continues to disappear. This will be finished at the 19th day
19th day : the yolk is being withdrawn into the body cavity the air cell gets
penetrated by the beak
20th day : the yolk is withdrawn, the embryo fills the whole egg, excluding the
air space the eggshell is fractured
21st day : the chicks is hatched
From Egg to Chicken 2009-10 Page | 23CHAPTER V
MANAGEMENT FACTORS FOR THE INCUBATION AND HATCHING PROCESS
A. For a special incubation and hatching the following factors are of major importance:
1. Temperature
2. Humidity
3. Ventilation
4. Turning
1. Temperature
During incubation till 18 days the temperature should be 99,7F.
In the hatcher the temperature should be 99F. Make sure of a constant temperature and regularly
check the thermometers of deviations. During incubation a too high as well as a too low
temperature has influence on the hatching results which has been proven in several trials. (see
table I). In the same time they may influence the time of incubation (see table II).
Table I: Table II:
The influence of the temperature during The influence of the temperature during
incubation
Incubation on the hatching results on the time before the chicks are hatched.
Temperature % hatched chicks Temperature Number of days
in F of fertile eggs in F needed for incubation
an hatching
96 10 97 22.5
97 50 98 21.5
98 70 99 – 100 21.0
99 80 102 19.5
100 88
101 85
102 75
103 50
Embryo temperature versus air temperature
The embryo temperature depends on the air temperature, the heat production by the embryo and
the ability to transport heat from egg to air or vice versa. Especially the heat transfer between eggs
and air is a relevant factor in incubators. It is important to realize that this heat transfer is not only a
result of the difference in temperature between eggs and air, but that for instance air velocity will
have a high influence on the rate of heat transfer as well. A high air velocity will give a high heat
transfer, a low air velocity will give a low heat transfer. This means that when there is a difference
in temperature between egg and air, the rate of air velocity will determine the actual embryo
temperature at a given moment. This is important both at the start of incubation, when the eggs are
warmed, as in the second part of incubation, when the embryo starts to produce significant levels
of metabolic heat.
From Egg to Chicken 2009-10 Page | 24See graph at page 22.
Temperature and air velocity at 18 days
41,0
Air temperature
40,0
Temperature (ºC)
Eggshell temperature
39,0
38,0
37,0
36,0
0,0 0,5 1,0 1,5 2,0
Air velocity (m/s)
Source: S.Lourens, the Netherlands
How to measure embryo temperature
To control incubation processes, it is very important to have a good idea of the embryo temperature
during incubation. There are several ways of recording embryo temperatures, but the easiest and
cheapest way of doing it is by using an infra-red ear thermometer as used for humans.
The way to use them is by checking the eggs in an incubator by placing the head of the
thermometer halfway on the egg, so under the air cell. Simply put the setter trays horizontal, open
the setter of hatcher, pull out a tray half way or in case of a hatcher lift some trays so you can
reach the eggs, take out an egg and measure it.
As described in the document concerning the basics of embryo temperature, embryo temperature
is dependent on heat production of the embryo, air temperature, air humidity but mainly on air
velocity. Therefore, look for the places with high air velocity (top or bottom trays, close to the
ventilator, outer side of the trays) and especially low air velocity (middle of the tray, away from the
ventilator).
Both at the start of incubation but especially at the end of incubation, it is very important to
control embryo temperature and adjust the air temperature to maintain an embryo
temperature of about 99.7 – 100.0 oF at the start of the process and 100.0-100.5 oF at the end
of incubation.
See also Appendix 7 for the desired eggshell temperature and humidity.
The same thermometer can also be used for measuring day-old chick temperatures, for instance in
the hatcher or during handling, storage and transportation. Place the thermometer on the cloaca of
the chick and do the recording. Temperature should be 102.5-103.0 oF.
From Egg to Chicken 2009-10 Page | 25Measuring Embryo Temperature.
2. Humidity
Inside the incubator it is necessary to maintain a relative humidity of 52-55%.
Which is equals an 84-85F reading on the wet bulb (see appendix 2). In the hatcher, too, one
should maintain a relative humidity of 52- 55% bus as soon as 1/3 of the shells of the hatching
eggs have been fractured, one should raise the humidity up to 70-75% (91-92 F wet bulb reading).
This increase in humidity will appear normally without adjusting the hatcher settings.
In each incubator and hatchery it is absolutely necessary to have a correct functioning hygrometer,
preferable a wet bulb thermometer.
The cottons of the wet bulb thermometers need to be cleaned regularly, otherwise they get
hardened by the calcium salts in the water, dust and fluff. Use only distilled water in the water
reservoirs of the wet bulb. Never open the door to the incubator, between the time the eggshells
are fractured and the chicks are collected.
3. Ventilation
A correct functioning of the ventilation system is needed:
To supply oxygen
To discharge carbon dioxide
To distribute the heat evenly
The carbon dioxide content inside the hatchery should never exceed 0,5%.
4. Turning
During the incubation period (1-18days) the hatching eggs need regular turning (90) to prevent
that the embryos getting fixed to the eggshell. It is best to turn the eggs each hour. To increase the
air velocity after 15 days, it is possible to stop turning at this time.
B. Checklist
For a good supervision of the course of events in the hatchery checklists are necessary (see page
25). Besides the records on the temperature and humidity of the rooms one needs to keep records.
Four times a day, on the temperature, the humidity and the turning of the eggs of each machine.
This checklist may be of great value if one needs to solve troubles of the hatching process.
The figures of these checklists need to be collected regularly and correctly.
From Egg to Chicken 2009-10 Page | 26C. Embryonic death
Early embryonic death
In most cases the causes of death are related to:
a. the breed or nutrition of the parent stock;
b. care of the hatching egg before setting;
c. fumigation during the first days of incubation;
d. insufficient turning;
e. shocking and trembling.
From Egg to Chicken 2009-10 Page | 27If one disinfects the hatching eggs inside the incubator one should take the greatest caution. In any
case one should not fumigate the eggs between 12-96 hours after setting, otherwise the embryo
will die.
Mid term and late embryonic death
The turning and the care of the hatching eggs play a great part.
Embryonic death in other stages of the incubation process may have other reasons:
Temperature, humidity, ventilation, poisoning or insufficient turning of the eggs or the nutrition of
the parent stock.
D. Candling
One gets information on the fertility by candling the eggs on the 5th or 6th day of incubation. One
should distinguish between infertile eggs and eggs in which the embryos died.
To prevent too much cooling-down of the eggs during candling, one should not allow the hatching
eggs to stay outside the incubator for more then 20 minutes. Infertile eggs can be used for
consumption purposes. Depending on the incubator type, it is important to fill trays after candling to
get an even distribution of heat.
In any case the rows should be filled.
F. Troubles
If too many eggs are infertile one should look for causes in the parent stock. To find out what the
reasons are for embryonic death, it is necessary to know what is normal and what is abnormal.
Certain trouble indicate certain causes e.g. :
Trouble: Probable cause:
1. Clear (infertile eggs) - insufficient mating, old males, wrong male, female
ratio, females too fat.
- eggs kept too long or under unfavourable conditions
vitamin deficiencies (A,B,C, and E)
- parasitic infestations (capillary worms)
- vaccination or diseases among parent stock
2. Early embryonic death - incubator temperatures too high or too low
- wrong fumigation of the eggs
- genetic factors
- insufficient turning of the eggs
- diseases among the parent stock
3. Embryonic death between 11th - wrong temperature or insufficient ventilation
and 20th day - mercury damps (broken thermometers)
- deficiencies of vitamins or trace elements among
- insufficient turning
- diseases among the parent stock.
From Egg to Chicken 2009-10 Page | 284. Deaths close before the - insufficient turning of the eggs
fracturing of the eggshell - genetic factors
- eggs are set with small end up
- air space in wrong position
5. Deaths after fracturing - humidity too low
of the eggshell - temperature too high or too low
for a short period of time.
6. Hatch too early - temperature too high
7. Hatch too late - incubator temperature too low
- eggs too old or badly acclimated before
setting.
8. Hatch not coming off evenly - uneven distribution of heat
- eggs from parent stock of different age
groups.
- large and small eggs.
9. Chicks stifled inside the egg - humidity too high in the incubator
- humidity too high in the incubator before
1/3 of the eggs were shell fractured
10.Rough and swollen navels - temperature too high or with many
fluctuations.
- wrong disinfection during hatching
- humidity too low.
11.Navels badly closed - too high embryo temperature
12.Chicks covered with egg - temperature too low.
remnants - average humidity too high
- nutrition of parent stock
13.Small chicks - small eggs
- humidity too low
- too much heat
14.Weak chicks - overheating
- nutrition of parent stock
15.Malformed chicks - temperature too high
- humidity too low
- insufficient turning of the eggs
- bottom hatching tray too smooth
From Egg to Chicken 2009-10 Page | 29F. Hatching Results
Depending on the breed (heavy-light), flock age and generation (GPS-PS or FP) an average %
hatch of 80% to 85% of the eggs set should be obtained, when the management of the breeding
stock, the handling, the storage and candling of the hatching eggs is well done and the conditions
during incubation and hatching are optimum.
The higher the hatch results, the better the quality of the chicks.
When handling hatching eggs, e.g. traying, transports, candling, transferring, one should
always take the greatest possible caution.
Rough handling of the eggs decreases the hatch result.
In most cases large eggs need longer to hatch than small ones do. In general small eggs
hatch sooner.
During the hatching of large eggs the chicks that are hatched from the small eggs may
loose too much moisture due to the fact that they stay too long in the incubator.
It is ideal to hatch separately in one incubator the eggs of one age group of parent
stock or still better eggs originated from one poultry house.
Hatching eggs of light and heavy breeds should certainly be kept separate.
G. Hints
- After transportation hatching eggs need a rest of 18 hours, so one should not set them
directly on arrival at the hatchery.
- Before incubation hatching eggs need preheating at + 25C. (acclimation) for 6 to 12
hours.
- Never fumigate hatching eggs with formalin from the 2nd through the 4th day of incubation
- Transfer the hatching eggs as late as possible, bur never before the 18th day of incubation.
- During transfer eggs should not stay outside the machine for more than 30 minutes.
- It is necessary to keep correct records. Not just a financial administration but a pure
technical one. Besides breed, origin, number of eggs set, % fertility, % hatching, one
needs to keep records daily on the temperature and humidity both of each incubator
and incubator and of the different hatchery rooms.
H. Added precautions
To eliminate risks one should take the following precautions:
1. A correct working alarm system, which is daily checked and which is connected to
the house of the hatchery manager.
2. An emergency stand by generator, which is fully dependable and ready for use.
Once a week it needs to be checked while running.
3. Additional water reservoirs. Check the calcium content of the water which may give
rise to blocked conduit-pipes and nozzles.
4. Spare parts e.g.: motors, belts, ventilators, thermometers, and electronic spare parts, need to
be present and stored in places which are easy to reach.
From Egg to Chicken 2009-10 Page | 305. The place where chick boxes and pads are stored needs to be dry to prevent
moulds. Also this place needs to be disinfected regularly.
From Egg to Chicken 2009-10 Page | 31CHAPTER VI
CHICK DISPATCH
Besides the interest of the hatchery man in a high hatching result and percentage of saleable
first class chicks, the liveability of the day old chicks on the farm during the first week of
age is very important too. The chick mortality in this period may be caused by mistakes of
both, the grower and hatchery man.
A. Chick handling
Freshly hatched chicks often suffer due to handling several times, which means stress
for them. In the hatchery one may reckon among them:
1. The collecting of the chicks: never collect chicks for the second time; certainly do
not help chicks to hatch by cracking the egg into two parts.
2. sexing: hand sexing needs to be done with very young chicks; take precautions against
rough sexing.
3. dubbing: use a proper, well cutting pair of scissors.
4. vaccinating (Marek): inject musculatory, do not damage blood vessels, nerves or
bone tissue.
From Egg to Chicken 2009-10 Page | 325. grading: eliminate all malformed and weak chicks.
6. preparing the dispatch: use only new boxes with the punched holes open;
adapt the number of chicks per box to the climate conditions (in summer less
than in winter). Put the boxes on racks or trolleys while waiting for delivery.
When plastic chicken boxes are used, clean and disinfect them thoroughly, and use paper in
bottom of the box.
B. Dispatch
Chicks hatched from young breeders may hold less in reserve. (resistance, moisture)
than chicks hatched from older ones (correlation with egg-weight).
For that reason it is advisable to set the eggs of different age groups apart and keep
them separate after hatching.
If chicks are to be transported over long distances use for that purpose the chicks of
the older flocks.
In the case of chicks from young parent stock, early delivery is preferred e.g. the very
day of hatching. Prior to loading the lorry, take care the truck is well cleaned and
disinfected; the petrol tank has to be filled to capacity. During the process of loading
be aware of having sufficient clear space between both the boxes themselves and the
sides of the van.
Prevent sliding of the boxes.
A chick delivery report may be helpful for both:
- the driver to check all the important points.
- the hatchery man to solve troubles if any should arise
over a certain baby chick delivery (see appendix 3).
C. Recommendations for baby chick delivery
Regardless of the method of transportation, the chicks must be moved
a. Quickly
b. Comfortably
c. Under optimum sanitary conditions
Especially for summer delivery, speedy shipment and chick comfort are vital.
And it goes without saying that strict sanitation is essential at all times.
ad. a. Speedy Delivery
1. Where chicks arrive by plane, allow the chick transport van to be at the airport
one (1) hour prior to the scheduled time of arrival of the aircraft.
Remember that in a plane that has just landed, and is not moving, cooling to prevent the
chicks from becoming overheated is usually a great problem. The chick load
must, therefore, be transferred to the transport van as quickly as possible.
- In the event that the plane arrives over one (1) hour earlier than originally
scheduled, and the transport van is still not there, then the chick boxes must be
removed from the plane to a room with an inside temperature between 20 and
22C. Make sure to maintain sufficient clear space between the chick boxes. Also there should
be sufficient air circulation and ventilation.
- Advice customs officers and health service authorities well in advance of plane and
time of arrival of the chicks, asking them to be present on time so as to get
From Egg to Chicken 2009-10 Page | 33quick action, this assuring a quick move of the chicks to the brooder house.
2. Make sure the van is in good repair, and that its tank capacity is filled before each
delivery.
3. Once loaded, the chicks should be moved to their destination without delay so far
as practicable.
4. Avoid the rush of traffic and diversions.
5. The driver should drive directly to the place of destination, leaving coffee breaks
and lunch interval until off duty.
6. Loading and unloading should be done quickly
ad. b. Chick comfort
1. Use a van specially designed for baby chick transportation.
It should be equipped with (a) racks,
(b) heating and ventilation facilities.
Temperature in the van body should be at the correct level.
In summer, during waiting periods, park the van at a place not in the sun.
A well equipped van – a good chick delivery.
From Egg to Chicken 2009-10 Page | 342. During the process of loading and unloading never keep chick boxes crooked and
do not handle them roughly (don’t throw the boxed chicks).
3. Be aware of load limitations of the chick transport van related to temperature and
ventilation conditions in the body of the van.
4. Boxes of baby chicks should be stocked in cars and rooms in such a way that
sufficient clear space is available between the boxes and sides of the car or walls
of the room and between each stock of boxes.
Placing boxes of baby chicks too near the sides of the car or walls of the room
should be avoided at all times. In short, separate the boxes to allow ventilation
completely around them.
5. Prevent the boxes from sliding. Driving over rough roads, too fast driving in sharp
turnings and jamming are the chief causes.
6. Protect boxed chicks from direct sunshine.
7. Don’t expose filled boxes to draughts.
8. In hot climates, it may be more desirable to deliver as early in the day as possible
or at night.
From Egg to Chicken 2009-10 Page | 359. Chicks should be shipped in roomy, well ventilated boxes at all times.
In hot weather, start putting only 80 chicks per 100-size box.
10. Don’t put over 5 boxes in a stock in the chick handling room.
11. Chick boxes should be strongly made. The punched holes should be open to allow
free movement of air through the boxes. The inner surface of the bottom should
be rough enough to prevent the baby chicks from slipping.
12. Chicken-rooms, with boxed-chickens, should have a temperature of about 20C.
Should prompt unboxing be impracticable upon arrival at he farm, prevent boxed
chicks from remaining in hot surroundings for an excessive period of time anyway.
In such instances, place the boxed chicks in a room, perhaps the service room
located in the front of the brooder house, where temperature should be around 20C.
ad. c. Sanitation
1. For disease prevention, the boxes and the filling material in them should be dry
and free from disease germs.
2. Persons who load and unload filled chick boxes should use clean outer clothes and
footwear. They should make a practice of washing and disinfecting their hands
thoroughly before starting the job.
3. Have the van disinfected before each chick transport.
4. Don’t allow the driver through areas where epizootic poultry diseases exist
Some extra points
On arrival at destination the chicks should be unboxed without delay.
Here’s what they are immediate need of:
- (a) A temperature of 32 - 35C.
- (b) Baby chick mash or chick starter, and water at 20C.
- (c) Dry litter free from disease organisms and, if need be, covered with paper.
- (d) 23 Hours of light daily.
- (e) Q U I E T N E S .
From Egg to Chicken 2009-10 Page | 36CHAPTER VII
MAREK PREVENTION, PREPARATION AND ADMINISTRATION
Marek prevention
As there is no therapy for MD the only way to fight the disease is by preventive measures. For this
purpose we have several possibilities at our disposal:
1. Vaccination
At the moment there are several MD vaccines commercially available:
Monovalent vaccines:
HVT: Herpes Virus of Turkeys (MDV Group 3). Widely used in many countries. It has been
given very good results in the past, but protection is now insufficient in many
countries. HVT is marketed in cell-free (Lyophilized) and cell-associated (under liquid
nitrogen) form.
CVI 988: This is the so called “Rispens” strain. It is an attenuated Group I MD virus, which
means that originally it was a pathogenic chicken Herpes virus, weakened by
attenuation.
In the past there was a fear that this vaccine could turn into a pathogenic form again
and therefore it was not allowed in some countries.
Experience in the field during many years proved there was no risk whatsoever in
using this vaccine. In some countries where Rispens is not allowed, a cloned strain
called CR6 is used on a small scale. Rispens vaccine is a cell-associated strain, so it
has to be stored under liquid nitrogen.
Polyvalent vaccines:
SBI: SBI is a group @ MDV. On itself it does not give sufficient protection but in
combination with HVT it gives better protection than HVT alone. This combination is
used in some areas where HVT on itself does not give sufficient protection.
HVT+CVI 988:
This combination is used in some countries where MD is a very serious clinical
problem. There are field experiences that this combination gives a good protection for
MD, however there is little experimental or laboratory work to support these
experiences.
2. Hygiene
As mentioned before MD virus can be isolated in almost all poultry areas world-wide. It is present in
all the dust inside and around poultry houses. Furthermore it requires some time (7 – 12 days) for
vaccinated day old chickens to develop a sufficient level of immunity. These afore mentioned two
facts together show the high risk of young chickens getting the infection before immunity has
developed.
From Egg to Chicken 2009-10 Page | 37You can also read