Golden West Webmail
    User Manual
Updated January 2019
←
→
Page content transcription
If your browser does not render page correctly, please read the page content below
Golden West Webmail
User Manual
Updated January 2019
Table of Contents
Login Process .............................................................................................................................................3
   Understanding reCAPTCHA.................................................................................................................3
   reCAPTCHA Security Settings .............................................................................................................4
   Which domain name to use? .................................................................................................................4
The Tour Plugin..........................................................................................................................................5
   Tour of the mail view ............................................................................................................................5
The Mail View............................................................................................................................................5
   Mail Quota Miniview ............................................................................................................................5
   Add To Blacklist/Whitelist ....................................................................................................................6
   Reporting Feedback ...............................................................................................................................7
   Switching back to the previous webmail...............................................................................................7
Contacts View ............................................................................................................................................8
   Contact Importing From Previous Webmail..........................................................................................8
Calendar View ............................................................................................................................................8
   Creating Events .....................................................................................................................................8
   Editing Events .....................................................................................................................................10
   Importing/Exporting Events ................................................................................................................10
Settings ..................................................................................................................................................... 11
   Preferences .......................................................................................................................................... 11
      User Interface ................................................................................................................................. 11
       Mailbox View ................................................................................................................................12
      Displaying Messages ......................................................................................................................13
       Composing Messages ....................................................................................................................14
      Address Book .................................................................................................................................15
       Special Folders ..............................................................................................................................16
       Server Settings ...............................................................................................................................16
      Message Highlights ........................................................................................................................17
      Calendar ..........................................................................................................................................18
   Folders .................................................................................................................................................19
   Identities ..............................................................................................................................................20
   Adding Images to a Signature .............................................................................................................21
   Responses ............................................................................................................................................21
   Password..............................................................................................................................................22
   Mailbox Quota.....................................................................................................................................22
   2-Factor Authentication .......................................................................................................................23
   Web Quota ...........................................................................................................................................27
   Mail Settings .......................................................................................................................................27
   Mail Filter ............................................................................................................................................28

2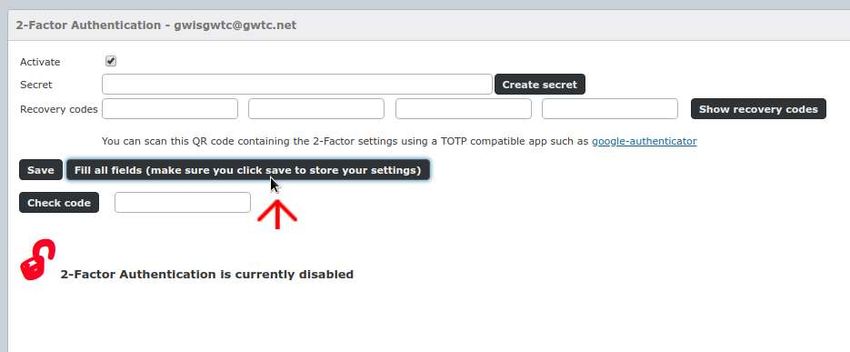
Login Process
                                Understanding reCAPTCHA
“reCAPTCHA”, or as stated as the acronym, “Completely Automated Public Turing test to tell
Computers and Humans Apart” is a tool to deter bots and hackers. Typically, automated bots all around
the world crawl web pages for login forms that may appear as if there is no security on them. This
could include a form that sends an email out when you submit it, or a username/password form.
Not only will this tool help greatly to fight against these types of attacks, analytic information is also
automatically collected to help us get a better look at what out there is attempting to attack the login
form. This will aid for future projects, and may also spark interest to the curious eye.
When the user visits the login page, The ‘Login’ button will be disabled. (See the red arrow below.)
This behavior is because the reCAPTCHA checkbox has not yet been checked. Once the user checks
the box, and the reCAPTCHA verification process passes, a callback will re-enable the ‘Login’ button.

If the user has never seen a reCAPTCHA verification form before and cannot log in, A ‘Need help
logging in?’ button is below. (See blue arrow above). This will fire up a miniature tour on the login
process, and explain the process a little deeper. (Above Image)

Please note, after many failed attempts, (around 5),
The customer may be requested to click on images
that have specific items in them. This is to verify
that they are indeed not a bot on the Internet.
(See image on right).

Once you have passed validation, the checkbox will
turn green and you will be able to login.

3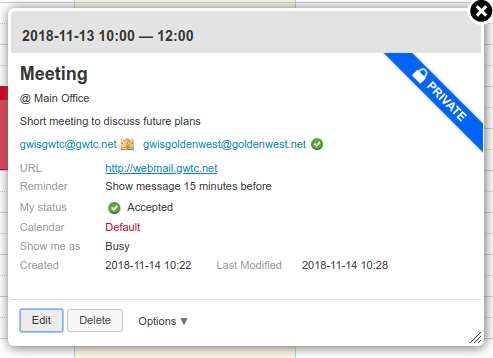
reCAPTCHA Security Settings
       By default, All domains will have ‘Easiest for users’ as a Security Preference. This will allow
about ~5 attempted logins before images start appearing and the user is prompted to select them. It is
possible to increase this preference, however going any lower is not.

                            Which domain name to use?

                               Which domain name to use?
In the current environment, A customer is able to use their full email address under a different webmail
domain. For example, A customer could visit https://webmail.goldenwest.net and use
‘gwisgwtc@gwtc.net’ as a username, and this would be a valid login. These types of logins are no
longer supported. If the customer has a username of ‘user@gwtc.net’, they will need to visit
‘https://webmail.gwtc.net’ to login correctly.
         The reason these types of logins are deprecated and should not be endorsed is because of
duplicate entries in the database when a valid login occurs. For example, If one user visits
webmail.gwtc.net, logs in using ‘gwisgwtc’, and then visits webmail.goldenwest.net using
‘gwisgwtc@gwtc.net’, there are effectively two entries in the database for the same user. This causes
clutter, and could cause confusion, seeing that the customer expects all of his/her settings to be under
one account without knowing that he/she created two accounts. If you use either ‘gwisgwtc’ or
‘gwisgwtc@gwtc.net’ as a username, using the correct domain for both usernames, this will not
create a duplicate entry in the backend.
When a user attempts to log in using this
convention, their session will be aborted
and a message will be shown. (See image).

This example shows the user visiting
‘https://webmail.goldenwest.net’ and
attempting to log in using the email address
‘gwisgwtc@gwtc.net’.

4
The Tour Plugin
                                    Tour of the mail view

When a user logs in, they have the option of viewing the tour on every view. The button to begin the
tour is in the very top left corner. This will dim the entire screen, and give them a clickable ‘tour’
through every view, including the Mail View. The ‘Exit’ button will halt the tour and place the customer
in the main view. The ‘Next’ button will continue the tour.

Once all of the tour slides have been viewed, The buttons will be replaced with a single ‘Done’ button.
When the user clicks this button, this will end the tour.

The content of the tour can be modified very easily. If something needs to be updated, or you spot a
potential typo, please file a bug report.

                                   The Mail View
                                     Mail Quota Miniview
       When the user is logged in and viewing the main Mail View, Their email quota will be viewable
on the bottom left corner. This, along with the mail quota in settings, is in real time. Below is an
example of the graph:

5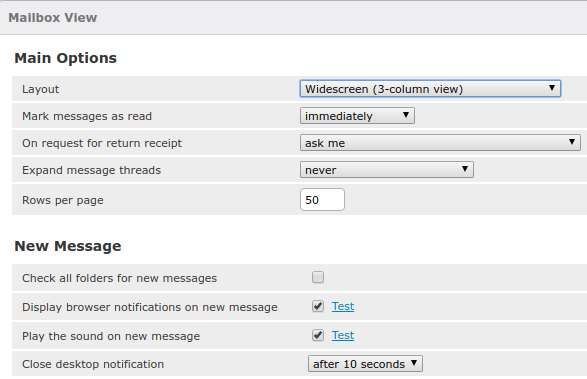
The color of this graph will change depending on the percentage the
                                  user is at. If it is greater than or equal to 85%, The text will appear
                                  red, and the graph will appear yellow. After 90%, both the text and
                                  the graph will appear red.

A warning will also be displayed when the user is close to being over quota. (>90%, see image).

When the user has reached 100% quota, An error message will appear on the screen. Mail functions
may be altered as well from a result of this.

                                  Add To Blacklist/Whitelist
Directly in the mail view are options to add the currently selected email into a users “enemies” list.
When a user clicks on one of these options, The “From” field of the email will be extracted, and added
into the appropriate list. (See images)

Multiple messages are also able to be selected and added into either list. This is done by clicking one
message, holding either Ctrl or Shift, and selecting more. Duplicate entries will be consolidated into
one entry.

6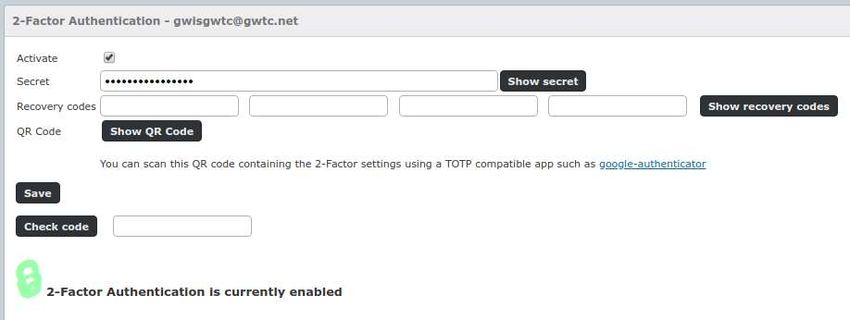
Reporting Feedback
If the user would like to voice their opinion on a certain element
within webmail, A button exists in the top left corner that will allow
them to do this. (See image)

Once clicked, A new window will populate over the main
mail view. This window will not submit information until
the “Your Name” field has been filled out.
Once the user has clicked “Post”, an email with the
information will be sent to
gwisoperations@goldenwest.com.

                       Switching back to the previous webmail
If, for any reason, you would like to switch back to
the previous webmail, a button exists in the top left
corner of the mail view. This button will only be
available until January 31, 2019. (see image)

Once you click on this button, An alert message
will appear at the top portion of the screen,
confirming that you would like to switch back.
Once “OK” is clicked, You will be logged out
and redirected to the previous webmail.

In the “old” webmail, a link to do the opposite will exist on the login form. When you visit the login
form, you may click this link to be redirected to the current webmail.
7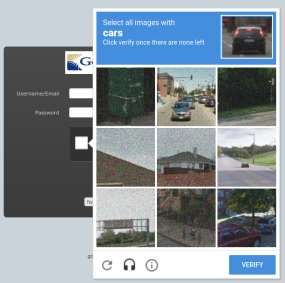
Contacts View
                    Contact Importing From Previous Webmail

When you first click on “Contacts”, A silent
process will begin in the background. This
process will connect to the database associated
with the previous webmail, search for contacts
based on the currently logged in user, And
migrate them into the current webmail. Note:
This process will happen only once.
A constant sync of contacts between both instances will not be put in place. Why? Not only would this
put unnecessary stress on the database that handles this type of data, but this increases the chance of
manipulating the data between the two incorrectly, because a portion of data exists in one instance, but
not the other. Duplicates, incorrectly removed/added entries, as well as incorrectly grouped contacts
could happen.

                                   Calendar View
                                        Creating Events
To create an event, You can either click/double click on the
main calendar view, or the “New event” button located in the
top left.

                                                           When the “New event” window opens, (See
                                                           image left) You will be presented with quite
                                                           a bit of options.

8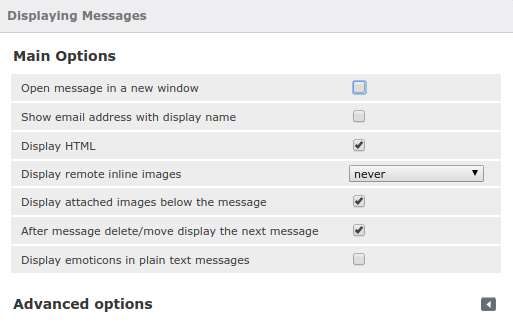
Here is a quick breakdown of all of them:
The “Summary” tab:
       Summary: This is what will be displayed on the Calendar itself after the event is created. A
       basic overview of the event. This field is optional, however it is discouraged to leave this field
       blank.
       Location: Where the event will be. This field is optional.
       Description: A short breakdown of what this event entails.
       URL: A website that you may want to link to regarding this type of event.
       Start/End: The beginning and the end of the event time.
       Reminder: Set a reminder, that will alert you through a message in webmail.
       Calendar: Which calendar this event should go under.
       Category: Which type of event this is. The current options are Personal, Work, Family, and
       Holiday.
       Status: Your current status with this event, The current options are Confirmed, Cancelled, and
       Tentative.
       Show me as: When the event is in progress, This is how your status will appear. The current
       options are Free, Busy, and Tentative.
       Priority: A basic scale from 1 to 9, to show how important this task is. 1 being the highest, and
       9 being the lowest.
       Privacy: Set the view mode of this event. The current options are Public, Private, and
       Confidential.
The “Recurrence” Tab:
       Repeat: This option will allow you to set up recurring events, based on popular repeat
       frequencies such as daily, weekly, and so on.
       Every: Frequency of specified Repeat option noted above. For example, If “daily” is selected,
       this option will allow you to specify “every x days”.
       Until: Repeat this process, until this conditonal.
The “Participants” Tab:
This tab allows you to add participants, assigning them roles, and checking their availability
beforehand. The users in this list will also be sent an invitation to the email address listed in the
“Participant” column.
9
Editing Events
To edit an already existing event, click on the event
within the main calendar view.

                                                        This will bring up another window that will give
                                                        you a short breakdown of the current event. The
                                                        viewing status will also be in the upper right hand
                                                        corner of this window. (Private, Confidential, etc.).
                                                        You may edit this event, Which will bring up the
                                                        original event create window, Delete this event, or
                                                        bring up more options including downloading this
                                                        event, sending it to a participant, or copying the
                                                        event.

                                 Importing/Exporting Events
To import events, Click the “Import” button
towards the top left of the calendar view.
(see image) The expected format for
importing events will need to be in the ‘.ics’
format. When importing, The option to
choose which calendar to import to, as well
as “event from” will be selectable.
To export events, Click the export button.
When exporting, The option to choose
which calendar and which events will also
be selectable.

10
Settings
Preferences
To change your user preferences, Select “Preferences” in the left column. This will expand more sub-
options to the right, in the “Section” column.
User Interface
This section covers most of the
elements contained within the user
interface, including date formats,
refresh intervals, and interface skins.
User Interface (all options)
Language: Choose between a large list
of languages. (Please note, Not all
features may work correctly if another
language is chosen.)
Time zone: If you would like to choose
your timezone, this will be chosen
automatically otherwise.
Time format: Different formats to
display the time.
Date format: Different formats to display the date.
Pretty dates: With this option checked, dates close to today will be translated into relative terms like
“Today”, “Yesterday”, etc.
Refresh: How often webmail should consult the mail server to check for new messages.
11Interface Skin: Choose between “Classic” (which closely resembles the previous webmail), or the new skin “Larry”. Handle popups as standard windows: When webmail opens messages or the compose form in a new window, this can either be a detached window with a smaller size and without toolbar buttons or, with this option activated, be a regular browser window or even just anther tab in your current window. If enabled, all windows opened by the webmail application obey the settings of your browser. Register protocol handler: You can register this webmail app to be opened when ever you click an email link somewhere on the web Mailbox View The settings within the mailbox view changes how the webmail environment appears when in the mail view, as well as how notifications are handled. Mailbox View (all options) Layout: Choose between “Widescreen”, “Desktop”, and “List”. This will change how your mail view appears. Mark messages as read: Apply a delay between viewing the message, and marking it as read. On request for return receipt: This option controls the behavior when the message you received has a return receipt associated with it. Expand message threads: When listing messages in threads, this option controls how conversation groups are expanded in the list. Rows per page: The messages list displays this number of messages at a time (aka a “page”). Increasing this number may result in longer loading times when opening a mailbox folder. Check all folders for new messages: By default, only the Inbox is checked for new messages periodically. If you have server-side filters installed that will move incoming messages to other folders, you should check this option. Note: Currently server side filters are not implemented. Once they are, this option will be of more use. Display browser notifications on new message: When a new message arrives, checking this box will change the favicon in your browser to alert you to a new message. 12
Display desktop notifications on new message (SSL only): This option will not be selectable unless
your connection is over SSL. If it is however, This will display a notification, directly to your
computers desktop.
Play the sound on new message: When a new message arrives, A sound will play.
Close desktop notification (SSL only): How long the desktop notification will stay on screen. If your
connection is not over SSL, this option will be hidden.

Displaying Messages
This set of options controls how
messages in the mail view should
be displayed.
Open message in a new window:
With this option checked, double-
clicking a message in the email
view will open it in a new
window instead of the current
browser window/tab.
Show email address with display
name: When checked, The email
address will be appended to the
sending email address. When not checked, Only the display name is shown.
Display HTML: Check this option to display formatted messages as the sender intended it. When
disabled, formatted emails will be converted to plain text.
Display remote inline images: Formatted (HTML) messages can contain references to images which
have to be loaded from a remote server. That can harm your privacy and reveal to the sender that you
opened the message. This technique is often used by spammers to verify that your email address works
and you can be sent more spam.
Display attached images below the message: Enable this option if you want image attachments being
displayed below the message text.
After message delete/move display the next message: Controls whether the screen should jump to the
next message in the list when opening an email message (not in the preview pane) and then move or
delete it.
Display emoticons in plain text messages: When a specific pattern of characters are found, such as “:)”
or “:(“, these will be translated into emoticons.
13
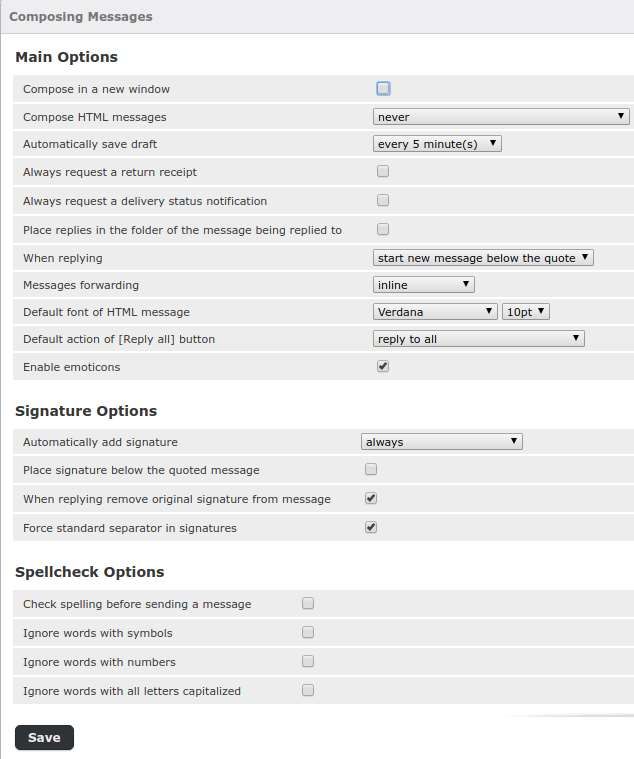
Composing Messages
These settings control the look and feel
of composing a message to someone.
Compose in a new window: With this
option checked, the message compose
form will open in a new window
instead of the current browser
window/tab.
Compose HTML messages: Check this
option to enable the rich text (HTML)
editor when start to compose a new
message. This is only the default setting
for HTML message composing. It can
be toggled at any time while
composing.
Automatically save draft: While you
write a new message, a copy will be
saved to the Drafts folder ever few
minutes. Select the interval or disable
the automatic saving here.
Always request a return receipt:
Activate the “Return receipt” sending
option by default for new messages.
Always request a delivery status notification: Activate the “Delivery status notification” sending option
by default for new messages.
Place replies in the folder of the message being replied to: Choose the current folder for saving the
reply message to instead of saving it to the “Sent” folder.
When replying: This option controls whether and where to place the quoted original text when replying
to a message.
Messages forwarding: Controls the mode how messages are forwarded by default when clicking the
Forward button without choosing a forward mode.
Default font of HTML message: When writing a formatted (HTML) message, this font face and size is
used for the default text formatting.

14
Default action of [Reply all] button: When replying to messages coming from mailing lists, this setting
controls how to reply to them.
Enable emoticons: Enables emoticons to be used in the message when it arrives at its destination.
Automatically add signature: Select in which cases the signature text from your sender identity is added
to a new message.
Place signature below the quoted message: When replying to a chain, This will enable your signature to
be placed underneath it.
When replying remove original signature from message: As the name suggests, this setting removes
detected signatures from the original message when citing it in the reply.
Force standard separator in signatures: When checked, two dashes (“--”) will be added before your
signature.
Check spelling before sending a message: Before the message is sent, it is ran through a spell check,
any errors will be underlined. You may click on the word to bring up a menu that allows you to select
the proposed correct word.
Ignore words with symbols: Do not spell check words with symbols.
Ignore words with numbers: Do not spell check words .
Ignore words with all letters capitalized: Do not spell check all capitalized words.

Address Book
These settings will control
how contacts are handled
and displayed.
Default address book:
Select the default address
book where new contacts
are saved to when adding
them from the mail view.
List contacts as: Choose
how names are displayed
in the contacts list.
Sorting column: Select the contact attribute used for sorting the contacts in the list.
Rows per page: The number of contacts displayed at a time (aka a “page”) in the contacts list.
15
Skip alternative email addresses in autocompletion: With this option checked, every contact will only
appear once in the autocompletion list that appears when you start typing in the recipient field. The first
email address of the selected contact will then be inserted. If disabled, all email addresses of a
matching contact are displayed for selection.
Use automatic address book: When sending a message to someone, Have the email address be
automatically added to your contacts
Use automatically collected addresses for autocompletion: When composing a message, Addresses that
have been automatically collected will appear when beginning to fill out the “From” field.

Special Folders
Some folders have special purposes
and are used by system processes to
store messages. This form allows
you to choose which folders are used
to store Drafts, Sent or deleted
messages (Trash).
Show real names for special folders:
With this setting enabled, the original names of the assigned special folders are displayed in the folders
list instead of localized names.

Server Settings
This section provides more advanced settings
that control how messages are treated by the
email server.
Mark the message as read on delete: With this
option enabled, unread messages are also
flagged as read when deleting them right
away.
Do not show deleted messages: This option
suppresses messages flagged as deleted from
being listed.
If moving messages to Trash fails, delete
them: Moving to Trash can fail if the Trash
folder isn’t selected or over quota. With this option enabled, messages are deleted from the current
folder when you attempt to move them to Trash.
16
Directly delete messages in Junk: Messages in the Junk folder are also move to the Trash first when
deleting them. Skip that step by enabling this option.
Clear Trash on logout: As the option name says, this will empty the Trash folder when you terminate
the session.

Message Highlights
Message Highlights will allow you to mark messages a specific color based on a ruleset. The current
rulesets that you may define include:
From: When a message has come in and the “From” header, (The email address), matches this rule,
color the message differently.
Subject: When a message has come in and the “Subject” header matches this rule, color the message
differently.
To: When an email is sent, If the “To” header matches this rule, color the message differently. This will
mark messages in the “Sent” folder.
Cc: When a message contains a “carbon copy” that matches this rule, color the message differently.

Below is an example of what an email will appear as when a rule is matched.

The color can be changed by clicking on the “color” box:

17
Calendar
The calendar has many options that you
may configure to enhance your overall
experience.
Default View: When first clicking on
the calendar tab, Display this view first.
Time slots per hour: How many slots to
show in either the “Week” or “Day”
view. Example with 6 timeslots:

First weekday: In the mini calendar, as
well as some portions of the main
calendar view, Set this day to be the
first weekday.
First hour to show: In the main
calendar view, on either “Week” or
“Day” view, show this hour at the top
of the calendar.
Working Hours: Set this to the time you are typically at work, to automatically detect conflicts when
accepting invites.
Event coloring: Color events based the Calendar or the Category, Including the outline of both.
Default reminder setting: Set your default reminder when creating new events.
Create new events in: Set the default calendar to place events in when creating them.
After an invitation or update message is processed: When a invitation has been updated, Do this action
to the original email with the invitation.
Categories: Here is where new categories can be created and default colors can be assigned.

18
Display birthdays calendar: Add a new calendar into the Calendars list that will display birthdays.
From these address books: Choose which address books contains the birthdays.
Show reminders: Set a reminder when a birthday is close. You can choose between minutes before,
hours before, and days before.

                                                  Folders
This section will allow you to create, remove and manage viewability of folders in the main mail view.

To create a new folder, Click the “Create Folder” button, located below the “Folders” column:

Once clicked, a new window will populate
to the right of the Folders column.
Provide the Folder name, The parent folder,
and the default view mode. The default
view mode will automatically select the
“List” or “Threads” view when viewing
mail within this folder.
After filling out the options, click save to
apply your changes.

                                               The current quota usage for all folders combined will be
                                               displayed next to the “Add” button at all times. This will
                                               also change colors to better alert you when your quota is
                                               almost full.

19
When a folder is selected,
You may edit the existing
configuration as noted above.
However the current size of
only this folder can be viewed
by clicking on “Click here to
get folder size”.
To empty a folder of all email, Select the folder
and choose “Empty” under the settings button.
Identities
The settings here control the
name(s) and email address(es)
stated as sender when you
send out email messages.
Display name: The full name
displayed in the recipient’s
email program upon receiving
your message
Email: The email address
stated as sender of email
messages you send with this
identity. Please enter a valid
email address that is handled
by your email account. Otherwise message sending might fail because of an invalid sender address.
20Organization: Some email programs display the organization field when receiving messages from you
with this filled out.
Reply-To: Enter an email address that differs from the identity’s email address here in order to force
recipients to send answers to that address instead of the sender email address.
Bcc: Specify an email address here that will receive blind copies of every message you send with this
identity.
Set default: Check this box to make the current identity the default selection when writing new
messages. You can still chose another sender identity while composing a message, though.
Signature: Enter the signature text here.
HTML signature: Check this option if you mainly send formatted (HTML) messages and to enable
formatting of your signature. The text box above will then show a toolbar to adjust formatting.
Adding Images to a Signature
HTML formatted signatures also allow to embed images which are sent with outgoing messages. To
add an image to your signature, first check the HTML signature box. Then find an image file on your
computer and drag & drop it into the signature box. The image can be moved around or resized within
the editor box using the mouse.
Responses
This settings section lets you manage your
personal boilerplates (aka “canned
responses”) which are handy when replying
to messages with prepared responses.
Click the + icon in the response list footer to
create a new response. Give it a name, enter
the response text and finish with clicking the
Save button.
21Password
This tab will allow you to change the
password of the currently logged in
account, If your ISP allows this type
of change. Here is an example of the
password view. To change your
password, type your current password,
and then your desired password twice.
Once into the New Password field,
and again into the Confirm New
Password field.
If your ISP does not allow password changes, No changes can be made. A banner will populate above
the fields, and no buttons or text entries will be selectable.
Mailbox Quota
To view your mailbox quota, Click the
Mailbox Quota tab. This will present an
intractable graph with your quota in real
time.
22You may also hover your mouse over the pie
graph for a more detailed sizing of your
quota.
2-Factor Authentication
2-Factor Authentication helps tremendously with securing your account. The basis behind 2FA is that
another form of authentication is required before the initial login is allowed. When this feature is
enabled, You will need to provide your email address and password, and then a “rolling code” that is
generated every minute by popular 2FA apps such as Google authenticator.
Please note: When 2FA is enabled, you will need an external app to pair to your account. If
something happens to the device that is paired with your account that generates the codes you
will have to use a recovery code, or have the 2FA configuration reset.
When you first click the tab, You will be presented with the configuration pane. None of the fields will
be filled out:
23A quick breakdown of the options are as follows:
Secret: This is the passphrase that will be shared between the client and the server to generate
one time passphrases. This secret will be stored on the device you use 2FA for, for example,
your Android or iOS device.
Recovery Codes: These sets of codes can be used to gain access to your account if something
should happen to the device that is handling generating the one time passcode.
Check Code: When everything is set up on your device to handle passcode generation, You
must enter one of the rolling passphrases into this field. Once you fill the field out and click
“Check code”, you will be able to save your settings, and your account will be fitted with 2FA.
To activate 2FA, click the “Activate” checkbox at the top of the view.
Once the “Activate” button has been checked, click the “Fill all fields” button.
24This will automatically fill all of the required fields for 2FA. Please copy the recovery codes
(Underlined in yellow) somewhere private and secure.
After the fields have been filled out, Click on “Show QR Code”. This will display the QR code used for
your device to generate the One time passphrases. (Green arrow in image above)
Open up your 2FA app on your device and scan
this QR code. Depending on the app, this should
be the only step. In this example, Google
Authenticator is used. Once the app is opened,
you will be presented with an option to add an
account. Tap on “Scan a barcode”.
This will ask for permission to access the camera on your
device, and then present you with the scanning tool. Point
your camera at the QR code within webmail, and the
account will automatically add into your phone.
25Once the account has been added, You will be presented with your rolling codes. (Underlined in red). When logging in, You will need to enter your username, password and click the reCAPTCHA confirmation as normal. After this you will be presented with a window to place your rolling code. Enter your code as it appears in your app, and click “Login”. Once 2-Factor authentication is enabled, The status indicator will change to “2 Factor Authentication Is Currently Enabled”. 26
Web Quota
Similar to the mail quota, if your
account has web services on it this
tab will show you your current web
space usage. Compared to the mail
quota however, the web quota
information is updated every 24
hours, and is not real time.

This graph is also intractable, hovering over one of the slices will provide you with more information.

                                                    \

                                          Mail Settings
The mail settings tab allows you to view common configuration options when setting up external
clients outside of webmail. This information will include IMAP settings, SMTP settings, and other
information.
The apple mobileconfig location is a special file that can be used with iOS to automatically configure
mail accounts into the native iOS mail app. To use it, Browse to the URL specified under Apple
mobileconfig location on your Apple device and set your account up when iOS prompts you.

27
Mail Filter The mail filter tab will take you directly into your spam dashboard. This will open a new tab, and may get blocked by some browsers. Double check that your browser is not blocking pop ups if you are having issues opening the filter. If the pop-up tab happens to get blocked, Clicking the link marked with the red arrow in the below image will open the new tab. 28
You can also read