Guidance Notes End of Key Stage 2 Procedures 2019 Using Assessment Manager 7
←
→
Page content transcription
If your browser does not render page correctly, please read the page content below
Guidance Notes

        End of Key Stage 2
     Procedures 2019 Using
      Assessment Manager 7
                   May 2019

These notes can only be used once the SIMS
 Spring 7.186 upgrade has been completed.

    The final date for the submission of
data for validation & checking by Surrey is:
        Monday 24th June 2019.
Copyright © Strictly Education 4S Limited [2019]. No unauthorised copying permitted

All rights reserved. No part of this document may be reproduced, stored in a retrieval
system, or transmitted, in any form, or by any means, electronic, mechanical, photocopying,
recording, or otherwise without the prior permission of Strictly Education 4S.

Guidance notes and Powerpoint presentations are available from the Strictly
Education 4S website

Powerpoint        Key Stage Area
Reference
PPT1              Introduction to the Key Stage Process
PPT2              Submitting Data via CTF & Perspective Lite
Contents
Section 1: Introduction ............................................................................................................... 1
   Assessment and Reporting Arrangements ............................................................................. 1
   KS2 Test Week & Headteacher’s Declaration ........................................................................ 2
   Test Results & Review of Marking Applications ..................................................................... 2
   Assessment Manager 7 ......................................................................................................... 3
Section 2: Key Changes for 2019 .............................................................................................. 4
Section 3: End of Key Stage 2 Procedure Check List ............................................................... 6
Section 4: Importing Key Stage Resources................................................................................ 7
   Step by Step Guide to Importing the Key Stage Resources ................................................... 7
   Importing Key Stage 1 Wizard Resources (Junior Schools) ................................................... 9
Section 5: Using the Key Stage Resources ....................................................................... 10
   Using the Key Stage Wizard to Create Marksheets ............................................................. 10
   Entering Teacher Assessments – Options Available ............................................................ 11
   Printing Marksheets.............................................................................................................. 12
   Entering Teacher Assessment Data ..................................................................................... 13
   SEN at Key Stage 2 – Mandatory collection of P Scales...................................................... 15
   Analysis of Data ................................................................................................................... 19
   KS1 and KS2 Analysis Reports ............................................................................................ 19
Section 6: Data Collection ........................................................................................................ 20
   Creating a CTF using SIMS.net............................................................................................ 20
   Submitting the Return by Perspective Lite............................................................................ 21
Section 7: Test Results ............................................................................................................ 24
   Import Data Electronically .................................................................................................... 24
Section 8: Individual Pupil Reports .......................................................................................... 27
   Upload Reports .................................................................................................................... 28
   Exporting Reports ................................................................................................................ 28
   Customising the Reports ...................................................................................................... 31
Appendix A - Creating an Assessment User Defined Group.............................................. 33
Appendix B – Creating Marksheets from a Template .............................................................. 36
Appendix C – Exporting a Marksheet to Excel ......................................................................... 37
Appendix D – Analysis of Data ................................................................................................ 39
Appendix E – Key to Success .................................................................................................. 45
Appendix F - KS1 and KS2 Analysis Reports .......................................................................... 47
End of KS2 Procedures 2019

Section 1: Introduction
Assessment and Reporting Arrangements

Guides to the Assessment and Reporting Arrangements for Key Stage 2 can
be downloaded from the Department for Education (Df E) website, see below .
https://www.gov.uk/government/publications/20 19-key-stage-2-assessment -
and-reporting-arrangements -ara
Key Dates: h t t p s : / / w w w . g o v . u k / g o v e r n m e n t / p u b l i c a t i o n s / k e y - s t a g e - 2 - a s s e s s
m e n t s - 2019- p l a n n e r / k e y - s t a g e - 2 - a s s e s s m e n t s - 2 0 1 9- p l a n n e r

This collection is being supported by Standards and Testing Agency (STA), but
local authorities can decide which method they prefer to use in order that the
usual 100% return is made. We are therefore req uesting all Teacher
Assessments are sent directly to the Data Management Team at Surrey via
Perspective Lite . We will validate, collate and forward a Surrey file to the STA on
your behalf. The date for submission is between Monday 3 r d June with a
deadline of before 5pm on Monday 24 th June 2019.

The submission dates window to Surrey is to enable the Data Team to check and
validate all returns and where necessary obtain resubmissions to ensure the
Surrey file uploaded to NCA Tools is correct.

Schools MUST by aware that data received after Monday 24 th June will not be
validated by the Surrey Data Team.

If your school decides not to send the data to Surrey for validating and
load a file directly to the STA, then please let the Data Team know so they
do not chase your school for the data.
These schools must submit accurate Teacher Assessment data directly via
NCA tools by Thursday 27 th June 2019.

P Scale assessments should be entered for pupils who are working below the
standard of the Pre Key Stage (BLW ) in Reading, W riting or Maths or who have
not met the expected standard (HNM) in Science.

Due to the lack of response from schools we will no longer operate an early
collection of KS2 TAs for forwarding to secondary schools via CTF.

                                                                                                                                       1
End of KS2 Procedures 2019
If you should receive any correspondence from the STA, please contact the
Data Management Team for advice to ensure the correct procedure is being
followed. Failure to do so could cause duplicated work for your school.

IMPORTANT: If you have submitted your data, and subsequently resend it to
Data Management because of changes to the data, please contact Data
Management to advise them that you have re -submitted your return.

KS2 Test Week & Headteacher’s Declaration
KS2 Test week is Monday 13 th May to Thursday 16 th May 2019.
Headteacher’s Declaration (HDF) – Available from 5p.m. on 16 th May 2019
and the deadline for submission of the HDF is Friday 24 th May 2019.

Test Results & Review of Marking Applications
Key Stage 2 pupil test results (raw scores and scaled scores) will b e available
via NCA Tools from 7.30 a.m. on 9 th July 2019. Raw score to scaled score
conversion tables will be available on GOV. UK. See Section 7 of these notes).
Friday 19 th July – deadline to submit review of marking applications.

                                                                               2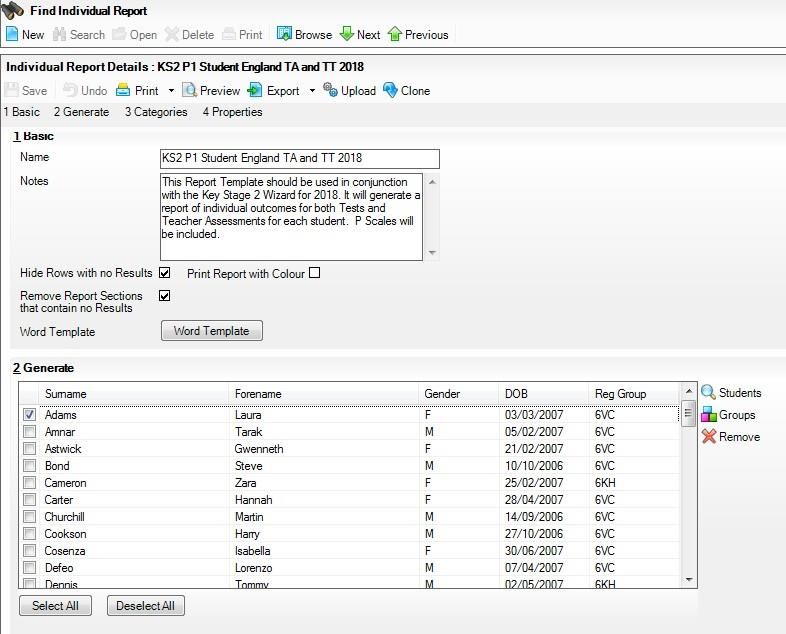
End of KS2 Procedures 2019

Assessment Manager 7
SIMS Assessment Manager provides a way of managing the statutory end of
Key Stage procedures. These notes will guide you through the process of
selecting student groups; entering, editing and validating the results;
returning the data to Surrey Data Management via Common Transfer File
(CTF) and the generation and printing of the reports for parents.

Spring 2019 SIMS Upgrade
You must upgrade your SIMS system to 7.186 or higher to b e a b l e t o
download the relevant Key Stage W izards and to send the assessment data
via CTF to Surrey Data Management.

Permissions
Only members of the Assessment Co-ordinator and Assessment Operator
System Manager User Groups have the required Permissions to use the Key
Stage W izard Manager. However, where a user has the appropriate Permissions,
they can access the Marksheets and Individual Reports through the usual
Marksheet and Individual Report menu      route.

Reporting to Parents
For a pupil who transfers from one school to another in the summer term, it
is the responsibility of the school at which the pupil was enrolled when the
tests were administered to submit the teacher assessments to the LA. This
school must also include the pupil’s test outcomes in its results.

                                                                                 3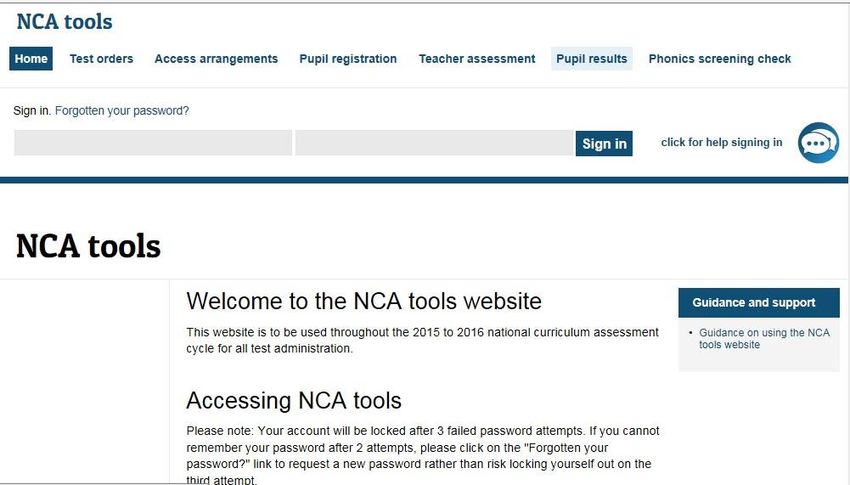
End of KS2 Procedures 2019

Section 2: Key Changes for 2019
The key changes in assessment and reporting arrangements are detailed in
Section 2 of The Assessment and Reporting Arrangements for Key Stage 2
which can be downloaded from the Department for Education (Df E) website
(see page 5 for link).

However the main changes are:

Removal of teacher assessment for English reading and mathematics
Schools are no longer required to make statutory teacher assessment (TA)
judgements in English reading and mathematics. This change has been made
to reduce assessment burdens on schools, as set ou t in the government
response to the 2017 public consultation on Primary assessment in England.

Test results in English reading and mathematics will continue to be used in
school performance measures.

Revised teacher assessment frameworks
Science
The science frameworks have been revised for use from the 2018 to 2019
academic year onwards. The ‘pupil can’ statements have been refined for
clarity, based on feedback from teachers and other educational experts.

Pre-key stage 2 standards
The pre-key stage 2 standards are to be used for assessing pupils engaged in
subject-specific study, who are working below the standard of national
curriculum assessments. The ‘pupil can’ statements have been revised to
ensure they appropriately represent the key aspects of each subject, allow for
progression towards the national curriculum, and give a better reflection of
classroom practice.

P scales 1 to 4 should continue to be used for statutory assessment of pupils
not engaged in subject-specific study at the end of KS2.

Monitoring and moderation services for academies
The process for academies to notify STA about which LA they intend to use
for monitoring the KS2 tests and moderating their TA has changed.

                                                                                 4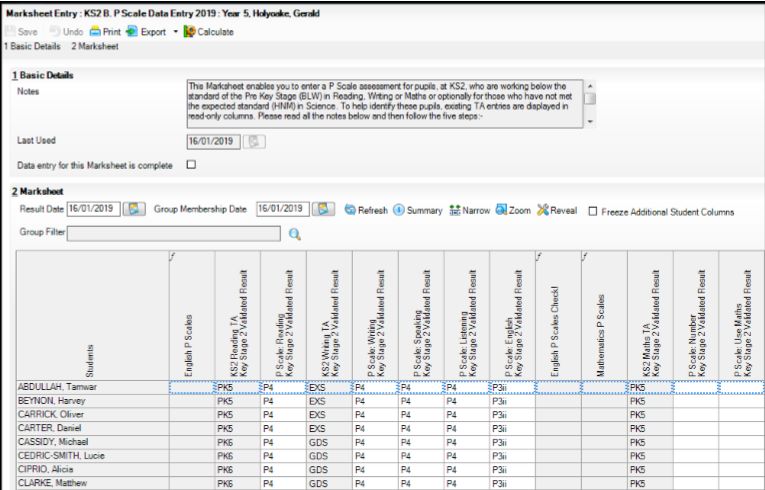
End of KS2 Procedures 2019

Key for Teacher Assessment Outcomes

Data Entry          English Reading
PK6                 Pre Key Stage Standard 6
PK5                 Pre Key Stage Standard 5
PK4                 Pre Key Stage Standard 4
PK3                 Pre Key Stage Standard 3
PK2                 Pre Key Stage Standard 2
PK1                 Pre Key Stage Standard 2
BLW                 Below the standard of the pre-key stage*
A                   Absent
D                   Dis-applied
L                   Left
F                   Pupil will take test in the future
P                   Pupil has taken test in the past
Q                   Maladministration
Data Entry          English Writing
GDS                 Working at greater depth at the expected standard
EXS                 Working at the expected standard
WTS                 Working towards the expected standard
PK6 – PK1           As for English Reading
BLW                 Below the standard of the pre-key stage*
ADLFPQ              As for English Reading
Data Entry          Mathematics
PK6                 Pre Key Stage Standard 6
PK5                 Pre Key Stage Standard 5
PK4                 Pre Key Stage Standard 4
PK3                 Pre Key Stage Standard 3
PK2                 Pre Key Stage Standard 2
PK1                 Pre Key Stage Standard 2
BLW                 Below the standard of the pre-key stage*
ADLFPQ              As for English Reading
*to be reported with P-Scales or NOTSEN as appropriate
Data Entry          Science
HNM                 Has not met the standard
EXS                 Working at the expected standard
A DL F P Q          As English Reading

                                                                                       5
End of KS2 Procedures 2019

Section 3: End of Key Stage 2 Procedure Check List

Ensure all of these steps are completed.

Step   Detail                                                 Page    Done

       Ensure the latest SIMS.net Spring upgrade      7.186      7
 1
       or higher has been applied.

       Import the KS2 W izard Resources                          7
 2
       Import the KS1 W izard Resources                          7

       Create User Defined Groups if required                   10
 3

       Use the Key Stage Wizard to create the relevant          10
 4
       Marksheets

       Print marksheets for Teachers - optional                 12
 5

       Enter Teacher Assessments (TAs) into the                 13
 6
       marksheets and check entries – ensure TAs exist
       for all students.

       Ensure P Scale marksheets have been completed.           16
 7

       Create a Common Transfer File                            20
 8

 9     Transfer the CTF via Perspective Lite to Surrey
       by Monday 24 th June 2019.                               21

       Manually enter or import the Test Results                24
 10

 11    Generate, preview and print Individual Pupil
       Reports. Upload the reports to the Document              27
       Server.

                                                                                 6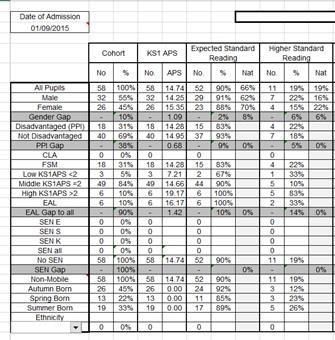
End of KS2 Procedures 2019

Section 4: Importing Key Stage Resources
SIMS.net Spring 2019 upgrade 7.186

Before continuing with the import process, SIMS should be upgraded to
version 7.186 or higher. To check which version is currently installed:
1   Log into SIMS
2   Select Help | About SIMS
3   Check the version is 7.186 or higher. If not, consult your
    Systems Manager before proceeding.
4   Click on the box to close.

Step by Step Guide to Importing the Key Stage Resources

1   In SIMS.net, select Routines I Data In I Assessment I Import .
2   You may now see the displayed screen below.
    If the screen is not displayed, it is possible that someone else at
    your school has already imported the resources at the time of
    completing the SIMS upgrade, in which case continue from step 5.
    If the screen is vis ible, choose one of the options be lo w :
    a)    If you are using SIMS for pupil tracking, e. g. Programme of
    Study, continue from step 3 to import all of the resources.
    b)    If your school DOES NOT use SIMs for your termly tracking, e.g.
    using Target Tracker or Pupil
    Asset, continue from step 4 to
    close the import dialogue
    permanently. If you use Remind
    me later, this screen will
    continue to display each time
    SIMs Assessment is used.

3   T o i m p o r t a l l o f t h e r e s o u r c e s, tick both boxes and select
    Yes. The import does take some time! The following action will close the
    import screen without importing any resources.
    U n t i c k the available options and select Yes. Continue from step 5.

                                                                                                7
End of KS2 Procedures 2019
4 To check that the Key Stage W izards are available, select Tools |
Performance | Assessment | Wizard
Manager.
Check to see if the 2019 W izards are listed.
If they are not, the Wizards can be
imported manually as follows.
5 In SIMS.net, select Routines I Data
In I Assessment I Import .
6 Click on the Field Browser button (magnifying glass).
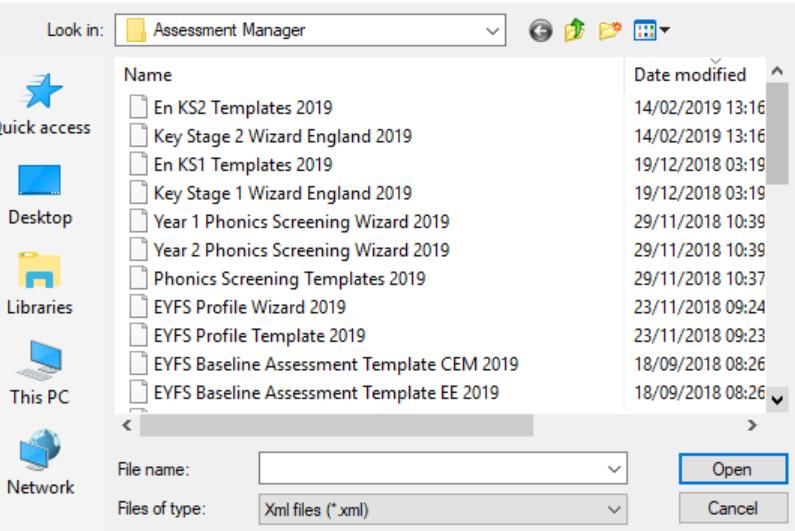
7 Locate C:\ Program Files(x86) \
SIMS \ SIMS.net \ AMPA
8 Double click on the AMPA folder.
9 Double click on the England
Primary (and Middle Deemed
Primary) folder.
10 Double click on the Assessment
Manager folder.
11 Select the Key Stage 2 Wizard
England 2019
12 Click on the Open button.
The name of the selected file will now
be displayed in the
“Select the file to import from ”
field. Check the details to ensure you
have selected the correct wizard.
13 Select Finish.
14 Select Yes.
15 An Activity Log will be displayed when the import is complete. Check the log
to ensure the relevant files have imported.
16 Select Close .
The imported KS2 Wizard is now available for use.
8End of KS2 Procedures 2019
Importing Key Stage 1 Wizard Resources (Junior Schools)
Separate detailed notes are available for Infant/Primary Schools: see notes
End of Key Stage 1 Procedures 2019 Using Assessment Manager.
Notes are also available for Phonics Screening and EYFS returns.
The Key Stage 1 Wizard Resources will also need to be imported by Junior
Schools to enable you to receive the Key Stage 1 assessment data sent to
your school via CTF from feeder (Infant) schools. To import the KS1 W izard,
follow the instructions from page 8 but select Key Stage 1 Wizard England
2019:xml.
Check the Key Stage 1 Wizard England 2019 has imported.
Using the KS1 W izard will be a similar process to that detailed in the next
two sections, substituting the Key Stage 2 wizard with the Key Stage 1.
9End of KS2 Procedures 2019
Section 5: Using the Key Stage Resources
Creating a User Defined Group
A User Defined Group can be created if you have students being assessed
who are not in Year 6, or there are pupils in Year 6 who are not
participating in the assessment. If required, this group needs to be created
prior to using the Key Stage Resources – see Appendix A.
It is also useful to create an
Assessment User Defined Group if
you wish to analyse year on year
Key Stage assessment data, e.g.
compare 2 years of data KS2
2017, and KS2 2018. See
Appendix E – Group Analysis.
Using the Key Stage Wizard to Create Marksheets
1 Select: Tools | Performance | Assessment | Wizard Manager from the
Menu Bar.
Any Key Stage wizards that have already been imported into Assessment
Manager will be displayed. Tick as Complete any wizards for previous
years that have not already been marked as Complete.
The list of Key Stage wizards can be filtered by selecting Incomplete ,
Complete or All from the Filter drop down menu.
Selecting Incomplete will filter out all the Key Stage wizards that have
already been processed and marked as Complete .
10End of KS2 Procedures 2019
2 Select: Key Stage 2 England Wizard 2019.
3 Select: Next
4 Click on the Group Browser (magnifying glass).
This enables you to select the group on whose Key Stage results you
want to report.
5 Expand Year Group by clicking on the
adjacent + sign and select Year 6 .
If a User Defined Group was created, i.e.
KS2 2019, this group will be located
under Assessment User Defined or User
Defined Groups in the Group browser.
Click the adjacent +sign to expand the
groups available.
6 Select: Apply
7 Select: Next to display the list of marksheets
linked to the group selected above.
8 The display can be filtered to display
Incomplete , Complete or All marksheets.
The Complete check box can be selected to
indicate that you have finished working on a
particular marksheet.
9 Read through the guidance on the next two pages before
entering Teacher Assessments into the marksheets.
Entering Teacher Assessments – Options Available
There are four options available for inputting the data into the marksheets:
1 Direct teacher entry of the data into the marksheets through the
Key Stage Wizard for a whole Year Group or User Defined Group.
(Recommended option).
2 Direct teacher entry of the data into the marksheets if the marksheets
have been created for Registration Groups via the route Focus |
Assessment | Marksheet Entry. (Recommended option). (See Appendix B
for guidance on creating marksheets for Registration Groups).
11End of KS2 Procedures 2019
3 Printing the marksheet for manual entry by the teacher onto the sheet.
Someone then needs to input the assessments into the marksheets in
SIMS using option 1 or 2 above.
4 Exporting marksheets into Excel for data entry and then importing the data
into SIMS Assessment. Useful for schools with limited teacher access to
SIMS. (See Appendix C).
Printing Marksheets
1 Individual marksheets can be printed by clicking on the Print button on
each marksheet. Options are available for Portrait or Landscape
orientation and Fit to Page. It is recommended that Print Preview is
viewed prior to printing.
2 Alternatively, multiple marksheets can be printed via the menu route:
Tools | Performance | Assessment | System Utilities | Marksheets |
Print a Selection of Marksheets.
For Key Stage 2 there are four marksheets available :
KS2 A. Teacher Assessments 2019
This marksheet can be used to store the Outcome for the KS2 Reading,
Writing, Mathematics and Science Performance Descriptor of the new
curriculum (Assessment without Levels) Teacher Assessment from 2019
onwards. Any pupils assessed at Level BLW (Below the Standard of Pre-
Key Stage), in Reading, W riting or Maths, or HNM in Science will also be
entered on this marksheet, with the relevant P Scale entered on marksheet
KS2 B. PScale Data Entry 2019 .
KS2 B. P Scale Data Entry 2019.
This marksheet enables you to enter a P Scale assessment for pupils who are
working below the standard of the Pre -Key Stage (BLW ) in Reading, W riting or
Mathematics, or who have not met the expected standard (HNM) in Science.
12End of KS2 Procedures 2019
KS2 C. Test Outcomes 2019
This marksheet can be used to enter results of the (Assessment without
Levels) tests completed in the week May 13 th to 16 th May. Test results are
available via NCA Tools on 9 th July 2019 file and can be imported or manually
entered into the marksheet. See Section 7 of these notes.
KS2 D. Broadsheet (Review) 2019
This marksheet is used to review the entries on the other marksheets.
Entering Teacher Assessment Data
S e e p a ge 5 f o r da t a e n t ry g r a d e s a va i la b l e
1 Select the marksheet KS2 A. Teacher Assessments 2019 by clicking on the
Edit button or double clicking on the marksheet name.
A marksheet will open
displaying pupil names and
columns that relate to the
assessments to be entered.
Please read the text in the Notes field at the top of each Marksheet, this
will give advice and information relating to that particular marksheet.
Data can be entered in a number of ways:
a) Type the first result in the first cell and use the down arrow on the
keyboard to move to the next pupil. Enter the marks for all pupils in the
white columns. If an invalid grade is entered, a message will be displayed .
13End of KS2 Procedures 2019
b) Select Grade for Column
1 Right mouse click on the column heading and click on Select Grade for
Column.
2 From the dropdown list available, select
the grade that has been achieved by the
majority of pupils.
This allows the entry of one grade for the
whole column. This column can then be
edited for those pupils not achieving that
grade, either by method a), or c) below.
c) Select Grade for Cell
1 Select the first cell for the first pupil. Right mouse click in the cell and
click on Select Grade for Cell .
2 Select the grade you require for the
selected pupil and click on Apply &
Next, or double click on the required
grade.
This will a u t o m a t i c a l l y move the
cursor down to the next pupil. The Skip
button can be used to miss a cell and
move to the next pupil.
4 Once the results have been entered, click on the Save button.
5 Missing entries will be indicated by a red Fail
message in the Missing Entry Check
column, otherwise OK! will display.
6 If there are any missing entries or entries that
need to be updated, highlight the required cell
and enter the grade.
7 If you enter an incorrect grade, the Invalid
Results dialog is displayed, giving details of
the valid grades for the specific column.
8 Tick the box Data Entry for this Marksheet is complete .
9 Re-calculate by clicking on the Save button again.
14End of KS2 Procedures 2019
10 Save
11 Click the Close button to close the Marksheet and return to the Key
Stage W izard Manager.
Using F and P Grades for KS2 Teacher Assessments
An F grade should be recorded where a pupil will complete the programme of
study and take the relevant Key Stage test in the future.
A P grade should be recorded where a pupil has already completed the
programme of study, has already taken the relevant Key Stage test and a
teacher assessment result has been reported in the past.
SEN at Key Stage 2 – Mandatory collection of P Scales
P Scale Assessments for pupils who are working below the standard of the Pre-
Key Stage (BLW ) in Reading, Writing or Mathematics or who have not met the
expected standard (HNM) in Science should be entered in Marksheet.
KS2 B. P Scale Data Entry
For 2019, the associated gradeset for the relevant P Scales has been amended
to remove the grades P5, P6, P7 and P8.
Important Notes to Remember:
P Scale parameters for an assessment cannot be present for both overall
subject and for subject component, u nless all parameters are recorded as
NOTSEN. If Reading is BLW , then English or Reading P Scale should be
entered. Speaking and Listening are optional. If W riting is BLW , the English or
Writing P Scale should be entered. Speaking and Listening are option al.
Reading and W riting must both be set to BLW if overall English P Scale is to be
in use.
15End of KS2 Procedures 2019
E n g l i s h a s a n A d d i t i o n a l L a n g u a g e ( E A L ) : At each Key Stage it may be that a
pupil has been assessed as working below the standard of the Pre -Key Stage
(BLW ) in Reading, W riting or Mathematics or who have not met the expected
standard (HNM) in Science, because they have EAL status rather than Special
Educational Needs (SEN). This must be indicated by assigning NOTSEN to the
appropriate P Scales column.
Marksheet: KS2 B. P Scale Data Entry 2019
1 To open the KS2 B. P Scale Data Entry 2019 marksheet, access the
Key Stage 2 W izard from Tools | Performance | Assessment | Wizard
Manager.
2 Select the Key Stage 2 England Wizard 2019 wizard.
3 Select Next and Next again to reach the Marksheet selection screen.
4 Double click on the KS2 B. P Scale Data Entry 2019 marksheet or
select the marksheet and click on the Pencil icon.
5 The following Notes are displayed in the Basic Details panel of the
marksheet:
This marksheet enables you to enter a P Scale assessment for pupils at
Key Stage 2,who are working below the standard of the Pre-Key Stage
(BLW) in Reading, Writing or Maths, or optionally for those who have not
met the expected standard (HNM) in Science. To help identify these
pupils, existing TA entries are displayed in read -only columns. Read
more…….. (full instructions are given in the panel and also later in these
notes).
6 The data entry techniques are the same as those for entering data into
the KS2 A. Teacher Assessments 2019 marksheet described earlier, e. g.
typing directly into result cells, or Select Grade for Cell options.
16End of KS2 Procedures 2019
Data Entry
Requirements :
E n gl ish :
For pupils with an English Reading or Writing outcome of
BLW, ensure that there is a P Scale entry for English or
one of its components.
An entry for P Scale Speaking or P Scale Listening can
also be entered as P4 or NOTSEN but is optional.
Maths
For pupils with a Maths Outcome of BLW, ensure that
there is a P Scale entry for Maths or one of its
components.
Science
For pupils with a Science Level of HNM, a P Scale entry is optional for Science.
A P Scale entry is either a P4 or NOTSEN. The marksheet indicates this is
optional, however it is recommended that an assessment result is entered so that
the result will display on the Pupil Individual Report.
1 Once data has been entered, click the Calculate button to apply
validation rules. Pupils with issues will be shown as Failed! Amend data
as necessary and then click the Calculate button again to double check
the validation rules.
2 Click on the Save button
3 Close the marksheet and exit the wizard.
4 The data is now ready to return to Surrey – see Section 6.
See examples of the validation rules below:
17End of KS2 Procedures 2019
Marksheet: KS2 D. Broadsheet (Review) 2019
This marksheet is used to review the entries that have been made as part of
the arrangements for the end of Key Stage 2 for England. This is a Data
Review (read only) marksheet.
EXAMPLE SCREEN ONLY
Please continue w ith Section 5 of the End of Ke y Stage 2 notes as soon as
possible. Do not w ait for the deadline for returning data to Surrey w hich is
Monda y 24 t h June 2019.
Test results w ill be covered in a later section.
18End of KS2 Procedures 2019
Analysis of Data
In Appendix D at the end of these note, guidance is given to enable the user
to:
• Provide Additional Student Information, e.g. % Attendance, FSM, or SEN.
• Filter this additional student information.
• Order Rows in ascending or descending order.
• Filter by group, e.g. FSM, SEN, Gender, EAL etc.
• Show the Grade Distribution of pupils,
e.g. how many or what % of students achieved each grade. Graph this data
in a bar or pie chart. Export the data in Excel format or save the graph for
presentation purposes.
• Show Summary Rows to provide Mean and Median data.
KS1 and KS2 Analysis Reports
An example and details of the report are available in Appendix F KS1 and
KS2 Analysis Reports.
Guidance notes, marksheets and the report definition file to create this report is
available from the Strictly Education 4S website:
https://www.strictlyeducation4s.co.uk
following the links:
S u p p o r t Services | SIMS and Technology | ICT Service Desk | SIMS –
Assessment Manager
19End of KS2 Procedures 2019
Section 6: Data Collection
The last process in the Key Stage W izard, ‘Results for Export’, is not used. KS2
data is returned via Common Transfer File (CTF) directly to the Data
Management Team at Surrey via Perspective Lite. The information will be
validated and collated. A Surrey file will then be forwarded to STA on your behalf.
Creating a CTF using SIMS.net
Ensure you have relevant permissions within System Manager to create CTFs.
Creating a CTF File
1 Go to SIMS. net.
2 Select Routines I Data Out I CTF I Export CTF .
3 Select the CTF export type of KS2.
Do not select General in this instance.
4 Click on the down arrow adjacent to Year Grp and
select Year 6 pupils from the dropdown menu.
5 Select the first pupil in the list.
6 Hold the Shift key down and scroll to the bottom of the list and click
on the last pupil in the Destination LA/ Other column.
7 Release the Shift key. From the drop down menu select Surrey. All the
students in between should now also have Surrey as their destination.
8 Select Export CTF
9 Select Yes to the displayed message.
10 Note the name of the CTF file
created once the export is complete.
11 Select OK.
20End of KS2 Procedures 2019
12 Locate the file in the I: SIMS I CTFOUT folder (where I is the drive letter for
your SIMS directory).
13 If you selected the CTF Type of KS2, the CTF file name will be displayed
as: 936xxxx_KS2_936LLLL_001.xml where xxxx is the 4 digit DFE number of
your school.
14 Copy this file to I:\SIMS \ LEA \ OUTBOX.
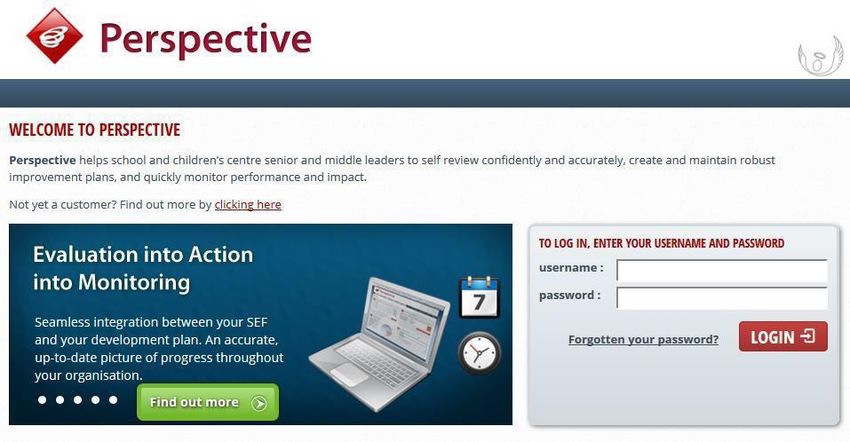
Submitting the Return by Perspective Lite
Perspective Lite is used for data collections. If you have any queries regarding
Perspective Lite, please contact the Performance and Knowledge Management
team (PKM) at Surrey: p k m @ s u r r e y c c . g o v . u k
1 To access Perspective Lite, you need to open up an internet
browser (Such as Internet Explorer).
2 Type https://perspective.angelsolutions.co.uk into the address
bar, then press the return/enter key on the keyboard.
3 The browser should now take you to the Perspective login page.
P l e a s e N o t e: whilst Perspective should work in the majori ty of
internet browsers your experience will be better if you use newer
versions of Internet Explorer, Firefox or Chrome.
4 To log in to Perspective, click into the username box and type in your
username.
5 Then click into the password box and type your password.
6 Then click the red Login button.
21End of KS2 Procedures 2019
Sending data to Surrey
The Send feature within Perspective Lite will give you a simple to use tool to
send files to the Surrey Data Team securely.
1 To access the Send option in your Perspective Account, hover over
Documents(1) on the navigation bar and then select Send files (2 ) from the
drop down menu that appears.
1
2
2 To send files to Surrey, click on the Browse button and navigate to the
I:\SIMS \ LEA \ OUTBOX.
3 Select the file you want to send from your computer, i.e.
936xxxx_KS2_936LLLL_001.xml .
4 Select the Tag i.e. Untagged, Other, Census, EYFSP, Phonics, KS1 , KS2
TA, KS3 TA
5 Click the button Upload and Send.
6 Once your file has been received, a copy will be available for you to
download from the previously sent list for 30 days. If you wish to keep a
copy for your own records, we suggest it is kept securely on your own
computer/network.
7 You can view all files sent in this section or f ilter by those sent but not
received and those sent and received.
8 Help is available by clicking on the button
22End of KS2 Procedures 2019
T h e f i l e ( s ) s h o u l d b e s e n t n o l a t e r t h a n Monday 24th J u n e 2019 f o r
validating and checking .
IMPORTANT : If you have submitted your data, and subsequently resend it to
Data Management because of changes to the data, please contact Data
Management to advise them that you have re-submitted your return.
23End of KS2 Procedures 2019
Section 7: Test Results
Import Data Electronically
Data is available to import electronically from the NCA Tools website from
the 7.30 a.m. 9 th July 2019 by signing in and clicking on the link to Pupil
Results .
https://ncatools.education. gov. uk/
The Key Stage W izard has one marksheet to record test data: KS2 C.Test
Outcomes 2019. This marksheet can be used to enter the outcomes of tests
in English and Maths either by manual entry or electronically imported .
To access the marksheet in the Key Stage W izard:
1 Select Tools | Performance | Assessment | Wizard Manager.
2 Select the Key Stage 2 Wizard England 2019.
3 Click the Next button twice to reach the Marksheets window.
4 Select and open the marksheet: KS2 C. Test Outcomes 2019.
5 The following Notes are displayed in the Basic Details panel of the
marksheet:
This marksheet can be used to enter results of the reformed curriculum
(Assessment without Levels) tests that support the Teacher Assessments
made as part of the KS2 arrangements from 2019 onwards.
24End of KS2 Procedures 2019
Composition of Key Stage 2 Tests
The tests for 2019 consist of:
English Spelling (20 marks)
English Grammar, Punctuation and Vocabulary (50 marks)
= Total Score (70 marks)
+ Scaled Score ( 999) – available on 9 th July 2019
+ Outcome (Performance Descriptor).
English Reading Paper 1 (50 marks)
= Scaled Score (999) - available on 9 th July 2019
+ Outcome (Performance Descriptor).
NOTE: There is no longer a separate test for English W riting.
Mathematics paper 1: Arithmetic (40 marks)
Mathematics paper 2: Reasoning (35 marks)
Mathematics paper 3: Reasoning (35 marks)
= Total Score (110 marks)
+ Scaled Score (999)- available on 9 th July 2019
+ Outcome (Performance Descriptor).
Scaled Scores:
Scaled scores help test results to be reported consistently from one year to the
next. National curriculum tests are designed to be as similar as possible year
on year, but slight differences in difficulty will occur between years. Scaled
scores maintain their meaning over t ime so that two pupils achieving the same
scaled score in different years will have demonstrated the same attainment.
For the KS2 tests a scaled score of 100 will always represent the ‘expected
standard’.
25End of KS2 Procedures 2019
A pupil’s scaled score will be based on their raw score. The raw score is the
total number of marks a pupil receives in a test. The pupil’s raw score will be
translated into a scaled score using a conversion table.
For the 2019 KS2 tests STA will publish test results on the NCA website on
9 th July 2019. Each pupil registered for the tests will receive:
• a raw score (the number of raw marks awarded).
• a scaled score.
• and confirmation of whether or not they attained the expected standard.
Conversion tables for the 2019 tests will also be published on GOV.UK on
9 th July so schools can understand how pupils’ scaled scores are derived
from their raw scores.
Outcome
Descriptors
26End of KS2 Procedures 2019
Section 8: Individual Pupil Reports
To access Individual Reports in the Key Stage W izard, select Tools |
Performance | Assessment | Wizard Manager and select the relevant KS
wizard. Click on the Next button 3 times to reach Individual Report Format.
This page of the wizard enables the printing of individual student
results,
KS2 P1 Student England TA 2019 (Teacher Assessments only)
KS2 P1Student England TA and TT 2019 (Teacher Assessments and Test
Results).
The Individual Student Report
1 Select: KS2 P1 Student England TA and
TT 2019 report.
2 Ensure the Group Membership Dates for
Group reflect the SATs week period.
Refresh the student data. This will ensure
that statistics are based on the correct
students.
3 Click on Deselect All .
4 Select an individual student by ticking the box by the s ide of the surname.
5 Click on the Preview button to display the report in Microsoft Word.
6 If a warning message is displayed, select Enable Macros through
Options .
7 Close the document – d o n o t s a v e.
8 To print the report for all students, click on Select All to select all
of the students and the Print Report button. Alternatively, select
individual students and click on the Print Report button.
27End of KS2 Procedures 2019
Upload Reports
A copy of each child’s report can be saved in the Document Server. This can
then be viewed or printed again at any time.
1 Once reports have been generated they
can be uploaded, either individually or by
selecting all pupils and clicking the
Upload Report button.
2 A message will appear confirming the upload was completed.
3 To view the copy, open the Pupil Details screen for a relevant pupil
and select Linked Documents in the Links panel on the right.
4 Select the required document and Open. The report will open as
Read Only.
Exporting Reports
As an alternative to uploading reports
as SIMS Linked Documents, reports
can be exported and saved to an
alternative location of your choice by
selecting the Export button. Note the
displayed message, and navigate to
your chosen location.
Select OK.
28End of KS2 Procedures 2019
Example of the Individual KS2 Pupil Report
29End of KS2 Procedures 2019
30End of KS2 Procedures 2019
Customising the Reports
To customise the reports by including your school logo etc. it is necessary to
edit the template and print the reports outside of the Key Stage W izard.
1 Close the KS2 W izard.
2 Select: Focus | Assessment | Individual Report from the Toolbar.
3 Select Search.
4 Select: KS2 P1 Student England TA and TT 2019 report.
5 Click on the Clone button.
6 Rename the report: e.g. School KS2 Student Report 2019.
7 Click on the Word Template button to access the template. You may
need to click on Enable Content. Edit the template
as desired (using the Word editing features
available).
8 Select Add Ins from the Toolbar and Verify
Template. Once this process has completed close
the Verify Template message.
9 Save and Close Word.
10 Save the template in Assessment Manager.
11 To preview the report, click on the Generate hyperlink, and to the right
of the Generate panel, select Students .
12 Expand Year Group and select Year 6 (or Assessment User Defined if a
group for KS2 2019 has been created) and select the group required.
13 Select one pupil by ticking the box
adjacent to their name and Apply.
14 Select the pupil again on the
Generate panel.
15 Select Preview to view the report.
16 Close Word.
17 To generate the report for all
students in the group, click on the
Generate hyperlink and to the right of the Generate panel select Students
31End of KS2 Procedures 2019
18 Expand Year Group and select Year 6 (or Assessment User Defined if a
group for KS2 2019 has been created) and select the group required.
19 Ensure the Attendance Reporting
Period reflects the date range you
wish to report on.
20 Click on Select All and Apply.
21 On the Generate panel, click on
Select All and Print.
32End of KS2 Procedures 2019
Appendix A - Creating an Assessment User Defined Group
If you have pupils taking the tests who are not in Year 6 or there are pupils
in Year 6 who are not taking the tests, you should create an Assessment
User-Defined Group.
1 Select: Focus | Groups | Assessment Defined Groups to display the
Maintain User Defined Groups browser.
2 Click the New button to display the Assessment Group Details page.
3 Insert KS2 2019 in the Group Description and Short Name f ields.
4 Select Active from the Active State
drop down list.
5 Enter any required notes, e. g. pupil
out of year if applicable.
6 Save.
Adding Members to a Newly Defined User Group
1 Select: Focus | Groups | Assessment Defined Groups to display the
Maintain User Defined Groups browser.
2 Click on Search to display existing defined assessment groups.
3 Highlight the KS2 2019 group and click on Open or double-click on
the group to display the Assessment Group Details page.
4 In 2 Membership section, click on
the Action button.
5 Select Add Member to open the
Select Members dialog.
6 Click on Search to display a list of all pupils who are members of the
selected academic year.
7 Select Year Group from the Group Type drop down list.
33End of KS2 Procedures 2019
8 Select the Group browser and if necessary click on Search. Select
Year 6 and click on OK.
9 Click on Search to display all of Year 6.
10 Highlight the pupils to be assigned membership and click on OK. The pupils
will be displayed in the Membership panel.
Multiple members can be selected by holding down the Ctrl key and clicking each
member’s name. Sequentially listed members can be selected by clicking the first
name in the list, holding down the Shift key, then clicking on the last name in the list.
11 Repeat this procedure if required to include pupils from another year
group.
12 Save.
Alternatively, at point 10 above, select all the pupils in Year 6 and click on
OK. Now use the option of Removing a Member from a User Defined
Group below to remove one or two pupils from the group.
Removing a Member from a User Defined Group
1 Select the pupil to be removed by clicking on the orange time line to the
right of the pupil.
2 Click the Action button and
select Remove Membership .
3 Confirm you wish to remove
the selected member.
4 Save and Close.
If not created last year, a similar group could be created for the Academic
Year 2017/2018 to be able to compare 2 years of KS2 data in the future.
Follow the notes above and name the Group KS2 2018. In the Membership
area, change the Academic year to reflect the correct year for the group. At
step 5 above, Action | Members , ensure the effective date also reflects the
end of the summer term for the required pupils, e. g. June 2018 .
Click on Search to display the pupils who were in Year 6 in June 2018. The
Year/Reg. Group should be displayed in brackets to indicate the pupils have
left the school.
34End of KS2 Procedures 2019
Adding a Supervisor to a User Defined Group (Optional)
1 Select: Focus | Groups | Assessment Defined Groups to display the
Maintain User Defined Groups browser.
2 Click on Search to display existing defined assessment groups.
3 Highlight the group and click on Open or double-click on the group to
display the Assessment Group Details page.
4 Adding a supervisor is optional, but if a t eacher requires access to a
group’s marksheets, they must be added as a supervisor. Click on the
Current Main Supervisor browser.
5 If you need to change the Effective Date, click the Browse button to
open the Select Effective Date range dialog. Select the required dates
from the options available:
a. Today to end of year
b. Whole year
c. Custom Dates
6 Click on OK to return to the Manage Group Supervisors dialog. Any
amendments made to the effective date will be displayed in the Effective
Date f ield.
7 Click on Action and select Add Supervisor to open the Select Person
dialog.
8 Use either Search or type in the required supervisor’s name and select
Search.
9 Select the supervisor required and click on OK. The Add Supervisor
dialog will be displayed.
10 Select the Supervisor Title from the drop down list. Start and End
dates can be amended if required.
11 Click on OK to return to the Manage Group Supervisors dialog.
12 Click on OK to return to the Assessment Group Details page.
13 Click on: Save and Close.
35End of KS2 Procedures 2019
Appendix B – Creating Marksheets from a Template
The Key Stage W izard Templates are also available through the menu route:
Focus | Assessment | Templates . If your school has more than one
Registration Group in Year 6, you may find it easier to create separate marksheets
for each Group. Individual Registration Group teachers can then log into SIMS
and locate their own marksheets through the My Marksheet Entry icon, or
through the menu route: Focus | Assessment | Marksheet Entry.
To create the marksheets:
1 Select Focus | Assessment | Template .
2 In the Template Name f ield enter: KS2 .
3 Click on Search.
4 Select the marksheet: KS2 A. Teacher Assessments 2019.
5 Select Open.
6 Click on the link 3 Marksheets
and note that a marksheet already exists
for Year 6 created via the Key Stage W izard.
7 Click on the New button (Add a new marksheet) to the right-hand side of
the Marksheet pane.
8 Click on the +sign adjacent to Registration Group and tick the box
adjacent to the Year 6 Registration Groups.
9 Select Apply and Save .
10 Repeat the process for the remaining Data Entry KS 2 marksheets
detailed earlier in these notes.
36End of KS2 Procedures 2019
Appendix C – Exporting a Marksheet to Excel
This method can be used where teachers wish to enter their results through
Excel rather than Assessment Manager. These mark sheets must then be
imported back into Assessment Manager.
1 Open a marksheet and select the arrow by Export.
3 Excel will automatically open to display the marksheet.
4 Save the spreadsheet to a location of your choice.
5 Note that the file name extension is xml not xls.
6 Results can now be added to the spreadsheet and saved.
7 Close the spreadsheet.
8 The original marksheet in Assessment Manager will still be open.
Close this marksheet.
Alternatively all the relevant marksheets can be exported together using Tools I
Performance I Assessment I System Utilities | Marksheets and choosing Export
A Selection Of Marksheets .
37End of KS2 Procedures 2019
Importing the Excel File into Assessment Manager
1 Select Routines | Data In | Assessment I Import from Spreadsheet .
2 From the ‘Select file to import from’ browser, select the Excel file you
have just saved.
3 Select Open.
4 Select Next.
5 Close the Activity Log which will say Read Only columns not imported.
6 Select Next.
7 Select Finish.
8 Select Yes to the message “Are you sure you want to proceed?”
9 Close the Activity Log.
10 Select Focus I Assessment I Marksheet Entry.
11 Select and open the marksheet originally exported.
12 View the imported results.
13 Close the marksheet.
38End of KS2 Procedures 2019
Appendix D – Analysis of Data
In order to be able to extract data from the marksheets for analysis purposes,
there are a number of key features available. These are available on any
marksheet.
Calculate
Click on Calculate to activate any formula columns on the marksheet. These
columns are usually coloured grey and have an f symbol at the top of the
column.
Summary
Click on the Summary button to provide additional summary rows at the
bottom of the marksheet based on data entered in the individual columns
This is an example of the
EXAMPLE ONLY
Summary Row
functionality being
applied to the KS2 A.
Teacher Assessments
2019.
39End of KS2 Procedures 2019
Showing Grade distribution
• Select a marksheet.
• Right click on a grade column heading, e.g.
KS2 Reading TA
(This option is not available for columns
recording a number, decimal or age).
• Select Show Grade Distribution from the
pop- up menu.
The frequency and cumulative frequency can be
expressed as:
• Percentage of Results .
• Percentage of Students (this will
include pupils with no results).
• Count of Students , i.e. number of students. Other EXAMPLE ONLY
options: Export, Print, Graph
• Export will export the data as an xml file.
Select Export and save the file to a location of your
choice. The grade distribution can then be viewed
in Excel format. Using this procedure in conjunction with f iltering
EXAMPLE ONLY
(see later in these notes) gives the opportunity, using cut and
paste functions, to compile a spreadsheet giving a
summary of attainment or progress for the whole
cohort and filtered groups.
See example on next page.
40End of KS2 Procedures 2019
This spreadsheet displays attainment
and sub level progress data for a Year 6
group for Maths in the Summer Term.
Filtering has been applied to obtain
data for Gender, FSM, EAL,
SEN and other User Defined Groups.
This example shows the export of
attainment data using levels, a similar
output can be achieved using
assessment without levels data.
• Print
Select Print to open an Excel print preview screen.
• Graph
Select Graph to display a bar chart which can
be Saved, Printed or Exported using the icons EXAMPLE ONLY
at the top of the graph.
Right mouse click on the graph and select
Gallery to change the style of graph.
EXAMPLE ONLY
41End of KS2 Procedures 2019
Changing the Marksheet Display
Showing/ Hiding Additional Student
Information and ordering on this data.
• Right click anywhere on the Student
column and select:
Select Additional Student Columns from
the menu.
• Select the additional student information you require using the tick boxes
and OK.
• Left click on a selected column heading, e. g. date of birth, this will order
the students in ascending date of birth order. Click again to reverse the
order.
Any Student Information column can be ordered in this way.
• To remove the additional columns, right click in the student column
heading. Select: Select Additional Student Columns from the menu
and remove the tick from selected colum ns, or select Clear All and OK.
The additional student information will
be displayed on the marksheet when
printed.
Ordering Rows by results columns
Rows containing assessment data can be ordered in either ascending or
descending order. Right click on the required column heading and select either
Order Rows | Ascending or Order Rows | Descending from the pop- up menu.
Note: W here a grade column is selected, the values of the grades are used.
To restore the default row order right click on any column and select Restore
Row Order from the pop-up menu.
42End of KS2 Procedures 2019
Group Filter
Enables f iltering by Ethnicity, SEN, Home Language and more.
1 Click on the Group Filter browser.
The pupils listed in the marksheets can be limited
by using filters. These filters can be saved to use
on any other marksheet, e.g. all summer born
males, or females with dyslexia.
2 Click on the + sign adjacent to the required filter.
3 Select the filter required by ticking the box.
4 Repeat the process to include additional filters.
Details of selections will be inserted in the
Description box.
5 Select Apply to apply the filter to the marksheet.
6 If you wish to save the filter, insert a relevant
description in the Filter Name box, e. g. FSM + EAL.
7 To share the filter with other users, ensure the Private
box remains unticked.
8 Select Save
9 To apply a saved filter, select the named filter and
Open
10 Select Apply to apply the filter to the marksheet.
Include will include any filters selected and will
display in blue.
Exclude will exclude any filters selected and will
display in red.
To use the Exclude option:
• Click on Exclude before making selections.
• Expand the + sign adjacent to Ethnicity and select any
White British categories. This will display all pupils from other ethnic groups on
the marksheet.
• Apply
43End of KS2 Procedures 2019
Now use the Grade Distribution option on the filtered group.
The grade distribution shows the number of pupils from Ethnic groups other than
White British and the distribution of grades.
Column Filters
Filters are available on individual columns on marksheets.
Hover with the mouse over a column heading to display a small filter
arrow. The filter will reveal a menu of the data displayed the column.
For example, using the f ilter on the Additional
Student Details columns for EAL, will display a
menu of Blank, N or Y. Select Y and OK to
display all pupils with EAL.
The filter that has been applied to the column will
be displayed in the bottom left hand corner of the
Marksheet. Multiple filters can be applied. To
remove the filter, uncheck the tick box.
Add the Attendance data column. Right click in the Students column heading
and click on Select Additional Student Columns. Once this column has
been added the f ilter can be used to display
pupils with below 85% attendance.
Another example: apply the filter to any
Teacher Assessment column. The menu will
display the grades entered in the column. In this
example, pupils working at BLW only will be
displayed on the marksheet.
Now use the Grade Distribution option on the filtered group.
44End of KS2 Procedures 2019
Appendix E – Key to Success
DfE Secure Access website:
https://sa.education.gov.uk/idp/ Authn/ UserPassword
For schools, a single Secure Access account is being provided for the entire
establishment. Please remember to lodg e your username, password, and
security question and answer with your head teacher to allow other approved
users to access the systems covered by Secure Access.
Once you have logged into the website, you will see options to access
COLLECT, KtS (Key to Success) and S2S (The School to School system).
Key to Success enables you to search for historical end of Key Stage data
for pupils within your school
For individual pupil data, you will require their name and UPN to use the
search facility.
45End of KS2 Procedures 2019
You are able to search for whole year group end of Key Stage data, e. g. KS2
2018 results
EXAMPLE ONLY
CTF Details
46End of KS2 Procedures 2019
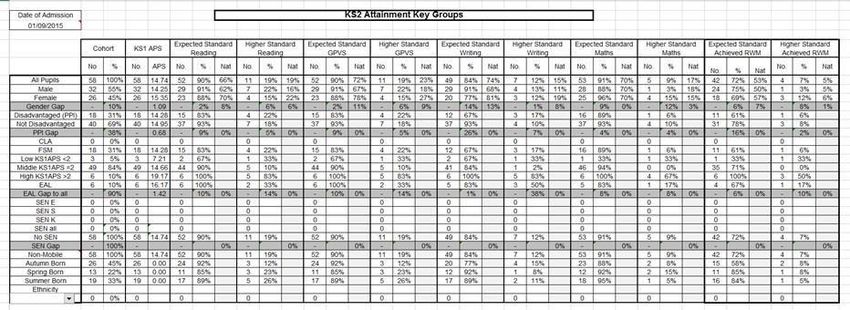
Appendix F - KS1 and KS2 Analysis Reports
Guidance notes, marksheets and the report definiti on file to create this
report are available from the Strictly Education 4S website:
https://www.strictlyeducation4s.co.uk
following the links:
Support Services | SIMS and Technology | ICT Service Desk | SIMS – Assessment Manager
– KS1 & KS2 Statutory Analysis Reports
Enlarged view of the report.
47You can also read