Hi! Let's Get Started - TTW Window AC English
←
→
Page content transcription
If your browser does not render page correctly, please read the page content below
Hi! Let’s Get Started.

                TTW Window AC
                         English
          1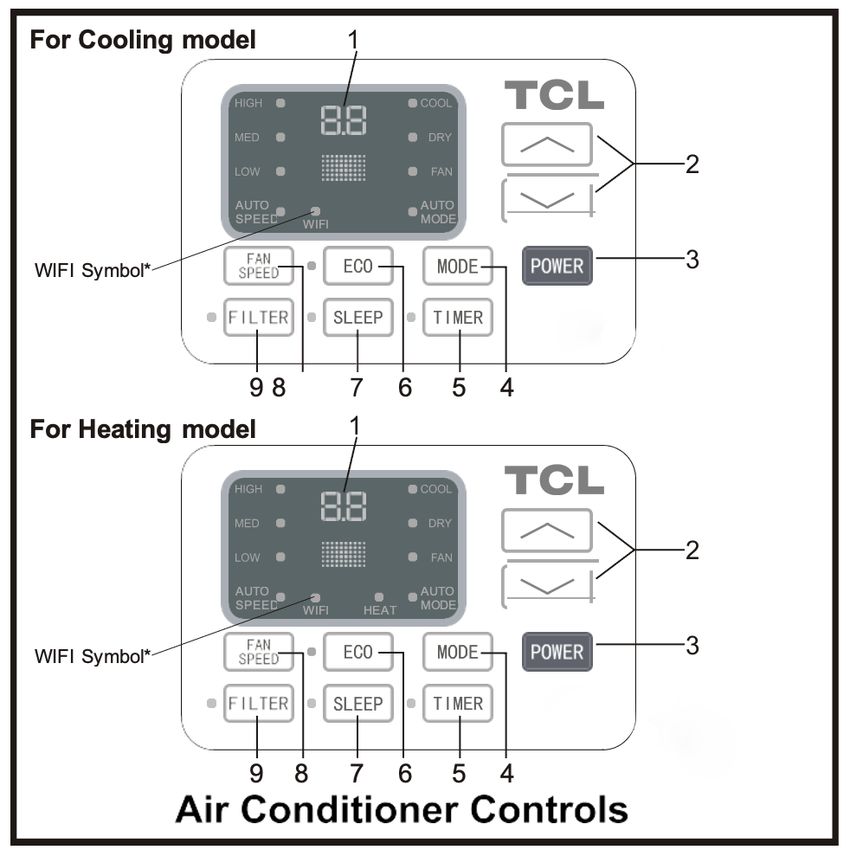
Table of Contents

Register and protect your purchase...................................................................................................3

English
Important Safety Instructions...............................................................................................................4
What’s in the Box.......................................................................................................................................5
Let’s Get Started!.......................................................................................................................................6
Direct Unit Mounting................................................................................................................................8
How to Control Your AC..........................................................................................................................11
Operating Your AC....................................................................................................................................12
Care and Cleaning.....................................................................................................................................14
Troubleshooting..........................................................................................................................................15
WiFi App Installation................................................................................................................................31
Spanish/French/English Online QSG.................................................................................................33

                                                                                2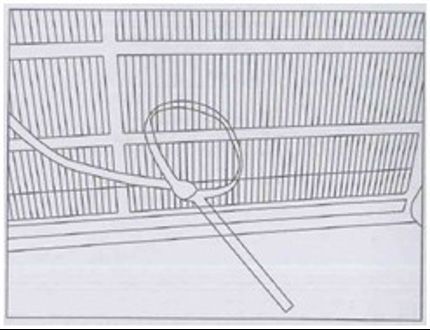
Register and protect your purchase

                              Text to Register
                              Text a photo of the
                              camera icon to 71403

                              Or register online at register.tcl.com
                              Need help? Visit photoregister.com/help
   TCL-TTWAC
                              or text HELP to 71403

Enjoy exclusive benefits with registration:

Expedited support and service                Insider tips on your appliance

Exclusive offers and promotions              Verification of ownership

 Add a TCL Protection Plan when you register
your product and be covered from life’s mishaps
Thank you for choosing TCL. We want your ownership experience to
bring you as much joy as the appliance you purchased does, so we’re
    offering you a special price on TCL Protection Plans when you
purchase during registration. Add a TCL Protection Plan within your
first 30 days of ownership to receive the best value at the best price.

                                  3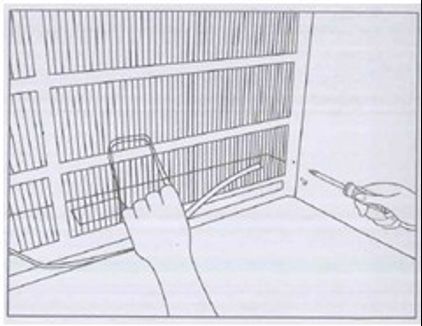
IMPORTANT SAFETY INSTRUCTIONS
  Before installing and using your air conditioner, please read this owner’s manual carefully. Store this manual in a safe place for future
   reference. Your safety and the safety of others is very important to us. Please pay attention to all safety messages outlined in this
                                                                owner’s manual.
 WARNING: To reduce the risk of fire, electrical shock or injury when using your air conditioner, follow the following basic precautions:
                                                         ELECTRICAL REQUIREMENTS
 The electrical ratings for your air conditioner are listed on the model and serial number label located on the front right side of the unit
                                                            (when facing the front).
                                                         REGISTER YOUR APPLIANCE
                                      You can register your appliance online by going to register.tcl.com
                 Be sure to retain your original sales receipt. A valid proof of purchase is required for all warranty claims.
                                                       BATTERY WARNING STATEMENT
    Do not mix old and new batteries and do not mix alkaline, standard (carbon-zinc) or rechargeable (ni-cad, ni-mh, etc.) batteries

                                                  Document your model and serial numbers here:

    Model #___________________________________                                                 Serial #___________________________________

          You can locate your 20 digit serial number underneath the bar code (right hand side of the AC).

                                      Specific electrical requirements are shown in the diagram below. Follow the requirements below for the
        WARNING                                                        type of plug on the power supply cord.

     Electrical Shock                     Wiring Requirements                            Power Supply Cord                             Power Requirements
         Hazard
                                     • (15K) 115 Volts                                                                      • W8T9E1-A, W10T9E1-A,   • W10T9EX1-A,
  Plug into a grounded 3 prong         (103 min – 127 max)                                                                  W12T9E1-A: 115V          W12T9EX1-A, W14T9X1-A:
                outlet.                (18K – 24K) 230 Volts                                                                grounded wall outlet     230V grounded wall
                                                                                                                                                     outlet
    Do not remove the ground           (187 min – 253 max)
                prong.               • (15K) 0-11 amps
      Do not use an adapter            (18K) 7.1 amps
  Do not use an extension cord.        (24K) 11.0 amps
      Failure to follow these          (15K) 3.15 amp time-delay fuse or circuit breaker
 instructions can result in death,     (18K-24K) 3.15 amp time-delay fuse or circuit breaker    15K BTU     18K – 24K BTU
      fire, or electrical shock      • Use on single outlet circuit only on all sizes            115 Volt    208/230 Volt

                                                   RECOMMENDED GROUND METHOD
   For your personal safety, this air conditioner must be grounded. This air conditioner is equipped with a 3 prong power supply cord
 with a grounded plug. To minimize the possibility of electrical shock, the cord must be plugged into a 3-prong outlet and grounded in
  accordance with all local codes and ordinances. If a 3-prong outlet is available, it is the customer’s responsibility to have a properly
                                         grounded 3 prong outlet installed by a qualified electrician
                                                               FCC CAUTION
  This device complies with part 15 of the FCC Rules. Operation is subject to the following two conditions: (1) This device may not cause
harmful interference, and (2) this device must accept any interference received, including interference that may cause undesired operation.
 Any Changes or modifications not expressly approved by the party responsible for compliance could void the user’s authority to operate
                                                              the equipment.

  Note: This equipment has been tested and found to comply with the limits for a Class B digital device, pursuant to part 15 of the FCC
Rules. These limits are designed to provide reasonable protection against harmful interference in a residential installation. This equipment
   generates uses and can radiate radio frequency energy and, if not installed and used in accordance with the instructions, may cause
harmful interference to radio communications. However, there is no guarantee that interference will not occur in a particular installation. If
 this equipment does cause harmful interference to radio or television reception, which can be determined by turning the equipment off
                and on, the user is encouraged to try to correct the interference by one or more of the following measures:
                                                -Reorient or relocate the receiving antenna.
                                       -Increase the separation between the equipment and receiver.

                                                     DO NOT RETURN TO STORE

                      WE ARE
                      READY TO                                                                                  TCL SUPPORT:

                      HELP                                contact us first                                       support.tcl.com
                                                           with any questions                                  1-800-825-6747

                                                     BE CAREFUL WHEN REMOVING
                                                     THE AIR CONDITIONING UNIT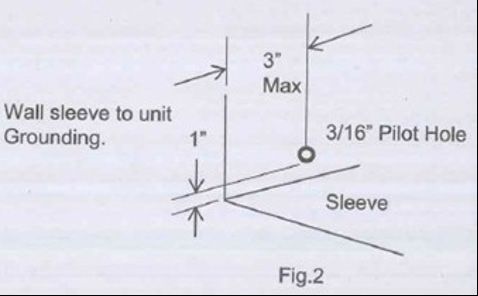
BEFORE YOU BEGIN
•   Read the instructions completely and carefully
•   Save these instructions for local inspector’s use
•   Observe all governing codes and ordinances
•   Note to installer – be sure to leave these instructions with the consumer
•   Note to consumer – keep these instructions for future reference
•   We recommend 2 people install this product
•   Proper installation is the responsibility of the installer
•   Product failure due to improper installation is not covered under warranty

What’s in the box
    NO.                       APPEARANCE                                          PART NAME           QUANTITY

                                                                          Through-The-Wall Air
      2                                                                       Conditioner
                                                                                                         1

      3                                                                          Remote Control          1

                                                                               Trim Frame 1
      4                                                                                                  2
                                                                            (Left & Right legs)

                                                                              Trim Frame 2
      5                                                                                                  2
                                                                           (Top & Bottom legs)

      6                                                                          Aluminum Grill          1

      7                                                                          Rear Plastic Grill      1

      8                                                                1/2” Long Hex-Head Screw          4

                                                                      Grounding Wire with Tooth
      9                                                                       Washer
                                                                                                         1

      DIMENSION                                                PART NAME                              QUANTITY

       1’’x3/4’’x14’’                                           Seal sponge                              2

       1’’x3/8’’x14’’                                           Seal sponge                              2

       1’’x3/8’’x25’’                                           Seal sponge                              3

       1’’x1 1/2’’x25’’                                         Seal sponge                              3

       1’’x1 1/2’’x14’’                                         Seal sponge                              2

       1’’x1 1/2’’x84’’                                         Seal sponge                              1

    3 3/ 4’’x1 1/2’’x4’’                                        Seal cotton                              4

     3/4’’x1 1/2’’x17’’                                         Seal cotton                              2

Tools needed: Drill and drill bits, Phillips head screwdriver, Flat headed screwdriver, tape measure,
level, scissors or knife, pencil.
                                                                  5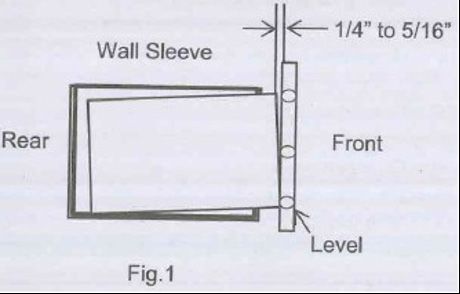
Let’s get started!

Step 1: Testing
Before you install the AC, let’s test it to make sure it made it safely to your home and your outlet
has the proper power outlet to run your AC. Place it on a flat surface, plug it directly into a wall
outlet (never use a power strip or other device), and turn it on. Next, use the Mode button on your
control panel to change the AC into Cool Mode and press the down arrow to set the temperature
to the lowest setting. After 3 minutes, the AC should be blowing cool air. If so, please continue to
the next step. If not, see detailed troubleshooting tips at tclusa.com/support.

Step 2: Installation

UNIVERSAL WALL-SLEEVE DIMENSIONS
1.   Identify which brand your wall-sleeve is and ensure its dimensions match those in the
     chart below.

                                                        Wall-sleeve Dimension
               Type
                                       Height                   Width                    Depth
       Standard Dimension              15 3/4”                    26”                      20”
2.   The wall sleeve used to mount the air conditioner must be in sound structural condition and
     have a rear grill that is securely attached to the sleeve, or rear flange that serves as a stop for
     the air conditioner.
3.   Remove the old air conditioner from the wall sleeve.
4.   Clean the interior of the wall sleeve, do not disturb the seals.
5.   Make sure the sleeve is securely installed and in sound structural condition.
6.   Measure the size of the sleeve to ensure the air conditioner will fit.
7.   Slope – ensure your unit has a rearward slope to drain any accumulated condensation.

8.   Repair/repaint the sleeve surface if needed.
9.   For best performance, replace the existing rear louver grill with the plastic mesh unit supplied
     in the package. Measure and cut the plastic grill to fit and place inside the wall sleeve against
     the rear flange.

                                                    6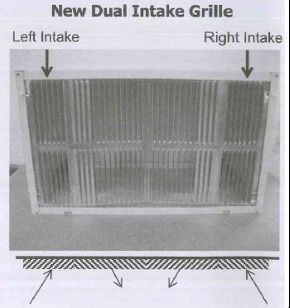
10. The ground wire hole does not exist. In a clear area about 3 inches (max) from the front edge,
    drill a 3/16’’ pilot hole for the grounding screw through the left-hand side of the sleeve as
    shown below. Pull the loose end of the ground wire out of the front of the sleeve and bend it
    away from the opening. This will be attached to the air conditioner once installed.

11. Install the new unit into the wall sleeve.
12. To attach the ground wire to the new unit, remove the screw from the left side on the front.
13. Assemble and install the trim frame.
Existing Frigidaire sleeves may have older single sided intake grills, as pictured below.

                                                 7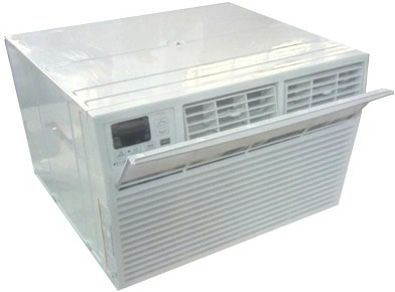
1. These grills should be replaced with the dual intake grill type, as pictured below.
• Remove the existing single intake grill and save the mounting screws.
Warning: When removing the grill, protect it from falling by securing with a leash. This can be
fastened with a cord or strap looped through the grill and secured with a knot. Holding the grill
by the leash with one hand, remove the retaining screws so that the grill can be removed through
the front of the sleeve.
• Place the grill included with your new air conditioner towards the inside rear of the sleeve.
• Attach the new grill by aligning the four mounting holes.
• Re-insert the self-tapping screws into the nylon retainers.
Direct Unit Mounting
In the event that the dual intake grill cannot be mounted directly to the sleeve, it is recommended to
attach the grill to the back of the through-the-wall unit with the hole pre-drilled in the unit.
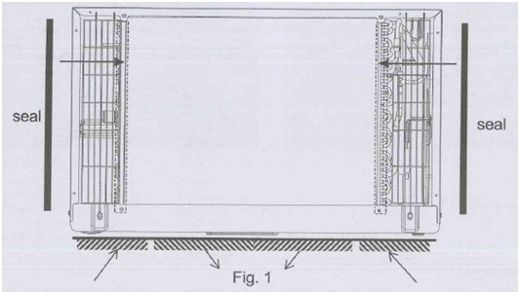
1. Attach the 2 seals(1’’x3/8’’x14’’), as Fig. 1.
2. Position the grill over the rear of the unit making sure that:
• The double set of screw holes are at the bottom.
• The intake fins on either side are pointed away from the unit.
3. Align the top of the grill with the top of the unit. Make sure the overhang on each side is equal.
4. Install 4-#8 self-tapping screws to affix the grill to the unit.
5. Insert the unit into the sleeve.
8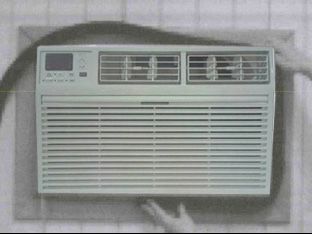
Seal Installation
1.   Use 1’’x3/8’’x25’’ long seal in the center at the top of the sleeve. Remove the back paper and
     press into position.
2.   Use 1’’x3/8’’x14’’ seal both to the left and right sides of the sleeve.
3.   Cut the 1’’x3/8’’x25’’ long seals to 14’’ length each and attach to the vertical sections of the
     grill as shown.
4.   Take the 1/2’’x3 1/2’’x1 1/2’’ centering blocks (one on each side wall). Place in the center of side
     wall with the tapered end facing the opening.

Ground Wire Installation
1.   Install screw end of the ground wire into the inside of the sleeve according to
     preparation instruction.
2.   Before sliding the unit all the way back, remove the second screw from left side of unit.
3.   Remove plastic washer from screw.
4.   Screw the other end of the ground wire into the unit as shown. Make sure the toothed washer
     is against the cabinet

                                                    9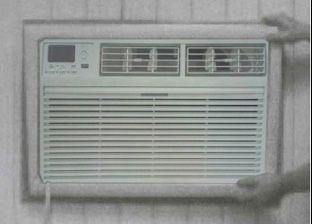
Trim Kit Installation Instructions
1.   Install the 1’’x1’’x84’’ long stuffer seal between the wall sleeve and the unit. A flat-bladed
     screwdriver or putty knife is needed.

2.   Assemble the trim frame by inserting the top and bottom pieces into the side pieces and
     snapping them into place.

3.   Pull the cord through the trim frame and slide the trim over the unit until flush with the wall.

                                                   10
How to Control Your AC
All the basics you need to know to stay cool!
1. Digital Display: When the timer is not
in use, the operation mode and the set
temperature will be displayed. Time will be
displayed under the timer setting.
Time will be displayed under timer setting.
2. and Buttons – use these buttons
on the control panel or remote control
to increase or decrease the desired
temperature, or time using the Timer. The
temperature range is:
61°-88° Fahrenheit, or 16°-31° Celsius
3. Power Button: Turn the air conditioner on
and off.
4. Modes – Press the Mode button on the
control panel to cycle and select a Mode,
or select a Mode by pressing the desired
button the remote.
• Cool Mode - The cooling function allows
the air conditioner to cool the room and
reduce air humidity at the same time. Adjust the fan speed and temperature to your desired
comfort level. In this mode, if Eco is not enabled, the fan may continue to run after reaching
the desired temperature.
• Dry Mode – This function reduces the humidity of the air to make the room more
comfortable. Press the Mode button to set to Dry mode. An automatic function of alternating
cooling cycles and air fan is activated.
• Fan Mode: Fan Mode helps to circulate air in your home, but only works when the air
conditioner is vented
• Auto Mode: In Auto mode the unit automatically chooses the fan speed and the mode of
operation (Cool, Dry or Fan).In this mode the temperature is set automatically according
to the room temperature (tested by the temperature sensor which is incorporated in the
indoor unit.).
• Heat Mode: The heating function allows the air conditioner to heat the room. Press the Mode
button to activate the heating function. To optimize the function of the air conditioner, adjust
the temperature and the speed by pressing the button indicated.
5. Timer Button – press the Timer button on the panel or the Timer button on the remote to set
the timer.
• Set Timer On: With the AC off, press the Timer button and then use the
and buttons to set the desired temperature. Press the Timer button again and
use the and buttons to set the desired amount of time before the AC turns on.
Press the timer button again to start the countdown.
• Set Timer Off: With the AC on, press the Timer button and then use the and
buttons to set the length of time before the AC will turn off. Press the timer button again
to start the countdown.
Note: It can be set to automatically turn off or on in 0.5-24 hours. Each press of the
11buttons will increase or decrease the timer. The Timer can be set in 0.5 hours increment below 10
hours and 1 hour increment for 10 hours or above. The Set light will turn on while setting.
To cancel the Set function, press the TIMER button again.
the humidity is high. This design feature helps remove moisture and increase efficiency.
You may hear the thermostat click when the compressor cycles on and off. Water will collect in the
base pan on rainy days, or high humidity days. The water may overflow and drip from the unit on the
outside. The fan may run, even when the compressor is not on.
6. Eco Mode – In Eco mode, the unit will turn off once the room is cooled to the user-set
temperature. The unit will turn back on when the room temperature rises above the user-set
temperature. While in Eco mode, the fan will occasionally turn on for a few seconds in order to
take an accurate temperature reading.
The unit will turn back on when the room temperature rises above the user set temperature. Before
the compressor starts, the fan motor will run for a while, then it will stop for a while. The process
will continue to repeat to save energy while creating a comfortable environment.
7. Sleep Button – In Sleep mode, all of the display lights will turn off after a while, but the Sleep
light stays on. In Sleep mode, the air conditioner will automatically adjust the temperature
and fan speed to make the room more comfortable during the night. The set temperature
will automatically raise every 30-60 minutes, and at most change six times until the set
temperature is 81 or 82 degrees.
8. Fan Speed – Press the Fan Speed button to choose the fan speed options. You can choose Hi,
Med, Lo or auto speed in cool mode and choose Hi, Med, Lo in fan mode.
9. Filter Button – After the fan motor has run for 500 total hours, the Filter Check light will turn
on to remind the user to clean the filter. After you clean the filter, you can turn off the light by
pressing the Filter button.
10. Directional Louvers: To direct the airflow horizontal wheel to control the horizontal direction,
air deflector to control the vertical direction.,
Operating Your Air Conditioner
Remote Control
1. POWER: Turn the air conditioner on and off.
2. COOL: Press the COOL button to COOL mode.
3. Up and Down: Use these buttons to increase or decrease
the temperature. The Set light will turn on after selecting the
desired temperature. Decrease the Set Temperature or Timer.
Temperature range: 61˚ ~88˚ Fahrenheit or 16˚ ~31˚ Celsius.
4. SLEEP: Press the Sleep button, all of the display lights will turn
off after a while, but the sleep light is always on. In the mode, the
air conditioner will automatically adjust the temperature and fan
speed to make the room more comfortable during the night. The
set temperature will automatically change every 30-60 minutes
and at most change six times until the set temperature is 81˚ or
82˚ Fahrenheit for cooling and 75˚ or 76˚ Fahrenheit
for heating.
5. TIMER: Use these buttons on the control panel and remote to set
12the Timer.
• Timer Off: The timed stop is programmed by pressing Timer button. Set the rest time by
pressing the button Up or Down until the rest time displayed is to your demand then press
Timer button again.
• Timer On: When the unit is off, press Timer button at the first time, set the temperature with
pressing the button Up or Down. Press Timer button at the second time, set the rest time with
pressing the button Up or Down. Press Timer button at the third time, confirm the setting,
then the rest time to next automatically switching-on could be read on the display of the
machine.
Note: It can be set to automatically turn off or on in 0.5-24 hours. Each press of the buttons will
increase or decrease the timer. The Timer can be set in 0.5 hours increment below 10 hours and 1
hour increment for 10 hours or above. The Set light will turn on while setting.
To cancel the Set function, press the TIMER button again.
6. Auto Mode: In AUTO mode the unit automatically chooses the mode of operation(COOL,DRY
or FAN). In this mode the temperature will be set automatically according to the room
temperature (tested by the temperature sensor which is incorporated in the indoor unit.).
7. Fan Speed: Press the Fan Speed button to choose the fan speed options. You can choose Hi,
Med, Lo or auto speed in Cool or Heat mode and choose Hi, Med, Lo in Fan mode.
8. Display: To press the Display button, it can switch off/on all lights or LED display.
9. Eco: When the unit is in ECO mode, the light will turn on. In Eco mode, the unit will turn-off
once the room is cooled to the user set temperature. The unit will turn back on when the
room temperature rises above the user set temperature. Before the compressor stars, the fan
motor will keep running for a while and stop for a while-and again, to provide much more
comfortable feeling, and save the energy.
10. Fan Only: Press the Fan Only button to Fan Only mode.
Battery Size: AAA - NOTE: Do not mix old and new batteries or different types of AAA batteries.
13Care And Cleaning
Clean your air conditioner to keep it looking new and to minimize dust build up.
AIR FILTER CLEANING
The air filter should be checked at least once every month to see if it needs cleaning. Trapped
particles and dust can build up in the filter and may decrease airflow as well as cause the cooling
coils to accumulate frost. To clean the air filter:
1. Remove the filter by pulling down on the indents of the filter door on the front of the unit.
(See FIG.21)
2. Wash the filter using liquid dish soap and warm water. Rinse the filter thoroughly. Gently shake
the filter to remove excess water.
3. Let the filter dry completely before placing it into the air conditioner.
4. If you do not wish to wash the filter, you may vacuum the filter to remove the dust and other
particles.
FIG. 2.1
WEAR AND TEAR
To minimize wear and tear on the air conditioner, always wait at least 3 minutes before changing
modes. This will help prevent the compressor from overheating and the circuit breaker from tripping.
CABINET CLEANING
To clean the air conditioner cabinet:
• Unplug the air conditioner to prevent shock or a fire hazard. The cabinet and front panel of
the air conditioner may be dusted with an oilfree cloth or washed with a cloth dampened in a
solution of warm water and mild liquid soap. Rinse thoroughly with a damp cloth and wipe dry.
• Never use harsh cleaners, wax or polish on the cabinet front.
• Be sure to wring excess water from the cloth before wiping around the controls. Excess water
in or around the controls may cause damage to the air conditioner.
WINTER STORAGE
To store the air conditioner when it is not in use for an extended period of time, remove it carefully
from the window according to the installation instructions and cover it with plastic or place it in the
original box.
14Troubleshooting
Having trouble completing installation? Don’t worry, it’s usually an easy fix.
PROBLEM POSSIBLE CAUSES SOLUTIONS
• Make sure the air conditioner is plug is
The air conditioner is unplugged
pushed completely into the outlet
The fuse is blown/circuit breaker • Check the house fuse/circuit breaker box
is tripped and replace the fuse or reset the breaker
• The unit will automatically re-start when
power is restored
• There is a protective time delay (approx.
Air Conditioner Power Failure 3 minutes) to prevent damage to the
will not start compressor. For this reason, the unit may
not start normal cooling for 3 minutes after
it is turned back on.
• Press the RESET button located on the
power cord plug
• If the RESET button will not stay
The current interrupter device is tripped
engaged, discontinue use of the air
conditioner and contact a qualified service
technician
• Make sure there are no curtains, blinds, or
Airflow is restricted furniture blocking the front of the
air conditioner
The temperature control may not be
• Lower the set thermostat temperature
set correctly
• Clean the filter. See the Cleaning
The air filter is dirty
Air Conditioner does not and Care Section of the manual
cool as it should
• Please allow time for the room to cool
The room may be too warm
down after turning on the air conditioner
• Check for open furnace registers and cold
Cold air is escaping
air returns
The Cooling Coils are frozen • See “Air Conditioner Freezing Up” below
• Set the MODE to HIGH FAN or
Air Conditioner Ice blocks the air flow and stops the air
HIGH COOL and set the thermostat to a
is freezing up conditioner from cooling the room
higher temperature
Remote Control The batteries are inserted incorrectly • Check the position of the batteries
is not working The batteries may be dead • Replace the batteries
Water is dripping outside Hot and humid weather • This is normal
• For proper water drainage, make sure the
Water is dripping inside The air conditioner is not correctly tilted
air conditioner is slightly tilted downward
the room outside
from the front of the unit to the rear
• This is normal for a short period in areas
Water collects in the base Moisture removed from the air is draining
with low humidity and normal for a longer
pan into the base pan.
period in areas with high humidity
Digital Display reads
A sensor has failed • Contact customer service
“E1”, “E2”
15Wi-Fi App Installation and Instruction Manual
(for wifi models only)
Step 1: Download and Install the TCL Home Comfort App
1. Using your camera function on your smartphone, please scan the QR code below to be
directed to download the latest App for your TCL branded air conditioner.
If your phone does not currently have a QR scanner installed you can download and install
one from your App store.
tcl.link/homeconnectapp
Note: The TCL Home Comfort App is supported on 2.4 GHZ Wi-Fi Channels only.
Please be sure your connection is using a Wireless channel broadcasting in 2.4GHZ
2. After navigating to the TCL Home Comfort App select DOWNLOAD, INSTALL, and then
OPEN.
16Step 2: Register Your Account
1. Once you download the App, you will need to create an account. Click the “Register” button
to begin the registration process. You can register with your email address OR with a mobile
phone number.
Register with an email address:
Register with a mobile phone number: Select “or Register with Mobile number” on the bottom of
the screen. You will be sent a verification code via text to complete the registration process.
17Step 3: Login to Your User Account
1. Once you have registered and created an account, click the “Login” button. You will be able to
login with either the email account or mobile phone number you registered with.
2. For phone number login: You will be requested each time to validate login with a login code
sent via text. Press the “Sign In with SMS” button to enter the login screen. Type in your
phone number and press “Get” to receive a verification code. Once the verification code is
received, type it into the login screen and press “Login”.
18Forgot Password?
If you forget your password, you can retrieve it by following these instructions:
1. Press the “Forgot password” button to enter the next page.
2. Type in the registered phone number or email address and press
the “Next” button to continue.
3. You will receive a verification code to continue. Type in the code received and set a new
password. Press the “Confirm” button to finish.
19Step 4: Add Your AC Unit
After installing the TCL Home Comfort App on your mobile device, you must then add your AC
unit to be controlled by your installed app. Follow the directions below:
1. Press the “Add Device” and click the type of product you are connecting to.
Step 5: Connect Your AC Unit to the Wireless Network
There are two setup Modes/Methods to connect the AC unit to the wireless network.
Reminder: The TCL Home Comfort App only works on 2.4 GHZ networks.
Note: The default set-up mode will be CF mode when first starting the AC unit.
CF Mode - When setting up your AC unit using a Wi-Fi connection using the CF mode, the AC unit
being connected for Wi-Fi operation will automatically search for an available wireless
network and connects automatically when the setup directions are followed. The unit
and device will be synced together afterwards.
AP Mode - If your AC unit does not connect to the mobile device through the wireless network
using the setup instruction in CF mode, you can connect the mobile device to the AC
unit using the air conditioner’s Wi-Fi adapter or “Device hotspot”. The AC unit will show
as a wireless network under the mobile devices Wi-Fi connections as “Home Comfort
-xxxx”. You can then connect the mobile device from the AC unit’s hotspot. After the
AC unit is turned off/on the next time you use it, the AC unit will connect to the wireless
network the phone is connected to.
20Add the AC Unit to the Wireless Network using “CF Mode”
1. The App and AC unit automatically defaults to CF mode upon start up. Follow the prompts
on the screen and then press “ Next Step” to continue.
Note: If the AC unit is not in CF mode, press Display on the remote 6 times. After 8 to 10 seconds
your will hear two beeps and the AC will display CF.
2. Select the network you wish to connect to, enter the router password and press “Next” to
continue.
Note: If having difficulties finding or joining your wireless network you may need to give the TCL
Home Comfort App permission to enable Location. This setting can typically be found by going to
Settings > Apps > TCL Home Comfort and then select to enable Location. The exact location and
method to enable this setting varies by phone OS and version.
213. After connecting to the wireless network, The TCL Home Comfort App software will
automatically try to pair with the AC unit. The AC unit’s LED screen may display “PP” or “SA”,
indicating it is searching for the network signal. This may take 10-15 seconds to connect the
AC to the network.
4. After successfully pairing the AC unit to the network, the page will display as below. You can
“Rename” the AC unit as you like, share with family, or press “Done” to start to controlling the
device.
Note: If at any time you need to start over, pressing “Display” on the remote control 6 times will
reset the wireless setup configuration on the AC unit back to CF mode. Pressing the “Display”
button an additional 6 times after CF mode appears will switch the unit to AP mode.
Please allow the unit 10-15 seconds to switch modes if toggling from CF to AP modes.
22Add the AC Unit to the Wireless Network using “AP Mode”
If connections to the wireless network fail using the “CF mode”, you can connect using the “AP
mode” (using the AC unit as a mobile hotspot).
1. On the App page indicating CF mode, click “AP mode” in the top, right-hand corner as
illustrated.
2. AP should show on the page as illustrated below. Press “Next Step” to continue.
3. To the switch the AC unit over to AP mode - Press “Display” on the remote control 6 times
within 6 seconds so the AC unit switches from “CF mode” to “AP mode”. Allow the unit 10-15
seconds to switch modes and AP will flash on the AC unit display screen when complete.
234. Select the Wi-Fi network you are trying to connect to, type in the password, and press “Next”
to continue.
5. Open your mobile device settings to get to Wi-Fi connections.
6. “TCLHOMECOMFORT-XXXX” should show as an available network connection option.
Connect to the TCLHOMECOMFORT-XXXX network.
7. After connecting to “TCLHOMECOMFORT -XXXX” network using the AC unit’s Wi-Fi adapter,
return to the TCL Home Comfort App to resume setup.
Note: You may need to manually navigate back to the TCL Home Comfort App.
248. The AC unit will automatically begin installing/syncing on the mobile device.
9. The AC unit’s LED screen may display "PP" or "SA", indicating it is searching for the network
signal. This may take 10-15 seconds to connect the AC to the network.
10. When the connection is complete, the TCL Home Comfort App on your mobile device will
show the unit as connected with a check mark as illustrated. If the setup connection fails, the
App will display a warning. Press "Retry" to try the connection again or “View help”.
Connection Successful Connection Failed
11. Once connected, you are ready to begin controlling your AC unit from your mobile device.
Once your unit cycles on and off after using the AC unit’s Wi-Fi adapter to connect, the AC
unit will automatically pair with the network your phone is connected to.
Note: If at any time you need to start over, pressing "Display" on the remote control 6 times will
reset the wireless setup configuration on the AC unit back to CF mode. Pressing the “Display”
button an additional 6 times after CF mode appears will switch the unit to AP mode. Please allow
the unit 10-15 seconds to switch modes if toggling from CF to AP modes.
25Step 6: Controlling Your AC Unit
1. Click the air conditioner name to enter the App control panel. Click the ON/OFF button to
adjust the settings.
2. You can adjust the settings for the operating mode you want to use: Cool, Heat, Dry, Fan,
Auto. Click the "Mode" button and choose the mode you would like to change.
Note: Some units also have a heat function. The Heat mode on the App will not be functional
or change any settings on AC units that are cool only.
263. For Fan mode, click the "Fan" button and choose the speed you want: Low, Med, High, Auto.
4. Other unit controls can be changed by selecting the "Function" button. By selecting the
Function control, you can select the Sleep or Eco modes. In Sleep mode, the fan speed will be
set to low only.
275. To set the Timer function: Click the "Timer" button. The App will enter the timer setting
screen. It will display times that were previously scheduled. You can press to edit the timer or
create a new timer by clicking the "Add Timer" button.
6. Click "ON" or "OFF" button to set Timer ON or Timer OFF.
You can set the: Hour, Minute, Operate Mode, Operate Fan Speed, Operate Temperature.
You can also set a weekly timer. After you're finished setting the timer, click the button
to Cancel or Confirm.
Notes:
Dry Mode - temperature is preset at and cannot be changed up or down.
Heat Mode - does not apply to all units. If your AC unit does not have a heat function, the heat
mode on the App will not change anything on the AC unit for cooling only models.
If your unit has a heater function, you will be able to adjust the temperature up or down.
Fan Mode - temperature is preset and cannot be adjusted up or down.
Auto Mode - temperature is preset and cannot be adjusted up or down.
Cool mode - temperature settings can be adjusted to the desired temperature.
287. More Options- From the upper, right-hand corner, you can view or change the following
options: Modify Device Name, Device Sharing, Device Info, Feedback, Check for Updates,
Remove the Device or Restore Defaults.
8. Manage the information in your profile. It includes:
a. Account information.
b. Scan QR code: Opens a QR code reader within the App
c. Share Device: Display user’s device sharing information
d. Message Center: Displays all messages that the system sent to the user
e. Feedback: Where users could submit feedback online
f. About: Displays the current App version information
29Note: The first registered mobile device is the main control and other devices can only be shared
through the primary device. Shared accounts need to be setup for the same country.
9. Tap "Pattern unlock" under the Profile section where you set your name. You can then set up
your App unlock pattern. After it is enabled, you need to draw the pattern to unlock the App.
30Troubleshooting
Having trouble completing installation? Don’t worry, it’s usually an easy fix.
PROBLEM POSSIBLE CAUSES SOLUTIONS
Wireless router may be too far from AC • Relocate wireless router closer to AC.
TCL Home Comfort App
loses connectivity to AC • Restart wireless router, AC, and
during setup Network error restart mobile device with TCL Home
Comfort App installed.
• Restart wireless router, AC, and
Network error restart mobile device with TCL Home
Comfort App installed.
TCL Home Comfort App
App & AC are not on the same 2.4GHz • Confirm your device is connected to
cannot find AC
channel the 2.4GHz channel.
Router blocking TCL Home Comfort • Verify App is not being blocked by
App router firewall.
• Follow the instructions to Add the AC
Failed to connect using
Unknown connectivity or network error unit to the wireless network using
CF mode
"AP MODE".
Unable to find or • Give TCL Home Comfort App
connect to Wireless App may need permission to location permission to Location in
Network phone settings.
31Need more help?
www.TCLUSA.com/support
1-800-825-6747
Need more help?
www.TCLUSA.com/support
1-800-825-6747
Copyright © 2019 by TCL. All rights reserved.
TCL and the TCL Logo are owned by TCL
Corporation and under license to TTE Technology, Inc.
Copyright © 2019 by TCL. All rights reserved.
TCL and the TCL Logo are owned by TCL
Part No.: 70-43MS10-QSG9D
Corporation and under license to TTE Technology, Inc.
Part No.: XXXXX
32Spanish / French / English Online QSG
For the full QSG in all three languages (English, Spanish, and French)
please follow the instructions below.
Using the camera function on your smartphone, please scan the
QR code below to be directed to the full QSG. If your phone does not have
a QR scanner, download one from the app store or manually type in
the URL below in your smartphone’s web browser.
tcl.link/ttw-qsg
Need more help?
www.TCLUSA.com/support
1-800-825-6747
Copyright © 2019 by TCL. All rights reserved.
TCL and the TCL Logo are owned by TCL
Corporation and under license to TTE Technology, Inc.
Part No.: 70-43MS10-QSG9D
33You can also read