ICEWARP WEBCLIENT ADMINISTRATION GUIDE - ICEWARP UNIFIED COMMUNICATIONS VERSION 12.0
←
→
Page content transcription
If your browser does not render page correctly, please read the page content below
IceWarp Unified Communications

IceWarp WebClient
Administration Guide
Version 12.0

                       Published on 3/7/2018
Contents
WebClient Administration ........................................................................................... 5
Overview ................................................................................................................................................................... 5
General Server Principles .......................................................................................................................................... 5
Administration Options ............................................................................................................................................. 6
IceWarp Server Administration Console ...................................................................................................... 6
Options in IceWarp WebClient Menu........................................................................................................... 6
Forcing Options on Other Users ....................................................................................................... 8
Global Settings ............................................................................................................................... 12
Forgotten Passwords Sending Option ............................................................................................ 16
Home page ..................................................................................................................................... 17
Restrictions .................................................................................................................................... 18
Time Zones ..................................................................................................................................... 20
Domains Management ................................................................................................................... 21
Dialling over Third Party SIP Server ................................................................................................ 23
Delayed Actions ............................................................................................................................. 23
Installing New Dictionary for IceWarp WebClient Spell Checker ............................................................... 24
Installing New Dictionary under Linux ........................................................................................... 25
Miscellaneous............................................................................................................................................. 26
Dropbox Integration ....................................................................................................................... 26
Create Account – List of Domains .................................................................................................. 27
Facebook Integration ..................................................................................................................... 28
Signature Exporting Script .............................................................................................................. 28
IP-based Access Control to Self-signup .......................................................................................... 28
MS Office Document Preview ........................................................................................................ 29
Forcing Users to Fill Specific Contact Fields ................................................................................... 29
Migration to IceWarp WebClient ............................................................................................................................ 30
Intended Audience ..................................................................................................................................... 30
Nomenclature ................................................................................................................................ 30
Considerations............................................................................................................................................ 31
Licensing Requirements ................................................................................................................. 31
GroupWare License ........................................................................................................................ 31
Database Storage ........................................................................................................................... 31
Installation.................................................................................................................................................. 32
Note for Linux Installations ............................................................................................................ 32
Upgrade ......................................................................................................................................... 32Document Online Installation ........................................................................................................ 33
Address Book Conversion ........................................................................................................................... 35
International Characters ................................................................................................................ 35
Converting User Data Containing International Characters to UTF-8 ............................................35
Converting Plain Text Address Books to GroupWare Database ..................................................... 35
How to Create Global Address Book .......................................................................................................... 37
Create Public Folder Using a Group Account ................................................................................. 37
Subscribe to the Public Folder in IceWarp WebClient.................................................................... 37IceWarp Server WebClient Administration
WebClient Administration
Registered Trademarks
iPhone, iPad, Mac, OS X are trademarks of Apple Inc., registered in the U.S. and other countries. Microsoft, Windows, Outlook and
Windows Phone are either registered trademarks or trademarks of Microsoft Corporation in the United States and/or other
countries. Android is a trademark of Google Inc. IceWarp is a registered trademark in the USA and other countries.
Overview
IceWarp WebClient sets users free from their desks and boosts productivity with advanced GroupWare features.
Fully-featured yet easy to use, IceWarp WebClient allows web access to email, calendars, contacts, files and shared data from any
computer with a web-browser and internet connection, without none of the usual configuration hassle.
Thanks to advanced technologies giving the look and feel of a desktop application, IceWarp WebClient is set to become the
ultimate replacement for Outlook and similar desktop mail clients.
Great for workers on the move, with easy to maintain desktops and fast, low-cost deployment.
Supported browsers:
Mozilla Firefox 7 and higher
Apple Safari 9 and higher
Opera 10 and higher
NOTE: Users need to enable Allow scripts to detect context menu events in Tools – Preferences – Advanced – Content –
Javascript Options...
Microsoft Internet Explorer 8 and higher
Google Chrome 4 and higher
A number of other browsers will work using the light-weight, JavaScript-independent WebClient Tablet interface:
http://server/webmail/basic
Mobile browsers or text browser (Lynx) can use the WebClient Mobile interface:
http://server/webmail/pda
General Server Principles
IceWarp's WebClient is a cutting edge web application based on AJAX, XML, JavaScript, RSA authentication, DB specification PDO
and special XML settings.
IceWarp WebClient access directly by IMAP to folder structure. This communication allows IceWarp WebClient to provide many
new features such as direct folder accessing (spam, quarantine folders integration).
Full integration and connection with GroupWare allows many services to be accessible from IceWarp WebClient. You can
administer your contacts, calendar events, notes and tasks, not only in personal mode, but also in group mode or via a shared
account.
Page 5IceWarp Server WebClient Administration
Administration Options
IceWarp Server Administration Console
The IceWarp Server Administration GUI offers some configuration options under the GroupWare –WebClient node. To learn
more, refer to the GroupWare guide – WebClient section for details, or press F1 in the console.
Options in IceWarp WebClient Menu
Administrator accounts have access to many extra options in IceWarp WebClient.
NOTE: This section explains only some of the options, as most of them are either self-
explanatory or correspond with user options described within the IceWarp WebClient User
Guide.
When you login with the administrator type of account (or domain administrator type of account) into WebClient, you will be
able to access Administration Options(within the Icon menu). This section gives you various possibilities depending on whether
you are logging on as an administrator or a domain administrator, and if you have chosen to log into Desktop or Tablet interface.
Desktop interface gives you the most possibilities and can be accessed via the Icon menu (under the user's photo (silhouette)).
In the Tablet interface the menu can be viewed by clicking the Settings icon – . Make your selection in the dropdown menu
and click the Administrate button. Selecting Administration Options lets you configure global settings. Selecting a particular
domain lets you customize the settings for this domain (which has been previously setup as a virtual host).
Page 6IceWarp Server WebClient Administration
NOTE: Administration Options in the Tablet interface are for the most part synchronized with
the eponymous settings found in Desktop interface. In few cases they are independent, to allow
different settings for Desktop and Tablet. One such notable exception is the Message Format
(HTML/Plain text) setting on the Compose tab. Others are listed under the tag of the
/config/_webmail/settings.xml file. Very few of these settings are specific only to the Mobile
interface, such as the accessibility mode (Use high contrast skin). Many settings exist only in
Desktop and have no counterpart in the Tablet administration.
As an administrator of IceWarp WebClient, you have the ability to force some options on users, or domain administrators and
users.
This can be done for most options.
There are two levels of configuration:
Server administrator settings where a "full" administrator can enforce some configuration to all users.
Domain administrator settings where a domain administrator can enforce some configuration to his/her domain users – if
a server administrator does not restrict them from doing so.
User rights are automatically recognized because of the integration with IceWarp Server API.
Page 7IceWarp Server WebClient Administration
Forcing Options on Other Users
Server Administrator
Page 8IceWarp Server WebClient Administration
The column of red check-boxes forces options for domain administrator and users.
The column of green check-boxes forces options for users only (this can be changed by domain administrators).
The left hand column of check-boxes shows the options as they affect your own account. Do not forget to check these boxes.
NOTE: Server administrator can change settings for a specific domain using the Domains tab (by double-
clicking the appropriate domain name). These changes overwrite domain administrator's settings and he/she
can not change it if red check-boxes are used.
Groups of settings placed on single tabs correspond with groups in the settings.xml file for the appropriate
domain. This means that if you set some feature as a server administrator in domain settings, you will not be
able to overwrite it from the server level. (Of course, it is still possible on the domain level.)
To avoid this, you can revert domain settings to the server level ones by either deleting the appropriate
record(s) in the /config/_webmail//settings.xml file (not recommended) or by
deleting whole this file.
WARNING: If the Bounce back messages for failed recipients option is enabled (Admin Options – Mail –
General), you cannot use the Dedupe email messages feature (the Mail Service – General node – Advanced
tab – SMTP section). As a result of enabling of both options, users would receive duplicated messages.
Domain Administrator
The column of green check-boxes forces options for your domain users only.
The left hand column of check-boxes shows the options as they affect your own account. Do not forget to check these boxes.
Field Description
Page 9IceWarp Server WebClient Administration
Default Flag Use the drop-down to select the color of the flag you would like as your default.
When you click on the flag icon next to a message it is automatically flagged with this default
color.
Forward messages Use the drop-down to choose how you would like forwarded messages to be handled.
Inline – the original message will appear as part of your forwarded message (you can still
add your own message to it).
As attachment – the original message will be packaged in a file and attached to your
message. The file type is .eml, which is readable by most email clients.
Enable sound Check this box and a sound will be played when a new message is received, notifying you of
notification the event.
Check for new emails Check this box to have IceWarp WebClient automatically check for new messages. Enter a
every (Minutes) number in the textbox to specify how often this check should occur.
An interval of 5 minutes is usually frequent enough for most peoples needs. Entering too short
a time interval may put unnecessary resource strain on your mail provider's server(s).
Remember, you can always click on Get new in the menu bar if you are waiting for an urgent
message.
Save draft messages Check this box and any message you in the process of creating will be saved at the interval you
every (Minutes) specify in the text box.
This can be extremely useful if you are using an unstable connection to access and reply to
your messages. Messages are saved to the Drafts folder.
Delete Trash messages Check this box and all messages in your Trash folder older than the number of days you
older then (Days) specify in the text box will be permanently deleted.
NOTE: This option is directly affected by the next setting. If you select to Move
deleted messages to Trash folder, you should use this option.
It can also be affected by Folder Mapping as you can specify a different folder to be
your Trash folder!
Move deleted If you check this option, any messages you delete (using the Del keyboard shortcut, the
messages to Trash Delete menu bar item or the right-click context-sensitive menu) will be moved to the Trash
folder folder rather than actually be deleted. Used in conjunction with the previous option this can
give you a "window of opportunity" during which you could retrieve an accidently deleted
message.
Remember that the actual location of the Trash folder can be affected by Folder Mapping.
Delete messages on This option overrides the effect of the Move deleted messages Trash folder option above
Empty Folder action – when you use the right-click context-sensitive menu and select Empty Folder.
If this option is checked, all items in a folder will be deleted rather then moved to the Trash
folder.
Automatically display Check this box if you want to have automatically shown external images that are inserted into
external inline images email bodies using HTTP links.
Automatically display Checking this box tells IceWarp WebClient to display any attached image file(s) in the reading
attached images pane.
Group Subject prefixes Check the box if you want to have these prefixes automatically added to messages Subject
(e. g. Re[4], Fw[2]) fields.
Use Reply prefix (>) Check the box if you want to have these prefixes used in the email body.
Bounce back messages When sending an email message from WebClient to two or more recipients, (one of them is
for failed recipients "local" and the message cannot be delivered to him/her (account does not exist, rejected by
rules or limits, etc.) => message is not sent at all – neither to invalid recipients nor to valid
ones.
To bypass this, enable the option Bounce back messages for failed recipients. With this
option, WebClient will send out all messages using "relay" format
(). This will ensure that a bounce back for a local
Page 10IceWarp Server WebClient Administration
user will be generated and the message will be delivered to remaining valid recipients.
NOTE: In conjunction with the User can send mail to local domains only restriction
(Domains & Accounts – Management – – User – –
Options/Options), the user cannot send messages at all using IceWarp WebClient,
because WebClient will try to send it using "relay". So do not use these options
together.
NOTE: For more information about SmartAttach setting, refer to the GroupWare Reference – SmartAttach
chapter.
NOTE: Other dialog features are not explained in detail here, as they are either mentioned in the following
text (e.g. Layout) or described in the IceWarp Webclient User Guide (and/or self-explanatory and easy to
understand).
Mail – Groups
This feature lets you define group email addresses that will be offered for the From field of the IceWarp WebClient email
composer window. These addresses have to exist on your server. Addresses are offered only to the appropriate group members.
WARNING: The concerned users have to have the Options – Mail – Signature –Advanced options –Enable
box ticked.
Field Description
Add Click the button to add a group. The Group dialog opens.
Edit Select a group and click the button to edit this group settings. The Group dialog opens.
Remove Select a group and click the button to remove this address.
Group Enter the appropriate group email address.
Sent Folder If you want to change a folder for sent emails, click the field and select the wished folder.
Mail – Signature
This tab allows you to create a default signature for all server/domain users. Users can still create and use other signatures.
Use the Insert Variable list to create an "adjustable" signature.
Page 11IceWarp Server WebClient Administration
Global Settings
General – Global Settings
This tab allows you to adjust WebClient look. Many features are obvious (e.g. data and time formats) or described wintin the
IceWarp WebClient User Guide. In the following sections, a bit complicated ones are described.
Field Description
Skin See the Changing Skins and Banner chapters further for more information.
Page 12IceWarp Server WebClient Administration
Logout URL After logout, a user is directed to the specified URL. Optional.
Logout after inactivity (min) Users are logged out after period of time specified here – in minutes. By default, there is
no limit.
Use HTTP Flash upload in SSL See the Use HTTP Flash Upload in SSL Session chapter further for more information.
session
and
Use Flash upload for
attachments
Use Open in Office when Tick the box(es) if you want attachments (with the appropriate extensions) to be opened
possible in MS Office (Open Office respectively) applications.
Changing Page Title
You can also define what will be written as the page title of all your IceWarp WebClient sites (Administation Options – General –
Login Screen).
Page title will be, as mentioned, displayed on all titles of pages (name of a window in IE).
NOTE: Each domain can have its own settings – including logo and title. However for this functionality it is
critical to set a hostname mapping in domain settings so IceWarp WebClient engine can automatically
apply particular domain settings based on the hostname you are accessing IceWarp WebClient from.
Changing Logo
IceWarp WebClient's logo is also changeable.
Just use the Administrator Options dialog – General – Login Screen tab – Login logo – Upload button. This logo is used for both
Desktop and Tablet.
Page 13IceWarp Server WebClient Administration
Changing Logo for WebClient Mobile and Apple (iPhone, iPod)
It is possible to change a logo also for WebClient Mobile and Apple.
The appropriate paths are:
For Mobile: \html\webmail\pda\skin\pda\css\images
For Apple: \html\webmail\pda\skin\apple\css\images
The figure has to be named logo-custom.jpg. You can use also the .gif format: logo-custom.gif.
The server checks whether this file exists. If it does, it is used, if not, the original logo.jpg is used as usually. It means that it is not
necessary to remove logo.jpg from the directory if you want to use logo-custom.jpg.
NOTE: Do not load your logo as logo.jpg as it is overwritten during every upgrade.
Changing Skins
You may want to use your own skin. To do it, you have to:
1. Create this skin. Create all files and folders needed – the Default skin can lead you.
(It is possible to copy other skin and change what you need.)
2. Place it to the \html\webmail\client\skins\ folder using some suitable folder name.
3. Into this folder, place the name.dat file that has to include the skin name in this format:
My Skin
(If in doubt, see the appropriate file within the Default skin.)
4. Add your skin as an item into the skins.xml file (also in the skins/ folder).
5. Rename build.safe inside \html\webmail\ to build.php.
6. Execute the build.php.
7. In the Skin dropdown (Administration Options dialog – General – Layout), select your skin.
The Default skin is always listed as the first one, other ones follow in the alphabetical order. (The list is
generated dynamically.)
It is also possible to select one of other skins:
bigger – suitable for some non-latin scripts that need bigger characters to be readable
biggerrtl – suitable for similar scripts that are written from right to left
Banner
When selecting the Skin – Banner option, the banner pane is displayed in the upper part of a page.
Page 14IceWarp Server WebClient Administration
There are two images in the IceWarp\html\webmail\client\skins\banner\images\ directory.
banner_bg.gif for a banner background
banner_logo.gif for a logo/figure displayed here.
You can change these images (do not change names) to display whatever you want.
Note that there are .css files in the IceWarp\html\webmail\client\skins\banner\css\ directory, where you can change banner
size and position.
Use HTTP Flash Upload in SSL Session
WebClient uses a flash application for attachment uploads. This application allows users to upload multiple files in one step –
without necessity to open a new select dialog for every single file.
To select more files within one dialog (from one folder), use CTRL + click or SHIFT + click.
However, it can cause some problems when a SSL session, Firefox and a certificate that is not signed by a certificate authority
(such as one provided with IceWarp Server) are used.
There are the following scenarios:
HTTP session, any Internet browser, an unsigned certificate – no problems occur.
HTTPS session, any browser different from Firefox,, an unsigned certificate – no problems occur.
HTTPS session, Firefox, an unsigned certificate – multiple uploads will not work, unless you tick the Use HTTP Flash
Upload in SSL Session check box (see the first screenshot in this chapter).
Login Screen Design
The login screen is a HTML page that uses JavaScript. Anybody can design their own one. To do it, edit files within the
\html\webmail\client\skins\default\login folder.
Administrators can customize the help banner to work as advertisement banners (using the banners.xml file in their own skins).
External Login
External login allows you to embed WebClient login form to a web site or portal under IceWarp Server. The form is pure HTML
and can run under any web server. Feel free to adopt it into ASP or PHP, but mind that this can have additional web server
prerequisites beyond the scope of this guide.
The form path is: /html/webmail/client/_external/external.html
Use this document as an example, copy it into the desired place in your website's HTML code. Replace the placeholders in
UPPERCASE with real values; if you do not want to use some option, you need to delete the whole line so that the placeholder is
not used as a value. See the file comments for possible values and required items. Next, you can make other useful modifications
such as to add input field labels. After unsuccessful login or any other error, the user will be redirected to REFERER_URL, where
you can process the returned variable eid and output the corresponding error message e.g. localized or in the form of a simple
pop-up as in the example.
NOTE: Configuration options are included in the comments of the file itself.
Page 15IceWarp Server WebClient Administration
Default Settings and Cookies
You may want to define the default settings.xml and cookies.xml files that will be used (by default) for all newly created
accounts. These files are to be placed within the /config/_webmail/ directory.
If they are not there, follow these steps:
1. Create a new domain and a user within it.
2. Log into his/her WebClient and set all wished properties (Options) to create the settings.xml file.
3. Set other properties (e.g. sizes of tree and reading panes) to create the cookies.xml file.
4. Navigate into the /mail///~webmail/ folder.
5. Copy the files into the /config/_webmail/ directory.
6. Edit both files – it is necessary to replace all occurrences of the user's email address with the %%ACCOUNT_ID%%
variable.
7. Now, you can delete both the domain and user.
Forgotten Passwords Sending Option
Many times customers or users forgot their passwords.
Rather than reset passwords manually and send them their new one, IceWarp WebClient allows you to send them their actual
password to their alternate email (if defined and enabled within Administrator Options – General – Password Reset).
As shown above, you can customize the message sent with the password.
Page 16IceWarp Server WebClient Administration
Field Description
HTTP port You can modify the connection to your IceWarp Server here.
IMAP server This only needs to be changed if you are using non-standard ports or your IceWarp Server
SMTP server is not bound to localhost IP address.
XMPP server
Allow SSO Login only Tick the box if you want to force users to use only Single Sign-On login.
Login with email address This option lets you modify the way users log in.
Even if there is a username mode authentication set on IceWarp Server side, IceWarp
WebClient can be set to require full email address login if this option is checked.
NOTE: If the "global" method is set to use email address (Domains and Accounts
– Policies – Login Policy – Users login with their email address), it applies to all
services including WebClient. In spite of the fact, this feature is disabled here.
Support national sorting Tick this box if you want to use your national alphabet for email sorting. (This alphabet is
of emails ... included in a language file.)
Logging level Set a logging level here:– the higher level, the higher volume of logs, of course.
Upload Limit (MB) This table allows you to setup upload limit, so all uploaded files must be smaller then the
size you setup.
Server alter upload_max_filesize with the value from /config/_webmail/server.xml
in upload.php
NOTE: After changing the upload_limit value, it takes some time for PHP to
apply it (it can be changed in php.ini by modifying user_ini.cache_ttl, its default
value is 300 seconds - 5 min).
Home page
This tab allows you to enable/disable banner located on the home page and its details.
Page 17IceWarp Server WebClient Administration
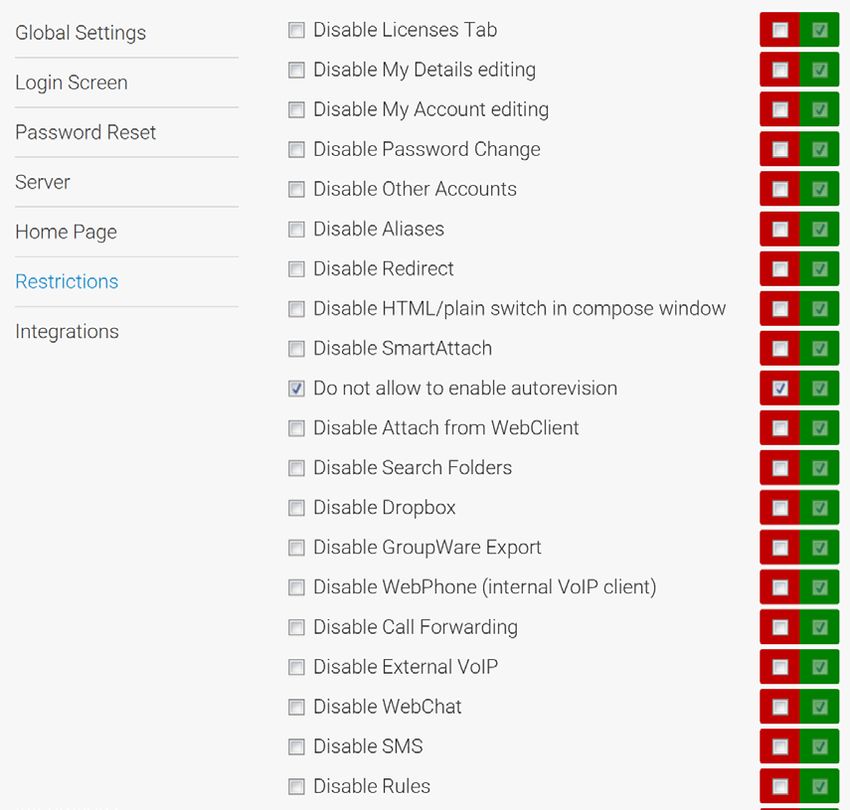
Restrictions
This tab allows you to:
Allow/deny the Licenses tab.
Allow/deny editing of the My Details dialog. (When disabled, users cannot edit their account details. This helps to keep
your wished style of GAL contacts.)
Allow/deny editing of the My Account dialog.
Allow/deny password changes.
Page 18IceWarp Server WebClient Administration
Allow/deny adding other accounts (Tools – Accounts – Other).
Allow/deny using aliases.
Allow/deny using email redirection. If denied, the Redirect menu item is not available.
Allow/deny HTML / Plain switch in compose window.
Allow/deny SmartAttach.
Allow/deny autorevision enabling
Allow/deny attach from WebClient.
Allow/deny Search Folders.
Allow/deny using Dropbox service.
Allow/deny export of groupware items.
Allow/deny WebPhone
Allow/deny Call Forwarding.
Allow/deny external VoIP.
Allow/deny WebChat.
Allow/deny SMS.
Allow/deny Rules.
Allow/deny Google Maps.
Show/hide the Sort String (My Details and Contact dialogs; only useful for those who do not use the Latin alphabet – this
field is to be filled in with alpha-numerical characters).
Show/hide Alternate Email – this field (Options – Accounts – My Account) allows sending and actual password to a user's
alternate email.
Show/hide sharing for anonymous account.
Show/hide sharing for groups and domains.
Show/hide the Forwarder tab.
Show/hide the Keep emails in mailbox feature (Forwarder).
Show/hide the Autoresponder tab.
Show/hide the Anti-Spam tab.
Exclude/include GAL from/into auto-complete – if excluded, HAB contacts are not suggested when composing a new
message – just contacts from a user's personal Contacts folder are displayed..
Enable/disable remote wipe.
Force users to enter contact information – if ticked, after the first login into WebClient, users are prompted to fill in their
contact information.
Youn can set mandatory fields that are to be filled in:
Add the Field1,Field2,Field3 tag into
the /config/_webmail/server.xml file.
Field in vCard Name in XML
Full name NAME
Nickname ITMNICKNAME
Company ITMCOMPANY
Phone PHONE1, PHONE2,
Email EMAIL1, EMAIL2, EMAIL3
IM IM1
Page 19IceWarp Server WebClient Administration
Enable/disable adding new aliases.
Enable/disable private certificates (Private Certificates dialoque in user Options/Accounts).
Enable/disable weather setting.
Enable/disable specific folder types.
Time Zones
It is possible adjust the time zone offset list to your needs. This means you can localize the whole line in the custom calendar.xml
file (there is a comment already in it). You can also remove a time zone offset line completely. So you have the ultimate control
and if you want, the list of time zones can be 100% as the one in Windows.
Place the calendar-custom.xml file into the IceWarp/calendar directory.
Syntax of the tags is as follows:
[label];[TZID]
e.g.: Bermuda;Atlantic/Bermuda
where
label is shown it the WebClient time zone list – if empty, this time zone is excluded from the WebClient list
TZID is obligatory time zone identifier
Examples
Prichozi
Kontakty
Soubory
Udalosti
Ukoly
Poznamky
Zurnal
Praha stověžatá;Europe/Amsterdam
;Pacific/Gambiera
The original label for Europe/Amsterdam is Amsterdam, Andorra, Belgrade, Berlin, Brussels, Budapest, Copenhagen,
Gibraltar, Luxembourg, Madrid, Malta, Monaco, Oslo, Paris, Prague, Rome, Stockholm, Tirane, Vaduz, Vienna,
Warsaw, Zurich. It will be replaced by Praha stověžatá.
The label for Pacific/Gambier will be excluded.
Page 20IceWarp Server WebClient Administration
NOTE: All time zone changes will apply after the GroupWare module restart.
Domains Management
The Administration Options – Domains tab allows you to select which domains, running on IceWarp Server, you wish to manage.
Select the domain from the drop-down list and click the Add button.
Your selected domain(s) will be shown in the list.
Page 21IceWarp Server WebClient Administration
Each domain can be then configured to have its own login page, title and other custom configuration (use the Edit domain
settings button – the Domain Options () dialog opens). Domain administrators are allowed to modify domain options
except for settings that are forced by full administrator (red force checkbox is checked).
NOTE: To be able to manage settings of the selected domain, you have to set a hostname for this domain.
See the Hostname to Domain Mapping chapter for more information.
Page 22IceWarp Server WebClient Administration
Hostname to Domain Mapping
It is possible to set a hostname for particular domain so the domain options will be loaded (Page Title, Login Title and Login Logo)
if a connection request comes from that hostname.
This option must be configured in the configuration file: \config\_webmail\_hosts\.dat. The only
content of the file is the domain name.
See an example below:
In the case shown, when someone accesses mail.icewarpdemo.com with their browser, IceWarp Server will:
Find the mail.icewarpdemo.com.dat file
Read the file
Use the Domain settings for icewarpdemo.com (i.e. use the Titles and Logo specified for icewarpdemo.com)
Primary Domain Autofill
When a user sends a message with only a user name in the To field, the IceWarp Server appends its primary domain. This
behavior can be unwished because it can cause confusion.
In this case, edit the server.xml file (\config\_webmail\) – the variable.
If the tag is not present or is [true, 1], it automatically appends @ to the recipient's name.
If the tag is present and is [false, 0], it does not append @ to the recipient's name.
Dialling over Third Party SIP Server
Upon the Options dialog – Phone tab, users can set dialling over 3rd party server. Their server administrator has to provide them
with external account credentials.
Besides using SIP URI (e.g. john.doe@domain.com), IceWarp Server supports http:// protocol with the %number% and
%owner% variables. This allows users to call via an external PBX that uses its own HTTP script.
HTTP URL example: http://[remote_server]/call.php/?number=%number%&owner=%owner%
where [remote_server] can be either an IP address or domain name – depending on what this remote server and its PBX
support.
This URL is to be inserted into the Dial via external VoIP (SIP) account field of the dialog mentioned above.
Delayed Actions
This feature allows IceWarp Server to perform all actions done by a user in IceWarp WebClient (such as move to folder, copy to
folder, delete, etc.) all together. These actions look like done in IceWarp WebClient but are not synchronized to the server before
the Get New link is clicked (or the user logs out).
This feature shortens server response time and reduces server load.
In the case a user is using two email clients concurrently, the second client will show the changes after they are sent to the
server.
How to Disable
Page 23IceWarp Server WebClient Administration
The feature is enabled by default. To disable it, you have to edit the server.xml file (IceWarp\config\_webmail\). Add the
following line:
1
Installing New Dictionary for IceWarp WebClient Spell Checker
IceWarp WebClient has a built-in spell checker based on Enchant library. Enchant is a free open source library that interfaces
many spell checking dictionaries. IceWarp Server uses Hunspell dictionaries, which are the same like, for example,
OpenOffice.org uses.
Dictionaries already come pre-installed, but an administrator can install new languages.
For installing a new language dictionary, go to http://extensions.services.openoffice.org/dictionary/, select dictionary you want
and download the file.
You will download a file with the .oxt extension. The file is in fact a zip archive. Unzip it with a convenient tool, and copy files
with the .aff and .dic extensions to \enchant\myspell.
TIP: From the dictionary file name, you can detect "XY" mentioned below.
TIP: You can copy .aiff/.dic files directly from Desktop Client installation folder – \Dictionaries.
After download, start installation process and when asked for the dictionary installation path, write:
\enchant\myspell
After installation, go through the following steps:
Go to the \config\_webmail folder,
here you can see the spellchecker.xml file,
you have to edit this file, so open it in a text editor (notepad),
add line with your newly installed dictionary between the and tags,
the line consists of the name of language tag, where XY is the language code of the dictionary (with
optional region and variety, see the dictionary file in /dict/pt_BR.multi and use its filename, such as such as pt_BR in
this case).
Example:
English
Czech
Portuguese
after editing all languages, save the .xml file,
check whether all languages are added by selecting Options – Mail – Mail Compose in the IceWarp WebClient menu.
Page 24IceWarp Server WebClient Administration
As you can see on the picture above, you can choose from all installed language dictionaries for default checking. This is
the last installation step.
Installing New Dictionary under Linux
You can download these dictionaries (free) from http://extensions.services.openoffice.org/dictionary/.
To install a dictionary, use the ./scripts/install_hunspell_dictionary.sh script. Use the dictionary file name as a first command
line parameter and required language ID as the second one.
Example of the command for the Czech dictionary installation:
[linux]# ./scripts/install_hunspell_dictionary.sh /home/user/dicts-cs-2.0.oxt cs_CZ
NOTE: You can use the steps for installing dictionary on Windows too.
After dictionary installation, the new dictionary will not be automatically available in WebClient. You need to add a record about
this dictionary to the WebClient configuration file:
./config/_webmail/spellchecker.xml
The record format is as follows:
Name_in_WebMail
Example:
New IceWarp Server installation has in the ./config/_webmail/spellchecker.xml file one record for implicit English dictionary
that is included in the installation:
English
After installation of the Czech dictionary, it is necessary to add the following record:
Czech
Use similar records for other languages.
NOTE: The ./config/_webmail/spellchecker.xml file is created after the first login to WebClient and after
displaying of the dialog for spell checker setting. This dialog is accessible via the Settings menu item within
the email composer window.
Page 25IceWarp Server WebClient Administration
Miscellaneous
Dropbox Integration
It is possible to integrate Dropbox with IceWarp WebClient in order to enable users to insert links to their Dropbox files into email
bodies.
To do so, follow these steps:
1. In the case you do not have a Dropbox account, proceed to the Dropbox web site (https://www.dropbox.com/login),
click the create an account link and enter the information needed:
NOTE: This account is used only for getting an API key and is not going to be used for storing files.
2. Within the left-hand menu, navigate to the Drop-ins – Chooser page.
Read the instructions – note the Generic embed code (insert your app key) field.
Click the create a Drop-in app link.
Select the Drop-ins app – Chooser or Saver option, enter your application name (any name works, unless already
taken) and click the Create app button.
3. Use the Drop-ins domains field to add all host names (domains) your users will use to access WebClient from.
E. g. adding only server.mycompany.com would not work in the case, you also use mail.mycompany.com etc.
Page 26IceWarp Server WebClient Administration
Copy the App key for use within WebClient administration.
4. Navigate to WebClient – Administrator Options – General – Dropbox tab and enter App key into the Application
Key field.
This enables WebClient message composer window Dropbox icon – .
When enabled, clicking the icon opens the Chooser dialog where a WebClient user can enter their Dropbox
credentials and consequently select their Dropbox file. Link to this file is inserted into the message body.
Create Account – List of Domains
Clicking the Create an account link (within the Sign in page brings a user to the Sign up page. Besides other fields, there is also
the Domain list. It is possible to customize this list of domains. (If not customized, all system domains are listed.)
Page 27IceWarp Server WebClient Administration
To customize the list, do the following:
• Create the signup.dat file and place it into the /config/_webmail/ folder
• insert the list of domains you want to have shown into the file – use one line for each domain.
Facebook Integration
In the case you want to show the Facebook LIKE feature on the IceWarp WebClient login page, specify URL of the page you want
to like in administration settings (Administrator Options – General – Login Screen).
There are these possibilities:
1. The Disable Facebook integration box ticked – the like button is not shown.
2. The Disable Facebook integration box not ticked and the URL of page to like is blank – the like button is shown, the default
page (https://www.facebook.com/IceWarpInc) is set to be liked.
3. The Disable Facebook integration box not ticked and the page you want to be liked is filled into the URL of page to like field –
the like button is shown and this page can be liked.
Signature Exporting Script
It is possible to synchronize signature(s) set within IceWarp WebClient into IceWarp Desktop Client. This is done by the
signature.php file (/html/webmail/server/). Signature synchronization has to be enabled within
the IceWarp Desktop Client central administration.
IP-based Access Control to Self-signup
Page 28IceWarp Server WebClient Administration
It is possible to restrict access to the WebClient self-signup function by a client IP address(es). Use the server.xml
file (\config\_webmail\) variable. The appropriate syntax is as follows:
IP1;IP2
for example:
127.0.0.1;192.168.4.68
Use ; (semicolon) as a delimiter.
MS Office Document Preview
This feature allows preview of MS Office documents in WebClient directly (without it, you can preview only documents converted
into PDF).
The feature is available only if "online documents service" is accessible from the machine where IceWarp Server is running.
In fact, the "online documents service" is the LibreOffice Server. It is developed by Colabora and sponsored by IceWarp. Only
available builds are for 64-bit Debian.
The Libre Service is distributed as a pre-installed virtual machine. Three virtual machine engines are supported:
1. DOCKER (recommended for Linux)
2. VM Ware
3. Hyper-V
There are variety configuration options, but basically two simple rules apply:
If DOCKER is used (virtual server runs locally), there is no need to setup the IP (Online Documents Server Connection),
otherwise the IP of the virtual machine must be filled.
Networking inside the virtual server must be able to connect to webdav on the IceWarp Server (the URL in Smart Discover
settings must be accessible from within the virtual machine).
The web page dedicated to this topic contains:
link to download the images
description how to install the images
description how to discover IP of the virtual machine
NOTE: WebDocuments setup guide with downloads is possible to find here:
https://www.icewarp.com/support/webdocuments.
Forcing Users to Fill Specific Contact Fields
You may want to force users to fill in some fields of their My Details dialogs. Just include the following tag into the server.xml file
(\config\_webmail\):
Field1,Field2,Field3
Field1, Field2, ..., FieldN correspond with columns in ContactItem (groupware DB).
E.g. ItmTitle,ItmFirstName,ItmMiddleName
Page 29IceWarp Server WebClient Administration
Migration to IceWarp WebClient
Intended Audience
Only read this chapter if you are upgrading from IceWarp Server or Visnetic version 8.9 and lower. If you already have upgraded
to version 9, skip this chapter, unless you specifically avoided using AJAX WebMail up to this moment (with version 10 you have
no choice but make the move).
Support for the classical HTML based WebMail was discontinued with version 9, after almost 5 successful years on the market.
This chapter provides instructions for migrating existing user data created with the old HTML WebMail interface for use with the
new WebClient (Pro, Tablet, Mobile).
The new AJAX based IceWarp WebClient has become the standard client interface for many years to come, taking the user
experience, the functionality and future extensibility options to a new high.
Nomenclature
WebClient in version 10 evolved from WebMail Pro in version 9. The older WebMail (Basic) interface is EOL with version 10
release.
WebMail – HTML web interface distributed up to version 9, at one time it was also available as a standalone web application,
now discontinued completely.
WebMail Basic – refers to the same HTML interface as above, named Basic to differentiate it from the enhanced WebMail Pro
interface since these two co-existed alongside in version 9.
WebMail Pro – AJAX based interface distributed in version 9, named Pro to differentiate it from the less capable WebMail Basic
interface since these two co-existed alongside in version 9.
WebClient – web interface distributed with version 10, exists in the following three formats:
WebClient Advanced Interface – full-featured AJAX interface with application-like functionality, requiring a JavaScript
enabled browser
WebClient Tablet – less capable HTML interface not depending on JavaScript, suited for older browsers but using the
same core server frameworks as WebClient Pro
WebClient Mobile – low resolution-optimized HTML interface, suited for mobile browsers but using the same core server
frameworks as WebClient Pro
Page 30IceWarp Server WebClient Administration
Considerations
This section outlines what you need to consider before you make the switch, when you should do so, and how to prepare for the
move. It also recommends ways to accomplish the migration with minimal impact on your end users.
Licensing Requirements
IceWarp WebClient requires an up-to-date license for both the IceWarp WebClient and IceWarp Email Server modules (i.e. new
or recently updated, with a renewal period of both greater than zero). This is because of close integration of client and server
sides. The new IceWarp WebClient will not run with any version prior to version 9 (excluding release candidates).
WebMail Standalone cannot be upgraded to IceWarp WebClient. Since the announcement of end-of-life last year, it was only
available without upgrades and with time limited technical support. And vice versa, IceWarp WebClient cannot be used as a
standalone web interface to 3rd party mail servers. Request a quote to migrate to a complete IceWarp solution at a very
competitive price.
IceWarp WebClient is by default served by the integrated, free of charge, Web Service module, but can also be run under Apache
or IIS, provided that it's run on the same server as IceWarp Server, as all internal communication is performed locally. This is a
new condition compared with classical WebMail without GroupWare & Calendaring features (plain email client).
GroupWare License
IceWarp WebClient depends heavily on calendaring capabilities. It is required that the GroupWare module to be installed and
running for these capabilities. If a GroupWare license is not present, any sharing capabilities, including Global Address List, will be
disabled as a result (i.e. user will only be able to see his/her own calendar events, contacts, notes, folders, etc.).
Database Storage
Emails, folders and files are always stored in file system on the server and therefore do not require any changes when you are
switching from one client interface to the other.
Other user data (e.g. calendars, tasks, contacts) are stored in a dedicated database on the server. If you already have a license for
GroupWare, this data should already be stored in the GroupWare database on the server. No additional steps need to be taken.
In the case that a license for GroupWare module was not present on the server (or if configured that way by the administrator),
Address Books (User and Global) stored in plain-text .dat files need to be manually converted into database storage. IceWarp
WebClient is equipped with a conversion script to simplify this process, see the Converting Plain Text Address Books to
GroupWare Database chapter.
By default, IceWarp Server installs an SQLite database for GroupWare that is suitable for a maximum of 500 users.
If you have not previously used the GroupWare module, you will need to setup the database engine for servers expecting more
than 500 users.
SQLite is recommended for up to 500 users, MySQL or MS SQL for higher amounts.
Page 31IceWarp Server WebClient Administration
Installation
Note for Linux Installations
Please note that the following symbolic links will need to be created if you are upgrading to IceWarp WebClient from an earlier
version. If you do not do this, then IceWarp WebClient will not work.
# ln -s /lib/libssl.so.0.9.7a /opt/merak/libssl.so.0.9.8
# ln -s /lib/libcrypto.so.0.9.7a /opt/merak/libcrypto.so.0.9.8
It can be useful to ensure these are defined even on clean installations.
NOTE: This applies ONLY for version 8 (end earlier ones) – for version 9 (and 10) you can ignore this section,
as it is not necessary to create the mentioned links.
Upgrade
It will be installed into its own directory \html\webmail, ensuring it does not overwrite the previous
version (located in the html folder in the IceWarp Server root).
On Windows: You will need to install any additional Hunspell dictionaries you require. (Aspell is not used anymore.)
On Linux: You should install Hunspell versions of previously installed additional Aspell dictionaries. Aspell will also work, but it is
obsolete and not updated by vendors anymore.
See the Installing New Dictionary for IceWarp WebClient Spell Checker chapter.
In order to change default IceWarp WebClient from WebMail you have two options:
1. Using a Webserver Rewrite rule (see the webserver manual) as follows:
What: ^/$
To: /webmail/ [R]
RegEx: Checked
Page 32IceWarp Server WebClient Administration
2. Modify the redirection rule in index.html, found in the icewarp/html default root folder.
The original redirection to icewarp\html\mail\ folder (root folder for WebMail) is to be changed to
icewarp\html\webmail\ (root folder for IceWarp WebClient). So the only change is to modify string /mail/ to
/webmail/ as is shown on the screenshot below.
Both ways will make IceWarp WebClient your default web interface and all users accessing your server URL will be automatically
presented with the IceWarp WebClient login page.
Document Online Installation
Currently administrators can setup using of Libre office online to preview office documents directly in webmail.
This feature is disabled by default. Installation requires special and rather complex setup.
How to install:
1. Install Libre office online:
Download pre-installed vmware or hyper-v image with linux, which already contains installed libre office. Run the
image, Enter IP address of that machine into IW server.
Download pre-installed docker image and run it. If you run it on the same server where Icewarp is located, you do not
have to enter the IP - it is determined automatically.
Page 33IceWarp Server WebClient Administration
2. Configure IceWarp:
Obtain IP adress assigned to imported virtual machine, the ip should be visible on terminal or SSH login screen under
the IceWarp logo.
Open IceWarp Administration Console and insert IP address of VM into "WebDocuments server connection" input
located at GroupWare / WebClient / WebDocuments tab.
Enable "WebDocuments Service" feature.
Check whether the configuration is correct by clicking "Test Connection“ button.
Save configuration changes by clicking on "Apply" button.
NOTE: WebDocuments setup guide with downloads is possible to find here:
https://www.icewarp.com/support/webdocuments.
Page 34IceWarp Server WebClient Administration
Address Book Conversion
International Characters
WebMail and IceWarp Email Server engine up to version 8.5.0 were based on the ANSI charset, whereas IceWarp Server from
version 9 comes with full Unicode (UTF-8) support throughout all software components. This means you can have, for example,
completely localized folder names in IceWarp WebClient.
If you are using character sets other than English in address books and shared address books, you need to start with converting
them to UTF-8 before the actual migration to IceWarp WebClient can happen.
NOTE: This does not apply to email messages received in other charsets, they are transparently converted to
UTF-8 MIME format by the server whenever they are requested by an internal operation. Should there be a
change to message contents (e.g. by a content filter), the message is automatically saved in UTF-8.
Converting User Data Containing International Characters to UTF-8
Conversion is required only for version prior to 8.9 and only if there are account names and address book entries containing
national characters (i.e. applies mostly to countries with user base from outside of English speaking countries). If you have
already done this for version 8.9 then please skip to the next section of this chapter.
1. Close all running applications and save application data before running the script. It is recommended to perform the
conversion in a maintenance window to avoid degradation of server performance in case of high traffic, large amounts
of data to be migrated or any possible error.
2. Login to WebAdmin with Administrator credentials.
3. Run the script by accessing http://hostname:port/admin/old/tools/convert_user_data.php (simply append
/admin/old/tools/convert_user_data.php to the URL you see in address bar)
e.g. http://icewarpdemo.com/admin/old/tools/convert_user_data.php
4. After you select the original character set, the script will recursively search \webmail\ and
subdirectories for address.dat, groups.dat and settings.dat and wherever it finds a value containing non-ASCII
character, it will convert it from the original to UTF-8 encoding.
Converting Plain Text Address Books to GroupWare Database
Now, you are ready to proceed with conversion of user data to new IceWarp WebClient. This is necessary to convert WebClient's
file-based data to IceWarp WebClient's improved database-stored data.
The most important data – private and global address books can be converted using the supplied convert_old_webmail.html
script, located in the \html\admin\old\tools\ directory.
Just open the script from a browser:
http://[yourhostname:controlport]/admin/old/tools/convert_old_webmail.html
Access to the script is protected – you will be asked to enter your administrator username and password.
Page 35IceWarp Server WebClient Administration
Enter the Global Address Book address (see more in the How to set Global Address Book chapter) and click the Convert
button. The script reads the contacts stored in plain text files and inserts them into the database.
You can additionally override the full path to the WebClient users directory. This is useful if the WebClient data are stored in a
non-default path.
It can take some time to convert larger user database.
KNOWN ISSUES
Only the first phone number of a contact is converted, further numbers will have to be inputted manually.
If you still allow users to access WebClient after conversion, they will see all their contacts duplicated. This is because
WebClient will read both the new database contacts and the original text files. You can manually fix this by deleting
the address.dat files after conversion.
NOTE: If you do not want to convert Global Address Book, leave the Global address book account filed blank. Only
contacts of individual users are converted.
If you want to use the default path, you can leave even the second field blank and just click the Convert button.
ALSO: In the case you want to convert bigger number of users, you may face script timeout. In this case, check the
PHP error log. You will see a similar error: Fatal error: Maximum execution time of 1920 seconds exceeded in
"install path"\html\admin\inc\conversion\tools.php on line 2. Just run the script again (maybe more times) until all
data are converted.
It is possible to check a successful data conversion for an individual user in the /webmail/users/[domain]/[user]
directory. If any wm_xxx.convert file is present, the conversion was successful. (xxx – this part of the file name can
differ – typically it is mail, cal or dl.)
Page 36You can also read