Workbook Cases treated by: Dr. Ashley Smith Dr. Chris Turnock Dr. David Birnie Dr. David González Zamora Dr. Jamie Reynolds - Ormco
←
→
Page content transcription
If your browser does not render page correctly, please read the page content below

Workbook
Cases treated by:
Dr. Ashley Smith
Dr. Chris Turnock
Dr. David Birnie
Dr. David González Zamora
Dr. Jamie Reynolds

Table of Contents
3    Insignia Advanced Smile Design: A History
11   Science of Insignia
15   Best Practices
18		- Treatment Planning
21		- Approver Process
26		- Suggested Wire Sequence
27   Case Studies
29		- Dr. Ashley Smith | Patient: Erin
35		- Dr. Chris Turnock | Patient: Aiden
43		- Dr. Ashley Smith | Patient: Minnie
49		- Dr. David Birnie | Patient: Victoria
57		- Dr. David González Zamora | Patient:Lorena
63		- Dr. David González Zamora | Patient: Natalia
69		- Dr. Jamie Reynolds | Patient: Firas
75   Contributors
Preface
We are fortunate to exist within a profession where visionaries have a long history
of challenging norms and offering new, unique approaches to treatment. In the
mid-1980s, Dr. Craig Andreiko, engineer and orthodontist, had an innovative idea to
control and minimize the common variables that affect clinical efficiency, therefore
achieving reproducible results. With the foresight to see what computers could
do for treatment planning and custom appliance design, he would transform
digital orthodontics. More than twenty years later, his vision, Insignia, has been
used to treat hundreds of thousands of patients all over the world. This pioneering
spirit remains at the core of Ormco, and particularly with Insignia. Customized,
digital orthodontics is a concept so unique that its evolution is accredited to the
visionaries we have been so fortunate to meet, work alongside with and learn from
learn from during our lifetime.

This workbook, a work in progress, was developed as an educational tool for all
Insignia users. Instead of a how-to manual, it is designed to expose the clinician to
the science behind the system, provide best practices and detail a variety of clinical
cases. Prepared with this information, users will possess a deeper understanding of
the tools and algorithms driving the system.

Our deepest appreciation goes to the teachers, tinkerers, innovators and
originals who have had the passion to drive this category of orthodontics to life
through Insignia. It is because of you that Ormco is committed to advancing the
orthodontic profession through sustained innovation within the digital space.
Thank you to those who have contributed to the content and discussion within
this workbook and beyond. Dr. Andreiko’s legacy and dedication to solving our
profession’s daily problems was, and continues to be, the driving force behind
Insignia’s mission.

Patrik Eriksson
President
Ormco

Insignia Advanced Smile
Design: A History

Discussions that eventually     computer—a technology early in its development
                        led to the development of       at the time—to digitize the anatomy of each
                        Insignia™ Advanced Smile        individual tooth and its skeletal base, align the
                        Design™ were couched in         teeth into ideal position, then reverse-engineer
                        a dilemma. Time: the mid-       appliances and a means to bond them accurately
                        1980s. Dr. Craig Andreiko,      on the patient? Wouldn’t such customized
                        engineer, orthodontist and      treatment be a boon to both orthodontists and
                        already the holder of 50+       patients alike? Dan Even continues, “According
                        patents for orthodontic         to Craig’s thinking, these challenges are all
                        innovations had long been       mathematical problems for which computers and
                        pondering a particular          their ability to execute sophisticated algorithms
Dr. Craig Andreiko
                        question. As Dan Even,          are perfect for addressing.”
Ormco president at the time, recalls, “Craig would
cite the literature as demonstrating that teeth         Having become interested in the clinical
could be moved safely through bone at a rate of         applications of the appliances he was designing
1 mm per month. So the question he and I had            and with the idea for customized treatment in
extended conversations about was this: If the vast      mind, Dr. Andreiko started working part-time
majority of cases present with no more than 3           at Ormco in 1983 so he could pursue a dental
mm of tooth discrepancy, why couldn’t we devise         education. He earned his general dental degree in
a hyper-efficient orthodontic system to treat most      1988 and an orthodontic specialty degree in 1991,
cases in no more than three months.”                    both from Loma Linda University.

Of course, Dan Even and Dr. Andreiko recognized         Starting in 1987, he and fellow Ormco colleague
that the challenges of tooth movement are many.         and engineer, Mark Payne, began work. Mr.
First are the biological issues. Human beings           Payne shares the approximate 20 patents for
are complex organic systems. There are tongue,          the foundational research behind Insignia. It took
lip and mastication forces, muscular habits,            nearly three years to write the computer code,
skeletal growth and the periodontal response to         develop the algorithms and fabricate and test the
name a few. Human aspects aside, there are a            measuring devices to conduct their research—
myriad of other variables—competing vectors of          an analysis of 200 ideally treated orthodontic
moving 32 teeth, inefficiencies in the interaction      patients that would serve as the basis for the
between archwires and bracket slots (including          development of Insignia. This research, begun
manufacturing tolerances), inaccuracies and             in 1991, was the first of its kind in at least two
inconsistencies in bracket placement, anterior-         aspects: it was the first to involve actual, ideally
posterior and vertical discrepancies, tooth shape       treated orthodontic patients and the first to use
and size disparities and the human variability          computer-aided engineering to do so. Dr. Jim
relative to the broad averages with which “off-         Hilgers, retired orthodontist who practiced 30
the-shelf” orthodontic brackets and archwires are       years in Mission Viejo, California, was also involved
necessarily designed.                                   with Insignia early in its development and was one
                                                        of the first orthodontists to bond Insignia cases
Dr. Andreiko wrote, “Clinical efficiency is all about   and offer clinical feedback. As he explains, “The
controlling and minimizing variables to achieve         idea was to develop software that would recreate
reproducible results and consistent treatment in        ideally treated orthodontic cases. In essence,
terms of both time and quality.”1 He felt the key       Craig and Mark repeated Larry Dr. Andrews’s
to meeting the challenges of tooth movement—at          seminal work of the 1970s, but with ideally treated
least the quantifiable ones—lay in harnessing the       orthodontic cases rather than ideal naturally
burgeoning power of computer technology. What           occurring dentitions and with more sophisticated,
if, he asked himself, he could use the power of the     digitized measuring devices.” From this research

4     Insignia Workbook
not only was Insignia spawned, the geometries for
a greatly refined average twin appliance was born,
that of Orthos®, which Ormco launched in 1994.

One of the key differences between Dr. Andreiko’s and
Dr. Andrews’s approaches to appliance design was
the development of the archwire shape. Dr. Andrews’s
mandibular archwire reflects the shape and width
of the WALA Ridge. Using this landmark leads to
high-profile brackets, particularly in the lower anterior
brackets. Mark Payne explains, “With the advantage
of computer technology, Craig and I were able to
program the software to sweep the archwire shape as
close to the teeth as practicably possible. The result
was a significantly lower-profile bracket.”

By 1994, Dr. Andreiko had developed the                     Early appliance design software
foundational elements of Insignia digital smile
design: the concept of the Mantrough—which
later evolved to encompass Dr. Dwight Damon’s
idea of natural arch form development—arch
segmentation and dental landmarking, library-
dictated root forms and the parameters for custom
appliance fabrication—brackets, coordinated
archwires and positioning jigs. To these, he added a
3D interactive Approver Interface.

Dr. Andreiko clarified that these ideas “would go
beyond, but not dismiss, traditional cephalometric
analysis by adding accurate 3D visualization of
the desired result and then provide the specific
appliances that encourage that result.” This
concept must also “decrease reliance on hand-eye
coordination and, finally, it should improve inter-         Early bonding jig design software
operator variance.”1

Dr. Hilgers reminisces that, “Craig focused
considerable time and effort in determining                 would be positioned at specified inclinations.
what the Insignia arch form should be because               Facial inclinations had been used to date, which
he knew that to do an ideal setup and then get              had always been problematic. As Dr. Hilgers
custom brackets positioned ideally to drive                 describes it, “The basic objective, then, was to
teeth to that setup, archwires would have to                keep the lower teeth over basal bone, then set
be perfectly coordinated.” Dr. Andreiko coined              the upper teeth to it. I know it sounds simple, but
the term “Mantrough” to signify the outline of              the equations to make all this work together are
the mandibular basal bone and its medullary                 amazingly complex.”
center. He then converted these landmarks into a
                                                            Dr. Andreiko’s Mantrough establishes where the
mathematical equation in which the mandibular
                                                            apices of the lower roots are positioned. The arch
teeth would be set so that the crown long axes
                                                            form is dictated by the positions of the crowns.

                                                                       Insignia Advanced Smile Design: A History   5
Speaking to the accuracy of Insignia setups, Dr. Andreiko explained, “Models can
contain between 800,000 and one million digitization points in each arch.
Because of such dense mapping, individual teeth are often composed of more
than 40,000 data points. With this precision, occlusions can be designed and
created that are of unprecedented precision and detail.”

Whether a clinician prefers the crowns of the              Since Insignia was designed to capture the
teeth be lateral to the apices of the roots (a             preferences of the individual practitioner and
typical Roth setup) or is a proponent of what Dr.          match these preferences to the specific patient
Dwight Damon calls the “natural arch form” with            and setup, the system essentially serves as the
preferences for more upright canines and buccal            same appliance the clinician is already using,
segments, the Mantrough is the foundation that             but with much of the guesswork eliminated. The
serves both.                                               system allows the practitioner to concentrate more
                                                           on treatment planning and less on adjusting for the
Speaking to the accuracy of Insignia setups, Dr.           mismatch between the appliance and the patient.
Andreiko explained, “Models can contain between            As Dr. Bob Ricketts always said, “Begin with the
800,000 and one million digitization points in each        end in mind.”2 With its 3D visualization software,
arch. Because of such dense mapping, individual            Insignia allows clinicians to “Begin with the end in
teeth are often composed of more than 40,000               sight.”
data points. With this precision, occlusions can be
designed and created that are of unprecedented             As Dan Even puts it, “The unique thing about
precision and detail.” 1                                   what Craig created is that it didn’t matter which
                                                           philosophical system you followed, Insignia would
                                                           offer clinicians a more direct means of achieving
Integrating Treatment Plans with Doctor                    high-quality results consistently and reliably.”
Preferences and Customized Appliances
                                                           Dr. David Sarver, Vestavia, Alabama, thinks that
The big idea behind Insignia was that it was to            accommodating individual preferences is one of the
be the first system to integrate each clinician’s          key appeals of Insignia, “For me, an important aspect
treatment plan with appliances customized for
the individual patient, using computer-aided
technology to do so. It would begin by digitizing
the skeletal and dental a natomy of the patient
(first by scanning PVS impressions and later via
direct dental scanning), then proceed to design an
ideal setup based on the practitioner’s treatment
plan and on algorithms developed to mate the
three-dimensional positioning of the dentition to
the skeletal framework. Next, the system would
design and fabricate brackets, archwires and
bracket-positioning devices that would essentially
be reverse-engineered from the desired final results
for that individual patient. Originally, geometries
were cut into the face of the brackets, then with          Original Insignia twin bracket. Customization was milled
the advent of Insignia SL, the means by which to           into the face of the bracket.
cut the torque into the base was achieved.

6     Insignia Workbook
of Insignia is that it can accommodate the various                planning and appliance design. The challenge was
methodologies I employ depending on the needs                     the difficulty of calculating the algorithms given
of the patient. Each clinician’s specific proclivities            the speed and capacity of computer technology at
are taken into account.”                                          the time. To afford the project focus, we broadened
                                                                  Craig’s team and segregated it from the more
Dr. Jeff Kozlowski, East Lyme, Connecticut agrees,                conventional appliance research and development
“Insignia does not determine treatment mechanics                  efforts. Since applying computer technology to
nor prescribe tooth movements. It allows clinicians               orthodontics had not been done before, Craig had
to use the mechanics and adjuncts of their choice.                to figure out the algorithms himself.” Dr. Hilgers
It offers us unprecedented control in determining                 agrees, “The story here is what technology can do
accurate tooth positions and in making changes                    when properly utilized and what Craig got done
directly to the 3D models without relying on an                   with his brilliance and prescience.”
operator’s interpretation of instructions.”
                                                                  Dr. John R. “Bob” Smith, Winter Springs, Florida,
The Story: Harnessing the Power of Technology                     began bonding early iterations of Insignia and
                                                                  continues to serve as an Insignia clinical advisor. “I
Dr. Sarver was intrigued by Dr. Andreiko’s work                   was an early advocate of variable torque, lecturing
early on, bonding patients from the outset. Dr.                   and writing about it all through the 1990s. In fact,
Sarver remembers when he initially met Dr.                        I had worked with Craig on factoring variable
Andreiko, “On my first visit to Ormco and its                     torque into Orthos. One day he and I were chatting
manufacturing plant, I was introduced to Craig                    about building torque into the Insignia algorithms.
who was sitting at a single desktop computer                      I recommended he get out his trusty calculator
engrossed in doing some arcane calculations.                      and make it happen, adding or subtracting torque

Dr. Andreiko (right) with Dr. Stephen Tracey (left) and
Joshua (center) in Ormco’s R&D facility in Glendora, CA. Dr.
Tracey treated the first ever Insignia patient at his office in
Upland, California.
He told me what he was working on and I was
immediately intrigued—not only by the idea, but
by Craig himself. “What a brain. Craig was curious
about everything, He thought big thoughts and
loved to engage people in big ideas.”

Dan Even points out, “Craig’s genius was to have
had the foresight to see what computers, then in
their infancy, could do for customized treatment

                                                                  Custom torque chart in design software today

                                                                             Insignia Advanced Smile Design: A History   7
as needed, letting the Insignia software factor in        set the teeth up virtually where we want them—for
wire play, wire stiffness and the wire progression.       aesthetics, for the arch development—then Insignia
Craig was the genius behind those calculations.           gives us an appliance that gets us there with many
I was just the wet-finger orthodontist conferring         fewer adjustments required. Of course, the ideal
with him about what we clinicians needed. Patient-        situation would be no adjustments ever, but
specific, per-tooth torque values became one of
the foundational elements of Insignia.”                   we’re dealing with human beings and variables
                                                          still too many to calculate—various forces, skeletal
Dan Even recollects, “My mission for the Ormco team       growth and compliance to name a few. But even
was clear—every product Ormco developed must              with that, Insignia puts us way ahead in the game.”
meet three critical standards. It must produce better
clinical outcomes, minimize pain and reduce treatment     Dr. Jamie Reynolds, Novi, Michigan, began using
time. With the goal set, Craig was off and running.”      Insignia in 2009 and now lectures on Insignia
                                                          internationally. He considers the occlusogram in
Dr. Sonia Palleck, London, Ontario, Canada, makes         Insignia’s Approver software a good example of
this point, “One of Insignia’s key differentiators
versus stock appliances is the different torque
values it calculates between the left and right
sides of the mandibular posterior arch. Teeth
erupt asymmetrically. In a great number of cases,
there is a maxillary transverse deficiency that
causes a mandibular deflection and resultant
midline discrepancy. All this leads to teeth being
more compensated on one side than the other.
The differential torque values Insignia determines
can only be measured in fractions of a millimeter,
but the distinction between a good finish and a
great finish is measured just this way. Insignia is a
finishing appliance, which begins at the planning
stage. Tooth-by-tooth custom torques are a major          Occlusogram feature in Approver software
factor in getting those high-quality finishes.”           a feature he particularly relies on to assess case
                                                          setups and improve the efficiency and quality of
What Makes Insignia Different: What it Does for           his finishes. “Occlusal interferences that usually
Clinicians and Patients                                   aren’t obvious until the case gets into Class I
                                                          position are my number one finishing challenge.
Dr. Kozlowski asked Dr. Andreiko once what made           If my positioning with stock brackets is off or
Insignia different, Dr. Andreiko’s reply: “That’s easy.   the geometries are insufficient, vertical occlusal
We put brackets on straight teeth.”                       interferences become a time-consuming frustration.
Dr. Kozlowski acknowledges, “As we position               They’re often subtle and difficult to find when the
brackets conventionally, we’re trying to envision         patient is actually in treatment. The occlusogram
how the teeth mesial/distal to it, how the teeth          feature in the Approver software serves to greatly
on the opposing side of the arch and occlusally in        minimize such issues in the planning stage.”
the opposing arch will be affected. It’s all a mental     “Moreover,” Dr. Sarver relates, “most orthodontists
calculation of how teeth are going to align and           treat a patient to a ‘‘milestone,’’ then “Moreover,” Dr.
how torque is going to be affected, how changing          Sarver relates, “most orthodontists treat a patient
the vertical height of the tooth will change its          to a ‘‘milestone,’’ then reposition brackets or do
torque, etc. With Insignia, we can forget about the       some wire bending to achieve the final detailing.
appliance and focus on designing the smile. We

8      Insignia Workbook
EVOLUTION OF JIGS
1st Generation 2nd Generation Current
4th generation, 3D-printed
bonding jigs are available
in a variety of quadrants.
Each tooth had a 2nd generation bonding
corresponding single jig jigs became available in
with a drop-in pin. multi-tooth quadrants.
While this works in the end, it’s hardly efficient. fiddle with the case, adding this, taking away
The object of Insignia is to reduce or eliminate this that, struggling to get things to work, sometimes
detailing by reducing the bracket placement errors running over time and even accepting a less than
we all experience.” ideal result when the patient was tapped out.
Insignia’s predictability is invaluable in managing a
Drs. Kozlowski and Reynolds concur that Insignia practice. It ensures I deliver the results I promise so
has made them better clinicians than they ever I know basically what it will cost to treat a patient.
would have been without it. Dr. Reynolds remarks, It’s a ‘fixed cost’ for me.”
“If you take the time to dive deeply into your case
finishes to learn how Insignia works, why it makes Dr. Reynolds concludes his input with a reference
treatment more efficient and why they treat out to marketing with Insignia, “I feel leading with
better, it will take your clinical knowledge and customization during a consultation has a greater
skills to a much higher level. Learning why the appeal than leading with a product. People know
torque math works the way it does, studying how a lot less about braces than we give them credit
bracket placement should look and figuring out for. While off-the-shelf brackets work well enough
the patterns for great finishes has taught me to in certain situations, like anything else across a
be a better clinician—even with my direct-bonded broader sample, customization is more effective.
cases.” Today, the call for customization and individuality
is at an all-time high. Many people are not only
Dr. Palleck began using Insignia in 2010, after willing to seek out high-tech customized treatment
having used other appliances including a self- but actually demand such a top-of-the-line option.
ligating appliance from another manufacturer. She Adults are all about efficiency, which Insignia
now employs Insignia full-time as the standard offers. Parents especially like it when I talk about
of care in her practice and is one of the largest designing treatment as unique as their child.”
providers of Insignia in North America, lecturing
internationally about its benefits. “Before using Insignia Today. Looking to the Future.
Insignia, there was a percentage of patients I There have been more than 120,000 cases treated
simply could not finish as well as I wanted—not with Insignia, which now boasts advocates in
because of patient compliance or diagnosis—it more than 25 countries. The Approver software is
was because with stock appliances, I just didn’t continually being refined as are elements of the
have the right prescription. This means I had to appliance itself.
Insignia Advanced Smile Design: A History 9In looking to the future, Dr. Smith is inspired not in the desired final relationship with a ‘straight’
only by what Insignia does for the orthodontist wire. The key to quality is consistency, and, at the
and patient, but by what it might mean for the end of the day, the ability to visualize treatment
profession. “Orthodontic residents have always from beginning to end before I start allows me to
had a challenge finding adequate data on treated consistently see conflicts and hazards ahead of
cases with which to do research for their theses. time, thus improving my navigation of treatment.”
With over 120,000+ cases treated to ideal setups,
Insignia offers a rich database available to be mined. Conclusion
Moreover, there has never been a large-scale study When Dr. Andreiko—who always insisted on being
of treatment results based on ideal setups because called Craig—originally conceived of the idea for
such data has never been available. Research using customized treatment, it was in response to human
Insignia data could satisfy innumerable questions variability relative to the limited geometries available
that have heretofore only been answered by for therapy from stock appliances. Considered a
empirical observation. What’s the best average genius, usually the smartest person in the room
torque for canines? What are the statistical with the biggest ideas and the greatest curiosity,
variations in tooth anatomy? What role does persistent, committed, focused yet amazingly
ethnicity play? Is there data to validate the natural humble, Craig recognized the merits of patient-
arch form? The profession has more and more specific treatment years before personalization
insisted on evidence-based conclusions. To me, became a marketplace expectation. He also shrewdly
Insignia is the mother of inventions that will supply identified digital technology as holding the potential
the data to move the profession in this direction. to achieving what now seems inevitable: the vision
Residents should be all over this!” and control of digitally assisted case design; the
predictability of custom appliances.
Dr. Sarver sums up his ideas about Insignia this way:
“I would recommend the system to others because According to Patrik Eriksson, Ormco president,
of my appreciation of the ability to design treatment “Insignia represents a pioneering technology vital to
as individually as possible rather than using a ‘’one perpetuating our company’s legacy of innovation.
size fits all’ approach. Insignia allows us to plan Ormco is committed to continuing the work
treatment with the end in mind. With conventional Craig began nearly 30 years ago—a technological
treatment, we put brackets on crooked teeth and achievement that has established the foundation for
in the end sort it out. Insignia allows me to see the improved quality of orthodontic treatment for years
teeth straightened in the virtual setup, and brackets, to come.”
then designed to be placed on ‘straight teeth’
Acknowledgments
Thanks goes to Drs. Hilgers, Kozlowski, Palleck, Reynolds, Sarver, Smith and Larry White as well as Dan Even
and Mark Payne for providing material for this history—not only for which they are directly quoted but for
much of the background material.
References
1 Andreiko, C. Increasing clinical performance with 3D interactive treatment planning and patient-specific
appliances. Ormco (2014). Orange, CA.
2 JCO Interviews Craig Andreiko on the Elan and Orthos Systems, J. Clin. Orthod. 28:459-468, 1994.
10 Insignia WorkbookThe Science of Insignia
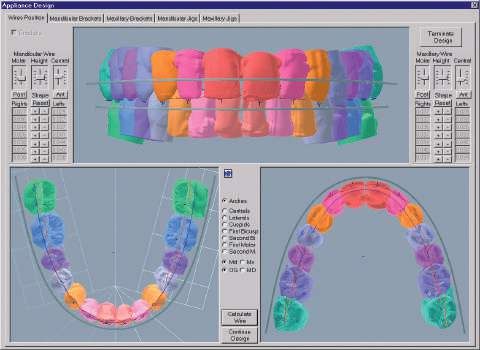
Insignia Advanced Smile Design: A History 11The Insignia Design and Approver software is based on the widely held goal of many orthodontists to provide true straight wire treatment. The key aspects that need to be customized to treat a patient with a true straight wire appliance include: • Crown Angulation or Tip • Bracket Positioning – Occluso-Gingival and Mesial-Distal • In-Out • Torque Insignia intends to provide a customized appliance to achieve the desired straight wire outcome for each patient through a combination of visual tools controlled by the doctor and algorithmic power embedded in the software. To utilize the Insignia system, doctors first determine the treatment goal by interacting with the visual tools included in the 3D Approver software to design the ideal outcome for their patient. The digital tools included in Approver enable orthodontists to visualize and manipulate various elements of smile design when creating the patient’s setup, including marginal ridges, Curve of Wilson and smile arc, for example. Marginal Ridges Smile Arc Curve of Wilson 12 Insignia Workbook
By using the visual tools and relying on Insignia’s    Archwire Plane
algorithms, the doctor is able to manipulate the
key aspects of straight wire treatment that inform
the final bracket prescription and position.

• Crown Angulation or Tip:
  Using the compass tool to move the crowns in
  relation to the flat archwire allows the doctor to
  see and simulate the ideal finish.

• Bracket Positioning – Occluso-Gingival:
  The archwire plane defines the bracket position
  occluso-gingivally for each tooth. The position
  can be modified by moving the archwire plane
  itself or moving the teeth in relation to the
  archwire plane.                                      Bracket Placement

• Bracket Positioning – Mesio-Distal:
  Insignia’s algorithm automatically detects the
  center of each tooth along the facial axis and
  calculates bracket position mesio-distally. For
  molars, the buccal tubes may be aligned with
  the mesial groove of the molar rather than at the
  center of the tooth.

• In-Out:
  Insignia’s algorithm calculates the most
  appropriate in-out for each bracket to
  compensate for differences in the crown
  prominences of individual teeth when the final
  virtual setup is determined.                         Torque chart

• Torque:
  Bracket torque is calculated for each tooth
  individually. Insignia’s algorithm analyzes the
  surface and the inclination of each tooth in
  relation to the archwire plane, then calculates
  the torque needed to ensure that the slot of
  each bracket is parallel to the archwire plane.
  This provides custom torques for every patient,
  allowing the doctor to finish each case with a
  straight archwire and working towards the ideal
  outcome irrespective of the archwire plane or
  surface contours of the teeth.

                                                                           Science of Insignia   13
In addition to the features above related to crown With both CBCT root data and library roots, the
visualization, Insignia offers 3D visualization of the superimposition tool in Approver allows doctors
patient’s root position, as well as the movement to accurately visualize the extent of root and
necessary to achieve the desired outcome crown movement needed to achieve the planned
with parallel roots optimally positioned in the end result.
surrounding bone. There are two methods to
visualize root position. Once the clinician has utilized Insignia’s tools to
review crown and root positions and movement,
CBCT data can be provided with each Insignia and approves the virtual setup, custom fabrication
case. In this instance, the root information of the appliances begins. Each bracket and
is extracted and stitched together with the archwire is individually machined and indirect
crown data via Insignia’s TruRoot™ process. By bonding jigs are produced to help ensure that
incorporating CBCT root data, there is no need to each bracket is transferred easily and positioned
estimate root position, direction and length. The precisely according to the approved setup.
benefits of accurately planning for root parallelism
and the extent of root movement by using actual This overview of Insignia’s unique technology
patient data prior to the start of treatment allows demonstrates the importance of achieving an
the orthodontist to feel confident in achieving a ideal virtual setup and ensuring that the clinician
functional and esthetic result for the patient. reviews it with great care prior to approval. Taking
advantage of the visual aids, case design tools
If CBCT data is unavailable, Insignia supplies and algorithms that the Insignia system provides,
library roots for each case. The library roots are while following the Best Practices outlined in the
estimated 3D root positions based on Panoramic following chapter, will help clinicians achieve the
X-rays provided by the clinician. The library roots most favorable results for their patients.
can be used for visualization and planning optimal
root movements.
CBCT Roots Superimposition
14 Insignia WorkbookBest Practices
Treatment Planning
Approval Process
- Step 1: Preliminary Review
- Step 2: Evaluation and Modification
- Step 3: Verify Proper Alignment
- Step 4: Evaluate Occlusion & Occlusal Contacts
- Step 5: Appliance Check
Suggested Wire Sequence
Science of Insignia 15Best Practices
Treatment Planning
Insignia case designers are trained to follow a These movements can be described in
standard set up protocol that is based on Andrews several ways:
Six Keys and to follow the general preferences
included with every case submission. In order to 1. As an absolute value
ensure that the case set up best matches your
Examples:
treatment plan for each patient, we recommend
utilizing the ‘Outline Treatment Plan’ section to a. Move upper molars 1mm distal and move
provide additional information that is not obvious lower molars 3mm mesial to achieve Class I
to the case designer.
b. Place upper arch wire plane 5mm from incisal
The top items to include are: edge of central incisors
c. Upper midline is correct. Correct lower midline
1. A/P movement of molars or individual arches 2mm to the left
2. Vertical movement of teeth within an arch
2.
(Intrusion/extrusion in relation to an ideally 2. As a percentage
positioned tooth) specially the central incisors Examples:
and first molars
a. Close the first premolar extraction space by
3. Movement planned to achieve:
3. showing 30% mesialization of the posterior
a. Space closure for extraction or pre-existing and 70% distalization of the anterior
spaces b. Display 50/50 A/P movement to correct class
b. Space opening for veneers, composites,
3. In relation to ideally positioned teeth
implants, or missing teeth
Examples:
c.
a. Hold premolar heights and intrude molars to
d. Directional movement to correct midline the same level
4.
1. A/P movement of molars or individual arches b. Level upper anterior teeth to the height of
tooth 21 to achieve an ideal smile arc
5.
2. Directional movement to correct midline
3. Placement of the upper archwire plane (for open
6.
bite and deep bite cases)
4. Upper central incisor torque (maintain, procline,
7.
or retrocline)
8.
5. Lower incisor torque (maintain, procline, or
retrocline)
16 Insignia WorkbookExample 1
Outline Treatment Plan
(Please add all your
case specific notes Upper molars should move approx. 2mm distral and lower molar should move approx. 2mm mesial. Hold height
here. Do not handwrite of 21 to preserve smile arc. Patient midline is correct. Correct Curve of Wilson and expand arches. Will accept
notes) residual buccal overjet and Class II buccal segments due to lack of growth.
Best Practices 17Example 2
Outlilne Treatment Plan
(Please add all your
case specific notes Avoid IPR. Upper wire plane needs to be 7mm from incisal edge. Upper centrals need to hold height for smile
here. Do not handwrite arc. 16, 26 should advance mesial 6mm using TADs and finish in Class II. Molar position of 36, 46 should not move
notes) mesial os distal. 14 and 24 will be intruded 2mm off occlusion.
Occlusal Upper Occlusal Lower
18 Insignia WorkbookBest Practices
Approver Process
The Approver Guide provides a suggested process for reviewing your Insignia cases. Having a systematic
approach should save time, improve consistency, and help you manage cases more efficiently.
Step 1 – Preliminary Review
Before making any modifications, review the following items:
Treatment Preferences
Treatment Preferences
• Confirm brackets, molar tubes, and wire selection
Slot Size
• Interproximal reduction (if applied)
Bracket
To make any changes to your preferences, write a note to the technician.
Molar Tubo
Hook Location
Wire Sequence
Notes
It is important to review the notes each time the case is returned to you. The technician will provide you with
information about your setup and provide an alert if any issue exists.
Step 2 – Evaluation and Modification
Expansion & Posterior Torque
Evaluate the lower posterior torque, then in-out relative to the
mandibular trough. Position the lower arch in a lingual view and
turn superimposition ‘on’. Posterior uprighting with minimal
translation of root apex should be shown.
Modify the torque by using the Posterior Expansion (Group-Wise
Editing) tool, then modify the in-out of the lower arch using the
Arch Form tool. Or modify by leaving a note for the technician.
Best Practices 19Step 2 (continued)
Smile Arc & Incisor Torque
Evaluate incisor torque. Reference the patient’s photos and cephalometric x-ray (if included).
Modify using the Anterior Torque (group-wise editing) tool or by writing a note to the technician.
Evaluate the vertical movement of the maxillary incisors. Reference the patient’s front smiling photo. Play the movie or toggle
between T1 and T2 with superimposition ‘on’ to determine if the upper incisors move in the desired direction.
Modify using the Smile Arc tool or by writing a note to the technician..
Tip! The setup has been tilted to
simulate an average occlusal plane of
7 degrees. Compare the setup to the
patient’s cephalometric x-ray to confirm.
20 Insignia WorkbookStep 2 (continued)
AP Movement
Evaluate the directional movement of each arch using the Movie tool or by selecting T2 with superimposition ‘on’. It is
important that the teeth are moving in the amount and direction that you deem appropriate, as this has implications
for mechanics as well as torque compensation.
Modify the lower arch using the AP Correction (group-wise editing) tool, then write a note to the technician to adjust
the upper arch if needed.
Submit Changes
If modifications are made in steps 1 or 2, conclude your review Tip! Leave a ‘note to self’ briefly
at this time. Submit a note to the technician documenting your listing the steps you’ve already
changes and requesting that the case be “reworked” accordingly. completed to prevent repeating
any work the next time that the
If no modifications are made in steps 1 or 2, continue with your case is returned to you.
review to step 3.
Best Practices 21Step 3 – Verify Proper Alignment Evaluate each arch individually to verify proper alignment. Make minor modifications as deemed necessary. If significant discrepancies exist, write a note to the technician for improvement. Modify by double-clicking on a tooth and selecting the desired movement. Recommended order of movements: · torque, then verticall · rotations, then tip (reference the Panoramic x-ray) · in-out, then mesio-distal Helpful views for evaluating each aspect Rotations Tip Torque Torque Vertical Symmetry Rotationen Tip Marginal Ridges Marginal Ridges 22 Insignia Workbook
Step 4 – Evaluate Occlusion & Contacts
Evaluate the occlusion by displaying both arches. Consider buccal and anterior overjet,
overbite, and overall esthetics.

Modify by writing a note to the technician. Be specific in documenting the improvements
that are needed.

Evaluate occlusal contacts by using the Occlusion tool and clipping view. Verify that there
are no interferences. If interferences exist, determine if these are due to misalignment or
tooth anatomy.

Modify by writing a note to the technician. Minor modifications such as in-out, occluso-
gingival, and torque can be made within the Occlusion tool by double-clicking a tooth and
selecting the desired movement; however if major modification is required, this should be
documented in detail to the technician.

Overbite         Overall Esthetics                                  Occlusal Contacts

                                                                                          Best Practices   23
Step 5 – Appliance check Bracket placement Place the model in frontal and lateral views. Evaluate bracket placement to confirm that there are no occlusal or gingival interferences. Modify by using the Wire Plane tool or by writing a note to the technician. Bracket-Torque Evaluate torque chart values. Determine if additional torque is needed to compensate for treatment mechanics. Modify by adjusting tooth position or by writing a note to the technician. Arch Wires Place the model in an upper and lower occlusal view. Evaluate the arch wires to confirm that there are no bends in the wire that will impact treatment. Also confirm that the arch wires are long enough to accommodate unerupted teeth. Modify by adjusting tooth position or by writing a note to the technician. 24 Insignia Workbook
Step 5 (continued)

Jig Groupings
Evaluate setup in T1 with brackets on.
Jig groupings should coincide with your
preferences unless an issue exists that
results in a single jig being provided.

Modify by writing a note to the
technician.

Ready to approve?
              If no further modifications are needed, you are ready to click ‘Approve’.

              The Approver software will then guide you through a final check of bracket placement and arch
              wires.

                                                                                          Best Practices   25
Best Practices Tip from Dr. Ashley Smith
Suggested Wire Sequence
Stock Damon CuNi-Ti .013/.014
Stock Damon CuNi-Ti .018
Insignia CuNi-Ti .014 x .025
Insignia CuNi-Ti .018 x .025
CLI, CLII & III (ish), Non Exo, CLII & CLIII, Moderate Sliding
Moderate Torque adjustment mechanics, Exo, Moderate Torque Extraction Treatment
Minimal AP adjustment
Insignia 35° CuNi-Ti .021 x .025 Insignia TMA/SS .019 x .025 Insignia SS .01 6x .025/.018 x .025
Insignia TMA .019 x .025/.021 x .025 Insignia 35° CuNi-Ti .021 x .025 Insignia 35° CuNi-Ti .021 x .025
Insignia TMA .019 x .025/.021 x .025 Insignia SS .019 x .025/.021 x .025
Wire Stiffness Guide
Severe* Malocclusion Moderate* Malocclusion Mild* Malocclusion
WIRE TYPE
Stainless .019 x .025
Steel .021 x .025
.019 x .025
TMA ® ®
.021 x .025
.019 x .025
Copper
.021 x .025
Ni-Ti ® 35˚ C
.021 x .025 TMA is… .021 x .025 CuNiTi is…
• ½ as stiff .017 x .025 SS • 25% as stiff .021 x .025 TMA
• 40% as stiff .019 x .025 SS • 1/10 as stiff as .021 x .025 SS
• And ~ 10% stiffer than .019 x .025 TMA
26 Insignia WorkbookCase Studies
Dr. Ashley Smith | Patient: Erin
Dr. Chris Turnock | Patient: Aiden
Dr. Ashley Smith | Patient: Minnie
Dr. David Birnie | Patient: Victoria
Dr. David González Zamora | Patient: Lorena
Dr. David González Zamora | Patient: Natalia
Dr. Jamie Reynolds | Patient: Firas
Best Practices 27Clinician: Dr. Ashley Smith, Toowoomba, QLD, Australia Patient: Erin Pretreatment Diagnosis Initial Final Skeletal Class II, Brachyfacial patient, 13 years old. My chief concern is the traumatic deep bite. Patient already commenced peak growth and lives 2 hours drive from our practice. Skeletal II Brachyfacial. Profile. Lips are retrusive to the nose and chin and have a thin contour. Upper Centrals are over erupted by 2mm and retroclined 25 degrees. Smile arc can be flattened 2mm. 13 is distally angled and 12 and 22 mesial angulation. Gingival heights of the centrals to laterals are incorrect. The proportion of central incisor enamel exposed compared to gingival height is low due to the starting position of the centrals. The upper centrals are over erupted. Incisal edges are not worn or damaged. Treatment Plan Objectives Treat non-extraction using Insignia SL. Develop collapsed arches with Damon mechanics, keeping the occlusion unlocked with • Composite resin, bite ramps on the first premolars. • Then with the AdvanSync appliance. • With anterior Bite Turbos after the AdvanSync has been removed. Insignia design will hold the height of the upper laterals and align smile arc. The Insignia overlays must show the 36 46 moving mesial 3mm and the arches expanding as the curve of Wilson is levelled. Appliance used: Insignia SL 28 Insignia Workbook
Treatment Sequence

 Appointment        Archwire                     Notes

 1                  U: .013 Damon CuNi-Ti*       Bonding
                    L: .013 Damon CuNi-Ti*       CR ramp 14 24

 2                  U: .014 Damon CuNi-Ti*
                    L: ..014 Damon CuNi-Ti*

 3                  U: .018 Damon CuNi-Ti*
 14 weeks           L:. .018 Damon CuNi-Ti*

 4                  U: .018 Damon CuNi-Ti*       Separators for AdvanSync
                    L: .018 Damon CuNi-Ti*

 5                  U: .018 Damon CuNi-Ti*       Fit AdvanSync
 22 weeks           L: .018 Damon CuNi-Ti*

 6                  U: .016 x .025 CuNi-Ti       Activate AdvanSync 2mm
                    L: .014 x .025 CuNi-Ti

 7                                               Activate AdvanSync 2mm (right), 4mm (left)
 36 weeks

 9                  U: .018 CuNi-Ti              Remove AdvanSync, Bond all 6’s
 52 weeks           L: .014 x .025 CuNi-Ti       Add ¼ 2oz elastics, Add bite turbos 11 21
                                                 Remove CR ramps 14 24

 11                 U: .018 x.025 CuNi-Ti        Chain upper 3-3
 60 weeks

 13                 U: .021 x .025 35° CuNi-Ti   Ligate upper 3-3
 73 weeks           L: .021 x .025 35° CuNi-Ti   Elastics (night time only)

 14                 U: .021 x .025 TMA           Add upper CTBs
 81 weeks           L: .021 x .025 TMA

 15                 U: .021 x .025 TMA           Add offsets
                    L: .019 x .025 TMA           Retied upper CTBs

 16                                              Debonding, Retention, Upper 2-2 Everstick,
 106 weeks                                       Lower 3-3 Flex, Maxillary invisible retainer (night time
                                                 only)

*Stock round wire
                                                        Appointment photos featured in this case study

                                                                                   Case Studies        29
Bonding Appointment 3, 14 weeks Appointment 5, 22 weeks Appointment 9, 52 weeks Appointment 11, 60 weeks 30 Insignia Workbook
Appointment 14, 81 weeks

Final, 106 weeks

                           Case Studies   31
Treatment Discussion which matches the patient’s facial balance.
All treatment objectives were achieved and the One flaw with this case was that too much resin
patient is pleased with her orthodontic result. The had been left under a few brackets at bond up. The
patient now has improved lip support, and the bite 32, 41 and 11 all had slightly too much resin, and
depth and buccal occlusion is much improved. therefore they could not follow the Insignia plan,
hence the need to add offsets.
The incisor proportions and gingival relationships
are close to ideal as are the connectors and Recently we have purchased a very powerful sand
embrasures. blaster and are much more confident repositioning
the Insignia brackets with the single jigs when
Ligating the AdvanSync upper first molar crowns the initial bondup is not ideal. Another challenge
to only the upper first premolars, has allowed with this case was broken brackets and, since the
some distalising of the upper posteriors whilst patient lives more than 2 hours from the practice,
leaving some overjet to allow for further lower arch they could not attend to have the brackets
advancement. All my AdvanSync cases are treated replaced for about 4 weeks. When rebonding
this way. broken first molar brackets I now prefer to use
SnapLink as I can step the archwire to compensate
Wherever possible I ensure the archwire includes for the small in/out distance between Insignia
the 7’s. Having the 7’s all on the archwire helps custom and standard bracket. (I may still round the
minimize the intrusion of molars which can be an wire to compensate for different torque between
iatrogenic effect of AdvanSync treatment. a stock bracket and prescribed Insignia bracket
torque)
Starting this treatment with U/L .013 Damon CuNi-
Ti archwire for 6 weeks then transitioning to only At the 1 month retention check I added an anterior
the U/L .014 Damon CuNi-Ti for 4 weeks keeps the bite plane to the upper essix to aid retention of
forces very light allowing good arch development. the deep bite. This has an added advantage of
adding rigidity to the upper retainer which helps
It is also important to keep the deep bite unlocked
to maintain the width gained during treatment. I
to assist arch development. In deep bite cases it is
recommended the upper bonded stay in place for
important to place anterior bite turbos on the day
at least 2 years, when it eventually fails, I remove
the AdvanSync is removed and support
it. The existing essix will still fit and retain. The flex
L3-3 I advise is to stay as a permanent retainer.
What I Would Do Differently Today
I was happy with my chosen mechanics for this
case and I treat a lot of my Skeletal II patients with
a similar treatment plan.
Although the aesthetic result is good and the
torque of the upper incisors is much improved, on
reflection I would have preferred an increase of
approximately 5 degrees labial crown torque on
the upper incisors. One method that we now use
in this practice to more accurately design the ideal
final position of these teeth in our Insignia set up
is to use a smiling profile picture (in natural head
position). This helps to create an incisal position
32 Insignia WorkbookDr. Chris Turnock, Toowoomba, QLD, Australia
Patient: Aiden
Pretreatment Diagnosis Initial Final
Meso- to dolichofacial Class II skeletal base, with an
associated Class II div 1 subdivision Right malocclusion.
Significant mandibular retrognathia and lack of effective
chin projection. Lip strain evident. Family history of Class II
skeletal base. Mild upper and lower incisor proclination with
mild crowding in both arches. Impacting 8’s.
Treatment Plan Objectives
• Treatment aims were to relieve the crowding in
both arches, decompensate the dentition for
orthognathic surgery. Expand the arches in the
premolar region to help fill the buccal corridors.
Restore facial balance via orthognathic surgery.
• Treatment Plan notes submitted with this case:
• Try to avoid IPR, if required limit to .25mm mesial
of 33, 32, 42, 43
• Upper wire plane to be about 5mm from incisal
edge
• Upper centrals need to maintain current height
• Molar movements should be finishing Class I
• Please turn off A-P Torque Compensation as this
is a surgical case
• Class II correction will be via mandibular
advancement
• Ensure all lower incisor brackets are clear of
upper incisors
• Midline Correction- Correct lower midline at
surgery
• Preserve smile arc
•
Appliance Used: Insignia SL
Case Studies 33Treatment Sequence
Appointment Archwire Notes
1 U: .014 Damon CuNi-Ti* Bonding
L: .014 Damon CuNi-Ti* Composite stops for bite opening/disarticulation
2 Scheduled wire trim
5 weeks
3 U: .018 Damon CuNi-Ti* Removed CR stops
11 weeks L: .018 Damon CuNi-Ti*
4 U: .016 x .025 CuNi-Ti
15 weeks L: .014 x .025 CuNi-Ti
5 U: .018 x .025 CuNi-Ti
23 weeks L: .018 x .025 CuNi-Ti
6 U: .021 x .025 35° CuNi-Ti Chain L 6-6 under arch wire
30 weeks L: .021 x .025 35° CuNi-Ti
7 U: .021 x .025 TMA® Started Class III 3/16 4oz elastics full time
38 weeks L: .019 x .025 TMA®
8 Impressions for Surgeon for surgery
47 weeks
9 Checked elastics, keep going with them
56 weeks Plan for new OPG and Let Ceph to view at
next appointment
10 Checked x-rays
64 weeks New impressions for surgeon at surgeons
request. Added upper chain tie backs.
Go to night only wear for Class III elastics
11 Breakage 27, new bond with spare insignia
67 weeks bracket, and dropped back to U .021x.025 35
degree CuNi-Ti
34 Insignia WorkbookAppointment Archwire Notes
12 Keep going with night time only Class III
69 weeks elastics
Refit Upper .021 x .025 TMA Very Small
Offset 11, 21
Booked Surgery for 27th June 2015
Prä-OP-Termin Surgery booked after this visit.
13 Added surgical hooks to arch wires
74 weeks
Post-OP-Termin Checked elastics post-surgery, advised to
14 persist with the heavy elastics
76 weeks
15 Check elastics, keep going with them
78 weeks Expand upper arch wire
16 Bond button on lingual of 26 for cross elastic
82 weeks 3/16 4oz left side cross elastic full time and
1/4 4oz night only box elastics left and right
17 Check elastics, keep going with them
84 weeks
18 Stop cross elastic
85 weeks Chain U 3-3 under archwire
Keep going with 3/16 4oz left and right
19 Check elastics, keep going with them, book
88 weeks debond appointment
20 Removed all appliances. Bonded upper 2-2
89 weeks (everstick). Bonded lower 3-3 (Flex). clear
retainer with wire to hold expansion, plan for
new clear retainer with anterior bite plane in
1 month
Appointment photos featured in this case study
Case Studies 35Pretreatment 36 Insignia Workbook
Appointment 9, 56 weeks

                          Case Studies   37
Appointment 13, 74 weeks, pre-surgery visit Appointment 16, 82 weeks 38 Insignia Workbook
Final, 89 weeks

                  Case Studies   39
Finishing
• No rebonds
• No Torque adjustments
• 1 very small offset bend between 11,21
• Simple post-surgical elastics
• Expanded upper wire to ensure transverse was
ideal
Treatment Discussion
Pre-treatment Post-treatment
This was a routine Class II single jaw surgical case. I
used Insignia because I use it for every F/F braces
case I start.
Insignia is particularly good for surgical cases as
it ensures early and accurate arch coordination, to
the extent to which the pre-surgical neuromuscular
environment permits. It also ensures rapid
completion of arch coordination in the new, post-
surgical neuromuscular environment.
Customized torque removed the need for third
order adjustments.
Treatment was slightly lengthened as the original
surgeon was unavailable when surgery was
required.
The Approver set-up incorporated over expansion
of the maxillary posterior teeth to ensure the
transverse dimension was adequate at the time of
surgery.
What I Would Do Differently Today
The main thing I would do differently is ensure the
setup involved more uprighting or buccal crown
torque in the posterior segments to help broaden
Aiden’s smile some more. Whilst we achieved
an excellent result, his smile would have looked
better with some more expansion. It is likely we
have given him a more stable outcome with the
current set up, so it really comes down to doctor
preference.
40 Insignia WorkbookDr. Ashley Smith, Toowoomba, QLD, Australia
Patient: Minnie
Pretreatment Diagnosis Initial Final
Minnie is a 13 year old female with a dolichofacial,
skeletal III growth pattern with a severely crowded
maxilla. Her mandible is in a normal position with
good arch shape and size. Upper lip is slightly flat
with severely crowded 13 and 23. Minnie has good
size and shape to her teeth, so there will be no
need to veneer. I suggested two treatment plan
options:
1. Extract 15 and 25, align upper and lower with
fixed appliances and treat with a surgical maxilla
impaction and advancement.
2. Avoid orthognathic surgery, align and develop
with Damon mechanics and treat the open
bite with TAD supported intrusion of the upper
posteriors.
We agreed to treat without surgery if possible.
Treatment Plan Objectives
Treat non-extraction using Insignia SL. Develop the
upper arch using Damon style mechanics slowly
opening the space for alignment of the 13, 23 with
open coil spring.
Insignia design must show the lower molars not
moving mesial or distal and the upper incisors need
to extrude and align to a good overjet and overbite.
The T2 occlusion will need to show heavy contact
on the incisors and no contact on the molars. The
upper archwire plan will need to be positioned high
on the 11, 21 at about 6.5 mm.
Once she was aligned to the .021 x .025 TMAs
upper and lower, fit TADs to intrude the upper
posteriors.
Appliance Used: Insignia SL
Case Studies 41Treatment Sequence
Appointment Archwire Notes
1 U: .014 Damon CuNi-Ti* Bonding
L: .014 Damon CuNi-Ti*
2 U .014 Damon CuNi-Ti* Wire trim only
10 weeks L: .014 Damon CuNi-Ti*
3 U: 018 CuNi-Ti
15 weeks L: .014 x .025 CuNi-Ti
4 U: .016 x .025 CuNi-Ti
23 weeks L: .018 x .025 CuNi-Ti
5 U: .018 x .025 CuNi-Ti
28 weeks L: .021 x .025 35° CuNi-Ti
6 U: .021 x .025 35° CuNi-Ti Tie back
32 weeks L: .021 x .025 TMA Upper 3-3
Lower 3-3
7 U: .021 x .025 TMA
44 weeks L: .021 x .025 TMA
8
53 weeks
9 Fit TADs and intrusion appliance
58 weeks
11 Started vertical elastics 3/16 4 oz
96 weeks
14 Debonding
109 weeks
*Stock round wire
Appointment photos featured in this case study
42 Insignia WorkbookBonding
Appointment 3, 15 weeks
Appointment 5, 28 weeks
Appointment 7, 44 weeks
Case Studies 43Appointment 9, 58 weeks Appointment 11, 90 weeks Appointment 12, 96 weeks 44 Insignia Workbook
Appointment 13, 101 weeks

Final, 109 weeks

                            Case Studies   45
Treatment Discussion All treatment objectives were achieved and the patient was very pleased with her orthodontic result. It was important to take time in the light round wires and slowly open space to align the 13 and 23. Once we transitioned to the .018 Damon CuNi- Ti, we were able to quickly progress through the Insignia archwires until Minnie was on the .021 x .025 TMA. The final aesthetic result is very good with the incisors positioned upright with an excellent smile arc. The incisor proportions and gingival relationships are close to ideal as are the connectors and embrasures. Minnie’s treatment took longer than needed as when she was ready to start the TAD intrusion they delayed until it was made clear that a successful result could only be achieved. I used the BENIFT-System 11mm and 9mm TADs placed in the suture distal of the third rugae. The “mouse trap” appliance and the bonded TPA were custom made in our practice laboratory. The excellent torque control was delivered with the Insignia system using torque compensation and choosing .021 x .025 size archwires. It was pleasing to achieve a great aesthetic result for Minnie especially at such an early age. She was finished at age 15 which is no doubt great for her self-esteem. The retention of any open bite is very important and can be challenging. We placed upper and lower bonded retainers with upper and lower clear retainers worn each night. 46 Insignia Workbook
Dr. David Birnie, Newcastle upon Tyne, United Kingdom
Patient: Victoria

Pretreatment Diagnosis                                   Initial   Final

33-year-old female at the start of treatment, Class
II division 2. The patient is concerned about the
appearance of her upper front teeth. She had good
upper incisor display and a good smile arc.

The #47 had been previously extracted.

Treatment Plan Objectives

Positive upper incisor crown torque required. Wire
plane on FA point. No build-ups.

Lower centreline to right and likely to worsen as
#48 moved forward into 4.7 space. Planned TAD
Q4 to support anchorage as #48 moved forward.
Full closure of #47 space planned.

Molar AP movement: RHS ¾ II and LHS ½ II.
Planned correction by Class II elastics.

Expansion: AP expansion planned to change axial
inclination of anterior teeth, to support the lips and
to reduce overbite. Principal method of overbite
reduction is extrusion of lower posterior buccal
segments using anterior bite turbos and short
Class II elastics to protect upper incisor display.

No extractions.

Notes to Insignia technician at time of case
submission: “Damon set-up, canines 0.5mm above
incisors, ensure match of smile arc to curvature of
lower lip when smiling. No single jigs please.”

Appliance Used: Upper Damon Clear 5-5, Lower
Insignia SL

                                                                           Case Studies   47
You can also read