Instructions for use Medical device for surgery and dentistry - Osseotouch
←
→
Page content transcription
If your browser does not render page correctly, please read the page content below

Medical device for surgery and dentistry

                             Instructions for use

    Rev07/AE
    Rev.
   Rev.  09/EU
         08/EU --FT08
                 FT07
             - FT05    --30.01.2021
                          31.10.2019
                    - 31.10.2018
                                                                 1

INGLESE.indd 1                                               05/05/15 16:30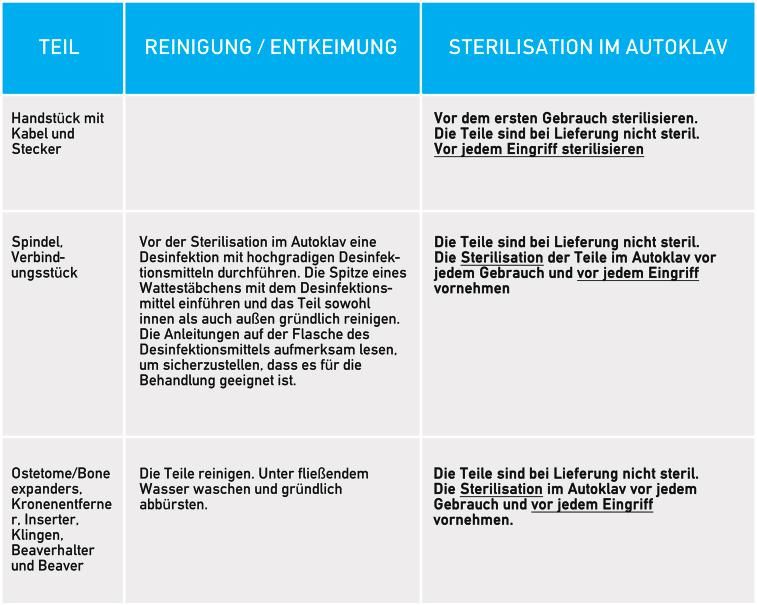
TABLE OF CONTENTS

     1.0. Important information for the user                                      3
     2.0. Device Illustrations                                                    4
      2.1. Control elements, indicators, connections and functions                6
     3.0. Explanation of the used symbols                                         7
     4.0. Device description                                                      9
      4.1. Device general description                                             9
      4.2. Description of the coupling parts                                     10
     5.0. Safety Guidelines                                                      12
      5.1. Warning and Caution                                                   12
      5.2. Intended use                                                          14
      5.3. User’s qualifications                                                 15
      5.4. Use conditions                                                        15
      5.5. Safety guidelines for the installation environment                    15
      5.6. Operating safety guidelines                                           15
     6.0. Transport and storage                                                  16
      6.1. Transport and storage conditions                                      16
     7.0. Installation and use                                                   17
      7.1. Unpacking                                                             17
      7.2. Installation and connection                                           18
      7.3. Activation                                                            19
      7.4. Surgery instrument insertion on the handpiece OSTEOTOME function      19
      7.5. Release of surgery instrument                                         20
      7.6. How to activate the handpiece                                         21
      7.7. Calibration of the force                                              21
     8.0. Maintenance                                                            22
      8.1. Cleaning and maintenance                                              22
      8.2. Disinfection and sterilization of the parts                           22
      8.3. Maintenance                                                           24
      8.4. Repairs                                                               24
      8.5. Fuses replacement                                                     24
     9.0. Disposal of waste                                                      25
      9.1. Responsibility                                                        25
      9.2. Warranty                                                              25
      9.3. Technical Literature                                                  25
     10.0. Technical description                                                 26
      10.1. Failures and malfunctions                                            26
     11.0. Technical data                                                        28
     12.0. Electromagnetic compliance declaration                                29

     2

INGLESE.indd 2                                                                05/05/15 16:30   INGL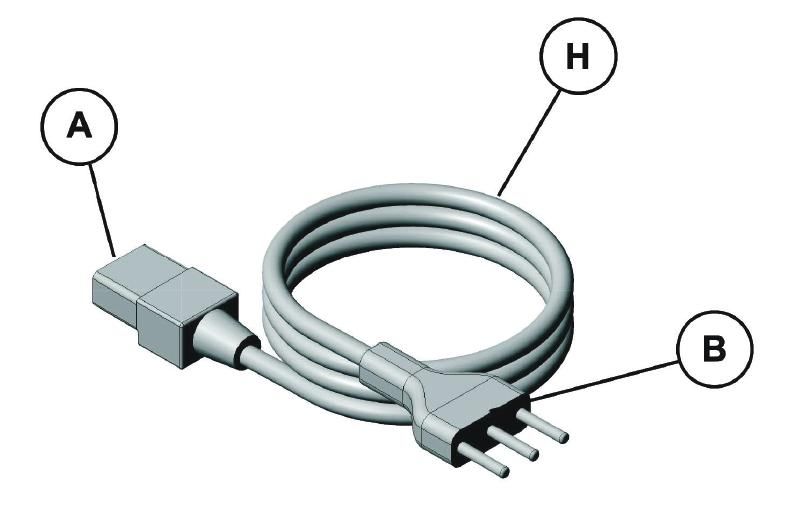
1.0. IMPORTANT INFORMATION FOR THE USER

             This operating manual was made to help you to properly install and connect the
             Magnetic Mallet device. All the useful details for a proper use of this device are
             contained in this manual.
             You should read it very carefully and store it in its slipcase in a dry and clean place
             in order to gather any useful information in the future.

                    Attention:
             Please be aware you are referring to the last update of the instructions for use as the
             manufacturer reserves the right to make improvements at any time without prior warning .
             The images and drawings in this instructions for use are provided for illustrative purposes
             only.

             © copyright Meta Ergonomica S.r.l.

             All rights reserved. Meta Ergonomica S.r.l. retains all copyright in any text, graphic images
             and images owned by Meta Ergonomica S.r.l.
             You may not mirror, modify or otherwise alter any file for re-broad, print or exploit the information
             contained therein without the written permission of Meta Ergonomica S.r.l.
                                                                                                                     3

16:30   INGLESE.indd 3                                                                                         05/05/15 16:30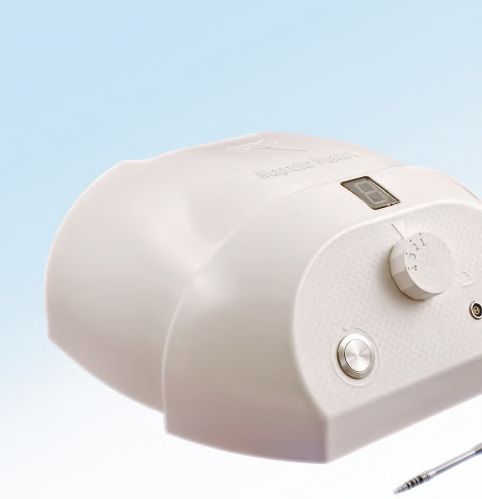
2.0. DEVICE ILLUSTRATIONS

       MAGNETIC MALLET (1)
       MAGNETIC        (1)

      (1) Magnetic
      (1) Magnetic Mallet
                   Mallet can
                          can be
                              be also
                                 also supplied
                                      supplied with
                                               with the Crown Remover Handpiece (on request)

      44

 INGLESE.indd 44
INGLESE.indd                                                                                   05/05/15 16:30   ING
                                                                                                                INGL
Front view

               Rear view
                                5

16:30   INGLESE.indd 5      05/05/15 16:30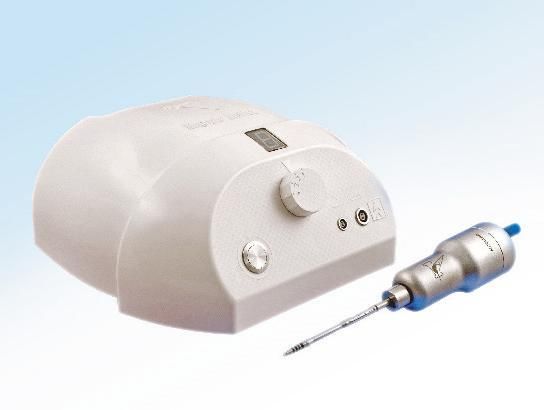
Osteotome Handpiece                                                                                                                   Q

                                                                                 R                                                             R

                                                                               Q
                                                                                                                                             P

                                                                               O                                                          O

                                                                                                                                                                      Eti

     2.1. Control elements, indicators, connections and functions

     CONTROL UNIT
     A. Socket
     B. Mains plug
     C. ON/OFF switch
                 QUANTITA'                                         DESCRIZIONE                                                 MATERIALE             PESO
     D. Control unit 1                                   ASSIEME MAGNETIC MALLET                                                                        0.4
     E. Manual control     push button
                   DISEGNATO            DATA         CONTROLLATO           DATA            APPROVATO              DATA             SCALA
     F. Knob for the TCR
                       calibration         of the force
                                      22-06-14                           22-06-14                                22-06-14          1:1
     G. Display showing       the force
                   Questo documento             levelin esso contenute sono di esclusiva proprietà di TECNICONSULT SPA . Ne è vietata la copia, riproduzione,
                                      e le informazioni
                   pubblicazione, divulgazione, ed uso, anche parziale, per scopi diversi da quello per cui è stato preparato, senza nostra autorizzazione scritta.
     H. Power cable
     I. Fuse holder
     L. Footswitch                                                                                        B AGGIORNATO ESPLOSO                           07-04-15

     M. Handpiece connector                                                                                       EMISSIONE ORIGINALE                    22-06-14
                                                                                                                                                           TCR
     N. Footswitch connector                                                                             REV.               DESCRIZIONE
                                                                                                                                                          DATA
                                                                                                                                                           FIRMA
                          MACCHINA
                                                                MAGNETIC MALLET - F
     OSTEOTOMEGRUPPO
                  HANDPIECE
                                                                                                                                                   B
                                                                                                                                                           FOGLIO
     O. Osteotome function handpiece
     P. Chuck    NUMERO DISEGNO
                                                                                     ME001_00_01                                                INDICE
                                                                                                                                               MODIFICA
                                                                                                                                                              1
                                                                                                                                                              1
     Q. Ring Nut

     6

INGLESE.indd 6                                                                                                                              05/05/15 16:30            INGL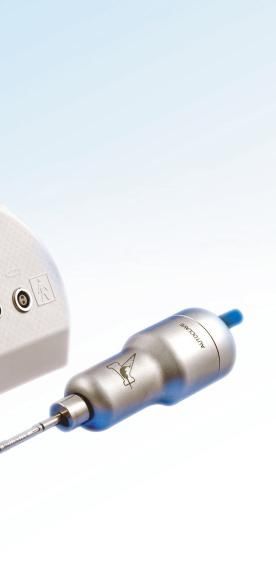
SYMBOLS PLACED ON THE MAGNETIC MALLET CHASSIS

                                            Manual control push button

                                            Handpiece metal connector

                                            Footswitch plastic connector

                                            Gauge of the supplied force

                 Etic.MAGNETIC MALLET:Layout 1   27-04-2015   14:29   Pagina 1

                    Etic.MAGNETIC MALLET:Layout 1   27-04-2015   14:29   Pagina 1

                                                                                    Tensione di alimentazione:             230 V
                                                                                    Power Voltage:
                                                                                    Frequenza nominale:                    50 Hz
                                                                                    Nominal Frequency:
                                                                                    Corrente nominale in stand-by:
                                                                                    Nominal stand-by current:            0.070 A
                                                                                    Corrente nominale durante l’impulso:
                                                                                                                          0.38 A
                                                                                    Nominal current during the pulse:
                                                                                    Fusibili:
                                                                                    Fuses: F - 5x20 - 250V - 1,6A
                                                                                                 Seguire le istruzioni per l’uso.
PESO                                                                                             Prima di mettere in funzione l’apparecchiatura
                                                                                                 leggere attentamente le istruzioni d’uso.
    0.4                                                                                          Scrupolously adhere to the instructions for use
                                                                                                 Before activating the device you should carefully
                                                                                                 read the instructions.
                                                                                                 ATTENZIONE! Un uso scorretto del dispositivo
iproduzione,                                                                                     può provocare seri danni.
zione scritta.                                                                                   An improper use of this device can cause injuries.
                                                                                                 ATTENZIONE!
                                                                                                 ON: 1 colpo/sec (max 200 colpi) OFF: 40 minuti
     07-04-15                                                                                    ON: 1 pulse/sec (max 200 pulses) OFF: 40 minutes
     22-06-14
       TCR
      DATA
      FIRMA

      FOGLIO
            1
A           1

                                                                                                                                                7

    16:30        INGLESE.indd 7                                                                                                            05/05/15 16:30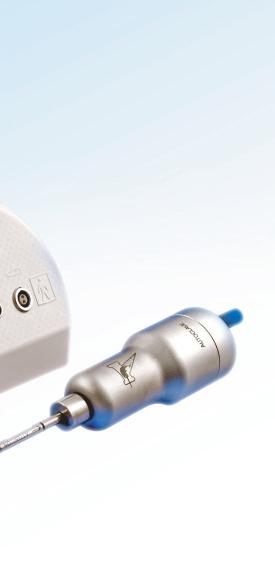
SYMBOLS LABELLING

                                                               Company
                   Information on the manufacturer and date of manufacture

          SN       Device serial number

                   AC (Alternating current)

                   Coupled part “BF type” (according to IEC 60601-1 rules)

                   Prior to setting the device going carefully read the instructions for use

                   Caution hazardous voltage

                   Store in a dry and clean place

                   Caution! The improper use of this device can cause injury

                   You should not use the device if the packaging is damaged

                   Storage temperature

           193 6   CE mark including the identification number of the Notified Body

                   Disposal of special waste (electric and electronic devices)

                   Device Class II - IEC 417-5172

     8

INGLESE.indd 8                                                                          05/05/15 16:30   INGL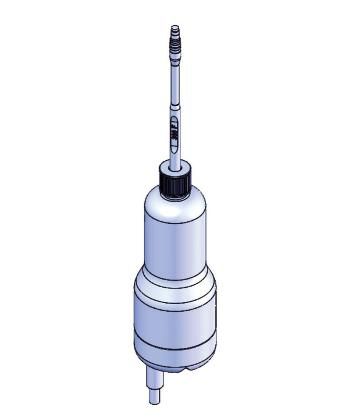
4.0. DEVICE DESCRIPTION
             4.1. Device general description

             Magnetic Mallet is an electro-medical device for surgery and dentistry practice
             with a double function according to the coupled part (handpiece O) :

             •    OSTEOTOME version to obtain the bone plastic deformation thanks to the
                  available forces and their application timing.
             •    CROWN REMOVER version to obtain the crown and bridge removal from the
                  abutment or the implant.

             This device is basically made up by a control unit, a footswitch and two inter-
             changeable handpieces which can be used depending on the needed practice.

             The control unit case is made by self-extinguishing plastic. On the control unit you
             can find:

             •    The ON/OFF switch (C)
             •    Two different connectors. One for the footswitch and the other one for the
                  handpiece. The two connectors are identifiable by the following graphic sym-
                  bols:
                  ► Handpiece metal connector (M)

                  ► Footswitch plastic connector (N)

             •    Manual control push-button (E)
             •    Plastic knob to calibrate the level of the force (F)
             •    Display showing the selected force (G)

             The control unit, the control/operational electronics together with the electronic/
             electric safeties are housed into the control unit case.
             The handpiece is powered by the control unit with a 58V c.c. maximum voltage.
             The handpiece is connected to the control unit by a cordset which can be manually
             unplugged. The handpiece can be activated by the pressure of both footswitch (L)
             and manual control push-button (E).

             Both for the OSTEOTOME and for the CROWN REMOVER function the force applied
             to the handpiece through the pressure of the footswitch or of the push button is
             not continuous. Each pressure of the switch conveys a single force pulse

                                                                                                   9

16:30   INGLESE.indd 9                                                                         05/05/15 16:30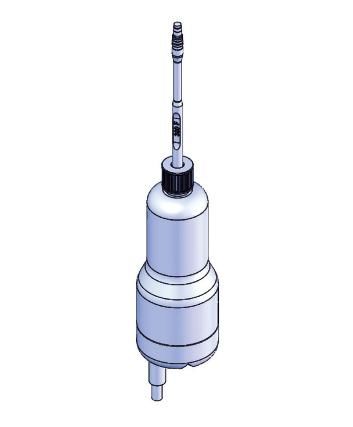
Turning the knob (F) you can select the desired level of the force among the four
     possible options (1-4); at the same time the selected force will be showed on the
     liquid crystal Display (G) and by the number selected on the knob.
     Magnetic Mallet has been designed to give 1 pulses per second. You should not
     exceed the maximum threshold of 200 consecutive pulses without having a
     40 minutes break.

     4.2. Description of the coupling parts

     Osteotome Function Handpiece with ring nut

                                                 For the OSTEOTOME function you must
                                                 use the Hanpiece with the ring nut (O)
                                                 equipped with the appropriate surgery
                                                 instruments.

                                                 INTENDED USE
                                                 Medical device to perform a wide array of
                                                 dentistry surgeries. The pulse conveyed
                                                 to the surgery instrument allows you to
                                                 achieve the plastic deformation of the
                                                 bone in order to create the site for the
                                                 implant.
                                                 The Magnetic Mallet, equipped with the
                                                 handpiece and the surgery instrument is
                                                 a medical device fitted to plastically de-
                                                 form both maxilla and lower jaw spongy-
                                                 bone.
     In this way the surgeon can create the proper site for the implant.
     Through the handpiece the surgery instrument can be energized with 4 different
     forces so that the surgeon can replace the energy carried out by the human force
     in the manual practice (state of art).

     You can select the desired level of the force among the 4 possible options (1-4) by
     turning the knob (F) placed on the control unit.

     In the pre-marketing tests we carried out the most used forces have been the 2nd
     and the 3rd one; nevertheless it’s important to remember that the whole spec-
     trum of the forces has a very close progressive range. That’s why they can all be
     considered suitable for surgery. It’s entirely up to the surgeon to determine the
     more suitable one to achieve the desired result.

     10

INGLESE.indd 10                                                                    05/05/15 16:30   INGL
In order to familiarize yourself with the device, in the first stage you
!
should always start from the lighter force (No.1). It’s also advisable
to keep the surgery instrument between your fingers selecting the
different levels of the forces. In this way you shall be able to assess
the corresponding pulse.
Surgery instrument action is led both by the pressure exerted by the surgeon on
the handpiece and by the axial forwards of the energy. In any case the maximum
forwards of the surgery instrument is of about 1 mm.
Attention: The surgeon must always determine the pressure to be exerted on
the bone in order to achieve the desired result.
of
s
-
11
16:30 INGLESE.indd 11 05/05/15 16:305.0. SAFETY GUIDELINES
5.1. Warning and Caution
Please carefully read this Manual for use and rigorously adhere to the instructions.
The captions “Caution”, “Warning” and “Attention” have a precise meaning.
You should carefully read the related instructions in order to grant a safe and ef-
fective working of this device.
Caution: indicates a danger/risk for the patient or the surgeon. The failure in
comply with the indication can carry injuries to the patient or to the surgeon.
Warning: indicates the maintenance to comply with in order to avoid any pos-
sible damaging in the appliance.
Attention: indicates special information related to the use of the Magnetic
Mallet device or other important information.
Caution: Prior to activating the device carefully read the manual for use. Pay close
attention to the sections related to the device working and to safety guidelines in
order to avoid any risk for the patient, your staff and yourself.
Caution: Install the Magnetic Mallet device keeping it out of the reach of the pa-
tient.
Caution: Always check the cables. If the cable is somehow damaged you should
immediately replace it calling the authorized service provider.
Caution: Prior to activating the device you should always have a functional opera-
tional test (FOT) pressing the footswitch or the manual control push-button.
Caution: Prior to activating the device make sure you have connected the proper
handpiece according to the intended practice/treatment.
Caution: It’s strictly forbidden to open the control unit – Electric shock risk!
Any opening of the control unit by non authorized persons nullifies the warranty.
Caution: You should move away the device from the patient every time there is
stalling in the device (for example: power failure during the use).
Caution: You should unplug the device from the main power every time you goes on working
on the control unit (for example : disinfection/cleaning, unplugging of the connector).
12
INGLESE.indd 12 05/05/15 16:30 INGLCaution: It’s
Caution: It’s forbidden
forbidden to
to put
put fingers
fingers or
or any
any tool
tool inside
inside the
thefootswitch
footswitchororthe
thehand-
hand-
piece connectors.
piece connectors.
Caution:
Caution: Handle with care
Handle with care the
the packaging
packaging and
and avoid
avoid all
all sort
sort of
of strikes
strikes or
or damages.
damages.
Caution:
Caution: 11 pulse/sec
pulse/secfor fora maximum
a maximum of 200
of 200 consecutive
consecutive pulses
pulses then athen a 40 minutes
40 minutes break.
break.
Warning: Keep dry! Make sure no liquid gets into the control unit. Do not lean liquid
Warning:
holders onKeep
it. dry! Make sure no liquid gets into the control unit. Do not lean liquid
holders on it.
Warning: You should install the device in dry environments only and keep it dry.
Warning:
Take care You should
no liquid install
gets into the
thedevice
controlinunit
drysince
environments onlytoand
this can lead and into the
malfunction.
handpiece keep it dry. Take care no liquid gets into the control unit since this can
Warning:
lead The device must be only supplied with the voltage which is stated on the
to malfunction.
rating plate placed on the rear panel of the control unit.
Warning: The device must be only supplied with the voltage which is stated on the
Warning:
rating plateUse fuseson
placed having a value
the rear panelcorresponding
of the controltounit.
the one stated on the line filter
rating plate.
Warning: Use fuses having a value corresponding to the one stated on the line
Warning:
filter ratingHandle
plate. and use with care the power cable and the hand-piece/footswitch
cordsets. In order to avoid cable stress use them in wide leeway situations.
Warning: Handle and use with care the power cable and the hand-piece/footswitch
Attention:InThe
cordsets. warranty
order to avoidcoverage is nullified
cable stress by improper
use them usage situations.
in wide leeway of the device.
Attention: The
Attention: According
warrantyto an official test
coverage the Magnetic
is nullified Malletusage
by improper meetsof the requirements
the device.
of Directive 89/336/EEC concerning electromagnetic compatibility and doesn’t emit
Attention:
any According
interfering to an official test the Magnetic Mallet meets the requirements
radiation.
of Directive 20114/30/UE concerning electromagnetic compatibility and doesn’t
Attention:
emit Do not use
any interfering on patients :
radiation.
- Less than 14 years old
Attention: Do problems
- With health not use on patients:
-- With
Lesssystemic
than 14 years olddependancy
chronic
-- With
With problems
health problems
in maxillary sinus
-- With
With handicaps
systemic chronic dependancy
-- With
With coagulation
problems indisosrders
maxillary sinus
-- With
With periodonatal
handicaps infection in alveolar bone
-- Smokers
With coagulation disosrders
-- Alchool
With periodonatal infection in alveolar bone
or drugs addicted
- Smokers
- Alchool or
Attention: In drugs addicted
the first stage you should start by a low level force and increase it step
by step as necessary.
Attention: In the first stage you should start by a low level force and increase it step
Attention:
by It’s up to the surgeon to determine the more suitable pressure to be ap-
step as necessary.
plied on the bone in order to achieve the desired result.
Attention: It’s up to the surgeon to determine the more suitable pressure to be ap-
Attention: It’s up to the surgeon to determine the more suitable force to achieve the
plied on the bone in order to achieve the desired result.
desired result.
Attention: It’s up to the surgeon to determine the more suitable force to achieve the
desired result.
ATTENTION: You should be knowledgeable about the device and its working
before usingYou
ATTENTION: it onshould
a patient.be knowledgeable about the device and its working
before using it on a patient.
13
16:30 INGLESE.indd 13 05/05/15 16:305.2. Intended use
The Magnetic Mallet is a medical device to be used in dental surgery.
According to the coupled handpiece it can have a different use:
• OSTEOTOME function HANDPIECE with ring nut
• CROWN REMOVER function* HANDPIECE with joint
Intended use : Osteotome function
Medical device to be used to perform dentistry surgeries. The pulse action
plastically deforms the bone in order to implant partial denture.
The Magnetic Mallet in OSTEOTOME function must be used with surgery
instruments supplied by Meta Ergonomica only.
* N.B. For the Crown-Remover function you should refer to the dedicated
Instruction for use you can download from our website
For your own safety you should not use the device in other areas of applicability.
Attention: For your own safety you should not carry out alterations on the
device.
5.3. User’s qualifications
The Magnetic Mallet should be used in medical environments only and performed
by a dentistry surgeon cognizant on the device use.
5.4. Use conditions:
Temperature -5°/+45°
5.5. Safety guidelines for the installation environment
The device should be used in dentist’s surgery or medical environments only.
Warning: The device should be installed in dry environments only and kept dry.
Warning: The device must be only supplied with the voltage which is stated on
the rating plate placed on the rear panel of the control unit.
14
INGLESE.indd 14 05/05/15 16:30 INGL5.6. Operating safety guidelines
Prior to your first treatment on a patient you should be cognizant on the working of this
medical device.
Warning: 1 pulse/sec for a maximum of 200 consecutive pulses then a
40 minutes break
Warning: Prior to activating the device you should always carry a functional
operational test (F.O.T.)
Warning: Instruments are not provided in a sterile package and must,
therefore, be sterilised before their first use (see “Disinfection and sterilization of
the parts” section). Carefully read the specific Sterilization handbook.
Warning: Move away the device from the patient every time there is a stalling
in the device working (for example: power failure)
Warning: Prior to activate the device make sure you have plugged into the
device the proper handpiece.
: Warning: Prior to activate the device make sure you corerctly plugged the
handpiece into the corresponding plug (M) and the footswitch in the corresponding
plug (N).
Warning:Handle with care the blades supplied with the beaver. Blades by
nature are very sharp-edged. You should pay attention in inserting them into the
beaver. Do not insert beaver, with the blade coupled to it, into the handpiece, till the
starting of the surgery. Do not leave the handpiece coupled with the beaver and the
blade into the housing of the power supply.
Warning: make sure no liquids penetrate into the handpiece.
15
16:30 INGLESE.indd 15 05/05/15 16:306.0. TRANSPORT AND STORAGE
6.1. Transport and storage conditions
Caution: Handle with care. Take care the package is not damaged.
Take care the external labelling is undamaged.
On the delivery please inspect the device into the packaging. Verify the device is
undamaged and the wholeness of the supply (see “Unpacking” section).
16
INGLESE.indd 16 05/05/15 16:30 INGL7.0. INSTALLATION AND INSTRUCTIONS FOR USE
7.1. Unpacking
Take care in pulling the device and the accessories out from the package. Verify no
article is missing or damaged.
Should any article be missing or be damaged please immediately contact the
manufacturer or the supplier.
STANDARD SUPPLY
1 Control unit
1 Handpiece with ring nut – OSTEOTOME function
1 Footswitch
10 Surgery instruments
1 Spare nut
2 Spare
1 O-rings
Container for2 the
with ringfor
blades nutbeaver
1 Instructions
2 for for
Spare O-rings usethe
andring
maintenance
nut
1 Instructions for use and maintenance
SUPPLY ONLY ON REQUEST
For further instruments download the catalogue from our website:
www.osseotouch.com
For OSTEOTOME function:
• Axially double bended osteotomes
•• Axially double bended osteotomes
Osteotome D-100
•• Osteotome D-100P
Osteotome D-200
•• Osteotome D-160
Osteotome D-330
•• Osteotomes Extractors / Expanders
Initial split blade
•• Hexagonal inserter
Implant inserter
17
16:30 INGLESE.indd 17 05/05/15 16:307.2. Installation and connection
Warning: Install the device in dry environments only. Take care no liquid
gets into the control unit.
Caution: The device should be installed and kept away from the patient.
The power source and the Magnetic Mallet should have the same nominal volt-
age. The nominal voltage is indicated on the rating panel placed on the rear panel
of the control unit.
2. Connect the power cable (H) to the device through the socket (A)
3. Plug in the power cable (H) of the device
4. Jack in the proper handpiece (O) into the connector (M)
5. Jack in the footswitch (L), into the connector (N)
Caution: Prior to the activation, take sure you’ve plugged in the proper
handpiece according to the required use/treatment.
QUANTITA'
1
DISEGNATO
TCR
Questo document
pubblicazione, div
MACCHINA
GRUPPO
NUMERO DISEGNO
18
INGLESE.indd 18 05/05/15 16:30 INGL7.3. Activation
1. Switch on the device pushing the ON/OFF push button (C) placed on the rear
panel of the control unit (D)
2. The display (G), placed on the front panel of the control unit, lights up.
Attention: When the display (G) lights up it will show a number (from 1 to 4)
according to the positioning of the knob (F)
7.4 Surgery instrument insertion into the handpiece
Q 1. Insert the instrument (R) into the hand-
piece
2. Insert the ring nut (Q) on the instrument
R R
3. Screw the ring nut (Q)
Q
P
4. Ensure the surgery instruments is tight-
ly fastened in order to avoid any possible
O O
ejection of the instrument during surgery.
This could cause severe risk for the opera-
tor, the assistant and the patient.
QUANTITA' DESCRIZIONE MATERIALE PESO
1 ASSIEME MAGNETIC MALLET 0.4
DISEGNATO DATA CONTROLLATO DATA APPROVATO DATA SCALA
TCR 22-06-14 22-06-14 22-06-14 1:1
Warning: Handle with care the blades supplied with the beaver. Blades by
Questo documento e le informazioni in esso contenute sono di esclusiva proprietà di TECNICONSULT SPA . Ne è vietata la copia, riproduzione,
pubblicazione, divulgazione, ed uso, anche parziale, per scopi diversi da quello per cui è stato preparato, senza nostra autorizzazione scritta.
nature are very sharp-edged. You should pay attention in inserting them into the
B
beaver. Do not insert beaver, with the blade coupled to it, into the handpiece, till the
AGGIORNATO ESPLOSO
EMISSIONE ORIGINALE
07-04-15
22-06-14
starting of the surgery. Do not leave the handpiece coupled with the beaver and the
REV. DESCRIZIONE
TCR
DATA
FIRMA
MACCHINA bladeMAGNETIC
into the housing
MALLET - of
F the power supply.
GRUPPO
B
FOGLIO
NUMERO DISEGNO
ME001_00_01 INDICE
MODIFICA
1
1
19
16:30 INGLESE.indd 19 05/05/15 16:307.5. Release of surgery instrument
1. Unscrew the ring nut (Q)
2. Pull out the instrument (R)
20
INGLESE.indd 20 05/05/15 16:30 INGL7.6. How to activate the handpiece
1. To activate the handpiece, press the footswitch (L) or the manual control (E) which
is placed on the front panel of the control unit (D).
Each pressure of the footswitch (L) or of the manual control (E) conveys a single
pulse.
Attention: In the first stage you should always start by the lighter force (No.1).
Caution: 1 pulse/sec for a maximum of 200 consecutive pulses then a
40 minutes break
7.7. Calibration of the forces
1. Turn the knob (F) on the control unit front panel in order to calibrate the force
level (from 1 to 4).
2. The display (G) shows the calibrated force level according the knob (F) positioning.
Attention: The most suitable level of the force is determined by the surgeon
according to the practice/treatment.
The Surgery instrument action is mainly due to the pressure exerted by the sur-
geon on the handpiece and by the axial forwards movement of the energy.
Attention: It’s up to the surgeon to determine the pressure to be exerted on
the bone in order to achieve the desired result.
21
16:30 INGLESE.indd 21 05/05/15 16:308.0. MAINTENANCE
8.1. Cleaning and maintenance
Caution: You should unplug the device from the main power every time you
go working on the control unit (for example: cleaning, connectors unplugging).
Caution: The silicone cable with the connector and the handpiece should be
sterilized by autoclave before any usage
Caution: You should never put your fingers or any tool inside the connector
of the handpiece or into the footswitch one.
Warning: Take sure no liquids enter into the control unit. You should not
hold liquids on it.
The control unit case should be routinely disinfected with cleaning products which
aren’t harmful for plastics.
Make sure no liquind enter into the handpiece
8.2. Disinfection and sterilization of the parts
Caution: You should unplug the device from the main power every time you
go working on the control unit (for example: cleaning, connectors unplugging).
DISINFECTION AND STERILIZATION BY AUTOCLAVE OF THE HANDPIECE WITH
ITS CORDSET AND CONNECTOR, THE RING NUT AND THE SURGERY INSTRU-
MENT.
The handpiece (O) with its cordset and metal connector (M), the ring nut (Q) and the
surgery instrument (R) must be submitted to autoclave sterilization before their
first use and before all treatment.
After having uncoupled the parts (see the section 7.5) you should carry out the
cleaning process. Brush parts off under flowing tap water, then proceed with the
sterilization by autoclave.
22
INGLESE.indd 22 05/05/15 16:30 INGLAUTOCLAVE DIRECTIONS FOR USE:
Achievement of the dew point through the proper combination of temperature and
pressure values which should be the following ones:
• 121°C for 1 bar pressure
• 135°C for 2 bar pressure
Avoid anyt entering of liquids into
the handpiece. Do not use liquid
disinfectants for the handpiece
Avoid any use of IUPAC (benzalkonium
chloride) to clean instruments
Caution:
Prior to disinfection and sterilization, carefully read the instructions contained
in the instruments tray.
23
16:30 INGLESE.indd 238.3. Maintenance
Caution: Do not open the device! Electric shock danger! Any intervention on
the device by unauthorized people nullifies the warranty.
NO LUBRICATION AND/OR MAINTENANCE IS NEEDED ON THIS DEVICE
NO INTERVENTION ON THIS DEVICE IS ALLOWED.
In the event of any failure you should immediately contact the manufacturer/dis-
tributor (see section “Failures and malfunctions”). The only maintenance you can
carry out is the fuses replacement (see section “Fuses replacement”).
8.4. Repairs
Caution: Do not open the device! Electric shock risk! Any opening of this
device by unqualified people nullifies the warranty.
Warning: FOR YOUR OWN SAFETY YOU SHOULD NOT MAKE ALTERATIONS
TO THIS DEVICE.
IN THE EVENT OF FAILURES OR MALFUNCTIONS CALLING FOR REPAIRS YOU
SHOULD PROMPTLY ADVICE THE MANUFACTURER/DISTRIBUTOR SO THAT THE
DEVICE WILL BE CALLED IN.
The distributor/manufacturer will carry out the failures test and the repair works.
8.5. Fuses replacement
Warning: You should replace fuses with some new one having the amper-
age value indicated in the rating plate on the fuse holder.
1. Take off the fuse holder (I) from the line filter using a little screwdriver.
2. In the fuse holder you will find two 1,6 A fuses.
3. Verify if one or both fuses are burnt out.
4. Pull out the burnt out fuse/fuses.
5. Pull into the holder the new fuse/fuses. Make sure they have the same amper-
age value indicated in the rating plate placed on the fuse holder.
6. Verify the correct working of the device.
24
INGLESE.indd 24 05/05/15 16:31 INGL9.0. DISPOSAL OF WASTE
This device meets the requirements of Directive
2012/19/UE for electric and electronic devices dis-
2002/96/CE
posal - RAEE. At the end of the period of use the
device and the accessories, must be sent for recycling
of the materials or for disposal in a manner which
poses no threat to humans or the environment. The
manufacturer is responsible for the compliance with
National requirements.
9.1. Responsibility
The manufacturer is liable for safety, reliability and performances of this device
only if:
• The installing has been performed in order to adhere rigorously to the in-
structions.
• All necessary alterations or repairs have been carried out by authorized
repair service only.
• The device has been used in accordance with the instructions for use and its
intended use.
9.2. Warranty
The manufacturer undertakes to provide the final customer of this device with a
warranty of satisfactory functions freedom from faults in both and manufacturing
process for the duration of 24 months from the delivery date. In case of justifi-
able complaints the manufacturer will provide repairs and/or spare parts free of
charge. Nevertheless, the manufacturer will charge the final customer with ship-
ment costs and it is not accountable for risks arising from the shipment itself. For
other instances the manufacturer will refer to the warranty indicated in the trade
general conditions.
Any opening, repair or alteration carried out by unauthorized persons relieves
the manufacturer of all responsibility concerning the safe working of the device
and nullifies the warranty.
9.3. Technical Literature
The manufacturer will furnish on request circuit diagram, the components list, all
descriptions and information useful to the technical assistance in order to carry
the authorized repairs.
25
16:31 INGLESE.indd 25 05/05/15 16:3110.0. TECHNICAL DESCRIPTION
Failures and malfunctions
Caution: Every time you go on working on the control unit you should unplug
the device from the main power.
Failure / Malfunction
Break down without sonic alarm.
Possible cause
• Failure of electrical supply.
• Line filter fuse burnt out.
• Internal circuit failure.
Possible solution
• Verify the electrical supply presence.
• Fuse/fuses replacement (see section “Maintenance”). If the malfunction is
still present after the fuse/fuses and power cable replacement contact the
authorized service provider.
• Contact the authorized service provider.
Failure / Malfunction
The display shows the capital letter “E”, the sonic alarm is ringing and you notice
a mild heating of the handpiece.
Possible cause
• Internal circuit failure.
Possible solution
• Switch off the device.
• Contact the authorized service provider.
Failure / Malfunction
When you press the footswitch no pulse is conveyed to the bone expander/oste-
otome.
Possible cause
• Possible wrong connection of the footswitch in the corresponding plug.
• The footswitch is damaged.
• Internal circuit failure.
Possible solution
• Verify you correctly connected the footswitch in the plug.
• Verify if the pulse is conveyed to the bone expander/osteotome by pressing the
manual control push-button. If so contact the authorized service provider and
ask for a new footswitch.
• Even if the footswitch doesn’t work you can follow through the treatment using
the manual control push-button.
26
INGLESE.indd 26 05/05/15 16:31 INGLFailure / Malfunction
If you press the manual control push-button no pulse is conveyed to the bone-
expander/osteotome.
Possible cause
• The manual control push-button is damaged.
• Internal circuit failure
Possible solution
• Verify if the pulse is conveyed by pressing the footswitch. If so contact the
authorized service asking for the manual control switch repair/replacement.
• Contact the authorized service.
Failure / Malfunction
The display is switched off or it shows some nondescript number.
Possible cause
• The display is damaged.
• Internal circuit failure.
Possible solution
• Take note that the level of the force is all the same indicated by the knob po-
sitioning (1-2-3-4). In that event you can follow through the treatment before
calling the authorized service for display replacement or repairs.
Failure / Malfunction
Mild heating of the handpiece
Possible cause
• Improper use. You have exceeded the maximum threshold of 200 consecutive
pulses without having had the necessary break.
Possible solution
• Switch off the device. Wait 40 minutes before switching on the device again.
Failure / Malfunction
The o-ring type 108 of the handpiece is no more working as anti-unscrewing for
the ring nut
Possible cause
• O-ring consumption or breaking
Possible solution:
• Replace the O-ring with the spare one supplied with the handpiece (see
blades container).
• If the problem endures, contact the authorized service provider.
27
16:31 INGLESE.indd 27 05/05/15 16:3111.0. TECHNICAL DESCRIPTION
Supply voltage: 230 V
Frequency: 50 Hz
Current input (stand by): 0,070 A
Current input (operative condition): 0,38 A
Fuse: F - 5x20 - 250V - 1.6A
Medical device class IIa in accordance with MDD 93/42/CEE
Medical device Class II – BF type in accordance with IEC 60601-1
Dimensions 226.5 mm x 223 mm x 109 mm
(l x h x d)
Control unit weight Kg. 2,600
Handpiece weight Kg. 0,390
Transport/storage conditions
Storage temperature range - 40°C / + 50°
Humidity 10% . 90%
(relative humidity, without condensation)
Air pressure: +700hPa / +1060 hPa
Conditions for use
Temperature range for use -5°C / + 45°C
Humidity 15% . 85%
(relative humidity, without condensation)
Air pressure: +700hPa / +1060 hPa
28
INGLESE.indd 28 05/05/15 16:31 INGL12.0. ELECTROMAGNETIC COMPLIANCE DECLARATION
Compliance Electromagnetic
Immunity test IEC 60601 Test level
level environment - guidance
Floors should be wood,
Electrostatic concrete or ceramic tile.
±8kV contact
discharge (ESD) Compliant If floors are covered with
±2, 4, 8, 15kV air
IEC 61000-4-2 synthetic material, the
relative humidity should
be at least 30%.
Electrical fast ±2kV for input Mains power quality should be
Transient/Burst power ports Compliant that of a typical commercial or
IEC 61000-4-4 ±1kV for I/O ports hospital environment.
Input power ports:
Surge 0.5 and 1.0kV (line to
line) Mains power quality should be
IEC 61000-4-5 Compliant
0.5, 1.0 and 2.0kV (line that of a typical commercial or
to earth)
hospital environment.
Signal I/O:
2kV (line to earth)
Dips:
Mains power quality should be
Voltage Dips, Short >95% UT for 0.5 and 1
cycle that of a typical commercial
interruptions and
voltage variations 30% UT for 25 cycles or hospital environment. If the
on power supply (50Hz) user of the device requires
input lines 30% UT for 30 cycles Compliant continued operation during
(60 Hz)
power mains interruptions
IEC 61000-4-11
Interruption: it is recommended that the
>95% UT for 250 cycles device be powered from and
(50Hz) uninterruptible power supply
>95% UT for 300 cycles
or a battery.
(60Hz)
Power frequency Power frequency magnetic
(50/60Hz) magnetic fields should be at levels char-
30 A/m Compliant
field acteristic of a typical location in
IEC 61000-4-8 a typical commercial or hospital
environment.
29
16:31 INGLESE.indd 29 05/05/15 16:31Th
ra
Compliance Electromagnetic
Th
Immunity test IEC 60601 Test level by
level environment - guidance
eq
m
Portable and mobile RF communication
equipment should be used no closer to
any part of the device, including cables,
than the recommended separation
distance calculated from the equation
applicable to the frequency of the
transmitter.
Recommended separation distance.
d=1,167* sqrt (P)
d=1,167* sqrt (P) 80 MHz to 800 MHz
d=2,2333* sqrt (P) 800 MHz to 2,5 GHz
Conducted RF 3 Vrms
IEC 61000-4-6 150KHz to 80MHz 3 Vrms
Where P is the maximum output power
rating of the transmitter in watts (W)
according to the transmitter
Radiated RF 3V/m manufacturer and d is the
IEC 61000-4-3 80 MHz to 2,5 GHz 3 V/m
raccomended separation distance
in metres (m).
Field strengths from fixed RF
transmitters, as determined by an F
electromagnetic site survey3,
s
should be less than the compliance
level in each frequency range. b th
Interference may occur in the vicinaty of tr
equipment marked with the following
symbol:
N
N
a
Note 1: at 80 MHz and 800 MHz, the higher frequency range applies
Note 2: these guidelines may not apply in all situations. Electromagnetic propagation is affected by
absorption and reflection from structures, objects and people.
30
INGLESE.indd 30 05/05/15 16:31 INGLThe equipment is intended for use in the electromagnetic environment in which
radiated RF disturbances are controlled.
The customer or the user of the device can help prevent electromagnetic interference
by maintaining a minimum distance between portable and mobile RF communications
equipment (transmitters) and the device as recommended below, according to the
maximum power of communications equipment.
Separation distance according to frequency of transmitter
Rated maximum output
power of transmitter 150 KHz to 80 MHz 80 MHz to 800 MHz 800 MHz to 2,5 GHz
W d=1,17*sqrt (P) d=1,17*sqrt (P) d=2,33*sqrt (P)
m m m
0,01 0,117 0,117 0,233
0,1 0,370 0,370 0,740
1 1,17 1,17 2,33
10 3,70 3,70 7,40
100 11,7 11,7 23,3
For transmitters rated at maximum output power not listed above, the recommended
separation distance d in metres (m) can be estimated using the equation applicable to
the frequency of the transmitter, where P is the maximum output power rating of the
transmitter in watts (W) according to the transmitter manufacturer.
Note 1: At 80 MHz and 800 MHz, the higher frequency range applies.
Note 2: These guidlines may not apply in all situations. Electromagnetic propagation is
affected by absorption and reflection from structures, objects an people.
by
31
16:31 INGLESE.indd 30 05/05/15 16:31Dispositif médical pour la chirurgie
et la pratique dentaire
Mode d’emploi
Rev.
REV. 04/eu- -FT05
03/EU
Rèv. 02/EU ft08- 31.10.2018
FT07 --30.01.2021
31.10.2019
1TABLE DES MATIÈRES
1.0 Informations importantes pour les utilisateurs 3
2.0 Illustrations de l’appareil 4
2.1 Éléments de commande, indicateurs, branchements et leurs fonctions 7
3.0 Explication des symboles 8
4.0 Description de l’appareil 10
4.1 Description générale du dispositif 10
4.2 Description des parties appliquées 11
5.0 Normes de sécurité 13
5.1 Avertissements et précautions 13
5.2 Utilisation prévue 15
5.3 Qualification de l’utilisateur 16
5.4 Conditions d’utilisation 16
5.5 Mesures de sécurité dans le lieu d’installation 16
5.6 Mesures de sécurité durant l’utilisation de l’appareil 16
6.0 Transport et stockage 17
6.1 Conditions de transport/stockage 17
7.0 Installation et mode d’emploi 18
7.1 Déballage 18
7.2 Installation et branchement de l’appareil 19
7.3 Mise en service 19
7.4 Insertion des instruments sur la pièce à main fonction ostéotome 20
7.5 Démontage des instruments 21
7.6 Activation de la pièce à main 21
7.7 Réglage de la force 21
8.0 Entretien 22
8.1 Nettoyage et conservation 22
8.2 Désinfection et stérilisation des parties 22
8.3 Entretien 24
8.4 Réparation 24
8.5 Remplacement des fusibles 24
9.0 Mise hors service 25
9.1 Responsabilités 25
9.2 Garantie 25
9.3 Documentation technique 25
10.0 Description technique 26
10.1 Pannes et anomalies 26
11.0 Données de la plaque signalétique et données techniques 28
12.0 Déclaration de conformité électromagnétique 29
21.0 INFORMATIONS IMPORTANTES POUR LES
UTILISATEURS
Ce manuel vous aidera à installer, brancher et utiliser correctement le dispositif
MAGNETIC MALLET. L’emploi correct de l’appareil et tous les détails nécessaires
pour l’utilisation sont expliqués ci-après. Nous vous conseillons donc de lire
attentivement le manuel et de le conserver dans l’étui de protection fourni avec le
dispositif, pour une éventuelle consultation future.
Remarque:
Les utilisateurs sont priés de contrôler toujours la mise à jour du manuel
dans la mesure où le producteur se réserve d’apporter n’importe quel type de
modification afin d’obtenir des améliorations techniques et fonctionnelles sans
aucune obligation de préavis. Les images et les dessins contenus dans ce manuel
sont purement indicatifs.
© copyright Meta Ergonomica S.r.l.
Tous les droits sont réservés. Le texte, les images et le graphisme du présent document sont protégés
par le droit d’auteur et les autres lois sur les droits de propriété intellectuelle.
Sans autorisation écrite de Meta Ergonomica S.r.l., le contenu ne peut pas être copié,
divulgué, modifié ou rendu accessible à des tiers à des fins commerciales.
32.0 ILLUSTRATIONS DE L’APPAREIL
MAGNETIC MALLET (1)
(1) Le Magnetic Mallet sera fourni seulement sur demande muni de Pièce à main avec fonction
arrache-couronnes
4Vue avant
Vue arrière
5Pièce à main fonction Ostéotome
Q
R R
Q
P
O O
62.1 Éléments de commande, indicateurs, branchements et leurs fonctions
BLOC D’ALIMENTATION
A. Prise câble d’alimentation
B. Fiche câble d’alimentation
C. Interrupteur pour l’allumage
D. Bloc d’alimentation
E. Bouton-poussoir pour la commande manuelle
F. Bouton pour le contrôle de la force
G. Afficheur indiquant le niveau de force
H. Câble d’alimentation
I. Porte-fusible
L. Commande à pédale
M. Raccordement pièce à main
N. Raccordement commande à pédale
PIÈCE À MAIN FONCTION OSTÉOTOME
O. Pièce à main avec fonction ostéotome
P. Mandrin
Q. Douille
R. Instrument
7SYMBOLES PRÉSENTS SUR LE CORPS DU MAGNETIC MALLET
Commande manuelle dispositif
Connecteur métallique pièce à main
Connecteur plastique commande à pédale
Indicateur du niveau de force
Etic.MAGNETIC MALLET:Layout 1 27-04-2015 14:29 Pagina 1
Etic.MAGNETIC MALLET:Layout 1 27-04-2015 14:29 Pagina 1
Tensione di alimentazione: 230 V
Power Voltage:
Frequenza nominale: 50 Hz
Nominal Frequency:
Corrente nominale in stand-by:
Nominal stand-by current: 0.070 A
Corrente nominale durante l’impulso:
0.38 A
Nominal current during the pulse:
Fusibili:
Fuses: F - 5x20 - 250V - 1,6A
Seguire le istruzioni per l’uso.
Prima di mettere in funzione l’apparecchiatura
leggere attentamente le istruzioni d’uso.
Scrupolously adhere to the instructions for use
Before activating the device you should carefully
read the instructions.
ATTENZIONE! Un uso scorretto del dispositivo
può provocare seri danni.
An improper use of this device can cause injuries.
ATTENZIONE!
ON: 1 colpo/sec (max 200 colpi) OFF: 40 minuti
ON: 1 pulse/sec (max 200 pulses) OFF: 40 minutes
8SYMBOLES ÉTIQUETTES
Données du fabricant et année de fabrication
SN Numéro de série du dispositif
Courant alternatif
Partie appliquée de type BF suivant les normes CEI 60601-1
Suivre le mode d’emploi. Avant de mettre in fonction l’appareil, lire
Attention tension dangereuse.
Conserver dans un endroit sec, à l’abri de jets ou projections d’eau.
Attention ! Une utilisation incorrecte du dispositif peut provoquer de
sérieux dommages.
Ne pas utiliser l’appareil si l’emballage est endommagé.
Plage de température à laquelle il est conseillé de conserver dispositif.
193 6 Marque CE accompagnée du numéro correspondant à l’Organisme
Notifié.
Collecte sélective des appareils électriques et électroniques.
Appareil Classe II - IEC 417-5172
94.0 DESCRIPTION DE L’APPAREIL
4.1 Description générale du dispositif
Le Magnetic Mallet est un dispositif électromédical pour la chirurgie et la pra-
tique dentaire ayant une double fonction suivant la partie appliquée (pièce à main)
utilisée:
• OSTÉOTOME avec forces et temps d’application prédéterminés pour la défor-
mation plastique de la masse osseuse spongieuse.
• ARRACHE-COURONNES avec forces et temps d’application prédéterminés
pour le descellement des couronnes et des bridges couvrant des dents piliers
L’appareil est constitué essentiellement d’une unité de contrôle et d’alimentation,
d’une commande à pédale et de 2 pièces à main, interchangeables suivant la fonc-
tion, qui représentent la partie appliquée.
Le carter de l’unité de contrôle est réalisé en plastique autoextinguible et présente
les parties suivantes :
• Interrupteur pour l’allumage de l’appareil (C)
• Deux prises, une pour la commande à pédale et une pour la pièce à main, dif-
férenciées par les symboles spécifiques:
► Raccordement pièce à main (M)
► Raccordement commande à pédale (N)
• Bouton-poussoir pour la commande manuelle du dispositif, identifié par le
symbole (E)
• Bouton en ABS pour le contrôle de la force (F)
• Afficheur indiquant le niveau de force sélectionné (G)
Le bloc d’alimentation, l’électronique de contrôle et de commande, ainsi que les
protections électriques/électroniques sont contenus à l’intérieur de l’unité de
contrôle. La pièce à main extérieure est alimentée, à travers un câble flexible en
polyuréthane, à une tension maximale de 58 Vcc, par l’unité de contrôle à laquelle
elle est raccordée par un connecteur qui peut être débranché manuellement.
L’actionnement de la pièce à main se fait à l’aide de la commande à pédale (L) ou
du bouton-poussoir (E) situé sur le bloc d’alimentation (D).
Tant pour la fonction OSTÉOTOME que pour la fonction ARRACHE-COURONNES, la
force fournie par la pièce à main, due à l’activation du bouton-poussoir, n’est pas
continue. Chaque pression d’un des deux boutons est suivie d’une unique trans-
mission de force de la part de la pièce à main.
10À travers le bouton (F) situé sur le bloc d’alimentation, il est possible de sélection-
choisi sera visible sur l’Afficheur (G) tout comme le numéro sélectionné sur le
bouton en question.
Le dispositif Magnetic Mallet a été conçu pour donner un total de 1 impulsion
par seconde pour un maximum de 200 impulsions consécutives. Après 200 impul-
sions consécutives, il faut effectuer une pause de quarante minutes avant de
reprendre le travail.
4.2 Description des parties appliquées
Fonction OSTÉOTOME-PIÈCE À MAIN avec douille (Équipement de base)
Pour la fonction OSTÉOTOME utiliser
la PIÈCE À MAIN avec douille (0) munie
des instruments spécifiques.
UTILISATION PRÉVUE
Dispositif médical utilisé en chirurgie
dentaire pour effectuer une vaste
gamme d’opérations chirurgicales, à
travers l’action d’un impacteur, qui
déforme plastiquement la masse osseuse
spongieuse en permettant la mise en
place de prothèses dentaires.
Le Magnetic Mallet muni de la pièce
à main avec douille est un système
servant à déformer la masse osseuse
spongieuse en permettant la mise en place
de prothèses dentaires.
Le Magnetic Mallet muni de la pièce à main avec douille est un système servant à
déformer la masse osseuse spongieuse maxillaire et mandibulaire à l’aide
d’instruments adéquats afin de permettre la pose des pivots nécessaires à la mise
en place de prothèses dentaires. À travers la pièce à main, l’impacteur percute
l’instrument avec une énergie réglable (4 niveaux), en remplaçant, dans la technique
de l’élévation de sinus maxillaire, l’énergie fournie par la force humaine à travers le
marteau chirurgical ou d’autres systèmes manuels.
En tournant le bouton situé sur l’unité d’alimentation, il est possible de sélectionner
la valeur de force désirée parmi les 4 possibles. 11Les
Les essais
essais de
de laboratoire
laboratoire effectués
effectués en
en phase
phase de de pré-commercialisation
pré-commercialisation ont ont
Les
mis essais
mis en de laboratoire
en évidence
évidence que
que les effectués
les forces
forces les en phase
les plus
plus employées
employéesde pré-commercialisation
ont
ont été
été la
la 2
2 et
et la
la 3. Il ont
3. Il est
est
mis
bon en
bon de évidence
de soulignerque
souligner les forces
toutefois
toutefois que les forces
que les
les plus employées
forces se situantont
se situant à été la 2 etd’une
à l’intérieur
l’intérieur la 3. Ilgamme
d’une est
gamme
bon de souligner
progressive
progressive toutefoisétroite,
relativement
relativement que leselles
étroite, forces
elles se situant
doivent
doivent à l’intérieur
toutes
toutes être d’une gamme
être considérées
considérées comme
comme
progressive
appropriées
appropriées àrelativement
à la
la pratique étroite, elles
pratique chirurgicale. doivent
chirurgicale. Il toutes
Il incombera
incombera doncêtre
donc auconsidérées
chirurgien comme
au chirurgien d’établir
d’établir
appropriées
quelle
quelle force à lala
force est
est pratique
la plus chirurgicale.
plus efficace
efficace suivant Ill’intervention
suivant incombera donc
l’intervention qu’ilau
qu’il chirurgien
doit
doit exécuter.d’établir
exécuter.
quelle force est la plus efficace suivant l’intervention qu’il doit exécuter.
1 impulso/seg. por un máximo de 200 impulsos consecutivos.
Luego una pausa de trabajo de 40 minutos.
!
Afin
Afin de
de sese familiariser
familiariser avecavec lele dispositif,
dispositif, dans
dans la la phase
phase initiale
initiale
Afin de se familiariser
d’utilisation,
d’utilisation, il
il est avecde
est conseillé
conseillé dele toujours
dispositif,
toujours dansde
partir
partir delala
laphase
force initiale
force la
la plus
plus
d’utilisation,
(niveauil1).
basse (niveau
basse estPar
1). conseillé
Par depour
ailleurs,
ailleurs, toujours
pour partir à
apprendre
apprendre àdeévaluer
la force
évaluer lesladiffé-
les plus
diffé-
basse
rentes(niveau
rentes forces, il1).est
forces, il est Par ailleurs,
bon
bon de tenirpour
de tenir apprendre
l’instrument
l’instrument entre
entreà évaluer
les lesquand
les doigts
doigts diffé-
quand
rentes
on forces,
on sélectionne il
sélectionne les est bon de
les différentstenir l’instrument
différents niveaux
niveaux de entre
de force.
force. Il
Il serales doigts
sera ainsi quand
ainsi plus
plus fa-
fa-
on
cilesélectionne
cile d’évaluer les différents
d’évaluer l’impulsion
l’impulsion quiniveaux
qui en de force. Il sera ainsi plus fa-
en découle.
découle.
cile d’évaluer l’impulsion qui en découle.
Soulignons
Soulignons d’autre
d’autre part
part que
que l’action
l’action de
de l’instrument
l’instrument est
est déterminée
déterminée tant
tant par
par la
la
Soulignons
pression d’autre
pression exercée
exercée part
sur
sur la que l’action
la pièce
pièce à mainde
à main dul’instrument
du chirurgien est par
chirurgien que
que déterminée
par l’avancéetant
l’avancée parde
axiale
axiale la
de
pression
l’énergie.exercée
l’énergie. Dans surles
Dans tous
tous la pièce
les cas, à main du
cas, l’avancée
l’avancée dechirurgien
de quene
l’instrument
l’instrument nepar l’avancée
pourra
pourra pas axiale de 1
pas dépasser
dépasser 1
l’énergie.
mm
mm environ, Dans tous
environ, valeur les
valeur qui cas, l’avancée
qui correspond
correspond au de l’instrument
au mouvement
mouvement maximalne pourra
maximal que pas dépasser
que l’instrument
l’instrument peut1
peut
mm
avoir.environ, valeur qui correspond au mouvement maximal que l’instrument peut
avoir.
avoir.
Remarque:
Remarque: IlIl incombe
incombe auau chirurgien
chirurgien de
de déterminer
déterminer le
le type
type de
de pression
pression àà
Remarque:
exercer
exercer avecIlla
avec incombe
la pièce à au
pièce à chirurgien
main
main sur de déterminer
sur l’instrument
l’instrument pour le typele
pour obtenir
obtenir derésultat
le pression
résultat à
voulu.
voulu.
exercer avec la pièce à main sur l’instrument pour obtenir le résultat voulu.
12
12
125.0 NORMES DE SÉCURITÉ
5.0 NORMES DE SÉCURITÉ
5.1 Avertissements et précautions
5.1 Avertissements et précautions
Prière de lire attentivement le présent manuel et de respecter scrupuleusement
Prière de lire attentivement le présent manuel et de respecter scrupuleusement
les instructions.
les instructions.
Les mots Précaution, Avertissement et Remarque ont une signification spécifique.
Les mots
Prière Précaution,
de lire Avertissement
attentivement et Remarque
le texte qui ont une
les accompagne signification
à chaque spécifique.
fois qu’elles
Prière de lire attentivement le texte qui les accompagne à chaque fois qu’elles
apparaissent dans le présent manuel d’instructions, afin de garantir un fonctionne-
apparaissent dans lede
ment sûr et efficace présent manuel d’instructions, afin de garantir un fonctionne-
l’appareil.
ment sûr et efficace de l’appareil.
Précaution: signale un danger pour le patient ou le médecin. Le non-respect
Précaution: signale
de cette indication un danger
peut pour
provoquer le lésions
des patient au
ou patient
le médecin.
ou auLe non-respect
médecin.
de cette indication peut provoquer des lésions au patient ou au médecin.
Avertissement: signale les mesures d’entretien ou de sécurité qui doivent être
Avertissement: signale
prises pour éviter les mesures
d’endommager d’entretien ou de sécurité qui doivent être
l’appareil.
prises pour éviter d’endommager l’appareil.
Remarque: indique des informations particulières pour l’utilisation de l’appareil
Remarque: indique
ou donne des des informations
informations particulières pour l’utilisation de l’appareil
importantes.
ou donne des informations importantes.
Précaution: Avant de mettre en fonction l’appareil, lire attentivement le manuel
Précaution:
d’instructions.Avant de mettrelire
Notamment, en avec
fonction l’appareil,
attention lire attentivement
le chapitre le manuel
relatif à la fonction du
d’instructions. Notamment, lire avec attention le chapitre relatif à la fonction
dispositif et aux normes de sécurité afin d’éviter de mettre en danger les patients, du
dispositif et aux
le personnel normes de sécurité afin d’éviter de mettre en danger les patients,
et soi-même.
le personnel et soi-même.
Précaution: Installer l’appareil hors de la portée du patient.
Précaution: Installer l’appareil hors de la portée du patient.
Précaution: Contrôler toujours que les câbles ne présentent pas de signes d’usure
Précaution: Contrôler
tels que des zones toujours
mises à nu ouque
desles câbles ne
ruptures de présentent pas type.
n’importe quel de signes
Dansd’usure
de tels
tels que des zones mises à nu ou des ruptures de n’importe quel type. Dans de tels
cas, ils devront être immédiatement remplacés (envoyer au service après-vente).
cas, ils devront être immédiatement remplacés (envoyer au service après-vente).
Précaution: Avant chaque mise en service, il faut effectuer un contrôle fonction-
Précaution: Avant
nel du dispositif, enchaque
tenant mise en àservice,
la pièce il faut
main loin du effectuer
patient et un
en contrôle fonction-
l’actionnant avec la
nel du dispositif, en tenant la
commande manuelle ou à pédale. pièce à main loin du patient et en l’actionnant avec la
commande manuelle ou à pédale.
Précaution : Avant chaque mise en service, s’assurer d’avoir connecté la pièce à
Précaution : Avant à
main correpondant chaque misedemandée.
la fonction en service, s’assurer d’avoir connecté la pièce à
main correpondant à la fonction demandée.
Précaution: Ne pas ouvrir l’appareil! Risque de décharge électrique! Toute ouver-
Précaution: Ne pas
ture de l’appareil deouvrir
la partl’appareil! Risque
de personnes nondeautorisées
décharge entraîne
électrique! Toute ouver-
la déchéance de
ture de l’appareil
la garantie. de la part de personnes non autorisées entraîne la déchéance de
la garantie.
Précaution: Il faut éloigner le dispositif médical du patient à chaque fois que
Précaution: Il faut éloigner le dispositif médical du patient à chaque fois que 13
13You can also read