Dolphin 7400/7450 Hand Held Computer - User's Guide
←
→
Page content transcription
If your browser does not render page correctly, please read the page content below
Dolphin® 7400/7450
Hand Held Computer
    ™

         User’s Guide
Patents
    The Dolphin 7400 mobile computer is covered by the following U.S Patent: D439,898 S.
    The IMAGETEAM 4250 image engine is covered by one or more of the following U.S. Patents: 3,991,299; 4,570, 057;
    5,021,642; 5,038,024; 5,081,343; 5,095,197; 5,144,119; 5,144,121; 5,182,441; 5,187,355; 5,187,356; 5,218,191; 5,233,172;
    5,258,606; 5,286,960; 5,288,985; 5,420,409; 5,463,214; 5,541,419; 5,569,902; 5,591,956; 5,723,853; 5,723,868; 5,773,806;
    5,773,810; 5,780,834; 5,784,102; 5,786,586; 5,825,006; 5,837,985; 5,838,495; 5,900,613; 5,914,476; D400,199; 5,292,418;
    5,932,862; 5,942,741; 5,949,052; 5,965,863; 5,992,744; 6,045,047; 6,060,722.
    Other U.S. and foreign patents pending.

    Trademarks
    Dolphin, HomeBase, IntelliBase, IntelliBase+, Mobile IntelliBase and QuadCharger are trademarks or registered trademarks
    of Hand Held Products, Inc.
    Java and all Java-based trademarks and logos are trademarks or registered trademarks of Sun Microsystems, Inc. in the U.S.
    and other countries.
    Other product names mentioned in this manual may be trademarks or registered trademarks of their respective companies and
    are hereby acknowledged.

    Disclaimer
    Hand Held Products, Inc. d/b/a HHP (“HHP”) reserves the right to make changes in specifications and other information con-
    tained in this document without prior notice, and the reader should in all cases consult HHP to determine whether any such
    changes have been made. The information in this publication does not represent a commitment on the part of HHP.
    HHP shall not be liable for technical or editorial errors or omissions contained herein; nor for incidental or consequential dam-
    ages resulting from the furnishing, performance, or use of this material.
    This document contains proprietary information which is protected by copyright. All rights are reserved. No part of this docu-
    ment may be photocopied, reproduced, or translated into another language without the prior written consent of HHP.
    © 2004 Hand Held Products, Inc. All rights reserved.
    Web Address: www.hhp.com

2
Table of Contents
Chapter 1 - Introduction
           Additional Features .......................................................................................................................1-1
       Required Safety Labels........................................................................................................................1-2
           If Your Dolphin 7400/7450 has a Radio .......................................................................................1-3
           FCC Compliance...........................................................................................................................1-4
           Regulatory and Safety Agency Approvals....................................................................................1-5
           Dolphin 7400/7450 RF Cisco 352 R&TTE Compliance Statement .............................................1-6
       Batteries ...............................................................................................................................................1-7
       Care and Cleaning of the Dolphin .......................................................................................................1-7

Chapter 2 - Getting Started
       Accessories for the Dolphin 7400/7450 ..............................................................................................2-1
       Dolphin 7400 Models and Options......................................................................................................2-1
       Image Engine Options ........................................................................................................................2-2
       Bar Code Symbologies Supported.......................................................................................................2-2
       Laser Engine Options and Symbologies Supported ............................................................................2-2
       Using Dolphin 7400/7450 for the First Time ......................................................................................2-2
       Setting the Date/Time ..........................................................................................................................2-6
       Setting Up Communications with Detectoid™ ...................................................................................2-7
       Configuring the Modem ....................................................................................................................2-10

Chapter 3 - Dolphin 7400/7450 Overview
       System Features ...................................................................................................................................3-1
           Processor .......................................................................................................................................3-1
           Operating System ..........................................................................................................................3-1
           Memory .........................................................................................................................................3-1
           Radio Options ...............................................................................................................................3-1
       Front Panel Features ............................................................................................................................3-2
           LEDs .............................................................................................................................................3-2
           1/4 VGA Display ..........................................................................................................................3-2
           ON/SCAN Key .............................................................................................................................3-3
           Cursor Keys...................................................................................................................................3-3
           Audio Signals ................................................................................................................................3-3
           Keyboard .......................................................................................................................................3-3
           RF Antenna ...................................................................................................................................3-3
       Back Panel Features.............................................................................................................................3-4
           Dolphin 7400.................................................................................................................................3-4
           Image Engine ................................................................................................................................3-4
           Laser Engine .................................................................................................................................3-5
           Battery Well ..................................................................................................................................3-5
           Battery Charging Contacts ............................................................................................................3-5
           Hand Strap.....................................................................................................................................3-5
           Dolphin 7450.................................................................................................................................3-6
           Rubber Nose Bumpers ..................................................................................................................3-7
           Scan Trigger ..................................................................................................................................3-7
           Pistol Grip Handle.........................................................................................................................3-7

                                                                                                                                                                 iii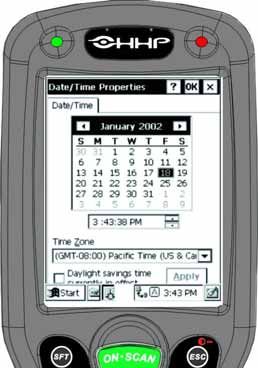
Communication ...................................................................................................................................3-7
         Micro-DB9 RS-232 Port ...............................................................................................................3-7
         IrDA Port.......................................................................................................................................3-7
         RJ-45 Phone Jack (7400 only) ......................................................................................................3-7
      Power ...................................................................................................................................................3-8
         5 VDC Port...................................................................................................................................3-8
         Batteries ........................................................................................................................................3-8
         Internal NiMH Backup Battery.....................................................................................................3-8
         Main Battery Pack.........................................................................................................................3-8
      Managing Battery Power .....................................................................................................................3-8
         Setting Critical and Low Battery Points .......................................................................................3-9
         Using the Power Control Panel .....................................................................................................3-9
         Servicing the Battery Pack ..........................................................................................................3-10
      Charging the Battery Pack .................................................................................................................3-10
         Storing Batteries..........................................................................................................................3-10

Chapter 4 - Using the Dolphin 7400/7450
      Entering Data .......................................................................................................................................4-1
          Via the Touch Screen ....................................................................................................................4-1
          Via the Keyboard ..........................................................................................................................4-1
          Using the Image Reader ................................................................................................................4-1
          Omni-Directional Scanning Options.............................................................................................4-2
      Communication Media ........................................................................................................................4-3
          Software Communication Programs .............................................................................................4-3
      Keyboards ............................................................................................................................................4-4
          Using the Cursor Keys ..................................................................................................................4-5
          Using the Modifier Keys...............................................................................................................4-6
          Other Special Keys........................................................................................................................4-6
          Key Combinations.........................................................................................................................4-7
      Navigating the Keyboard.....................................................................................................................4-7
      Using the Modem ................................................................................................................................4-8

Chapter 5 - Dolphin 7400/7450 RF Terminal
      Configuring The Dolphin 7400/7450 RF Terminal.............................................................................5-2
      Client Utilities for the Cisco DSSS 802.11b Radio.............................................................................5-2
      Configuring the Cisco DSSS WLAN Radio........................................................................................5-3
      Host Connectivity ................................................................................................................................5-5

Chapter 6 - Dolphin Charging/Communication Cradles
      Hub of the System ...............................................................................................................................6-1
         Power Conditioning ......................................................................................................................6-1
         Convenient Storage .......................................................................................................................6-1
      Dolphin Charging/Communication Cradle Parts & Functions............................................................6-2
         HomeBase/IntelliBase/USB HomeBase ......................................................................................6-2
         IntelliBase+ ...................................................................................................................................6-3
         Bottom Panel of HomeBase/IntelliBase/IntelliBase+...................................................................6-6

iv
Powering the Dolphin Terminal ..........................................................................................................6-7
           Charging Additional Battery Packs in the IntelliBase+ ................................................................6-8
           Deep-Cycling Batteries .................................................................................................................6-8
       Setting Up For Communications .........................................................................................................6-8
           Installing The Charging/Communication Cradle ..........................................................................6-8
           Configuring the Dolphin Terminal for Communications ...........................................................6-10
       Setting Up For Communications With The USB HomeBase............................................................6-12
           Communicating with the Dolphin Terminal ...............................................................................6-14
       Mounting the HomeBase/IntelliBase/USB HomeBase .....................................................................6-15

Chapter 7 - Dolphin QuadCharger
       Dolphin QuadCharger Parts and Function...........................................................................................7-1
          Top Panel ......................................................................................................................................7-1
          Rear Panel .....................................................................................................................................7-2
       Charging Batteries In The QuadCharger .............................................................................................7-2
          Setting Up The QuadCharger........................................................................................................7-2
          Supplying Power To The QuadCharger........................................................................................7-2
          Inserting and Removing Battery Packs .........................................................................................7-2
          LEDs .............................................................................................................................................7-3
          Servicing The Battery Pack...........................................................................................................7-3
          Storing Batteries............................................................................................................................7-3
       Troubleshooting...................................................................................................................................7-4

Chapter 8 - Dolphin Mobile Charging/Communication Cradles
       Mobile IntelliBase and Mobile Base Parts and Functions...................................................................8-2
           Front Panel ....................................................................................................................................8-2
           Rear Panel .....................................................................................................................................8-4
           Bottom Panel of Mobile IntelliBase/Mobile Base ........................................................................8-6
       Powering the Dolphin Terminal ..........................................................................................................8-6
           Charging A Dolphin Terminal ......................................................................................................8-6
           Deep-Cycling Batteries .................................................................................................................8-6
       Setting Up For Communications with the Mobile IntelliBase/Mobile Base.......................................8-7
           Installing The Dolphin Mobile IntelliBase ...................................................................................8-7
           Installing The Dolphin Mobile Base .............................................................................................8-8
           Configuring the Dolphin Terminal .............................................................................................8-10

Chapter 9 - Developing Applications

Chapter 10 - Warranty, Support and Service
       Limited Warranty ..............................................................................................................................10-1
       How Problems Should Be Handled ...................................................................................................10-1
       Return Information ............................................................................................................................10-2
          Locations .....................................................................................................................................10-2
       How To Extend Your Warranty ........................................................................................................10-2
       Technical Assistance .........................................................................................................................10-3

Chapter 11 - Appendix A

                                                                                                                                                              v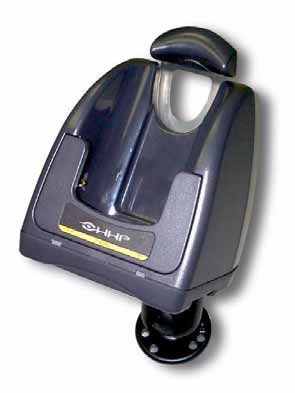
Using the Modifier Keys ...................................................................................................................11-2
     43-Key Alpha/Numeric Keyboard.....................................................................................................11-2
         Key Combinations.......................................................................................................................11-3
     35 Key Numeric/Alpha......................................................................................................................11-4
         Key Combinations.......................................................................................................................11-5
     56 Key Full Alpha Numeric ..............................................................................................................11-5
         Key Combinations.......................................................................................................................11-7

vi
1
         Introduction

    Congratulations on the purchase of your new Dolphin 7400/7450 hand held computer. You have made a wise choice in selecting
    the Dolphin, a device known worldwide for its ergonomic shape, light weight and single-handed data collection features.
    The patented shape of the Dolphin 7400 allows true, one-handed operation and fits either hand comfortably, while the Dolphin
    7450’s integrated pistol-grip handle provides comfortable ergonomics and intuitive point-and-shoot scanning for extended
    periods of use.
    Built to last, the Dolphin’s ruggedly built case houses a 206MHz RISC processor and Microsoft® Windows® CE™ operating
    system that is easily programmable with standard programming tools, Microsoft® Windows® CE™ eMbedded Visual Tools
    (includes eMbedded Visual C/C++® and eMbedded Visual Basic®) or Java™. Dolphin 7400 supports Insignia Solutions® Jeode™
    Java Virtual Machine to run Java-based applications on the terminal.
    Load up the Dolphin with your custom software application and the ultimate data collection solution for your business fits in the
    palm of your hand.
    The terminal provides ample, secure storage for data and applications with its 32 MB RAM and 32 MB Flash memory
    configuration. Up to 256MB additional memory for data storage is available with an optional compact flash card.
    The Dolphin 7400/7450 terminals are some of the most durable devices available, designed to withstand repeated five-foot drops
    onto a concrete floor. The terminal also resists extreme temperatures, humidity levels and dust conditions.

    Additional Features
    •   Long-lasting Nickel Metal Hydride (NiMH) batteries
    •   Large, easy-to-read 240 x 320 1/4 VGA backlit display that can display text or graphics
    •   Natural scan and viewing angle
    •   Low-power, high-resolution digital image engine for omni-directional and auto-discrimination decoding of linear bar codes
    •   Stacked Linear and matrix codes and provides
    •   OCR (Optical Character Recognition) functionality
    •   Optional Advanced Long Range laser scanner
    •   802.11b direct sequence and frequency-hopping spread spectrum radio options for real-time data collection applications
    The Dolphin 7400/7450 hand held computer/HomeBase™ User Guide is designed to provide you with the information you need
    to make the most of your new Dolphin terminal. Sections on the basics, safety, battery use, accessories, and service make this
    guide a complete source of information.

                                                                                                                                1-1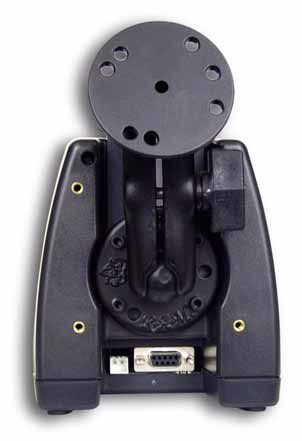
Required Safety Labels
The Dolphin 7400/7450 hand held computer meets or exceeds the requirements of all applicable standards organizations for
safe operation. However, as with any electrical equipment, the best way to ensure safe operation is to know the possible risks.
The following safety guidelines are designed to protect both you and others around you. Please read them carefully before using
your Dolphin terminal.

Batch Terminals
The following is the required safety label that appears on the back panel of Dolphin 7400/7450 batch terminals equipped with an
imager:

The following is the required laser safety label that appears on the back panel of Dolphin 7400/7450 batch terminals equipped
with a laser scanner:

1-2

If Your Dolphin 7400/7450 has a Radio
The Dolphin 7400/7450 RF terminal is designed to comply with the most current applicable standards on safe levels of RF energy
developed by the Institute of Electrical and Electronics Engineers (IEEE) and the American National Standards Institute (ANSI)
and has been recommended for adoption by the Federal Communications Commission (FCC).
The following is the required safety label that appears on the back panel of the Dolphin 7400/7450 RF terminals equipped with
a Cisco® 352 radio and an imager:

The following is the required safety label that appears on the back panel of Dolphin 7400/7450 RF terminals equipped with a
laser scanner:

                                                                                                                         1-3
FCC Compliance

Dolphin 7400/7450 Batch Terminal
The Dolphin 7400/7450 Batch complies with part 15 of the FCC rules. Operation is subject to the following two conditions:
1. Devices may not cause harmful interference.
2. Devices must accept any interference received, including interference that may cause undesired operation.

Dolphin 7400/7450 RF Terminal with Cisco 352
This device complies with Part 15 of the FCC Rules. Operation is subject to the following two conditions:
1. This device may not cause harmful interference.
2. This device must accept any interference received, including interference that may cause undesired operation.
In accordance with FCC 15.21, changes or modifications not expressly approved by the party responsible for compliance could
void the user’s authority to operate the equipment.
This equipment has been tested and found to comply with the limits for a Class B digital device pursuant to Part 15 of the FCC
Rules. These limits are designed to provide reasonable protection against harmful interference in a residential installation. This
equipment generates, uses, and can radiate radio frequency energy and, if not installed and used in accordance with the
instructions, may cause harmful interference to radio communications. If this equipment does cause harmful interference to radio
or television reception, which can be determined by turning the equipment off and on, the user is encouraged to try to correct the
interference by one or more of the following measures:
•   Reorient or relocate the receiving antenna.
•   Increase the separation between the equipment and receiver.
•   Connect the equipment into an outlet on a circuit different from that to which the receiver is connected.
•   Consult the dealer or an experienced radio/TV technician for help.
If necessary, the user should consult the dealer or an experienced radio/television technician for additional suggestions. The user
may find the following booklet helpful: "Something About Interference." This is available at FCC local regional offices. Our
company is not responsible for any radio or television interference caused by unauthorized modifications of this equipment or the
substitution or attachment of connecting cables and equipment other than those specified by our company. The correction will
be the responsibility of the user. Use only shielded data cables with this system.
In accordance with FCC 15.21, changes or modifications not expressly approved by the party responsible for compliance could
void the user’s authority to operate the equipment.

CAUTION: To comply with FCC RF exposure compliance requirements, a separation distance of at least 2 inches (5 cm)
must be maintained between the antenna of this device and all persons (excluding hands, wrists, feet and ankles),
during normal operation.
This device and its antenna must not be co-located or operating in conjunction with any other antenna or transmitter.
This device is not specified or designed for body-worn configurations. Use of any body-worn accessories may not
ensure compliance with the FCC RF exposure guidelines.

Canadian Compliance
This Class B digital apparatus complies with Canadian ICES-003.
Operation is subject to the following two conditions: 1. Devices may not cause harmful interference. 2. Devices must accept any
interference received, including interference that may cause undesired operation. To prevent radio interference to the licensed
service, this device is intended to be operated indoors and away from windows to provide maximum shielding. Equipment (or its
transmit antenna) that is installed outdoors is subject to licensing.

Cet appareil numérique de la Classe B est conforme à la norme NMB-003 du Canada.

1-4
Regulatory and Safety Agency Approvals

     Parameter                                 Specification

     U.S.A.                                    FCC Part 15, Class B

     Canada                                    IEC 0003

     Europe                                    EN 55022 (CISPR22) Class B
                                               ETS 300 826 Type Certified

     Mexico                                    NOM Certified

     Others                                    EMC 89/336/EEC
                                               EN 50082-1:1997, EN55024

     RF Approvals

     U.S.A                                     FCC Part 15.247
     Canada                                    RSS 210 Certified
     Europe                                    ETS 300 328 Certified
     Mexico                                    Telecom RCPHAD002-485

The CE mark on the product indicates that the system has been tested to and conforms with the provisions noted within the 89/
336/EEC Electromagnetic Compatibility Directive and the 73/23/EEC Low Voltage Directive.

                                                                                                                        1-5
Dolphin 7400/7450 RF Cisco 352 R&TTE Compliance Statement
The Hand Held Products Dolphin 7400RF and Dolphin 7450RF are in conformity with all essential requirements of the R&TTE
Directive (1999/5/EC). This equipment has been assessed to the following standards:
Parameter Specification
R&TTE EN 300 328-2:2000
EN 301 489-1 (August 2000)
EN 301 489-17 (Sept 2000)
EN 60950: 1992 Incl Amdt 1-4,11
EN 50361: 2001
This product is marked with in accordance with the Class II product requirements specified in the R&TTE
Directive, 1999/5/EC.
The equipment is intended for use throughout the European Community, but its authorization for use in France is restricted as
follows:
PAN European Frequency Range: 2.402 - 2.480 GHz
France: Limitation on Outdoor use - maximum power (EIRP*) of 100 mW for the 2400-2454 MHz band and with maximum power
(EIRP*) of 10 mW for the 2454-2483 MHz band.
For further information please contact,
HHP EMEA
Nijverheidsweg 9
Eindhoven, 5627 BT
Netherlands
Canadian Radio certification: 1693 B12143
HHP shall not be liable for use of our product with equipment (i.e.,power supplies, personal computers, etc.) that is not CE
marked and does not comply with the Low Voltage Directive.
1-6Pacemakers, Hearing Aids and Other Electrically Powered Devices
Most manufacturers of medical devices adhere to the IEC 601-1-2 standard. This standard requires devices to operate properly
in an EM Field with a strength of 3V/m over a frequency range of 26 to 1000MHz.
The maximum allowable field strength emitted by the Dolphin is 0.3V/m according to Subpart B of Part 1 of the FCC rules.
Therefore, the Dolphin RF will have no effect on medical devices that meet the IEC specification.
Microwaves
The radio in the Dolphin RF terminal operates on the same frequency band as a microwave oven. Therefore, if you use a
microwave within range of the Dolphin RF terminal you may notice performance degradation in your wireless network. However,
both your microwave and your wireless network will continue to function.
The Dolphin Batch terminal does not contain a radio, and therefore, is not affected by microwave ovens.
Batteries
The following are general guidelines for the safe use and disposal of batteries:
• Use only the battery supplied with your Dolphin or a replacement battery supplied, recommended, or approved by HHP.
• Replace a defective battery immediately as it could damage the Dolphin terminal.
• Never throw a used battery in the trash. It contains heavy metals and should be recycled according to local guidelines.
• Don’t short-circuit a battery or throw it into a fire. It can explode and cause severe personal injury.
• Excessive discharge damages a battery. Recharge the battery when your Dolphin indicates low battery power.
• Although your battery can be recharged many times, it will eventually be depleted. Replace it after the recommended usage
period (about 600 charge cycles for the 2700 mAh NiMH battery) or if the battery is unable to hold an adequate charge.
• If you are not sure the battery or charger is working properly, please send it to Hand Held Products or an authorized HHP
service center, for inspection.
The Dolphin hand held computer meets or exceeds all applicable standards and has been manufactured to the highest level of
quality.
Care and Cleaning of the Dolphin
When needed, clean the image engine/laser scanner window and the LCD display with a clean non-abrasive, lint-free cloth.
1-71-8
2
Getting Started
The Dolphin 7400/7450 is a hand held computer/imager designed for easy, single-handed data collection. The terminal is
equipped with a StrongARM 206MHz RISC processor built to run the Windows CE operating system.
Dolphin 7400/7450 terminals are available with different types of 2D imagers, wireless radios, and memory configurations to meet
most any automated data collection requirement. Dolphin 7400 hand held computers may also be equipped with a low power,
high speed, V.90 56K FAX/modem to allow communications via an analog phone line.
The Dolphin 7450 terminal’s integrated pistol-grip handle provides comfortable ergonomics and intuitive point-and-shoot
scanning for extended periods of use.
Offered with a memory configuration of 32 MB RAM and 32 MB Flash, the device has three keyboard options and a 240 x 320
pixel, backlit 1/4 VGA display. The display also is available with a touch screen.
The Dolphin 7400/7450 platform is equipped with an integrated imager. The imager can take images like shipping manifests,
recipient signatures, while at the same time, decode OCR (Optical Character Recognition) fonts. The imager can also decode
standard linear and two-dimensional symbologies. An optional Advanced Long Range laser scanner is also available for both
terminals.
Accessories for the Dolphin 7400/7450
The Dolphin 7400/7450 is part of a data collection system that includes accessories specifically designed for vehicle, desktop
and hub operations. Accessories available include serial and networkable communications/charging cradles, vehicle mounted
charging/communication cradles.
You can use these accessories with the Dolphin:
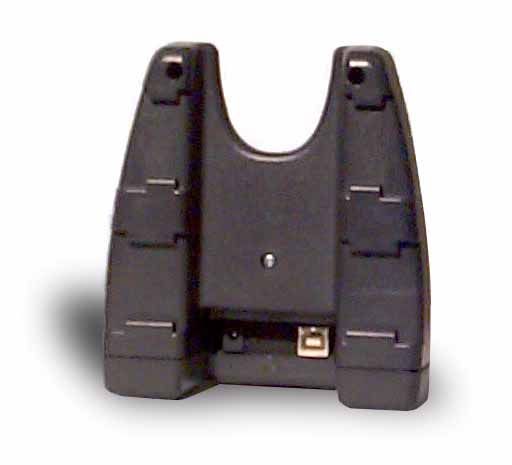
Dolphin HomeBase™ Dolphin terminal charging and communication cradle, includes power adapter.
Dolphin IntelliBase™ Dolphin terminal charging and communication cradle for communicating with devices such as printers
and modems without integrated IrDA protocol software, includes power adapter.
Dolphin USB HomeBase Communicate directly with a USB-compatible host computer, includes power adapter.
Dolphin IntelliBase+™ Communicate with devices such as printers and modems without integrated IrDA protocol software, and for
charging and conditioning a spare battery, includes power adapter.
Dolphin Quad Battery Charger™ Charges four batteries in under three hours and conditions in under eight hours.
Dolphin HomeBase™ Power Adapter Replacement power adapter for Dolphin HomeBase.
Note: Use only power adapters approved for use by HHP. Failure to do so may result in improper operation or damage to the
unit and will void the warranty.
NiMH Battery Pack Nickel Metal Hydride (NiMH) 2700mAh rechargeable battery for the Dolphin.
RS-232 Serial Cable Allows Dolphin 7400 to connect to other computer systems for file transfer or to connect Dolphin 7400
terminal using the terminal’s serial RS-232 interface.
Contact your Value-Added Reseller for more information. For details about how to install or use any of these accessories, refer
to the documentation provided with the product. Documentation may also maybe downloaded from our website, www.hhp.com.
Dolphin 7400 Models and Options
Hand Held Product’s family of Dolphin 7400 hand held portable data collection terminals includes these models:
The Dolphin 7400 Batch terminal is a Windows CE programmable hand held computer with a unique, ergonomic shape
designed for single-handed use. The standard Dolphin 7400 is available with 32 MB RAM and 32 MB Flash and an integrated
digital imager or Advanced Long Range (ALR) laser scanner. An optional compact Flash card offers up to 256MB of additional
memory. The terminal's RS-232 connector supports external plug-in scanners, land line modems and printers. It also features
an IrDA infrared transceiver for data communicate to portable printers and cradles.
The Dolphin 7450 Batch hand held computer offers the same enhanced productivity features of the Dolphin 7400 terminal with
the added convenience of a pistol grip style form factor for high volume scanning applications.
The Dolphin 7400 RF and Dolphin 7450 RF terminals integrate the basic functionality of the Batch terminals with the choice of
an 802.11b direct sequence radio or frequency hopping radio that allows the terminal to communicate with a host computer via
a radio WLAN.
2-1Image Engine Options
Dolphin 7400/7450 terminals may be equipped with one of three image engines options:
• LX: red or green aimer option scans from 2.0 to 15.0 in. (5.1 to 38.1 cm.)
• LR: red or green aimer option scans from 1.9 to 9.4 in. (4.8 to 23.9 cm.)
• HD: red or green aimer option scans from 1.6 to 3.9 in. (4.1 to 9.9 cm.)
Bar Code Symbologies Supported
1D symbologies supported are: Code 3 of 9, Interleaved 2 of 5, EAN, Codabar, Code 11, Code 128, Code 93, TLC39, Universal
Product Code (UPC), RSS.
2D symbologies supported are: PDF417, MaxiCode, Data Matrix, QR, EAN.UCC, Aztec, Code 49.
Composite codes supported are: RSS-14, CODABLOCK, Aztec Mesa.
OCR codes supported include: OCR A and OCR B.
Postal codes supported include: Postnet and most international 4 state codes, PLANET CODE, BPO 4 STATE, Canadian 4
State, DUTCH POSTAL, AUSTRALIAN 4 STATE, JAPANESE POSTAL.
Laser Engine Options and Symbologies Supported
Dolphin 7400/7450 terminals may be equipped with an Advanced Long Range (ALR) laser engine. The ALR engine reads 30mil
bar codes from 2.75 to 8 ft (0.83 to 2.4 m) and 100mil reflective bar codes out to 30 ft (9.1 m), making it ideal for use in warehouse
applications.
1D symbologies supported are: UPC/EAN, Code 39, Interleaved 2 of 5, Codabar, Code 128, MSI, Plessey.
Using Dolphin 7400/7450 for the First Time
Follow these steps to begin using your Dolphin 7400/7450 terminal.
1. Unpack and check the terminal and documentation.
2. Charge the main battery pack and internal back-up battery.
3. Turn the Dolphin on.
4. Calibrate the screen, set the date/time, and user information.
5. Verify that the Dolphin 7400/7450 terminal is working properly.
1 Unpack the Carton and Check Its Contents
Inspect the package to see that the following standard items and accessories (if ordered) are included in the standard Dolphin
7400/7450 kit:
• Dolphin 7400/7450 hand held computer/imager/scanner
• Battery (2700 mAh, Nickel Metal Hydride [NiMH])
• Dolphin HomeBase
• RS-232 Serial Cable
• AC-DC Power Adapter for Dolphin Terminal/HomeBase
• Dolphin 7400/7450 Software Development Kit & User’s Guide CD-ROM
Note: Be sure to keep the original packaging in the event that the Dolphin terminal or HomeBase should need to be returned for
service.
2-22 Charging the Main Battery and Backup Battery
WARNING Use only 2700 mAh NiMH battery packs provided by HHP. The use of any other battery pack in the Dolphin terminal
will void your warranty and may result in damage to the Dolphin terminal or battery.
WARNING Although the Dolphin 7400/7450 terminal is received with the battery inserted, it is NOT ready for charging and/or
deep-cycling. Remove the plastic insulator located between the terminal and battery connectors. Failure to remove the insulator
may result in damages to the terminal.
The terminal’s NiMH battery is not conditioned at the factory and is shipped discharged of all power and inserted in the Dolphin
terminal.
For maximum battery life, HHP recommends that you deep-cycle the battery twice before initial use. It is also recommended that
you service the battery once per month. Refer to the section on Managing Battery Power in Chapter 3 for further information on
deep-cycling the battery.
After deep-cycling the battery, the terminal’s NiMH battery must be charged before using it for the first time. To charge the main
battery pack:
1. Place the main battery pack in the Dolphin 7400/7450 terminal.
2. Place the terminal in the terminal well of the Dolphin HomeBase. Time to Charge: 3.5 hours for the main battery; 8 hours for
the back-up battery
As the main battery pack charges, the internal back-up battery also charges. For the initial charging cycle, it is recommended
that the terminal be charged for approximately 8 hours to allow adequate charging time for the back-up battery. Not doing so may
result in the terminal becoming unstable should the unit lose power and the back-up battery is required. The back-up battery
maintains the RAM and clock when the NiMH main battery pack is discharged or removed from the terminal.
Removing the Battery Pack
Follow these steps to remove the Dolphin battery pack.
1. Hold the Dolphin with the front panel (keyboard) facing down.
2. On the 7400, remove the handstrap by pushing its clip down and forward to unhook it from the terminal; move the strap away
from the battery compartment.
3. Push the locking tab on the battery pack up and pull the battery out from the Dolphin terminal with a hinging motion.
Installing the Battery Pack
Follow these steps to install the Dolphin 7400 battery pack.
1. The Dolphin 7400 ships with the handstrap installed. Hold the terminal with the front panel (keyboard) facing down. Push the
clip of the handstrap down and away from the terminal to unhook it; move the strap up and away from the battery compart-
ment.
2. Insert the end without the locking tab into the top of the battery opening and snap the battery into place with a hinging
motion. Press the battery into the well until the clip is engaged. The battery case serves as the back cover of the Dolphin.
3. Reattach the handstrap by positioning it down over the battery case and sliding the clip back into the place at the bottom end
of the 7400.
4. The terminal will initialize and, after a few seconds, will show the splash screen for the Dolphin 7400 demo program.
Follow these steps to install the Dolphin 7450 battery pack.
1. Hold the terminal with the front panel (keyboard) facing down.
2. Insert the end without the locking tab into the top of the battery opening and snap the battery into place with a hinging
motion. The battery case serves as the back cover of the Dolphin.
3. The terminal will initialize and, after a few seconds, will show the splash screen for the Dolphin 7400 demo program.
3 Turning the Dolphin On And Off For the First Time
Turning on the Dolphin 7400/7450 for the first time is a cold boot. Follow these steps to turn on your Dolphin 7400/7450 terminal.
2-31. Install the charged battery pack in the Dolphin.
2. The red LED will come on and the green LED will blink for approximately three seconds.
DO NOT PRESS ANY KEYS WHILE THE TERMINAL IS BOOTING UP.
3. The terminal will initialize and after a few seconds will display the splash screen shown below:
Dolphin 7400/7450 Splash Screen
Waking the Dolphin From Sleep Mode
The Dolphin 7400/7450 terminal is never actually turned off. To conserve power, the Dolphin suspends operation, or goes into
“sleep mode” when it is inactive for a programmed period of time, as defined by your application. The screen is blank when the
Dolphin is in “sleep mode.” Press the ON/SCAN key to wake the Dolphin terminal from sleep mode, and you can start working
where you left off.
The Dolphin terminal also goes into sleep mode if you remove the main battery pack. To wake the Dolphin terminal from sleep
mode, install a charged battery and press the ON/SCAN key.
WARNING If the main battery and back-up battery are ever fully discharged of power, the terminal will cold boot. The
terminal will be restored to its original state. All data stored in RAM memory also will be lost.
4 Calibrating the Screen, Setting the Date/Time and Modem (if equipped)
Calibrating the Screen
If your Dolphin 7400/7450 is equipped with a touch screen, you must calibrate the screen after a cold boot. Calibration can also
be performed by opening the "Stylus" folder in the Control Panel directory and choosing the "Calibration" tab. Follow the
directions on the screen to calibrate the screen and keep the following points in mind:
• After the Welcome Splash Screen appears, you will be prompted to calibrate the screen. The Dolphin 7400/7450 terminal will
display a cross-hair target and a message to "Tap the target firmly……".
• Calibration should always be performed with a stylus designed for touch screen applications. The small point is required for
accurate calibration.
2-4• The stylus should be oriented at a 90 degree angle to the screen surface. Press the stylus firmly into the center of the cross-
hair target and release. Do not "double-tap" the target. You will be prompted to repeat this process for a total of five targets.
Press the key when complete in order to save the new calibration settings.
• It may also be necessary to calibrate the screen for the users preference of "double-tap" speed. If the Dolphin 7400/7450 does
not respond properly to a "double-tap" on the screen, open the "Stylus" folder in the Control Panel directory and choose the
Double-Tap tab. Double-tap the checkered square using your normal double-tap speed then verify by double-tapping the
verification icon. This setting is also reset to factory default each time the terminal is cold booted and must be recalibrated by
the user.
• After calibrating the screen, you will be prompted to set the date and time on the terminal.
HHP recommends using screen protectors for Dolphin 7400/7450 terminals equipped with a touch screen display; especially for
those terminals used for applications that require high-volume interfacing with the touch display. Screen protectors will help
prevent damage to the touch panel display and are easily installed over the display. Screen protectors can be purchased at any
major computer retail store.
Stylus Properties Screen
2-5Setting the Date/Time
Use the Windows CE Date/Time function to set the correct date and time for your Dolphin 7400/7450 terminal. Use the Dolphin
7400/7450 mouse utility to navigate through the screens if your terminal does not have a touchscreen. For more information
about the mouse utility, see Navigating the Keyboard in Chapter 4.
Note: Exit the mouse utility before adjusting the contrast.
Date/Time Properties Screen
The Dolphin 7400/7450 Demo Program main menu appears after you set the date and time.
2-6Setting Up Communications with Detectoid™
The Detectoid Communication Utility makes it easier to set-up communications between your PC and Dolphin 7300, 7400 or
7450 terminal. The utility has two components: DetectoidPC for setting up ActiveSync on the PC and DetectoidCE for setting
communication parameters on the Dolphin terminal.
DetectoidPC Screen as seen on Host PC DetectoidCE Screen as seen on Dolphin 7400/7450
Installing DetectoidPC
The DetectoidPC.exe file is located in the \Utilities\PC directory on the user’s CD that is shipped with the Dolphin terminal. Users
may run the executable right from the CD-ROM, or they can copy it to their machine.
System requirements for installing DetectoidPC on your PC are:
Operating system: Windows 98, 2000, or XP
Free disk space: Less than one megabyte
DetectoidPC is included with Dolphin 7400 and 7450 terminals using kernel 2.08 with Service Pack 2 or kernel 2.11 or later; and
Dolphin 7300 terminals with kernel 3.02 or later.
Using DetectoidPC and DetectoidCE
Use DetectoidPC to configure the ActiveSync settings on your PC for communication with a Dolphin terminal. Detectoid PC sets
the baud rate and configures the COM port for ActiveSync. Once the settings are configured, you can save them and your PC is
always ready to connect with the Dolphin terminal.
Before starting, ensure that your Dolphin is connected via serial cable or docked in a working HomeBase or IntelliBase. If
ActiveSync is detected to be running on the PC when DetectoidPC is started, the following message will appear:
2-7Click OK to continue using DetectoidPC to set up communication settings. On starting, DetectoidPC will check for the availability of COM ports, as well as IrDA/USB support. Once the terminal is detected, the port status will change from Idle to Listening as shown in the screen shot above. 2-8
DetectoidCE
After running DetectoidPC, start Detectoid CE on the Dolphin terminal selecting Start>Programs>HHP>DetectoidCE.
DetectoidCE will attempt to find the connection with the PC. If successful, the discovered settings will be saved and the
Communications Properties Launch window shown below will then display on your Dolphin. The default is Start ActiveSync when
the unit is docked or connected. By choosing the default, ActiveSync will start automatically when the terminal is connected via
a powered serial cable or docked in a powered HomeBase/IntelliBase. If you select Do not automatically start ActiveSync, you
must manually start ActiveSync on the Dolphin terminal to establish communications (see Chapter 6).

If you want to go back and change the settings later, select Start>Settings>Control Panel>Communication Properties and
select the Launch tab.
Once the communications parameters have been detected and configured, the status indicator will change to Success. Verify
that the ActiveSync settings are correct, then click save to transfer those settings to ActiveSync.

                                                                                                                           2-9
Follow these steps to establish a connection for the first time after configuring the settings: 1. Select Launch ActiveSync in the DetectoidPC window. 2. Start ActiveSync on the Dolphin terminal. Once parameters are configured and saved, you do not need to run DetectoidPC again unless you need to change the ActiveSync settings or cold-boot the terminal. Configuring the Modem If your Dolphin 7400 hand held computer is equipped with a modem, follow these configuration instructions. Use the Dolphin 7400 mouse utility to navigate through the configuration process if your terminal does not have a touch screen. For more information about the mouse utility, see Navigating the Keyboard in Chapter 4. 1. From the Start menu, select Programs>Communication>Remote Networking. 2. Select Make New Connection. Type in the name for the connection. Select Dial-Up Connection and touch Next. 3. Select the modem from the drop-down menu, CIRRUS LOGIC 56K MODEM or PCMCIA_CARD_MEMBER F56R_NCTV2, and then touch Configure. 4. Set the option on Port Settings tab as shown below and then touch OK. 5. Touch Next and enter the country code, area code and phone number in the appropriate fields. Touch Finish and the terminal will return to the Connection window. For information on using the modem, see Using the Modem in Chapter 4. 5 Verifying that Dolphin 7400/7450 is Working Properly After the main battery pack is charged and installed and you have calibrated the screen and set the time and date, the Dolphin 7400 terminal is ready to use. Choose the IMAGING DEMO or SCAN DEMO to verify that the terminal is operating properly. Touchscreen-equipped terminals: To take an image: 2 - 10
1. Select IMAGE DEMO.
2. Press the  button and the image you take will appear on the terminal’s screen.
3. Touch  to go back to the main menu.
To scan a bar code label:
1. Select SCAN DEMO.
2. Press the  button, aim the terminal at a bar code and the red SCAN LED will illuminate. The green SCAN LED
   will illuminate and the terminal will beep when a good scan is obtained. Information about the bar code scanned will appear
   on the screen.
3. Press  to exit the demo and return to the main menu.
Terminals without touchscreens:
To take an image:
1. Using the Cursor keys, navigate down to the IMAGING DEMO button and press an  key.
2. Press ON/SCAN button and the image you take will appear on the terminal’s screen.
3. Press  to go back to the main menu.
To scan a bar code label:
1. Using the Cursor keys, navigate down to the SCAN DEMO button and press an  key.
2. Press ON/SCAN button, aim the terminal at a bar code and the red SCAN LED will illuminate. The green SCAN LED will
   illuminate and the terminal will beep when a good scan is obtained. Information about the bar code scanned will appear on
   the screen.
3. Press  to go back to the main menu.

Resetting the Dolphin (Cold Boot)
Under some conditions, you may need to reset the Dolphin 7400/7450 terminal with a cold boot. These may include:
• Resetting the operating system
• Resetting the terminal back to factory defaults
• Resetting the terminal after a bootloader, keyboard, and kernel upgrade.
To perform a cold boot:
1. Press and hold the Control (CTRL) and the Escape (ESC) keys for about 10 seconds.
2. Release the keys and the terminal will reset. The red LED will come on and the green LED will blink for approximately 3
   seconds.
3. The terminal will behave as described in the section about Turning the Dolphin On for the First Time.

Resetting the Dolphin (Warm Boot)
There are times when you may need to warm boot the Dolphin 7400/7450 terminal, such as after loading a software application
that requires a warm boot after installing new software. To warm boot the Dolphin 7400 terminal:
1. Press and hold the Control (CTRL) and the SHIFT (SFT) keys for about 10 seconds, then release.
2. Release the keys and the terminal will reset. The red LED will come on and the green LED will blink for approximately 3
   seconds.
3. The terminal will initialize and after a few seconds will display the main menu screen for the Dolphin 7400/7450 Demo
   Program.

                                                                                                                           2 - 11
2 - 12
3
        Dolphin 7400/7450 Overview

    System Features

    Processor
    The Dolphin 7400/7450 terminal is equipped with a StrongARM 206MHz RISC microprocessor that runs on a 100 MHz BUS and
    is the most powerful Windows CE platform on the market.

    Operating System
    Microsoft Windows CE is a compact, highly efficient, scalable operating system whose open architecture and minimal memory
    requirements facilitate application development for energy-efficient data collection devices like the Dolphin 7400/7450 terminal.
    The graphical interface also makes the device more user-friendly.

    Memory
    Main Board
    The memory configuration for the Dolphin 7400/7450 terminals is 32 MB RAM and 32 MB Flash memory.
    Compact Flash Card
    Dolphin 7400/7450 terminals have one Type I compact Flash card socket for additional application and data storage capacity.
    Additional modular compact flash upgrades of 64 MB, 128 MB, and 256 MB are available through an authorized HHP service
    center. The compact Flash card socket is not user accessible, to preserve the terminal’s environmental rating.

    Radio Options
    Dolphin 7400/7450 terminals have one Type II PCMCIA card slot to allow for an interface with wireless network adapter cards.
    Certified radio cards currently include the Cisco 342 (FCC #LDK102035) and Cisco 352 (FCC #HD5-7400-352) series network
    cards.

                                                                                                                                3-1
Front Panel Features
This section describes features on the Dolphin 7400/7450 terminal front panel.
Decode LED Scan LED
1/4 VGA Display
(Optional
Touchscreen)
ON/SCAN Key
Cursor Key
Keypad with epoxy-
coated keys
LEDs
The red light emitting diode (LED) located at the upper right corner of the LCD display is SCAN LED. This LED illuminates when
the user presses the ON/SCAN key and activates the scan engine. The green LED located at the upper left corner of the LCD
display is DECODE LED. This LED illuminates when the bar code software successfully decodes a bar code. Both LEDs are
software programmable.
1/4 VGA Display
The Dolphin 7400/7450 screen is a non-touch 240 x 320 pixel 1/4 VGA industrial protective lens display. The electroluminescent
backlight allows you to view the display in low light conditions. To conserve power, the backlight may be programmed to
automatically turn off after a prescribed amount of time. The contrast may be adjusted with the contrast keys. The Dolphin 7400/
7450 display may be equipped with a touchscreen that can be activated with a stylus or finger.
3-2You can also read