Minleon USA Unicorn Cloud-Based LED Control System
←
→
Page content transcription
If your browser does not render page correctly, please read the page content below
Minleon USA
                     Unicorn Cloud-Based LED Control System

Last update: March 2020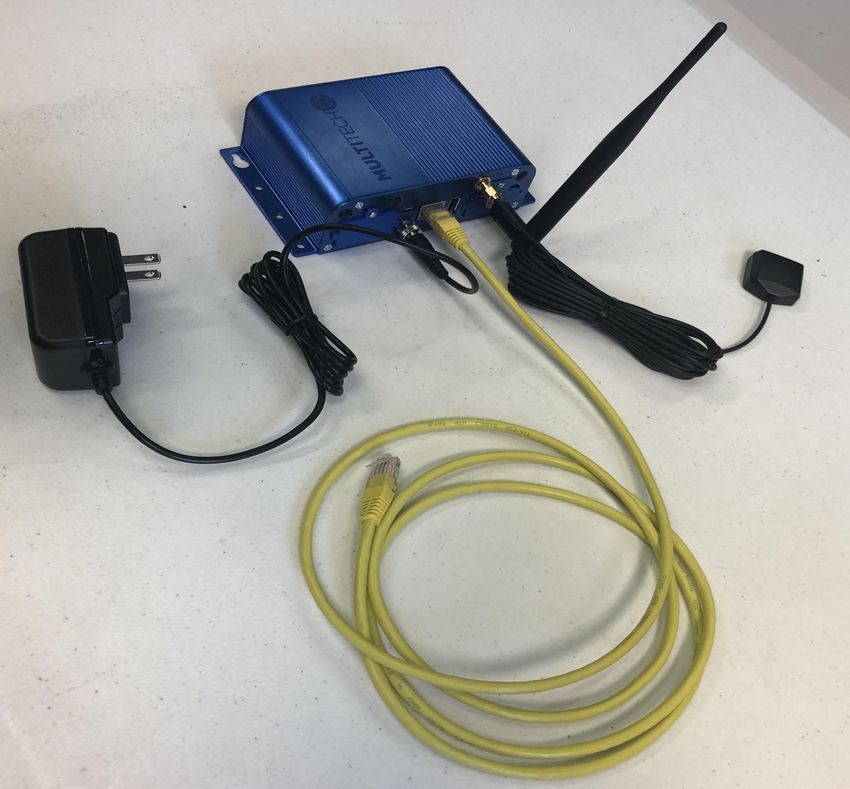
Unicorn Cloud-Based LED Control System
             Table of Contents
1.   Create an Account
2.   Become an Installer
3.   Installing the Gateway
4.   Create an Installation
5.   Installing Field Controllers
6.   Uploading Configuration to The
     Cloud
7.   Box Delivery & Verification
8.   Create a Group of Controllers
9.   Control the Lights
10. Schedule Effects
11. Troubleshooting Tips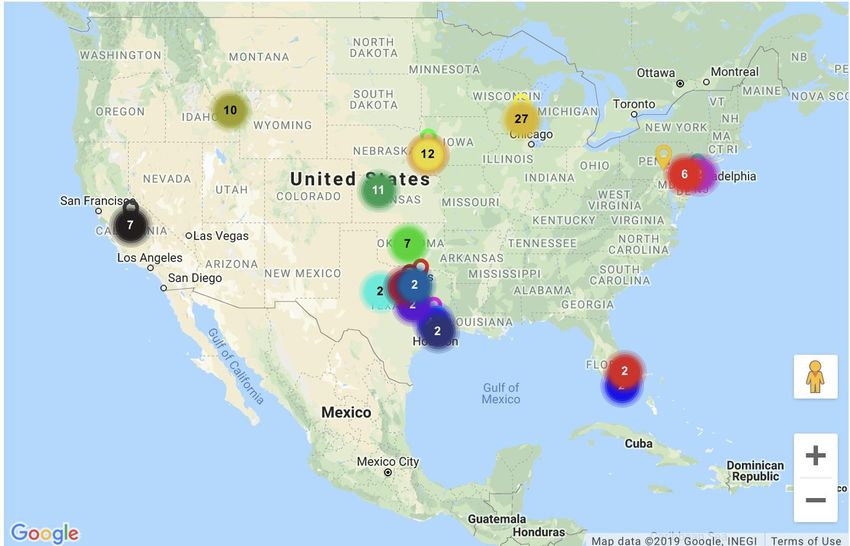
Account Creation
Go to the Unicorn Cloud account
homepage: cloud.innup.net
● Select: CREATE AN ACCOUNT
● Fill out the form with all information
● Check your email for confirmation
● Verify your account by clicking the
  link.
● Fill out the Account Form and
● Create an easy to remember
  password.
Note: This step also can be used for a
customer account creation.

Important: This info will also be used
when Configuring your Field
Controllers in the SpectraShow App
(pp 14-20).
Logging in for the
      first time
Go to cloud.innup.net and log in
using the email you created an
account with and the password you
created.

Once you login you will see the Cloud
as a user. This would be the view the
customer has as well.

If you are going to be an Installer, click
the Become Installer button.

Note: This is only used for being an
installer. Customers will be denied this
access.
Becoming An
         Installer
Once you click on Become Installer you
will fill out a Form requesting this
permission:

● In the “Company Code” type “unicloud”.
● Forward request to DISTRIBUTOR, not
  Administrator.
● In “Distributor’s Email” field always type:
  unicorn@minleonusa.com
● SEND the form and wait for a response.
  This may take up to 24 hours.

Note: The status will change from
PENDING to a disappeared status.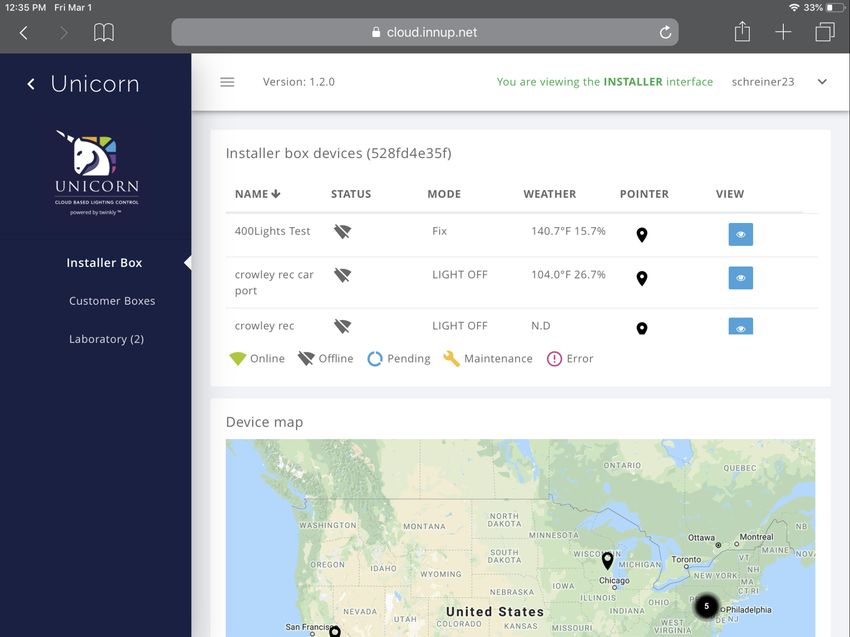
Installer Level
This is the Installer Level of the
Unicorn. You can manage your
installations from this screen.

This is also where you create new
projects for your customers

This is a management tool for the
installers.

It is helpful to think in these terms:

Customer Box=Group of Field
Controllers (aka “Devices”)
delivered to the job site

Device=single Field Controller

Installer Box
This is a virtual holding tank for
controllers not currently in use.

We place controllers that are
taken off site along with
controllers that have come out of
a rental status here.

Again, a “box” is a group of
“devices”. “Devices” are “Field
Controllers”
Laboratory
This is a virtual holding tank for
controllers (aka “Devices”) that a
customer will “send to you” in the
cloud for service. It is simple a place
to isolate and test a controller and it
not affect the customer‘s scheduled
events.

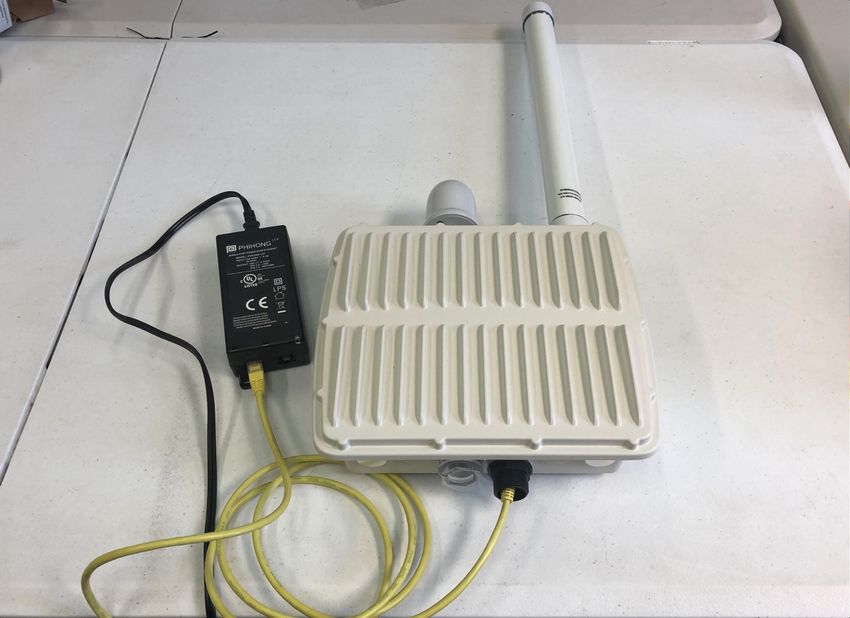
Installing the Gateway
The Gateway is the conduit to the Cloud. Therefore it
needs Internet to communicate the commands from the
Cloud to the Field Controllers.

THE INTERNET CONNECTION MUST BE OPEN WITH
NO FIREWALLS & HARDWIRED.

Also, the Ethernet PORT of the network to which you
are connecting must be configured for DHCP, random
IP address assignment.

All configuration is done prior to you receiving the
Gateway, so all you need to do is plug it in and connect
the Cat 5 cable.

Note: The only thing our Gateways talk to is the Cloud
and to the controllers, it can not communicate with
anything else, so it is extremely secure.

Range: 1-2 mile radius - 4 mile end to end, must place in
Drybox or indoors.
Installation of the
   IP67 Military
     Gateway
Like the Indoor Gateway, the Military
Grade GW needs the same internet
connection, but without the need for a
dry box. This unit also uses POE,
Power-Over-Ethernet, allowing you to
plug the power supply closer to the
internet connection and run cat5 cable
up to 200’ away to the GW. This will
give you the most mounting options
and the ability to get it as high as
possible giving you maximum
coverage.

Range: 2.5 - 5 mile radius - 10 Miles
end to end coverage max
Creating a new
installation
Because there is one Transmitter (aka:
Gateway) to many Unicorn Receivers
(aka: Field Controllers) and everything
is controlled via the Cloud, you must
have a unique ID for the installation.
This ID can be a single location (city or
shopping center) but it can also be
multiple locations across the country.
The ID allows us to assign specific
controllers to specific customers,
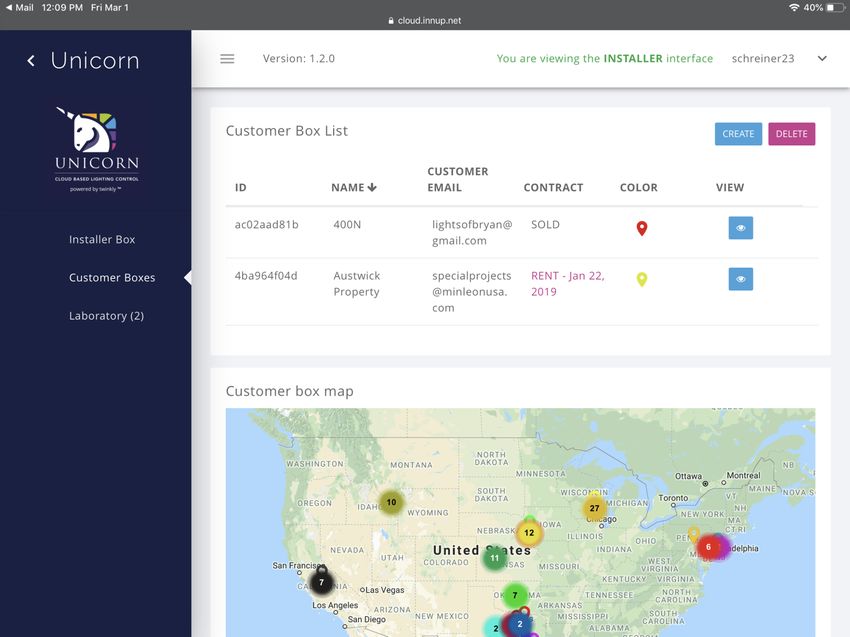
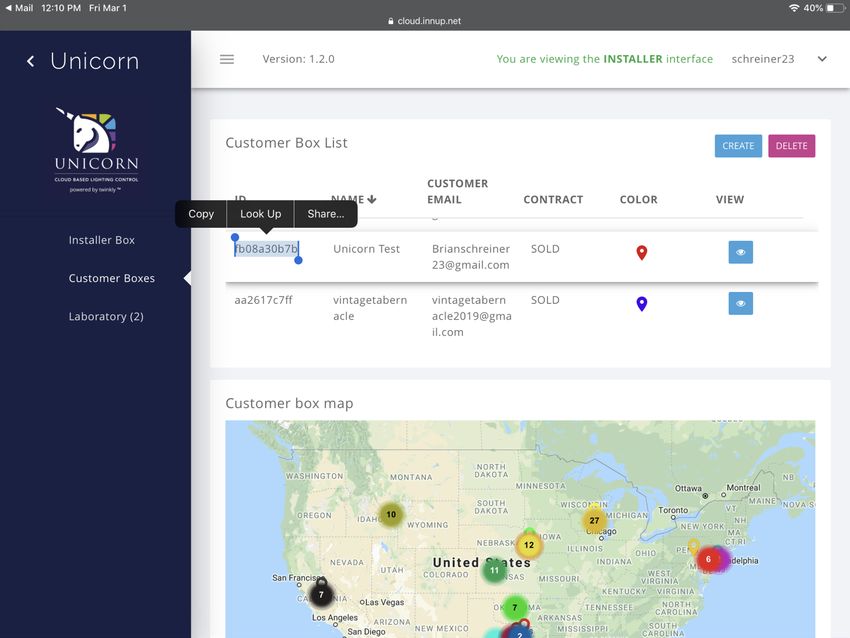
regardless of their physical location.Create a Project ID In the upper right hand corner of the Installer interface, in the Customer Boxes section press CREATE. Fill in: CUSTOMER BOX NAME – Installation description CUSTOMER NAME – Your client CUSTOMER EMAIL – Email of customer, or an email you set up for the customer if you are managing the day to day operation of the system. POINTER COLOR – Color of the PIN on the map) CONTRACT – SOLD or RENT, select rent if there is an end date to a contract Click CREATE - and you will see it appear in you list of CUSTOMER BOXES
Customer Box ID
This ID tells the Cloud where the
controllers belong.

Once you create this ID, it is important
your ground installers have this code.
Make sure you email, take a photo,or
text it… somehow share it.

Have them copy & paste the ID to their
notepad in their phone, or jot it down.

In the example to the right, the Box
belongs to UNICORN TEST and
customer
brianschreiner23@gmail.com.
Installing field level
     controllers
The process of bringing a controller
online is done via a WiFi connection
using an iOS device.

● Download SpectraShow from the
  App Store.

● Create an account, or use the
  account you created in the Cloud (p
  3).

● Restart the app

● Look for an available WiFi Network
  name TWINKLY________ that has
  a lock beside it.

● Connect using the password
  “Installer” with a capital “i”.
Controller
Installation
● Open SpectraShow and wait for the
app to connect to the controller.
● If prompted to do an update, do it…
they are needed to function properly.
● Click CONFIGURE
● Click CONFIGURE THE
CONTROLLERController
Installation
Have your CUSTOMER BOX ID ready
to Copy/Paste into a notepad on your
phone, or written down exactly as it
appears.
Remember this ID is the location
where the CLOUD assigns the field
controller its home. If this is not done
correctly, you will be asked to reinstall
the controllers.Configuring your
Controllers
APPLICATION MODE - select
LORAWAN
CUSTOMER BOX ID - Copy & paste, or
type the ID you created for this project
DESCRIPTION- Type the location, or
name of the controller
LED TYPE - Select the LED type
NO of PORTS - Select how many ports
you are using
LED per PORT - Select how many
LEDS(up to 200 per)
CLICK - NEXTConfiguring your Controllers Once you click next the APP will delete all existing information on the field controller. ● Notice a summary of your configuration. ● Click the LOCATION link. The App will use your iPhone’s GPS & drop a PIN for the Cloud to record where it has been installed. ● Click the CAMERA at the bottom right and take a photo of where the controller is installed (NOT A CLOSE UP) ● Click FINISH
Uploading your
Controllers to the
Cloud
Now that you have configured the
Controller you have to upload the profile
to the Cloud. This is done using your
Cellular data, or WiFi that has Internet.
● CLOSE THE APP
● DISCONNECT from the controller’s
network
● CONNECT to the Internet or cellular
data plan
● REOPEN THE APP
● You will get an error that says it can’t
connect, CLICK OK, then click
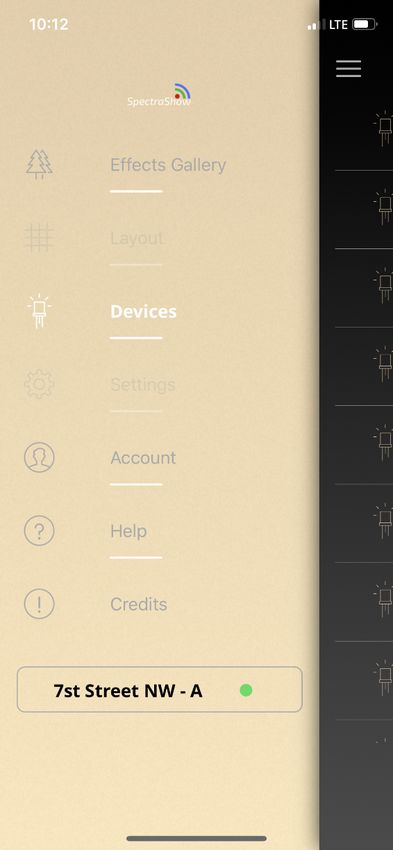
PREVIEW at the very bottom.Uploading your
Controllers to the
Cloud
● In the upper Left Hand Corner hit
the 3 horizontal Lines
● Select DEVICES
● FIND THE CONTROLLER YOU
CONFIGURED
● Select the “i” button
● At the bottom you will see UPLOAD
FILES with an “!”
● Click UPLOAD FILES
● The “!” Will change to a ☑ check
mark once uploaded
● This should take about 10-20
secondsConfirmation Of
Uploaded
Controllers
Once you hit UPLOAD PROFILE and
the Check Mark appears you will now
be able to see the Controller in your
Customer Box List under the
Customer’s Project ID.
Notice that the Controller is listed as
ONLINE in the STATUS area and
currently the Lights are OFF.
You will also see the TEMP and
HUMIDITY of the controller
You can also see the LOCATION in
visual form on the MAP. This was
done when you hit LOCATION in the
app.Check Functions Verify everything is working. If you are doing a LARGE installation with many controllers, the preferred method is turning on each building as you go. This will give your installers a visual representation of what is completed. This also allows you to double check lights and communication ● Select a controller/device - Click VIEW, then click EDIT. ● Change Mode=LED Mode ● TOGGLE the ON/OFF switch to ON, then Select an effect. ● Fix=Static effect ● Press APPLY—If you don’t hit APPLY and wait, a command is not sent You will see the status change from ONLINE to PENDING as the command is being sent to the controller and the controller reports back to the Cloud that it received the command.
Check Functions
You will see the status go from
PENDING to ONLINE once the system
is satisfied everything is
communicating properly. If there is a
communication error the system will
indicate it in the STATUS field.

A preview window gives you a quick
view of what is currently playing or not
playing. Notice the box on the RIGHT,
has changed from a BLANK off effect
preview, to the effect that we now have
playing on the lights.
Finishing your
       Installation
The process for adding additional
controllers for the installation is nearly
identical. Simply repeat the process
changing only the Description, which
is the name of the controller in the
Cloud. Using street names or
business names works well and allows
for efficient troubleshooting later.

Make a Note: Does the Status say
ONLINE or OFFLINE? Are there
Temp Readings? This confirms the
controller is communicating with the
Gateway and in turn communicating
with the Cloud.
Install Complete - Now Deliver to customer Once installation is complete, we need to VIRTUALLY deliver your BOX of field controllers (devices) to the customer… Moving the responsibility for LED control from the Installer’s Cloud account to the Customer’s Cloud account. This will go to the account linked to customer email address you provided before generating a “Customer Box ID” on page 12: ● Click on the CUSTOMER BOX you installed ● Click on BOX DELIVERY in the upper RIGHT ● Verify Customer Email (they need to setup a CLOUD ACCOUNT) ● Click DELIVER BOX
VERIFY
      DELIVERY
At this point the status of this
CUSTOMER BOX has been changed
to BOX ALREADY DELIVERED,
meaning now the customer has control
of their lights. The INSTALLER can
view what is going on, but for
customer security and liability we shift
the control to the customer.

Your customer will receive an email
letting them know that a new
UNICORN(s) has been sent to their
dashboard.

They can now control their lights as
they wish.
Notice the customer view
Adding Controllers only has 1 Controller
listed, we still have to
to a Customer DELIVER the new
controller to the
Many times customers install things in
customer, only then will it
phases. We need to be able to add or
appear as a DEVICE
replace controllers if one goes bad.
they can control.
The process is easy.
Create a NEW CUSTOMER BOX ID
and repeat the steps from the
installation process using the NEW ID.
Deliver the NEW CONTROLLER
virtually to the customer. They see no
difference, just an additional Controller
appears in their account.
Note: Do NOT use a previously
delivered ID. You will have to repeat
the install with a new Box ID. This is
necessary to avoid issues with multiple
controllers in multiple areas.Delivering New Controllers Repeat the process of delivering the CUSTOMER BOX. Send the new Controller(s) to the customer. Say you sold a job with 1 controller, delivered it and your client has been using it for a month. They only see 1 controller in their Customer Account. Now, you want to add a new controller to their account. Deliver the box and it will now appear in their Dashboard as an additional Device.
Customer View
DEVICES - This is a list of Unicorn
Filed Controllers available for control.
They are available to set a schedule,
run an effect, change colors, switch
OFF, rename, check Temps and
Humidity, but only individually.

GROUPS - this is a place to create a
GROUP of individual devices/field
controllers. A device/field controller
can not occupy multiple groups.

Groups can be edited or undone.
Changes here do not have to be
permanent. Group or ungroup as you
experiment with your display.
Creating a GROUP
● Select GROUPS

● Select CREATE GROUP

● NAME THE GROUP

● Select a POINT COLOR

● Select each Controller in the
  GROUP

● CLICK SAVE
Groups
Now that you have placed the
controllers in a GROUP, they will no
longer appear in DEVICES, since they
are now occupying a GROUP. They
cannot be in both. They are either a
single device or in a group.
Controlling your
 Group
Now that you created a group, to
control them as one use the same
process for single devices:

● Select your GROUP and hit VIEW

● Click EDIT

● Toggle the ON/OFF switch to ON

● Select the EFFECT, COLOR, and
  SPEED, you desire

● Click APPLY

● Status will go from PENDING to
  ONLINE once all devices receive
  the command
Controlling Lights
The Cloud system is a redundant
system meaning the command to a
group will be sent over and over again
until every controller in the group
receives the information. Once every
controller reports back that all is ok
and received, only then will the status
appear as ONLINE for the entire
group.

Once in a group you can click VIEW to
see all controllers in the group and the
status of each as well. This is a TOP
DOWN view of the GROUP and
everything in it.
Turning off the
  lights
This system functions under a
Command for everything scenario. So
an OFF command is just like an effect.
So we must tell the controller to TURN
OFF the lights, which actually CUTS
POWER to the ports.

This is a great feature as it increases
the life of the pixels. By having no
power running to the lights, your
“burning hours” are decreased.

To turn OFF the lights simply follow
the previous steps but this time toggle
the switch to OFF and then CLICK
YES and wait.
Scheduling Effects
There is a full scheduling feature
available. You can schedule as a
group or single devices but it depends
on your setup. To Schedule an event:

● Click VIEW
● Hit EDIT
● Scroll down to SCHEDULE NEW
  EFFECT
Scheduling
● Select your START date and time

● Select if you want it to REPEAT,
  Daily, weekly, monthly, yearly… and
  an END DATE of the repeated
  Effect.

● Toggle to ON and select the effect
  you want.

● Click SCHEDULE
Scheduling OFF
We need to send an OFF, or dark,
command via the Scheduler when we
do not want the LED’s on.

Schedule an additional EFFECT, but
this time don’t select the toggle ON...

Leave toggler in the OFF position & do
you repeat functions, and the time to
make it happen. Once that is done
click APPLY way up at the top.
Scheduling
Now that you have scheduled when
your effects turn ON and OFF you will
see them in your CALENDAR at the
bottom of the screen. You can
MOUSE over each event to see what
is scheduled.

If you made an error simply click
VIEW, then EDIT and scroll to the
bottom and click on the event you
want to delete. Select REMOVE and
then CLICK APPLY

You will have to create a NEW event
in the place of the deleted event.
Unicorn Cloud-based LED Control System
                             Troubleshooting Tips
GATEWAY TIPS:
1. Be sure your Internet port is not firewalled.
2. Be sure your Internet port is set to DHCP (random IP addressing). Static IP addresses are unsupported.
3. Be sure the antennae is as unobstructed as possible. Outdoors is preferable. Obstructions to line-of-sight will reduce
   the maximum range of the Gateways. Ideal placement is often on a rooftop with open surroundings.
FIELD CONTROLLER TIPS:
1. When installing the RGB+Line Unicorn controllers, please abide by the cable limitations outlined in Minleon’s Field
   Guide to Power & Data Management. Use Power injections and Data Boosters where necessary.
2. The power transformers for the Field Controllers are switching power supplies—they protect themselves & turn OFF
   when overpowered with LED’s and spacers. If your power supply cuts power, remove light strings and extra cabling
   and try again.
3. Are you running more than 400 lights total, or more than 200L per output? This is the maximum lights given the
   24Vdc Field Controller’s power supply. (The 12Vdc Unicorn Field Controller will power 200L max.) Move lights #401+
   to a new Field Controller. If under the data limitations, another option is to inject proper voltage inline with a Power T.
4. Do the lights flash when powered ON? This means we do not have enough power for the display. Reduce the
   amount of lights, or the amount of spacer cables which could be inducing extra voltage drop. Or inject power.
5. One or more of the output ports is not working? Maybe a fuse has blown. Was a light run overpowered, or shorted by
   water ingress? Unscrew the control box and see if one of the fuses has blown. Replace if needed. (more…)
Unicorn Cloud-based LED Control System
Troubleshooting Tips (continued)
FIELD CONTROLLER TIPS (cont.):
6. If the Field Controller will not accept the password “Installer” (with a capital I), and you are certain that you typed it
properly, the controller will need hard reset. Unscrew the lid, and press the button next to the antennae for 5
seconds. Only reset the controller once at a time. Never twice within the same minute, as this could damage the
controller. Be sure you can log into the controller with the password, before re-assembling the box. If this does not
work, contact your account manager or sales rep for a warrantied replacement.
7. Field Controllers are only able to communicate to one device (smart phone or tablet) at a time. Make sure all other
smart phones and tablets are disconnected before trying to log in.
8. When configuring in the SpectraShow App, it will not allow Preview Mode – Remember to sign in with your Unicorn ID
and password.
9. Configuration files will not upload – Be sure your wireless device is connected to the Internet, and not the Field
Controller’s access point. Double check you have the correct “Installer Box ID”
10. Field Controller (Device) will not appear in the Unicorn Cloud – Make sure the Box ID is correct. Make sure you are
not using a previously delivered box ID – As this will cause the controller to be uploaded to nowhere. Re-cycle the
power to the Field Controller & reconfigure via SpectraShow.
CLOUD TIPS:
1. Be sure to select “APPLY” when making changes to the Groups, Scheduler or Effects in the Unicorn Cloud.
2. To turn your lights OFF, in the Unicorn’s Cloud Scheduler, remember to schedule a unique OFF command—separate
from the Effect command.Unicorn Cloud-Based LED Control System
HAVE MORE QUESTIONS?
Please e-mail
support@minleonusa.com
& reference this presentation.
Minleon USAYou can also read