MNCMAT2 Minnesota Department of Transportation - System Help - Minnesota Department of ...
←
→
Page content transcription
If your browser does not render page correctly, please read the page content below
MNCMAT2                System Help

Minnesota Department of Transportation
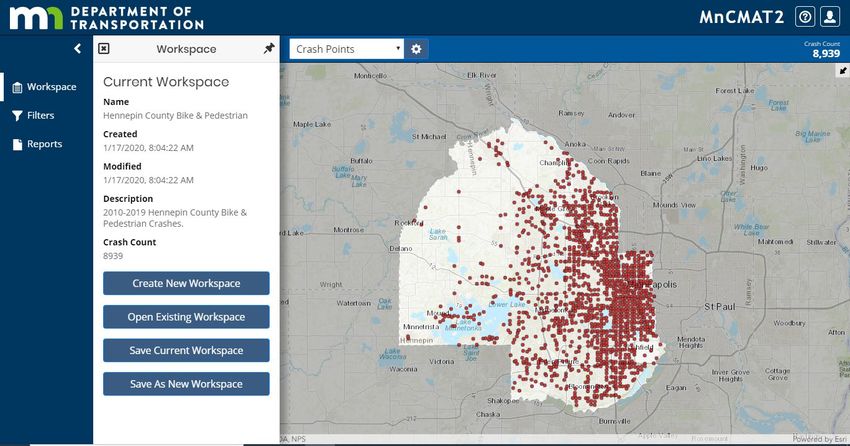
Table of Contents
Overview ....................................................................................................................................................... 5
   User Registration ...................................................................................................................................... 5
       The Application URL .............................................................................................................................. 5
       The Registration Process ....................................................................................................................... 6
Quick Start..................................................................................................................................................... 7
   Log In ......................................................................................................................................................... 7
   View Stacks ............................................................................................................................................. 10
   View Charts ............................................................................................................................................. 11
   View Table ............................................................................................................................................... 13
   Print a Map.............................................................................................................................................. 13
   Log Out .................................................................................................................................................... 13
High Level Description of the Application Interface ................................................................................... 14
   The Application Header .......................................................................................................................... 14
   The Application Tabs ............................................................................................................................... 14
   The Application Views ............................................................................................................................. 14
   Help ......................................................................................................................................................... 14
       Quick Start........................................................................................................................................... 15
       Help Document ................................................................................................................................... 15
       Toggle Help ......................................................................................................................................... 15
   Account ................................................................................................................................................... 15
       Manage ............................................................................................................................................... 15
           Profile .............................................................................................................................................. 15
           Password ......................................................................................................................................... 16
           Security Questions .......................................................................................................................... 16
       Logout ................................................................................................................................................. 17
Application Tabs .......................................................................................................................................... 17
       Pin and Close Tabs .............................................................................................................................. 17
   Workspace .............................................................................................................................................. 17
       Create New Workspace ...................................................................................................................... 19
           County, Construction District, State Patrol District, Tribal Government, State.............................. 19

2|Page                                                                    May 2021                                                    MnDOT MnCMAT 2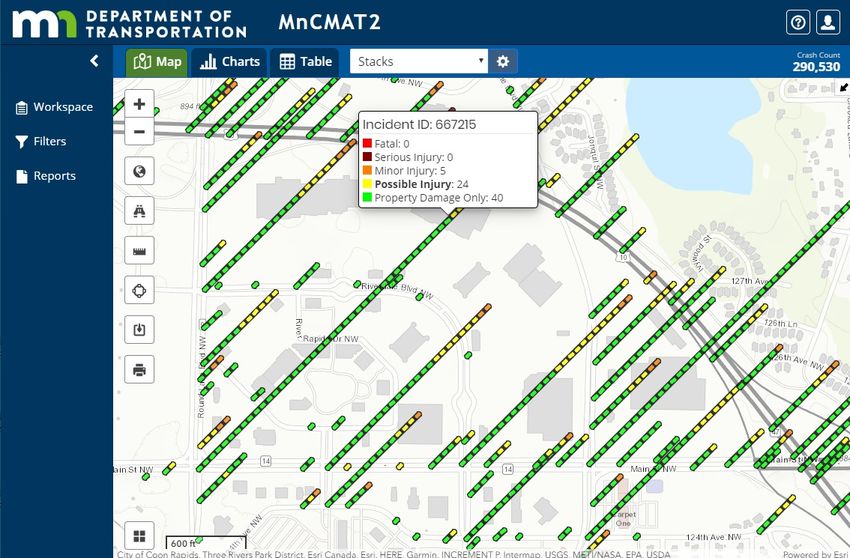
Open Existing Workspace ................................................................................................................... 20
       Save Current Workspace ..................................................................................................................... 20
       Save as New Workspace ..................................................................................................................... 21
   Filters....................................................................................................................................................... 21
       Filter List .............................................................................................................................................. 21
       Filter Options ...................................................................................................................................... 23
           Check List ........................................................................................................................................ 23
           Radio Button ................................................................................................................................... 23
           Date Filter........................................................................................................................................ 24
              Date Ranges ................................................................................................................................ 24
           Number Filters ................................................................................................................................ 25
              Numeric ranges ........................................................................................................................... 25
   Reports .................................................................................................................................................... 25
       Report Limits ....................................................................................................................................... 26
       Intersection Reports ........................................................................................................................... 27
           Map Selection ................................................................................................................................. 27
           Name Lookup .................................................................................................................................. 27
       Segment Report .................................................................................................................................. 28
           Map Selection ................................................................................................................................. 28
           Use Existing Route Selection ........................................................................................................... 29
Application Views........................................................................................................................................ 30
   Map View ................................................................................................................................................ 30
       Map Visualizations .............................................................................................................................. 30
           Configuration .................................................................................................................................. 30
           Crash Point ...................................................................................................................................... 31
           Stack ................................................................................................................................................ 32
           Segment Density ............................................................................................................................. 33
           Segment Rate .................................................................................................................................. 33
           Intersection Density ........................................................................................................................ 34
           Intersection Rate ............................................................................................................................. 34
       Map Tools............................................................................................................................................ 35
           Map Navigation ............................................................................................................................... 35

3|Page                                                                   May 2021                                                    MnDOT MnCMAT 2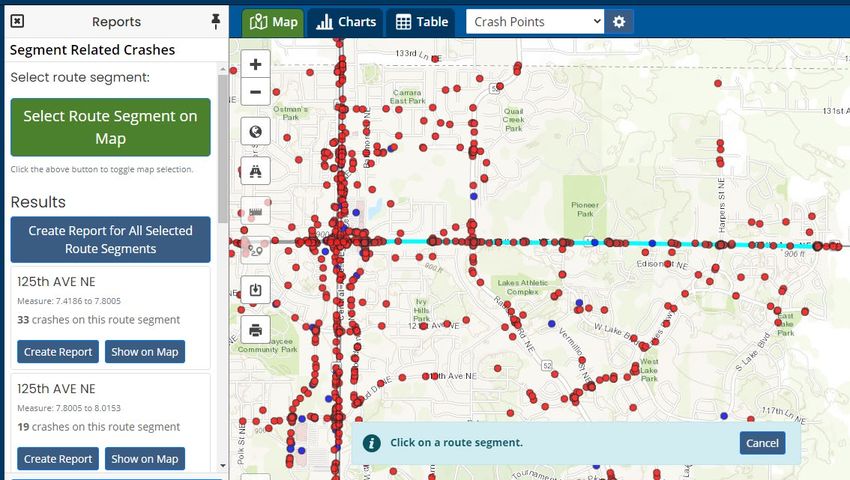
Find Location ................................................................................................................................... 35
        Measure Distance ........................................................................................................................... 38
        Selection Tools ................................................................................................................................ 38
            Overview ..................................................................................................................................... 38
            Select by Segment ....................................................................................................................... 38
            Select by Intersection.................................................................................................................. 38
            Select by Rectangle ..................................................................................................................... 39
            Select by Polygon ........................................................................................................................ 39
            Select by Radius .......................................................................................................................... 39
            Clear Selection ............................................................................................................................ 39
        Export Map...................................................................................................................................... 39
        Print Map ........................................................................................................................................ 40
    Basemap .............................................................................................................................................. 40
    Overview Map ..................................................................................................................................... 41
 Charts View ............................................................................................................................................. 41
    Add/Edit Chart .................................................................................................................................... 41
        Topic List, Title, Chart Types, Export Chart ..................................................................................... 42
    Clear All ............................................................................................................................................... 44
    Pop Out View ...................................................................................................................................... 44
 Table View ............................................................................................................................................... 44
    Table Navigation - First Record, Previous Record, Next Record, Last Record .................................... 45
    Show on Map ...................................................................................................................................... 45
    View Details ........................................................................................................................................ 45
    Export Table ........................................................................................................................................ 45
    Pop Out View ...................................................................................................................................... 46

4|Page                                                                May 2021                                                   MnDOT MnCMAT 2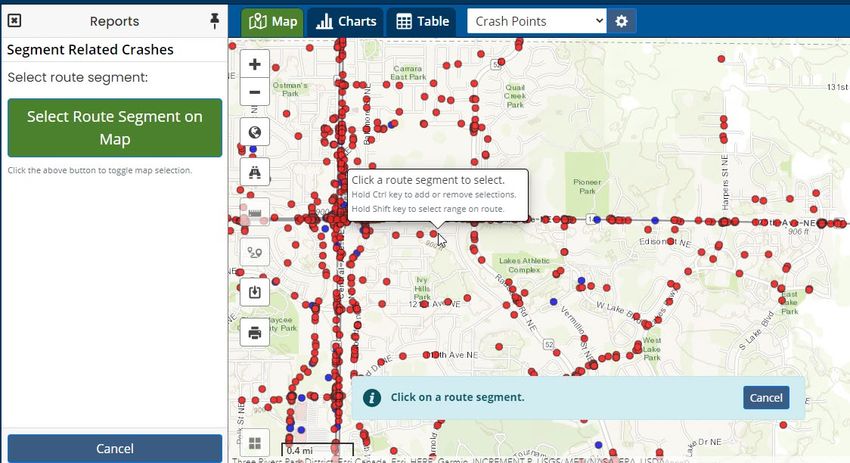
Overview
The Minnesota Crash Mapping Application (MnCMAT) is an application that provides access to mapping,
analytic, and reporting capabilities on, historical vehicle crash data to an ever-growing user base of
mostly external business partners, particularly county and municipal engineers, across the State of
Minnesota. The application directly supports MnDOT’s strategic plan to make its transportation network
operate better by improving traveler safety. It also supports Minnesota’s “Toward Zero Deaths”
initiative by providing intuitive access to an easy-to-use tool and reliable, timely data that Local
Government Transportation Authorities, local law enforcement agencies and other partners need to
reduce the number of deaths and injuries resulting from traffic crashes in Minnesota.

This Help document explains the functionality of the MnCMAT2 application. If interested in more
detailed information on the actual data and uses of the data, please explore the Resources found at
http://www.dot.state.mn.us/stateaid/mncmat2.html.

                                         MnCMAT Application

User Registration
Perform the following actions to access the MnCMAT application and register as a User or Consultant.

The Application URL
https://mncmat2.dot.state.mn.us/web/Identity/Account/Login?ReturnUrl=%2Fweb

5|Page                                         May 2021                             MnDOT MnCMAT 2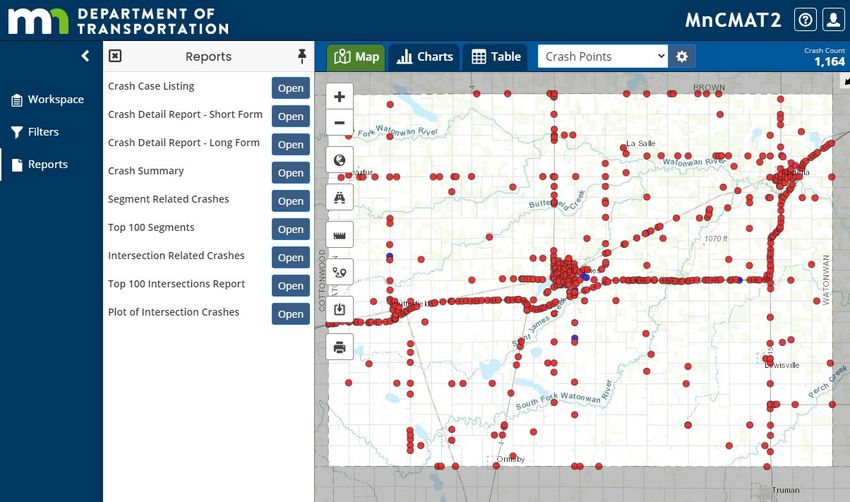
The Registration Process
A full step by step registration guide can be found here

1. Enter the required application URL. Or Click here to go to the MnCMAT2 main page
2. Click on ‘New User Request’ on the Login page.

3. Read the New User Information Page, and if in agreement, click the Proceed button.
4. Read the Register a New Account page, and if in agreement, click the Proceed button.
5. Fill out all the information on this page, choosing User or Consultant as the Account Type
6. Securely store your chosen password or choose a password that you can remember easily, as it
   might be several days before receiving approval.
7. Click the Register button.
8. Wait for an email notification of Approval from MnDOT.
9. Upon receiving an email approval, open the application with the above URL or through a link in the
   email.

6|Page                                          May 2021                           MnDOT MnCMAT 2
Quick Start
This Quick Start section is intended to be a brief introduction to the application. The remainder of this
document lists detailed instructions for using all aspects of the application.

Log In
1. Enter the required application URL. Or Click here to go to the MnCMAT2 main page
2. Enter your email and password and click the Log in button. This launches the MnCMAT application.

3. Since there are not yet any Workspaces created, click Create New Workspace in the Create/Open
   Workspace dialog.

7|Page                                          May 2021                               MnDOT MnCMAT 2
4. Create New Workspace defaults to State.

5. Click on the County tab. Select the desired County from the list or click it on the map. Click OK.

8|Page                                          May 2021                               MnDOT MnCMAT 2
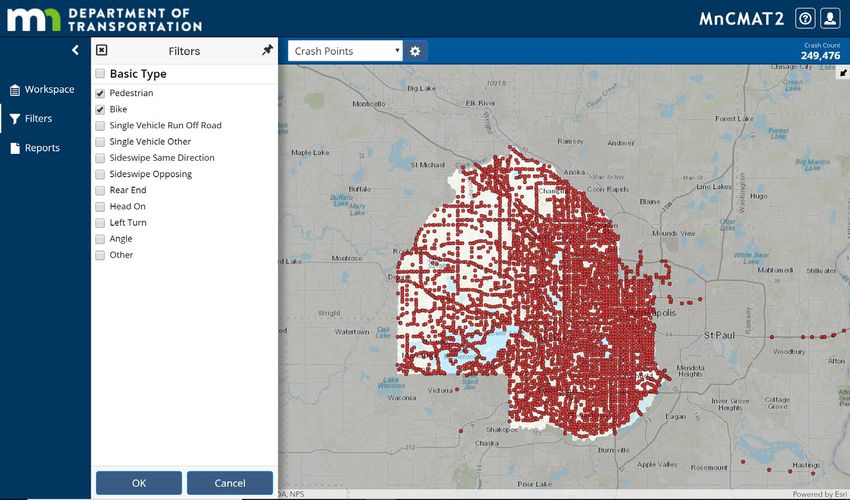
6. Open Filters. Choose Basic Type. Check Pedestrian and Bike from the List. Click OK.

7. Pan and Zoom around in the map, using the map navigation tools.

8. Click Save Current Workspace, naming it and optionally giving a description.

9|Page                                        May 2021                             MnDOT MnCMAT 2

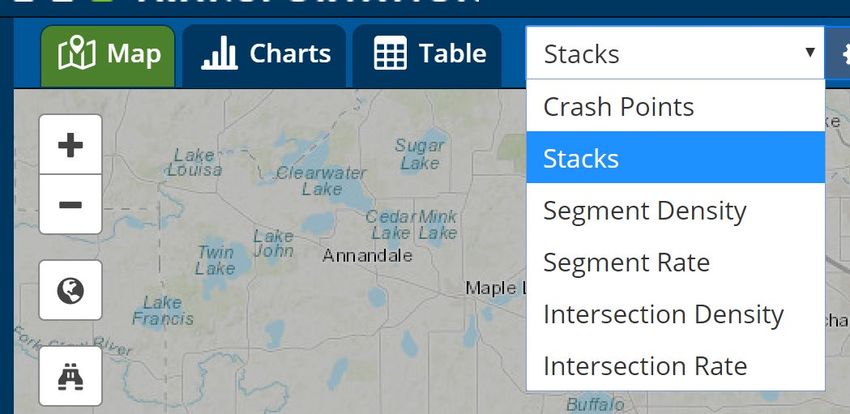
View Stacks
1. Click the Map Visualizations selector drop down list and choose Stacks.

2. Zoom in to an intersection and zoom in until Stacks appear. Hover over the Stacks to get individual
   crash details.

10 | P a g e                                   May 2021                             MnDOT MnCMAT 2
View Charts
1. Click the Charts tab in the top toolbar.

2. Click Add Chart in the top toolbar to view the Add Chart dialog.

11 | P a g e                                   May 2021               MnDOT MnCMAT 2
3. Click Select Chart Topic in the upper right and select Crash Severity.

4. Cycle through the Chart types in the bottom bar and click Export Chart to save a local copy or csv
   file. Click OK to save the Chart to your session and try adding additional Charts.

12 | P a g e                                    May 2021                             MnDOT MnCMAT 2
View Table
Back at the main screen, click the Table Tab.
   • The table view is a tabular view of the current set of data and reflects any applied filters.
   • Use the navigation buttons at the top to step through each page of data.
   • Selecting a record and clicking Show on Map will bring up the Map view with the record briefly
        highlighted with a flashing circle.
   • As with Charts, you can also Export the Table.
   • You can also click View Details to see the Officer Sketch and Narrative of the selected crash.

Print a Map
Back at the Map view, click on the Printer icon to print out the map, from which a PDF can be generated.

Log Out
To log out of the application, click the User icon in the upper right and choose the Logout menu item.

13 | P a g e                                   May 2021                              MnDOT MnCMAT 2
High Level Description of the Application Interface The main components of the interface are: The Application Header The Application Header runs across the top of the main page, and includes the title and logo, and the Help and Account menus. The Application Tabs The left panel of the application includes tabs used to set the Workspace, manage Filters, and create Reports. The Application Views The Application Views are just below the Application Header and to the right of the Application Tabs. These Views include: the Map View, where the map can be viewed and navigated; the Charts View, where charts can be created and viewed; and the Table View, where tabular results of the current data can be viewed. Help Clicking the Help button in the application displays the Help Menu and options. 14 | P a g e May 2021 MnDOT MnCMAT 2
Quick Start
Clicking the Help drop down menu and then clicking Quick Start will open the Help Document to the
Quick Start section, ideal for new users.

Help Document
Clicking the Help drop down menu and then clicking the Help Document menu item will load the
complete Help Document (this document).

Toggle Help
The Toggle Help Tooltips menu item allows users to set tooltip help on or off in the application. Turning
it on is especially useful for new users.

Account
Clicking the Account button displays the Account Menu and options.

Manage

Profile
Clicking the Account button and then Manage launches the account management tool in a new tab, set
to the Profile tab. This is where the user can set Name, email and agency. When finished editing, click
Save to save the changes.

15 | P a g e                                    May 2021                              MnDOT MnCMAT 2
Password
Under the Password tab, users can change their password. Note the requirements listed at the bottom
of the page. Click Update Password to save the changes.

Security Questions
Under the Security Questions tab, Users set and update their security questions on this tab. When
finished choosing questions and keying in answers, click the Update Security Questions to save changes.

16 | P a g e                                  May 2021                             MnDOT MnCMAT 2
Logout
Click Logout to leave the site. This will raise an information dialog warning that changes might not be
saved. Clicking Leave will log out of the application.

Application Tabs
The Application Tabs are arranged in the left panel of the application. That panel can be minimized by
clicking the left-pointing arrow in the upper right to only show icons or maximized to also show the
descriptions of each.

Pin and Close Tabs
When one of the tabs is clicked, it opens to the right. The open tab can be closed by clicking the ‘X’
button in the upper left or pinned in place by clicking the Pin button in the upper right. Note that
pinning adjusts the extent of the current View (Map, Chart or Table) to fit between the pinned tab and
the right border of the application. Un-pinned, the tab overlays the left portion of the View.

Workspace
A Workspace is required to work within the application. A Workspace is comprised of the geographic
area of interest, any applied location or attribute filters, and user settings and preferences. Upon

17 | P a g e                                    May 2021                              MnDOT MnCMAT 2
entering the application where you had previously saved Workspaces, you will be presented with this
dialog:

While working in the application, click the Workspace tab to open the Workspace dialog to Create New
Workspace, Open Existing Workspace, Save Current Workspace, or Save As New Workspace.

18 | P a g e                                  May 2021                             MnDOT MnCMAT 2
Create New Workspace

County, Construction District, State Patrol District, Tribal Government, State
Clicking the Create New Workspace button opens the Create Workspace dialog. Users can choose
County, Construction District, State Patrol District, Tribal Government or State. Once the category tab
is selected, the user can choose one or more of the geographic areas either in the list or by clicking on
the map. Clicking a selected item de-selects it.

The user can click Select All or Clear All to manage selections. User can click Make Default to have this
Workspace category and geography selection become the default selection whenever Create New
Workspace is selected.

19 | P a g e                                    May 2021                               MnDOT MnCMAT 2
Open Existing Workspace
Click Open Existing Workspace to open the Open Workspace dialog. This is a list of previously created
and saved Workspaces. Clicking the Open button opens that Workspace. Clicking the down arrow on any
of the Workspaces in the list will display details of the Workspace and allow the user to delete it. Click
the up arrow to return to the Workspace list. Click Sort by Date or Sort by Name to resort the list.

Save Current Workspace
Click Save Current Workspace to save the active Workspace. A brief notification will be displayed if this
is a New workspace.

20 | P a g e                                    May 2021                              MnDOT MnCMAT 2
Save as New Workspace
Click Save as New Workspace to create a copy of the current state of the application. This will save the
map extent, filters, symbology, etc., and present a dialog for the user to enter a new Name and
Description.

Filters
Click the Filters Application Tab in the left panel to open the Filter List. Applying filters to the current
selection of crash points will limit the selection by those specified locations or attributes.

Filter List
The filter list is organized by Reportable and NonReportable, Location Filters, such as City or County,
and Attribute Filters, such as Crash Severity and Day of Week. Use the scroll bar to access the full list.

Clicking on a filter category will bring up a list of options (or ranges) to select from. The options can be
clicked once to select, or again to de-select. Click OK to accept or Cancel to go back to the main list.
Filter categories with selected options will show a green badge with the number of options selected, or
in the case of a date, the date or range. A Clear button will also then display, allowing the user to click

21 | P a g e                                      May 2021                                 MnDOT MnCMAT 2
that Clear button as a shortcut to remove all those filter options. There is also a Clear All option which
clears ALL filters.

For the Location-based Filters, County and City attributes were as assigned by the officer that entered
the crash into the system. The MnDOT District, State Patrol District, and Tribal Government Location-
based filters were created by performing a spatial overlay of the data in GIS software to make the
assignments.

22 | P a g e                                     May 2021                               MnDOT MnCMAT 2
Filter Options

Check List
Most filter options are of the Check List type, where options can be selected by clicking the check box,
and de-selected by checking it again. One or more options can be selected. To quickly select or de-select
all, click the check box next to the Filter name.

Radio Button
The Reportable and NonReportable filter requires the user to invoke one of three options. The default
is Reportable and NonReportable.

23 | P a g e                                   May 2021                              MnDOT MnCMAT 2
Date Filter
Clicking on the text entry box of a Date type of filter opens a date picker. Select the date from the date
picker, or simply key in the date in MM/DD/YYYY format.

Date Ranges
To specify a date range, click the Use Range check box and enter From Date and To Date in the 2 entry
boxes.

24 | P a g e                                     May 2021                               MnDOT MnCMAT 2
Number Filters
For Number type filters, simple type in the desired number.

Numeric ranges
For Numeric ranges, click the Use Range check box and enter a From Value and To Value in the entry
boxes.

Reports
Click the Reports Application Tab in the left panel to open the Reports List.

25 | P a g e                                    May 2021                           MnDOT MnCMAT 2
Click on the Open button to launch a report. If there is not a Crash Count limit, the user will be
presented with the Open Report dialog.

Key in a Subtitle and Notes (optional) and click OK. The report will be generated and presented in a new
tab. Click the Generate PDF. Then Download PDF to save to the default browser download folder.

Report Limits
Depending on the selected report, if the current selection (Crash Count) is greater that the number
allowed to process for that report, the system will display an Information dialog that the selection will
need to be further reduced in order to run the report.

26 | P a g e                                     May 2021                               MnDOT MnCMAT 2
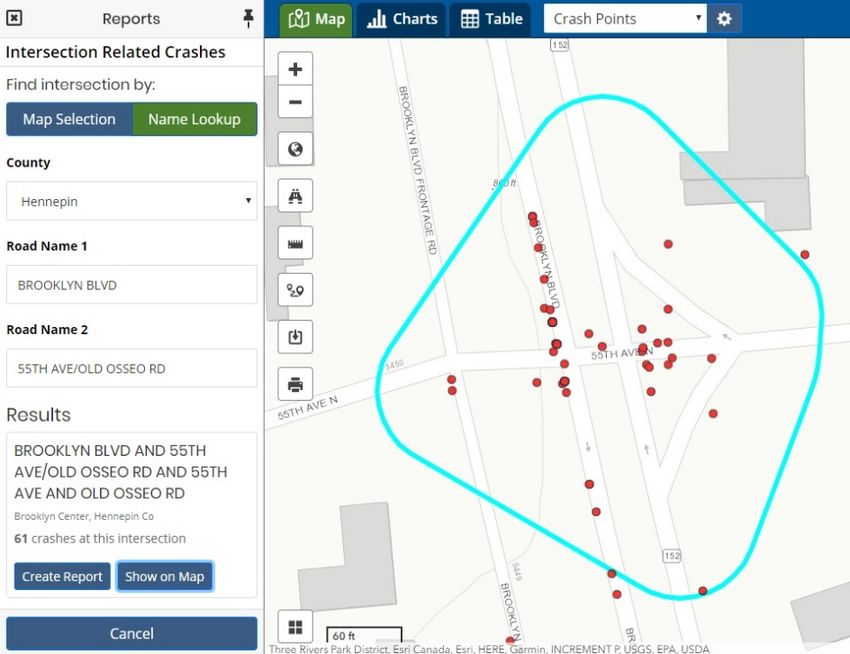
Intersection Reports
The Intersection Related Crashes and Plot of Intersection Crashes require the user to select an
intersection, either through a Map Selection or a Name Lookup.

Map Selection
Click Map Selection, then Select Intersection on Map to activate selecting the intersection from the
map. Once an intersection is clicked, the result will appear in the dialog. Click Create Report to follow
the normal report creation steps.

Name Lookup
Find the intersection by using a street name lookup. Click Name Lookup, choose the County, then start
keying in the Road Names 1 and 2. The names will auto-fill. Upon finishing keying in the names, a found
intersection will be displayed in the list. Follow the steps for Create Report or Show on Map to zoom to
that intersection.

27 | P a g e                                     May 2021                               MnDOT MnCMAT 2
Note that the street names (Road Name 1 and Road Name 2) are derived from the data that was
generated as part of the Intersection Polygon provided by MnDOT. In order to find a street name, and
exact match is necessary.

Segment Report
The Segment Related Crashes report requires the user to select segments on the map.

Map Selection

28 | P a g e                                  May 2021                             MnDOT MnCMAT 2
Like Map Selection in the Intersection related reports, click Select Route Segment on Map. Click the
desired road segment(s) on the map. Options will be presented for Create Report and Show on Map.

Use Existing Route Selection
If multiple route segments have been selected, a summary report for ALL segments along with the
individual road segment results will be listed in the report dialog. In this case, the user can click Create
Report for All Selected Route Segments, or can click on Create Report or Show on Map for any to
individual segment.

29 | P a g e                                      May 2021                                MnDOT MnCMAT 2
Application Views
The main portion of the application is where the map and data are visualized, either in a Map View,
Charts View, or Table View. Each can be accessed by clicking the Map, Charts, or Table tabs.

Map View
Click the Map button will display the Map in the Application.

Map Visualizations
Clicking each of the items in the Map Visualizations list will update the map display for that data type.
Note that all these visualizations except Crash Points will require being zoomed in to the map in order to
display.

Configuration
For each of the visualizations, the Configuration gear can be clicked to bring up the settings specific to
that visualization. For each configuration dialog, clicking Make Default will save these settings with the
Workspace.

30 | P a g e                                     May 2021                               MnDOT MnCMAT 2
Crash Point
This visualization displays crash points per selections and filters, with symbology per the settings in the
Crash Point Configuration dialog.

Users can set Opacity (the transparency level of the symbol), the symbol shape, size, outline size, color,
and outline color. NonReportable crashes can be set with a different color and outline. In addition,
NonSelected crashes can be displayed in the map by checking the “Show non-selected crash locations”
check box. Colors for the non-selected crashes can be set as well.

31 | P a g e                                     May 2021                               MnDOT MnCMAT 2
Stack
This visualization shows crashes grouped by location and drawn to appear stacked vertically up from the
map. Mouse hover over the individual crashes on the stacks to get details. The stack display is per the
Stack Configuration dialog.

Settings here include opacity, angle, and snap distance (for grouping crashes into stacks).

Note that Stacks are generated first by grouping all crashes by intersection polygon as single stacks. The
remaining crashes are grouped by road segments. For each road segment, the minimum and maximum
measures are pulled from the related crash data as a measure range between the first and last crash
point. That measure range is then divided by the snap distance specified by the user and then rounded
to determine the total number of stacks for the segment. The measure range is then subdivided into
equal length groups for the number of stacks. Crashes are then assigned to each of the stack groups
based on their measure.

32 | P a g e                                    May 2021                               MnDOT MnCMAT 2
Segment Density
This visualization symbolizes the routes based on the density of crashes. Mouse hover over the
individual routes to get details in this configuration dialog, set range colors and values, color for
segments with no crashes, and opacity of the symbology.

Segment Rate
This visualization symbolizes the routes based on the crash rates. Mouse hover over the individual
routes to get details. In this configuration dialog, set range colors and values, color for segments with no
crashes, color for segments with no AADT data, and opacity of the symbology.

33 | P a g e                                      May 2021                                MnDOT MnCMAT 2
Intersection Density

This visualization symbolizes intersections based on the density of crashes. Mouse hover over the
individual intersections to get details. In this configuration dialog, set range colors and values, color for
intersections with no crashes, and opacity of the symbology.

Intersection Rate
This visualization symbolizes the intersections based on the crash rates. Mouse hover over the individual
intersections to get details. In this configuration dialog, set range colors and values, color for
intersections with no crashes, color for intersections with no AADT data, and opacity of the symbology.

34 | P a g e                                      May 2021                                MnDOT MnCMAT 2
Map Tools
The map tools are the buttons that appear on the map itself within the Application.

Map Navigation
These tools enable navigation of the map, including Zoom In, Zoom Out, Zoom Extent, Zoom Previous,
Zoom Next, Default Pan, Scroll Wheel Zoom.

The plus and minus represent Zoom In and Zoom Out, the globe represents Zoom Extent, and the
arrows represent Zoom Previous and Zoom Next. In addition, Pan is enabled by default, and zooming in
and out can also be accomplished using the mouse scroll wheel.

Find Location
Selecting this button will launch the Find Location dialog.

35 | P a g e                                     May 2021                             MnDOT MnCMAT 2
Clicking the drop-down list in the upper right will let the user choose from County, Municipality,
Intersection, Incident or Coordinate.

County and Municipality are simple lists to choose from. Note that the cities listed are only those that
are attributed (correctly or incorrectly) to at least one crash in your workspace.

Intersection requires first the selection of a County, then the 2 road names. The road names are auto-fill
enabled.

36 | P a g e                                    May 2021                               MnDOT MnCMAT 2
Incident Id requires an exact incident ID to be entered.

For Coordinate, the user must first select the coordinate type, then the latitude and longitude.

In all cases, the Zoom to Location button is then clicked to zoom to the chosen location, where the
feature will be briefly highlighted with a flashing symbology.

37 | P a g e                                    May 2021                              MnDOT MnCMAT 2
Measure Distance
Clicking this button enables the Measure tool.

With the measure tool enabled, continue to click on the map to see the current and cumulative
distances. To finish, double click on the map.

Selection Tools

Overview
Hovering over the current Selection tool brings up the full menu of Selection tools. All tools are active
only for a single action, except for the Select Route Segment tool, which remains active to allow the
selection of multiple segments. To stop the selection, click the Select Route Segment button again.

Select by Segment
Click on the map to select segments. To select more than one, hold down the Ctrl key. To an entire
segment, click the begin point, hold down the Shift key, then click the end point.

Select by Intersection
Click an Intersection the map for this selection type. To select more than one, hold down the Ctrl key

38 | P a g e                                     May 2021                               MnDOT MnCMAT 2
Select by Rectangle
Click and drag a rectangle on the map for this selection type.

Select by Polygon
Click the map at each desired vertex of the polygon. To complete the polygon, double click the last
vertex.

Select by Radius
Click the map at the desired center of the circle and drag the desired circle radius. Release the mouse
button to complete the circle.

Clear Selection
This will clear all map selections that were drawn using this tool.

Export Map
Click this button to open the Export Map Image dialog.

Enter a file name, choose file type of JPG or PNG, and click Save. The map image will be saved to the
default browser download location.

39 | P a g e                                     May 2021                             MnDOT MnCMAT 2
Print Map
Click this button to open the Print Map dialog.

Enter a title, any desired notes, select an orientation, and click Print. The map will be printed to a new
browser tab. Click Generate PDF, and when it completes processing, click Download PDF to download
the map PDF to the default browser download location.

Basemap
Click this toggle to open the Basemap Selector.

Scroll through this collection of basemaps and select one for the current map by clicking on it. Click the
Basemap toggle button once again to close the Basemap Selector

40 | P a g e                                      May 2021                              MnDOT MnCMAT 2
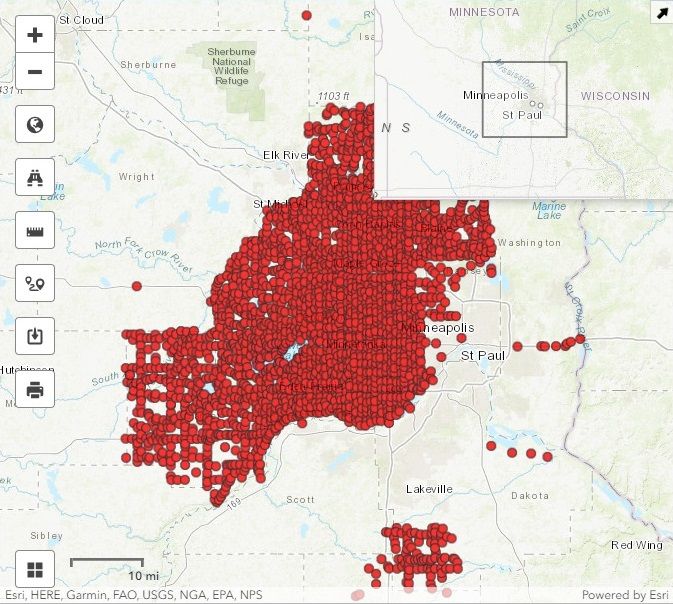
Overview Map
Click the small arrow in the upper right of the map display to open the Overview Map. This Overview
shows a zoomed-out display of the map, with the current map extents highlighted. Click the small arrow
to minimize the Overview Map.

Charts View
Click the Charts tab to open the Charts View.

Add/Edit Chart
Click Add Chart to open the Add Chart dialog.

41 | P a g e                                    May 2021                           MnDOT MnCMAT 2
Topic List, Title, Chart Types, Export Chart
To add a chart, select the type of chart along the bottom, the topic in the upper right drop down list,
enter a title, and click OK. To export the chart, click the Export Chart button in the lower left, enter a File
Name, then select File Type Comma Separated Value, PNG or JPG, and click Save. The export will save
to the default browser download location.

This is an image of the Charts View with charts created. To edit a chart, click on it. To delete it, click the
“X” in the upper right of the chart.

42 | P a g e                                      May 2021                                 MnDOT MnCMAT 2
For Vertical Bar, Horizontal Bar, and Line charts there is an option for Zeros On or Zeros Off.

Toggling this button will hide any data values in the chart that have a 0 for the value.

43 | P a g e                                     May 2021                                  MnDOT MnCMAT 2
Clear All
Click the Clear All button to clear all charts from the view.

Pop Out View
Clicking the Pop Out View button will open the Charts View in a separate Browser tab or window.

Click Pop In View to return the Chart to the Main Application Window.

Table View
Click the Table tab to open the Table View. This view is a tabular list of all selected crash records.

44 | P a g e                                      May 2021                               MnDOT MnCMAT 2
The results are paged. Clicking on the arrows next to each column name will sort the records based on
that column. The default sort order is Route ID, Measure, and Date.

Table Navigation - First Record, Previous Record, Next Record, Last Record
To navigate through the pages of Table results, use the highlighted navigator buttons – First, Previous,
Next, or Last. The range of records on the current page are displayed in the middle of the navigator.

Show on Map
With a record in the table selected, click on Show on Map to bring up the Map View and have it zoom to
that crash location and have it briefly highlighted.

View Details
Click on View Details to get access to the Officer Sketch and Narrative for the selected crash.

Export Table
Click on Export to open the Export Data dialog.

45 | P a g e                                      May 2021                             MnDOT MnCMAT 2
Enter a File name, choose the export type – either CSV or Shapefile, and click Save. The file will be saved
to the default browser download location.

Pop Out View
Clicking the Pop Out View button will open the Table View in a separate Browser tab or window.

Click Pop In View to return the Table to the Main Application Window.

46 | P a g e                                    May 2021                               MnDOT MnCMAT 2
You can also read