SAP S/4HANA 1909 FPS01 & FPS02 Fully-Activated Appliance: SAP Portfolio and Project Management
←
→
Page content transcription
If your browser does not render page correctly, please read the page content below

SAP S/4HANA 1909 FPS01&02 Fully-Activated Appliance         PUBLIC
June 2020 (V1.2)
English

SAP S/4HANA 1909 FPS01 & FPS02 Fully-Activated Appliance:
SAP Portfolio and Project Management
Demo Guide

Table of Contents

1         How Can This Script Be Used?                                      3

2         SAP Portfolio and Project Management 1.0 for SAP S/4HANA          4
2.1       Overview                                                          4
2.2       Review Item Dashboard and Bucket Structure                        5
2.3       Create New Proposal Item                                          7
2.4       Detailed Assessment of New Proposal Item                         13
2.5       Review and Release of New Proposal Item                          20
2.6       Project Planning                                                 28
2.7       Staffing via Resource Manager                                    34
2.8       Authorizations, Project Release, and Baseline                    38
2.9       Task Management and Time Recording                               43
2.10      Project Monitoring                                               51
2.11      Portfolio Monitoring                                             56
2.12      Decision Point Closing                                           60
2.13      Project Phase Closure                                            63

Document History

    Revision      Date             Change

    1.0           December 2019    Release for customer – S/4H 1909 SP00

    1.1           April 2020       Release for customer– S/4H 1909 FPS01

    1.2           June 2020        Release for FPS02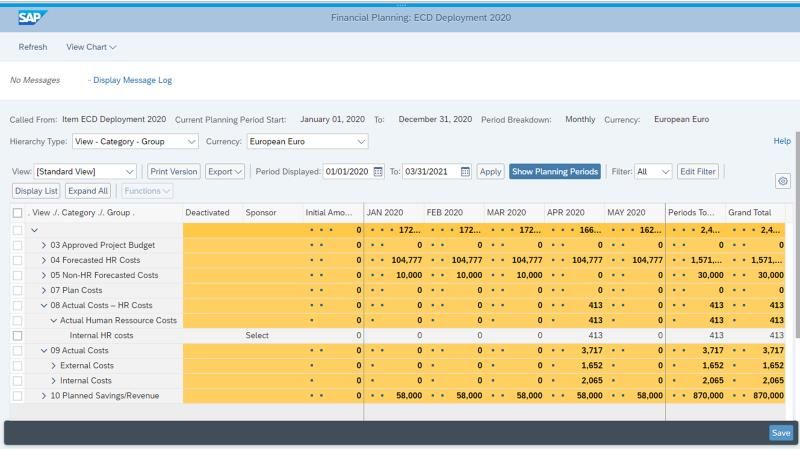
1 How Can This Script Be Used?

This demo script has been written for usage with the SAP S/4HANA Fully-Activated Appliance for 1909 Feature Package Stack 01
and 02 (FPS01, FPS02), further referred to as “appliance”, hence you will need such an appliance to make use of this guide.
The appliance can be brought up in two ways, and the demo scenario in this script is largely the same for both:

1.   Via SAP Cloud Appliance Library (hosted on cloud providers)
     You need a cloud provider account at AWS, MS Azure, or GCP. With this, you can deploy the appliance within 1-2 hours from
     https://cal.sap.com > Solutions > SAP S/4HANA 1909 FPS02 Fully-Activated Appliance.
2.   Via installing it on your own on-premise hardware.
     You need to provide your own hardware, and order & install the appliance as explained in SAP Note 2041140.

If you are new to the SAP S/4HANA Fully-Activated Appliance, introductory information can be found here:
https://blogs.sap.com/2018/12/12/sap-s4hana-fully-activated-appliance-create-your-sap-s4hana-1809-system-in-a-fraction-of-
the-usual-setup-time/

Important:
Before you start your demo, please read SAP S/4HANA Fully-Activated Appliance: Demo Scripts for information about necessary
preparations, especially any post-deployment steps to ensure the full functionality of your appliance. These steps are covered in
sections;
         B) General Remarks
         C) Post-deployment Steps
         D) Log-on to the system
Besides this, you will also find links to all demo scripts on this page.

                                                                                                                                    3
2        SAP Portfolio and Project Management 1.0 for
         SAP S/4HANA

2.1      Overview
This demo script leads you through a typical end-to-end process for managing projects in SAP S/4HANA. In this
scenario, the example of an IT Project is used to showcase the solution capabilities, but you can also manage other
types of projects such as R&D projects, customer projects, and capital and maintenance projects using this solution.

The process starts in portfolio management where the user creates a project request by providing information about
the expected time frame and the financial and capacity demands of the future project. In a review session, the
stakeholder will evaluate and rank multiple project proposals against each other using questionnaires and scoring
methods. Based on the result, the user will approve the project proposal and create an operational project in project
management.

Next, the Project Manager will start planning and scheduling detailed project tasks, while specifying the required
project roles. A Resource Manager will review the resource demand for the project and assign a named resource out
of his or her resource pool. Before the Project Manager releases the project for execution, he or she will set the
authorizations and create a base line version, which will later be used to compare actuals vs. planned values.

Project team members can find the tasks assigned to them in the “My Task List” app. During the project execution
phase, each member can record his or her time spent on the project. This data will automatically transfer to the
Finance module and lead to actuals costs in the financial planning of the portfolio item. With the Project Management
solution, the Portfolio Manager can closely track the progress and costs performance of the project.

Upon approval of the last decision point and generation of the project status report, the project is closed and locked
against further changes.

                                                                                                                         4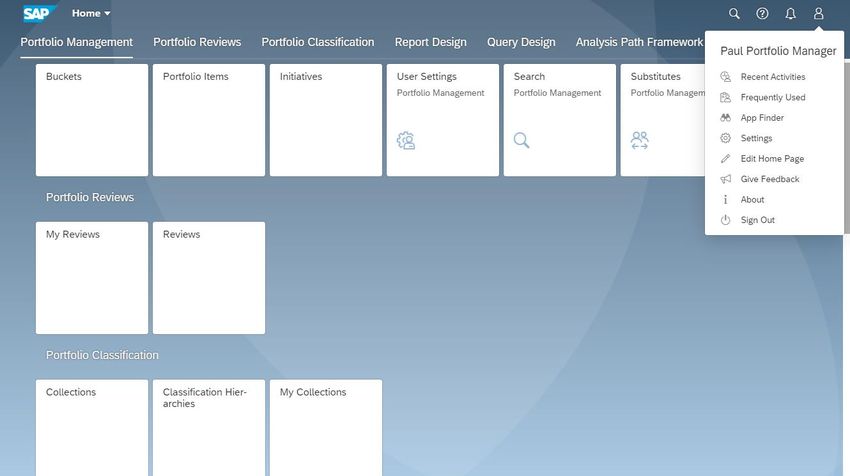
2.2      Review Item Dashboard and Bucket Structure

 What to Do                 What You Will See
 Open the Fiori
 Launchpad and log on
 as a Portfolio Manager.
 User: S4H_PPM_PFM
 Password: Welcome1

 Navigate to the
 Portfolio Management
 group and choose the
 Portfolio Items app.

 The Portfolio Items
 view shows a list of all
 existing items.

 Choose Standard View
 from the View
 dropdown list.

 Select different views
 to display, filter and
 sort Portfolio Items.

 Choose Back to return
 to the dashboard.

                                                      5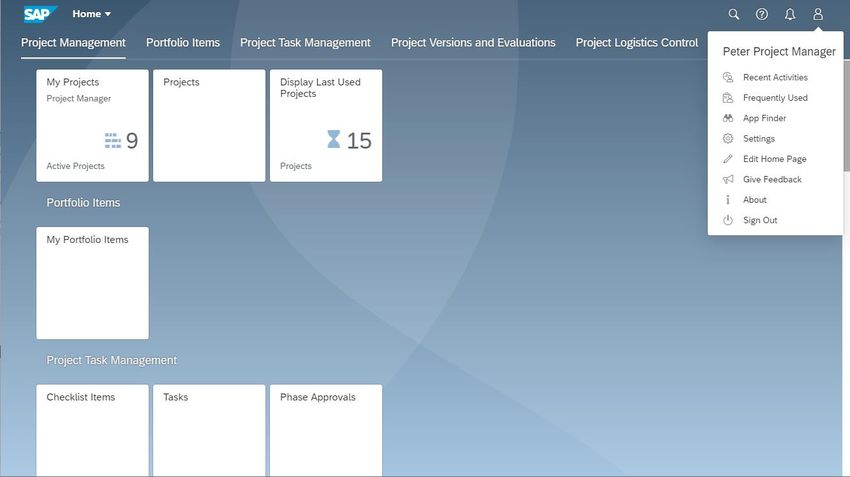
What to Do                 What You Will See
Navigate to the
Portfolio Management
group and choose the
Buckets app.

This structure
represents the
hierarchal structure of
the portfolio planning.

Choose the Bucket
Structure tab, select
the Bucket Name and
click Expand Subtree to
display the hierarchal
structure of the
portfolio planning.

Choose Back.

Navigate to the
Portfolio Classification
group and choose the
Classification
Hierarchies app.

                                               6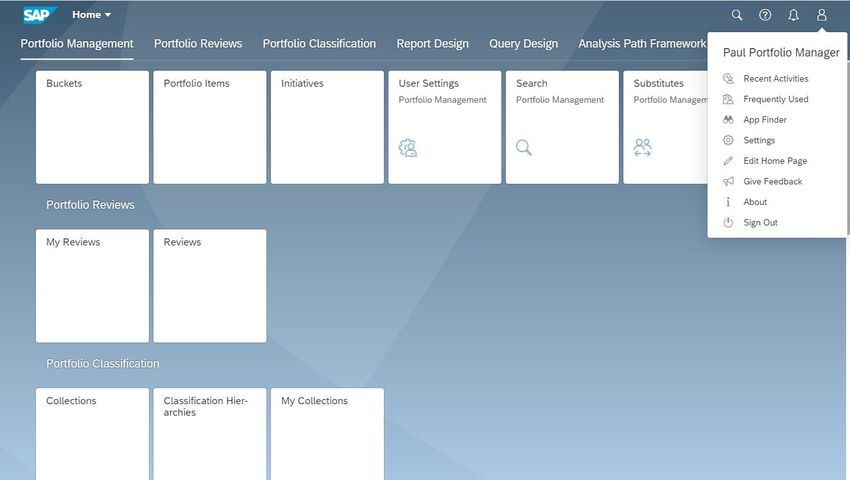
What to Do               What You Will See
 Select the Bucket
 Name and click Expand
 Subtree to display the
 Classification
 Hierarchy structure
 and the alternative
 structure of the
 portfolio planning.

 Choose Back.

2.3     Create New Proposal Item

 What to Do               What You Will See
 Navigate to the
 Portfolio Management
 group and choose the
 Portfolio Items app.

                                              7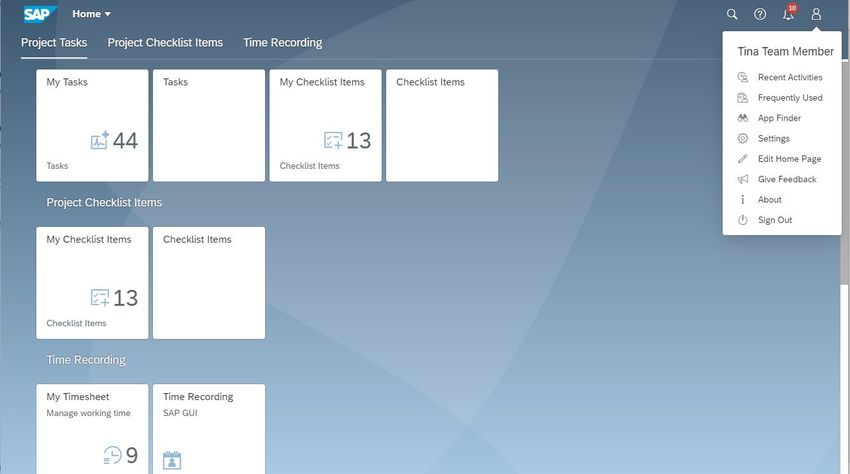
What to Do              What You Will See
Choose the Create
dropdown button and
choose Create Item.

Choose Select Bucket.

Expand IT Innovation.

Choose Infrastructure
and choose OK.

Make the following
entry and choose
Continue:
Item Type: IT
Project

                                            8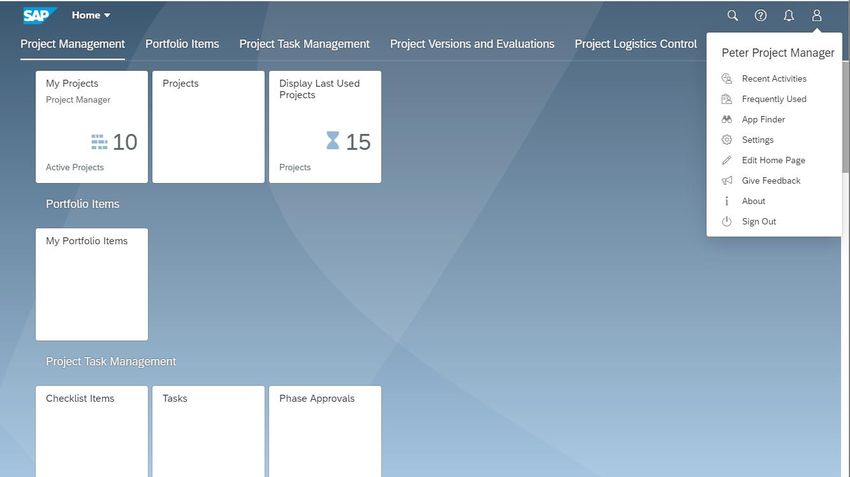
What to Do                 What You Will See
Make the following
entries and choose
Save:
Item Name:

In this scenario we will
use:
ECD Deployment
2020
Item ID:
IT_IN_20_0X
(0X is an ongoing ID)
Priority:
High

Make the following
entries and choose
Save:
Forecasted Start and
Finish Date:
01.01.2020 –
31.03.2021
Planned Start and
Finish Date:
01.01.2020 –
31.12.2020

Choose the
Miscellaneous tab and
choose Add.

                                               9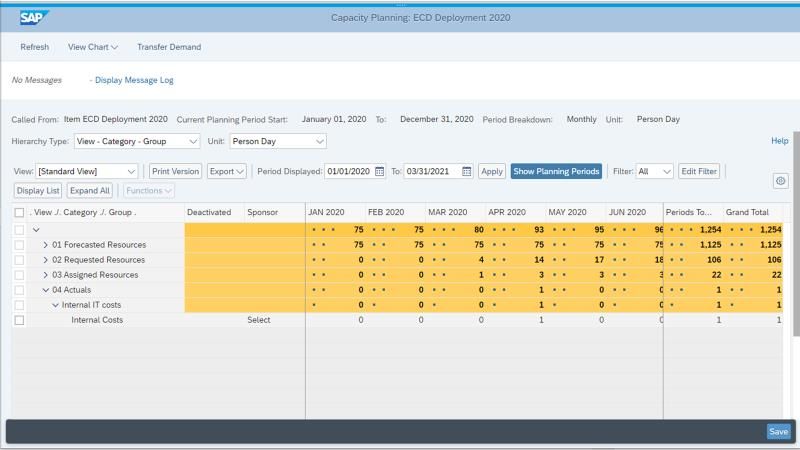
What to Do              What You Will See
To Add Authorizations
for User, make the
following entries and
choose Assign:
User: S4H_PPM_PM
Write:
Person Responsible:

Choose Save.

Notice Peter Project
Manager is added

In the Documents and
Notes tab, choose New
Document.

Make the following
entries and choose
either Check In or
Check In As URL:
File:
Description:

                                            10
What to Do What You Will See
In the General
Information tab,
change the Status to
In Progress.
Choose Proposal.
In the Overview tab,
change the Status to
In Progress.
Choose Save.
Choose Refresh to see
the decision point
change.
11What to Do What You Will See
Go back to Home.
Choose the User
button.
Log yourself out by
choosing Sign Out.
Confirm your decision.
122.4 Detailed Assessment of New Proposal Item
What to Do What You Will See
Open the Fiori
Launchpad and log on
as a Project Manager.
User: S4H_PPM_PM
Password: Welcome1
Navigate to the
Portfolio Management
group and choose the
My Portfolio Items app.
Click on your new item.
A new window will
appear showing the
details of that item.
13What to Do What You Will See
In the Overview tab,
choose Additional
Information.
Choose the
Questionnaire button in
the Probability
Technical Success
field.
Make the following
entries and choose OK:
Product Fits Business
Strategy: Excellent
Fit
Product Leverages
Core Competencies:
Highly
Meets market criteria
for functionality:
Highly
Meets market criteria
for usability: Highly
Usable (Minor
Issues)
Market provides
growth opportunity:
Yes
Product is technically
feasible: Yes..It is
Choose the
Questionnaire button in
the Probability
Commercial Success
field.
Make the following
entries and choose OK:
How long has client
been in business:
greater than 7
years
Clients business
practices: 90
Clients market share:
70
Competition in clients
marketplace: 20-50
competitors
14What to Do What You Will See
Choose the
Questionnaire button in
the next to Assessed
Risk field.
Make the following
entries and choose OK
and then choose Save:
Product is technically
feasible: Yes..It is
Product is
commercially feasible:
Yes..It is
Product forecasted for
technical success:
Possibly
(outsourcing may
be needed)
Are current facilities
adequate for product
development: Yes
Are current personnel
adequate for product
development: Yes
Product forecasted for
commercial success:
Yes, projected
sales > cost to
produce
In the Overview tab,
choose Classification.
Make the following
entries and choose
Save:
Category: IT
Group: Customer
Request
Area: EMEA
Location: Germany
15What to Do What You Will See
Choose Capacity
Information.
Choose Capacity
Planning.
Expand Forecasted
Resources and Internal
IT.
Maintain Capacity
Planning for the
internal IT resources
by entering values for
the required capacity
for the months.
Choose Save and Close
the Capacity Planning
Window.
Choose Financial
Information.
Choose Financial
Planning.
A new window
displays.
16What to Do What You Will See
Expand Non-HR
Forecasted Costs and
Internal Costs.
Enter 10,000 for first
3 periods of the
administration costs
and confirm your
entries. Press enter.
Expand Planned
Savings/Revenue and
Revenue.
Enter 58,000 in every
period and press enter.
Choose Save and Close
the Financial Planning
Window.
Choose Financial
Information.
Choose Refresh.
Check the calculated
financial KPIs.
Choose Proposal to
open decision point.
A new window
displays.
17What to Do What You Will See
Make the following
entry and choose Save:
Status: Ready for
Decision
Choose Refresh to see
the decision point
change.
Go back to Home.
Choose the User
button.
Log yourself out by
choosing Sign Out.
18What to Do What You Will See
Confirm your decision.
192.5 Review and Release of New Proposal Item
What to Do What You Will See
Open the Fiori
Launchpad and log on
as a Portfolio Manager.
User: S4H_PPM_PFM
Password: Welcome1
Navigate to the
Portfolio Reviews
group and choose the
Reviews app.
Choose IT Review.
20What to Do What You Will See
In the Items tab,
choose Add.
Fill in your item ID.
Choose Find.
Choose your item with
your ID of
IT_IN_20_0X and
then choose the (>)
Add button to add the
item to the Selected
Objects section.
21What to Do What You Will See
Choose OK.
Choose Save.
Choose Scoreboard.
In the Scoreboard view,
make the following
entry:
Scoring Model: NPV
Score
Close the scoring
window.
22What to Do What You Will See
Choose all the items
and choose Reporting
Cockpit.
Familiarize yourself
with the results of the
reporting.
Use the table and the
graphic to compare the
items.
Close the reporting
window.
23What to Do What You Will See
(Continued from
previous page)
24What to Do What You Will See
(Continued from
previous page)
In the View dropdown
field, choose Project
Prioritization.
Open your item by
choosing the link in the
table .
In your Item Overview
make the following
entries:
Create Project on
Saving:
Project Management
Template: IT
Project Template
Choose Save.
Choose Proposal.
25What to Do What You Will See
In the Decision Point:
Proposal view, change
the Status field to
Approved and choose
Save.
Close the window.
Choose Refresh to see
the decision point
change.
Choose the User
button.
Log yourself out by
choosing Sign Out.
26What to Do What You Will See
Confirm your decision.
272.6 Project Planning
What to Do What You Will See
Open the Fiori
Launchpad and log on
as a Project Manager.
User: S4H_PPM_PM
Password: Welcome1
Navigate to the Project
Management group
and choose the
Projects app.
Choose the Project
IT_IN_20_0X by
choosing the Project
(Number) or Project
(Description).
28What to Do What You Will See
To staff yourself as the
Project Manager,
choose the Resources
tab→ choose Details →
and choose Staffing.
Choose the IT Project
Manager as a Role
(Resource).
Make the following
entry and choose
Staffing:
Resource: Peter
Project Manager
Choose Save.
To create a task within
the existing project
structure, choose the
Structure tab→ choose
Detail .
29What to Do What You Will See
Check Project
Preparation.
Choose Create Task.
In the Structure tab,
choose Detail.
Choose the Basic Data
tab and make the
following entries:
Name: Create
Project Plan
Task Type: Tasktype
[01]
Responsible Role: IT
Project Manager
In the Structure tab,
choose Detail.
Choose Dates and
Work and make the
following entries:
Duration: 10
Work: 8
30What to Do What You Will See
In the Structure tab,
choose Detail.
Choose Roles.
Mark the row IT
Knowhow Manager
and choose Assign
Role.
Unmark the IT
Knowhow Manager.
Mark the row IT Project
Manager to choose this
role.
Mark the resource
Peter Project Manager
and choose Assign
Resource.
Enter &
person days in the
Work column.
Choose Save.
31What to Do What You Will See
To update the demand
of the role IT Project
Manager according to
the project planning,
go to tab Resources →
Details → General.
Mark the role IT Project
Manager and choose
Update Role According
to Tasks and see how
the Total Demand
raises by 2 (days work
from the task
planning).
To create a
relationship with
another task, go to tab
Structure → Detail →
Relationships.
32What to Do What You Will See
Make the following
entries and choose
Save to create a
relationship with task.
Technical
Requirements:
Task (Same Level):
Technical
Requirements
Relationship Type:
Finish-start
relationship
Choose Predecessor to
define the task
Technical
Requirements as
predecessor.
Close the Window.
Go back to Home and
choose the User
button.
Log yourself out by
choosing Sign Out.
Confirm your decision.
332.7 Staffing via Resource Manager
What to Do What You Will See
Open the Fiori
Launchpad and log on
as a Resource
Manager.
User: S4H_PPM_RM
Password: Welcome1
Choose the Resource
Overview app.
Choose the Staffing
Overview app.
34What to Do What You Will See
Choose IT PROJECT
PORTFOLIO as your
Views.
Note: Here you see
the overview of the
staffing status of all
projects assigned to
the Resource Manager.
Choose the button
to expand your project
(in this case it is ECD
Deployment) and
expand the Role IT
Knowhow Manager.
To staff a resource to
the role IT Knowhow
Manager, choose the
button and select
Assign Resource.
35What to Do What You Will See
In the Staffing
Overview view, choose
the row Tina Team
Member and choose
the button to
choose the selected
resource.
Choose OK.
Notice Tina Team
Member was added
and choose Save.
Choose Back.
Choose the User
button.
Log yourself out by
choosing Sign Out
36What to Do What You Will See
Confirm your decision.
372.8 Authorizations, Project Release, and Baseline
What to Do What You Will See
Open the Fiori
Launchpad and log on
as a Project Manager.
User: S4H_PPM_PM
Password: Welcome1
Navigate to the Project
Management group
and choose the My
Projects app.
Choose the project tile
of
within the Planned
Projects card.
38What to Do What You Will See
Choose the Structure
tab and choose
Authorizations.
Click Add.
Make the following
entries and choose
Assign:
User: BPINST
Authorizations: Admin
Evaluate:
Accounting:
Resource
Management:
Staffing Manager:
Candidate Manager:
Choose Save.
39What to Do What You Will See
In the Basic Data tab,
change the Status field
to Release.
Choose Save.
v
Change the Status of
the Project to Flag
for Transfer.
Choose Save.
Note: This flags the
project for transfer to
ERP. Once saved, a PS
Project is created. This
is a prerequisite for the
next step, the time
recording.
v
v
Make sure that the
Phase Project
Preparation as well as
the Tasks Kick-Off,
Technical
Requirements, IT
Project Preparation
and Create Project Plan
have the Status
Released – Transferred
– Assigned.
40What to Do What You Will See
Choose the Accounting
tab and choose
Account Assignment.
Check the WBS
Structure.
To create a project
baseline, choose the
tab Project Versions →
Snapshots.
Choose Create.
Make the following
entry and choose
Continue:
Version:
Z_SNAP_VERSION1
41What to Do What You Will See
Choose Save.
Click on Back.
Choose the User
button.
Log yourself out by
choosing Sign Out.
Confirm your decision.
422.9 Task Management and Time Recording
What to Do What You Will See
Open the Fiori
Launchpad and log on
as a Team Member.
User: S4H_PPM_TM
Password: Welcome1
Navigate to the Project
Tasks group and
choose the My Tasks
app.
Search your Project ID
and click Go.
Click on a task that has
already begun
(Planned Start is
before your current
date).
In this case, it is Create
Project Plan.
43What to Do What You Will See
Note: Check all the
details. Here the team
member can find more
information on what
needs to be done.
Check the figures for
dates and work. Note
that the information
could have been stored
as an attachment or a
description.
Choose Confirm.
Choose Edit.
Type in a value for
Done Since Last
Confirmation and a
Percentage, for
example, see values in
screenshot.
Choose Save.
Click on Back.
44What to Do What You Will See
Navigate to the Project
Checklist Items group
and choose the My
Checklist Items app.
Choose a checklist
item that has already
begun (Planned Start
is before your current
date).
Note: Check all the
details. Here the team
member can find more
information on what
needs to be done.
What are the figures
for dates and works.
The information could
have been stored as an
attachment or a
description.
Choose Edit.
45What to Do What You Will See
Make the following
entries and choose
Save:
Change Status:
Release.
Result: OK.
Change Status:
Finish.
Click on Back.
Preconditions for • Make sure you have assigned the user BPINST as Admin to the project IT_IN_01
successful time This is described in Step Obtain further authorizations in section Authorizations, Project
recording: release and Baseline.
• Make sure you have created the task Create Project Plan and that you staffed the role
IT Knowledge Manager to this task.
• Make sure you have assigned Tina Team Member to the role IT Knowledge Manager.
• Make sure you have released the task Create Project Plan.
The team member
must record their
times to the task.
Therefore, choose the
My Timesheet App in
the Time Recording
section.
Note: There are two
possible methods for
Time Recording. In this
demo, the new Fiori
App My Timesheet was
enabled.
46What to Do What You Will See
Choose the day on the
calendar when you
want to record the
times.
Choose Create.
Choose the
(Search Help) of the
field Select Favorite or
Worklist
In the upcoming pop-
up, you can choose the
task that you have
created earlier.
IT_IN_20_0X
Enter the Duration
And optionally, enter a
Note .
Move to area Time
Assignment
Make the following
entries:
(Feel free to use the
search help. )
Activity Type: 8
Controlling Area: A000
Sender Cost Center:
17101301
Choose Submit.
47What to Do What You Will See
Confirm Submission.
Note that the time was
successfully recorded.
Note: Every full hour
the Job PPM_Service is
scheduled.
This job updates the
recorded times to PS,
Project Management
and renews the
Financial Planning
Views in Portfolio
Management.
In the backend via SAP
Logon, you can
monitor this Job with
Transaction SM37.
Optional: Record You can skip the next steps and sign out in case you successfully recorded times with the My
Times with Transaction Timesheet app
CAT2
Optional:
Go back to Home.
The team member
must record his or her
times to the task. He or
she will enter the Time
Recording Transaction
in the Time Recording
section.
48What to Do What You Will See
Make the following
entries:
Data Entry Profile:
ZMCRDPPM
Key Date:
Date of your Time
Recording entry
Personnel Number:
20
Note: 20 is the
Personnel Number of
Tina Team Member.
Choose Enter Times.
Choose a Task from
the Worklist.
The task Create
Project Plan should be
available.
Choose More →copy
row.
Or, Press F 5 on your
keyboard.
In the Data Entry Area
section, make the
following entries:
Sender Cost Center:
17101301
Controlling Area: A000
Activity Type: 8
Sending Functional
Area: YB20
In the Data Entry Area
section, make the
following entries:
Sender Cost Center:
17101301
Controlling Area: A000
Activity Type: 8
Sending Functional
Area: YB40
Receiving Functional
Area: 0001
Unit of Measure: H
Insert hours into
the period columns.
Choose Save.
49What to Do What You Will See
Note: Every full hour
the Job “PPM_Service”
is sheduled.
This job updates the
recorded times to PS,
Project Management
and renews the
Financial Planning
Views in Portfolio
Management.
Optional: You can
monitor this Job with
Transaction SM37.
Click Back.
Choose the User
button.
Log yourself out by
choosing Sign Out.
Confirm your decision.
502.10 Project Monitoring
What to Do What You Will See
Open the Fiori
Launchpad and log on
as a Project Manager.
User: S4H_PPM_PM
Password: Welcome1
Navigate to the Project
Management group
and choose the My
Projects app.
Choose the tile My
Projects – Active →
View All.
51What to Do What You Will See
Mark the project Your
Project and choose
Project Progress.
If in the following step
only, Create Project
Plan is displayed, go
back to Section 2.8
and make sure that
you have released the
project phases. Click
Save again.
c
Choose the Expand
button in the line of the c
phases or zoom in/out
to get an overview of
the project progress.
Click on Back.
Choose Projects.
52What to Do What You Will See
Choose a project from
the list.
Choose the Project
(Number) or Project
(Description).
Choose Print Fact
Sheet.
Choose Preview to
generate a PDF Fact
Sheet.
Printing and
Downloading is
available within the
integrated PDF viewer.
Choose Item.
53What to Do What You Will See
Choose Financial and
Capacity Planning →
Financial Planning.
Check the Actual
Costs.
This ALV should
display the Actual HR
Costs for Efforts that
were recorded by the
Team Member Tina
Team Member. (The
recorded hours are
converted via cost
rate).
Adjust the Period
Displayed and choose
Apply.
Close the window and
choose Financial and
Capacity Planning →
Capacity Planning.
54What to Do What You Will See
The capacity planning
displays the Actual
Person Days for Efforts
that were recorded by
the Team Member Tina
Team Member.
Close the window and
go back to Home.
Choose the User
button.
Log yourself out by
choosing Sign Out.
Confirm your decision.
552.11 Portfolio Monitoring
What to Do What You Will See
Open the Fiori
Launchpad and log on
as a Portfolio Manager.
User: S4H_PPM_PFM
Password: Welcome1
Navigate to the
Portfolio Management
group and choose the
Portfolio Items app.
Choose the View drop-
down list and choose
Standard View.
Select different views
to display, filter and v
sort Portfolio Items in
different ways, e.g.
Project Overview.
Choose Back.
56What to Do What You Will See
In the Portfolio
Management section,
choose Buckets.
Choose Bucket
Structure.
Click IT Innovation.
Choose Financial and
Capacity Planning.
Choose Financial
Planning.
57What to Do What You Will See
In the Financial
Planning: IT Innovation
view, choose Include
Subobjects to display
the items related to the
bucket cost.
Choose View Chart and
choose your desired
view to Display Chart
Reports of the
Financial Bucket
Planning.
Close the window and
go back on your
Bucket.
Choose Financial and
Capacity Planning and
choose Capacity
Planning.
58What to Do What You Will See
The Capacity Planning
of the bucket is shown.
To display the items
related to the bucket
cost, choose Include
Subobjects.
To Display Chart
Reports of the
Capacity Bucket
Planning, choose View
Chart at the top and
select the desired view.
Go Back to Home.
592.12 Decision Point Closing
Choose Portfolio Items
and choose a Portfolio
Item.
Click on Your Item.
In the Phase and
Decisions tab, choose
the Created Decision
Point.
60Change the Status
from Created to In
Process.
Change the Status
from in Progress to
Ready for
Decision.
Choose Save at the
bottom of the page.
Afterwards you can
change the Status from
Ready for
Decision to
Approved.
Choose Save.
The Decision Point
Planning is locked, and
the Decision Point
Execution is activated.
Choose the User
button.
Log yourself out by
choosing Sign Out.
61Confirm your decision.
622.13 Project Phase Closure
Open the Fiori
Launchpad and log on
as a Project Manager.
User: S4H_PPM_PM
Password: Welcome1
Navigate to the Project
Management group
and choose the
Projects app.
Choose a project item.
63Choose the phase
Project Preparation.
Choose Complete
Subordinates.
Accept the pop-up.
All tasks within this
phase are being
completed.
In the Basic Data tab,
change Status to
Completed.
This phase is
completed.
Choose Save
Go to the next Phase
Business Blueprint and
change the Status of
the phase into
Release.
Choose Save.
64www.sap.com/contactsap
© 2020 SAP SE or an SAP affiliate company. All rights reserved.
No part of this publication may be reproduced or transmitted in any
form or for any purpose without the express permission of SAP SE or
an SAP affiliate company.
The information contained herein may be changed without prior notice.
Some software products marketed by SAP SE and its distributors
contain proprietary software components of other software vendors.
National product specifications may vary.
These materials are provided by SAP SE or an SAP affiliate company
for informational purposes only, without representation or warranty of
any kind, and SAP or its affiliated companies shall not be liable for
errors or omissions with respect to the materials. The only warranties
for SAP or SAP affiliate company products and services are those that
are set forth in the express warranty statements accompanying such
products and services, if any. Nothing herein should be construed as
constituting an additional warranty.
SAP and other SAP products and services mentioned herein as well as
their respective logos are trademarks or registered trademarks of SAP
SE (or an SAP affiliate company) in Germany and other countries. All
other product and service names mentioned are the trademarks of
their respective companies. Please see www.sap.com/corporate-
en/legal/copyright/index.epx for additional trademark information
and notices.
65You can also read