VRdirect User Guide February 2021
←
→
Page content transcription
If your browser does not render page correctly, please read the page content below
VRdirect User Guide

February 2021 | support@vrdirect.com
Chapter overview

A. Preparation                 B. Production                               C. Virtual Reality Creation

§   Concept                    §   Specifications & Formats                §   Overview of the VRdirect Studio
§   Storyboard                 §   Alternative Options for 360° Material   §   Creation Area
§   360° Production List       §   Editing 360° Content                          §   Scenes
§   360° Camera Guide          §   2D Media & Assets                             §   Objects
§   Tips for 360° Production                                                     §   Interactions & Time Events
                                                                                 §   Preview
                                                                           §   Publishing Area
                                                                                 §   Upload VR Project
                                                                                 §   Publish VR Project
                                                                           §   Distribution of the VR Project
                                                                                 §   Web Player
                                                                                 §   App
                                                                                 §   VR Headset

                                                                                                                  2
Chapter overview

A. Preparation                 B. Production                               C. Virtual Reality Creation

§   Concept                    §   Specifications & Formats                §   Overview of the VRdirect Studio
§   Storyboard                 §   Alternative Options for 360° Material   §   Creation Area
§   360° Production List       §   Editing 360° Content                          §   Scenes
§   360° Camera Guide          §   2D Media & Assets                             §   Objects
§   Tips for 360° Production                                                     §   Interactions & Time Events
                                                                                 §   Preview
                                                                           §   Publishing Area
                                                                                 §   Upload VR Project
                                                                                 §   Publish VR Project
                                                                           §   Distribution of the VR Project
                                                                                 §   Web Player
                                                                                 §   App
                                                                                 §   VR Headset

                                                                                                                  3
Preparation: Concept Creation

Develop a good concept for the VR project!

§   What is the VR project about?
      Ø   What is the presented use case? (Training, onboarding, marketing etc.)
      Ø   What should be achieved with the VR project? (More efficient processes,
          secure working conditions, ... etc.)
                                                                                                            Application
§   Determine the content of the VR Project
      Ø   What type of production is needed? (Professional? DIY?)                                                             …
                                                                                                            Virtual
                                                                                                                            (360°
      Ø   Which media types should be used? (Video, images, 3D objects, …?)                                Walkthrou
                                                                                                                          Pictures)
                                                                                                              gh
      Ø   How should the user be guided through the project? (Linear or open          Intro   Menu                                                     …
          guidance?)                                                                                                                  Studies (8)

      Ø   What design style should it have? (Professional, suitable for children,                          Education                   Technical
                                                                                                                                       Education (8)       …
          corporate CI, ... ?)
                                                                                                                                       Economic
§   Definition of target group                                                                                                         Education (2)

      Ø   What is the target group? (Age range, VR-experienced, etc.)
                                                                                                     Figure 1: Example of project structure
      Ø   Which devices are mainly used for cconsumption? (Web, mobile, VR glass)
      Ø   How large is the audience? (Internal / external use? Marketing campaign?)

§   Selection of distribution channels
      Ø   VRdirect App (For mobile devices and VR devices)
      Ø   Web Player (For the web browser on all devices, website integration?)

                                                                                                                                                               4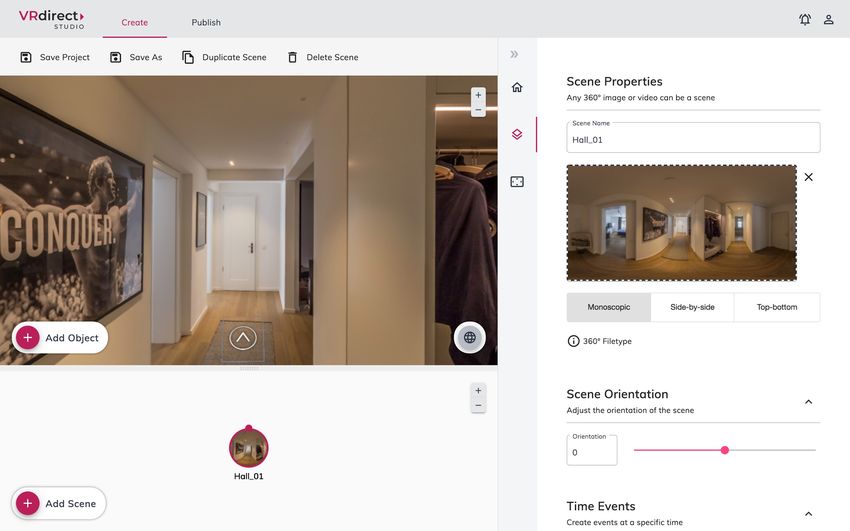
Preparation: Concept & Storyboard Creation

Develop a good concept for the VR project!

§   Structure of VR project (see figure 1)
      Ø   Approximately how many scenes / chapters are needed?

      Ø   How are these scenes connected to each other?
      Ø   Is (external) help needed to realize the project?

§   Create a compelling story
      Ø   What story should the VR project tell?
      Ø   How can your ideas be transferred to Virtual Reality?                                                Figure 2: Example of storyboard

§   Create a storyboard (see figure 2)
      Ø   Which scenes must be included?
      Ø   The further the storyline is defined, the better.                                    1 Day            1-2 Weeks                              3-4 Weeks                     1-2 Weeks

                                                                                     Shoot &     Post-                        Creation of VR                                 Preparation
§   Develop a detailed timetable for the production (see figure 3)                  Production Production                      Project with
                                                                                                                              VRdirect Studio
                                                                                                                                                                              Marketing
                                                                                                                                                                               Material
                                                                                                                                                                              (optional)
      Ø   When should production begin?
                                                                          §   Preparation of Shoot     §   360° Stiching                        §   Info-Boxes                         §   Teaser Video
                                                                          §   Briefing                 §   Editing                              §   Graphical Elements                 §   Screencasting
      Ø   How long should the production take? (Consider pre- and post-                                §   Selection of Material                §   Icon & Button Set                  §   Marketing
                                                                                                       §   Color Correction                     §   Interactions in the                    Graphics
          production)                                                                                  §   …                                        VRdirect Studio
                                                                                                                                                §   Editing of 2D Material

      Ø   Is there enough time for feedback loops?

                                                                                                               Figure 3: Example of timetable

                                                                                                                                                                                                           5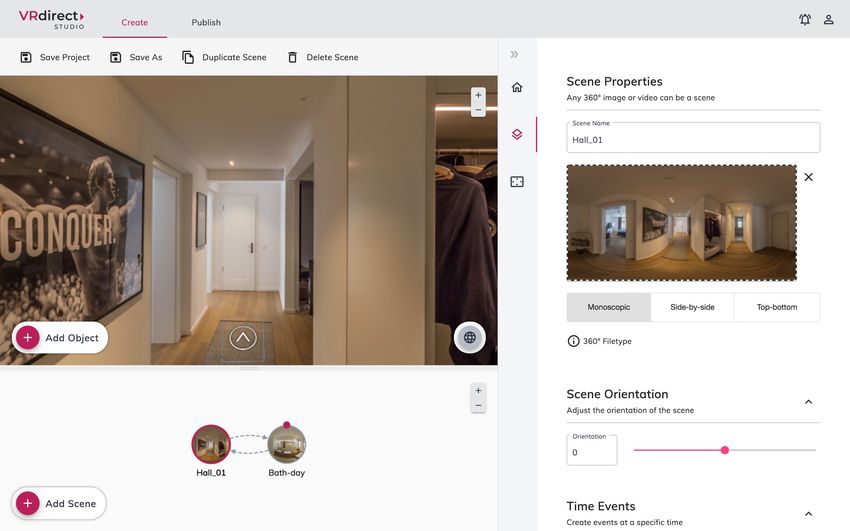
Preparation: 360° Production List

Create a detailed production list for the project!

§   Purpose of a production list
      Ø   The production list results from the concept & storyboard
          planning and helps the coordination of the upcoming 360°
                                                                                                                                 Download
          production (camera shoot).
                                                                                                                                 template here:
      Ø   The parameters must be clarified in advance as detailed as
          possible - especially if several people are involved in the
          production.
                                                                                                                                     Link
      Ø   It is recommended to visit the locations on-site in advance

§   Components
      Ø   General information about course of action                        Figure 4: Template of a 360° production list
      Ø   Overview of all scenes
      Ø   Required 360° content in the scene (images or videos)
      Ø   Required staff / persons (actors, production team, …)                                                                                    1

      Ø   Required tools and equipment

                                                                                                                                               2

      Note: The tips apply to both - a professional production and a "do-                                          6
                                                                                                                                                       3

      it-yourself" production.                                                                                         5                 4

      For virtual tours it is recommended to mark the stations / camera
      positions on a floor plan (see Fig. 5).
                                                                                                                 Figure 5: Position markers in floorplan

                                                                                                                                                           6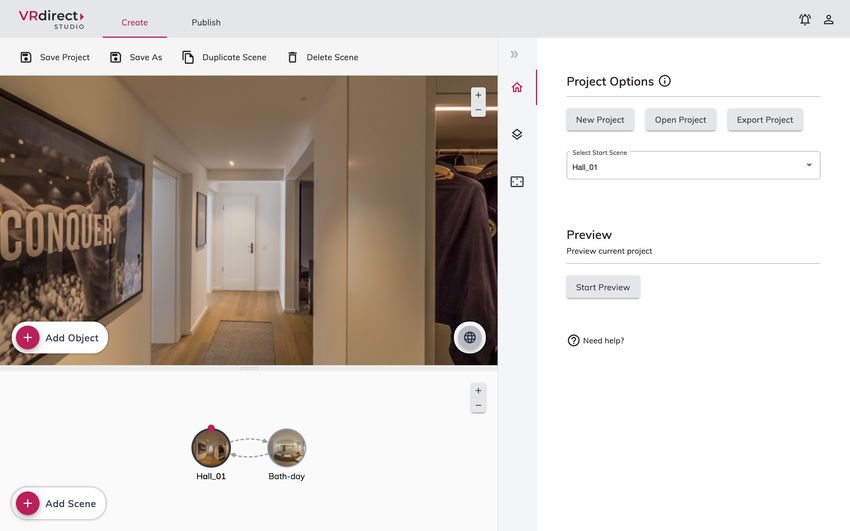
Preparation: 360° Camera Guide

What to look for in a 360° camera

§   Special features in 360° cameras
      Ø   High 360° image and video resolution
      Ø   Stabilization for moving images
      Ø   Support for dark and night shots
      Ø   Stitching options (automatic stitching or manual stitching?)
      Ø   More lenses = higher quality of the image à but also more complicated   Insta360 One R
          handling

§   Cameras for beginners
      Ø   Insta360 One R (ca. 260 EUR)
                                                                                                    Insta360 One X2
      Ø   Ricoh Theta V (ca. 350 EUR)
      Ø   Insta360 One X2 (ca. 400 EUR)

§   Advanced / professional cameras
                                                                                                                      Ricoh Theta Z1
      Ø   Ricoh Theta Z1 (ca. 970 EUR)                                            Insta 360 Pro 2
      Ø   GoPro Omni Rig (ca. 2500 EUR)
      Ø   Insta 360 Pro 2 (c. 5000 EUR)

                                                                                                                                       7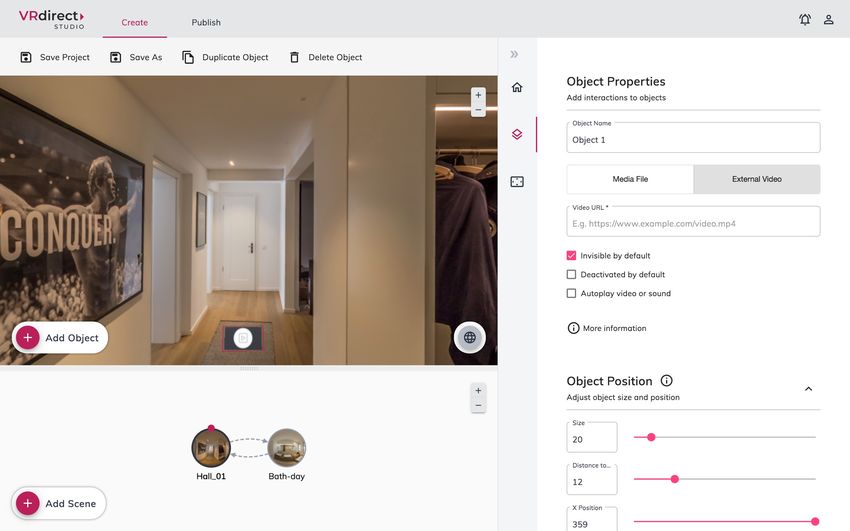
Preparation: Tips for taking 360° images and videos

§   General tips
      Ø   Use as much lighting as possible.
      Ø   Use a stable tripod to ensure the camera is centred and steady
      Ø   Set the camera at a person’s average eye level (approx. 1,60 meters)
      Ø   Do not position the camera too far or too close to the subject / object of attention
      Ø   Clear the space around the camera and make sure that people in the background
          are not visible in the scene (or staged on purpose)

§   360° Images
      Ø   Ensure that you also take "neutral" 360° photos (e.g. for a menu or intro scene)
      Ø   Rather take too many photos than too few

§   360° Videos
      Ø   When taking a 360° video it is recommended to also take a 360° image in the
          same camera position (in case the video appears laggy or has poor quality)
      Ø   Please consider that most 360° cameras take better quality images than videos
      Ø   Only record video sequences that are worth showing, as some viewers may lose
          interest over time
                                                                                                 Download info sheet here:   Link
      Ø   Make sure the 360° video is sharp, to the point and rather short
      Ø   Rather record too many videos than too few

                                                                                                                                    8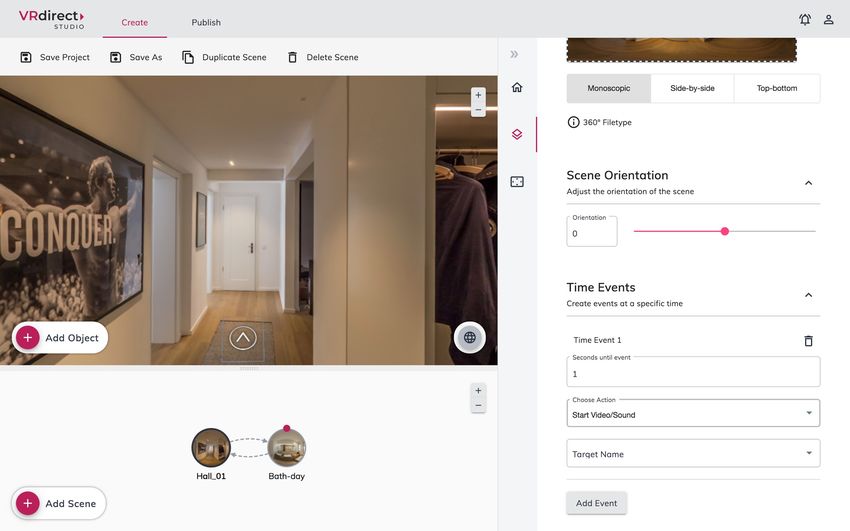
Chapter overview

A. Preparation                 B. Production                               C. Virtual Reality Creation

§   Concept                    §   Specifications & Formats                §   Overview of the VRdirect Studio
§   Storyboard                 §   Alternative Options for 360° Material   §   Creation Area
§   360° Production List       §   Editing 360° Content                          §   Scenes
§   360° Camera Guide          §   2D Media & Assets                             §   Objects
§   Tips for 360° Production                                                     §   Interactions & Time Events
                                                                                 §   Preview
                                                                           §   Publishing Area
                                                                                 §   Upload VR Project
                                                                                 §   Publish VR Project
                                                                           §   Distribution of the VR Project
                                                                                 §   Web Player
                                                                                 §   App
                                                                                 §   VR Headset

                                                                                                                  9
Production: Specifications and Formats

Use these specifications and formats when importing content into the VRdirect Studio!

§   360° images
      Ø   Projection type: Equiangular monoscopic or stereoscopic
      Ø   Quality: 8K (recommended) = 8000 x 4000px JPG or PNG

§   360° videos
      Ø   Projection type: Equiangular monoscopic or stereoscopic (side-by-side)
      Ø   Quality: 4K (recommended) = 4096 x 2048px MP4 - H264 encoded, 30 fps, 12 mbps bitrate

§   2D images
      Ø   Format: JPG or PNG
      Ø   Stereo images: Stereoscopic side-by-side images, JPG or PNG
      Ø   Quality: HD (recommended) = 1920 x 1080px

§   2D videos
      Ø   Format: MP4 (transparency is not supported)                                             Download specification sheet:
      Ø   Audio format: MP3 stereo mix
          Quality: HD (recommended) = 1920 x 1080px
      Ø
                                                                                                               Link
§   Audio
      Ø   Format: MP3 stereo mix - Recommended: 128 Kbps
      Ø   1,2,6 and 8 audio channels for AAC codec
      Ø   Spatial audio in TBE format (44.1 KHz)

                                                                                                                                  10
Production: Alternative Options for 360° Material
Existing 360° content from Stockfootage libraries
§ 360° images and 360° videos
Ø Bigstock (Link)
Ø Adobe Stock (Link)
Ø Shutterstock (Link)
Ø Pond5 (Link)
royalty-free, also offers music
§ 3D models
Ø Turbosquid (Link)
Ø Sketchfab (Link)
Ø cgtrader (Link)
Note: When making use of a 3D model, the 360° content must
be rendered in monoscopic format from the 3D model. This can
be done in a 3D software (e.g. Blender, Cinema4D or Maya).
3D
11Production: Editing 360° Content
Edit 360° content for a professional touch!
Optional
§ Stitching within the 360° camera
Ø The so-called “stitching" combines the individual shots from the
camera lenses to create a 360° image or video
Ø Most 360° cameras perform stitching automatically after an image or
video has been captured
Ø Look for this feature when choosing a 360° camera
Ø Manual stitching can get very time-consuming and therefore only Adobe Photoshop
recommended for professionals
§ Tools for professional editing
Ø Use of professional design software for adjustments to brightness,
contrast, color correction, video cutting ... etc.
Ø Adobe Photoshop (Link)
Adobe Premiere
Ø Adobe Premiere (Link)
Ø GIMP (Link)
GIMP
12Production: 2D Media & Assets
Enriching the VR project with media and graphics
§ Creation of graphics, buttons, icons, text boxes ...
Ø The creation of such 2D assets can be done via common software (e.g. PowerPoint) or other
graphical design programs
Ø In PowerPoint, you can export the 2D assets as a PNG image and then add them to the VR project
Import your
Open Create your Group
Select everything you Save as an
graphic/text to the
PowerPoint graphic/text have created image (png)
Studio
VRdirect builder
§ Other possibilities
Ø Find buttons, images, icons and more on the internet (Flaticon, Pixabay, …)
Ø Use the VRdirect icon library (see next slide)
13Production: 2D Media & Assets
Download the VRdirect icon set: Link
14Chapter overview
A. Preparation B. Production C. Virtual Reality Creation
§ Concept § Specifications & Formats § Overview of the VRdirect Studio
§ Storyboard § Alternative Options for 360° Material § Creation Area
§ 360° Production List § Editing 360° Content § Scenes
§ 360° Camera Guide § 2D Media & Assets § Objects
§ Tips for 360° Production § Interactions & Time Events
§ Preview
§ Publishing Area
§ Upload VR Project
§ Publish VR Project
§ Distribution of the VR Project
§ Web Player
§ App
§ VR Headset
15Overview of the VRdirect Studio: Introduction
When the studio is opened for the first time, an
instruction video provides the necessary all-round
introduction and visualizes the process step by
step.
In addition, five instruction graphics are displayed
there. Those again visually describe how to start
creating the project.
The window can be closed at any time by clicking
the „Close“ or "Don‘t show again" button.
If this introduction slider needs to be looked at again
at a later time, it can be found by clicking on the
"Need help?" button in the Home tab of the sidebar.
16Overview of the VRdirect Studio: The Studio Environment
Tab bar:
Toolbar: Here you can switch
The toolbar is only between the tabs
displayed on the creation 'Create' and
side of the Studio. Here you 'Publish'.
can save the project and Notifications and
delete or duplicate scenes profile options are
and objects. also located here.
Scene View:
This window shows the
inside of a scene. Here you
can add objects and look
around the scene (360°
environment) by dragging
your mouse left or right. Sidebar:
The sidebar shows
the properties of the
selected object or
Storyboard View: scene. As well as
All scenes are displayed the general project
and arranged here. New options and the so-
scenes and connections can called background
be added. scene.
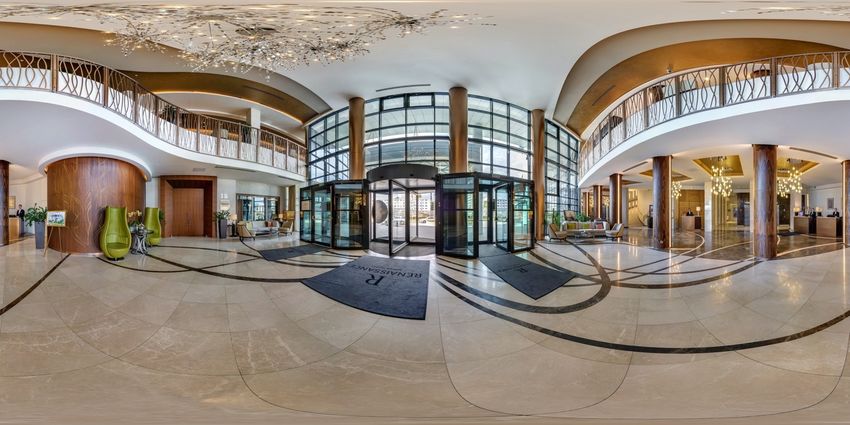
17Creation Area : Adding a Scene
§ When you open VRdirect Studio for the first time,
you will see this screen after the instruction
window.
§ Start a VR project by adding 360° content - either
by dragging and dropping it or by clicking into the
large field in the middle of the screen.
§ A 360° scene will be automatically created from
the 360° content.
§ Alternatively, you can click on the plus button "Add
scene" (bottom left corner).
What is a scene?
A scene represents a 360°
environment in which the user is
standing in. Scenes are filled with
360° images or videos.
18Creation Area: Selecting the 360° Content for a Scene
§ As soon as a scene has been created (here
in the example: via the "Add Scene"
button), it can be edited in the scene
properties in the right-hand sidebar.
§ To keep the project orgainzed, it is
advisable to name the scenes in the
"Scene name" field.
§ 360° content (images or videos) can be
directly dragged and dropped into the
VRdirect Studio or chosen afterwards in
the scene properties by clicking on the
large import field.
19Creation Area: Add Additional Scenes
§ To expand the VR project, you can
add more scenes.
§ This can be done repeatedly by
clicking on the plus button "Add
scene".
20Creation Area: Connecting Scenes
§ To move from room to room, as in this
example, insert a connection between
the scenes.
§ Two scenes are connected by clicking
on the small upper circle in the first
scene and attaching the resulting arrow
to the second scene (by dragging it out
and releasing).
§ A connection between two scenes is
after creation only existing and not yet
doing anything. It must be actively
triggered by an interaction in order to
bring the user from room to room. This
interaction must additionally be created
in the respective scene (see later
chapter "Interaction").
21Creation Area: Adding an Object
§ To trigger the interaction of a scene connection
(e.g. jumping from room to room), you need an
object that the user can click on - meaning a
trigger for the interaction.
§ Back in the first scene, a click on the "Add object"
button adds a new object to the scene. This
element can be placed freely in the room by
dragging it with the mouse.
§ In the object properties (sidebar on the right) you
can set and adjust various parameters of the
object.
What are objects?
Objects are elements within a 360° scene that can
trigger an interaction (e.g. the connection to another
scene, the fading in of a text/image, the playing of
music/video etc.).
Music Video Image
22Creation Area: Graphics for Objects
Options for creating graphics (for objects)
§ The graphics for objects serve as 2D assets (icons, buttons, graphics, etc.).
§ The creation of such 2D assets can be done using common software (e.g. PowerPoint) or other
graphical design programs (e.g. Photoshop).
§ In PowerPoint, you can export the 2D assets as PNG and then add them to the VR project.
Import your
Open Create your Group
Select everything you Save as an
graphic/text to the
PowerPoint graphic/text have created image (png)
Studio
VRdirect builder
Alternative options:
§ Use existing 2D content
§ Find buttons, images, icons and more on the internet
§ Download and use the standard VRdirect icon library: Download
23Creation Area: Adding an Interaction
§ To insert an interaction (e.g. connecting two
scenes) the object must be selected and then
an interaction can be defined in the right-
hand sidebar (scroll down to bottom).
§ For an interaction, 3 parameters must be set:
§1 The trigger (the way the interaction is
triggered by the user on the object)
§2 The action (the type of interaction that
should happen - e.g. activate object)
§3 The target object (what does the interaction
refer to - e.g. the target scene for a
connection) 1
2
What are the types of triggers? 3
§ Select = User clicks on the object
§ Gaze In = User moves / hovers with mouse or
view over the object
§ Gaze Out = User moves / hovers away with
mouse or view from the object
24Creation Area: Adding a Time Event
§ So-called "time events" can be set in each
scene to trigger a time-based interaction.
§ To do this, simply select the respective scene
and scroll all the way down in the scene
properties (in the sidebar).
§ Add a time event and set the timer in the first
field to start the interaction - meaning the
seconds until the event happens.
§ Example: 3 seconds after the user has entered
the scene, ... should happen.
§ Then, as with interactions, an action must be
selected and a target object to which the action
refers to.
Which interactions are suitable for time
events?
Time events are particularly suitable for
guiding the user through a VR project like in
an animated video (e.g. text fades into the
scene as a speaker talks).
25Creation Area: The Background Scene
§ The background scene is a scene that is not
visible on the storyboard. It runs in the
background of the project but can be edited
like a normal scene.
§ It is located behind the third icon in the
sidebar.
§ All objects, interactions and time events in the
background scene are visible and available
throughout the entire project (e.g. a music
object in the background scene runs
throughout the entire project and does not
reload in every scene).
What is the background scene suitable for?
The background scene is helpful for
integrating background music (which runs
during the project) and menu graphics (which
e.g. lie at the bottom of the users feet).
26Creation Area: Adding an Invisible Object
§ To add an invisible object, first add a new object to
the scene.
§ Then click the checkbox "Object is invisible by
default" in the object properties. This hides the object
when entering the scene (it is not visible).
§ To show the object again, a corresponding
interaction is necessary - either via a second
interaction on another object or via a time event.
§ For this, the action "Show object" is necessary.
What are invisible objects suitable for?
An invisible object can be, for example, a video that
is only displayed and played as soon as the user
clicks on a "Play" button. In this case, the video
object must first be invisible and will then appear
once the user actively clicks on „Play“.
27Creation Area: Adding External Links
1§ When adding an object to a scene you have
the possibility to either upload a media file or
to add an external video link (for 2D videos).
The external video link then pulls the video
1
from the internet source via stream and thus
makes it possible to save the file size of the
video file.
A precise link format must be integrated
(more information on VRdirect support page 2
or blog). 2
§
2 The interaction "Open Web Link" allows you
to open an external web link in a new web
browser.
Such external links can, for example, trigger
the opening of websites, chat windows or
PDF downloads. Please note:
For both features - "External Video Link" and "Open Web
Link" - the end user must have a stable internet connection
when viewing the VR project.
28Creation Area: Preview of VR Project
§ A preview of the built VR project is
possible at any time in order to test /
check the project and all interactions
while creating.
§ To do this, click on the first icon in
the right sidebar and select the
button "Start preview".
§ This opens a new window in which
the VR project is displayed from a
user's point of view.
Here, you can see what your users
will see once the project is published.
29Publishing Area: Add VR Project Entry
§ Please save the VR project in the creation area first
(via the toolbar).
The project will locally be saved as a .vrprj file.
§ Then switch to the second tab of the tab bar
"Publish"
§ Click on the big button "Upload & Publish Project"
to create a new VR project entry that will later on be
published. Please enter a project title to do so.
Please note:
In the publishing area, already existing projects can
be edited or updated. They appear in a list after they
have been created.
30Publishing Area: VR Project Entry
§ After entering a project title, a new tab appears in
the tab bar with the new project entry.
§ Here you can add and edit additional information for
the project (meta data), such as a project author
and a description. Additionally, you can add a
preview image for the project.
§ All meta data in the upper area must be actively
saved via the button "Save Information".
What does the yellow box on the right-hand
side mean?
The boxes on the right side are so-called
„Status informations“ and indicate whether a
project is being processed, is ready for
publication or has already been published.
31Publishing Area: Uploading the VR Project
§ After the information and preview image have been
added, the VR project can be uploaded in the next
step.
§ To do this, select the locally saved project (.vrprj
file) via the "Upload" button. All media files and
assets are uploaded into the VRdirect cloud in this
step.
§ After uploading, the data is being processed and
made available for all devices.
§ After the processing time, the project can be viewed
again via the "Preview" button (also on the app or
in the VR headset).
§ Please note that the preview links are not suitable
for distribution or sharing.
32Publishing Area: Publishing the VR Project
§ In the third step, the VR project can be published via
the "Publish" button.
§ After a successful publication, the status of the
project is changed, and one has the possibility to
"take back" the project at any time (i.e., to cancel
the publication).
§ The "Upload" button is active again in the published
state so that a new project version can be uploaded.
In this case, the 3-step cycle starts again.
§ The published project is now ready to be shared via
the distribution links below.
33Publishing Area: Sharing the VR Project
§ The distribution links make it possible to
share the published project with your
audience.
1
§
1 The project code can be entered into the
VRdirect App*. It leads the user directly to
the VR project, which can then be
downloaded and even consumed offline.
2
§
2 The URL (Web Player Link) can simply be
opened in a web browser and leads the user
directly to the VR project. An internet
connection must be available here.
Please note that the web player works on all
devices that have a web browser available
(also mobile devices and VR headsets).
* The VRdirect app can be
downloaded from the App Store or
the Google Play Store
34Publishing Area: Integrating the VR Project into Website
§ The VR project can be integrated into any
website, just like a YouTube video, by
embedding the project via the "Embed
Code”.
§ To do this, click on the "Embed Code" icon
below the Web Player link.
§ A new window opens with the embed code
generator. It generates the so-called HTML
snippet (iframe), which must be inserted
into the source code (HTML) of the desired
website.
§ Here you can also adjust additional
parameters such as the size of the window
or the full-screen mode.
35Distribution of the VR Project : 3 Channels for Distribution
1. 2. 3.
Web Player App VR Headset
The published VR project can be consumed by the end user in various ways and via various channels
36Distribution of the VR Project: Web Player
Start the VR project by pressing the
play button in the middle. § Navigation within the VR project:
§ In the 360° environment, you can
look around to the left and right
by dragging the mouse (mouse
drag).
Pause the VR project any time (bottom § In the 360° environment you can
centre). zoom in or out with the mouse.
§ The small white arrow (at the bottom)
Activate the full screen mode in the
can be used to display the controls
lower right corner to see the VR project
(pause, full screen, VR, ...)
in full screen.
Please note:
Switch to the Virtual Reality mode The Web Player also works on
on a smartphone by clicking on the smartphone, the tablet or in
the VR icon in the bottom left the VR glasses - everywhere
corner. where a web browser can be
opened.
37Distribution of the VR Project: App
1 2 3
The app is available in the After installation, open Click on "Add
Apple and Android Store the VRdirect App. Project" (plus
and can be downloaded button).
for free on iOS and Then enter the VR
Android devices. Project Code or scan
the QR Code.
4 5 6
As soon as the The project then
project is found, appears in the app
confirm the addition menu and can be
again via "Add VR downloaded via the
Project". download button.
Once the VR project has been
downloaded, it can be viewed. For this
purpose, it is recommended to turn the
smartphone into landscape mode.
38Distribution of the VR Project: App
§ After the project has opened, you
can look around in all directions by § The project can be
navigating left and right in the paused via the "Pause"
360° scene with your finger. icon.
§ A click on the "Swipe"
§ You can select an object using the icon switches to the
cross in the centre. It functions as a "Gyroscope Mode".
"mouse cursor" and selects an There you can look
object after the circle is complete. around in the 360°
environment to the left
and right by moving and
tilting the mobile device.
§ Clicking on the lower arrow brings
up further controls. § Click on the "VR glasses"
icon to switch into the
§ The "Back Button" (arrow) at the “Cardboard Mode”.
top left of the screen leads back to
the app menu with the overview of
your added VR projects.
39Distribution of the VR Project: App Menu
§ At the top right is the § Behind the information
Edit button, with icon in the upper left
which you can delete corner you will find
added projects. legal information and
the legal notice.
§ Select the project that § The menu can be
should be removed by extended at any time
clicking on it in the list. by adding new VR
projects.
§ Then click on the
"Delete" button and
confirm the deletion.
40Distribution of the VR Project: VR Headsets
1 Cardboard mode 2 Oculus Quest / 3 Oculus Go
for any mobile headset Oculus Quest 2 (Headset is no longer
supported by Oculus)
§ Download the VRdirect App via iOS or § Access to project via the Oculus Browser § Download the VRdirect App via the
Android and then switch on the VR mode § After entering the Web Player link, the project Oculus Go Store.
(Cardboard Mode) can be viewed via the VR headset in the Web § Note: Device is no longer supported
à VR button at the bottom left of the app Player by Oculus - therefore app updates
are no longer possible.
Selecting objects via eye control (selection cross in the centre of view).
Within a VR project the use of a controller is not necessary.
41Next steps?
Get to know the advantages of Virtual Reality
and contact us!
contact@vrdirect.com
42You can also read