Notes on Installing Evergreen 2.2.0 on Ubuntu 12.04 (Precise) (my text in green)
←
→
Page content transcription
If your browser does not render page correctly, please read the page content below
Notes on Installing Evergreen 2.2.0 on
Ubuntu 12.04 (Precise) (my text in green)
The text into which I am inserting my notes below is the official readme file found at:
http://open-ils.org/documentation/install/README_2_2_0.html
There is also a dokuwiki that I found incredibly useful at:
http://open-ils.org/dokuwiki/doku.php?id=server:2.0:install
Installing the Evergreen 2.2.0
Table of Contents
1. Preamble: referenced user accounts
2. Preamble: developer instructions
3. Installing prerequisites
4. Configuration and compilation instructions
5. Installation instructions
6. Change ownership of the Evergreen files
7. Configure the Apache Web server
8. Configure OpenSRF for the Evergreen application
9. Creating the Evergreen database
9.1. Creating the database on a remote server
10. Starting Evergreen
11. Testing connections to Evergreen
12. Getting help
13. License
1. Preamble: referenced user accounts
In subsequent sections, we will refer to a number of different accounts, as follows:
Linux user accounts:
o The user Linux account is the account that you use to log onto the Linux system
as a regular user.
o The root Linux account is an account that has system administrator privileges. On
Debian and Fedora you can switch to this account from your user account by
issuing the su - command and entering the password for the root account when
prompted. On Ubuntu you can switch to this account from your user account
using the sudo su - command and entering the password for your user account
when prompted.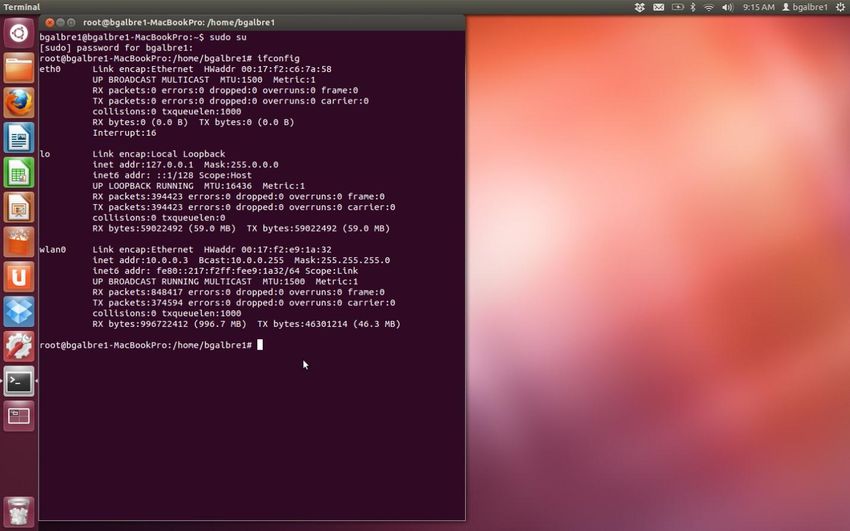
Created by Blake L. Galbreath for UTK, School of Information Sciences on August 8, 2012
o The opensrf Linux account is an account that you create when installing
OpenSRF. You can switch to this account from the root account by issuing the su
- opensrf command.
o The postgres Linux account is created automatically when you install the
PostgreSQL database server. You can switch to this account from the root
account by issuing the su - postgres command.
PostgreSQL user accounts:
o The evergreen PostgreSQL account is a superuser account that you will create to
connect to the PostgreSQL database server.
Evergreen administrator account:
o The egadmin Evergreen account is an administrator account for Evergreen that
you will use to test connectivity and configure your Evergreen instance.
2. Preamble: developer instructions
Skip this section if you are using an official release tarball downloaded from
Note
http://evergreen-ils.org/downloads
Developers working directly with the source code from the Git repository, rather than an official
release tarball, must install some extra packages and perform one step before they can proceed
with the ./configure step.
As the root Linux account, install the following packages:
autoconf
automake
libtool
As the user Linux account, issue the following command in the Evergreen source directory to
generate the configure script and Makefiles:
autoreconf -i
After running make install, developers also need to install the Dojo Toolkit set of JavaScript
libraries. The appropriate version of Dojo is included in Evergreen release tarballs. Developers
should install the Dojo 1.3.3 version of Dojo by issuing the following commands as the opensrf
Linux account:
wget http://download.dojotoolkit.org/release-1.3.3/dojo-release-1.3.3.tar.gz
tar -C /openils/var/web/js -xzf dojo-release-1.3.3.tar.gz
cp -r /openils/var/web/js/dojo-release-1.3.3/* /openils/var/web/js/dojo/.
3. Installing prerequisites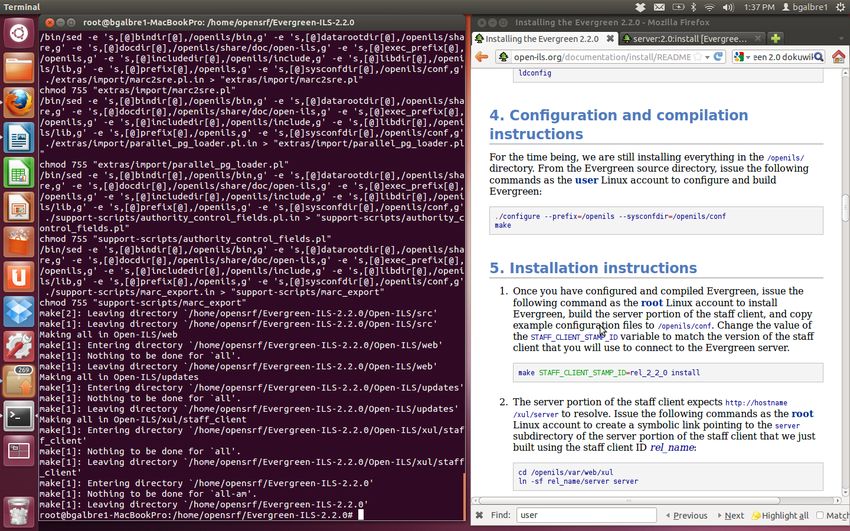
Created by Blake L. Galbreath for UTK, School of Information Sciences on August 8, 2012
Evergreen has a number of prerequisite packages that must be installed before you can
successfully configure, compile, and install Evergreen.
1. Begin by installing the most recent version of OpenSRF (2.1 or later). You can download
OpenSRF releases from http://evergreen-ils.org/opensrf.php
Already installed (see separate documentation)
2. On many distributions, it is necessary to install PostgreSQL 9 from external repositories.
o On Debian Squeeze, open /etc/apt/sources.list in a text editor as the root
Linux account and add the following line:
deb http://backports.debian.org/debian-backports squeeze-
backports main contrib
o On Ubuntu Lucid, you can use a PPA (personal package archive), which are
package sources hosted on Launchpad. The one most commonly used by
Evergreen Community members is maintained by Martin Pitt, who also maintains
the official PostgreSQL packages for Ubuntu. As the root Linux account, issue
the following commands to add the PPA source:
o apt-get install python-software-properties
add-apt-repository ppa:pitti/postgresql
oUbuntu Precise comes with PostgreSQL 9, so no additional steps are required.
oFedora 16 comes with PostgreSQL 9, so no additional steps are required.
3. On Debian and Ubuntu, run aptitude update as the root Linux account to retrieve the
new packages from the backports repository.
[sudo su]
[aptitude update]
4. Issue the following commands as the root Linux account to install prerequisites using the
Makefile.install prerequisite installer, substituting debian-squeeze, fedora16,
ubuntu-lucid, or ubuntu-precise for below:
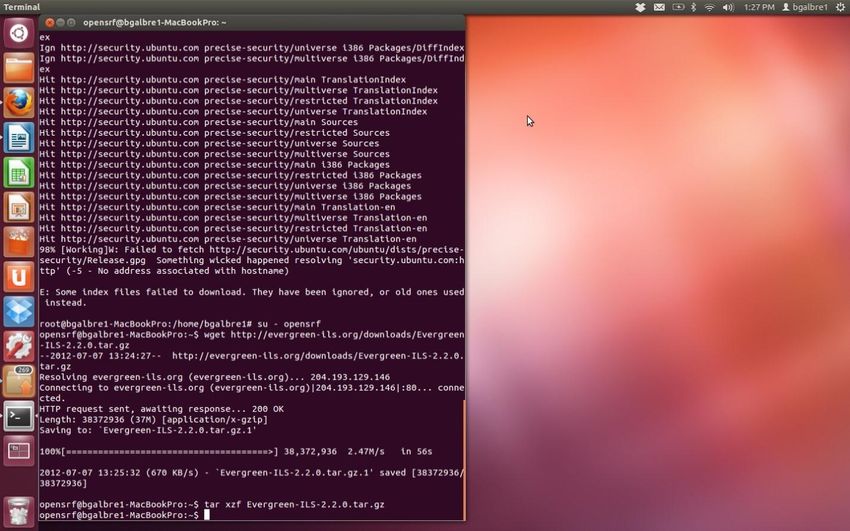
[wget http://evergreen-ils.org/downloads/Evergreen-ILS-2.2.0.tar.gz]
[tar xzf Evergreen-ILS-2.2.0.tar.gz]
Created by Blake L. Galbreath for UTK, School of Information Sciences on August 8, 2012

      [cd Evergreen-ILS-2.2.0]

      [make -f Open-ILS/src/extras/Makefile.install ubuntu-precise]

   5. Add the libdbi-libdbd libraries to the system dynamic library path by issuing the
      following commands as the root Linux account:

             You should skip this step if installing on Ubuntu Precise. The ubuntu-precise target
      Note
             uses libdbd-pgsql from packages.

      Debian / Ubuntu Lucid

      echo "/usr/local/lib/dbd" > /etc/ld.so.conf.d/eg.conf
      ldconfig

      Fedora

      echo "/usr/lib64/dbd" > /etc/ld.so.conf.d/eg.conf
      ldconfig

4. Configuration and compilation instructions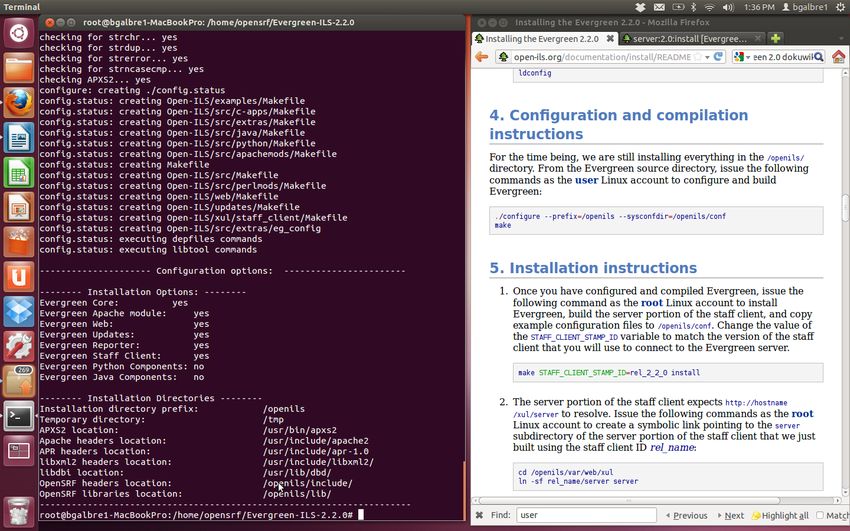
Created by Blake L. Galbreath for UTK, School of Information Sciences on August 8, 2012

For the time being, we are still installing everything in the /openils/ directory. From the
Evergreen source directory, issue the following commands as the user Linux account to
configure and build Evergreen:

       [exit]

       [cd Evergreen-ILS-2.2.0]

       [./configure --prefix=/openils --sysconfdir=/openils/conf]

       [make]
Created by Blake L. Galbreath for UTK, School of Information Sciences on August 8, 2012

5. Installation instructions
   1. Once you have configured and compiled Evergreen, issue the following command as the
      root Linux account to install Evergreen, build the server portion of the staff client, and
      copy example configuration files to /openils/conf. Change the value of the
      STAFF_CLIENT_STAMP_ID variable to match the version of the staff client that you will
      use to connect to the Evergreen server.

      [sudo su]

      [cd Evergreen-ILS-2.2.0]

      [make STAFF_CLIENT_STAMP_ID=rel_2_2_0 install]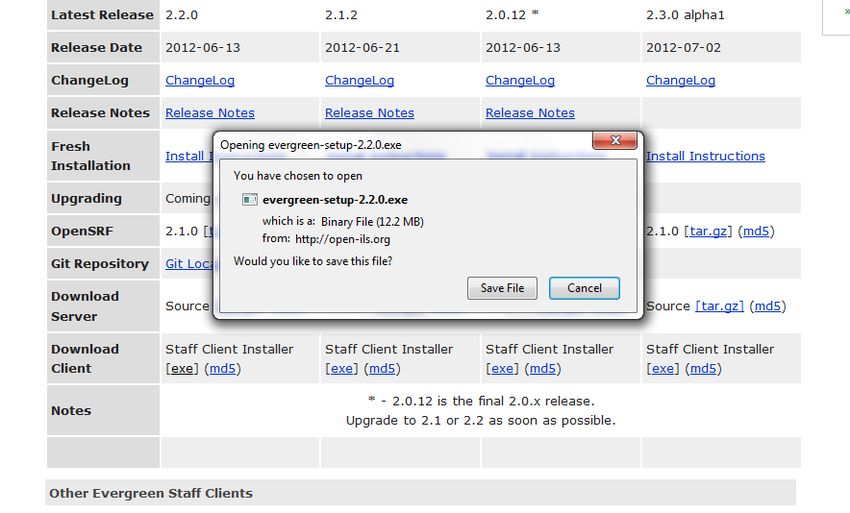
Created by Blake L. Galbreath for UTK, School of Information Sciences on August 8, 2012

   2. The server portion of the staff client expects http://hostname/xul/server to resolve.
      Issue the following commands as the root Linux account to create a symbolic link
      pointing to the server subdirectory of the server portion of the staff client that we just
      built using the staff client ID rel_name:

       [cd /openils/var/web/xul]

       [ln -sf rel_2_2_0/server server]

6. Change ownership of the Evergreen files
All files in the /openils/ directory and subdirectories must be owned by the opensrf user.
Issue the following command as the root Linux account to change the ownership on the files:

       [chown -R opensrf:opensrf /openils]

7. Configure the Apache Web server
   1. Use the example configuration files in Open-ILS/examples/apache/ to configure your
      Web server for the Evergreen catalog, staff client, Web services, and administration
      interfaces. Issue the following commands as the root Linux account: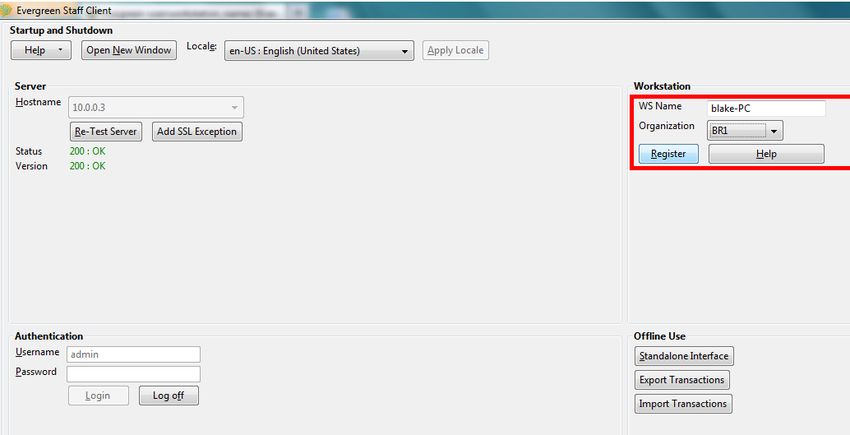
Created by Blake L. Galbreath for UTK, School of Information Sciences on August 8, 2012

      Debian and Ubuntu

      [cd /home/bgalbre1/Evergreen-ILS-2.2.0]

      [cp Open-ILS/examples/apache/eg.conf           /etc/apache2/sites-available/]

      [cp Open-ILS/examples/apache/eg_vhost.conf /etc/apache2/]

      [cp Open-ILS/examples/apache/startup.pl         /etc/apache2/]

      # Now set up SSL

      [mkdir /etc/apache2/ssl]

      [cd /etc/apache2/ssl]

      Fedora

      cp Open-ILS/examples/apache/eg.conf       /etc/httpd/conf.d/
      cp Open-ILS/examples/apache/eg_vhost.conf /etc/httpd/
      cp Open-ILS/examples/apache/startup.pl    /etc/httpd/
      # Now set up SSL
      mkdir /etc/httpd/ssl
      cd /etc/httpd/ssl

   2. The openssl command cuts a new SSL key for your Apache server. For a production
      server, you should purchase a signed SSL certificate, but you can just use a self-signed
      certificate and accept the warnings in the staff client and browser during testing and
      development. Create an SSL key for the Apache server by issuing the following
      command as the root Linux account:

      [openssl req -new -x509 -days 365 -nodes -out server.crt -keyout server.key]

   3. As the root Linux account, edit the eg.conf file that you copied into place.

      [cd /etc/apache2]

      [gedit sites-available/eg.conf]

          1. Replace Allow from 10.0.0.0/8 with Allow from all (to enable access to the
             offline upload / execute interface from any workstation on any network - note that
             you must secure this for a production instance)
          2. (Fedora): Change references from the non-existent /etc/apache2/ directory to
             /etc/httpd/.
Created by Blake L. Galbreath for UTK, School of Information Sciences on August 8, 2012
4. Change the user for the Apache server.
[gedit envvars]
o (Debian and Ubuntu): As the root Linux account, edit /etc/apache2/envvars.
Change export APACHE_RUN_USER=www-data to export
APACHE_RUN_USER=opensrf.
o (Fedora): As the root Linux account , edit /etc/httpd/conf/httpd.conf.
Change User apache to User opensrf.
5. Configure Apache with performance settings appropriate for Evergreen:
o (Debian and Ubuntu): As the root Linux account, edit
/etc/apache2/apache2.conf:
o (Fedora): As the root Linux account, edit /etc/httpd/conf/httpd.conf:
[gedit apache2.conf]
1. Change KeepAliveTimeout to 1. Higher values reduce the chance of a
request timing out unexpectedly, but increase the risk of using up all
available Apache child processes.
2. Optional: Change MaxKeepAliveRequests to 100
3. Update the prefork configuration section to suit your environment.
The following settings apply to a busy system:
4.
5. StartServers 20
6. MinSpareServers 5
7. MaxSpareServers 15
8. MaxClients 150
9. MaxRequestsPerChild 10000
6. (Fedora): As the root Linux account, edit the /etc/httpd/eg_vhost.conf file to change
references from the non-existent /etc/apache2/ directory to /etc/httpd/.
7. (Debian and Ubuntu): As the root Linux account, enable the Evergreen site:
[a2dissite default] # OPTIONAL: disable the default site (the "It Works" page)
[a2ensite eg.conf]Created by Blake L. Galbreath for UTK, School of Information Sciences on August 8, 2012
8. Configure OpenSRF for the Evergreen application
There are a number of example OpenSRF configuration files in /openils/conf/ that you can
use as a template for your Evergreen installation. Issue the following commands as the opensrf
Linux account:
[su – opensrf]
[cp -b /openils/conf/opensrf_core.xml.example /openils/conf/opensrf_core.xml]
[cp -b /openils/conf/opensrf.xml.example /openils/conf/opensrf.xml]
When you installed OpenSRF, you created four Jabber users on two separate domains and edited
the opensrf_core.xml file accordingly. Please refer back to the OpenSRF README and, as
the opensrf Linux account, edit the Evergreen version of the opensrf_core.xml file using the
same Jabber users and domains as you used while installing and testing OpenSRF.
[cd /openils/conf]
[sudo gedit opensrf_core.xml]
The -b flag tells the cp command to create a backup version of the destination file. The
backup version of the destination file has a tilde (~) appended to the file name, so if you
Note
have forgotten the Jabber users and domains, you can retrieve the settings from the backup
version of the files.
eg_db_config.pl, described in the following section, sets the database connection information
in opensrf.xml for you.
9. Creating the Evergreen database
By default, the Makefile.install prerequisite installer does not install the PostgreSQL 9
database server required by every Evergreen system; for production use, most libraries install the
PostgreSQL database server on a dedicated machine. You can install the packages required by
Debian or Ubuntu Lucid on the machine of your choice using the following commands as the
root Linux account:
(Debian and Ubuntu Lucid) Installing PostgreSQL 9.1 server packages
make -f Open-ILS/src/extras/Makefile.install
install_pgsql_server_backport_debs_91
(Ubuntu Precise) Installing PostgreSQL 9.1 server packages
[exit]Created by Blake L. Galbreath for UTK, School of Information Sciences on August 8, 2012
[cd Evergreen-ILS-2.2.0]
[make -f Open-ILS/src/extras/Makefile.install install_pgsql_server_debs_91]
You can install the packages required by Fedora on the machine of your choice using the
following commands as the root Linux account:
(Fedora 16) Installing PostgreSQL server packages
make -f Open-ILS/src/extras/Makefile.install install_fedora_pgsql_server
postgresql-setup initdb
For a standalone PostgreSQL server, install the following Perl modules as the root Linux
account:
(Debian / Ubuntu) Installing additional Perl modules on a standalone PostgreSQL 9 server
[aptitude install gcc libxml-libxml-perl libxml-libxslt-perl
cpan Business::ISBN
cpan JSON::XS
cpan Library::CallNumber::LC
cpan MARC::Record
cpan MARC::File::XML
cpan UUID::Tiny]
(Fedora 16) Installing additional Perl modules on a standalone PostgreSQL 9 server
yum install gcc perl-XML-LibXML perl-XML-LibXSLT perl-Business-ISBN
cpan Library::CallNumber::LC
cpan MARC::Record
cpan MARC::File::XML
cpan UUID::Tiny
You need to create a PostgreSQL superuser to create and access the database. Issue the following
command as the postgres Linux account to create a new PostgreSQL superuser named
evergreen. When prompted, enter the new user’s password:
[su – postgres]
[createuser -s -P evergreen]
Once you have created the evergreen PostgreSQL account, you also need to create the database
and schema, and configure your configuration files to point at the database server. Issue the
following command as the root Linux account from inside the Evergreen source directory,
replacing , , , , and with the appropriate values
for your PostgreSQL database (where and are for the evergreen PostgreSQL
account you just created), and replace and with the values you want
for the egadmin Evergreen administrator account:
[exit]Created by Blake L. Galbreath for UTK, School of Information Sciences on August 8, 2012
[perl Open-ILS/src/support-scripts/eg_db_config.pl --update-config \
--service all --create-database --create-schema --create-offline \
--user --password --hostname --port \
--database --admin-user --admin-pass ]
This creates the database and schema and configures all of the services in your
/openils/conf/opensrf.xml configuration file to point to that database. It also creates the
configuration files required by the Evergreen cgi-bin administration scripts, and sets the user
name and password for the egadmin Evergreen administrator account to your requested values.
9.1. Creating the database on a remote server
In a production instance of Evergreen, your PostgreSQL server should be installed on a
dedicated server.
9.1.1. PostgreSQL 9.1 and later
To create the database instance on a remote database server running PostgreSQL 9.1 or later,
simply use the --create-database flag on eg_db_config.pl.
9.1.2. For PostgreSQL 9.0
To create the database instance on a remote database server running PostgreSQL 9.0, you can
either:
Install the PostgreSQL contrib modules on the machine on which you are installing the
Evergreen code, and use the --create-database option from that machine, or
Copy the Open-ILS/src/sql/Pg/create_database.sql script to your PostgreSQL
server and invoke it as the postgres Linux account:
psql -vdb_name= -vcontrib_dir=`pg_config --sharedir`/contrib -f
create_database.sql
Then you can issue the eg_db_config.pl command as above without the --create-database
argument to create your schema and configure your configuration files.
10. Starting Evergreen
1. As the root Linux account, start the memcached and ejabberd services (if they aren’t
already running):
[/etc/init.d/ejabberd start]
[/etc/init.d/memcached start]Created by Blake L. Galbreath for UTK, School of Information Sciences on August 8, 2012
2. As the opensrf Linux account, start Evergreen. The -l flag in the following command is
only necessary if you want to force Evergreen to treat the hostname as localhost; if you
configured opensrf.xml using the real hostname of your machine as returned by perl -
ENet::Domain 'print Net::Domain::hostfqdn() . "\n";', you should not use the
-l flag.
[su – opensrf]
[osrf_ctl.sh -l -a stop_all]
[osrf_ctl.sh -l -a start_all]
o If you receive the error message bash: osrf_ctl.sh: command not found,
then your environment variable PATH does not include the /openils/bin
directory; this should have been set in the opensrf Linux account’s .bashrc
configuration file. To manually set the PATH variable, edit the configuration file
~/.bashrc as the opensrf Linux account and add the following line:
export PATH=$PATH:/openils/bin
3. As the opensrf Linux account, generate the Web files needed by the staff client and
catalogue and update the organization unit proximity (you need to do this the first time
you start Evergreen, and after that each time you change the library hierarchy in
config.cgi):
[autogen.sh –u]
4. As the root Linux account, restart the Apache Web server:
[exit]
[/etc/init.d/apache2 restart] i
If the Apache Web server was running when you started the OpenSRF services, you
might not be able to successfully log in to the OPAC or staff client until the Apache Web
server is restarted.
11. Testing connections to Evergreen
Once you have installed and started Evergreen, test your connection to Evergreen via srfsh. As
the opensrf Linux account, issue the following commands to start srfsh and try to log onto the
Evergreen server using the egadmin Evergreen administrator user name and password that you
set using the eg_db_config.pl command:
[su – opensrf]Created by Blake L. Galbreath for UTK, School of Information Sciences on August 8, 2012
[srfsh]
srfsh# [login ]
You should see a result like:
Received Data: "250bf1518c7527a03249858687714376"
------------------------------------
Request Completed Successfully
Request Time in seconds: 0.045286
------------------------------------
Received Data: {
"ilsevent":0,
"textcode":"SUCCESS",
"desc":" ",
"pid":21616,
"stacktrace":"oils_auth.c:304",
"payload":{
"authtoken":"e5f9827cc0f93b503a1cc66bee6bdd1a",
"authtime":420
}
}
------------------------------------
Request Completed Successfully
Request Time in seconds: 1.336568
------------------------------------
If this does not work, it’s time to do some troubleshooting.
As the opensrf Linux acccount, run the settings-tester.pl script to see if it finds any
system configuration problems. The script is found at Open-ILS/src/support-
scripts/settings-tester.pl in the Evergreen source tree.
Follow the steps in the troubleshooting guide.
If you have faithfully followed the entire set of installation steps listed here, you are
probably extremely close to a working system. Gather your configuration files and log
files and contact the Evergreen development mailing list for assistance before making any
drastic changes to your system configuration.
Before you leave Linux, you need to write down your ip address.
[sudo su]
[ifconfig]Created by Blake L. Galbreath for UTK, School of Information Sciences on August 8, 2012 ##In my case, I was connecting to my wireless router, so I chose the inet addr: 10.0.0.3 from “wlan0.” If you have a wired connection, you will need to use the inet addr from “eth0,” etc. 12. Getting help Need help installing or using Evergreen? Join the mailing lists at http://evergreen- ils.org/listserv.php or contact us on the Freenode IRC network on the #evergreen channel. 13. License This work is licensed under the Creative Commons Attribution-ShareAlike 3.0 Unported License. To view a copy of this license, visit http://creativecommons.org/licenses/by-sa/3.0/ or send a letter to Creative Commons, 444 Castro Street, Suite 900, Mountain View, California, 94041, USA. Last updated 2012-06-13 13:33:37 EDT
Created by Blake L. Galbreath for UTK, School of Information Sciences on August 8, 2012

Return to the land of Windows

At this point Linux and Evergreen Server are installed and running on a dedicated server. Now it
is time to install the Evergreen Client on another machine. I am installing the client on a separate
Windows machine, because that is the most likely scenario for the average library employee.

Open up a Windows machine.
Navigate to:
http://open-ils.org/cvs.php

Follow the incredibly easy to use (compared to the journey we have been on in Linux) .exe
installer. Depending on your browser, just follow the install wizard.

Insert your inet addr from above into the slot for “Server, Hostname” and click “Add SSL
Exception.” Confirm that you want to add this address as an exception to your security protocols
and click save.
Created by Blake L. Galbreath for UTK, School of Information Sciences on August 8, 2012

When you return to the previous screen, click “Re-Test Server.” If you get two “200: OK”
messages, then everything has worked fine. The result should bring you to the “Workstation.”
Change the name and location if you like. Insert the admin user and password we established in
step “9. Creating the Evergreen Database” above and we’re in!

The rest is up to you! Good luck!
i
    The first time I installed this program, I received the error message:

            (98)Address already in use: make_sock: could not bind to address 0.0.0.0:80
            no listening sockets available, shutting down
            Unable to open logs
Created by Blake L. Galbreath for UTK, School of Information Sciences on August 8, 2012
Action 'start' failed.
The Apache error log may have more information.
In order to resolve, I issued the following command:
[fuser –k –n tcp 80]
My solution was found at:
http://www.wallpaperama.com/forums/98address-already-in-use-make-sock-could-not-bind-to-address-80-
t1091.htmlYou can also read