N300 Wireless ADSL2+ Modem Router DGN2200Mv2 - User Manual - 350 East Plumeria Drive San Jose, CA 95134 - Telkom
←
→
Page content transcription
If your browser does not render page correctly, please read the page content below
N300 Wireless ADSL2+
                          Modem Router
                          DGN2200Mv2
                          User Manual

350 East Plumeria Drive
San Jose, CA 95134
USA

August 2011
202-10801-01
v1.0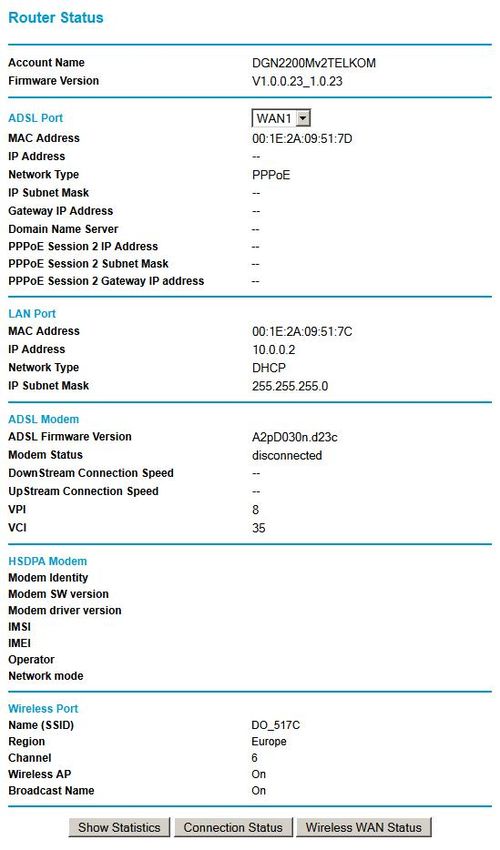
N300 Wireless ADSL2+ Modem Router DGN2200Mv2

© 2011 NETGEAR, Inc. All rights reserved
No part of this publication may be reproduced, transmitted, transcribed, stored in a retrieval system, or translated
into any language in any form or by any means without the written permission of NETGEAR, Inc.

Technical Support
Thank you for choosing NETGEAR. For support information and firmware upgrades, please visit:
http://www.hcom.co.za.
For more information about the topics covered in this manual, visit the Support website at
http://support.netgear.com.
Modem support: 0860 266 344
Support hours are Monday to Friday: 08h00 to 17h00
Telkom ADSL support: 10210

Trademarks
NETGEAR, the NETGEAR logo, and Connect with Innovation are trademarks and/or registered trademarks of
NETGEAR, Inc. and/or its subsidiaries in the United States and/or other countries. Information is subject to change
without notice. Other brand and product names are registered trademarks or trademarks of their respective
holders. © 2011 NETGEAR, Inc. All rights reserved.

Statement of Conditions
To improve internal design, operational function, and/or reliability, NETGEAR reserves the right to make changes
to the products described in this document without notice. NETGEAR does not assume any liability that may occur
due to the use, or application of, the product(s) or circuit layout(s) described herein.

                                                         2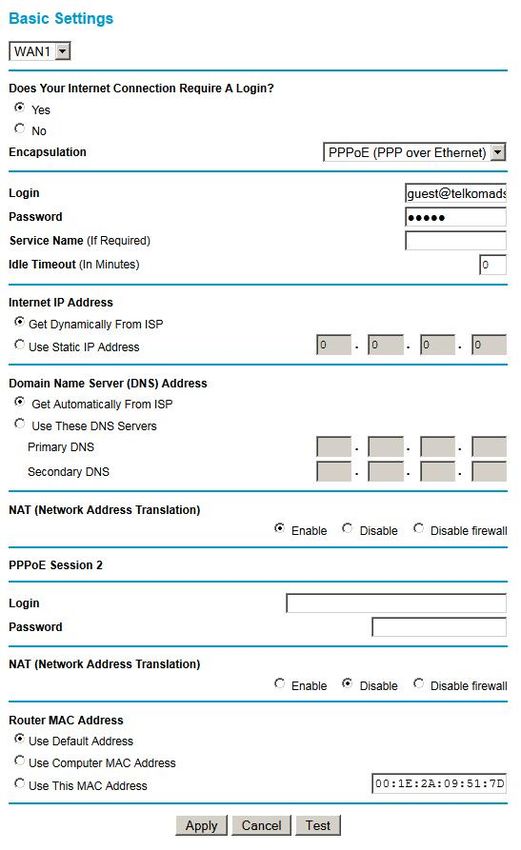
Table of Contents

       Chapter 1         Internet Configuration
           Log In. . . . . . . . . . . . . . . . . . . . . . . . . . . . . . . . . . . . . . . . . . . . . . . . . . . . . . 7
           Setup Wizard . . . . . . . . . . . . . . . . . . . . . . . . . . . . . . . . . . . . . . . . . . . . . . . . 8
           Fixed IP (Static) Account Setup. . . . . . . . . . . . . . . . . . . . . . . . . . . . . . . . . 10
           Manual Setup . . . . . . . . . . . . . . . . . . . . . . . . . . . . . . . . . . . . . . . . . . . . . . 10
             Broadband Settings . . . . . . . . . . . . . . . . . . . . . . . . . . . . . . . . . . . . . . . . 10
             3G Mobile Broadband Settings . . . . . . . . . . . . . . . . . . . . . . . . . . . . . . . 12
             Basic ISP Settings . . . . . . . . . . . . . . . . . . . . . . . . . . . . . . . . . . . . . . . . . 13
             ADSL Settings . . . . . . . . . . . . . . . . . . . . . . . . . . . . . . . . . . . . . . . . . . . . 16

       Chapter 2         Wireless Network Configuration
           Preset Wireless Security . . . . . . . . . . . . . . . . . . . . . . . . . . . . . . . . . . . . . .           19
           Plan Your Wireless Network . . . . . . . . . . . . . . . . . . . . . . . . . . . . . . . . . . .               19
             Wireless Placement and Range Guidelines . . . . . . . . . . . . . . . . . . . . .                            20
             Wireless Security Options . . . . . . . . . . . . . . . . . . . . . . . . . . . . . . . . . . .              20
           Manually Configure Wireless Settings . . . . . . . . . . . . . . . . . . . . . . . . . . . .                   22
             Restrict Access by MAC Address . . . . . . . . . . . . . . . . . . . . . . . . . . . . .                     24
             WPA, WPA2, or WPA + WPA2 . . . . . . . . . . . . . . . . . . . . . . . . . . . . . . .                       26
             WEP. . . . . . . . . . . . . . . . . . . . . . . . . . . . . . . . . . . . . . . . . . . . . . . . . . . .   26
           Push 'N' Connect (WPS) Method. . . . . . . . . . . . . . . . . . . . . . . . . . . . . . . .                   28
             WPS Button . . . . . . . . . . . . . . . . . . . . . . . . . . . . . . . . . . . . . . . . . . . . . .       28
             WPS PIN Entry . . . . . . . . . . . . . . . . . . . . . . . . . . . . . . . . . . . . . . . . . . .          30
             Add Devices That Do Not Support WPS . . . . . . . . . . . . . . . . . . . . . . . .                          30

       Chapter 3         Protect Your Network
           Password and Login Timeout Settings . . . . . . . . . . . . . . . . . . . . . . . . . . .                      33
              Change the Built-In Password . . . . . . . . . . . . . . . . . . . . . . . . . . . . . . . .                33
              Change the Administrator Login Time-Out . . . . . . . . . . . . . . . . . . . . . .                         34
           Block Keywords, Sites, and Services . . . . . . . . . . . . . . . . . . . . . . . . . . . .                    34
              Blocking Sites . . . . . . . . . . . . . . . . . . . . . . . . . . . . . . . . . . . . . . . . . . . .      34
              Block Services . . . . . . . . . . . . . . . . . . . . . . . . . . . . . . . . . . . . . . . . . . . .      35
           Firewall Rules . . . . . . . . . . . . . . . . . . . . . . . . . . . . . . . . . . . . . . . . . . . . . .     36
           Time Zones and Services Scheduling . . . . . . . . . . . . . . . . . . . . . . . . . . . .                     37
              Set Your Time Zone. . . . . . . . . . . . . . . . . . . . . . . . . . . . . . . . . . . . . . . .           38
              Schedule Firewall Services . . . . . . . . . . . . . . . . . . . . . . . . . . . . . . . . . .              38
              View, Select, and Save Logged Information . . . . . . . . . . . . . . . . . . . . .                         39
              Log Message Examples . . . . . . . . . . . . . . . . . . . . . . . . . . . . . . . . . . . .                40
           Enable Security Event Email Notification . . . . . . . . . . . . . . . . . . . . . . . . .                     40

                                       Table of Contents | 3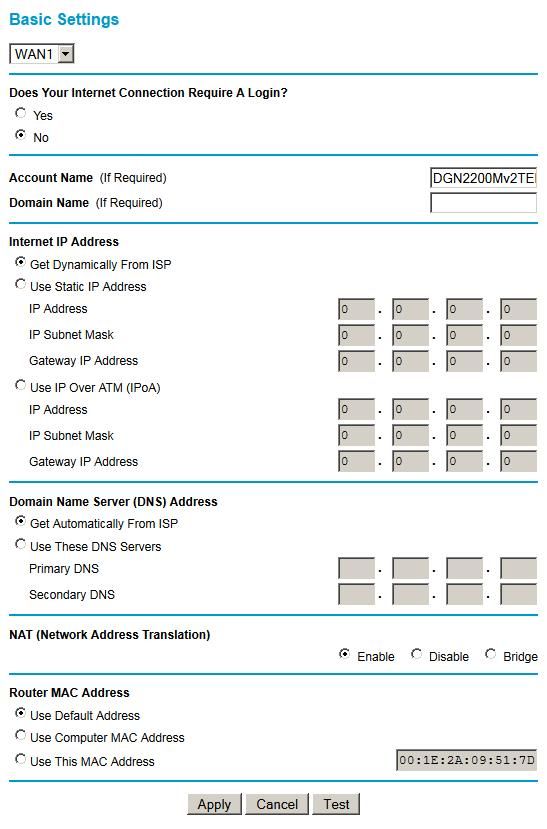
N300 Wireless ADSL2+ Modem Router DGN2200Mv2

Chapter 4         Manage Your Network
    Back Up, Restore, and Erase Your Settings . . . . . . . . . . . . . . . . . . . . . . . 44
    Router Status and Usage Statistics . . . . . . . . . . . . . . . . . . . . . . . . . . . . . . 45
      Statistics . . . . . . . . . . . . . . . . . . . . . . . . . . . . . . . . . . . . . . . . . . . . . . . . . 47
      Connection Status . . . . . . . . . . . . . . . . . . . . . . . . . . . . . . . . . . . . . . . . . 49
    Attached Devices . . . . . . . . . . . . . . . . . . . . . . . . . . . . . . . . . . . . . . . . . . . . 50
    Diagnostics and Rebooting . . . . . . . . . . . . . . . . . . . . . . . . . . . . . . . . . . . . 50
    Remote Management. . . . . . . . . . . . . . . . . . . . . . . . . . . . . . . . . . . . . . . . . 51

Chapter 5         Advanced Configuration
    WAN Settings . . . . . . . . . . . . . . . . . . . . . . . . . . . . . . . . . . . . . . . . . . . . . . . 54
    Default DMZ Server . . . . . . . . . . . . . . . . . . . . . . . . . . . . . . . . . . . . . . . . . . 55
    Dynamic DNS. . . . . . . . . . . . . . . . . . . . . . . . . . . . . . . . . . . . . . . . . . . . . . . 56
    LAN Settings . . . . . . . . . . . . . . . . . . . . . . . . . . . . . . . . . . . . . . . . . . . . . . . 57
      DHCP . . . . . . . . . . . . . . . . . . . . . . . . . . . . . . . . . . . . . . . . . . . . . . . . . . . 58
      Reserved IP Addresses . . . . . . . . . . . . . . . . . . . . . . . . . . . . . . . . . . . . . 59
    Quality of Service (QoS). . . . . . . . . . . . . . . . . . . . . . . . . . . . . . . . . . . . . . . 60
    Advanced Wireless Settings. . . . . . . . . . . . . . . . . . . . . . . . . . . . . . . . . . . . 62
    Static Routes . . . . . . . . . . . . . . . . . . . . . . . . . . . . . . . . . . . . . . . . . . . . . . . 63
    Universal Plug and Play . . . . . . . . . . . . . . . . . . . . . . . . . . . . . . . . . . . . . . . 65
    TR069 Client Configuration . . . . . . . . . . . . . . . . . . . . . . . . . . . . . . . . . . . . 66
    Wireless Bridging and Repeating Networks . . . . . . . . . . . . . . . . . . . . . . . . 67
      Point-to-Point Bridge Configuration . . . . . . . . . . . . . . . . . . . . . . . . . . . . 68
      Multi-Point Bridge . . . . . . . . . . . . . . . . . . . . . . . . . . . . . . . . . . . . . . . . . . 69
      Repeater with Wireless Client Association . . . . . . . . . . . . . . . . . . . . . . . 70

Chapter 6         VPN Lite
    Configuring VPN Lite Sites. . . . . . . . . . . . . . . . . . . . . . . . . . . . . . . . . . . . . 73

Chapter 7         Troubleshooting
    Basic Functioning . . . . . . . . . . . . . . . . . . . . . . . . . . . . . . . . . . . . . . . . . . . . 76
      Welcome Screen Displays instead of Router Main Menu . . . . . . . . . . . 76
    Troubleshooting with the LEDs . . . . . . . . . . . . . . . . . . . . . . . . . . . . . . . . . 76
    Cannot Log In to the Wireless Modem Router . . . . . . . . . . . . . . . . . . . . . . 78
    Troubleshooting the Internet Connection . . . . . . . . . . . . . . . . . . . . . . . . . . 78
      ADSL Link. . . . . . . . . . . . . . . . . . . . . . . . . . . . . . . . . . . . . . . . . . . . . . . . 78
      Internet LED Is Red . . . . . . . . . . . . . . . . . . . . . . . . . . . . . . . . . . . . . . . . 79
      Obtaining an Internet IP Address . . . . . . . . . . . . . . . . . . . . . . . . . . . . . . 80
      Troubleshooting PPPoE or PPPoA . . . . . . . . . . . . . . . . . . . . . . . . . . . . 80
      Troubleshooting Internet Browsing. . . . . . . . . . . . . . . . . . . . . . . . . . . . . 81
    Troubleshooting a TCP/IP Network Using the Ping Utility . . . . . . . . . . . . . 81
      Testing the LAN Path to Your Wireless Modem Router . . . . . . . . . . . . . 81
      Testing the Path from Your Computer to a Remote Device . . . . . . . . . . 82
    Restoring the Default Configuration and Password . . . . . . . . . . . . . . . . . . 83
      Using the Restore Factory Settings Button to Reset the Router . . . . . . 83

                                                 4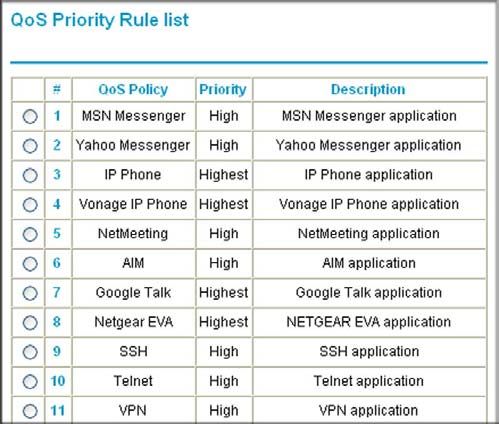
N300 Wireless ADSL2+ Modem Router DGN2200Mv2

    Problems with Date and Time . . . . . . . . . . . . . . . . . . . . . . . . . . . . . . . . . .83

Appendix A          Technical Specifications
    Technical Specifications . . . . . . . . . . . . . . . . . . . . . . . . . . . . . . . . . . . . . . .85
    Telkom Factory Default Configuration . . . . . . . . . . . . . . . . . . . . . . . . . . . .86

Appendix B          Notification of Compliance

Index

                                             5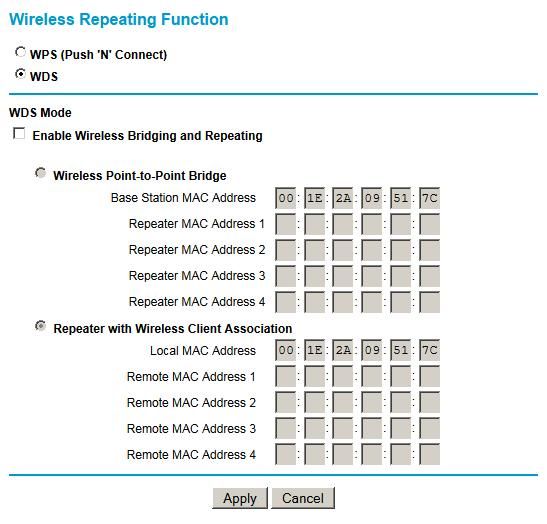
Internet Configuration
1.

                                                                                                  1
     This chapter describes how to configure your N300 Modem Router Internet connection. This
     chapter includes:
        •   Log In
        •   Setup Wizard
        •   Fixed IP (Static) Account Setup
        •   Manual Setup
     For help with installation and initial setup, see the N300 Modem Router DGN2200Mv2
     Installation Guide included in the package, or use the Animated Install Guide on the CD. For
     installation instructions in a language other than English, see the language options on the CD.
     For more information about the topics covered in this manual, visit the support website at
     http://support.netgear.com.

                                                     6
N300 Wireless ADSL2+ Modem Router DGN2200Mv2
Log In
You can log in to the wireless modem router to view or change its settings, and to access the
Knowledge Base and documentation.
When you have logged in, if you do not click Logout, the wireless modem router waits for 5
minutes after no activity before it automatically logs you out.
To log in to the wireless modem router:
1. If you have not set up wireless connections yet, connect your computer to the wireless
modem router with an Ethernet cable.
2. In the address field of your Internet browser,
type http://www.routerlogin.com.
To connect, you can also enter the modem
router’s IP address, http://10.0.0.2.
The wireless modem router user name and
password are not the same as any other user
name or password you might use to log in to
your Internet connection.
3. Enter admin for the user name and your
password (or the default, admin).
For information about how to change the password, see Change the Built-In Password on
page 33.
4. The screen that displays when you log in depends on whether the wireless modem router
has already been set up.
• Smart Wizard screen: The wireless modem router has never been configured. You
can use the Setup Wizard to automatically detect your Internet connection (see Setup
Wizard on page 8), or you can bypass the Setup Wizard and manually configure your
Internet connection (see Basic ISP Settings on page 13).
• Router Status screen: The wireless modem router Internet connection is not
configured, or the wireless modem router has been reset to its factory default
settings. See Router Status and Usage Statistics on page 45.
Internet Configuration
7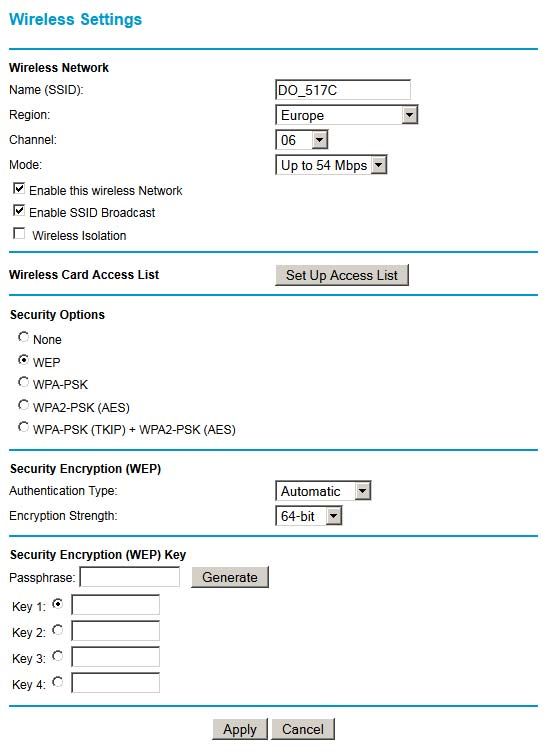
N300 Wireless ADSL2+ Modem Router DGN2200Mv2
Setup Wizard
The Setup Wizard can check your Internet connection for servers and protocols to determine
your ISP configuration. You can also manually specify your Internet connection settings in the
Setup Wizard Basic Settings screen. For instructions on manually configuring your 3G Mobile
Broadband settings, see 3G Mobile Broadband Settings on page 12.
Note: NETGEAR recommends that you use the installation CD-ROM to
install and configure your NETGEAR wireless modem router, rather
than using the firmware application to perform the installation. This
will simplify the installation process, and ensure that your router is
configured correctly.
To use the Setup Wizard:
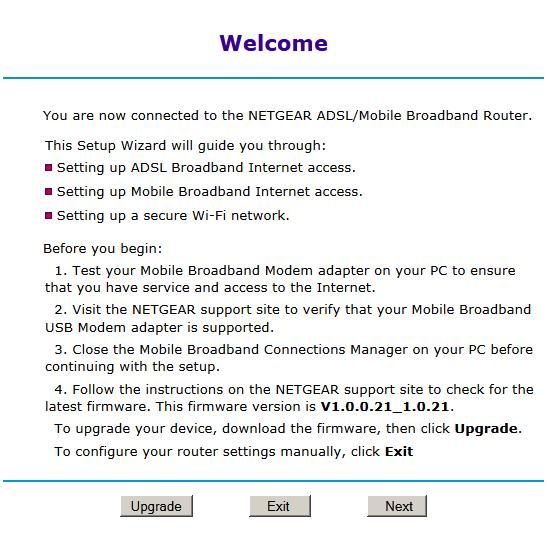
1. Select Setup Wizard to display the Setup Wizard Welcome screen.
Figure 1. Setup Wizard Welcome Screen
2. Click Next to display the following screen:
Figure 2. 3G Mobile Broadband Settings Configuration Screen
3. Select your Internet connection mode from the drop down menu.
Internet Configuration
8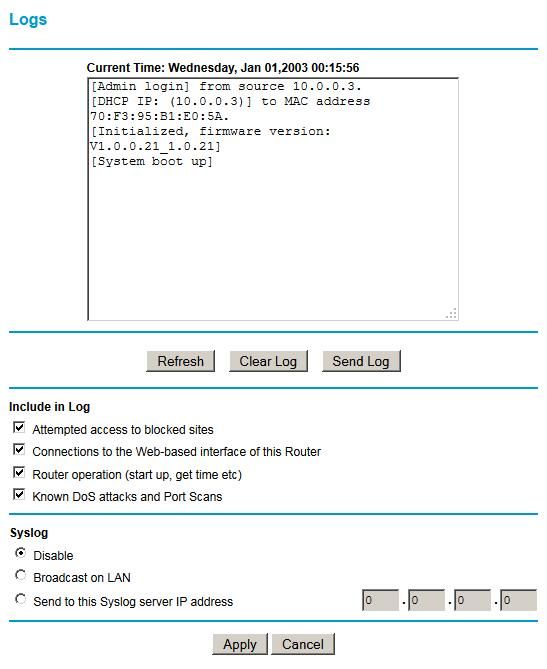
N300 Wireless ADSL2+ Modem Router DGN2200Mv2

   Select one of the following:
   •    Use ADSL connection first and if fail 3G Mobile Broadband connection.
   •    Always use Mobile Broadband connection.
   •    Always use ADSL connection.
4. Click Next to display the following screen.

5. Click Next. Initially, a connection detection progress screen displays. When the router
   successfully detects the connection, additional screens display.
   a. Enter your Internet service provider (ISP) configuration information. Select your
      country and your Internet service provider. If login credentials are required by your
      ISP, enter your user name and password. Click Next.
   b. Depending on the type of connection detected, you are prompted to enter your ISP
      settings. These may be one of the following:
      • PPPoE or PPPoA: This displays the PPPoE configuration screen. Enter the login
          user name and password. These fields are case-sensitive.
        •   Dynamic IP account setup: No entries are necessary.
        •   IP over ATM Classical IP assignment (RFC1577): Enter the assigned IP
            address, subnet mask, and the IP address of the primary DNS server for your ISP.
            If a secondary DNS server address is available, enter that also. DNS servers
            translate an Internet name such as www.netgear.com to a numeric IP address.
        •   To configure a static IP address: For instructions, see Fixed IP (Static) Account
            Setup on page 10.
6. At the end of the Setup Wizard, click Test to check your Internet connection.

       Note: If you have trouble connecting to the Internet, see Chapter 7,
             Troubleshooting for help.

7. After the test succeeds, click Apply to apply and save your configuration settings.

                                   Internet Configuration
                                             9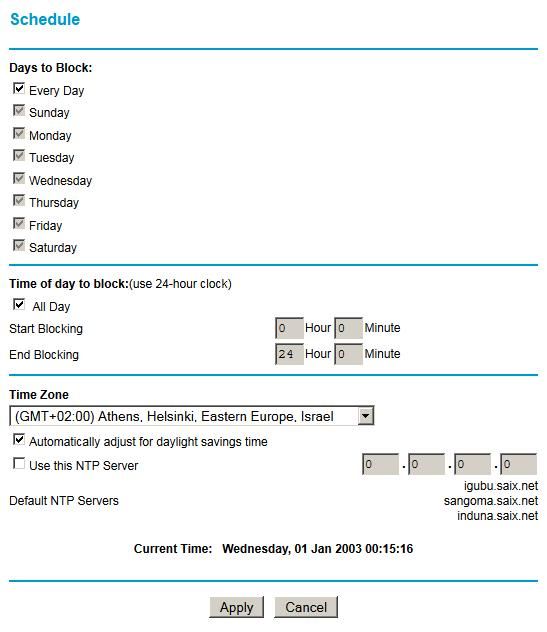
N300 Wireless ADSL2+ Modem Router DGN2200Mv2
Fixed IP (Static) Account Setup
1. Select Basic Settings from the router menu.
2. If required, enter the account name and domain name from your ISP.
3. Select Use Static IP Address or Use IP Over ATM (IPoA — RFC1483 Routed) according
to the information from your ISP. If you select IPoA, the router will detect the gateway IP
address, but you still need to provide the router IP address.
4. Enter your assigned IP address, subnet mask, and the IP address of your ISP’s gateway
wireless modem router. This information should have been provided to you by your ISP.
5. Enter the IP address of your ISP’s primary DNS server. If a secondary DNS server address
is available, enter it also. DNS servers translate an Internet name such as
www.netgear.com to a numeric IP address.
Manual Setup
In order to connect to the network, an active broadband service account is required. Contact
your ISP for your user name, password, and the network name. You must also configure
some or all of the settings described in the following sections, depending on how you have
chosen to connect to the Internet:
• Broadband Settings
• 3G Mobile Broadband Settings
• Basic ISP Settings
• ADSL Settings
The following sections provide instructions for each of these procedures.
Broadband Settings
To configure your broadband Internet settings manually:
1. Select Broadband Settings.
Internet Configuration
10N300 Wireless ADSL2+ Modem Router DGN2200Mv2
This opens the Broadband Settings configuration screen, which allows you to configure
your broadband settings, as shown in Figure 3, Broadband Settings Configuration
Screen.
Figure 3. Broadband Settings Configuration Screen
2. Enter your settings.
Table 1 on page 12 describes the Broadband Settings fields and options.
Internet Configuration
11N300 Wireless ADSL2+ Modem Router DGN2200Mv2
3. Click Apply to apply and save your changes, or Cancel to discard your changes.
Table 1. Broadband Settings
Setting Description
Internet Connection Mode Select one of the following:
• Use ADSL first and if fail use Mobile Broadband connection
• Always use Mobile Broadband connection
• Always use ADSL connection
Failover Detection Method1 Select the failover method and enter the following information:
• DNS lookup using WAN DNS Server
• Perform a DNS lookup by a hostname
If you select this option, you must also enter the DNS lookup
hostname in the text field to the far right of this option.
• Ping this IP address
If you select this option, you must also enter the IP address in the
text field to the far right of this option.
Retry Interval is1 Enter the retry interval in seconds.
Failover after1 Enter the number of retry attempts to perform before failing over.
Resume after1 Enter how long to wait for primary link to be stabilized before
resuming use of the primary link.
Enable Hardware link detection To enable, select the checkbox and enter the amount of time in
(Checkbox and text field) seconds to wait before failing over if the Ethernet link is dropped. This
is independent of the DNS/Ping detection methods.
1. This field is available only when the Internet Connection Mode is Use Ethernet first and if fail use 3G
mobile connection.
3G Mobile Broadband Settings
To configure your 3G mobile broadband Internet settings manually:
1. Select 3G Mobile Broadband Settings.
This opens the 3G Mobile Broadband Settings configuration screen. This screen allows
you to configure the broadband account access for your NETGEAR Modem.
Figure 4. 3G Mobile Broadband Settings Configuration Screen
Internet Configuration
12N300 Wireless ADSL2+ Modem Router DGN2200Mv2
2. Enter your settings. In order to connect to the network, an active broadband service account
is Required. Contact your ISP for username, password. and the network name
• Username. Account login username.
• Password. Account password for authentication.
• Connect automatically at startup. If selected, the modem will automatically connect
to the network upon powered up. This should be selected after login information is
provided.
• Reconnect automatically when connection is lost. If selected, the modem will
attempt to reconnect to the network when the connection is lost. Under normal
situation, this setting should be selected.
• Roaming automatically. If checked, it may roam to any available operator in range
and may incur roaming charges.
• Connection Status. Current WAN port status.
3. When done, select any of the following:
• Click Connect when you want to manually connect to the network.
• Click Disconnect when you want to manually disconnect from current network.
• Click Apply when you finish changing the settings.
• Click Cancel to discard changes.
• Click Refresh to update connection status
Basic ISP Settings
To configure the basic settings manually:
1. Select Basic Settings.
Internet Configuration
13N300 Wireless ADSL2+ Modem Router DGN2200Mv2
2. Select Yes or No depending on whether your ISP requires a login. This selection changes
the fields available on the Basic Settings screen.
ISP does not require login ISP does require login
• Yes. If your ISP requires a login, select this radio button.
• No. If your ISP does not require a login, enter the account name, if required, and the
domain name, if required.
3. Enter the settings for the IP address and DNS server. If you enter or change a DNS address,
restart the computers on your network so that these settings take effect.
4. If no login is required, you can specify the MAC Address setting.
5. Click Apply to save your settings.
6. Click Test to test your Internet connection. If the NETGEAR website does not appear within
1 minute, see Troubleshooting the Internet Connection on page 78.
When your Internet connection is working, you do not need to launch the ISP’s login program
on your computer to access the Internet. When you start an Internet application, your
wireless modem router automatically logs you in.
Internet Configuration
14N300 Wireless ADSL2+ Modem Router DGN2200Mv2
The following table describes the Basic Settings screen fields and options.
Settings Description
Does Your ISP Require a Login? • Yes
• No
These fields Account Name Enter the account name provided by your ISP. This might also be called the
appear only if no (If required) host name.
login is required.
Domain Name Enter the domain name provided by your ISP.
(If required)
These fields Login The login name provided by your ISP. This is often an e-mail address.
appear only if
your ISP Password The password that you use to log in to your ISP.
requires a login.
Service Name If your ISP provided a service name, enter it here.
Idle Timeout (In If you want to change the Internet login time-out, enter a new value in
minutes) minutes. This determines how long the wireless modem router keeps the
Internet connection active after there is no Internet activity from the LAN.
Entering an Idle Timeout value of 0 (zero) means never log out.
Internet IP Address • Get Dynamically from ISP. Your ISP uses DHCP to assign your IP
address. Your ISP automatically assigns these addresses.
• Use Static IP Address. Enter the IP address that your ISP assigned.
Also enter the IP subnet mask and the gateway IP address. The gateway
is the ISP’s wireless modem router to which your wireless modem router
will connect.
• Use IP Over ATM (PoA). This option is available only if your ISP does not
require a log in.
Domain Name Server (DNS) The DNS server is used to look up site addresses based on their names.
Address • Get Automatically from ISP. Your ISP uses DHCP to assign your DNS
server address automatically.
• Use These DNS Servers. If you know your ISP does not automatically
transmit DNS addresses to the wireless modem router during login, select
this option, and enter the IP address of your ISP’s primary DNS server. If
a secondary DNS server address is available, enter it also.
Internet Configuration
15N300 Wireless ADSL2+ Modem Router DGN2200Mv2
Settings Description
NAT (Network Address NAT automatically assigns private IP addresses (10.0.0.x) to devices on
Translation) your LAN.
• Enable. Usually NAT is enabled.
• Disable. This disables NAT, but leaves the firewall active. Disable NAT
only if you are sure that you do not require it. When NAT is disabled, only
standard routing is performed by this router. Classical routing lets you
directly manage the IP addresses that the wireless modem router uses.
Classical routing should be selected only by experienced users.1
• Advanced users can also bridge or disable the firewall.
Router MAC Address Your computer’s local address is its unique address on your network. This is
also referred to as the computer’s MAC (Media Access Control) address.
• Use Default MAC Address. This is the usual setting.
• Use Computer MAC address. If your ISP requires MAC authentication,
you can use this setting to disguise the wireless modem router’s MAC
address with the computer’s own MAC address.
• Use This MAC Address. If your ISP requires MAC authentication, you
can manually type the MAC address for a different computer. The format
for the MAC address is XX:XX:XX:XX:XX:XX.
1. Disabling NAT reboots the wireless modem router and resets its configuration settings to the factory defaults.
Disable NAT only if you plan to install the wireless modem router in a setting where you will be manually
administering the IP address space on the LAN side of the router.
ADSL Settings
For information about how to install ADSL filters, see the Setup Manual.
NETGEAR recommends that you use the Setup Wizard to automatically detect and configure
your ADSL settings. This usually works fine. However, if you have technical experience and
are sure of the multiplexing method and virtual circuit number for the virtual path identifier
(VPI) and virtual channel identifier (VCI), you can specify those settings here.
Note: Use the Setup Wizard to select the correct country to optimize
detection of the ADSL settings.
Internet Configuration
16N300 Wireless ADSL2+ Modem Router DGN2200Mv2
To specify ADSL settings manually:
1. Select ADSL Settings to display the following screen:
If your ISP provided you with a multiplexing method or VPI/VCI number, then enter the
setting. Otherwise, the default settings are adequate.
2. In the Multiplexing Method drop-down list, select LLC-based or VC-based.
• For the VPI, type a number between 0 and 255. The default is 8.
• For the VCI, type a number between 32 and 65535. The default is 35.
3. Click Apply.
Internet Configuration
17Wireless Network Configuration
2.
2
For a wireless connection, the SSID, also called the wireless network name, and the wireless
security settings must be the same for the wireless modem router and wireless computers or
wireless adapters. NETGEAR strongly recommends that you use wireless security.
Note: Computers can connect wirelessly at a range of hundreds of
meters. If you do not use wireless security, this can allow others
outside your immediate area to access your network.
18N300 Wireless ADSL2+ Modem Router DGN2200Mv2
Preset Wireless Security
The wireless modem router comes with preset security. This means that the Wi-Fi network
name (SSID), passphrase, and security option (encryption protocol) are preset in the factory.
You can find the preset SSID and passphrase on the bottom of the unit.
• Wi-Fi network name (SSID) identifies your network so devices can find it.
• Passphrase controls access to your network. Devices that know the SSID and the
passphrase can find your wireless network and connect.
Note: The preset SSID and passphrase are uniquely generated for every
device to protect and maximize your wireless security.
• Security option is the type of security protocol applied to your wireless network. The
security protocol in force encrypts data transmissions and ensures that only trusted
devices receive authorization to connect to your network. The preset security option is
WPA-PSK/WPA2-PSK mixed mode, described in Wireless Security Options on page 20.
The Wireless Settings screen lets you view and change the preset security settings.
However, NETGEAR recommends that you not change your preset security settings. If
you do decide to change your preset security settings, make a note of the new settings and
store it in a safe place where you can easily find it.
For information on how to connect additional devices to your wireless network, see Push 'N'
Connect (WPS) Method on page 28.
Plan Your Wireless Network
For compliance and compatibility between similar products in your area, the operating
channel and region must be set correctly.
To configure the wireless network, you can either specify the wireless settings, or you can
use Wi-Fi Protected Setup (WPS) to automatically set the SSID and implement WPA/WPA2
security.
To manually configure the wireless settings, have the following information on hand:
- SSID. The default SSID for the wireless modem router is printed on the label on the
bottom of the unit.
- The wireless mode (80.211n, 802.11g, or 802.11b) that each wireless adapter
supports.
- Wireless security option. To successfully implement wireless security, check each
wireless adapter to determine which wireless security option it supports.
See Manually Configure Wireless Settings on page 22.
Wireless Network Configuration
19N300 Wireless ADSL2+ Modem Router DGN2200Mv2
• Push 'N' Connect (WPS) implements WPA/WPA2 wireless security on the wireless
modem router and your wireless computer or device at the same time. The wireless
computer or device must be compatible with WPS.
See Push 'N' Connect (WPS) Method on page 28.
Wireless Placement and Range Guidelines
The range of your wireless connection can vary significantly based on the physical placement
of the wireless modem router. The latency, data throughput performance, and notebook
power consumption of wireless adapters also vary depending on your configuration choices.
For best results, place your wireless modem router according to the following guidelines:
• Near the center of the area in which your PCs will operate.
• In an elevated location such as a high shelf where the wirelessly connected PCs have
line-of-sight access (even if through walls).
• Away from sources of interference, such as PCs, microwave ovens, and 2.4 GHz
cordless phones.
• Away from large metal surfaces.
• Put the antenna in a vertical position to provide the best side-to-side coverage. Put the
antenna in a horizontal position to provide the best up-and-down coverage.
• If using multiple access points, it is better if adjacent access points use different radio
frequency channels to reduce interference. The recommended channel spacing between
adjacent access points is 5 channels (for example, use Channels 1 and 6, or 6 and 11).
The time it takes to establish a wireless connection can vary depending on both your security
settings and placement. WEP connections can take slightly longer to establish. Also, WEP
encryption can consume more battery power on a notebook computer.
Wireless Security Options
Indoors, computers can connect over 802.11g wireless networks at a maximum range of up
to 100 meters (300 feet). Such distances can allow for others outside your immediate area to
access your network.
Unlike wired network data, your wireless data transmissions can extend beyond your walls
and can be received by anyone with a compatible adapter. For this reason, use the security
features of your wireless equipment. The N300 Modem Router provides highly effective
security features, which are covered in detail in this chapter. Deploy the security features
appropriate to your needs.
There are several ways you can enhance the security of your wireless network:
• Restrict access based on MAC address. You can allow only trusted PCs to connect so
that unknown PCs cannot wirelessly connect to the wireless modem router. Restricting
access by MAC address adds an obstacle against unwanted access to your network, but
the data broadcast over the wireless link is fully exposed.
Wireless Network Configuration
20N300 Wireless ADSL2+ Modem Router DGN2200Mv2
• Turn off the broadcast of the wireless network name (SSID). If you disable broadcast
of the SSID, only devices that have the correct SSID can connect. This nullifies wireless
network discovery feature of some products, such as Windows XP, but the data is still
exposed.
• WEP. Wired Equivalent Privacy (WEP) data encryption provides data security. WEP
Shared Key authentication and WEP data encryption block all but the most determined
eavesdropper. This data encryption mode has been superseded by WPA-PSK and
WPA2-PSK. WEP encryption is available only when the Mode setting is Up to 54 Mbps.
• WPA-802.1x, WPA2-802.1x. Wi-Fi Protected Access (WPA) with user authentication
implemented using IEE 802.1x and RADIUS servers.
• WPA-PSK (TKIP), WPA2-PSK (AES). Wi-Fi Protected Access (WPA) using a pre-shared
key to perform authentication and generate the initial data encryption keys. The very
strong authentication along with dynamic per frame re-keying of WPA makes it virtually
impossible to compromise.
Wireless Network Configuration
21N300 Wireless ADSL2+ Modem Router DGN2200Mv2
Manually Configure Wireless Settings
Note: If you use a wireless computer to change the wireless network name
(SSID) or wireless security, you will be disconnected when you click
Apply. To avoid this problem, connect your computer to the router
with an Ethernet cable while you are making changes.
To view or manually configure the wireless settings:
1. Select Wireless Settings to display the following screen:
Note: South Africa falls under the Europe region for Wi-Fi.
The settings for this screen are explained in Table 2.
2. Select the region in which the wireless modem router will operate.
3. For initial configuration and test, leave the other settings unchanged.
4. To save your changes, click Apply.
5. Configure and test your computers for wireless connectivity.
Set up your wireless computers with the same SSID and wireless security settings as
your wireless modem router. Check that they have a wireless link and are able to obtain
an IP address by DHCP from the wireless modem router. If there is interference, adjust
the channel
Wireless Network Configuration
22N300 Wireless ADSL2+ Modem Router DGN2200Mv2
.
Table 2. Wireless Settings
Settings Description
Wireless Name (SSID) The SSID is also known as the wireless network name. Enter a
Network 32-character (maximum) name in this field. This field is case-sensitive.
When there is more than one wireless network, SSIDs provide a means
for separating the traffic. To join a network, a wireless computer or
device must use the SSID.
Region The location where the wireless modem router is used. South Africa
falls under the Europe region for Wi-Fi.
Channel The wireless channel: 1 through 13. This setting applies to any guest
networks you set up. Do not change the channel unless you experience
interference (shown by lost connections or slow data transfers). If this
happens, you might need to try different channels to see which is best.
The number of available channels varies by region and depends on the
selected mode.
• For Up to 145 Mbps mode, the default channel is 11.
• For Up to 300 Mbps mode, the default channel is 7.
Mode • Up to 300Mbps: This is the fastest mode, and is compatible with all
The mode can be set 802.11g, 802.11b, and faster Draft-N wireless stations. The channel
only for the primary bandwidth expands from 20 MHz to 40 MHz to achieve the 300 Mbps
wireless LAN rate. Channel expansion operates on a frame-by-frame basis to avoid
(NETGEAR). interference with transmissions from other wireless networks. Two
channels are used, but only the first is listed in the Channel field. The
associated channels are: 1+5, 2+6, 3+7, 4+8, 5+9, 6+10, and 7+11.
Note. WPA-PSK, WPA2-PSK (AES), or WPA-PSK (TKIP) +
WPA2-PSK (AES) security is required for the Up to 300 Mbps
Mode setting.
• Up to 145Mbps (default setting): Allows wireless stations that
support speeds up to 134 Mbps. The router transmits two streams
with different data concurrently on the same channel. This mode
restricts channel bandwidth to minimize interference with the
transmissions of other wireless networks.
Note. WPA-PSK, WPA2-PSK (AES), or WPA-PSK (TKIP) +
WPA2-PSK (AES) security is required for the Up to 145 Mbps
Mode setting.
• Up to 54 Mbps: Allows wireless stations that support speeds up to
54 Mbps.
Enable this Wireless Network You can completely turn off the wireless connectivity of the wireless
modem router by pressing the Wireless On/Off button on the front
panel of the wireless modem router. For example, if you use your
notebook computer to wirelessly connect to your wireless modem
router and you take a business trip, you can turn off the wireless portion
of the wireless modem router while you are traveling. Other members
of your household who use computers connected to the wireless
modem router through Ethernet cables can still use the wireless
modem router. To do this, clear the Enable Wireless Access Point
check box on the Wireless Settings screen, and then click Apply.
Wireless Network Configuration
23N300 Wireless ADSL2+ Modem Router DGN2200Mv2
Table 2. Wireless Settings (Continued)
Settings Description
Enable SSID Broadcast By default, the wireless modem router is set to broadcast its wireless
network name (SSID). You can restrict wireless access to your network
by not broadcasting the wireless network name (SSID). To do this, clear
the Allow Broadcast of Name (SSID) check box on the Wireless
Settings screen, and then click Apply.
Wireless devices will not “see” your wireless modem router. You must
configure your wireless devices to match the wireless network name
(SSID) of the wireless modem router.
The SSID of any wireless access adapters must match the SSID you
specify in the wireless modem router. If they do not match, you will not
get a wireless connection to the wireless modem router.
Enable Wireless Isolation If checked, the wireless client under this SSID can access only the
Internet and can’t access other wireless clients even under the same
SSID, Ethernet clients, or this device. Other clients can’t access the
wireless client, either.
Wireless Access Card List See Restrict Access by MAC Address.
Security Options None You can use this setting to establish wireless connectivity before
implementing wireless security. NETGEAR strongly recommends that
you implement wireless security.
WEP Use encryption keys and data encryption for data security. You can
select 64-bit or 128-bit encryption. See WEP. WEP is available only
when the Mode setting is Up to 54 Mbps.
WPA-PSK (TKIP) Allow only computers configured with WPA to connect to the wireless
modem router. See WPA, WPA2, or WPA + WPA2.
WPA2-PSK (AES) Allow only computers configured with WPA2 to connect to the wireless
modem router. See WPA, WPA2, or WPA + WPA2.
WPA-PSK (TKIP) + Allow computers configured with either WPA-PSK or WPA2-PSK
WPA2-PSK (AES) security to connect to the wireless modem router. See WPA, WPA2, or
WPA + WPA2.
Restrict Access by MAC Address
For increased security, you can restrict access to the wireless network to allow only specific
PCs based on their MAC addresses. You can restrict access to only trusted PCs so that
unknown PCs cannot wirelessly connect to the wireless modem router. MAC address filtering
adds an obstacle against unwanted access to your network, but the data broadcast over the
wireless link is fully exposed.The Wireless Card Access List determines which wireless
hardware devices will be allowed to connect to the wireless modem router.
Wireless Network Configuration
24N300 Wireless ADSL2+ Modem Router DGN2200Mv2
To restrict access based on MAC addresses:
1. Select Setup > Wireless Settings and click the Set Up Access List button to display
the list.
2. Select the Turn Access Control On check box to enable the restricting of wireless
computers by their MAC addresses.
Note: If you are using a wireless connection, do not click Apply until you
have added your computer’s MAC address in this screen.
3. Use the Add button to add wireless stations so that they will have access.
• You can select currently connected wireless computers from the Available Wireless
Cards List.
• You can type in the MAC address for the wireless computer or device. The MAC
address is usually printed on the wireless card, or on the label of a wireless device. It
might appear in the wireless modem router’s DHCP table. The MAC address is 12
hexadecimal digits.
• You can copy and paste the MAC addresses from the wireless modem router’s
Attached Devices screen into the MAC Address field of this screen. To do this,
configure each wireless computer to obtain a wireless link to the wireless modem
router. The computer should then appear in the Attached Devices screen.
4. Click Add to add each entry. You can add several stations to the list.
5. When you are finished adding stations, click Apply.
Now, only computers and devices on this list can wirelessly connect to the wireless modem
router. This prevents unauthorized access to your network.
Wireless Network Configuration
25N300 Wireless ADSL2+ Modem Router DGN2200Mv2
WPA, WPA2, or WPA + WPA2
Note: WPA-PSK, WPA2-PSK (AES), or WPA-PSK (TKIP) + WPA2-PSK
(AES) security is required for the Up to 145 Mbps or Up to 300 Mbps
Mode setting.
Both WPA and WPA2 provide strong data security. WPA with TKIP is a software
implementation that can be used on Windows systems with Service Pack 2 or later, WPA2
with AES is a hardware implementation; see your device documentation before implementing
it. Consult the product documentation for your wireless adapter for instructions for configuring
WPA settings.
Note: If you use a wireless computer to configure wireless security
settings, you will be disconnected when you click Apply. If this
happens, reconfigure your wireless computer to match the new
settings, or access the wireless modem router from a wired
computer to make further changes.
To configure WPA or WPA2 in the wireless modem router:
1. Select Wireless Settings.
2. Select the radio button for the WPA or WPA2 option of your choice. The settings displayed
on the screen depend on which security option you select.
3. For WPA-PSK or WPA2-PSK, enter the passphrase.
4. To save your settings, click Apply.
WEP
WEP encryption is available only when the Mode setting is Up to 54 Mbps.
Note: If you use a wireless computer to configure wireless security
settings, you will be disconnected when you click Apply.
Reconfigure your wireless computer to match the new settings, or
access the wireless modem router from a wired computer to make
further changes.
Wireless Network Configuration
26N300 Wireless ADSL2+ Modem Router DGN2200Mv2
To configure WEP data encryption:
1. Select Wireless Settings to display the following screen. Make sure the Mode setting is
set to Up to 54 Mbps.
2. In the Security Options section, select the WEP radio button:
3. Select the Authentication Type: Automatic or Shared Key. The default is Automatic.
Note: The authentication is separate from the data encryption. You can select
authentication that requires a shared key, but still leaves data transmissions
unencrypted. Security is stronger if you use both the Shared Key and WEP
encryption settings.
4. Select the Encryption Strength setting:
• WEP 64-bit encryption. Enter 10 hexadecimal digits (any combination of 0–9, a–f,
or A–F).
• WEP 128-bit encryption. Enter 26 hexadecimal digits (any combination of 0–9, a–f, or
A–F).
5. Enter the encryption keys. You can manually or automatically program the four data
encryption keys. These values must be identical on all computers and access points in your
network:
• Passphrase. To use a passphrase to generate the keys, enter a passphrase, and
click Generate. This automatically creates the keys. Wireless stations must use the
passphrase or keys to access the wireless modem router.
Wireless Network Configuration
27N300 Wireless ADSL2+ Modem Router DGN2200Mv2
Note: Not all wireless adapters support passphrase key generation.
• Key 1–Key 4. These values are not case-sensitive. You can manually enter the four
data encryption keys. These values must be identical on all computers and access
points in your network. Enter 10 hexadecimal digits for 64 bit encryption or 26 digits
for 128-bit encryption (any combination of 0–9, a–f, or A–F).
6. Select which of the four keys will be the default.
Data transmissions are always encrypted using the default key. The other keys can be
used only to decrypt received data. The four entries are disabled if WPA-PSK or WPA
authentication is selected.
7. Click Apply to save your settings.
Push 'N' Connect (WPS) Method
For you to use Push 'N' Connect, your wireless computers or devices must support Wi-Fi
Protected Setup (WPS). Compatible equipment usually has the WPS symbol on it. WPS
can configure the network name (SSID) and set up WPA/WPA2 wireless security for the
wireless modem router and the wireless computer or device at the same time.
Some considerations regarding WPS are:
• NETGEAR’s Push 'N' Connect feature is based on the WPS standard. All other
Wi-Fi-certified and WPS-capable products should be compatible with NETGEAR products
that implement Push 'N' Connect.
• If your wireless network will include a combination of WPS-capable devices and
non-WPS-capable devices, NETGEAR suggests that you set up your wireless network
and security settings manually first, and use WPS only for adding WPS-capable devices.
You can connect to the network using WPS either with a push button or a PIN.
• Push Button. This is the preferred method. See the following section, WPS Button .
• Entering a PIN. See WPS PIN Entry on page 30.
WPS Button
Any wireless computer or wireless adapter that will connect to the wireless modem router
wirelessly is a client. The client must support a WPS button, and must have a WPS
configuration utility, such as the NETGEAR Smart Wizard or Atheros Jumpstart.
Wireless Network Configuration
28N300 Wireless ADSL2+ Modem Router DGN2200Mv2
To use the wireless modem router WPS button to add a WPS client:
1. Select Add a WPS Client and click
Next.
By default, the Push Button
(recommended) radio button is
selected. WPS
button
2. Either click the onscreen button or
press the WPS button on the front of
the wireless modem router.
The wireless modem router tries to communicate with the client (the computer that wants
to join the network) for 2 minutes.
3. Go to the client wireless computer, and run a WPS configuration utility. Follow the utility’s
instructions to click a WPS button.
4. Go back to the wireless modem router screen to check for a message.
The wireless modem router WPS screen displays a message confirming that the client
was added to the wireless network. The wireless modem router generates an SSID, and
implements WPA/WPA2 wireless security. The wireless modem router keeps these
wireless settings unless you change them, or you clear the Keep Existing Wireless
Settings check box in the WPS Settings screen.
Note the new SSID and WPA/WPA2 password for the wireless network. You can view
these settings in the Wireless Settings screen. See Manually Configure Wireless Settings
on page 22.
To access the Internet from any computer connected to your wireless modem router, launch
a browser such as Microsoft Internet Explorer or Mozilla Firefox. You should see the wireless
modem router’s Internet LED blink, indicating communication to the ISP.
Note: If no WPS-capable client devices are located during the 2-minute
time frame, the SSID does not change, and no security is
implemented on the wireless modem router.
Wireless Network Configuration
29N300 Wireless ADSL2+ Modem Router DGN2200Mv2
WPS PIN Entry
Any wireless computer or device that will connect to the wireless modem router wirelessly is
a client. The client must support a WPS PIN, and must have a WPS configuration utility, such
as the NETGEAR Smart Wizard or Atheros Jumpstart.
The first time you add a WPS client, make sure that the Keep Existing Wireless Settings
check box on the WPS Settings screen is cleared. This is the default setting for the wireless
modem router, and allows it to generate the SSID and WPA/WPA2 security settings when it
implements WPS. After WPS is implemented, the wireless modem router automatically
selects this check box so that your SSID and wireless security settings stay the same if other
WPS devices are added later.
To use a PIN to add a WPS client:
1. Select Add a WPS Client (computers
that will connect wirelessly to the wireless
modem router are clients), and then click
Next. The Add WPS Client screen
displays:
2. Select the PIN Number radio button.
3. Go to the client wireless computer. Run a
WPS configuration utility. Follow the utility’s
instructions to generate a PIN. Take note of the client PIN.
4. Enter the client PIN number and click Next.
• The wireless modem router tries to communicate with the client for 4 minutes.
• The wireless modem router WPS screen confirms that the client was added to the
wireless network. The wireless modem router generates an SSID, and implements
WPA/WPA2 wireless security.
• If the client is not added during the 2-minute time frame, the router wireless settings
remain unchanged.
5. Note the new SSID and WPA/WPA2 password for the wireless network. You can view these
settings in the Wireless Settings screen. See Manually Configure Wireless Settings on
page 22.
To access the Internet from any computer connected to your wireless modem router, launch
an Internet browser. You should see the wireless modem router’s Internet LED blink,
indicating communication to the ISP.
Add Devices That Do Not Support WPS
If you set up your network with WPS, and now you want to add a computer that does not
support WPS, you must manually configure that computer. For information about how to view
the wireless settings for the router, see Manually Configure Wireless Settings on page 22.
Because WPA randomly creates the SSID and WPA/WPA2 keys, they might be difficult to
type or remember (that is one reason why the network is so secure). You can change the
Wireless Network Configuration
30N300 Wireless ADSL2+ Modem Router DGN2200Mv2
wireless settings so that they are easier for you to remember. If you do that, then you will
need to set up the WPS-compatible computers again.
To change the network wireless settings:
Note: Making these changes causes all wireless computers to be
disconnected from network. You then have to set them up with the
new wireless settings.
1. Use an Ethernet cable to connect a computer to the router. That way you will not get
disconnected when you change the wireless settings.
2. Log in to the router and select Wireless Settings (see Manually Configure Wireless Settings
on page 22).
3. Make the following changes:
• Change the wireless network name (SSID) to a meaningful name.
• On the WPA/PSK + WPA2/PSK screen, select a passphrase.
• Make sure that the Keep Wireless Settings check box is selected in the WPS
Settings screen so that your new settings will not be erased if you use WPS.
4. Click Apply so that your changes take effect. Write down your settings.
All wireless clients are disassociated and disconnected from the wireless modem router.
5. For the non-WPS devices that you want to connect, open the networking utility and follow
the utility’s instructions to enter the security settings that you selected in Step 3 (the SSID,
WPA/PSK + WPA2/PSK security method, and passphrase).
6. For the WPS devices that you want to connect, follow the procedure in WPS Button on
page 28 or WPS PIN Entry on page 30.
The settings that you configured in Step 3 are broadcast to the WPS devices so that they
can connect to the wireless modem router.
Wireless Network Configuration
31Protect Your Network
3.
3
This chapter describes how to use the basic firewall features of the wireless modem router to
protect your network. The chapter includes:
• Password and Login Timeout Settings
• Block Keywords, Sites, and Services on page 34
• Firewall Rules on page 36
• Time Zones and Services Scheduling on page 37
• Enable Security Event Email Notification on page 40
32N300 Wireless ADSL2+ Modem Router DGN2200Mv2
Password and Login Timeout Settings
For security reasons, the wireless modem router has its own user name and password. Also,
after a period of inactivity for a set length of time, the login automatically disconnects. You
can use the following procedures to change the wireless modem router’s password and the
period for the administrator’s login time-out.
Note: The user name and password are not the same as any other user
name or password your might use to log in to your Internet
connection.
NETGEAR recommends that you change this password to a more secure password. The
ideal password should contain no dictionary words from any language, and should be a
mixture of both upper case and lower case letters, numbers, and symbols. Your password
can be up to 30 characters.
Change the Built-In Password
To change the built-in password:
1. Select Maintenance > Set Password.
2. First enter the old password, and then enter the new password twice.
3. Click Apply to save your changes.
Note: After changing the password, you are required to log in again to
continue the configuration. If you have backed up the wireless
modem router settings previously, you should do a new backup so
that the saved settings file includes the new password.
Protect Your Network
33N300 Wireless ADSL2+ Modem Router DGN2200Mv2
Change the Administrator Login Time-Out
For security, the administrator’s login to the wireless modem router configuration times out
after a period of inactivity.
To change the login time-out period:
1. In the Set Password screen, type a number in the Administrator login times out field.
The suggested default value is 5 minutes.
2. Click Apply to save your changes, or click Cancel to keep the current period.
Block Keywords, Sites, and Services
The wireless modem router provides a variety of options for blocking Internet-based content
and communications services. With its security feature, the wireless modem router prevents
objectionable content from reaching your PCs. The wireless modem router allows you to
control access to Internet content by screening for keywords within Web addresses. Key
security options include:
• Keyword blocking of HTTP traffic.
• Outbound service blocking. Limits access from your LAN to Internet locations or services
that you specify as off-limits.
• Denial of service (DoS) protection. Automatically detects and thwarts denial of service
(DoS) attacks such as Ping of Death, SYN flood, LAND Attack, and IP spoofing.
• Blocking unwanted traffic from the Internet to your LAN.
Blocking Sites
To block keywords and sites:
1. Select Security > Block Sites:.
Protect Your Network
34N300 Wireless ADSL2+ Modem Router DGN2200Mv2
2. To enable keyword blocking, select one of the following:
• Per Schedule. Turn on keyword blocking according to the settings in the Schedule
screen.
• Always. Turn on keyword blocking all the time, independent of the Schedule screen.
• Never. Select never to turn off service blocking.
3. Enter a keyword or domain in the Keyword field, click Add Keyword and click Apply.
Some examples of keyword application follow:
• If the keyword XXX is specified, the URL http://www.badstuff.com/xxx.html is blocked.
• If the keyword .com is specified, only websites with other domain suffixes (such as
.edu or .gov) can be viewed.
• Enter a period (.) to block all Internet browsing access.
Up to 32 entries are supported in the Keyword list.
4. To delete a keyword or domain, select it from the list, click Delete Keyword, and then click
Apply.
5. To specify a trusted user, enter that computer’s IP address in the Trusted IP Address field,
and click Apply.
You can specify one trusted user, which is a computer that will be exempt from blocking
and logging. Since the trusted user will be identified by an IP address, you should
configure that computer with a fixed IP address.
6. Click Apply to save your settings.
Block Services
To block services:
1. Select Security > Services.
2. Click Add and the following screen displays:
.
3. Either select a service from the Service Type drop-down list, or select User Defined to
create a custom service.
4. Click Add to create the service, and the Service is listed in the Service Table.
Protect Your Network
35N300 Wireless ADSL2+ Modem Router DGN2200Mv2
5. Click Apply to save your settings.
Firewall Rules
Use this screen to create firewall rules to block or allow specific traffic.
Note: This feature is for Advanced Administrators only. Incorrect
configuration will cause serious problems.
To create firewall rules:
1. Select Security > Firewall Rules:
2. To create firewall rules for outbound services:
The table under Outbound Services lists all existing rules for outbound traffic. If you have
not defined any rules, only the default rule will be listed. The default rule allows all
outgoing traffic.
a. From the Firewall Rules screen under Outbound Services, click Add:
b. Complete the Outbound Services screen, and save the data. The new rule will be
listed in the table when you return to this screen.
3. To create firewall rules for inbound services:
Protect Your Network
36N300 Wireless ADSL2+ Modem Router DGN2200Mv2
The table under inbound services lists all existing rules for inbound traffic. If you have not
defined any rules, only the default rule will be listed. The default rule blocks all inbound
traffic.
a. From the Firewall Rules screen under Inbound Services, click Add:
b. Complete the Inbound Services screen, and save the data. The new rule will be
listed in the table when you return to this screen.
4. To apply or cancel:
a. Click Apply to update changes to the Outbound Services and Inbound Services
tables.
b. Click Cancel to disregard any unsaved changes.
Time Zones and Services Scheduling
The wireless modem router uses the Network Time Protocol (NTP) to obtain the current time
and date from one of several network time servers on the Internet. On the router menu,
select Schedule under Security to display the Security screen:
Protect Your Network
37N300 Wireless ADSL2+ Modem Router DGN2200Mv2
Set Your Time Zone
To localize the time for your log entries, you must specify your time zone:
1. In the Schedule screen, select your time zone.
This setting is used for the blocking schedule according to your local time zone and for
time-stamping log entries.
2. If your time zone is currently in daylight savings time, select the Adjust for Daylight
Savings Time check box.
Note: If your region uses daylight savings time, you must manually select
Adjust for Daylight Savings Time on the first day of daylight savings
time, and clear it at the end. Enabling daylight savings time causes
one hour to be added to the standard time.
3. The wireless modem router has a list of NETGEAR NTP servers. If you would prefer to use
a particular NTP server as the primary server, select the Use this NTP Server check box,
and enter its IP address.
4. Click Apply to save your settings.
Schedule Firewall Services
If you enabled services blocking in the Block Services screen or port forwarding in the Ports
screen, you can set up a schedule for when blocking occurs or when access is not restricted.
To block Internet services based on a schedule:
1. From the Schedule screen, select Every Day or select one or more days.
2. If you want to limit access completely for the selected days, select All Day. Otherwise, to
limit access during certain times for the selected days, or enter times in the Start Time and
End Time fields.
Note: Enter the values in 24-hour time format. For example, 10:30 a.m.
would be 10 hours and 30 minutes, and 10:30 p.m. would be 22
hours and 30 minutes. If you set the start time after the end time, the
schedule will be effective through midnight the next day.
3. Click Apply to save your changes.
Protect Your Network
38N300 Wireless ADSL2+ Modem Router DGN2200Mv2
View, Select, and Save Logged Information
The wireless modem router logs security-related events such as denied incoming service
requests, hacker probes, and administrator logins. If you enable Keyword Blocking in the
Block Sites screen, the Logs screen show you when someone on your network tries to
access a site that contains a blocked keyword or domain name. If you enable email
notification, you receive these logs in an email message.
To view the log, select Security > Logs to display a screen similar to the following:
You can write the logs to a computer running a syslog program by selecting Broadcast on
LAN or entering the IP address of the server where the syslog file will be written.
Field Description
Date and time The date and time the log entry was recorded.
Description or action The type of event and what action was taken, if any.
Source IP The IP address of the initiating device for this log entry.
Source port and interface The service port number of the initiating device, and whether it
originated from the LAN or WAN.
Destination The name or IP address of the destination device or website.
Destination port and interface The service port number of the destination device, and whether it is
on the LAN or WAN.
Protect Your Network
39You can also read