Operator's Manual Victa Robot Mower RM100
←
→
Page content transcription
If your browser does not render page correctly, please read the page content below
Operator's
                    Manual
                Victa Robot
              Mower RM100
WARNING! Read this manual before operating your Victa Autonomous Mower.
IMPORTANT NOTES

    Read this manual carefully prior to assembling and operating the Autonomous
    Mower. It is dangerous to operate this product without being familiar with these
    instructions. Keep this manual in a safe place and have it ready for future reference.

      Safety Marking and Symbols

    General notes on safety

      This appliance can cause serious injury if it is not properly used. Please read these
      operating instructions carefully and familiarise yourself with all the control elements before
      operating this appliance. Keep these operating instructions in a readily accessible place
      so that this information is always at your disposal.
      Please note that despite all precautions to integrate safety precautions into the
      construction, the safety appliances and supplemental safety mechanisms, a residual risk
      remains when using this appliance.

                 Warning!                                       Warning! Electric shock.

                 Read the directions and                        Always stop the appliance and
                 remove plug from the mains                     wait for the cutting blades to stop
                 before carrying out any                        before carrying out any inspection
                 maintenance work.                              and/or maintenance.

                 Read the directions for use                    Never place hands under or near
                 before operating the appliance.                the appliance when it is
                                                                operating

                 Never place feet under                         Be careful of objects being
                 or near the appliance                          thrown out!
                 when it is operating

                                                                Do not ride on the appliance.
                 Keep bystanders well                           Do not stand or sit on the
                 away from the appliance.                       appliance or load objects onto
                                                                it or the charging station.

                 Cleaning with water                            The robot is protected by an
                 systems can cause                              access PIN code and an
                 damage                                         anti-theft system.

2
IMPORTANT NOTES

             Guaranteed sound power level
                                                    Double insulation
             value is 67dB.
   67
                                                      SMPS(Switch mode power
              Pole orientation                        supply unit)

           SMPS (Switch mode power
           supply unit) incorporating a short-       The Power Supply is for
           circuit-proof safety isolating            indoor use only.
           switching power supply

                                                     Return any discarded batteries to your
           Batteries contain Li-Ion and              local dealer, collector or recycle point.
           should not be disposed with               It is not permitted to dispose of this
           general household waste. Contact          product with normal household waste.
           your local authority for disposal         Please recycle where facilities exist.
           advice.                                   Check with your local authority or
                                                     retailer for recycling advice.

Warning Symbols on the battery pack

          Take batteries to an old battery
          collection point where they will         Do not throw into water.
          be recycled in an environmentally
          friendly manner.

                                                   Do not subject the battery to strong
          Do not throw on the fire                 sunlight over long periods and do not
                                                   leave it in high temperatures.(max.45 C).

                                                                                                 3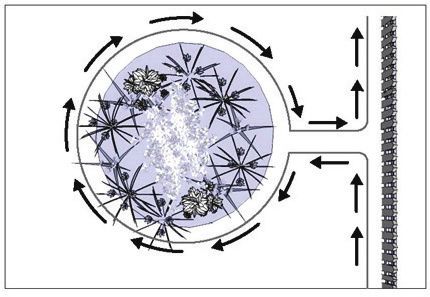
Table of Contents

          Important Notes                                                      2
                                    Introduction
                                    Safety Marking & Symbols

          Features & Definitions                                               5

                                    Features
                                    Technical Data
          Safety & Handling                                                    7

                                    Safety Instructions

          Operation Principles                                                 12

                                    Autonomous Mower basic operating principles
                                    Locating the charging station
                                    Recognising the boundary wire
                                    Starting and stopping while mowing
                                    Autonomous Mower mowing limitations
                                    Autonomous Mower cutting information

          Installation Procedures                                              16

                                    Installation Guide
                                    Uneven lawn surfaces
                                    Flowerbeds
                                    General Dos and Don’ts
                                    Marking out the Autonomous Mower's
                                    working area
                                    Pegging out the boundary wire
          Operating Instructions                                               26
                                    Setting the mowing height
                                    Starting and stopping the mower
                                    Messages on the display during operation
                                    Returning to the charging station
                                    Programming the mower
                                    Control Panel
                                    Display
                                    Using the control menu
          Maintenance & Care                                                   39
                                    Storage
                                    Cleaning and Maintenance
                                    Reversing or replacing the blades
                                    Replacing the battery
          Troubleshooting                                                   42

                                    Charging station
                                    Display messages and common problems
4                                   Error codes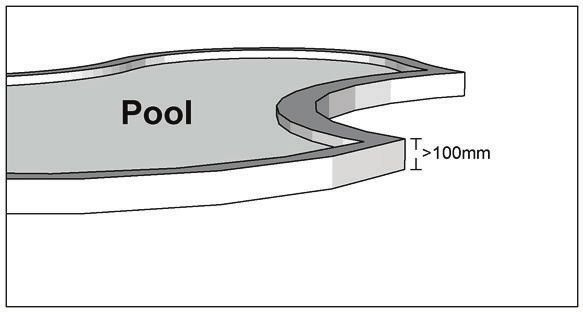
FEATURES DEFINITIONS

  Features

                                   2
                                   3                                                 4b

    1
                                                                                                5
                                            4a

    8                                                                                          12

    6                                   7

    9

                                         11
    10

                                                                                       14

                                                           13
                             16
                                                                                                                                     anty
                                                                                                                                 Warr                rt
                                                                                                                          nty                   k Sta
                                                                                                                      rra                   Quic uide
                                                                                                                   Wa                          G

                                                                                                    s
                                                                                              ator'
                                                                                          Oper ual
                                                                                            Man
                                                                                                            inal      n
                                                                                                        Orig strcutio
                                                                                                            in
         15

                                                                        19
                                                                                                                            20
                 17                          18

                  5. Docking                                                                               17. Boundary wire
1. Autonomous        station x 1       9. Rear wheel            13. Switching power                            connector x 3
   Mower x 1                                                        supply x 1

                  6. Blade x 3         10. Carrying             14. Extension                              18. Boundary wire
2. STOP button
                                           handle                   cord x 1                                   x 1 (120m)

3. Display and    7. Blade disc        11. Main power           15. Fixing peg x 150                       19. Spare blade
   keypad                                  switch                                                              & Bolt x 3

4a. Charging                           12. Control panel        16. Measurement                            20. Documents:
    contacts      8. Front wheel
                                                                    ruler (on the                          Operator's Manual
   (Autonomous                                                      color box) x 2                         Warranty Card
   Mower)
                                                                                                           Quick Start Guide
4b . Charging
    contacts
    (Docking
    station)
                                                                                                                                                          5
FEATURES DEFINITIONS
Functional description
This Autonomous Mower is an autonomous robot used to cut lawn grass. It will remain
within an area designated by a boundary wire, start work following a programmed schedule
and return to its charging station as needed. The three sharp blades ensure clean cuts with
minimal damage to the plant, leaving behind tiny snippets as natural fertilizer.
Technical Data
Model 2691783
Model Name Victa Robot Mower RM100
Max cutting area 600 m²
80086647-INR18650-20R
Battery
Lithium-Ion battery, 28V/2.0Ah, 56Wh
80086689 Input 100-240V AC,
Switching power supply
50/60 Hz Output 32 V DC, 1.5A
Typical mow time on one charge 60 min
Rated voltage 28 V DC
Rated power 50 W
No load cutting speed 3500 min -1
Cutting width 18 cm
Blade model / part number 80086674
Cutting height adjustment Stepless
Cutting height, min-max 20 mm-60 mm
Number of blades Three (Pivoting)
Charging time 60 min
Recommended time per day
300 m² 4 hours
600 m² 6 hours
Degree of protection:
Autonomous Mower IPX4
Docking Station IPX4
Autonomous Mower weight 8.5 Kg
Charging Station weight 2 Kg
Autonomous Mower size, L x W x H 570 X 390 X 260 mm
Package size, L x B x H 720 X 470 X 330 mm
Gross weight 16.5 kg
Measured sound power level
Measured sound pressure 66.4 dB(A) , K=3.0 dB(A)
Guaranteed sound power level L = 67 dB(A)
6Safety Instructions
Safety instructions for Autonomous Mowers
Do not store anything heavy on the top of the Autonomous Mower or charging station both
during storage and when use.
Never use the appliance if the main power switch (11) is damaged or does not work
properly. Never modify the main power switch. Set the main power switch to OFF for
storage or when the appliance is not in use. Use the original packaging when transporting
the Autonomous Mower, especially for long distances.
If you need to carry the Autonomous Mower from or within the working area, first press the
STOP button (2) to stop the appliance.
2
Ensure that the main power switch (11) is switched OFF before you lift up your Autonomous
Mower.
11
Main Power
isolation switch
7Close the top cover and carry the Autonomous Mower by the carrying handle (10) at the rear
under the mower, keeping the blade disc away from your body as shown.
Note: The carrying handle (10) includes two safety switches. Lifting the appliance by the
carrying handle will trigger the switches, deactivating the Autonomous Mower.
Lightning Protection
In order to prevent lightning damage to the appliance, do not place the charging station under
tall trees.
Do not use the Autonomous Mower during lightning or thunder storms. In case of damage to
the electronic circuitry, unplug the charging station and - if possible - disconnect the boundary
wire.
8Operating the appliance:
WARNING! This appliance can cause serious injuries. Follow instructions
below to reduce risk of accident and injury.
IMPORTANT! READ CAREFULLY BEFORE USE. KEEP FOR FUTURE REFERENCE.
Preparation:
• Read the instructions carefully and make sure you understand them fully. Be familiar with the
controls and the proper use of the appliance.
• Never allow children, persons with reduced physical, sensory or mental capabilities or lack of
experience and knowledge or people unfamiliar with these instructions use the appliance.
• Local regulations may restrict the age of the operator. Children should be supervised to ensure
that they do not play with the appliance.
• The operator or user is responsible for accidents or hazards occurring to other people or their
property.
• Ensure the correct installation of the perimeter boundary system as instructed.
• Periodically inspect the area where the appliance is to be used and remove all stones, sticks,
wires, and other debris which could cause damage to the appliance or be unsafe.
• Periodically visually inspect to see that the blades, blade bolts and cutter assembly are not
worn or damaged. Replace worn or damaged blades and bolts in sets to preserve balance.
• Never leave the appliance to operate unattended, especially while other people such as
children and pets are in the area.
• Never use the appliance to level out uneven patches.
• If the blades no longer cut correctly or if the motor is overloaded, check all the parts of your
equipment and replace the worn parts. If a more extensive repair is required, contact the
customer service centre.
Use:
• Never operate the appliance with defective guards or without safety appliances, for example
deflectors in place.
• Do not put hands or feet near or under rotating parts.
• Never pick up or carry the appliance while the motor is running.
• Press STOP button
• Turn OFF / Power OFF the appliance
– before clearing any blockages.
– before checking, cleaning or maintaining the appliance.
• Start Autonomous Mower according to the instructions. When the main power switch (11) is in
the ON position, make sure you keep your hands and feet away from the rotating blades.
• Never lift the Autonomous Mower or carry it around when the main switch is in the ON
position.
• Do not let persons use the mower who do not know how it works or behaves.
• Do not put anything on top of the Autonomous Mower or its charging station.
• Do not use the Autonomous Mower with defective blade discs, body, defective blades,
screws, nuts etc.
• Avoid operating the appliance in wet grass. Doing so can cause additional wear and tear and
will increase the amount of cleaning required.
9Work interruptions:
• After the appliance has been turned off, the cutting cylinder will continue to rotate
for a few seconds. Keep hands and feet well away.
• Only remove blockages when the appliance is standing completely still.
• Switch off the power when the appliance is transported, lifted or tilted.
• Never leave the appliance unattended. Children should be supervised to ensure that
they do not play with the appliance.
CAUTION!
The following below outlines measures to avoid damage and harm to
both the Autonomous Mower and people using it.
Taking care of your appliance:
• Switch off the power when the appliance is to be carried across uneven surfaces,
for example steps.
• Inspect the appliance before each use. Never operate the appliance if safety
appliances (e.g. impact protector, parts of the cutting facility or bolts) are missing,
worn out or damaged. Check the power cable. To avoid imbalance, all tools and
bolts must be changed as complete sets.
• Only use spare parts and accessories that have been supplied or recommended
by the manufacturer. The use of alien parts results in the immediate loss of all
guarantee claims.
• Ensure that all nuts, bolts and screws are firmly tightened and that the appliance is
in a safe working condition.
• Never try to repair the appliance yourself, unless you have been trained accordingly.
All work that has not been listed in these instructions must only be carried out by
authorised servicing agencies.
• Treat the appliance with the greatest care. Always keep the tool clean. Follow the
maintenance instructions.
• Never overload the appliance. Always work within the specified capacity range. Do
not use low-power appliances for heavy-duty work. Do not operate the appliance for
purposes for which it is not intended.
Electrical safety:
CAUTION!
The following states how to avoid accidents and injuries due to electric
shock:
• Before each use, carry out a visual inspection of the power and extension cord for
any signs of damage or ageing. Damaged mains power cables increase the risk of
electric shock.
• Connect the appliance to a power socket with a residual-current circuit breaker that
has a rated current of no more than 30 mA.
10• Always keep the extension cable well away from the cutting tools. Once the
power cable become damaged during work, instantly disconnect the power cable
from the mains. DO NOT TOUCH THE POWER CABLE BEFORE IT HAS BEEN
DISCONNECTED FROM THE MAINS! Risk of electric shock.
• The supply cord cannot be replaced. If the cord is damaged the appliance should
be scrapped.
• Keep extension cable away from blades and other moving parts. They may damage
the cable and result in contact with live parts.
• Check that the mains voltage is the same as indicated on the rating plate.
Maintenance and storage
• Keep all nuts, bolts and screws tight to be sure the appliance is in a safe working
condition.
• Replace worn or damaged parts for safety.
• Ensure that only the recommended replacement cutting blades are fitted.
• Ensure that batteries are charged using the charger supplied or recommended by
the manufacturer. Incorrect use may result in electric shock, overheating or leakage
of corrosive liquid from the battery.
• Servicing of the appliance should be carried out according to manufacturer's
instructions.
• In the event of leakage of electrolyte, flush with water / neutralising agent, seek
medical help if it comes into contact with the eyes.
• Store the appliance with battery pack fully charged at room temperature (around
20ºC).
• Every deep discharge cycle decreases the capacity of battery pack. To prolong
battery life, it is recommended to charge the battery every 6 months over extended
periods of time without use.
Transport
The original packaging should be used when transporting the Autonomous Mower over
long distances. To safely move from or within the working areas:
• Press the STOP button to stop the mower.
• Move the main switch button to the OFF position if you intended to carry the mower.
• Carry the Autonomous Mower using the handle below at the rear. Carry the mower
with the blade disc away from the body.
11OPERATION PRINCIPLES
Autonomous Mower Basic operating principles
The Autonomous Mower chooses its working direction randomly. It will mow your
garden completely without leaving behind any uncut part within the area restricted by
the chosen boundary.
Chaging Station
Work Area
Boundary Wire
Autonomous Mower
• You define the work area by installing the supplied boundary wire. Once the
Autonomous Mower detects the boundary wire, it will stop, move backwards
and continue mowing in a different direction. It is important to ensure that the
boundary is complete. Any objects you wish to protect within the boundary,
such as a garden pond, trees, garden furniture or flower beds can also be
protected by the boundary wire. The boundary wire must form one complete
loop. If the Autonomous Mower encounters an obstacle, such as a person,
tree, pet or other general garden obstacles, it will stop, move backwards and
continue mowing in a different direction.
• If you need a narrow corridor to connect two patches of lawn within the
boundary, the corridor should be at least 2 metres wide and max. 8 m long.
min. 2 m
max. 8 m
12OPERATION PRINCIPLES
Note: If your Autonomous Mower loses ground contact while hitting an obstacle, the blade
disc will stop immediately to avoid any potential damage.
Locating the charging station
• When the battery is running low, the Autonomous Mower will automatically return
to the charging station. It will approach the closest boundary wire and follow it
anticlockwise (without cutting) back to the charging station. When fully charged, the
Autonomous Mower will automatically resume the interrupted working cycle. The
launch direction from the charging station - clockwise - is hard-wired into the design
and is impossible to change.
Recognising the boundary wire
• Note that before stopping and changing the direction, the Autonomous Mower will
overrun the boundary wire by 10 to 40 cm. Please keep this in mind when planning
the boundary wire installation.
10-40 cm
13OPERATION PRINCIPLES
Starting and stopping while mowing
• If you want to stop the Autonomous Mower at any time during cutting, please
press the STOP button (2). Pressing the STOP button will also open the top
cover, providing access to the control interface. After pressing the START
button, The Autonomous Mower will not start working again until you have
closed the top cover.
Autonomous Mower mowing limitations
• The Autonomous Mower is set to work 7 days a week. You can adjust the daily
working time to match your garden.
• In case a neighbour is using the same Autonomous Mower, you need to keep a
0.5 m distance between your and your neighbour's boundary wires. Otherwise,
the two appliances might interfere with each other. Additionally, keep your
charging station more than 10 m away from your neighbour's boundary wires.
Last but not least, ensure that the adjacent boundary wires use different signals.
Please refer to section "Signal setting" in order to select signal S1 or S2 for your
installation.
> 10 m
Own land Neighbour
S1 > 0,5 m
S2
> 10 m
14OPERATION PRINCIPLES
Below is a table showing the signal distance for your Autonomous Mower. Use this
information as your guide when designing the boundary layout.
Model Max field Max. distance to wire
Victa Robot 600m² 12.5m
Mower RM100
Autonomous Mower cutting information
• The Autonomous Mower has a cutting height setting between 20 mm to 60 mm. If the
grass height exceeds 60 mm, cut it to 60 mm or below before using the Autonomous
Mower. Otherwise the load on the unit will be too large and the cutting efficiency will
suffer, we recommend using an ordinary lawn mower or trimmer. Once the installation
is complete, adjust the cutting height to the desired setting. Always start in a high
cutting position and work your way down to the cutting height you want. Before
adjusting the cutting height, always press the STOP button (2) to interrupt the cutting.
Then turn the large dial to adjust the cutting height.
Note: Only adjust the cutting height while the Autonomous Mower is switched off.
The Autonomous Mower cutting efficiency relies on sharp blades, so please keep them in
good condition.
15INSTALLATION PROCEDURES
Installation Guide
This chapter explains how to install the Autonomous Mower. Please read this completely
before you start the installation.
Introduction
We recommend creating a draft of your lawn, including all obstacles and how these should
be protected. This makes it easier to find a good position for the charging station and how
to correctly place the boundary wire around your garden perimeter protecting bushes,
flower beds etc. You will also need some tools, like a hammer and wire cutters, pliers or
scissors.
Cutting limitations
The Autonomous Mower is equipped with
collision sensors. These will detect any rigid
and fixed obstacles higher than 100mm, such < 400 mm
as walls, fences and garden furniture.
When triggered, the Autonomous Mower will
stop, reverse backwards and then continue
mowing in a different direction. Still, protecting
the obstacles running the boundary wire
accordingly is the recommended long-term
solution.
> 100 mm
Trees
The Autonomous Mower treats trees as
common obstacles, but if some roots of the
tree are exposed in your garden and lower
than 100mm, this area should be proteched
in order to prevent tree root, cutting blades or
rear wheels profile damage.
16INSTALLATION PROCEDURES
Stones
We recommend clearing the lawn
of small (less than 100 mm high)
rocks and stones and any stones
with a round or sloped edge. The
Autonomous Mower might try
and climb such rocks instead of
recognising them as a barrier.
An Autonomous Mower getting
stuck on such a stone requires
user intervention to restart mowing.
Contact with stones can result in
damage to the blades.
Slopes
The Autonomous Mower can
navigate slopes up to a maximum
of 40% incline or decline.
The boundary wire should never
run perpendicular to a gradient of
more than 10°. Likewise, please
allow a corridor of at least 2m Slope should not be steeper
between a 10° or steeper slope than 40
50 % (27˚).
(22°).
and the boundary wire. Otherwise,
the faster downhill speed may
cause the Autonomous Mower
to overshoot the boundary wire,
especially on wet and slippery
min. 2 m
ground.
Boundary wire
Slopeshould
Slope should not
not be
be
steeper than 10˚
Paths, Driveways and Roads
If an elevated driveway crosses
your lawn, better keep it outside
the boundary wire.
Please allow a safety distance
of 40 cm between driveway and
boundary wire.
cm
40
>
boundary wire
17INSTALLATION PROCEDURES
If the driveway and lawn are at
the same level, feel free to use the
boundary wire to create a corridor.
This allows your Autonomous
Mower to cross the driveway and
reach the opposite lawn. boundary
boundary
Uneven lawn surfaces
Uneven lawn areas may cause the
blades to touch the ground, and/
or allow Autonomous Mower to
get stuck.
We recommend leveling the lawn
before using your Autonomous
Mower or excluding uneven areas
with the boundary wire.
Flowerbeds
Use the boundary wire to exclude
any flowerbeds from the cutting
area.
There are two options for the two
lengths of boundary wire running
between the flowerbed and the
outer boundary:
1) Keep the distance between the > 10 cm
parallel wires above 10 cm. This
way, the Autonomous Mower will
recognise the boundary wire as an
ordinary obstacle. When cutting, it
will "bounce" off it as usual. When
following the boundary wire back
to the charging station, it will take
the detour around the flower bed.
18INSTALLATION PROCEDURES
2) Alternatively, keep the distance
between the two parallel wires
below 5 mm. Do not cross the
wires - see below.
This way, the Autonomous Mower
will not recognise the wires and
travel across them unhindered. This < 5 mm
option requires placing an obstacle
on the boundary wire around the
flowerbed. Place the obstacle, e.g
a large rock or pole, near position a
indicated on the below illustration.
The obstacle must be surrounded
by a flat area of about 1 m x 1 m,
without any slopes. This obstacle
will allow the appliance to exit the
circle.
Keep in mind that flowers, bushes
and surrounding shrubbery will
change in size over a season.
please keep sufficient space
between boundary wire and other
plants to avoid interference year-
round.
General Dos and Don’ts
While the Autonomous Mower is protected against rain and spray water, being submerged
is likely to cause severe damage to the electronic parts. Therefore, it is imperative to
exclude any pools from the cutting area. For added safety, we recommend placing a fence
around the pool with a height greater than 10cm.
> 10 cm
KE
CHO
19INSTALLATION PROCEDURES
If you have created a boundary corridor inside your working area, the corridor should be
at least 2 m wide and a max length of 8 m. If a corridor is too narrow or too long, the
Autonomous Mower might not be able to navigate it from one end to the other.
Never cross the wires!
Max length
of the
corridor is
8m
Minimum width of
the corridor is 2 m
Marking out the Autonomous Mower's working area
You have now understood the basic
principles of how the Autonomous
Mower works. The next step is to
mark out the working area with
boundary wire by referring to your
garden plan.
Starting from the charging station,
the boundary wire must be one
continuous loop without any breaks
or crossings. Connecting the end
to the charging stations second
connector will complete the circuit.
Where appropriate, use the included
ruler to check the 40 cm required
distance.
Firstly, locate the best position for
your charging station. Be aware that
it needs a permanent connection to
the mains, so take into account the
location of the nearest power outlet.
The included supply cord has a
length of 9m. The charging station (5)
must be placed on a flat surface, at
ground level.
20INSTALLATION PROCEDURES
To ensure the Autonomous Mower
can return to the charging station
smoothly, leave 2m of straight wire
to the front of the charging station
and 1m to the side facing the cutting
area. Use a shaded location for
the charging station, as a lower
temperature while charging is
beneficial to the battery.
>1m
>2m
IMPORTANT: Place the charging
station on an even, flat surface
away from ponds, pools or stairs.
We recommend suitable protection
from the elements, for example a
robot port or garage.
Pay attention to protect
cable!
Do not place the charging station too
close to a slope, such as at the top of
a hill or the bottom of a furrow. Avoid
left and right inclination in excess of 5
degrees.
If your lawn has a soft or uneven
surface, we recommend fortifying the
area around the charging station with
a grass protection mesh. Otherwise,
the repeated stress of the rear wheels
can damage the turf.
Once the position of the charging
station is confirmed and mains
electrical connection is laid out, please
do not connect to main power yet.
Finish all boundary layout work before
connecting the charging station to the
power supply. 5>INSTALLATION PROCEDURES
Use the included ruler (16) to ensure the required 40 cm distance between wire and
obstacles. The recommended distance between two pegs is about 80 cm in straight
lines, and less in tight curves. Note that the pegs' hook and wire slit always faces the
outside of the boundary. When first planting the pegs, do not drive them fully into the
ground. Use a light hammer to drive them in a little bit. Also locate the fixing pegs and
lay each one on the lawn at approximately the correct distance from lawn edges (40cm)
and obstacles. There is a gauge supplied for this.
Cutting area
40 cm The pegs should be knocked into lawn
with wire location to boundary outside like
8 0 cm shown.
Once all pegs are in position, lay out the boundary wire. Start from the charging station.
Run the wire through the peg's hook and wire slit one-by-one. Do not tighten the
boundary wire too much to prevent wire damage. Carefully prevent any kinks, knots,
etc. When cutting the wire, we recommend leaving at least 1 m spare wire to allow for
adjustments.
Note: The pegs are not suitable for fixing the boundary wire on hard surfaces,
e.g when running the boundary wire across a driveway. Instead, use
appropriate screws and plugs. Be sure to use insulation washers to protect the
wire insulation.
Only use the included waterproof boundary wire connectors (17) to join together two
pieces of boundary wire.
See below for some further sketches giving more guidelines.
Suitable location for
the charging station
Connector
F, black
Connector B, red
1 m extra wire
for potential
adjustment
22INSTALLATION PROCEDURES
Avoid right angles when running
the boundary wire around a corner.
Instead, separate into two 45°
angles.
In case the included boundary wire NO
is too short for your garden, more is
available from our service provider. OK
The wire's total length must not
exceed 300 m.
Prepare the boundary wire for the
charging station
Use a wire stripper to remove 10-15
mm insulation from each end. Twist
the threads tight.
10 - 15 mm
Connect the charging station to the
boundary wire
Place the charging station on the end
of the boundary wire so that the wire
runs lengthwise below the middle of F (black)
the charging station. Connect that end
to the left (black) connector marked
"F" (front). Connect the other end to
the right (red) connector marked "B"
(back).
KE
CHO
IMPORTANT INFORMATION
Double check that the charging station B (red)
connections are as shown on image.
Even if there is a blue light, if the
connectors are wrongly connected the
appliance will not work.
23INSTALLATION PROCEDURES
After connecting the “F” and "B" connectors to the charging station, the charging
station can be fixed down with the boundary pegs.
Before fixing the charging station, please check again that the above mentioned
conditions are met:
– Even surface within range of power supply
– 2 m straight boundary in front
– Inclination less than 5°
– Surplus boundary wire tucked under the charging station for protection, outside
the boundary.
Once the charging station is fixed, connect the charger extension cable (14) to
charging base. Now, connect the power supply to the mains outlet. After a brief
self-test, one blue LED on the charging station should light up. If all LEDs stay
dark, double-check the mains outlet and the power supply. If other than a single
blue LED lights up, please refer to the chapter on troubleshooting.
Turn on and test the installation
LED
Once the blue LED confirms all is OK, test the Autonomous Mower's funtion. Check
the LED regularly to ensure fixing the boundary wire has not affected the connection.
Then place the Autonomous Mower in the working area, a few metres beside the
charging station. Set the main power switch (11) to "ON". The Autonomous Mower will
power-up and start a self-test, but not start working at this time.
24INSTALLATION PROCEDURES
Press down on the large STOP button (2) to open the top cover and access the controls.
Activate the button marked " " (situated on the left part of the display) and press down
the top cover to close it.
Once closed, the Autonomous Mower will automatically return to the charging station by
locating and following the boundary wire in anti-clockwise direction. If the Autonomous
Mower fails to dock correctly, move the charging station to a more suitable position.
Once the appliance has docked, the symbol will start flashing. This indicates that the
battery is charging correctly.
After initial installation, the Autonomous Mower will remain in the charging station until the
battery is fully charged.
Successful docking and charging indicates that you have found a suitable position for the
charging station. It is now time to fix it in position by fully driving the pegs into the ground.
Take care not to damage or kink the surplus wire stored under the charging station.
Area to be cut
2m
KE
CHO
25OPERATING INSTRUCTIONS
Setting the mowing height
The mower’s mowing height can be set between 20 and 60 mm with 5 cutting heights. If
the grass is higher than 60 mm, it will be necessary to mow the grass using a standard
lawnmower. Otherwise, the grass will cause too great a load for the mower’s blades and thus
lead to unsatisfactory mowing. Do not adjust the cutting height during mowing.
1. Press the STOP button.
2. Rotate the mowing height selector to adjust the mowing height.
• It is recommended to begin with mowing by setting the mowing height to 60 mm (by
setting the selector to MIN) and then gradually lowering the mowing height until you get
the desired grass height.
3. Close the top cover after the adjustment.
Note: The mower can cut on wet grass. However this will lead to clumps of grass
forming under the mower which means more frequent cleaning of the mower is
necessary.
Starting and stopping the mower
Starting the mower
1. Make sure the mower is sufficiently charged.
2. Press the main isolation switch to turn on the mower.
3. Press the STOP button to open the control panel cover.
4. If a PIN is set, enter the PIN with the number keys on the display.
5. Press the START button in the control menu.
6. Close the control panel cover. The mower will start mowing.
Note: The mower can be programmed to automatically start mowing at specific
times and on specific days in a week. See the section: Programming the mower.
Stopping the mower
• Press the STOP button (2) to immediately stop the mower.
Note: Once the STOP button is activated, the control panel cover will open and the
mower will wait for further commands. The mower will not start to work until the
control panel cover is closed.
26OPERATING INSTRUCTIONS
Messages on the display during operation
While mowing, the display will show the operating status of the mower.
Information includes the current date and time, battery level, boundary cable signal (S1 or S2)
and operation status message (see below).
Message Description
The mower is working. When the blade disc starts to rotate, the
Running
blade disc icon (
The mower is in the process of returning to the charging sta-
Home
tion.
The battery power is low and the mower will return to the
Low voltage
charging station.
Charging The mower is being charged.
No signal There is no boundary cable signal.
Outside The mower has moved outside the mowing zone.
The obstacle sensor gives continuous alert for more than 10
Trapped
seconds. The mower has stopped for safety reasons.
The obstacle sensor has triggered more than 10 times in one
Pit
minute. The mower has stopped for safety reasons.
The mower has encountered a steep slope which it cannot
Slope
overcome.
The mower has either been lifted up or risen up over an obsta-
Lifted
cle.
ErrorI Incorrect PIN passcode is entered.
27OPERATING INSTRUCTIONS
Returning to the charging station
After approximately 60 minutes of mowing and when the mower’s battery power is low, the
mower will automatically return to the charging station by locating the closest boundary
cable and following it anticlockwise (without mowing) back to the charging station for a full
recharge. The display of the mower will show a charging symbol during charging.
When charging is complete, the mower will continue with the next mowing cycle. The mower
will also return to the charging station if you press the HOME button on the control panel and
then manually close the control panel cover. It also stays at the charging station during spare
time (no work assigned). If for some reasons the mower cannot successfully return to the
charging station, it will attempt five times before staying on the lawn and turning itself off to
save battery power. In this case, check if the charging station is correctly installed.
In addition, if the ambient temperature is higher than 40° C, the mower will stop charging to
protect the battery. Charging will resume when the temperature drops to a suitable ambient
temperature.
Programming the mower
The mower can be programmed through the control menu which can be accessed from the
control panel(10) of the mower.
IMPORTANT: Set the data and time first as this is the base for the rest of the programming
Note: The control panel can only be accessed by pressing the STOP button on the
top of the mower to unlock the control panel cover and ensure that the mower stops
working when you are programming it. After programming, the control panel cover
must be manually closed to resume the mower working and start carrying out the
programmed activities.
28OPERATING INSTRUCTIONS
Control Panel
Text
The control panel consists of the touch-sensitive display and physical buttons.
The physical buttons serve as a backup when there is any difficulty to use the touch
sensitive display (e.g. low temperature).
Functions of the physical buttons:
Button Description
(up) Each press of the button will move the selection
cursor upwards/ leftwards, or toggle among the
available options in a setting.
(down) Each press of the button will move the selection
cursor downwards/ rightwards, or toggle among
the available options in a setting.
Enter Press the button to confirm a selection in the
control menu station.
Home Press the button to return the mower to the
charging station for charging.
Start Press the button to start a mowing cycle.
Back Press the button to return to the previous screen
in the control menu.
29OPERATING INSTRUCTIONS
Display
The display of the control panel is touch-
sensitive.
Software version and serial number
When you turn on the mower, the software
version and serial number will show briefly on
the display.
Security PIN
For security reason, a PIN is required to
access the control menu. The default
passcode is “0000”. To change the
passcode, see the section: Using the control
menu > Settings > PIN.
Control menu
After the PIN passcode is correctly entered,
the home screen of the control menu will
show for programming the mower. See the
following sections for details.
30OPERATING INSTRUCTIONS
Navigating in the control menu
• Directly press on an icon or button on the display for input or selection.
• Press on the icons below for more navigation controls.
Icon Description
This is the same as the backspave key on a keyboard to cancel the last input
This is the same as the enter key on a keyboard to confirm a selection
This is the same as the escape key on a keyboard to return to the previous menu.
• Alternatively, use the physical buttons on the control panel to navigate in the control menu.
Overview of the control menu
KE
CHO
31OPERATING INSTRUCTIONS
Using the control menu
There are eight options in the control menu.
Refer to the relevant sections below for details.
• Start
Select this option to start a mowing cycle. This
option has the same function as the START
button on the control panel.
• Charge
Select this option to return the mower to the
charging station for charging. This option has
the same function as the HOME button on the
control panel.
• Settings
There are six further options in “Settings”.
• Boundary
There are three further options in “Boundary”.
32OPERATING INSTRUCTIONS
• Trimming
This option determines if the mower will carry out boundary trimming during a mowing
cycle. Select the option “Yes” to carry out boundary trimming. To determine the width of the
boundary edge, see the section: Width.
Note: The boundary cable must be carefully checked before confirming this option. The
mower may cut the boundary cable when the cable is not properly fixed to the ground.
• Width
This option determines the distance (0.1-0.4
m) the mower will run past the boundary
cable when performing boundary trimming.
• Signal
This option determines which signal (S1 or S2)
is using for the boundary cable.
If both you and your neighbour have the same Autonomous Mower and the boundary
cables between the two mowers is less than 10 m apart from each other, set the signal (S1
or S2) of your boundary cable to a different one from your neighbour. For example, if your
neighbour’s mower is already connected through signal S1, connect your mower to the
charging station through signal S2. On the charging station, you must also carry out the
corresponding change. To set the signal to S2 on the charging station: Press the button
again to change the signal of the charging station back to S1.
KE
CHO
33OPERATING INSTRUCTIONS
• PIN
This option sets the passcode of the mower to prevent theft or unauthorised change of
the menu settings. The existing (old) passcode is required to change to a new passcode.
If you have forgotten the passcode, contact your local dealer or after sales service.
The default passcode of the mower is “0000”.
• Rain
Mowing in the rain is not recommended.
This appliance has a rain sensor which may stop the robot from mowing in the rain.
When the rain sensor is triggered, the robot will go back to the charging station first,
where it will be fully charged. Once charged the mower will remain in the charging station
until the rain has stopped before starting to mow again.
Note: Be careful not to short circuit the sensors on the appliance with any metal
objects. This will cause the mower to work abnormally.
Rain sensor
Users can activate or deactivate the rain sensor as shown below:
Deactivating rain sensor:
34OPERATING INSTRUCTIONS
Activating rain sensor:
Select "Yes" and set the extra time.
• Multiple areas
Your lawn may consists of a number of isolated mowing areas (see example below). You
may set up a maximum 4 mowing zones and assign a mowing frequency to each of
them.
Measure and estimate the distance from each zone to the charging station along the
boundary cable. The mower will identify each zone by the distance to the charging
station. Each mowing zone will also be defined by a percentage, reflecting the size of the
mowing zone in relation to the total mowing area.
KE
CHO
By inputting the distance (m) and area percentage (%) in each mowing zone, the mower
will automatically calculate the mowing frequency in each zone. The higher it is marked
with percentage value, the more frequently the mower will cut it.
35OPERATING INSTRUCTIONS
The feature is also useful when there
are blind areas that the mower seldom
visits. You may find the nearest point
along the boundary cable and set it as
a mowing zone to improve the mowing
frequency.
• Reset
This option sets all settings to the
factory default values. The PIN
passcode is required to carry out the
reset.
• Review
This option shows the current settings,
including the cut days, cut times,
boundary trimming setting, boundary
edge width, area and number of users.
• Timer
This option sets the day and time the
mower will carry out a mowing cycle.
Select the option “Date” to set the cut
days and the option “Time” to set the
cut times.
• Set cut days
This option determines on which days in
a week the mower will work. By default,
all days are selected with highlights
in black. To stop the mower from
working on a specific day, press the
corresponding option on the display
36OPERATING INSTRUCTIONS
• Set cut time
This option determines the working
periods of the mower in a day. A
maximum of three working periods (T1 to
T3) can be set. Select a working period
and then use the number keys on the
display for inputting the start and end
times for each working period.
If the mower runs out of battery
power within a working period, it will
automatically return to the charging
station for charging and then work again
until the working period ends. It is best to
first leave the working periods as factory
defaults and then modity if required after
you know the time the mower takes to
completely cut the lawn. Remember that
the mower may take longer time to cut
the same lawn in different seasons or
under different weather conditions.
• History
There are four further options in “History”.
• Fault
This option shows the last 4 fault records. Error information includes:
Message Description
Low Battery The battery power is too low to get back to the charging station.
No signal There is no boundary cable signal.
Outside The mower has moved outside the mowing zone.
KE
CHO
Trapped The obstacle sensor gives continuous alert for more than 10 seconds. The
mower has stopped for safety reasons.
Pit The obstacle sensor has triggered more than 10 times in one minute. The
mower has stopped for safety reasons.
Slope The mower has encountered a steep slope which it cannot overcome.
Lifted The mower has either been lifted up or risen up over an obstacle.
Error(XX) See the section: Error codes. 37OPERATING INSTRUCTIONS
• Cutting
This option shows the start and end
times of the last two mowing cycles.
• Charge
This option shows the end times and
voltages of the last two charging cycles.
• Health
This option shows an overview of
the total working time and number of
charging cycles.
• Language
This option determines the language used in the control menu. The languages available
for selection are: English, Swedish, German, Danish, Spanish, Finnish, French, Italian,
Dutch and Norwegian.
• Date
This option sets the date and time for the control menu. Select the option “Date” to set
the current date and the option “Time” to set the current time. Use the number keys on
the display for inputs.
Note: All programmed activities and records in the mower will be based on the
date and time set in this option.
• Install
This option starts the test running mode.
In this mode, the mower will mow for three minutes and then return to the charging
station. After three minutes of charging, the mower will start mowing again. This mode is
used mainly for setup checking.
38Storage
Preparing for spring
After winter storage, please clean the charging contacts on both the Autonomous Mower
and the charging station.
Use a fine abrasion paper or a brass brush; this will help to achieve the best charging
efficiency and avoid any charging interference.
Short-time storage
• Store the appliance in a dry place well out of reach of children.
• Do not wrap nylon sacks around the appliance, as this could result in the formation of
moisture.
Winter Storage
During winter, keep your mower, charging station and power supply in a dry place. We
recommend a shed, garage or preferably store it indoors. Prepare your appliance for winter
storage as follows:
1. Fully recharge the battery.
2. Set the main power switch to "OFF".
3. Thoroughly clean your Robomower.
4. Unplug the power supply from the mains outlet.
5. Disconnect the power supply from the charging station.
6. Disconnect the boundary wire from the charging station. Lift up the charging station,
and clean it. The boundary wire can remain outside. However, it is imperative to protect
the wire against corrosion. We recommend a water-free grease or suitable sealing tape.
If available, repack the product in the original packaging.
Cleaning and Maintenance
It’s important to keep your Autonomous Mower clean. The mower will deal with slopes
easier when the wheels are clean. Sharp cutting blades need less power and create
cleaner cuts. Remember to turn off the main power switch (11) before any maintenance.
Use protective gloves when handling the blades! Never use a high pressure washer,
garden hose or running water when cleaning the appliance.
Cleaning the mower body
As your Autonomous Mower is battery
powered you need take care when
KE
CHO
cleaning. Remove rough dirt with a soft
brush. Use a manual water spray with
mild household detergent for intensive
cleaning. Wipe off any residue after
cleaning with a moist rag.
39Cleaning the underside
Ensure the main power switch (11)
is in OFF position. Wear protective
gloves. Turn the Autonomous Mower
onto its side to expose its underside.
Clean the blade disc and frame using
a soft brush or damp cloth. Rotate
the blade disc to make sure that it
moves freely, and check that the
blades can turn on their pivots and
no grass is obstructing them.
Clean the contact pins and the charging strips
Using wire wool, metal cleaner or very fine grade emery paper, clean the contact pins and
the charging strips on your mower and charging station. Remove any debris, leaves or
grass clippings around the contact pins and charging strips to ensure efficient charging.
Reversing or replacing the blades
WARNING!
Ensure the Autonomous Mower
is completely shut off before
cleaning, adjusting or
replacing the blades.
Always wear protective gloves.
WARNING!
To ensure maximum cutting
efficiency and safety, always
use recommended replacement
blades and blade mounting
parts when replacing.
Your Autonomous Mower has three blades fixed to the blade disk. unless damaged by
hard obstacles, these blades can last for up to five months with everyday use.
Weekly inspection of the blades and the fixing screws is required. Note that the blades are
double-edged. Once the first side is blunt, loosen the fixing screw. Turn the blade upside
down and fix it again with the fixing screw. After tightening the fixing screw, verify that the
blade can rotate freely around the screw.
A set of spare blades is included with the Autonomous Mower. More are available from
customer support. The blade's spare part number is 846210. Only use original spare parts.
For best performance and avoiding imbalance, always turn or replace all three blades at
the same time.
40Replacing the battery
While the actual battery life will depend
on usage and environmental factors, the
typical service life is several years. Spare
batteries are available from customer
support. To replace the battery, please
follow the instructions below.
1) Ensure the main power switch (11) is turned OFF. Clean the underside as instructed.
2) Set the Autonomous Mower to the lowest cutting height.
3) Turn the mower upside-down. Remove the 5 screws fixing the battery compartment's
lid. Note one screw is partially covered by the blade protector and is only accessible
through a service hole.
4) Pull out the battery and disconnect it from the Autonomous Mower.
5) Carefully clean the lid and the edge of the battery compartment. Debris may allow
excessive water to enter the battery compartment, causing major damage to the
appliance.
6) Connect and insert the replacement battery, close the compartment and fix the lid with
5 screws. Do not turn on the Autonomous Mower before placing it back on its wheels.
Beware of sharp blades!
KE
CHO
41TROUBLESHOOTING
Charging station
Nr LED indicator light Description
1 Blue Good connections
2 Blue ( flashing ) Interruption at the charging station. Internal wire.
3 Red ( flashing ) When the mower is docked at the charging station, it means
the mower is charging (normal). When the mower is working,
there is interruption at the cable loop.
4 Red and Blue flashing Interruption at both the charging station and cable loop.
Display messages and common problems
Display Description Action
message
(None) Blank screen Ensure the main isolation switch is turned on.
The battery may be empty. Carry the mower to the
charging station, turn on the main isolation switch
and start charging.
If the mower is working, press any key on the
control panel. If the screen is still blank, carry it to
the charging station for charging. Once the mower
is charged, check the fault history and rectify any
problems.
(None) The mower cannot return Check if the boundary cable under and in front of the
to the charging station. charging station is a straight line.
Check if the charging station is correctly installed.
(None) The mower turns around in Check if there is high power cable close to or
circle when returning to the underneath the boundary cable. If this is the case,
charging station along the avoid the area by changing the position of the
boundary cable. boundary cable.
(None) The mower runs into Change to a boundary cable signal (S1 or S2) that is
the mowing area of your different from your neighbour.
neighbour who is using the
same mower.
(None) The mower is vibrating. Check if the blade disc or blades are damaged and
replace the damaged parts.
CHARGING Charging is in progress. –
42TROUBLESHOOTING
Display Description Action
message
ERROR Wrong passcode has
Enter the correct PIN passcode.
been entered.
The mower is returning to
HOME –
the charging station.
LOW If the mower fails to automatically return to the charging
Battery power is low.
BATTERY station, carry it to the charging station for charging.
Check if the grass is too tall (> 60 mm) and cut the grass
The mower has been lifted with a normal mower before you start using the mower
LIFTED upward. again.
Check if the mower is free from obstructions.
Check if the LED indicator light is blue (no interruptions).
Refer to the table “Charging station” at the beginning of
this section for error messages.
The mower cannot receive Check if the charging station is properly connected to a
NO SIGNAL signals from the boundary power outlet.
cable.
Check if the signal of the boundary cable (S1 or S2) of
the mower is the same as the charging station.
If you are using the mower for the first time bring it close
to the boundary cable.
Check that the mower is not stuck in the middle of an
obstacle.
OBSTACLE A problem occurs at the
obstacle sensors. Contact after sales service if the problem cannot be
resolved.
If the mower is still inside the mowing area, check if the
boundary cable is installed properly.
Bring the mower back inside the mowing area and
restart the mower.
The mower is outside of If the mower runs outside of the boundary cable at a
OUTSIDE the boundary cable. corner, adjust and enlarge the angle to exceed 90°.
If the mower constantly runs outside of the boundary
cable at one place, check if there is a high power cable
KE
CHO
close to or underneath the boundary cable. If this is the
case, avoid the area by changing the position of the
boundary cable.
43TROUBLESHOOTING
Display Description Action
message
Remove the mower from the obstacle. This warning
TRAPPED The mower is trapped. occurs when the collision sensor has been triggered
more than 10 times within a minute.
RUNNING The mower is working. –
If the mower should be working, restart the mower.
SPARE TIME No work is assigned to the
mower. Program the working periods if necessary.
CRITICAL Check if the slope is too slippery to climb and make
The mower has been tilted.
SLOPE corrections to the mowing area if necessary.
Turn over the mower, bring it to a flat area and restart
TURNOVER The mower is overturned.
it.
The mower is just about
to enter the sleep mode Press any buttons on the control panel.
WAITING
because the battery power
is low.
44TROUBLESHOOTING
Error codes
Code Type of Description Action
message
ERROR 1 Fault Error at micro-controller core self-
checking.
ERROR Fault Error at middle boundary signal self-
20M checking.
ERROR Error at left boundary signal self-
Fault
20L checking.
Error at micro-controller self-
ERROR 21 Fault
checking ADC0.
Error at micro-controller self-
ERROR 22 Fault
checking ADC1.
Power off and restart the
The cutting motor cannot run when mower. If the fault persists,
ERROR 23 Fault
the mower is turned on. contact after sales service.
The cutting motor cannot run when
ERROR 24 Fault
the mower is turned on.
The cutting motor stops during use,
ERROR 3 Fault
cannot stop when turned off, or is
overloaded.
The drive motor cannot stop when
ERROR 4 Fault
the mower is turned off.
Refer to Error 4 and Error
M1_brake Warning The drive motor may be locked.
23.
Refer to Error 3 and Error
M2_brake Warning The cutting motor may be locked.
24.
The mower will automatically
I2C Warning Internal communication error
resume communication.
KE
CHO
45©2020 Briggs & Stratton
Victa is a trademarks of Briggs & Stratton Australia Pty. Ltd.
ABN 13 006 576 856
All rights reserved. No part of this booklet may be reproduced by any means
without prior written permission. All information herein is subject to change without notice.
2373 A EL SP OPERATORS MANUAL 16/09/19
80088464 - B ECN ISS DRN CKD DESCRIPTION DATEYou can also read