High Wall Duct-Free System Système bi-bloc sans conduits Sistema de Split sin Conducto - Owner's Manual Le manuel du propriétaire Manual del ...
←
→
Page content transcription
If your browser does not render page correctly, please read the page content below

Owner's Manual
                                Le manuel du propriétaire
                                      Manual del usuario

                                         YR-HQ (WJ26X27153)
High Wall Duct-Free System
Système bi-bloc sans conduits
Sistema de Split sin Conducto

                 SPEED

                                 APPLY

                                 F°/C°

                                           49-5000489 Rev. 1 04-20 GEA
ENGLISH

          2   49-5000489 Rev. 1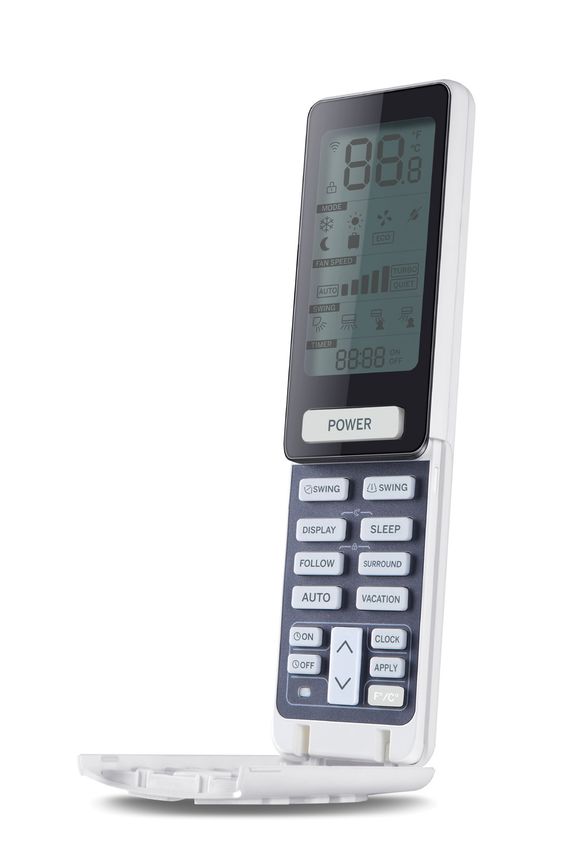
TABLE OF CONTENTS

                                                                                                                                                                                                                                                                                                            ENGLISH
SAFETY INFORMATION.  .  .  .  .  .  .  .  .  .  .  .  .  .  .  .  .  .  .  .  .  .  .  .  .  .  .  .  .  .  .  .  .  .  .  .  .  .  .  .  .  .  .  .  .  .  .  .  .  .  .  .  .  .  .  .  .  .  .  .  .  .  .  .  .  .  .  .  .  .  .  .  .  .  .  .  .  .  .  .  .  .  .  .  .  .  .  .  .  .  .  .  . 4

REMOTE CONTROL FEATURES AND SETTINGS .  .  .  .  .  .  .  .  .  .  .  .  .  .  .  .  .  .  .  .  .  .  .  .  .  .  .  .  .  .  .  .  .  .  .  .  .  .  .  .  .  .  .  .  .  .  .  .  .  .  .  .  .  .  .  .  .  .  .  .  .  .  .  .  .  .  .  .  .  . 5

EMERGENCY OPERATION AND MAINTENANCE .  .  .  .  .  .  .  .  .  .  .  .  .  .  .  .  .  .  .  .  .  .  .  .  .  .  .  .  .  .  .  .  .  .  .  .  .  .  .  .  .  .  .  .  .  .  .  .  .  .  .  .  .  .  .  .  .  .  .  .  .  .  .  .  .  .  .  .  .  . 8

TROUBLESHOOTING TIPS . .  .  .  .  .  .  .  .  .  .  .  .  .  .  .  .  .  .  .  .  .  .  .  .  .  .  .  .  .  .  .  .  .  .  .  .  .  .  .  .  .  .  .  .  .  .  .  .  .  .  .  .  .  .  .  .  .  .  .  .  .  .  .  .  .  .  .  .  .  .  .  .  .  .  .  .  .  .  .  .  .  .  .  .  .  .  .  .  . 9

LIMITED WARRANTY .  .  .  .  .  .  .  .  .  .  .  .  .  .  .  .  .  .  .  .  .  .  .  .  .  .  .  .  .  .  .  .  .  .  .  .  .  .  .  .  .  .  .  .  .  .  .  .  .  .  .  .  .  .  .  .  .  .  .  .  .  .  .  .  .  .  .  .  .  .  .  .  .  .  .  .  .  .  .  .  .  .  .  .  .  .  .  .  .  .  .  .  . 10

Record Keeping
Thank you for purchasing this Haier product. This installation manual             _____________________________
will help you get the best performance from your new heat pump.       _______________________________________
                                                                      __________
                                                                      Modelnumber
                                                                      Model   number
For future reference, record the model and serial number located on   _______________________________________
                                                                                  _____________________________
the label on the side of your heat pump, and the date of purchase.    Serial number
                                                                      __________
                                                                      _______________________________________
                                                                      Serial number
Staple your proof of purchase to this manual to aid in obtaining      Date of purchase
                                                                                  _____________________________
warranty service if needed.                                           __________
                                                                                  Date of purchase

To register your new Haier Duct Free System go to
haierductless.com/product-registration and input the model/serial
number information on this page. To receive a 10-year compressor
and parts warranty, registration is required within 60 days of
installation.

49-5000489 Rev. 1                                                                                                                                                                                                                                                                                    3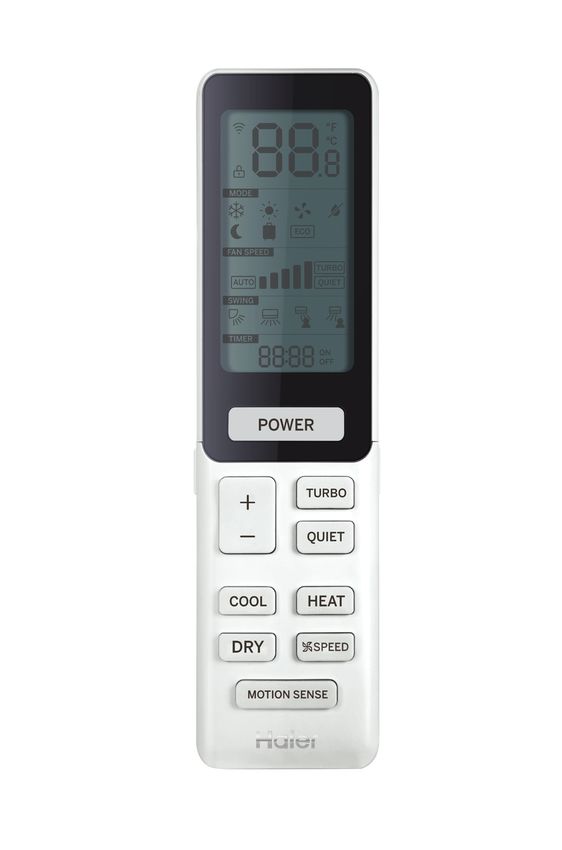
IMPORTANT SAFETY INFORMATION
          READ ALL INSTRUCTIONS BEFORE USING THE APPLIANCE
ENGLISH

                             For your safety, the information in this manual must be followed to minimize the risk of fire, electric shock
              WARNING or personal injury.
          •U se this appliance only for its intended purpose as            • GE Appliances does not support any servicing of the heat
             described in this Owner’s Manual.                                 pump. We strongly recommend that you do not attempt to
          • This heat pump must be properly installed in accordance with      service the heat pump yourself.
             the Installation Instructions before it is used.               • For your safety…do not store or use combustible materials,
          • Turn the unit OFF and unplug your heat pump before                gasoline or other flammable vapors or liquids in the vicinity
             cleaning the air filter.                                          of this or any other appliance. If you are getting rid of an old
                                                                               product with refrigerants, check with the company handling
                                                                               disposal about what to do.
                                                                            • These R410A heat pump systems require contractors and
                                                                               technicians use tools, equipment and safety standards
                                                                               approved for use with this refrigerant. DO NOT use
                                                                               equipment certified for R22 refrigerant only.

              WARNING Keep batteries away from children.
          •T
            his remote control contains batteries. If a new or used        • If you think batteries might have been swallowed or placed
           battery is swallowed or enters the body, it can cause               inside any part of the body, seek immediate medical
           severe internal burns and can lead to death in as little            attention.
           as 2 hours. Always completely secure the battery                 • The cells shall be disposed of properly, including keeping
           compartment. If the battery compartment does not close              them away from children.
           securely, stop using the product, remove the batteries,
           and keep it away from children.                                  • Even used cells may cause injury.

          4                                                                                                                          49-5000489 Rev. 1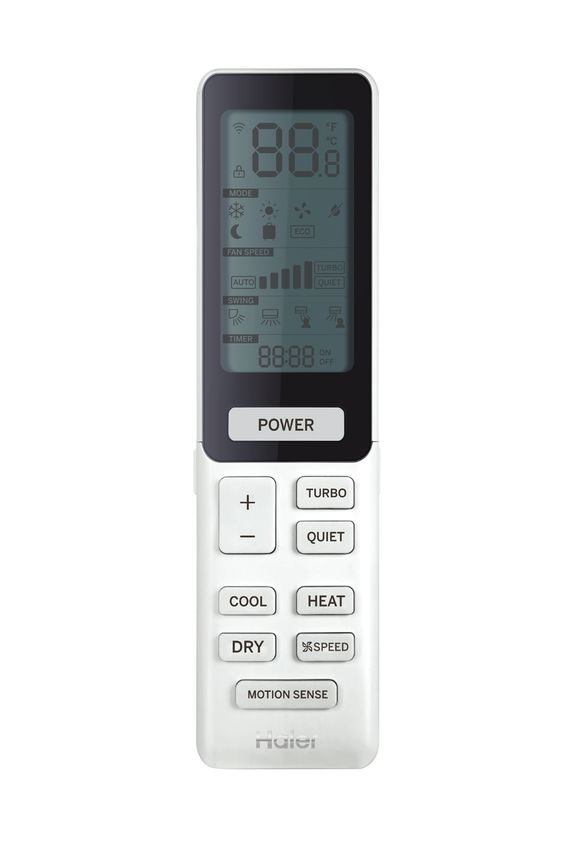
Remote Control Features And Settings

                                                                                                                                                 ENGLISH
Remote Control
                                                                        6. TURBO Button
                                                                           The TURBO function is used for speeding up the air flow to
                                                                           highest speed in heating and cooling mode. The UI interface will
                                                                           display the "TURBO" icon. Pressing the TURBO again or SPEED
                                                                           button will exit the Turbo function.
                                                                        7. QUIET Button
                                                                           The QUIET function is used for lowing the fan speed to the lowest
                                                                           speed. The control will display the QUIET icon on the UI interface.
                                                                           Pressing the QUIET button again or the SPEED button will exit the
                                                                           QUIET function.
                                                                        8. TEMP +/- Button
                                                                           TEMP + : The setting temperature will increase 1°F (0.5°C) when
                                                                           pressed. TEMP - : The setting temperature will decrease 1°F
                                                                           (0.5°C) when pressed. The range of operating temperature is
                                                                           60°F-86°F (16°C-30°C).
                                                                        9. MOTION SENSOR
                                                     1                     Press the MOTION SENSE button to activate Motion Sense
                                                                           mode. Eco will be displayed on the screen. While in this mode the
                                                                           unit will decrease the temperature set point 1°F (0.5°C) every 20
                                                     6                     minutes in heat mode until it reaches 68°F (20°C) or increase the
                    8                                                      temperature set point 1°F (0.5°C) every 20 minutes in cooling
                                                     7                     mode until it reaches 78°F (26°C) or above. If motion sensor
                                                                           detects motion in the room, it will exit the eco mode and change
                                                                           the temperature or the original setpoint immediately. If the set
                    3                                2                     temperature is below 68°F (20°C) while in heating mode or 78°F
                                                                           (26°C) while in cooling mode, this function will not be able to
                    4                                5                     change temperature further.

                                                     9

1. POWER Button
   Press the POWER button on the remote control to start or stop
   the unit.
2. HEAT Button
   In HEAT mode, warm air will blow out after a short period of
   time due to the cold-air prevention function. When FAN is set to
   AUTO mode, the heat pump automatically adjusts the fan speed
   according to room temperature. The        will be displayed during
   HEAT mode.
3. COOL Button
   In COOL mode, the heat pump will blow cool air. When FAN is
   set to AUTO, the heat pump automatically adjusts the fan speed
   according to the room temperature. The    will be displayed                                                                          11
                                                                                             10
   during COOL mode.
                                                                                             12                                         13
4. DRY Button
   DRY mode is used for dehumidification. In DRY mode, when room                             14                                         15
   temperature becomes lower than setting temperature +2°F, the
                                                                                             16
   Heat Pump will run intermittently at LOW speed regardless of FAN                                                                     17
   setting. The crossed out water droplet will be displayed during
                                                                                             18                                         19
   DRY mode.
5. SPEED Button                                                                                                                        20
   With each press of the SPEED button, the fan speed changes                                                                           21
   as follows: LOW-MID-HI-AUTO. The remote control display will
   show the fan icon. Hold the SPEED button for 10 seconds to go
   into FAN mode. Press any other button to exit this function.

49-5000489 Rev. 1                                                                                                                            5
Remote Control Features and Settings
ENGLISH
10. S
WING UP/DOWN 2. Heat Mode
Press the SWING UP/DOWN button to choose the position of One hour after SLEEP mode starts, the setting temperature
the horizontal airflow louvers. will decrease 2°F. After 2 hours later, the setting temperature
Status display of air flow will decrease additional 2°F. after 5 hours,the setting
temperature will increase 1°F, after 8 hours, the unit will run
COOL/DRY: according to the initial setting temperature, this feature helps
with achieving maximum efficiency and comfort the your
HEAT: feeling while you sleep.
SLEEP operation starts
NOTE: ℉
• It is advisable not to keep the horizintal air flow louver in the
downward position for an extended period of time in COOL or
temp.setting
Decrease 2℉
DRY mode. This may cause condensate water to form on the Decrease 2℉
louver.
Rises 1℉
• When turning the unit on, the remote control will automatically 1h 2h 7h 8h
return the louver to the previous set swing position. When
In HEAT mode
turning the unit off, the louver will rotate to the full open 3. AUTO mode
position prior to closing. the unit operates in corresponding sleep mode adapted to the
automatically selected operation mode.
11. S
WING SIDE/SIDE Button (select models)
NOTE:
Press the LOUVER SIDE/SIDE button to choose the position of
• When the unit is set to sleep mode, the fan speed will be
the vertical airflow louvers.
set to low speed and cannot be changed.
Status display of air flow
• When the TIMER function is set, the sleeping function
COOL/DRY/HEAT/FAN
cannot be set. If the sleeping function has been set and
the user sets the TIMER function, the sleeping function will
be canceled and the unit will be set to the timer function.
NOTE:
• When the humidity is very high, the condensate water may occur 14. FOLLOW
on the air outlet if all vertical louvers are adjusted too far to the Press the FOLLOW button, the air will follow the body no matter
left or right. people stand or moving. See chart below.
• When turning the unit on, the remote control will automatically
return the louver to the previous set position. Model Detect Area Louver Up/ Louver Left/
Down Right
12. DISPLAY FOLLOW Detect person Remote setting Swing in the
Turns on and off the indoor display. Press the DISPLAY button 10 in single zone position direction of the
times within 5 seconds to display the ambient temperature. The person
indoor will beep 2 times when the setting is successful. Press
Detect person Remote setting Swing
the DISPLAY button 10 times within 5 seconds again to display in multi zones position automatically
the setting temperature. The indoor will beep 4 times when the
setting is successful. Detect Keep the initial Keep the initial
nobody setting position settings position
The default display temperature is the setting temperature.
13. SLEEP 15. SURROUND
Press the SLEEP button, the heat pump will operate the sleep Press the SURROUND button. The air will surround the body no
function, the display light will be turned off after 20 seconds. the matter whether people are standing or moving. See chart below.
control logics are as following running in different mode.
Model Detect Area Louver Up/ Louver Left/
1. COOL or DRY modes
Down Right
One hour after SLEEP mode begins, the temperature
setpoint will increase 1°F (0.5°C). 2 hours after beginning SURROUND Detect Remote Keep the initial
sleep mode the setpoint will increase 1°F (0.5°C). Seven person in setting setting position
hours after beginning sleep mode, the setpoint will decrease single zone position
1°F (0.5°C). At the eighth hour the unit will be back to the Detect "Health airflow Swing
original setpoint. This feature helps with achieving maximum person in (up) in cooling automatically
efficiency and comfort while you sleep. See the image below. multi zones mode
Health airflow
SLEEP operation starts (down) in
℉ heating mode"
Detect Keep the Keep the initial
nobody initial settings settings position
Decrease 1℉
Rises 1℉
position
Rises 1℉ Decrease 1℉
temp.setting Unit stop
1h 2h 7h 8h
In COOL, DRY mode
6 49-5000489 Rev. 1Remote Control Features and Settings
ENGLISH
16. AUTO 20. APPLY
The heat pump will automatically select Cool, Heat, or Fan Save and Cancel the TIMER and CLOCK selection.
operation according to set temperature. When SPEED is set 21. F/C
to AUTO the heat pump automatically adjusts the fan speed Press F/C to switch the remote and unit display temperature
according to room temperature. between Fahrenheit and Celsius.
17. VACATION 22. LIGHT Button
10°C/50°F Heating sets the system to maintain 10°C/50°F. This Turns on and off the indoor display. To display only set
is used to prevent freezing during long unoccupied periods of temperature, press LIGHT button 10 times within 5 seconds. The
time. indoor will beep 3 times when successful. To return to ambient
18. TIMER ON/OFF temperature display, press LIGHT 10 times within 5 seconds
To set the Timer using the TIMER ON button, press the CLOCK again. Default is the indoor unit displaying ambient temperature.
UP/DOWN. The time will be changed by 1 minute. Press the The set temperature will only display a for a few seconds after
APPLY to confirm the setting. Press the TIME OFF button to adjusting it with the remote.
cancel the timer function.
23. RESET Button
19. CLOCK If the remote control is not functioning properly, use a pen point or
To set the clock using the CLOCK button, press the CLOCK UP/
a similar object to depress this button to reset the remote.
DOWN. The time will change by 1 minute. Press the APPLY to
confirm the setting. The clock will keep the original time if the
APPLY button is not pressed in 10 seconds.
Manual Operation (POWER Button) and Maintenance
Manual Operation Optimizing Performance
• Use the POWER button only when the remote control is lost 1. Close doors and windows during operation
or damaged. 2. Do not block the air inlet or outlet
• Press the POWER button and the unit will beep once, 3. Wipe the cabinet using a soft and dry cloth. For serious
indicating start of operation. stains, use a nuetral detergent diluted with water. Wring the
• The unit will run automatically in the following modes: water out of the cloth before wiping down the unit. Then
Room Designated Timer Fan Operation
wipe off the detergent completely.
Temperature Temperature Mode Speed Mode
Above 73°F 79°F No AUTO COOL Cleaning the Front Cover
Below 73°F 73°F No AUTO HEAT 1. Open the front cover by pulling it upward
2. Remove the Filter:
Gently push up on the filter's center tab until it is released
from the stopper, and remove the filter in a downward
emergency
operation switch
motion.
Be
ep
3. Clean the filter
• While in Manual Operation, temperature and fan speed Use a vacuum cleaner to remove dust, or wash the filter
cannot be changed, nor will it operate in timer or DRY mode. with water. After washing, dry the filter completely.
4. Attach the filter
Inserting the Batteries Attach the filter so that the "FRONT" label is facing
1. Remove the battery cover outward. Make sure that the filter is securly attached
2. Insert 2 AAA batteries as illustrated noting battery polarity behind the holding tabs. If the filter is not attached
3. Reinstall the battery cover correctly the unit may not achieve maximum efficiency.
5. Close the front cover.
NOTE:
• The distance from the remote control to the receiver should
be less than 23 feet with no obstructions.
• If the remote control display is weak or the operating
distance has diminished, the batteries may need to be
replaced.
• Remote control malfunctions can sometimes be corrected
by removing the batteries from the remote for a few
minutes and then reinstalling them.
• Remove the batteries from the remote control if the unit
will not be in use for an extended period of time. If any
segments of the display remain active after battery removal,
press the reset button.
49-5000489 Rev. 1 7Troubleshooting Tips ... Before you call for service
ENGLISH
For additional troubleshooting tips, see the full owner’s manual at GEAppliances.com.
Problem Cause and Solution
Normal Performance The system does not When the unit is stopped, it will not restart again for 3 minutes to
Inspection restart immediately protect the system.
When electricity is disconnected then reconnected, the protection
circuit will be active for 3 minutes to protect the heat pump.
Noise is heard During unit operation or a sudden stop, a swishing or gurgling
noise may be heard. The first 2-3 minutes after the unit has
started is when the noise could be noticeable. This noise is
generated by refigerant flowing in the system.
During unit operation, a cracking noise may be heard. This noise is
sometimes generated by the casing expanding or shrinking due to
temperature changes.
If the airflow is creating a loud noise during unit operation, the air
filter may be too dirty.
Odors The system circulates odors lingering in the airstream, such as the
smell of furniture, paint, and/or cigarettes.
Mist or steam is blowing During COOL or DRY mode, the indoor unit may blow out mist or
out steam. This is due to the sudden cooling of the indoor air.
In DRY mode, fan speed In DRY mode, when the room temperature becomes lower than
cannot be changed the set temperature by 2°F, the unit will run intermittently at LOW
speed regardless of SPEED setting.
Items to look for Nonresponsive unit Is there a power failure?
Is the circuit breaker off?
Is the fuse blown?
Poor Cooling Is the air filter dirty?
Is there anything blocking the inlet and/or outlet?
Is the temperature set correctly?
Are there any doors or windows open?
Is there any direct sunlight shining through the window during the
cooling operation?
Are there too many heat sources or too many people in the room
during cooling operation?
8 49-5000489 Rev. 1Limited Warranty
ENGLISH
ENGLISH
For warranty detail please refer to installation manual.
49-5000489 Rev. 1 9Notes
ENGLISH
10 49-5000489 Rev. 1Table des matières
CONSIGNES DE SÉCURITÉ . . . . . . . . . . . . . . . . . . . . . . . . . . . . . . . . . . . . . . . . . . . . . . . . . . . . . . . . . . . . . . . . . . . . . . . . . . . . . . . . . . . . . . . 12
RÉGLAGES ET FONCTIONS DE LA TÉLÉCOMMANDE . . . . . . . . . . . . . . . . . . . . . . . . . . . . . . . . . . . . . . . . . . . . . . . . . . . . . . . . . . . . . . . 13
FONCTIONNEMENT D’URGENCE ET ENTRETIEN . . . . . . . . . . . . . . . . . . . . . . . . . . . . . . . . . . . . . . . . . . . . . . . . . . . . . . . . . . . . . . . . . . 15
CONSEILS DE DÉPANNAGE . . . . . . . . . . . . . . . . . . . . . . . . . . . . . . . . . . . . . . . . . . . . . . . . . . . . . . . . . . . . . . . . . . . . . . . . . . . . . . . . . . . . . . 16
GARANTIE LIMITÉE . . . . . . . . . . . . . . . . . . . . . . . . . . . . . . . . . . . . . . . . . . . . . . . . . . . . . . . . . . . . . . . . . . . . . . . . . . . . . . . . . . . . . . . . . . . . . . 17
FRANÇAIS
Merci d’acheter ce produit Haier. Ce manuel d’utilisation vous aidera _______________________________________
à obtenir le meilleur rendement de votre nouveau climatiseur.
Numéro de modèle
_______________________________________
Pour référence ultérieure, notez le numéro de modèle et le numéro Numéro de série
de série figurant sur l'étiquette située sur le côté de la pompe à _______________________________________
chaleur et la date d'achat. Date d’achat
Agrafez votre preuve d’achat à ce manuel pour faciliter le service de
la garantie en cas de besoin.
Pour enregistrer votre nouveau système sans conduit Haier,
allez sur la page haierductless.com/product-registration et
entrez les numéros de modèle et de série sur cette page. Vous
devez enregistrer votre produit dans les soixante (60) jours suivant
l’installation afin de vous prévaloir de la garantie de dix (10) ans sur le
compresseur et les pièces.
49-5000489 Rev. 1 11CONSIGNES DE SÉCURITÉ IMPORTANTES
LISEZ TOUTES LES INSTRUCTIONS AVANT D'UTILISER L'APPAREIL
AVERTISSEMENT
Pour votre sécurité, les renseignements dans ce manuel doivent être observés afin de minimiser le
risque d'incendie, de décharge électrique ou de blessure.
• Utilisez cet électroménager uniquement aux fins auxquelles • Pour votre sécurité... Abstenez-vous d’entreposer ou
il est fait mention dans ce manuel du propriétaire. d’utiliser des matières combustibles, de l’essence ou
• Avant son utilisation, cette thermopompe doit être installée d’autres vapeurs ou liquides inflammables à proximité de
correctement en conformité avec les instructions d'installation. cet appareil ou de tout autre. Si vous vous débarrassez d’un
produit qui contient un frigorigène, informez-vous auprès
• Mettez l’appareil en arrêt (OFF) et débranchez la
de l’organisme responsable d’en disposer.
thermopompe avant de nettoyer le filtre à air.
•C
es systèmes de thermopompe R410A exigent que les
•G E Appliances ne recommande nullement la réparation
entrepreneurs et les techniciens utilisent des outils, des
de la thermopompe par un non spécialiste. Nous vous
équipements et des normes de sécurité approuvés pour ce
conseillons fortement de vous abstenir de réparer la
type de frigorigène. N'utilisez PAS un équipement certifié
thermopompe vous-même.
pour le frigorigène R22 seulement.
AVERTISSEMENT
Gardez les piles hors de portée des enfants.
• C
ette télécommande contient des piles. Si une pile • Si vous croyez que les piles ont pu être avalées ou placées
neuve ou usée est avalée ou pénètre autrement dans dans une partie du corps, cherchez immédiatement de l’aide
le corps, elle peut causer des brûlures internes graves médicale.
et même la mort en aussi peu que 2 heures. Fixez • Les cellules doivent être jetées proprement, à l’écart des
toujours le compartiment des piles complètement. Si le enfants.
compartiment des piles ne se ferme pas en toute sécurité,
cessez l’utilisation du produit, retirez les piles et gardez-les • Même des cellules usées peuvent causer des blessures.
FRANÇAIS
àl’écart des enfants.
12 49-5000489 Rev. 1Réglages et fonctions de la télécommande
Télécommande
6. Bouton TURBO (accélération)
La fonction TURBO est utilisée pour accélérer la circulation d’air à
la vitesse la plus haute dans les modes chauffage et climatisation.
L’interface utilisateur affichera le mot « TURBO ». Presser TURBO
de nouveau ou le bouton de vitesse du ventilateur vous fera
quitter la fonction TURBO.
7. Bouton QUIET (silencieux)
La fonction QUIET fait passer le ventilateur à la vitesse la plus
basse. La télécommande affichera le mot QUIET sur l'écran.
Une nouvelle pression sur QUIET ou sur le bouton de vitesse du
ventilateur vous fera quitter la fonction QUIET.
8. Bouton « +/- » (réglage de la température)
« + » : La température de réglage augmente de 1 °F (0,5 °C) lorsque
vous pressez cette partie du bouton. « - » : La température de
réglage diminue de 1 °F (0,5 °C) lorsque vous pressez cette partie
1
du bouton. La plage des températures de fonctionnement va de
60 °F à 86 °F (16 °C à 30 °C).
6 9. MOTION SENSE (détection de mouvement)
8 Pressez le bouton MOTION SENSE pour activer le mode Motion
7 Sense. Le mot Eco s’affichera sur l'écran. Dans ce mode, l’appareil
diminue la température de réglage de 1 °F (0,5 °C) toutes les 20
minutes en mode chauffage jusqu’à atteindre 68 °F (20 °C), ou
3 2 diminue la température de réglage de 1 °F (0,5 °C) toutes les 20
4 5 minutes en mode climatisation jusqu’à atteindre 78 °F (26 °C) ou
plus. Si le capteur détecte un mouvement dans la pièce, l’appareil
9 quitte le mode Eco et change la température ou la valeur de
réglage initiale immédiatement. Si la température de réglage
est sous 68 °F (20 °C) pendant le mode chauffage ou 78 °F (26
FRANÇAIS
°C) en mode climatisation, cette fonction ne pourra changer la
température davantage.
1. Bouton POWER (Marche/Arrêt)
Appuyez sur le bouton POWER de la télécommande pour mettre
l’appareil en marche ou arrêt.
2. Bouton HEAT (chauffage)
En mode HEAT, de l’air chaud est soufflé après une courte période
temps par la fonction de prévention d’air froid. Lorsque l’option
FAN (ventilateur) est réglée à AUTO, la thermopompe règle
automatiquement la vitesse du ventilateur selon la température
ambiante. L’icône s’affiche durant le mode HEAT.
3. Bouton COOL (climatisation)
En mode COOL, la thermopompe souffle de l’air froid. Lorsque
l’option FAN (ventilateur) est réglée à AUTO, la thermopompe
règle automatiquement la vitesse du ventilateur selon la
température de la pièce. L’icône s’affiche durant le mode
COOL.
4. Bouton DRY (sec) 10 11
Le mode DRY sert à réduire l’humidité. En mode DRY, lorsque la
température ambiante devient inférieure de +2°F par rapport au 12 13
réglage de température, l’appareil fonctionne par intermittence à
basse vitesse (LOW), quel que soit le réglage du ventilateur (FAN). 14 15
La goutte d’eau rayée s’affiche durant le mode DRY. 16
17
5. Bouton SPEED (vitesse)
À chaque pression du bouton SPEED, la vitesse du ventilateur change 18 19
comme suit : LOW-MID-HI-AUTO (basse-moyenne-haute-auto). 20
L’écran de la télécommande affichera l’icône de ventilateur. Pressez
21
le bouton SPEED durant 10 secondes pour entrer en mode FAN.
Pressez n’importe quel autre bouton pour quitter cette fonction.
49-5000489 Rev. 1 13Réglages et fonctions de la télécommande
10. S
WING UP/DOWN (pivoter vers le haut/bas) 2.Mode HEAT
Pressez le bouton SWING UP/DOWN pour choisir la position des Une heure après le début du mode SLEEP, la température
évents d’air horizontaux. de réglage diminuera de 2 °F. Deux heures plus tard, la
Affichage de l’état de la circulation d’air température de réglage diminuera de 2 °F supplémentaires.
Après cinq heures, la température de réglage augmentera de
COOL/DRY: 1°F. Après 8 heures, l’unité fonctionnera selon la température
de réglage initiale. Cette fonction contribue à obtenir une
HEAT: efficacité et un confort optimaux pendant que vous dormez.
REMARQUE : SLEEP operation starts
℉
• Il est préférable de ne pas laisser l’évent horizontal dans la
position baissée durant une longue période de temps dans les temp.setting
Decrease 2℉
modes COOL (climatisation) ou DRY (sec). Cela peut causer de
la condensation d’eau sur l’évent.
Decrease 2℉
Rises 1℉
• Lors de la mise en marche de l’appareil, la télécommande
remettra automatiquement l’évent à la position réglée 1h 2h 7h 8h
In HEAT mode
précédemment. Lors de la mise en arrêt de l’appareil, l’évent
pivotera à la position de pleine ouverture avant de fermer.
3. Mode AUTO
11. B
outon SWING SIDE/SIDE (pivoter d’un côté à l’autre) L’appareil fonctionne dans le mode Sleep correspondant au
(certains modèles) mode de fonctionnement sélectionné automatiquement.
Pressez le bouton SWING SIDE/SIDE pour choisir la position des REMARQUE :
évents d’air verticaux.
• Lorsque l’appareil est réglé en mode Sleep, le ventilateur
Affichage de l’état de la circulation d’air
sera réglé à la vitesse basse sans pouvoir la modifier.
COOL/DRY/HEAT/FAN
• Lorsque la fonction TIMER (minuterie) est réglée, il est
impossible de régler la fonction Sleep. Si la fonction Sleep
a été réglée et que l’utilisateur règle la fonction TIMER, la
REMARQUE :
fonction de veille sera annulée et l’appareil sera réglé selon
• Lorsque l’humidité est très élevée, l’eau de condensation peut se la fonction de minuterie.
déposer sur la sortie d’air si les évents verticaux sont réglés trop
loin vers la gauche ou la droite. 14. FOLLOW (suivre)
• Lors de la mise en marche de l’appareil, la télécommande Sur pression du bouton FOLLOW, l’air suivra la ou les personnes,
FRANÇAIS
remettra automatiquement l’évent à la position réglée qu’elles soient debout ou en mouvement. Voir le tableau ci-dessous.
précédemment.
12. DISPLAY (affichage intérieur) Modèle Zone de Évent Haut/Bas Évent gauche/droite
Active ou désactive l’affichage intérieur. Pressez le bouton détection
DISPLAY 10 fois en moins de 5 secondes pour afficher la FOLLOW Détection Position de Pivote en direction
température ambiante. L’affichage intérieur émettra 2 bips (suivre) dans une zone réglage par de la personne
unique télécommande
si le réglage est réussi. Pressez le bouton DISPLAY 10 fois en
Détection dans Position par Pivote
moins de 5 secondes pour afficher la température de réglage. plusieurs zones télécommande automatiquement
L’affichage intérieur émettra 4 bips si le réglage est réussi.
La température d’affichage par défaut est la température de Ne détecte Garde la position Garde les positions
réglage. personne de réglage de réglage initiales
initiale
13. SLEEP (sommeil)
En pressant le bouton SLEEP, la thermopompe active la 15. SURROUND (entourer)
fonction SLEEP et l’éclairage de l’écran s’éteindra au bout de 20 Pressez le bouton SURROUND. L’air va entourer la ou les personnes,
secondes. La logique de commande est relative aux différents qu’elles soient debout ou en mouvement. Voir le tableau ci-dessous.
modes suivants :
1. Modes COOL ou DRY Modèle Zone de Évent Haut/Bas Évent gauche/
Une heure après le début du mode SLEEP, la température de détection droite
réglage augmentera de 1 °F (0,5 °C). Deux heures après le SURROUND Détection Position de Garde la position
début du mode SLEEP, la température de réglage augmentera (entourer) dans une zone réglage par de réglage initiale
de 1 °F (0,5 °C). Sept heures après le début du mode SLEEP, unique télécommande
la température de réglage augmentera de 1 °F (0,5 °C). À Détection Air sain (haut) Pivote
la huitième heure, l’appareil retournera à la température dans plusieurs en mode automatiquement
de réglage initiale. Cette fonction contribue à obtenir une zones climatisation
efficacité et un confort optimaux pendant que vous dormez. Air sain (bas) en
Voyez le schéma ci-dessous. mode chauffage
Ne détecte Garde les Garde les
personne positions de positions de
réglage initiales réglage initiales
SLEEP operation starts
℉
Decrease 1℉
Rises 1℉
Rises 1℉ Decrease 1℉
temp.setting Unit stop
1h 2h 7h 8h
In COOL, DRY mode
14 49-5000489 Rev. 1Réglages et fonctions de la télécommande
16. AUTO 19. CLOCK (horloge)
La thermopompe sélectionnera automatiquement le mode Cool Pour régler la minuterie à l’aide du bouton CLOCK (horloge),
(climatisation), Heat (chauffage) ou Fan (ventilateur) en fonction pressez CLOCK et les flèches haut ou bas. Le temps changera
de la température de réglage. Lorsque l’option FAN est réglée par sauts de 1 minute. Pressez APPLY (appliquer) pour confirmer
à AUTO, la thermopompe règle automatiquement la vitesse du le réglage. L’horloge conservera l’heure d’origine si le bouton
ventilateur selon la température ambiante. APPLY n’est pas pressé dans les 10 secondes.
17. VACATION (absence prolongée) 20. APPLIQUER
10°C/ 50°F - Le chauffage règle le système pour maintenir Permet de sauvegarder et d’annuler la sélection des fonctions
la température à 10°C/50°F. Cela prévient le gel pendant de TIMER et CLOCK.
longues périodes d’absence.
21. F/C (Fahrenheit/Celsius)
18. BOUTONS ON/OFF (marche/arrêt) DE LA MINUTERIE Pressez F/C pour faire basculer la température de la
Pour régler la minuterie à l’aide du bouton ON (marche), pressez télécommande et de l’appareil entre Fahrenheit et Celsius.
le bouton CLOCK (horloge) et les flèches haut ou bas. Le temps
changera par sauts de 1 minute. Pressez APPLY (appliquer)
pour confirmer le réglage. Pressez le bouton OFF (arrêt) de la
minuterie pour annuler la fonction de minuterie.
Fonctionnement manuel (bouton POWER) et entretien
Fonctionnement manuel Optimisation du rendement
• Utilisez le bouton POWER seulement lorsque la 1. Fermez les portes et les fenêtres pendant le fonctionnement..
télécommande est défectueuse ou perdue. 2. N’obstruez pas les orifices d’entrée ou de sortie d’air.
• Pressez le bouton POWER et l’appareil émettra un bip pour 3. Essuyez la carrosserie à l’aide d’un linge doux et propre. Pour
signaler le début du fonctionnement. les taches tenaces, utilisez un détergent neutre dilué dans l'eau.
• L’appareil fonctionnera automatiquement dans les modes Tordez le linge pour en expulser l’eau avant de nettoyer l’unité. Puis
suivants : essuyez le détergent complètement.
Température Température Mode Vitesse du Mode de
ambiante désignée Minuterie ventilateur fonctionnement Nettoyage du couvercle frontal
FRANÇAIS
Above 73°F 79°F No AUTO COOL
Below 73°F 73°F No AUTO HEAT
1. Ouvrez le couvercle frontal en le tirant vers le haut.
2. Retirez le filtre :
Interrupteur de Poussez délicatement vers le haut sur la languette centrale du
filtre jusqu’à la dégager de la butée, puis retirez le filtre dans un
fonctionnement
d’urgence
mouvement vers le bas.
Bi
p
3. Nettoyer le filtre
• En fonctionnement manuel, il est impossible de modifier la Utilisez un aspirateur pour enlever la poussière, ou lavez le filtre
température et la vitesse de ventilateur, et il est impossible avec de l’eau. Après le lavage, séchez le filtre complètement.
de fonctionner dans les modes TIMER ou DRY. 4. Fixez le filtre
Fixez le filtre de façon que l’étiquette « FRONT » (avant) soit face
.Insertion des piles à l’extérieur. Assurez-vous que le filtre est bien fixé derrière les
1. Retirez le couvercle des piles. languettes de retenue. Si le filtre n’est pas fixé correctement,
2. Insérez 2 piles AAA tel qu’illustré en respectant la polarité l’appareil peut ne pas atteindre son efficacité maximale.
des piles. 5. Fermez le couvercle frontal.
3. Remettez le couvercle en place.
REMARQUE:
• La distance entre la télécommande et le récepteur doit être
inférieure à 23 pieds (7 mètres) sans obstructions.
• Un affichage de télécommande faible ou une distance de
fonctionnement raccourcie peut indiquer la nécessité de
remplacer les piles.
• On peut parfois corriger les défaillances de la télécommande
en retirant les piles durant quelques minutes puis les
remettant en place.
• Retirez les piles de la télécommande si l’appareil ne sera pas
utilisé durant une longue période. Si une partie quelconque
demeure active après le retrait des piles, pressez le bouton
RESET (réinitialisation).
49-5000489 Rev. 1 15Conseils de dépannage… Avant d’appeler un réparateur
Pour des conseils de dépannage supplémentaires, consultez le manuel d’utilisation complet sur GEAppliances com.
Problème Cause et solution
Inspection du rendement Le système ne redémarre Lorsque l’appareil est mis en arrêt, il ne pourra redémarrer durant 3 minutes
normal pas immédiatement afin de protéger le système.
Lorsque l’électricité est coupée puis rétablie, le circuit de protection sera actif
durant 3 minutes afin de protéger la thermopompe.
Du bruit se fait entendre Pendant le fonctionnement de l’appareil ou lors d’un arrêt soudain, un
bruissement ou un gargouillis peut se faire entendre. Le bruit est décelable
durant les premières 2 à 3 minutes après le démarrage de l’appareil. Ce bruit
est produit par le frigorigène qui circule dans le système.
Pendant le fonctionnement de l’appareil, un craquement peut se faire
entendre. Ce bruit est généralement produit par l’expansion ou la contraction
de la carrosserie en raison d’un changement de température.
Un filtre trop sale peut être à l’origine d’une circulation d’air bruyante durant le
fonctionnement de l’appareil.
Odeurs Le système fait circuler des odeurs qui persistent dans l’air, telles que peut en
dégager meubles, peinture, ou cigarettes.
Production de brume ou de Dans les modes COOL (climatisation) ou DRY (sec), l’unité intérieure peut
vapeur souffler de la brume ou de la vapeur. Cela est causé par un refroidissement
soudain de l’air intérieur.
En mode DRY (sec), la vitesse En mode DRY, lorsque la température de la pièce devient inférieure au réglage
du ventilateur ne peut être de température de 2 °F, l’appareil fonctionne par intermittence à vitesse basse
FRANÇAIS
modifiée (LOW), quel que soit le réglage du ventilateur (FAN).
Éléments à surveiller Unité non responsable Y a-t-il une coupure de courant?
Le disjoncteur est-il déclenché?
Le fusible est-il grillé?
Climatisation insuffisante Le filtre à air est-il sale?
Un objet obstrue-t-il l’entrée ou la sortie d’air?
La température est-elle réglée correctement?
Des portes ou des fenêtres sont-elles ouvertes?
Les rayons du soleil pénètrent-ils directement par la fenêtre pendant la
climatisation?
Y a-t-il trop de sources de chaleur ou de personnes dans la pièce durant la
climatisation?
16 49-5000489 Rev. 1Garantie limitée
Pour des renseignements détaillés sur la garantie, veuillez vous reporter au manuel d’installation.
FRANÇAIS
49-5000489 Rev. 1 17Remarques
FRANÇAIS
18 49-5000489 Rev. 1Índice
INFORMACIÓN DE SEGURIDAD. . . . . . . . . . . . . . . . . . . . . . . . . . . . . . . . . . . . . . . . . . . . . . . . . . . . . . . . . . . . . . . . . . . . . . . . . . . . . . . . . . . . 20
FUNCIONES Y CONFIGURACIONES DEL CONTROL REMOTO . . . . . . . . . . . . . . . . . . . . . . . . . . . . . . . . . . . . . . . . . . . . . . . . . . . . . . . 21
FUNCIONAMIENTO DE EMERGENCIA Y MANTENIMIENTO. . . . . . . . . . . . . . . . . . . . . . . . . . . . . . . . . . . . . . . . . . . . . . . . . . . . . . . . . . 23
CONSEJOS PARA SOLUCIONAR PROBLEMAS. . . . . . . . . . . . . . . . . . . . . . . . . . . . . . . . . . . . . . . . . . . . . . . . . . . . . . . . . . . . . . . . . . . . . . 24
GARANTÍA LIMITADA. . . . . . . . . . . . . . . . . . . . . . . . . . . . . . . . . . . . . . . . . . . . . . . . . . . . . . . . . . . . . . . . . . . . . . . . . . . . . . . . . . . . . . . . . . . . . 25
Gracias por adquirir este producto de Haier. Este manual del _______________________________________
propietario le ayudará a lograr el mejor rendimiento de su nuevo Número de modelo
acondicionador de aire.
_______________________________________
Número de serie
Para referencia futura, registre el modelo y número de serie
ubicados en la etiqueta que se encuentra al costado de su bomba de _______________________________________
calentamiento y la fecha de compra. Fecha de compra
Abroche su comprobante de compra a este manual, como ayuda
para acceder al servicio de la garantía de ser necesario.
.
Para registrar su Nuevo Sistema sin Conducto de Haier
visite haierductless.com/product-registration e ingrese la
información del número de modelo/ serie en esta página. Para
acceder a la garantía del compresor y de las piezas por 10 años,
es necesario realizar un registro dentro de los 60 días desde el
momento de la instalación. ESPAÑOL
49-5000489 Rev. 1 19INFORMACIÓN IMPORTANTE DE SEGURIDAD
LEA TODAS LAS INSTRUCCIONES ANTES DE USAR ESTE ELECTRODOMÉSTICO
P
ara su seguridad, siga las instrucciones de este manual a fin de minimizar riesgos de incendio,
ADVERTENCIA descargas eléctricas o lesiones personales.
•U
se este electrodoméstico sólo para su propósito original, •P
ara su seguridad... no acumule ni use materiales
como se describe en el Manual del Propietario. combustibles, gasolina u otros vapores o líquidos
•E
sta bomba de calentamiento se debe instalar de forma inflamables cerca de éste u otro electrodoméstico. Si se
apropiada de acuerdo con las Instrucciones de Instalación deshará de un producto antiguo con refrigerantes, consulte
antes de ser usada. a la compañía a cargo sobre cómo deshacerse del mismo.
•A
pague la unidad y desenchufe la bomba de calentamiento •E
stos sistemas de bombas de calentamiento R410A
antes de realizar la limpieza del filtro de aire. requieren que los contratistas y técnicos usen
herramientas, equipos y estándares de seguridad
•G
E Appliances no suministra servicio técnico para la bomba aprobados para su uso con este refrigerante. NO use
de calentamiento. Le recomendamos enfáticamente que no equipamiento certificado sólo para el refrigerante R22.
intente reparar la bomba de calentamiento usted mismo.
ADVERTENCIA Mantenga las baterías alejadas de los niños.
•E
ste control remoto contiene baterías. Si una batería •S
i cree que las baterías fueron tragadas o colocadas
nueva o usada es tragada o ingresa en el cuerpo, podrá dentro de cualquier parte del cuerpo, busque atención
ocasionar quemaduras internas graves y producir la médica inmediata.
muerte en un tiempo tan corto como 2 horas. Siempre •L
as celdas deberán ser descartadas de forma adecuada, lo
asegure completamente el compartimiento de la batería. cual incluye mantener las mismas alejadas de los niños.
Si el compartimiento de la batería no se cierra de forma
segura, deje de usar el producto, retire las baterías, y • Incluso las celdas usadas podrán ocasionar lesiones.
mantenga el mismo alejado de los niños.
ESPAÑOL
20 49-5000489 Rev. 1Funciones y Configuraciones del Control Remoto
Control Remoto
6. Botón TURBO (Turbo)
La función TURBO (Turbo) se usa para acelerar el flujo de
aire hasta la velocidad más alta en el modo de calefacción y
refrigeración. La interface de usuario exhibirá el ícono “TURBO”.
Presionar TURBO nuevamente o el botón SPEED (Velocidad) hará
que se salga de la función Turbo.
7. Botón QUIET (Modo Silencioso)
La función QUIET (Modo Silencioso) se utiliza para llevar el
ventilador hasta su velocidad más baja. El control exhibirá el ícono
QUIET (Modo Silencioso) en la interface de usuario. Presionar
el botón QUIET (Modo Silencioso) nuevamente o el botón FAN
Speed (Velocidad del Ventilador) apagará la función QUIET (Modo
Silencioso).
1
8. Botón de TEMP +/-
TEMP + : La temperatura configurada aumentará 1°F (0.5°C)
6 cuando se presione. TEMP - : La temperatura configurada
8 disminuirá 1°F (0.5°C) cuando se presione. El rango de
7 funcionamiento de la temperatura es de 60°F a 86°F (16°C a 30°C).
9. MOTION SENSOR (Sensor de Movimiento)
3 2 Presione el botón MOTION SENSE (Sensor de Movimiento) para
4 5 activar el modo Motion Sense (Sensor de Movimiento). Eco
será exhibido en la pantalla. Mientras se esté en este modo, la
9 unidad reducirá el punto de configuración de la temperatura en
1°F (0.5°C) cada 20 minutos en el modo de calor hasta que se
llegue a 68°F (20°C) o incrementará el punto de configuración
de la temperatura en 1°F (0.5°C) cada 20 minutos en el modo de
1. Botón POWER (Encendido refrigeración hasta que se llegue a 78°F (26°C) o más. Si el sensor
Presione el botón POWER (Encendido) del control remoto para de movimiento detecta movimiento en la sala, abandonará el
iniciar o detener la unidad. modo eco y cambiará la temperatura o el punto de configuración
original de forma inmediata. Si la temperatura configurada es
2. HEAT Button inferior a 68°F (20°C) mientras se está en el modo de calor o de
En el modo HEAT (Calor), el aire caliente será emitido luego de 78°F (26°C) mientras se está en el modo de refrigeración, esta
un período de tiempo corto debido a la función de prevención función ya no podrá cambiar la temperatura.
de aire frío. Cuando el modo FAN (Ventilador) esté configurado
en AUTO (Automático), la bomba de calentamiento ajustará de
forma automática la velocidad del ventilador de acuerdo con la
temperatura del ambiente. E será exhibido durante el modo
HEAT (Calor).
3. Botón COOL (Frío)
En el modo COOL (Frío), la bomba de calentamiento emitirá
aire frío. Cuando el modo FAN (Ventilador) esté configurado en
AUTO (Automático), la bomba de calentamiento ajustará de
forma automática la velocidad del ventilador de acuerdo con la
temperatura del ambiente. El - será exhibido durante el modo
COOL (Frío).
4. Botón DRY (Seco)
El modo DRY (Seco) se usa para deshumidificar. En el modo DRY
(Seco), cuando la temperatura del ambiente sea inferior a la
10 11
configuración de temperatura +2°F, la Bomba de Calentamiento
funcionará de forma intermitente en la velocidad LOW (Baja), sin 12 13
importar cuál sea la configuración de FAN (Ventilador). La gota
de agua tachada aparecerá en la pantalla durante el modo DRY 14 15
(Seco). 16
17
5. Botón SPEED (Velocidad) 19
18
Cada vez que se presione de forma seguida el botón SPEED
20
(Velocidad), la velocidad del ventilador cambiará del siguiente
ESPAÑOL
modo: BAJA—MEDIA – ALTA - AUTOMÁTICA La pantalla del 21
control remoto mostrará el ícono del ventilador. Mantenga
presionado el botón SPEED (Velocidad) durante 10 segundos para
ingresar al modo FAN (Ventilador). Presione cualquier otro botón
para salir de esta función.
49-5000489 Rev. 1 21Funciones y Configuraciones del Control Remoto
10. S
WING UP/DOWN (Balanceo Arriba/ Abajo) 2.Modo HEAT (Calor)
Presione el botón SWING UP/DOWN (Balanceo Arriba/ Abajo) Una hora después de iniciado el modo SLEEP (Inactividad), la
para elegir la posición de las rejillas de circulación de aire temperatura configurada disminuirá 2°F. 2 horas más tarde,
horizontales. la temperatura configurada disminuirá otros 2°F. Luego de 5
Pantalla de estado del flujo de aire horas, la temperatura configurada aumentará 1°F. Luego de
8 horas, la unidad funcionará de acuerdo con la temperatura
COOL/DRY:
configurada inicialmente. Esta función ayudará a lograr la
máxima eficiencia y confort mientras usted duerme.
HEAT:
NOTA:
SLEEP operation starts
℉
• Se aconseja no mantener la rejilla de flujo de aire horizontal
en la posición descendente durante un período de tiempo
temp.setting
Decrease 2℉
prolongado en el modo COOL (Frío) o DRY (Seco). Esto podrá Decrease 2℉
ocasionar que se forme agua condensada en la rejilla. Rises 1℉
• Al encender la unidad, el control remoto regresará la rejilla 1h 2h 7h 8h
de forma automática a la posición de balanceo previamente In HEAT mode
configurada. Al apagar la unidad, la rejilla rotará hasta la
posición de apertura máxima antes de cerrarse. 3. Modo AUTO (Automático)
La unidad funciona en el modo inactivo correspondiente,
11. B
otón SWING SIDE/SIDE ( BALANCEO LATERAL/ LATERAL) adaptado al modo de funcionamiento seleccionado
(modelos selectos) automáticamente.
Presione el botón LOUVER SIDE/SIDE (Rejilla Lateral/ Lateral) NOTA:
para elegir la posición de las rejillas de circulación de aire • Cuando la unidad se configure en el modo de inactividad, la
verticales. velocidad del ventilador será configurada en velocidad baja
Pantalla de estado del flujo de aire y no podrá ser modificada
• Cuando la función TIMER (Temporizador) se encuentre
configurada, la función de inactividad no podrá ser
COOL (Frío)/ DRY (Seco)/ HEAT (Calor)/ FAN (Ventilador) configurada. Si la función de inactividad fue configurada
NOTA: y el usuario configura la función TIMER (Temporizador),
• Cuando el nivel de humedad sea muy alto, se podrá acumular la función de inactividad será cancelada y la unidad será
agua condensada en la salida de aire, si todas las rejillas verticales configurada en la función del temporizador.
son ajustadas sobre el extremo izquierdo o derecho.
14. FOLLOW (Seguir)
• Al encender la unidad, el control remoto regresará la rejilla de
Al presionar el botón FOLLOW (Seguir), el aire seguirá al cuerpo
forma automática a la posición previamente configurada.
sin importar si la persona se queda parada o se mueve. Lea el
12. DISPLAY (Pantalla)
siguiente cuadro.
Enciende y apaga la pantalla interna. Presione el botón
DISPLAY (Pantalla) 10 veces durante 5 segundos para exhibir la Modelo Área de Rejilla Arriba/ Rejilla Izquierda/
temperatura ambiente. La parte interna emitirá 2 pitidos cuando Detección Abajo Derecha
se tenga éxito. Presione el botón DISPLAY (Pantalla) 10 veces SEGUIR Detectar Posición de Balanceo en la
durante 5 segundos nuevamente para exhibir la temperatura persona en una configuración dirección de la
ambiente. La parte interna emitirá 4 pitidos cuando se tenga sola área remota persona
éxito. Detectar Posición de Balanceo
La temperatura de la pantalla por omisión es la temperatura persona en configuración automático
configurada. áreas múltiples remota
13. SLEEP (Inactividad) No detectar a Mantener la Mantener la
Al presionar el botón SLEEP (Inactividad), la bomba de nadie posición de posición de
configuración configuración
calentamiento usará la función de inactividad y la luz de la inicial inicial
pantalla estará apagada durante 20 segundos. La lógica del
control continuará su funcionamiento de modo diferente. 15. SURROUND.
Press the SURROUND button. The air will surround the body no
1. Modos COOL (Frío) o DRY (Seco)
matter whether people are standing or moving. See chart below.
Una hora después del comienzo del modo SLEEP (Inactividad),
el punto de configuración de temperatura se incrementará Modelo Área de Rejilla Arriba/ Rejilla Izquierda/
1°F (0.5°C). 2 horas después del comienzo del modo de Detección Abajo Derecha
inactividad, el punto se configuración se incrementará 1°F RODEAR Detectar Posición de Mantener la
(0.5°C). Siete horas después del comienzo del modo de persona en configuración posición de
inactividad, el punto se configuración se reducirá 1°F (0.5°C). una sola área remota configuración
En la octava hora, la unidad volverá al punto de configuración inicial
original. Esta función ayuda a lograr la máxima eficiencia y Detectar Flujo de aire Balanceo
confort mientras usted duerme. Lea la siguiente imagen. persona saludable (arriba) automático
en áreas en el modo de
SLEEP operation starts
℉
múltiples refrigeración; flujo
de aire saludable
(abajo) en el modo
de calefacción
Decrease 1℉
ESPAÑOL
Rises 1℉
No detectar a Mantener la Mantener la
temp.setting
Rises 1℉ Decrease 1℉
Unit stop
nadie posición de posición de
configuración configuración
1h 2h 7h 8h inicial inicial
In COOL, DRY mode
22 49-5000489 Rev. 1Funciones y Configuraciones del Control Remoto
16. AUTO (AUTOMÁTICO) 19. CLOCK (Reloj)
La bomba de calentamiento seleccionará de forma automática Para configurar el reloj usando el botón CLOCK (Reloj),
la función Cool (Frío), Heat (Calor) o Fan (Ventilador) de presione CLOCK UP/DOWN (Reloj Arriba/ Abajo). La hora será
acuerdo con la temperatura configurada. Cuando el modo FAN modificada en 1 minuto. Presione APPLY (Aplicar) para confirmar
(Ventilador) esté configurado en AUTO (Automático), la bomba la configuración. El reloj mantendrá la hora original si el botón
de calentamiento ajustará de forma automática la velocidad del APPLY (Aplicar) no se presiona dentro de los 10 segundos.
ventilador de acuerdo con la temperatura del ambiente.
20. APPLY (Aplicar)
17. VACATION (Vacaciones) Guarde y Cancele la sección de TIMER (Temporizador) y CLOCK
La Calefacción en 10°C/50°F configura el sistema para el (Reloj).
mantenimiento de 10°C/50°F . Esto se utiliza para evitar el 21. F/C
congelamiento durante períodos de tiempo prolongados sin Presione F/C para alternar desde el control remoto la
ocupación. temperatura en pantalla de la unidad entre Fahrenheit y Celsius.
18. TIMER ON/OFF (Temporizador de Encendido/ Apagado)
Para configurar el Temporizador usando el botón TIMER ON
(Temporizador Encendido), presione CLOCK UP/DOWN (Reloj
Arriba/ Abajo). La hora será modificada en 1 minuto. Presione
APPLY (Aplicar) para confirmar la configuración. Presione el
botón TIME OFF (Hora Apagada) para cancelar la función del
temporizador.
Funcionamiento Manual (Botón ENCENDIDO) y Mantenimiento
Funcionamiento Manual Funcionamiento Optimizado
• Use el botón POWER (Encendido) sólo cuando el control 1. Cierre las puertas y ventanas durante el funcionamiento.
remoto se pierda o dañe. 2. No bloquee la entrada o salida de aire.
• Presione el botón POWER (Encendido) y la unidad emitirá un pitido, 3. Limpie el gabinete usando una tela suave y seca. En caso de
indicando el inicio del funcionamiento. manchas importantes, use un detergente neutro diluido con agua.
• La unidad funcionará automáticamente en los siguientes modos: Escurra el agua de la tela antes de limpiar la unidad. Luego elimine
Temperatura Temperatura Modo del Velocidad del Modo de Fun- el detergente completamente.
de la Sala Designada Temporizador Ventilador cionamiento
Superior a
73°F
79°F No AUTOMÁTICO FRÍO
Limpieza de la Tapa Frontal
Below 73°F 73°F No AUTO HEAT 1. Abra la tapa frontal empujando la misma hacia arriba.
2. Retire el filtro:
Interruptor de De forma suave, empuje hacia arriba sobre la lengüeta del centro
del filtro, hasta que sea liberado del tapón, y retire el filtro con un
funcionamiento
de emergencia
movimiento descendente.
Pi
tid
o
3. Limpie del Filtro
• Mientras se encuentren en el Funcionamiento Manual, la Use una aspiradora para retirar el polvo o lave el filtro con agua.
temperatura y la velocidad del ventilador no se podrán modificar, ni Luego del lavado, seque el filtro completamente.
funcionarán con el temporizador o el modo DRY (Seco). 4. Adhiera el filtro
Adhiera el filtro de modo que la etiqueta “FRONTAL” mire hacia
Colocación de las Baterías afuera. Asegúrese de que el filtro se encuentre adherido de forma
1. Retire la tapa de las baterías. segura detrás de las lengüetas de suspensión. Si el filtro no se
2. Inserte 2 baterías AAA como se muestra en la ilustración, encuentra correctamente adherido, la unidad no podrá alcanzar su
observando la polaridad de la batería. máximo nivel de eficiencia.
3. Vuelva a instalar la tapa de la batería. 5. Cierre la tapa frontal.
NOTA:
• La distancia desde el control remoto hasta el receptor deberá ser
inferior a 23 pies sin obstrucciones.
• Si la pantalla del control remoto es débil o la distancia de
funcionamiento disminuyó, es posible que sea necesario el
reemplazo de las baterías.
• Cualquier mal funcionamiento del control remoto podrá ser a veces
corregido retirando las baterías del control remoto durante unos
minutos y luego volviendo a colocar las mismas.
ESPAÑOL
• Retire las baterías del control remoto, si la unidad no estará en uso
durante un período de tiempo prolongado. Si cualquier segmento
de la pantalla permanece activo luego del retiro de las baterías,
presione el botón de reinicio.
49-5000489 Rev. 1 23You can also read