Perfectly Clear User Guide - Version 3.7.0 Copyright 2019 EyeQ Imaging Inc
←
→
Page content transcription
If your browser does not render page correctly, please read the page content below
Perfectly Clear User
       Guide

               Version 3.7.0

     Copyright © 2019 EyeQ Imaging Inc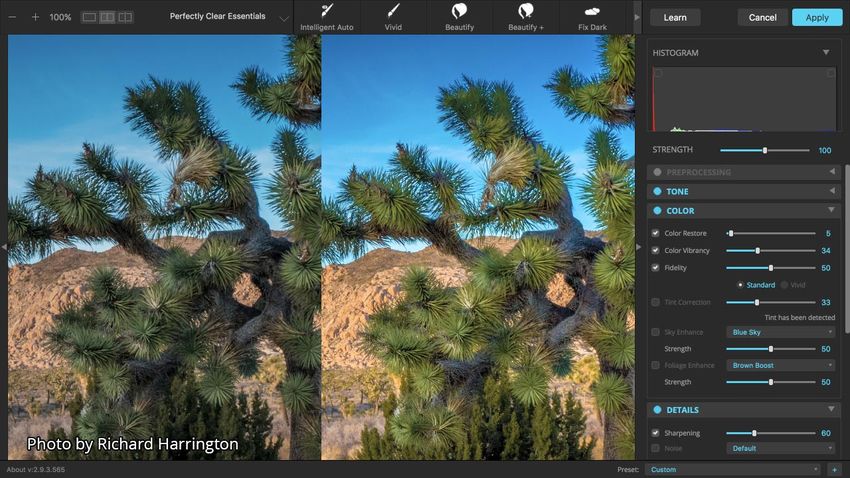
Perfectly Clear User Guide

© 2019 EyeQ Imaging Inc

All rights reserved. No parts of this work may be reproduced in any form or by any means - graphic, electronic, or
mechanical, including photocopying, recording, taping, or information storage and retrieval systems - without the
written permission of the publisher.

Licensees of Athentech products are granted the right to print or reproduce this document for their personal use.

Products that are referred to in this document may be either trademarks and/or registered trademarks of the
respective owners. The publisher and the author make no claim to these trademarks.

While every precaution has been taken in the preparation of this document, the publisher and the author assume no
responsibility for errors or omissions, or for damages resulting from the use of information contained in this
document or from the use of programs and source code that may accompany it. In no event shall the publisher and
the author be liable for any loss of profit or any other commercial damage caused or alleged to have been caused
directly or indirectly by this document.

Produced: July 2019
Contents                I

Table of Contents
     Part I About Perfectly Clear                                                                                                                    1
    Part II What’s new?                                                                                                                              2
   Part III Getting Started                                                                                                                          4
            1 System Requirements .......................................................................................................... 4
            2 Installation ........................................................................................................................... 6
            3 Trials & Activation ................................................................................................................ 8
            4 About the Perfectly Clear Interface .................................................................................... 11
            5 Photoshop: Using Perfectly Clear Plugin ............................................................................ 17
            6 Lightroom: Export to Perfectly Clear .................................................................................. 19
            7 Lightroom: Edit in Perfectly Clear ...................................................................................... 21

  Part IV The Power of Presets                                                                                                                      24
   Part V About the Corrections                                                                                                                     30
            1 RAW Adjustments ............................................................................................................... 31
            2 Crop Tool ........................................................................................................................... 33
            3 Preprocessing Corrections ................................................................................................. 34
            4 Tone Corrections ................................................................................................................ 36
            5 Color Corrections ............................................................................................................... 41
            6 Details Corrections ............................................................................................................. 46
            7 Face Selection Tool ........................................................................................................... 49
            8 Eyes Corrections ................................................................................................................. 51
            9 Face Corrections ................................................................................................................ 56
           10 Skin Corrections ................................................................................................................. 59
           11 Makeup Corrections ........................................................................................................... 63
           12 Graduated Filters ............................................................................................................... 65
           13 LOOKs ................................................................................................................................ 67
           14 Finishing Tools ................................................................................................................... 68

  Part VI Basic Workflow                                                                                                                            70
            1 Photoshop: Batch Processing with Actions ......................................................................... 71
            2 Lightroom: Single and Batch Processing ........................................................................... 75

 Part VII Keyboard Shortcuts                                                                                                                        77

© 2019 EyeQ Imaging Inc

                                                                                                                                                           I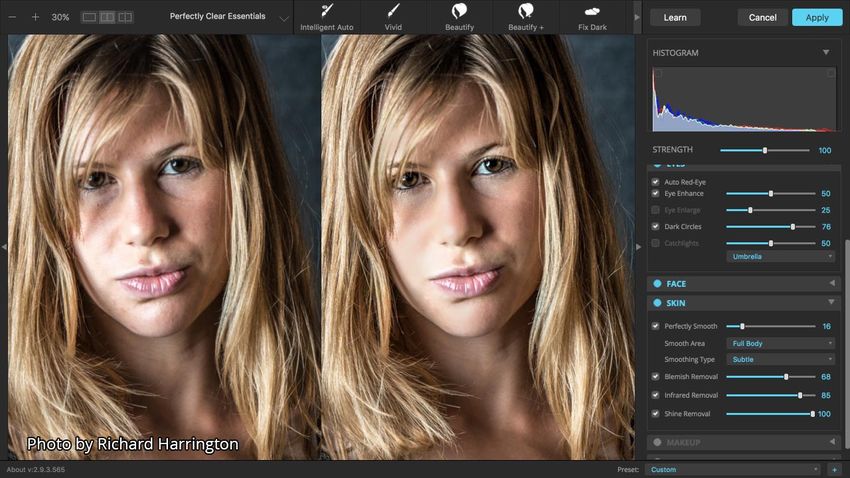
II   Perfectly Clear User Guide

     Index                                          79

                                  © 2019 EyeQ Imaging Inc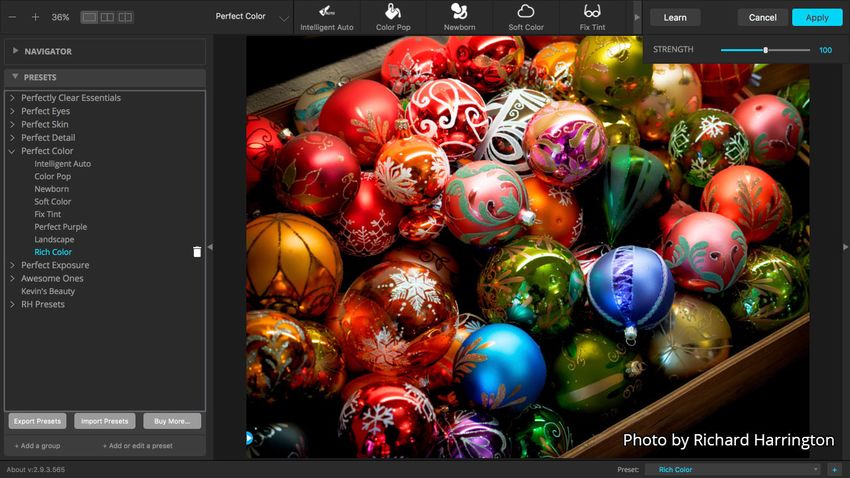
About Perfectly Clear       1

    I About Perfectly Clear
          Perfectly Clear is now offered in two versions - to allow it to fit into your budget and workflow.
          Perfectly Clear Complete includes all correction capabilities, presets, creating custom
          Presets, batch processing unlimited numbers of photos, and much more.
          Perfectly Clear is a free plugin, that provides amazing automatic image correction and
          powerful presets, but limits the corrections offered, the number of photos you can process in
          batches, as well as other feature limitations.

          You can "Test Drive" Perfectly Clear Complete for one 21-day period to experience all it
          offers. Simply click on the "Try/Buy" button at the bottom, or on any lock icon to open the
          following dialog, then click "Test Drive":

          This will begin your 21 day Test Drive of Perfectly Clear Complete - just re-run the plugin to
          get access to all the unlocked capabilities.

          The rest of this document will show the 'Complete' interface and capabilities.

© 2019 EyeQ Imaging Inc
2      Perfectly Clear User Guide

II What’s new?
    Version 3.5 is a major update, and adds the following new capabilities:

    1. RAW file support in the 'Stand-alone' products
    2. Visual Presets and LOOKs panels
    3. Filmstrip view in 'Stand-alone' products and Lightroom plug-in
    4. Undo / Redo support
    5. Finishing Tools to allow final adjustments to your images
    6. Graduated Filters to adjust portions of the image
    7. "Stand-alone" version in addition to the Lightroom and Photoshop plug-ins

    Version 3 provides a major update to all of our core processing technology, and also provides
    an easier to use, better looking interface. The major updates include:

    1. Beautiful new interface
    2. New image correction tools:
       a. Preprocessing section for Input Looks and "Image Ambulance" for manual exposure
          corrections
       b. "Face Aware" exposure for more accurate auto-exposure corrections in portraits and
          group photos
       c. Black Point tool to deepen blacks
       d. New Color Vibrancy tool to complement our previous "Vibrancy" control (now renamed
          to Color Restoration)
       e. Sky and Foliage enhancements
    3. Existing tools have been improved:
       a. Added strength sliders to Light Diffusion and Vibrancy for better control
       b. Better 'color pickers' for Skin Tone and Blush adjustments
    4. Manually identify faces that are not detected automatically
    5. One-click to zoom to individual faces
    6. Modify facial regions to provide the best corrections

                                                                                © 2019 EyeQ Imaging Inc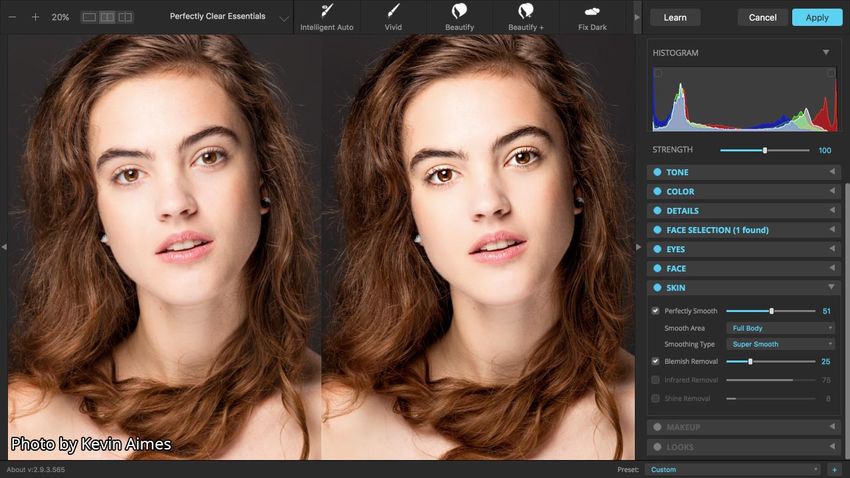
What’s new?   3

          7. Histogram
          8. Much improved preset management

© 2019 EyeQ Imaging Inc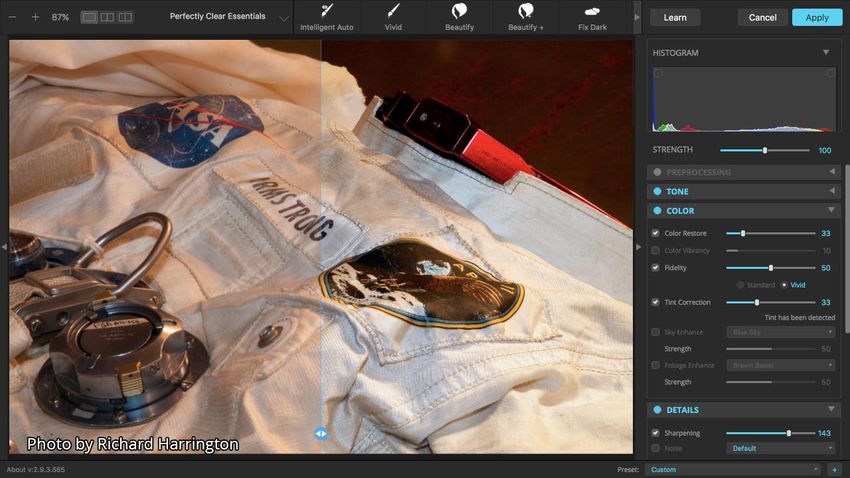
4      Perfectly Clear User Guide

III Getting Started
    3.1 System Requirements

                      · Mac OSX 10.9 or newer

                      · Photoshop CS6 or newer, including all Creative Cloud versions

                      · Photoshop Elements 12 or newer

                      · Lightroom 3 or newer

                      · Screen resolution: 1024 x 640 or larger

                      · 4 GB RAM or more

                      · OpenGL v2 or newer

                      · Windows 7, 8, and 10 (64-bit only)

                      · Photoshop CS6 or newer, including all Creative Cloud versions

                      · Photoshop Elements 13, 14, 15

                      · Corel PaintShop Pro X6 or newer

                      · Lightroom 4 or newer

                      · 4 GB RAM or more

                      · OpenGL v2 or newer

    NOTE: Any OS's, hosts version refers to the latest sub-version, or service pack
    available for this version. For example "Lightroom 4" means "Lightroom 4.4."

    Supported Image Formats
    Perfectly Clear requires RGB-formatted images in either 8 or 16-bit color depth in JPG, TIFF,
    BMP and PNG image formats. Monochrome and CMYK images must be converted to RGB

                                                                               © 2019 EyeQ Imaging Inc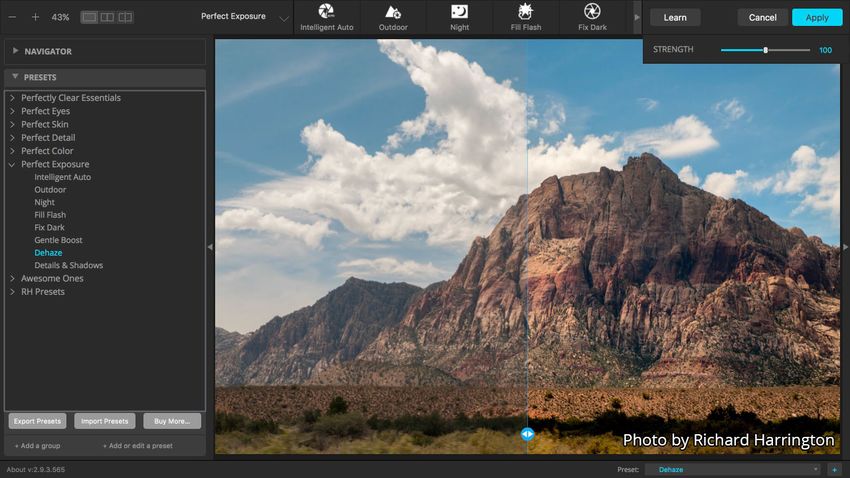
Getting Started   5

          before using Perfectly Clear. RAW files must be opened through Adobe Camera RAW and
          loaded into Photoshop or processed in Lightroom to be accessible to Perfectly Clear.

© 2019 EyeQ Imaging Inc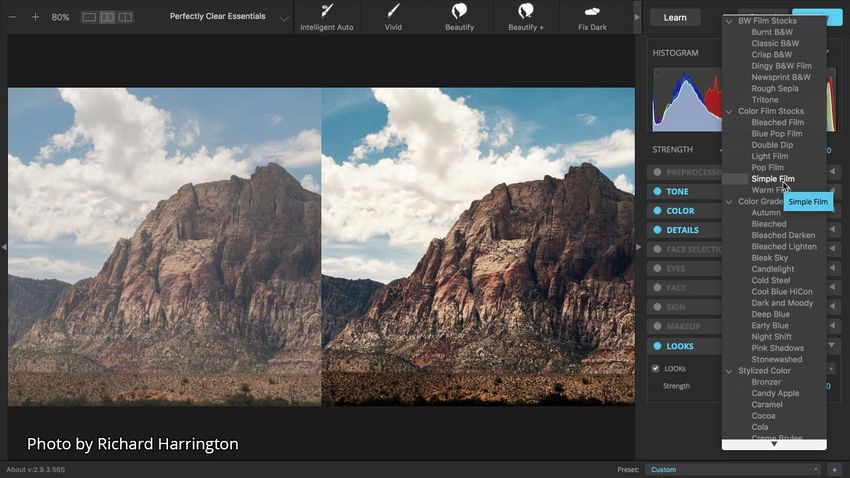
6      Perfectly Clear User Guide

    3.2 Installation
    Prior to installation, please ensure the image editing application that will serve as the host of
    Perfectly Clear is closed. Please also close any other open applications for the duration of the
    installation process.
    The installation is managed by the Athentech Application Manager. Just click 'Install' on the
    application tile you want to use:

    After accepting the End User License Agreement, the installer will automatically attempt to
    locate all installed versions of Adobe Photoshop, Adobe Photoshop Elements and Corel
    PaintShop Pro, and then install the plugin for all these products.
    If the installer was unable to locate a version of Photoshop or PaintShopPro, or if you are
    using a different image editing application, you will need to manually locate the appropriate
    plug-in installation location.
    The Perfectly Clear Complete Photoshop plugin will always be installed to this folder:
    For Windows, this is:
       C:\Program Files\Common Files\Adobe\Plug-
       Ins\CC\Athentech\Perfectly Clear V3 Photoshop Plugin

    For Mac this is:
       /Library/Application Support/Adobe/Plug-
       Ins/CC/Filters/PerfectlyClearCompletePS.plugin

                                                                                 © 2019 EyeQ Imaging Inc
Getting Started 7
Installing for Multiple Photoshop-
Compatible products
During the installation on Windows, the installer will detect several applications that support
Photoshop Plugins. This includes Photoshop Elements 11, 12, 13, 14, 15, Photoshop CS 5,
5.1, 6 and all CC (14, 2014, 2015, 2015.5, 2017). You may choose to NOT install a copy of
this plug-in for these additional host applications.
© 2019 EyeQ Imaging Inc8 Perfectly Clear User Guide
3.3 Trials & Activation
When you first install and run Perfectly Clear, you will be in Trial Mode. This is fully functional,
and will only allow you to run Perfectly Clear for a limited time. Once your trial expires, you’ll
need to purchase a license to continue to use Perfectly Clear.
If your trial expires and you still need more time for evaluation, please email Athentech
Support (help@athentech.com) for assistance - and include the Computer ID that you'll find
in the lower right of the About screen (below)
Activation
Online activation is the easiest way to enter a license key that you have received from
purchasing through the Perfectly Clear online store or from one of our retail partners. When
you run Complete, you will see a screen like the one below:
Simply click ‘Activate’ and copy and paste or carefully type in the license number you have
been provided. When you click ‘Activate’ again, we will validate the license and will unlock
Perfectly Clear for continual use.
© 2019 EyeQ Imaging IncGetting Started 9
De-activation
De-activation allows you to remove Perfectly Clear from one computer, so you can use it on a
different computer. You can install and use two computers at once, so if you only have two
computers that you use Perfectly Clear on, then you do not need to de-activate.
To de-activate, just open the Apps Manager, click the 'gear' icon in the top right of the
application you want to deactivate, and you'll be presented with an option to deactivate from
there.
Import and Export License Keys
The Apps Manager also allows you to export all license keys that have been activated on this
computer. This will save all license keys to a file that you can then take to a second
computer, and quickly 'Import and Activate' all licenses on that machine at once.
You can also activate licenses individually or multiple at a time by pasting them into the form
you see below:
© 2019 EyeQ Imaging Inc10 Perfectly Clear User Guide
This Apps Manager Menu is accessible from the small "gear" icon at the right
edge of the main Apps Manager window.
© 2019 EyeQ Imaging IncGetting Started 11
3.4 About the Perfectly Clear Interface
Let’s take a look at the Perfectly Clear interface to understand its key elements.
Zoom and View Controls
1. Zoom Controls - click the minus or plus to zoom out or in.
2. Double-click on the zoom number (16% in this example) to toggle between 100% and "fit
to screen".
© 2019 EyeQ Imaging Inc12 Perfectly Clear User Guide
3. View Mode buttons – these control the Preview Window in Perfectly Clear. From left to
right, the buttons are: Split View, Dual Image View, 50/50 Split.
a. Split View (shown in the image above) shows a single image with the corrected image
on the right, and the original on the left.
b. Dual Image View shows both the original and corrected and images side by side.
c.
d. 50/50 Split will switch to Split view and re-centers the before/after slider to the middle of
the view.
4. The 'Navigator' shows the full image you are working on, with the area that is in the
preview panel outlined in red. Click and drag the red rectangle to pan your image to a
different area.
5. Drag the zoom slider to zoom in or out.
Presets Bar
1. The selection on the left, showing "Perfectly Clear Essentials", allows you to select which
Preset Group is visible.
2. To the right are icons for each of the Presets in the selected Group. Click on an icon to
select that Preset and apply those settings to the current photo. If there are more Presets
than will fit, a left or right arrow will appear to allow you to scroll through the list.
© 2019 EyeQ Imaging IncGetting Started 13
Presets and LOOKs Panels
These panels shows all Preset Groups
and the Presets they contain. These
two icons: allow you to
switch between a 'visual' view -
showing thumbnails of each
Preset or LOOK and the standard
list view.
Click the Gear icon in the header to see
the following menu of items:
· Add or edit a preset: Save the
current image settings as a new
preset. You can edit an existing
preset by just using the same preset
name as the preset you'd like to edit.
· Add a group: Create a new, empty
preset group so you can organize
your custom presets.
· Export presets: Save the currently
selected preset or preset group to a
".preset" file. This makes backing up
or sharing your custom presets quick
and easy.
· Import presets: Import a ".preset"
file that you previously exported
· Buy More: Open the Apps
Manager to browse through
currently available Add-ons for
purchase
© 2019 EyeQ Imaging Inc14 Perfectly Clear User Guide
Status Bar
This status bar allows you to quickly switch between several images that are opened at once
(only available in the Lightroom plugin). The dropdown allows you to select from all open
images, and the left & right arrow buttons allow you to quickly proceed to the next photo.
Sync Settings will apply the current settings to all photos after the current one.
© 2019 EyeQ Imaging IncGetting Started 15
Tools Panel
This panel contains all the image
correction tools. The settings shown in
this panel will be applied to the photo and
will be visible in the Preview Panel.
Histogram - The histogram can help
you understand how the pixels in your
image are distributed according to
intensity. Shadow details are shown on
the left, midtones in the middle, and
highlights on the right. The histogram is
a useful way to judge the exposure of
your image.
In the upper left and upper right corners
you can check the boxes to show
clipped pixels. Blue areas show cold
pixels that lack detail in the shadows and
red areas are hot pixels which lack
details in the highlights. You can use the
manual sliders for tone or preprocessing
to recover details if needed.
Strength - The Strength slider is a
useful way to refine your adjustments or
presets. This slider can incrementally
increase or decrease most of the
adjustment sliders with one handle. You
can also use the keyboard shortcuts of
left and right bracket [ or ] to modify this
adjustment from the keyboard. Hold
down the Option/Alt key for granular
refinement when pressing a bracket key.
© 2019 EyeQ Imaging Inc16 Perfectly Clear User Guide
Face Selection Tool
The corrections applied by many of the
tools in the Eyes 51 , Face 56 , Skin 59
and Makeup 63 Groups apply their
corrections only to faces that have been
identified in your photos. This Face
Selection Tool allows you to see which
faces were automatically identified.
Clicking on one of the faces will zoom
the preview image to that face.
See the chapter on the Face Selection
Tool 49 for additional detail.
© 2019 EyeQ Imaging IncGetting Started 17
3.5 Photoshop: Using Perfectly Clear
Plugin
Perfectly Clear for Photoshop is a plugin – you can’t run the plugin directly, you need to open
an image in PhotoShop or PhotoShop Elements, then select the Perfectly Clear Plugin from
the filter menu to access the plugin.
The plugin will open with your image loaded in the Preview Window:
© 2019 EyeQ Imaging Inc18 Perfectly Clear User Guide
© 2019 EyeQ Imaging IncGetting Started 19
3.6 Lightroom: Export to Perfectly Clear
You can automatically batch correct lots of photos by pressing the “Export” button (or File >
Export) and then choosing “Athentech Perfectly Clear” from the “Export To:” drop down menu.
Simply follow the on-screen instructions to choose your export format and where to save it to.
Please note that if you don’t select “Hide Perfectly Clear Window” option, then our plug-in will
appear so you can view and tweak each photo (just like for option 1 above).
Figure 4 - Export to Perfectly Clear
There are several options you can choose when exporting, including:
1. Hide the Perfectly Clear Window – this allows you to batch correct a large number
of images without the plugin waiting for any interaction
2. Export Location – choose where the new files are saved to. There is an option in
this section to automatically add the exported files to your Lightroom catalog.
3. File Naming – choose what the name the new files
4. File Settings – choose the output image format
"Export" Troubleshooting
If you do not see “Athentech Perfectly Clear” under the “Export To:” drop down menu, then
press the “Plug-in Manager” button on the bottom left, then select “Athentech Perfectly Clear”
© 2019 EyeQ Imaging Inc20 Perfectly Clear User Guide
from the listing on the left and press the “Add” button. Make sure the status is enabled. If
Perfectly Clear does not appear in the list, then press the “Add” button and navigate to:
Windows (Win 7 or Win 8):
C:\Users\\AppData\Roaming\Adobe\Lightroom\Modules\PerfectlyClea
rCompleteV3.lrplugin
and select “ExportFilter.lua”
Windows (XP):
C:\Documents and Settings\\Application
Data\Adobe\Lightroom\Modules\PerfectlyClearCompleteV3.lrplu
gin
and select “ExportFilter.lua”
Note: if the above file path doesn’t exist, then please try “All Users” instead of your “user
name”
Mac:
/Library/Application
Support/Adobe/Lightroom/Modules/PerfectlyClearCompleteV3.lr
plugin
© 2019 EyeQ Imaging IncGetting Started 21
3.7 Lightroom: Edit in Perfectly Clear
This method is great for correcting small numbers of photos at a time. Select one or a few
images in Lightroom, and right-click (or select the “Photo” menu) and select Edit in >
Perfectly Clear.
Lightroom will ask you if you would like to:
1. Edit a Copy With Lightroom adjustments - This is the only option available if you are
working with raw files. This option applies any adjustments you’ve made in Lightroom,
creates a new image file, and sends that new image to Perfectly Clear
2. Edit a Copy – This duplicates the original image file, and sends it ,unaltered, to Perfectly
Clear
3. Edit Original – This sends the original file to Perfectly Clear, which will then alter the
original image and Lightroom will re-import the altered file.
© 2019 EyeQ Imaging Inc22 Perfectly Clear User Guide
If you have more than 1 photo selected then our plug-in will load all photos and you can view
and tweak them individually by pressing the “” buttons (located bottom right) within the
same session:
Please note that Perfectly Clear will not work on .psd files (this is due to the complex and
proprietary nature of the Adobe Photoshop file). Also, if you want to process very large
volumes of photos (ie – more than 10), we suggest you use the Export option (you can still
view and fine tune each photo) as opposed to “Edit In”. Lightroom imposes some technical
limitations on large volumes of photos with external image editors when using Edit In. See the
chapter on Workflow 70 for more details.
The plugin will open with your image loaded in the Preview Window:
© 2019 EyeQ Imaging IncGetting Started 23
"Edit In.." Troubleshooting
If Perfectly Clear does NOT appear when you select “Edit In”, then go to “Edit >
Preferences” (for Mac, it is under “Lightroom” menu) and select the “External Editing” Tab.
Then in the middle of your screen where it says “Additional External Editor”, press the
“Choose” button. Navigate to:
Windows
C:\Program files\Athentech\Perfectly Clear Plug-in LR v3
Or
C:\Program files (x86)\Athentech\Perfectly Clear Plug-in LR
v3
Select the file called “PCPlugin” (this is a .exe file). You will see the “Application:” now says
“PCPlugin.exe”. Now, under the “preset:” drop down choose “Save Current Settings as New
Preset…” and type “Perfectly Clear” and press the “Create” button.
Mac
/Application/Athentech/Perfectly Clear Complete
v3/PerfectlyClearLR.app
Then press “ok”, exit Lightroom, and re-launch, and Perfectly Clear should now appear under
Edit In.
© 2019 EyeQ Imaging Inc24 Perfectly Clear User Guide
IV The Power of Presets
Perfectly Clear provides an amazing amount of automatic image correction technology – all
packaged into a few different Presets to let you tune how you want your images to look. To
apply these presets to your image, just click a button in the top Presets bar, the left Presets
panel, or select a Preset in the bottom-right status bar.
Perfectly Clear comes with several different Preset Groups, each designed for a specific type
of photography or correction set.
Perfectly Clear Essentials
These presets are perfect for general photography adjustments. These are the default
presets that are loaded when you launch Perfectly Clear.
© 2019 EyeQ Imaging IncThe Power of Presets 25
Perfect Eyes
Use these presets to enhance the eyes of your subject. They’re perfect for instantly removing
dark circles and red-eye, adding catchlights, sharpening details, enhancing the eyes and even
removing squinting.
© 2019 EyeQ Imaging Inc26 Perfectly Clear User Guide
Perfect Skin
Make skin look its best with Perfect Skin presets. These will give you beautiful, natural-looking
skin. It’s ideal for anyone who wants to perfect their portraits by smoothing skin, reducing
shine and blemishes, and adding a tan or lighter complexion. It even lets you whiten your teeth
and add blush to your cheeks.
© 2019 EyeQ Imaging IncThe Power of Presets 27
Perfect Details
A collection of presets designed for adding depth and sharpness to your images while
removing noise. Our patented science automatically reveals the subtle details hidden in every
image.
© 2019 EyeQ Imaging Inc28 Perfectly Clear User Guide
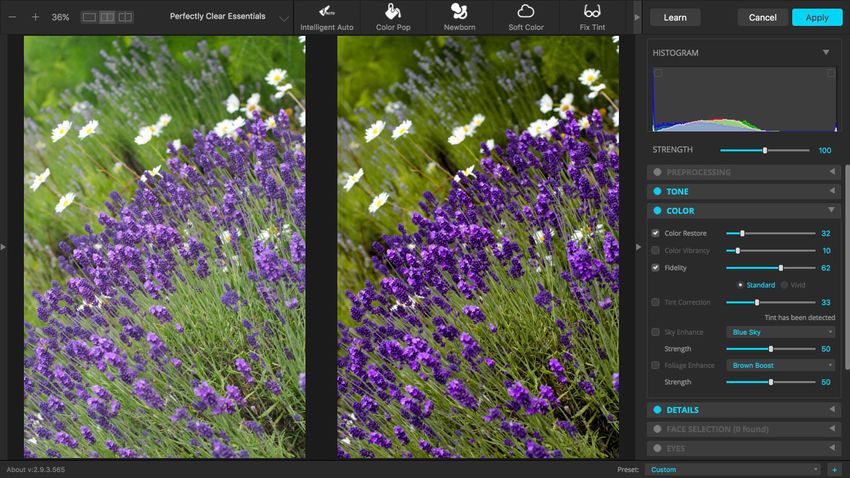
Perfect Color
These presets are perfect for bringing your images to life with rich, vibrant color. Our patented
science automatically reveals the great colors that were there when you captured the photo.
© 2019 EyeQ Imaging IncThe Power of Presets 29
Perfect Exposure
These presets come to the rescue when the camera didn’t quite get exposure right, Our
patented science automatically solves the most common exposure problems by quickly fixing
dark photos, adding light to your images, and removing unwanted noise.
© 2019 EyeQ Imaging Inc30 Perfectly Clear User Guide
V About the Corrections
The correction tools are all found in the
right toolbar. The "Strength" slider at
the top allows you to quickly adjust the
strength of most corrections with a
single slider. The 'Preprocessing'
group and the Looks group are not
controlled with this Strength slider.
Each of the correction tools has
question mark button: Clicking this
will open a browser to a video or web
page explaining the how to get the most
out of the corrections on this panel.
Auto Collapse Adjustment Panels -
when this is enabled, the tool groups for
sections that aren't enabled will "roll up"
to take up less space. This is useful
when working on landscape images, for
example, as the Face, Skin, Eyes and
other similar tool groups won't be in
use.
© 2019 EyeQ Imaging IncAbout the Corrections 31
5.1 RAW Adjustments
Perfectly Clear supports a wide range of RAW files, allowing you to quickly open RAW
images directly into Perfectly Clear, or you can 'Develop' them in the Perfectly Clear RAW
Editor. When you first open a RAW file, you'll be asked how you'd like to proceed:
Clicking 'Open' will take you directly into Perfectly Clear and will process the RAW file with
default RAW Adjustment options.
Clicking 'Develop' will open the RAW files in the Perfectly Clear RAW Editor:
The RAW Editor allows you to adjust many RAW Adjustments, so you can tune your RAW
conversion to get the best image quality. When you are ready to return to Perfectly Clear,
click 'Open' in the top right. 'Cancel' will return to Perfectly Clear without applying the RAW
© 2019 EyeQ Imaging Inc32 Perfectly Clear User Guide
Adjustments you have made in the RAW Editor (using default settings instead) and
'Syncronize' in the top right and Sync Setting both allow you to use the current RAW
Adjustments on all images after the current one.
When a RAW file is selected in Perfectly
Clear, you can open the RAW Editor
again with the two buttons shown in the
RAW Adjustments tool. You can also
quickly toggle Lens Correction on and off
without needing to open the RAW Editor.
The gear icon in the header allows you
to choose how to process RAW files
when they are first opened.
© 2019 EyeQ Imaging IncAbout the Corrections 33
5.2 Crop Tool
The crop tool allows you to crop images
from within Perfectly Clear Perfectly
Clear User Guide. Cropping is not
available in the plug-ins, but is included in
the stand-alone application.
Click 'Start Cropping' to switch into crop
mode, then use the Aspect Ratio
selection to define the height / width of
the crop frame. Select 'Free Resize' to
set an arbitrarily sized crop.
You can rotate the image in 90°
increments using the first button below
the aspect ratio selection. The next two
button allow you to flip the image
horizontally or vertically.
You can switch between four different
composition guides while cropping with
the buttons at the bottom of the crop tool
© 2019 EyeQ Imaging Inc34 Perfectly Clear User Guide
5.3 Preprocessing Corrections
The preprocessing corrections are not applied by default. These can be employed to address
image problems that are particularly problematic and require manual corrections.
These corrections are not affected by the 'Strength' slider.
Image Ambulance
This is an optional 'gamma' correction, and is great for fixing very under- or over-exposed
images. You can use this to recover or add up to five stops of light. If working with a raw file,
make these changes in your image processor (such as Adobe Camera Raw or Lightroom)
before invoking Perfectly Clear. But this adjustment is particularly useful for small
adjustments or dealing with JPEG or TIFF files (not processed in other software).
Corrective Filter
This allows you to apply a color or corrective filter to your images. These corrections simulate
traditional photography filters that would be attached in front of a lens.
© 2019 EyeQ Imaging IncAbout the Corrections 35
Neutral Density
In version 3.1, the Neutral Density Corrective Filter has been added to the main
Preprocessing tool to allow it to be adjusted more quickly - and now you can apply it as well
as one other Corrective Filter.
© 2019 EyeQ Imaging Inc36 Perfectly Clear User Guide
5.4 Tone Corrections
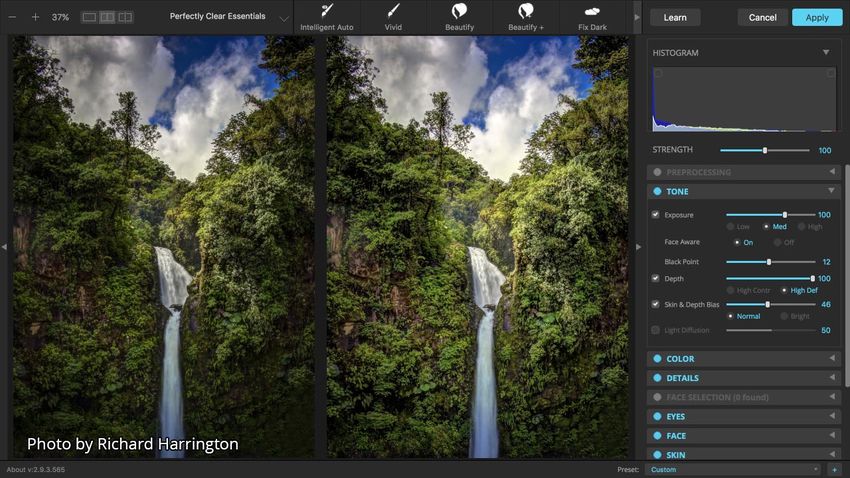
Exposure
Perfect Exposure is the most important algorithm and forms the core for all other corrections.
Perfect Exposure optimizes the light exposure in every pixel. This patented approach corrects
the image to emulate what the photographer and subjects saw at the time of taking the photo.
More effective than traditional brightness, Perfect Exposure lets you maintain Real Color
Photography® without clipping or washing out.
By default, when Perfect Exposure is ON, so is Automatic Strength Selection. This means
that Perfectly Clear will independently look at each photo and suggest a specific amount of
exposure correction unique to that photo.
You can adjust how aggressive the Automatic Strength Selection is: Low, Medium, High. In
general, a higher setting means a greater exposure correction per photo.
Face Aware - this control enables a more advanced auto-exposure calculation that takes
into account the exposure of faces that it finds in the photo, as well as the background
lighting.
Black Point - this sets the black point in your image. A higher value will intensify the
darkest portions of the photo darker.
© 2019 EyeQ Imaging IncAbout the Corrections 37 © 2019 EyeQ Imaging Inc
38      Perfectly Clear User Guide

     Depth
     Since the human eye perceives reality in 3D, photographers also like depth or contrast with
     their photos. Note that a depth of 0 does not yield the same result as turning depth off. Also
     note that when you choose to increase the Contrast your photos will usually benefit by
     increasing the defaults of Perfect Exposure since increasing depth creates a photo that is
     overall slightly darker.
     High Definition depth provides more detail in the shadows and highlights than High
     Contrast.
     For extremely dark photos, it is beneficial to turn depth “off” in order to bring out extreme
     details.

                                                                                    © 2019 EyeQ Imaging Inc
About the Corrections 39
Skin & Depth Bias
Our bias corrections will cover up many of the flaws created by digital cameras, and allow
you to further adjust how much depth you would like in your photos. There are two options to
choose from: Normal - this is our default setting removing red from skin tones, and adding
depth to the background areas. Brighter - the same impact as “Normal preference”, but with
overall a brighter image with more details revealed in the shadows.
© 2019 EyeQ Imaging Inc40 Perfectly Clear User Guide
Light Diffusion
The Light Diffusion setting has been developed for portrait photos, weddings, and close facial
shots. It will smooth the blemishes in the face and create a more diffused, softer picture with
less contrast. Skin tones will often be slightly warmer or red when this algorithm is enabled.
However all photographers may enjoy the soft and subtle enhancement that it adds. Be sure
to refine the adjustment using the slider to control the amount of the effect.
© 2019 EyeQ Imaging IncAbout the Corrections 41
5.5 Color Corrections
Color Restoration
Perfectly Clear automatically checks and determines whether or not the capture device has
captured the full vibrancy of the colors in the picture. If it hasn’t, then the algorithm will
automatically restore the washed out/faded colors in the photograph while always maintaining
the true colors represented in the original photo. If the camera has properly captured true
color, then this function will have no effect on the image. Version 3.5 updated this correction
for a more gentle correction when Color Restore in at 1, and sets Color Restore totally off
when at zero.
© 2019 EyeQ Imaging Inc42 Perfectly Clear User Guide
Color Vibrancy
This correction is a more traditional “Vibrancy” correction which will add saturation to colors
that are low in saturation, without over-saturating colors that were already vibrant. These
effect generally works best at lower values.
© 2019 EyeQ Imaging IncAbout the Corrections 43
Fidelity
Since True Color is fundamental to preserving precious memories perfectly, we provide you
with Digital Color Fidelity (“DCF”): a patent-pending process which maps untrue colors
created in the camera’s imaging pipe back into the true colors seen with the human eye at the
time the photograph was taken. There are two settings that you can adjust: “Standard”, and
“Vivid”. Standard will re-map to the full color spectrum of the colors that the camera failed to
capture. Vivid will do the same, but will accentuate the colors. The result is a photo with more
contrast, more vivid colors, and more “punch” to it.
© 2019 EyeQ Imaging Inc44 Perfectly Clear User Guide
Tint Correction
Abnormal tint occurs in situations where the sensors of the camera have inappropriately
picked up and reflected in the image excess green from fluorescent lights, or excess red from
the infrared heat of a person in the image, or excess blue from ultraviolet, or excess yellow
from tungsten lights.
© 2019 EyeQ Imaging IncAbout the Corrections 45
Sky and Foliage Enhance
These corrections will target color ranges that are traditionally associated with skies and
foliage. These corrections are not masked, so may affect a broader area than desired.
These are ideal for making targeted color corrections that focus on certain colors to produce
an image with deeper and richer colors. These work best at lower values.
In v3.1, there are now two controls for the Foliage corrections: one for browns and one for
greens. Both have their own Strength control, and several different effects to choose from.
These corrections are not affected by the 'Strength' slider.
© 2019 EyeQ Imaging Inc46 Perfectly Clear User Guide
5.6 Details Corrections
Sharpening
Perfectly Clear’s proprietary sharpening is a series of very powerful and unique algorithms
developed to deliver a crisp looking photo.
© 2019 EyeQ Imaging IncAbout the Corrections 47
Noise Correction
Our noise engine is the fastest and most effective on the market for removing high and low
ISO noise in photographs. It is the first photo noise reduction algorithm that allows for fully
automatic operation, by first analyzing the photo to determine if noise exists, and then
applying the proper amount of noise removal.
The algorithm includes modules of noise detection, noise analysis and noise filtration which
are statistically trained to provide optimal balance between photo noise reduction and
preservation of image details. Unlike other noise removal algorithms that blur photos after
removing noise, our algorithm is unique in preserving the crisp details.
The noise in digital photos is reduced by 2 - 3 stops, so that the noise level of the photo shot
at ISO 1600 is effectively reduced to ISO 200 - 400 levels.
When noise removal is turned ON, there are five presets to choose:
1. Default – a robust, powerful setting for most camera corrections.
2. Camera Phone – a special engine has been added in to correct the grainy quality of
most camera phone pictures.
3. Night Scene - The night setting is optimized for shots where dark areas of the
image are mixed with illuminated and potentially detail intensive areas. We find that
the lower frequency noise is the biggest (and solvable) concern for these types of
shots with potential noise blotches and color banding.
4. Portrait - The emphasis is to retain the structural and natural color composition but
remove larger noise artifacts and blemishes while avoiding the over-processed,
plastic look.
5. Strongest – This forces the maximum amount noise reduction
© 2019 EyeQ Imaging Inc48 Perfectly Clear User Guide
© 2019 EyeQ Imaging IncAbout the Corrections 49
5.7 Face Selection Tool
Face Selection Tool
The corrections applied by many of the
tools in the Eyes 51 , Face 56 , Skin 59
and Makeup 63 Groups apply their
corrections only to faces that have been
identified in your photos. This Face
Selection Tool allows you to see which
faces were automatically identified.
Clicking on one of the faces will zoom
the preview image to that face.
If there are faces in your photo that are not selected, you can add them with the "Manually Add
Face" button. For example, in the screen below, you will see only three of the four faces were
automatically identified:
© 2019 EyeQ Imaging Inc50 Perfectly Clear User Guide
The blue outlines in the preview image indicate that the second face was not automatically
identified. To manually add this face, click the Manually Add Face button in the Face
Selection tool, then click the left eye, followed by the right eye of the face you'd like to add,
then click "Apply". Now you'll see the additional face has been identified.
Eye center points
You can also move the eye center points to affect the position of several of the Eyes and
Face corrections. Many factors are considered for the placement of the corrections, and
these eye centers are just one of these factors. This means that moving one point by a fixed
amount will not also move the corrections by an identical amount. You can experiment with
various placements of these points until you get the best looking results.
Reset Face and Eyes
If you make a mistake or want to start this process over, simply click the 'Reset' button that
will appear in the Face Selection tool once any corrections have been made:
© 2019 EyeQ Imaging IncAbout the Corrections 51
5.8 Eyes Corrections
The Beautify corrections in the Face, Skin and Eyes sections individually apply specific
corrections tuned to each face found in your photos. First, the photo is analyzed to determine
the gender, race, age and other characteristics of each face. Then, the various correction
parameters are tuned individually for each face. For example, in a portrait of a man and a
woman, the ‘50’ value on the Eye Enhance could apply a stronger correction to the woman
than to the man. Moving each Beautify slider up or down will then apply proportionally more or
less correction individually to each face.
Auto Red-Eye Reduction
Athentech has teamed up with FotoNation (Tessera Technologies) to include their patented
technology as part of the Perfectly Clear image correction suite. Using advanced recognition
techniques, the presence of red-eye is automatically detected and removed. The technology
is so sophisticated that it carefully retains those important glints and sparkles in the subjects’
eyes.
Note: To reduce the occurrence of improper Red Eye corrections, Perfectly Clear will skip
Red Eye detection and correction on images with EXIF metadata that indicates that a flash
was not fired when the image was taken.
© 2019 EyeQ Imaging Inc52 Perfectly Clear User Guide
Eye Enhancement
Eye Enhancement will brighten and sharpen eyes in your photographs without distorting any
other aspects of the photo.
© 2019 EyeQ Imaging IncAbout the Corrections 53
Eye Enlargement
Use this correction to enlarge one’s eyes in a realistic manner. This unique technique is great
at automatically finding and adjusting eyes without distorting any other aspects of the photo.
© 2019 EyeQ Imaging Inc54 Perfectly Clear User Guide
Dark Circle Removal
Freshens tired eyes. Retouching the dark circles that appear underneath the eyes requires
high precision for distinguishing the actual circles for other natural details present around the
eyes. Our solution handles this task flawlessly, reducing the dark circles but at the same
time preserving the fine details of the eyes.
© 2019 EyeQ Imaging IncAbout the Corrections 55
Catchlight
Add sparkle to your eyes, automatically. By default we’re adding what’s called an “Umbrella”
pattern, but you can pick from several other options. These create the reflected pattern in the
subject’s pupil. If the results do not show as desired, make adjustments with the Face
Selection controls.
© 2019 EyeQ Imaging Inc56 Perfectly Clear User Guide
5.9 Face Corrections
The Beautify corrections in the Face, Skin and Eyes sections individually apply specific
corrections tuned to each face found in your photos. First, the photo is analyzed to determine
the gender, race, age and other characteristics of each face. Then, the various correction
parameters are tuned individually for each face. For example, in a portrait of a man and a
woman, the ‘50’ value on the Eye Enhance could apply a stronger correction to the woman
than to the man. Moving each Beautify slider up or down will then apply proportionally more or
less correction individually to each face.
Face Contouring
For those times when a slimmer, natural looking face is desired. The correction is made
naturally, so the final image does not look overly manipulated and the content and detail
around the face is preserved.
© 2019 EyeQ Imaging IncAbout the Corrections 57
Teeth Whitening
Whitens teeth naturally without the painful need to see the dentist. It automatically finds teeth
in the photograph and applies just the right amount of whitening to make teeth brighter without
looking artificial.
© 2019 EyeQ Imaging Inc58 Perfectly Clear User Guide
Lip Sharpening
This correction focuses just on lips - providing a crisp, sharp look. This can add extra details
to a portrait.
© 2019 EyeQ Imaging IncAbout the Corrections 59
5.10 Skin Corrections
The Beautify corrections in the Face, Skin and Eyes sections individually apply specific
corrections tuned to each face found in your photos. First, the photo is analyzed to determine
the gender, race, age and other characteristics of each face. Then, the various correction
parameters are tuned individually for each face. For example, in a portrait of a man and a
woman, the ‘50’ value on the Eye Enhance could apply a stronger correction to the woman
than to the man. Moving each Beautify slider up or down will then apply proportionally more or
less correction individually to each face.
Perfectly Smooth
If you’d like to smooth or diminish wrinkles automatically, try the Perfectly Smooth adjustment.
This will help smooth out skin without losing details in the hair or eyes. There are three
strength settings. Default works well to diminish wrinkles automatically, while making sure
the details in the hair, eyes, etc are preserved. The “Subtle” option accomplishes this in a very
realistic, yet subtle manner. If you select “Super Smooth”, then the skin will be even
smoother, but there may be some loss of details.
© 2019 EyeQ Imaging Inc60 Perfectly Clear User Guide
Blemish Removal
Unlike common approaches that simply employ a blur over the targeted area and have a
limited effect on hot spots, blemishes, or pimples, our solution scans the skin area for these
sorts of imperfections and employs a localized correction that does not affect the surrounding
skin areas.
© 2019 EyeQ Imaging IncAbout the Corrections 61
Infrared Removal
Digital cameras capture more infrared light than the human eye does. As a result, people in
photos often appear more red than the subject really were. This is especially true for indoor
photos when taken with a flash. The Skin Tone correction will automatically detect and
remove the spurious IR from flesh tones while maintaining the proper reds in the other portion
of the photo.
© 2019 EyeQ Imaging Inc62 Perfectly Clear User Guide
Shine Removal
Removes the bright sheen from flash, light, and oily skin.
© 2019 EyeQ Imaging IncAbout the Corrections 63
5.11 Makeup Corrections
Skin Toning
Alters skin tones. You can pick a preset color to correct with, or choose your own with the
Hue, Saturation and Balance sliders.
© 2019 EyeQ Imaging Inc64 Perfectly Clear User Guide
Blush
Adds ‘Blush’ makeup to your subjects. You can pick a preset color to correct with, or choose
your own with the Hue, Saturation and Balance sliders.
© 2019 EyeQ Imaging IncAbout the Corrections 65
5.12 Graduated Filters
The Graduated Filters allow you to make
photo adjustments to specific portions of
your photos. You can apply a radial
gradient - do add stylistic vignettes - or
linear gradients - affecting just the top
and bottom on the image.
For each of these styles of gradients,
there are two sets of corrections you
can define: inside and outside for radial
gradients, and top and bottom for linear
gradients. These two sets of
adjustments are shown at the bottom of
the Graduated Filter tool. The arrow
button between these two sets swaps
the settings on these two sets.
The adjustments you can make are the
same as in the Finishing Tools 68 .
© 2019 EyeQ Imaging Inc66 Perfectly Clear User Guide
© 2019 EyeQ Imaging IncAbout the Corrections 67
5.13 LOOKs
The LOOKs section is a way to add creative styles to your images as a finishing step. You’ll
find a wide range of different looks to achieve specific creative effects including those
designed for simulating film stocks, black and white photography, and creative color grading.
Be sure to adjust the intensity of the LOOK using the Strength slider directly below it. Some
users will prefer lower values for subtle effects while others may desire a more intense
adjustment. Additional LOOKs can be purchased by clicking the Buy More button in the
Presets area.
These corrections are not affected by the overall 'Strength' slider.
© 2019 EyeQ Imaging Inc68 Perfectly Clear User Guide
5.14 Finishing Tools
Finishing Tools allow you to add image
adjustments at the end of your photo
processing. These adjustments are
applied after all other corrections are
made.
© 2019 EyeQ Imaging IncAbout the Corrections 69
· Color Temperature – Try moving the slider to the right to correct a photo taken with a
higher color temperature of light. You can move the Temperature slider to the left correct a
photo taken with a lower color temperature of light.
· Tint – This overrides the white balance to compensate for a green or magenta tint.
Decrease Tint (by dragging to the left) to add green to the image; increase Tint (by dragging
to the right) to add magenta.
· Exposure – This slider affects the overall image brightness. It is like opening and closing
the aperture on a camera which controls the total amount of light.
· Contrast – This slider affects the midtones mostly. As you increase contrast, the middle to
dark areas will be darker and the middle to light areas become brighter. Effectively this
increases the difference between light and dark areas when you drag to the right. If you use
a negative value, then image tones are inversely changed as you decrease contrast.
· Highlights – This controls the brighter areas of an image. Drag to the left to recover blown
out highlights or to the right to brighten highlights while minimizing clipping.
· Shadows – This affects the darker areas of an image. Drag to the left to darken the
shadows while minimizing clipping. Conversely, you can drag to the right to brighten
shadows and recover shadow details.
· Whites – This slider control clipping of the white point. Drag to the left to reduce clipping in
highlights. Drag to the right to increase highlight clipping.
· Blacks – This slider control clipping of the black point. Drag to the left to increase clipping
in shadows. Drag to the right to decrease shadow clipping. A lower value gives you a purer
black.
· Vibrance – Vibrance is useful to adjust saturation in specific areas. It is useful to minimize
clipping as color approach full saturation. This means that it changes the saturation of all
lower-saturated colors with less effect on the higher-saturated colors. Practically it tends to
affect areas of blue and green with greater affect. Vibrance is also useful in that it can
prevent skin tones from becoming oversaturated.
· Saturation – This slider adjusts the saturation of all image colors equally. A value of
negative 100 producers a monochrome image, while plus 100 doubles the saturation.
© 2019 EyeQ Imaging Inc70 Perfectly Clear User Guide
VI Basic Workflow
Perfectly Clear is designed to save you significant time in your editing process. It should be
used as a first step in your image correction workflow to remove the various problems
created by digital cameras, specifically: under-exposure, lack of depth, lack of sharpness,
lack of color vibrancy, lack of color fidelity, abnormal tint, noise, red-eye, and incorrect skin
tones.
After you have used Perfectly Clear, you can then apply your creative talent to give your
photos an artistic look, whether that is HDR, Black & White, soft focus, etc.
Thus you should apply the Perfectly Clear Plug-in as a first step to your photos, before using
other filters, plug-ins, or correction tools. If you are using raw files, please perform minimal
adjustments in Adobe Camera Raw or Lightroom, to bring the photo into Perfectly Clear with
as much of the original information as possible.
© 2019 EyeQ Imaging IncBasic Workflow 71
6.1 Photoshop: Batch Processing with
Actions
Photoshop is designed to work on images one at a
time. But, with the help of Actions, you can quickly
develop a very fast batch processing workflow. An
Action in Photoshop is like a script – first your record
the steps you want to automate, then you can “play”
those steps on one image or on hundreds.
Here’s the process to record an Action to automatically apply Perfectly Clear:
1. Open the Actions Window in Photoshop (Window -> Actions).
2. Create a new Action Set by clicking the folder icon at the bottom of the Actions
Window. Name it anything you want, for example ‘Perfectly Clear’.
3. Create a new Action in that Set by clicking the New Action button, and give it a
name, for example ‘Fix HD!’.
4. When the new action is created, it will start recording automatically. All the steps
you do in Photoshop or in the Perfectly Clear plugin will be recorded, so just open
the Perfectly Clear plugin, apply the Fix HD! Preset, and click OK to return to
Photoshop.
5. Once you are back in Photoshop – remember to stop recording the Action by
clicking the stop icon (far left) in the Actions window.
© 2019 EyeQ Imaging Inc72 Perfectly Clear User Guide
That’s all there is to it. You can create separate Actions to apply different Presets, or
you can switch to the Tweak panel and apply specific corrections that are not part of a Preset.
Record each of these as its own Action.
If you make a mistake, simply stop recording, delete the action (last icon at the bottom of the
Actions Window) and start again from Step 3 above.
Once your actions are created, it’s simple to run this action on a large number of photos.
You can do this within Photoshop from the File -> Scripts -> Image Processor tool, or you can
do this from Adobe Bridge.
From Image Processor:
The Image Processor window itself will step you through this process.
1. In the first section, choose the images to work on. Select an entire folder of
images, or select “Use Open Images” to run the Action on all images that are
currently open in Photoshop.
2. Next, choose the folder where the corrected images should be saved to.
3. Choose the final image format. You can create multiple versions of each file in
different formats if you check multiple rows in this section.
4. Finally, at the bottom, click ‘Run Action”, then select the Action Set you created,
and then select the specific Action you want to apply (Fix HD!).
Click ‘Run’ and Photoshop will open every file that it supports in the folder you selected, apply
the Fix HD! Preset in Perfectly Clear, then will save the images in the format you selected to
the folder you selected.
© 2019 EyeQ Imaging IncBasic Workflow 73
From Adobe Bridge:
1. Open Bridge and select the files you’d like to process
2. Select Tools -> Photoshop -> Batch
3. Photoshop will open and the Batch window will be shown:
© 2019 EyeQ Imaging Inc74 Perfectly Clear User Guide
4. Choose the options in the Batch window to match how you’d like to process your
photos:
a. Play: choose Perfectly Clear and the Fix HD! Action
b. Source: the default will be ‘Bridge’ which means the images you had selected in
Bridge will be processed. You can change this to work on files in a specific
folder, or process the images currently open in Photoshop
c. Destination: choose ‘Folder’, then click ‘Choose’ to pick the location to save your
images to. If you choose the ‘None’ option, the images will remain open in
Photoshop – so be careful if you choose this with very many images selected.
d. File Naming: set the filename parameters any way you like.
Click ‘OK’ and the batch processing will start with each image you selected in Bridge.
© 2019 EyeQ Imaging IncBasic Workflow 75
6.2 Lightroom: Single and Batch
Processing
For a small number of photos
If you have a small number of photos to correct, the simplest way to do this is with the “Edit
in..” option described earlier in this guide 21 . This method is best used when you have a
small number of photos to correct. The Perfectly Clear interface will open and all of your
selected images will be loaded into the Plugin. Move through your images with the navigation
controls in the lower left, and when you are satisfied with the corrections on all the images,
click ‘Save’ to apply Perfectly Clear and save the results.
For many photos at once
Batch processing large volumes of photos is incredibly easy with the Perfectly Clear
Lightroom Plugin, using the Export method described above 19 . Simply select the photos you
want to correct in Lightroom, then File -> Export and select the Perfectly Clear plug in the
‘Export to’ dropdown at the top of the window that appears.
© 2019 EyeQ Imaging Inc76 Perfectly Clear User Guide
To automatically apply a single preset to all images, choose that Preset in the ‘Athentech
Perfectly Clear’ section of the Export window, and also check the ‘Hide Perfectly Clear’ option.
This is the fastest way to automatically correct your whole shoot. If you also select ‘Add to
This Catalog’ in the Export Location section, then once the Export is complete, you’ll easily be
able to find the corrected images in your Lightroom catalog!
© 2019 EyeQ Imaging IncKeyboard Shortcuts 77
VII Keyboard Shortcuts
Windows Mac Command
Z Zoom: toggle Fit / 100%
CTRL+0 CMD+0 Zoom Fit
CTRL+1 CMD+1 Zoom 100%
CTRL++ CMD++ Zoom in
CTRL+- CMD+- Zoom out
Enter Return ‘OK’ – Apply Perfectly Clear and close
ESC ‘Cancel’ – Close Perfectly Clear without
applying
Spacebar Toggle before / after view (in single image
view only)
` (grave or accent key) Full screen & hide or restore both side
panels
Strength Adjustments
] Strength + 5
[ Strength -5
Alt+] Option+] Strength + 1
ALT+[ Option+[ Strength - 1
Tab Hide both side panels
Shift+Tab Cycle the side panels open / closed
Apply a Preset
1-9 and 0 Use the number keys to apply the 1st to
10th Preset in the current group
Open Close Correction Group
P Preprocess
T Tone
C Color
© 2019 EyeQ Imaging IncYou can also read