PHOXI CONTROL USER MANUAL - VERSION: 1.2 - PHOTONEO
←
→
Page content transcription
If your browser does not render page correctly, please read the page content below
PhoXi® Control
User Manual
Version: 1.2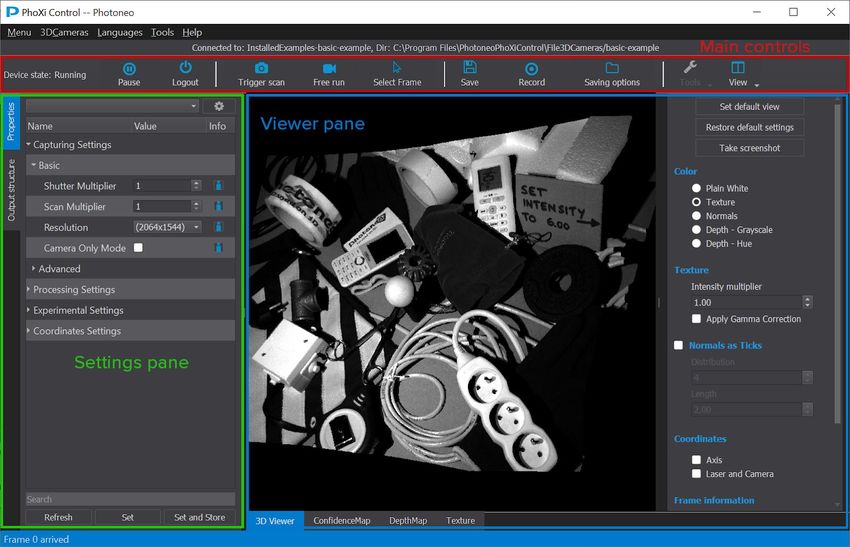
v 10/2019

User Manual for PhoXi Control version 1.2
Document version: 10/2019

All rights reserved.

No part of this publication may be reproduced, stored in a retrieval system, or transmitted in any form or
by any means, electronic, mechanical, photocopying, recording, or otherwise, without prior written
permission of the publisher.

Copyright © 2014-2019 by Photoneo s.r.o., Bratislava, Slovakia

Photoneo®, PhoXi® Control, PhoXi® 3D Scanner, MotionCam-3D, MotionCam 3D are registered
trademarks of Photoneo s.r.o.
Microsoft, Windows, Windows 7/8/8.1/10, Visual Studio C++ are either the trademarks or registered
trademarks of Microsoft Corporation.
Linux is a trademark of Linus Torvalds.
NVIDIA and CUDA are either trademarks or registered trademarks of NVIDIA Corporation.
OpenGL is a trademark of Silicon Graphics, Inc.
All other nationally and internationally recognized trademarks and tradenames are hereby recognized.

www.photoneo.com                      PhoXi Control 1.2 - User Manual                                1/50
v 10/2019 About This User Manual This manual is intended for users who want to familiarize themselves with the PhoXi Control software for PhoXi 3D Scanners. PhoXi Control provides both a graphical user interface (GUI) and an application programming interface (API). PhoXi 3D Scanner is a compact yet powerful 3D scanner with unbeatable performance in terms of precision, noise and overall efficiency. It can be used for scanning a wide variety of objects, making it a universal tool for all kinds of industrial applications, mainly automated object manipulation and inspection. The content in this manual is based on PhoXi Control version 1.2. and firmware version > 1.2. of the PhoXi 3D Scanner. Visit our website at http://www.photoneo.com for the most up-to-date information and documents. Please read this PhoXi Control User Manual before using PhoXi Control. Please read the PhoXi 3D Scanner User Manual first to become familiar with the safety and assembly instructions before using the device. Contact us: Technical support Headquarters: Contact us at support@photoneo.com. Photoneo s.r.o. See the Troubleshooting section at the end of this manual. Plynarenska 1 82109 Bratislava Visit Photoneo support pages at http://photoneo.com/support. Slovakia Orders and inquiries: sales@photoneo.com www.photoneo.com PhoXi Control 1.2 - User Manual 2/50
v 10/2019

Table of Contents
Introduction                                                                     6
    Common Terms                                                                 6

Getting started                                                                  7
   Computer Requirements                                                         7
   Installation                                                                  8
       Windows                                                                   8
       Linux                                                                     8
       Multiple Versions of PhoXi Control                                        9
           Windows                                                               9
           Linux                                                                 9

Running the Application                                                          9
   Disabling GUI or 3D Viewer                                                    9
   Command Line Parameters                                                      10

Graphical User Interface                                                         11
   Overview                                                                      11
   Menu                                                                          11
       Main Menu Items                                                           11
                  Network Discovery                                              11
                  Open File Camera                                               11
                  Lock GUI                                                       11
                  Turn Off PhoXi Control                                         11
       Other Menu Items                                                          11
                  3D Cameras                                                     11
                  Languages                                                      11
                  Tools / Options                                               12
                  Tools / Marker Patterns                                       12
                  Help / Send Logs                                              12
                  Help / Send Admin Request                                     12
                  Help / About                                                  12
   Network Discovery                                                            13
       Connecting to the Scanner                                                13
           Device States Overview                                               14
           Relationship between GUI and API                                     14
       File Cameras                                                             14
       Configuring the Scanner Network Settings                                 15
           Network Media                                                        15
           Network Topology                                                     15
           Network Configuration                                                16
                  Checking Computer Network Configuration                       17
                     Windows                                                    17

www.photoneo.com                        PhoXi Control 1.2 - User Manual   3/50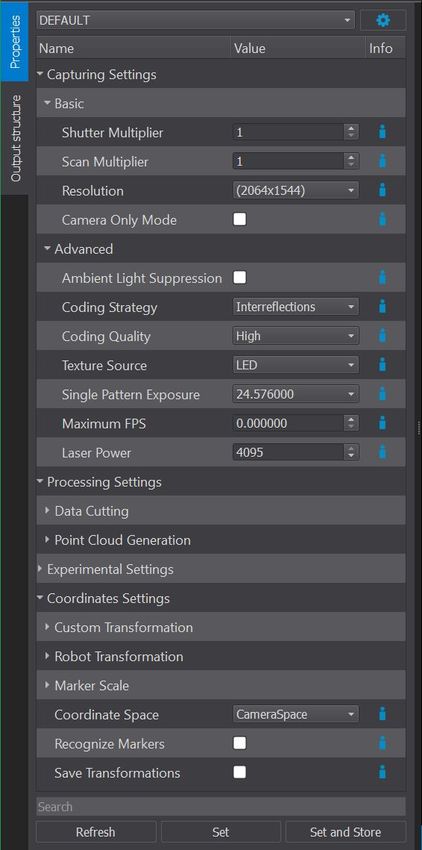
v 10/2019

                       Ubuntu                                                         19
      Device Window                                                                  20
         Main Controls                                                               20
             Acquisition Modes - Triggering Scan                                     20
             Scanner Logout                                                           21
             Saving the 3D Scans                                                      21
                    Understanding the Output Format - Topology of the 3D Scan         21
                    List of Supported Formats                                        22
                    Saving Single Scan Manually                                      22
                    Saving Scans Automatically - Recording                           22
                    Saving Options                                                   22
                    Specifics of File Formats                                        23
             Tools                                                                   23
                    Test Speed                                                       23
                    Firmware Upgrade                                                 23
             View                                                                    24
             Select Frame                                                            24
         Settings Pane                                                               24
             Scanning Profiles                                                       24
                    Using Custom Profile                                             25
             Scanning Parameters                                                     25
                    Controls                                                         25
             Output Structure                                                        26
         Viewer Pane                                                                 27
             3D Viewer                                                               27
                    Changing the Visualization                                       27
                    3D Viewer Controls                                               28
             Image Tabs                                                              29
                    Confidence Map                                                   29
                    Depth Map                                                        30
                    Texture                                                          30
                    Image Tabs Visualisation Controls                                30
                       Image Information                                             30
                       Intensity                                                     30
                       Controls                                                      30

API                                                                                   31
      Introduction                                                                    31
      Prerequisites                                                                   31
      Limitations                                                                     31
      API Examples                                                                    31
         Running the Examples                                                        33
             Windows OS                                                              33
             Linux OS                                                                33
      API and Multiple Versions of PhoXi Control                                     34

www.photoneo.com                           PhoXi Control 1.2 - User Manual      4/50
v 10/2019

   API Modification between Beta Versions and Official Release                                          34
   Compatibility                                                                                        35

Scanning Guide                                                                                          36
   How to Scan                                                                                          36
   Factors Affecting the Quality of Scan                                                                36
   Assessing the Quality of the Scan                                                                    37
   Scanning Parameters                                                                                  37
      Capturing Settings                                                                                37
          Basic                                                                                         37
          Advanced                                                                                      38
      Processing Settings                                                                               39
          Data Cutting                                                                                  39
          Point Cloud Generation                                                                        41
      Experimental Settings                                                                             41
      Coordinates Settings                                                                              42

Troubleshooting                                                                                         44
   Troubleshooting Network Connection                                                                   44
          Cannot connect to the Scanner or scanning time is too long                                    44
          The PhoXi 3D Scanner is not visible in the PhoXi Control application on a network with a
          dynamic IP assignment                                                                         44
          Bonjour Service cannot be started on Windows                                                  45
          In case of other issues                                                                       45

Backward Compatibility                                                                                  46
   PhoXi Control and Device Firmware                                                                    46
      PhoXi Control 1.2.14 with Devices Running Firmware 1.1.62 and Later                               46
      PhoXi Control 1.1.62 with Devices Running Firmware 1.2.14                                         46
   PhoXi API Compatibility                                                                              46
   Scanning Settings and PRAW Files Compatibility                                                       47
   Beta Releases of PhoXi Control 1.2.1 - 1.2.13                                                        47

Changelog                                                                                               48

www.photoneo.com                       PhoXi Control 1.2 - User Manual                               5/50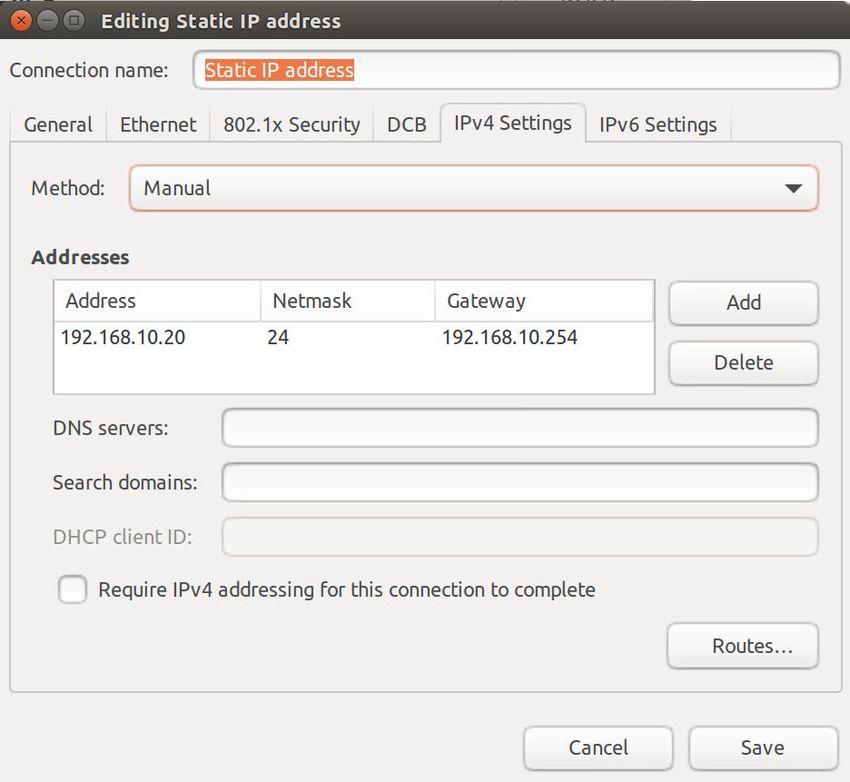
v 10/2019

Introduction
The PhoXi Control application enables users to control a PhoXi 3D Scanner manually via a GUI or by a
computer program using the provided API.

The GUI is primarily used to set up the scanning environment, to configure the Scanner parameters and
to test the output. In addition, the GUI can also be used as a powerful debugging tool for development
with the API because calls to the API trigger the same response in the GUI as the user inputs. After
triggering the scan by calling the API method, the application will execute the scan, send it as an output
of the call and display it simultaneously on the GUI.

The API has been designed to serve as a central platform for the development of custom applications for
PhoXi 3D Scanners. To facilitate the development process as well as to reduce computing demands, all
computations are performed on the device itself.

This user manual will first guide you through the use of the PhoXi Control GUI and the API, and then
provide a quick scanning guide with references to further resources.

Common Terms
Clarification of several terms used in this document.

 scanner, device          General term for the PhoXi 3D Scanner

 Image sensor             The PhoXi 3D Scanner is composed of three main units: projection unit, 2D
                          camera unit and computation unit. ‘Image sensor’ refers to the CMOS sensor
                          inside the 2D camera unit.

 2D camera                Refers to the 2D camera unit inside the PhoXi 3D Scanner.

www.photoneo.com                      PhoXi Control 1.2 - User Manual                                 6/50
v 10/2019

Getting started

Computer Requirements
Please ensure that your computer meets the minimum recommended requirements in order to run PhoXi
Control smoothly.

 Processor:             Intel i5 or higher, x64 architecture
                        (Processor performance affects the responsiveness of the application.)

 Operating system:      Only 64 bit platform
                        Windows 7, 10
                        Ubuntu 14 (will be deprecated, only bug fixes)
                        Ubuntu 16

 RAM:                   Recommended > 8 GB (minimum 2 GB for the application connected to 1
                        device)

 HD:                    Minimum 4 GB free disk space

 GPU:                   External graphics card with OpenGL v 2.0 support.

                        PhoXi 3D scanner has a very high resolution mode producing over 3
                        million 3D points, therefore the requirements made on the graphical
                        performance of your graphics cards are higher. Old or slow graphics card
                        can reduce the performance of the 3D viewer.

To use the API, the following compilers are supported:

   ‑    Windows OS:
           ‑ Visual Studio 12 2013 Win64
           ‑ Visual Studio 14 2015 Win64

   ‑    Ubuntu 14: g++ 4.9.4

   ‑    Ubuntu 16: g++ 5.4.0

www.photoneo.com                     PhoXi Control 1.2 - User Manual                               7/50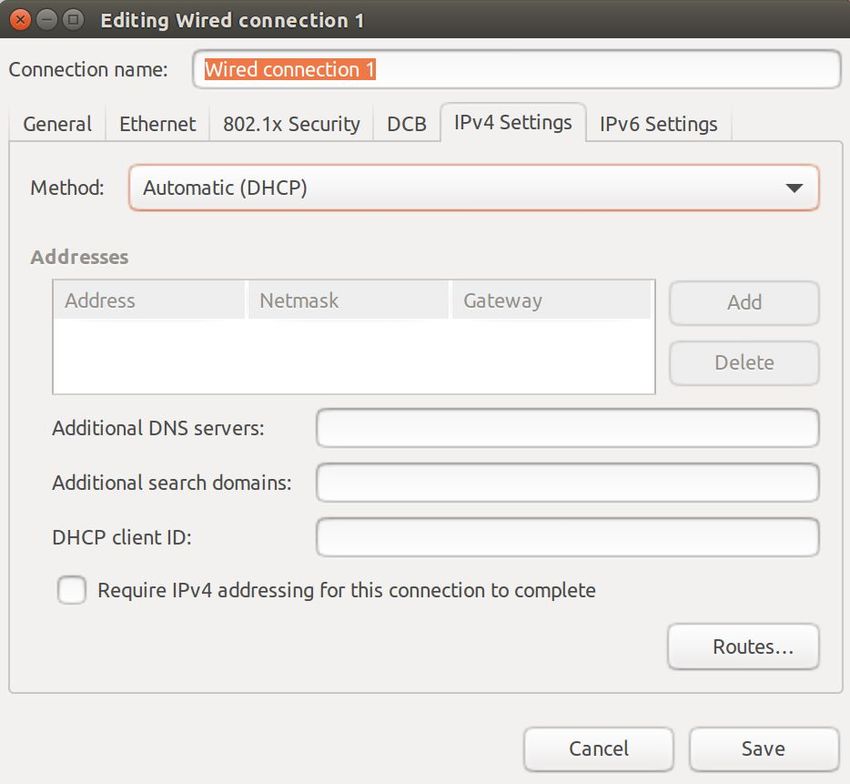
v 10/2019
Installation
Download the latest version of PhoXi Control: http://photoneo.com/3d-scanning-software/
The installer will prompt you to uninstall an existing version of PhoXi Control. Only one version of PhoXi
Control at a time is supported.
Windows
To install PhoXi Control on Windows, proceed as follows:
1. Double-click the downloaded .exe installation file.
2. Follow the setup wizard and restart the computer if this is your first installation of PhoXi Control.
3. Run PhoXi Control as a standard Windows application. The application automatically starts after
the computer startup.
Default installation paths:
‑ Shortcut folder:
C:\ProgramData\Microsoft\Windows\Start Menu\Programs\Photoneo's PhoXi
Control
‑ Installation folder:
C:\Program Files\PhotoneoPhoXiControl
‑ Application data folder:
%AppData%/roaming/PhotoneoPhoXiControl/
Linux
To install PhoXi Control on Ubuntu, proceed as follows:
1. Unpack the downloaded .tar file.
$ tar -xvf PhotoneoPhoXiControlInstaller-Ubuntu[16 14]--STABLE.run.tar
2. Execute with sudo.
$ sudo ./PhotoneoPhoXiControlInstaller-Ubuntu[16 14]--STABLE.run
3. Successful installation output will show you the installation path and will ask you to reboot.
4. Restart your computer.
$ sudo reboot
5. Run PhoXi Control from a command line or from a launcher.
$ PhoXiControl
Default installation paths:
‑ Installation folder:
/opt/PhotoneoPhoXiControl
‑ Application data folder:
/home//.PhotoneoPhoXiControl
www.photoneo.com PhoXi Control 1.2 - User Manual 8/50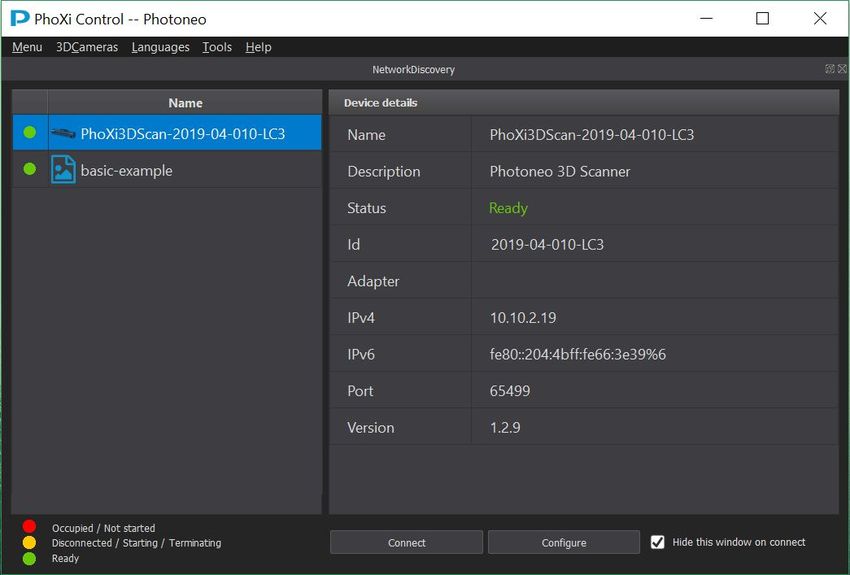
v 10/2019
Multiple Versions of PhoXi Control
Multiple versions of PhoXi Control can be installed on one computer. This is achieved by choosing
different installation directories during the installation. The process is as follows:
Windows
On Windows the installer asks for a path where the application should be installed. By default, this path is:
C:\Program Files\PhotoneoPhoXiControl
When another version of PhoXi Control is installed, a different path should be specified, for example:
C:\Program Files\PhotoneoPhoXiControl-custom
Linux
Ubuntu installer automatically installs PhoXi Control in the following folder:
/opt/PhotoneoPhoXiControl-1.2.X
To install PhoXi Control to a different folder, pass it as an argument to the install script:
$ sudo ./PhotoneoPhoXiControlInstaller-1.2.9-Ubuntu.run /your/custom/path
To match the old behavior of Ubuntu installer use the original location:
$ sudo ./PhotoneoPhoXiControlInstaller-1.2.9-Ubuntu.run /opt/PhotoneoPhoXiControl
Running the Application
By default, PhoXi Control starts automatically after the operating system is started. Users can change the
default application behavior by setting up specific environment variables or by command line parameters.
Disabling GUI or 3D Viewer
Disabling GUI or the 3D Viewer is used mainly in the following situations:
● PhoXi Control running on a slow computer
● 3D viewer not functioning as expected or running slowly
● Applications with their own GUI using only the API
Desired behavior Action needed
Permanently disable GUI Set environment variable: PHOXI_WITHOUT_DISPLAY=ON
Permanently disable the 3D Set environment variable: PhoXi3DViewer=OFF
Viewer only
Temporary disable the GUI Run script:
for one session
www.photoneo.com PhoXi Control 1.2 - User Manual 9/50v 10/2019
‑ Windows:
%PHOXI_CONTROL_PATH%\bin\support\PhoXi_Control_as_bac
kground_process.bat
‑ Linux:
/opt/PhotoneoPhoXiControl/bin/support/RunPhoXiControlOnBac
kground.sh
Temporary enable GUI Run script:
(when permanently disabled - Windows:
using the environment %PHOXI_CONTROL_PATH%\bin\support\PhoXi_Control_enable
variable) _gui.bat
Command Line Parameters
PhoXi Control can be started with the following command line parameters:
-minimized
‑ PhoXi Control will be started minimized.
-lock
‑ Used to lock the application against unauthorized use. The application will ask you to setup a
password and then to restart. Users are prompted to enter a password every time after they start
the application. The API can connect to the Scanner only after the password is entered.
-unlock
‑ Removing the authorization request after the application startup. The application prompts you to
enter a password and then restarts. This means PhoXi Control can be used without authorization.
-kill
‑ Any instance of PhoXi Control will be switched off.
-forceRun
‑ Used together with -kill. While -kill alone stops running instance of PhoXi Control. Additional
argument -forceRun ensures a new instance of PhoXi Control will be started.
Example command:
PhoXi Control -kill -forceRun
www.photoneo.com PhoXi Control 1.2 - User Manual 10/50v 10/2019
Graphical User Interface
Overview
The initial window of the application is called Network Discovery. It displays a list of all the devices
available on the network. A new connection to the device opens a new Device window. Device windows
can be organised by dragging the window title.
The application minimizes to the system tray. To close the application, use the Menu or right-click on the
system tray icon and select the option to Turn off PhoXi Control.
Menu
This chapter explains the use of the menu items.
Main Menu Items
Network Discovery
‑ Opens the Network Discovery window. The Network Discovery window
is usually hidden after connecting to the device.
Open File Camera
‑ Loads 3D scans in *.praw format into the new File Camera, which
remains available until the application is shut down.
Lock GUI
‑ Option to protect GUI against unauthorized use.
Turn Off PhoXi Control
‑ Shuts down the application. (Using the standard close button will only hide the application to the
system tray).
Other Menu Items
3D Cameras
‑ Switching windows to one of the connected devices or file cameras.
Languages
‑ Switch between supported languages.
www.photoneo.com PhoXi Control 1.2 - User Manual 11/50v 10/2019
Tools / Options
‑ Switching between different color themes.
‑ Disabling default warning behavior.
‑ Reset application look
‑ The application remembers your preferences for
showing UI components. Use this function to
reset PhoXi Control to the default layout. Useful
mainly when switching between monitors with
different DPI and resolutions.
Tools / Marker Patterns
- This option opens a directory containing folders with marker patterns and their metadata.
- Marker patterns are used for changing the coordinate space and device calibration (multiple
devices together, hand-eye calibration, calibration with external 2D camera)
- Marker patterns come in 4 sizes that are intended for different scanning distances. The applicable
scanning distances for each pattern are stated in the name of the corresponding pdf file.
Help / Send Logs
‑ This option allows you to send logs to Photoneo support
for further investigation.
‑ Make sure your network settings do not block access to
the photoneo.com server and its subdomains.
Help / Send Admin Request
‑ This function is mostly used by Photoneo stuff during
the remote sessions to temporarily get admin privileges.
‑ Please ensure that your computer is connected to the
Internet and that your network settings do not block
access to the photoneo.com server.
Help / About
‑ Displays the current PhoXi Control application version
and links to the Photoneo web page.
www.photoneo.com PhoXi Control 1.2 - User Manual 12/50v 10/2019 Network Discovery The Network Discovery window lists all available Scanners on the network. After the application starts, please wait a moment until all Scanners are found. If your Scanner is not listed, please make sure that it is turned on and connected to the network. After a short time the Scanner will appear on the list. The time required to discover a newly powered device should be under 3 minutes. The time required to discover the device after it was disconnected or the connection was lost should be under 45 seconds. If no device is shown in your list, please check your network configuration. See the chapter Configuring the Scanner network settings for more information. Selecting a device will display its details such as Name, Description, Status and ID, as well as its network status and firmware version. Not all information is available for File Cameras. Connecting to the Scanner To connect to a device, simply double click on the device name or select it and click Connect. It usually takes about 2-5 seconds for the device to connect; however, based on the internal state of the device, it can take up to 1 minute. It is only possible to connect to a device in Ready state. Once the Scanner is connected, a new Device window will open and the status of the Scanner in Network Discovery will change from Ready to Occupied. Therefore, if you share a Scanner with other users, make sure you www.photoneo.com PhoXi Control 1.2 - User Manual 13/50
v 10/2019
disconnect from the Scanner after you finish using it. The following list represents all the possible device
states.
Please ensure that you are using a wired network connection to the device. WIFI connections are not
recommended due to the lower reliability.
Device States Overview
Not started Device has just been plugged in or was restarted. After a few seconds, the status will
change to Starting.
Starting Device is starting its operating application. After a few moments, the status will change
to Ready.
Ready Device is ready for a new connection.
Occupied Device appears as occupied after the connection was established. Only one connection
at a time is permitted. It is not possible to connect to an occupied device.
Terminating Device is terminating after the user disconnects from the device. After a few moments,
the status will change to Starting and Ready.
Relationship between GUI and API
Connection to the Scanner via the API causes the GUI to open the Device window similar to when
connecting via the GUI. When you connect to the device through the GUI, it is perfectly possible to work
with the device through API.
File Cameras
Every 3D scan captured by a PhoXi 3D Scanner can be saved into a Photoneo RAW ( *.praw) file. The
main advantage of this native format is that it contains all the information about the scanning
configuration and additional information about the device.
Single or multiple *.praw files can be loaded into PhoXi Control either by using the menu or by dragging &
dropping the files anywhere on the GUI. Opening praw files will create a new virtual device called File
Camera. This virtual device behaves in a very similar way to a regular Scanner. Triggering a new scan on
the File Camera will open the next praw file in the directory.
Note: The scanning parameters for File Camera are read only, as these scans have already been taken
and processed.
www.photoneo.com PhoXi Control 1.2 - User Manual 14/50v 10/2019
Network Discovery window offers specific options for File Cameras when right click is used or by using a
keyboard shortcut:
‑ Add as internal File Camera
‑ Internal File Camera remains in Network Discovery even after you restart the PhoXi
Control application. Otherwise the File Camera is present only until the end of application.
‑ Remove from list (Delete key)
‑ This option will remove the File Camera from the list of devices, but keep underlying files
on disk.
‑ Delete from filesystem (Shift + Delete keys)
‑ This option will remove the File Camera from the list of devices and also delete underlying
files from disk.
Configuring the Scanner Network Settings
To ensure the smooth operation of the Scanner with your computer, make sure you follow the guidelines
for hardware setup and network connection described in the next sections. Before you connect your
Scanner to any network, make sure you know how the network is set up or have the administrator of your
network do it for you.
Connect the network cable to the Scanner first, then connect the power cable.
Network Media
Always use cables of a Cat5e category or higher that support Gigabit Ethernet or 10 Gigabit Ethernet
standards. Do not use cables of a Cat5 c ategory as their speed is usually 10-100 Mbps, which is too low
to obtain a good scanning performance. The easiest way to distinguish between these two types of
cables is to read the label on the PVC casing or use the Test speed tool in PhoXi Control.
WiFi connections are not recommended and may result in random disconnection.
If you are connecting your Scanner to a switch, make sure it is able to run at 1 Gbps or more.
Network Topology
Photoneo PhoXi 3D Scanners use Zeroconf technology for service discovery. However, this technology is
generally not routable outside of local sub-networks. Therefore, the supported network topologies are:
‑ Direct connection between a user's PC and a PhoXi 3D Scanner.
‑ Star topology with one or more user PCs and one or more PhoXi 3D Scanners connected to a
switch, all on a single local subnet. The switch has to be able to run at 1 Gbps or more.
www.photoneo.com PhoXi Control 1.2 - User Manual 15/50v 10/2019
If you connect the Scanner to your network via the router, the Scanner will not be accessible since
routers usually connect two different networks, but Zeroconf technology only works inside one network.
Network Configuration
If you are not sure how your network works or how to set up an IP address assignment, contact your
network administrator.
The Scanner is a network device, therefore, it needs a unique IP address so any other computer on the
same network can identify and communicate with it. IPv4 address usually serves this purpose.
There are three ways the device can obtain IPv4 and be discovered in the network:
‑ Dynamic IP assignment via DHCP (Dynamic Host Configuration Protocol). Ask your network
administrator if you have a DHCP server available on your network.
‑ Dynamic IP assignment via Zeroconf technology (for networks without DHCP). Thanks to
Zeroconf technology the Scanner is assigned an IPv4 address automatically and can be
discovered on the network with no further input from the user. IPv4 addresses assigned by
Zeroconf come from the 169.254.0.0/16 network as described in RFC 3927.
‑ Static IP address assignment. A static IP address has to be set up manually. Ask your network
administrator for a valid and available IPv4 address before configuring it. Be careful not to set an
IP address outside the network you are currently on, as this will make the Scanner undiscoverable
on the network. Once you set a static IP address for your Scanner, write it down and store it in
case you need to use the Scanner on a different network or change your network parameters in
the future.
Note: A fixed IPv6 link local address is assigned to each Scanner. The address starts with fe80:: and can
also be used to connect to the device.
www.photoneo.com PhoXi Control 1.2 - User Manual 16/50v 10/2019 The three different IP assignment types are reflected in the PhoXi Control setup. The configuration can be done by clicking the Configure button in the lower part of the Network Discovery window. You can select between DHCP and Static IP. The device restarts after every change in network configuration. Choosing Static IP opens a new window where IP address class, IP address, Gateway, Subnet mask and DNS can be setup. Please note, that setting an invalid IP address will make the device undiscoverable on the network, so make sure the IP address is valid and not outside the network you are on. By default, the device uses DHCP for IP assignment. On networks with no DHCP, the IP will be assigned by Zeroconf. Using Zeroconf technology for service discovery does not rely on any specific PhoXi Control configuration - the IP assignment type can be left blank or set to DHCP. After the device is connected to a network without a DHCP server, it should already be available in PhoXi Control. The only requirement for Zeroconf to work correctly is to have Avahi installed on Linux systems and Bonjour service on Windows systems. If a device is moved from a network with a static IP address assignment to a network with a dynamic IP address assignment before the device is disconnected, the IP assignment type should be changed to DHCP. Checking Computer Network Configuration Note that the IPv4 addresses used in the following pictures are just for illustrative purposes and may not work on your network. www.photoneo.com PhoXi Control 1.2 - User Manual 17/50
v 10/2019
Windows
Automatic DHCP method Static IP
1. Network and Sharing Center → Change 1. Use the following IP address s hould be
Adapter Settings. checked.
2. Right click on Ethernet adapter, select 2. IP address, Subnet mask and Default
Properties. gateway should be filled in.
3. Open Internet Protocol Version 4
(TCP/IPv4).
4. Check if Obtain an IP address
automatically is selected.
www.photoneo.com PhoXi Control 1.2 - User Manual 18/50v 10/2019
Ubuntu
Automatic DHCP method Static IP
1. Network Connections → Ethernet. 1. Method should be set to Manual.
2. Add or edit connection. 2. Address, Network and Gateway should be
3. Select the I Pv4 Settings tab in the new filled in.
window.
4. Check which Method is selected. For
Zeroconf or DHCP it should be Automatic
(DHCP) or Link-Local Only.
www.photoneo.com PhoXi Control 1.2 - User Manual 19/50v 10/2019
Device Window
The Device Window is the main screen used to control the device. It is divided into 3 sections:
‑ Main Controls (red)
‑ Settings pane (green)
‑ Viewer pane (blue)
rigger scan button to trigger a scan.
TIP: Once the window is open, hit F5 or the T
Main Controls
This pane provides the basic functions and advanced tools for triggering and saving scans and for safe
disconnection from the device.
Acquisition Modes - Triggering Scan
PhoXi 3D Scanner can run in two acquisition modes:
‑ Single scan mode (default)
‑ The device waits for the trigger command to capture a 3D scan.
‑ Use button Trigger scan.
‑ Free run mode
‑ The device performs consecutive scans at maximum speed (if not slowed down by
Maximum FPS setting).
‑ To turn free run mode on or off, use button Free run.
‑ When the device is in Free run mode, you can pause and restart the acquisition with the
Pause / Start button.
www.photoneo.com PhoXi Control 1.2 - User Manual 20/50v 10/2019
You may prevent the device from taking a scan by using the Pause button at any time. Using this function
is more intuitive in the API, where a secondary application may prevent another application from
triggering the scan.
Scanner Logout
Clicking the Logout button disconnects PhoXi Control from the currently selected device. Closing PhoXi
Control without disconnecting from the scanner first, may produce a warning when the next connection is
established.
Saving the 3D Scans
PhoXi Control allows you to save scans both manually and automatically. Automatic saving mode is called
recording.
The output of a PhoXi 3D Scanner contains:
‑ Information about the device, such as the ID number or calibration data of the image sensor
‑ Information about the 3D scan, e.g. duration, scanning parameters, coordinate system
‑ Point cloud: an organized set of 3D points.
‑ Normals: for each captured 3D point, the normal vector which expresses the orientation of the
captured surface.
‑ Texture: color (grayscale intensity) values for each 3D point.
‑ Depth map: the depth data for each pixel.
‑ Confidence data: the data expressing the estimated noise of the acquired point.
All these data can be stored only in the native Photoneo RAW format ( *.praw file extension). Praw files
can be opened later in PhoXi Control (as a File Camera) and converted to any other supported file
formats.
Other scan formats (PLY, PTX, tif) are capable of storing only partial information, usually only point cloud,
normals and texture. The data that should be stored for each format can be selected in Saving options
dialog.
Understanding the Output Format - Topology of the 3D Scan
The point cloud acquired by a PhoXi 3D Scanner is topographically organized according to the image
sensor. The photo from the image sensor is called texture. There is one computed 3D point for each pixel
in the texture. If any point from the scene is not illuminated by the projection (usually because of
shadows) the corresponding pixel has no 3D value (its coordinates are [0,0,0]) and is called “zero 3D
point”.
For example, the pixel at position [x= 2010, y =350] in the texture is the (2064*350 + 2010) = 724410-th
point in the point cloud.
www.photoneo.com PhoXi Control 1.2 - User Manual 21/50v 10/2019
PhoXi Control also allows unorganized point clouds to be saved. In unorganized point clouds, the "zero
3D points" are omitted and not saved; therefore, the topology is lost. If you have an unorganized point
cloud and would like to restore its organization, you will need to iterate over the point cloud and find a
corresponding pixel in the depth map by comparing the Z value.
List of Supported Formats
‑ Photoneo RAW data format (*.praw)
‑ Stanford’s PLY (*.ply)
- http://graphics.stanford.edu/data/3Dscanrep/
‑ Leica’s PTX (*.ptx)
- http://wiki.photoneo.com/index.php/PTX_file_format
‑ Text file (*.txt)
‑ Raw images in tif (*.tif)
For each format, you can choose which data to store (point cloud, normals, texture…). For further
information, see the Saving Options section below.
Saving Single Scan Manually
After triggering a scan, use the Save button to open saving dialog. Choose one of the supported formats
and confirm the selected option. The data stored within the file is selected according to the settings in the
Saving options dialog.
TIP: Any scan in a praw format can be converted into any other format by loading it into PhoXi Control
and choosing a different file format in saving dialog.
Saving Scans Automatically - Recording
Click the Record button to start or stop automatic recording. Before using this functionality, use Saving
options dialog to define destination and file formats in which the acquired scan should be stored. Using
*.txt format to save data during recording is not recommended.
When recording is used in free run mode, the disk writing speed may limit the amount of stored frames
and some frames might be skipped and not stored. This usually happens when multiple file formats are
being saved at once or when compression is used to
save *.praw files. If this occurs, the status bar in PhoXi
Control displays the message “Scans cannot be saved,
they are generated faster than the computer can
process them. Consider changing saving options.”.
Saving Options
Use the button Saving Options to configure your
preference for storing the 3D scans and corresponding
data.
The fields Folder path and File pattern are used by
automatic recording. Folder path defines the destination
where the scans will be saved. File pattern defines the
name of the files, hash signs will be replaced by a
counter starting at the defined value. The image on the
www.photoneo.com PhoXi Control 1.2 - User Manual 22/50v 10/2019
right depicts the settings that will save the scan in the file scan_0000.praw.
Use the check boxes on the left (next to the name of the file format) to select all the formats in which the
scan should be saved during automatic recording.
Use the Options button on the right (next to the name of the file format) to define which data should be
saved when using selected file format.
Specifics of File Formats
‑ Explanation of confidence map can be found at:
http://wiki.photoneo.com/index.php/Confidence_Map
‑ Using text file to save data may result in longer saving time, depending on the speed of your hard
drive. The same is true when the binary format is not used in PLY format.
‑ TIF file is one-dimensional, therefore it creates multiple files for each stored component.
Tools
Test Speed
This tool can be used to measure the transfer speed between the device and the
computer running PhoXi Control. Use the default settings for “Size [MB]” and
“Number of attempts” in case you don’t suspect any connection issue.
If you suspect there is a slow connection speed, change the
parameters “Size [MB]” and “Number of attempts” to lower values.
The result of the test are shown as Speed and Latency with their
minimal, maximal and median values. On 1 Gbps networks, the
expected speed should be around 100 MB/s with a latency below
6 ms.
Low speeds significantly prolong the overall scanning time. Check if
the network cables are of a Cat5e category or higher. Lower category
cables have a speed of around 10 MB/s.
Firmware Upgrade
Opens a new window for the installation of new firmware.
Before attempting to install new firmware, verify which firmware version is currently running on the device
(this can be seen in the Network Discovery). You should not attempt to upgrade firmware on the device if
the current version is lower than 1.1.62. All firmware upgrades from lower versions need to be handled by
Photoneo or qualified personnel. Please contact support@photoneo.com for assistance with manual
firmware upgrades.
To upgrade firmware, it is necessary to:
1. Obtain a new version of the Scanner firmware package from Photoneo.
2. The upgrade will start once you open the file in the Firmware upgrade window. Do not disconnect
the device during firmware update. PhoXi Control will display a “Firmware updated in device
successfully” message after successful installation.
3. The device is automatically rebooted.
www.photoneo.com PhoXi Control 1.2 - User Manual 23/50v 10/2019
In case any problems arise, try to repeat the upgrade procedure or contact Photoneo support.
Please note that firmware upgrade sets the scanning settings to their default values. Any user set values
have to be reset after the upgrade.
View
Toggling the visibility of GUI components:
‑ Device settings pane:
‑ the pane on the left side, which contains device settings.
‑ Visualization settings pane:
‑ The pane on the right-hand side, which contains options to change the visualization of the
point cloud.
Select Frame
This setting is only available for viewing File Cameras. It opens a new window where you can select the
index of the *.praw file that will be displayed after the next scan is triggered. The file is selected based on
the order of the files in the directory (index starts by 0).
Settings Pane
Settings pane:
‑ Contains the scanning profiles selector and scanning parameters (tab Properties).
‑ Allows to control the output data received from the device (tab Output structure).
The set of scanning parameters and profiles depends on the firmware version of your device. This User
Manual is based on FW version 1.2.14.
Scanning Profiles
Scanning profiles allow users to easily change multiple scanning parameters at once. There are several
profiles pre-configured with different scanning parameters for different use Factory profiles are not
editable, cannot be deleted or renamed; however, it is possible to clone them and edit the cloned profile.
It is also possible to define custom profiles.
Use the cog button to enter advanced configuration.
‑ Select - switch to chosen profile.
‑ Create a new profile from an existing one - this
creates a new duplicate profile from your selected
profile. The newly created profile can be modified in
the Properties tab and stored to the device.
‑ Delete - deletes user created profile.
‑ Rename - renames user created profile.
‑ Mark as startup profile - the device will be started
with this user profile.
‑ Reset to factory settings - resets settings to factory
default.
www.photoneo.com PhoXi Control 1.2 - User Manual 24/50v 10/2019
‑ Import - imports a user profile from .phop file.
‑ Export - saves a user profile into .phop file.
Using Custom Profile
‑ Use button and create a new profile from the existing one, which is closest to your user
case. You might want to mark it as a startup profile as well.
‑ Modify the desired parameters to your needs.
‑ Use Set and Store button to permanently store the settings into your custom made profile.
Scanning Parameters
The set of scanning parameters available depends on the
version of firmware installed on the device. This manual is
based on firmware version 1.2.14.
The scanning process consists of three phases: capturing
(or acquisition), processing (computation) and transfer.
Scanning parameters are divided into four logical groups:
‑ Capturing settings - these options change exposure
times and methods of projecting light patterns.
‑ Processing settings - these options affect the
computation of the point cloud and allow the setting
of filtering criteria such as the region of interest.
‑ Experimental settings - advanced settings which are
used in special use cases.
‑ Coordinate settings - defines the coordinate space
for the point cloud.
The total scanning time is the sum of the time required for
acquisition (defined by capturing settings), computation
(defined by processing settings) and transfer (defined by
Output structure).
The use of scanning parameters is described in Scanning
Guide - Parameters at the end of this User Manual.
Controls
‑ Search box (Ctrl+F)
‑ Search setting by name.
‑ Set button (Ctrl+S)
‑ Sets scanning parameters for the current session only. Settings are discarded after the
Scanner is disconnected.
‑ Set and store button (Ctrl+Shift+S)
‑ Stores scanning parameters permanently to the Scanner memory (applies to the current
profile).
www.photoneo.com PhoXi Control 1.2 - User Manual 25/50v 10/2019
‑ Refresh button (Ctrl+R)
‑ Retrieves current settings for the selected profile from the Scanner memory.
Output Structure
Output structure lets you choose which kind of data will be retrieved
from the Scanner. Any changes to the output structure will affect the
transfer stage. The read-out time can be speeded up by selecting only
the data which you need for your application.
PointCloud The point cloud is a set of measured 3D points. Each 3D point has the coordinates X,
Y, Z in the point cloud coordinate space (see Coordinate settings). The point cloud
has a topology which corresponds to the image sensor. Unmeasured points (pixels)
caused by shadows are given the default coordinates (0,0,0). Based on the saving
options, these unmeasured points might or might not be saved.
The point cloud can be examined in the 3D Viewer tab.
NormalMap The normal vector for each 3D point can also be calculated. The normal vector is
perpendicular to the area surrounding the point (see Normal estimation radius).
Normals can be inspected in the 3D Viewer tab after selecting the display parameter
in the right pane.
DepthMap The “depth” of a point is the absolute 3D distance from the image sensor to the
measured point (the ray of light that hits the surface of the object). The DepthMap is,
therefore, always in the camera coordinate system and corresponds to the Z
coordinate value in the point cloud.
NOTE: even when you change the point cloud coordinate space, the DepthMap
always shows the distance (depth) in the camera coordinate system.
Texture Texture is the 2D photo of the scene. The source of the illumination is either an LED
diode or a laser projection. Texture is in a gray scale (in the red spectrum). Texture is
also used to color the 3D point cloud.
ConfidenceMap For each measured 3D point, the “confidence” value expresses certainty about the
accuracy of the point measurements. For example, a confidence value of 0.12 means
that the estimated error for a point measurement is 0.12 mm. This value is based on a
heuristic method that considers the light conditions for each pixel.
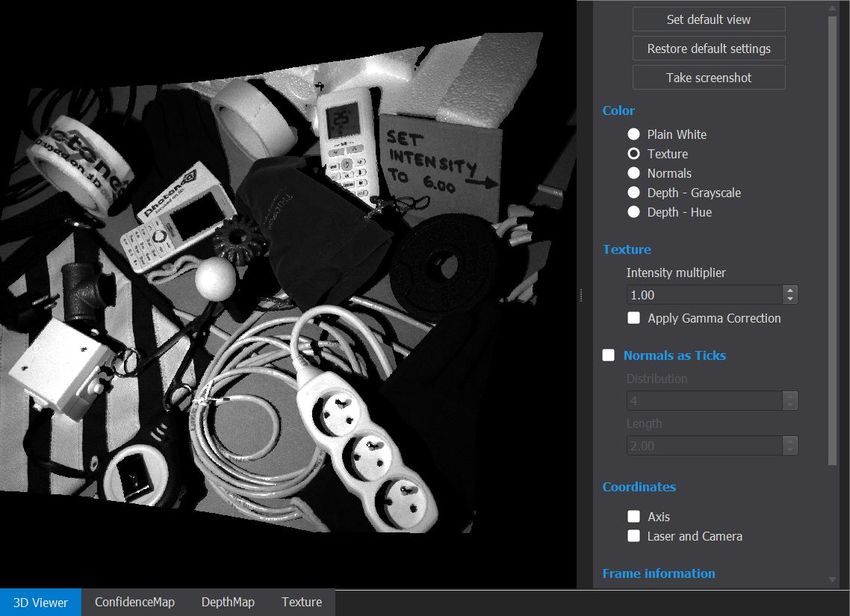
www.photoneo.com PhoXi Control 1.2 - User Manual 26/50v 10/2019 Viewer Pane This pane displays the output from the Scanner in various views. After the Device window is opened, hit F5 or press the Trigger scan button in the main controls to trigger the scan. The output is provided as a 3D point cloud (3D Viewer tab) and a set of corresponding data as 2D images (all other tabs). The view can be switched using the tabs at the bottom. Each view has its own display settings on the right. These settings do not change the data themselves, just their visualization. It is recommended that users understand the relationship between the 3D point cloud and the 2D images as described in Point cloud topology. 3D Viewer Use this tab to inspect the point cloud and obtain a general overview of the scanned scene. Changing the Visualization Set default view Resets the camera to the default position. Restore default settings Restores the default settings for Texture, Normals and Coordinates. Take screenshot Allows you to save a *.png s creenshot of the 3D Viewer window. Color Select the data source for coloring the point cloud: www.photoneo.com PhoXi Control 1.2 - User Manual 27/50
v 10/2019
‑ Plain White - all points are white, no shader is applied
‑ Texture - points have color from the photo of the scene
‑ Normals - the color is based on point orientation (direction of the
normal vector)
‑ Depth - Grayscale - the color of the point is based on its distance
from the device. The furthest points are white, the closest points
are black.
‑ Depth - Hue - the color of the point is based on its distance from
the device. The furthest points are red, the closest points are blue.
Texture - Apply gamma Adjusts the scene brightness by applying gamma correction. This is useful
correction for viewing dark objects.
Texture - Intensity multiplier Makes the visualization brighter or darker.
Normals as Ticks checkbox Renders normal vectors for selected 3D points. Controls the selection of
3D points using the Distribution setting and the length of the vectors by
Length setting.
Coordinates - Axis Renders the axis of the coordinate system.
Coordinates - Laser and Renders the position and field of view of the camera and laser unit of the
Camera checkbox Scanner.
Frame information section Shows information about the current frame, such as:
‑ Index - serial number of scanned frames in a current session.
‑ Acquisition - duration of the acquisition phase (projection of
patterns).
‑ Computation - duration of the computation on the device.
‑ Transfer - duration of the data transfer from the device to the
computer.
‑ Timestamp - timestamp of the scanned frame in the current
session.
‑ FileName - the name of the file opened in File Camera.
3D Viewer Controls
Left mouse button drag Rotates the point cloud around the selected point of focus. By default, the
selected point of focus is the camera position.
Mouse wheel or Zooms in/out.
Vertical right mouse button
drag or
Keys: [ ]
Mouse wheel drag or Moves the point cloud.
Hold SHIFT + left mouse drag
Hold CTRL + left mouse drag Tilts the point cloud.
www.photoneo.com PhoXi Control 1.2 - User Manual 28/50v 10/2019
F Sets the point of focus to the point under the mouse cursor. This is the
point around which the scene is rotated.
R Resets the view to default. Used to center the view on the point cloud.
Key: + Increases the size of a point.
Key: - Decreases the size of a point.
Image Tabs
Confidence Map
This tab displays the predicted error of depth measurement for each pixel (corresponding 3D point).
Darker areas on this map show parts of the scene which have been scanned with lower error rates, while
brighter areas show parts of the scene where errors may have occurred, suggesting that these sections
of the scene may be problematic. Confidence Map serves as a tool for estimating inaccuracy in
millimeters. It can be used to find places where the inaccuracy is high and then trim them away using the
Max Inaccuracy (mm) setting.
See http://wiki.photoneo.com/index.php/Confidence_Map for further information.
To see the confidence map, it is necessary to turn on the Confidence Map checkbox in the output
structure and then trigger a new scan. Setting the Maximal value threshold in the right pane to a
reasonably small number, e.g. 0.5. Then hover the mouse cursor over the image to see the value of the
specific pixel (its corresponding 3D point).
www.photoneo.com PhoXi Control 1.2 - User Manual 29/50v 10/2019
Depth Map
This view shows the scene as a gray-scaled image in which the intensity of every pixel represents the
distance of the measured point from the camera. The depth value of the pixel under the cursor is shown
on the right side pane as the current pixel value. The image can be made more readable by adjusting the
settings on the right side of the window, as explained below. This view can also be used to measure the
distance between 3D points by dragging a line between corresponding pixels with the right mouse
button.
Texture
The texture is a 2D photo of the scene. Intensities from the texture are used to color the point cloud.
Image Tabs Visualisation Controls
Image Information
Zoom level Current zoom level of the image.
Cursor position Position of the pixel under the cursor.
Current pixel value Value of the pixel under the cursor.
Pixel datatype Represents the data type of the image.
Distance Distance between two points. You can
measure the distance of two points by
dragging a line between them with the right
mouse button.
Intensity
Use Intensity settings to make the image look brighter or darker.
Minimal value Pixels with a lower value than the minimal value
are depicted in black.
Maximal value Pixels with a higher value than the maximal
value are depicted in white.
Auto Min Max Computes values of the Minimal and Maximal
intensity for the current viewport to maximize
the visualization benefit.
Highlight Camera Highlights pixels to which corresponding 3D
View points are currently in the viewport of the 3D
Viewer. This serves for better orientation when
the point cloud is zoomed in and you need to
know which part of the scene is currently visible
in the 3D Viewer.
Value multiplier Makes images look brighter or darker.
www.photoneo.com PhoXi Control 1.2 - User Manual 30/50v 10/2019
Controls
Button: Set default view Resets the image position and zoom to default values.
Button:
Restore default settings Restores the default settings for Intensity settings.
Left mouse button drag Moves the scene.
Mouse wheel Zooms in/out.
Right mouse button drag Draws a line between two pixels and computes the distance
between the two corresponding 3D points.
API
Introduction
The PhoXi API provides the building blocks necessary for developing your custom C++ or C# application
for working with a PhoXi 3D Scanner. Other programming languages are currently not supported. All API
functionalities are provided directly by the PhoXi Control application, therefore, PhoXi Control has to be
always running for your custom application to work with the device.
This manual shows how to use the API in several examples. You may start your development based on
one of the examples and modify it to suit your specific needs. Microsoft Visual Studio 2015 and CMake
are used to demonstrate how to run the API examples.
The technical documentation is located in the file API/API_Manual.html inside the application installation
directory.
On Windows OS, the path to the API directory is usually:
Program Files/PhotoneoPhoXiControl/API
On Linux OS, the path to API directory is usually:
/opt/PhotoneoPhoXiControl/API
Prerequisites
CMake version 3.10 or above. You can download CMake from the following link:
https://cmake.org/download/
Limitations
API does not currently support Set and Store functionality, which means that scanning profiles can be
used and changed only in the GUI.
API Examples
API Examples contain source codes together with build instructions (CMake) to bootstrap the
development of your custom application based on PhoXi API.
www.photoneo.com PhoXi Control 1.2 - User Manual 31/50v 10/2019
The most extensive source code is the Full API example which contains all functionalities provided by the
API. For better readability, specific functionalities are provided in the form of additional examples. All
examples are located in corresponding folders in the application installation directory in
API/examples/CPP or API/examples/C_Sharp. The overview of all examples is laid out in the following
table.
Example name C++ C# You will learn how to
‑ retrieve and set capturing, processing and coordinates settings,
Change Settings ✓ ✓
‑ best practice to disconnect from the device.
‑ check if PhoXi Control is running,
‑ obtain a list of devices connected to the network,
Connect and Grab ✓ ✓ ‑ connect to a device attached to PhoXi Control if there is one, or to
the last device on the list if there is not,
‑ different ways to capture scans.
‑ calibrate the Scanner to work with an external 2D camera,
‑ obtain depth map aligned from the point of view of the external
External Camera ✓
camera,
‑ align color texture from external camera with point cloud.
Get Image Sensor
✓ ‑ obtain image sensor calibration parameters.
Calibration Parameters
‑ use OpenCV in a project,
Minimal OpenCV ✓
‑ convert scanned frame into OpenCV format.
‑ use Point Cloud Library in your project,
Minimal PCL ✓
‑ convert scanned frame into PCL format.
‑ connect to a device from a list of devices connected to the
network by requesting its ID,
Read Point Cloud ✓ ‑ work with the acquired data and save it into a specific data
structure,
‑ save scans into different file formats.
‑ obtain transformations from marker space to camera space,
Rotated Calibration ✓
‑ apply custom transformation matrix before triggering the scan.
Two Scanners ✓ ‑ connect and trigger scans on multiple Scanners.
Two Scanners ‑ connect and trigger scans on multiple Scanners using multiple
✓
Multithread threads.
‑ set up your C# project independent from CMake,
Win Forms ✓
‑ use WinForms in your project.
‑ find scanners available on the network,
‑ various methods to connect to the device,
‑ obtain details about the current state of the device and its
Full API Example ✓ ✓ capabilities,
‑ capture scene using free run and manual mode and obtain all the
available output formats,
‑ change the scanning settings and specify desired output formats,
www.photoneo.com PhoXi Control 1.2 - User Manual 32/50v 10/2019
‑ handle and store the received data,
‑ correctly disconnect from the device.
Running the Examples
Windows OS
To run the examples on Windows operating system you will need CMake and Microsoft Visual Studio:
‑ Copy the content of any of the directories, e.g. API/examples/CPP/ConnectAndGrab_CPP to
your custom directory (This is only necessary when you want to edit the source code. Originally,
the source code is located inside the Program Files directory, so you will need admin rights to
change the file).
‑ Launch CMake:
‑ Choose the source and destination directory.
‑ Click the Configure button, specify Visual Studio 14 2015 Win64 as the generator for the
project and confirm with the Finish button.
‑ Wait until the configuration is completed, then click Generate button.
‑ In the destination directory, open the file ConnectAndGrab.sln.
‑ Set the project ConnectAndGrab as a StartUp Project in the right context menu.
‑ Rebuild the solution in Visual Studio (Menu → Build → Rebuild Solution).
‑ Make sure that the PhoXi Control application is running.
‑ In Visual Studio, hit F5 to run the example (Menu → Debug → Start Debugging)
‑ While the example is running, switch back to the PhoXi Control application - every frame captured
by the camera is displayed in the Viewer pane.
Linux OS
‑ Copy the folder with the example to your home directory.
www.photoneo.com PhoXi Control 1.2 - User Manual 33/50v 10/2019
cd $
cp -r /opt/PhotoneoPhoXiControl/API/Examples/FullAPIExample_CPP/.$FullAPIExample
‑ Create a new directory for the build.
mkdir dev
cd dev
‑ Prepare your project with CMake. Build type can be also Debug.
cmake ../FullAPIExample . -DCMAKE_BUILD_TYPE=Release
‑ Compile the program.
make
‑ Run the program.
./FullAPIExample_Release
API and Multiple Versions of PhoXi Control
When multiple versions of PhoXi Control are installed on one computer, the exact path to the PhoXi
Control installation directory has to be specified in the find_package(PhoXi)command in project’s
CMakeList.txt file, e.g.:
find_package(PhoXi REQUIRED CONFIG PATHS "C:/Program
Files/PhotoneoPhoXiControl-second")
API Modification between Beta Versions and Official Release
During the development process of PhoXi Control 1.2.14 some modifications were made to the beta
versions of API that change approach to connecting device. It is no longer possible to simultaneously
connect to the same PhoXi device multiple times from the same process. Any attempt to connect to a
device which is already connected in the same process will return nullptr:
pho::api::PhoXiFactory factory;
pho::api::PPhoXi device = factory.CreateAndConnect("2019-11-001-LC3");
if (device) {
// do something with the device
}
pho::api::PPhoXi device2 = factory.CreateAndConnect("2019-11-001-LC3");
if (!device2) {
// WARNING: device2 will be nullptr!
}
It is required to call the destructor of pho::api::PhoXi instance in order to be able to reconnect to the
device again. The simplest way is to take advantage of RAII and introduce a scope - the destructor of
pho::api::PPhoXi will call the destructor of pho::api::PhoXi when exiting the scope:
pho::api::PhoXiFactory factory;
{
www.photoneo.com PhoXi Control 1.2 - User Manual 34/50v 10/2019
pho::api::PPhoXi device = factory.CreateAndConnect("2019-11-001-LC3");
if (device) {
// do something with the device
}
} // destructor of underlying pho::api::PhoXi is called here
pho::api::PPhoXi device2 = factory.CreateAndConnect("2019-11-001-LC3");
if (device2) {
// do something with the device2, it is successfully connected
}
An alternative is to call the Reset member function on the p
ho::api::PPhoXi instance explicitly (which
will call the destructor of pho::api::PhoXi):
pho::api::PhoXiFactory factory;
{
pho::api::PPhoXi device = factory.CreateAndConnect("2019-11-001-LC3");
if (device) {
// do something with the device
}
device.Reset(); // destructor of underlying pho::api::PhoXi is called here
pho::api::PPhoXi device2 = factory.CreateAndConnect("2019-11-001-LC3");
if (device2) {
// do something with the device2, it is successfully connected
}
If you want to reconnect always to the same device you can simply reuse the existing device handle:
pho::api::PhoXiFactory factory;
pho::api::PPhoXi device = factory.CreateAndConnect("2019-11-001-LC3");
if (device) {
// do something with the device
device->Disconnect();
}
if (!device->isConnected()) {
device->Connect();
// do something with the device again
}
Compatibility
See section Backward Compatibility for full explanation about PhoXi API compatibility.
www.photoneo.com PhoXi Control 1.2 - User Manual 35/50v 10/2019
Scanning Guide
How to Scan
1) Arrange the scene for optimal scanning quality. See Factors affecting the scan.
2) Put the Scanner into optimal scanning distance. Check the datasheet in the PhoXi 3D Scanner
User Manual or on the Photoneo website for further details
(https://www.photoneo.com/phoxi-3d-scanner/).
3) Adjust scanning parameters for optimal results. See Scanning parameters.
Factors Affecting the Quality of Scan
The quality of the scan depends on a number of different factors. The Scanner provides a variety of
settings that help to perform an optimal scan. Before you decide to change the scanning settings, try to
rearrange the scene to ensure the best conditions for scanning. Changing the position of the Scanner
with regards to the scene can also make the results of the scan better.
Distance: Closer objects have a better spatial resolution and generally have less noise.
Material albedo (reflectivity): Material with a higher albedo provides a better signal-to-noise ratio. Albedo
is defined as a measure of the material’s reflectivity or the degree to which the material will reflect the
incoming radiation. The higher the albedo, the more radiation the material reflects from its surface.
Generally, brightly colored materials have a higher albedo than darker colored ones, but color alone is
not the most reliable indicator of albedo, because radiation has many components outside the visible
spectrum.
Strong ambient light: Indoor ambient light does not generally influence the scan. However, very strong
light such as direct sunlight might be a problem, especially when scanning outdoors. Try to remove all
direct sunlight, e.g. by closing window blinds or by moving the installation to a different place.
Reflections: Non-glossy, matte materials are typically scanned with high quality results, and even
semi-glossy objects are scanned with almost optimal quality. However, specular (mirror-like) reflections
can influence the scan quality since the projected light is reflected out of the sight of the camera (in which
case that part will be of poor quality). Similarly, reflected light can interfere with scanning when reflected
onto other parts of the scene (in which case the part illuminated by a reflection can show the artifacts).
Metal parts with a high-gloss (or mirror-like) finishes are particularly difficult to scan.
As a rule of thumb: Take a flat piece of the material you wish to scan and try to look into it as you would
into a mirror. If you are able to recognize the shape of your head in the reflection, the material is glossy.
If such an object is located in the scene, some parts might not be scanned optimally.
When scanning glossy objects, find a position where the light from the projection unit does not illuminate
other objects in the scene.
Tip: In some cases “AmbientLightSuppresion” setting can be useful to get better scanning results when
glossy objects are in the scene. This will increase the scanning time.
www.photoneo.com PhoXi Control 1.2 - User Manual 36/50You can also read