Presents: Intermediate PowerPoint - By Angie Harris Adapted from the Texas State Library's TEAL for All Texans Student Resources Manual
←
→
Page content transcription
If your browser does not render page correctly, please read the page content below
Presents:
         Intermediate PowerPoint

                                By Angie Harris
Adapted from the Texas State Library’s TEAL for All Texans Student Resources Manual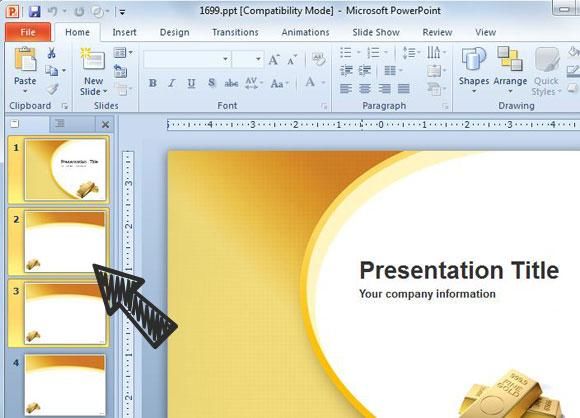
Intermediate PowerPoint Topics Intro to PowerPoint Designing a Presentation The Next Level
Goals and Objectives
• Learn how to navigate Microsoft PowerPoint
• Learn about the different command options in
  PowerPoint
• Learn how to create stylish and professional slide
  presentations
• Learn how to integrate music, video, animations,
  and transitions into a PowerPoint
• Learn how to incorporate and use additional
  features such as charts and photo albums

Intro to PowerPoint

What is Microsoft PowerPoint?

• Microsoft PowerPoint is a presentation software that
  allows you to create dynamic presentations that may
  include animation, narration, images, videos, and
  more.

• PowerPoint uses slides to build the presentation. In
  order to create an engaging presentation, PowerPoint
  allows you to add text, bulleted lists, images, charts,
  video, and more to your slides. You can add as many
  slides as you'd like to a presentation, and at any time
  you can view or play back your presentation by
  selecting one of the Slide Show play options.
Navigating PowerPoint
1. Ribbon Menu - consists of tabs, groups, and
   commands.
2. Quick Launch Bar – consists of save, undo, and redo
3. Slides Tab - allows you to view and work with the
   slides in your presentation. You can add, delete,
   duplicate, and rearrange slides in the Slides tab. You
   can also add sections to the Slides tab to organize and
   group your slides.
4. Outline Tab - displays the text content of each slide.
   You can edit your text directly from the outline view.
5. Slide Sorter – the pane on the left side where you can
   view how many slides you have in your presentation
   as well as modify them in the Slides Tab view.
Navigating PowerPoint
       2. Quick Launch Bar
                             1. Ribbon Menu

3. Slides
   Tab
                               4. Outline Tab

                                   5. Slide Sorter
Navigating PowerPoint
5. Scroll Bars - You can also navigate through your slide
show by clicking and dragging the scroll bars or by
selecting the Previous Slide and Next Slide arrows.
6. Notes Box – You can add notes to a presentation to
view when you present a slideshow in full screen. The
size of the note box can be adjusted
7. Slide Views - Adjust your slide view by choosing one
of the following:
– Normal view is selected by default, and shows the Slide and
Outline tabs along with displaying the current slide.
– Slide Sorter view displays smaller versions of all of the slides in the
presentation.
– Reading view displays only the slides with buttons at the bottom of
the screen for navigation.
– Slide Show will play your slides as an actual presentation.Navigating PowerPoint
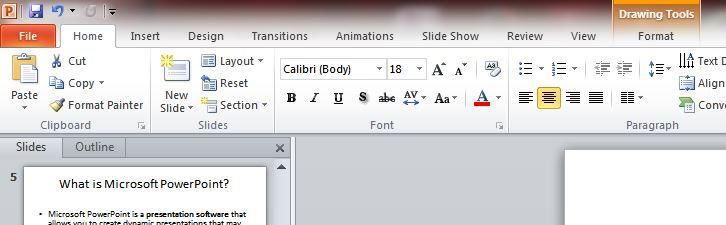
5. Scroll Bar
5. Scroll Bar
6. Notes Box 7. Slide ViewsTabs
There are 9 tabs total in 1. Home
PowerPoint which includes – Slides Group – lets you
some features specific to create a new slide, change a
this program. slide layout, reset a slide,
and create a new section
Note: It is important to – Drawing Group – lets you
remember that any time quickly add commonly used
you move your mouse shapes and text boxes and
onto a command and make quick style edits to
pause, it tells you what it them
is and what it does.Tabs
2. Insert 3. Design
– Images: lets you insert a – Page Setup: lets you change
picture, clip art, screenshot, the slide orientation
or the additional feature of
creating a photo album – Themes: lets you choose from
a variety of stylish and
– Links: lets you insert a
hyperlink to a website or file professional designs for your
or link to other objects such slides as well as change colors
as programs and other and font styles
slides in the presentation – Background: lets you insert a
– Text: lets you insert a text solid color, picture, or pattern
box, date & time, and the as a background and format
slide number various artistic features for
– Media: lets you insert video the background
files and audio filesTabs
4. Transitions 5. Animations
– Preview: lets you see a – Preview: lets you see a preview
of the animation you hover
preview of the transition you over on the current selected
click on the current slide object
– Transition to This Slide: lets – Animation: lets you see all the
animations you can choose
you see all the transitions you from to make your text and
can choose from to move pictures move on the page
your presentation from one – Advanced Animation: lets you
slide to the next use more advanced animation
options such as an animation
– Timing: lets you set sound pane, a painter to copy
effects, the duration of a animations to other objects
transition, and when the slide and more
– Timing: lets you set the starting
transitions point for an animation, the
duration, and the order in
which an animation playsTabs
6. Slide Show 7. Review
– Start Slide Show: lets you – Proofing: contains your spell
choose whether to start your check, thesaurus, and word
slideshow from the beginning
count
or the current slide and create
a custom slideshow including – Language: lets you translate
only the slides you select words into other languages
– Set Up: lets you practice how – Comments: lets you insert
your slideshow will run comments on a page your
including recording your
slideshow to rehearse how proofreading
much time you take per slide – Compare: lets you compare
and adjusting other aspects your edited PowerPoint to
– Monitors: lets you set up your another version of it and
slideshow for a monitor and accept or reject changes
gives you the option to use
presenter viewTabs
8. View 9. Format
– Presentation Views: lets you – Insert Shapes: lets you insert a
change the view of your text box or a variety of shapes
PowerPoint for easier reading or
editing – Shape Styles: lets you adjust
– Master Views: lets you select a the style, outline color, and fill
master slide and make changes to color of a shape or text box
all other slides that have the same
layout – WordArt Styles: lets you change
– Show: show or hide the ruler, the style, text outline, and fill
gridlines, or guides outline for words
– Zoom: lets you zoom in/out – Arrange: lets you align and
– Color/Grayscale: lets you choose adjust the position of text,
what color to view the
presentation in images and other objects on
– Window: lets you open a new the page
window of the same PowerPoint so Note: this tab only appears when
you can compare them side by side you have a placeholder or
or top to bottom
object selectedReview • Which slide view displays smaller versions of all your slides? • If I wanted to change the background theme on my slides, which tab would I look under? • Which tab appears when you have any placeholder or object selected?
Designing a Presentation
Getting Started

• Presentations consist of two main
  components: Slides and Placeholders. Every
  action you perform will consist of modifying
  one of those two components
Slide Basics
Slides                              Slide Layouts
• Slides can be added, deleted      •   Placeholders are arranged in
                                        different layouts that can be
  and rearranged as well as have        applied to existing slides, or chosen
  a number of style and design          when you insert a new slide. A slide
                                        layout arranges your content using
  themes applied to them.               different types of placeholders,
• Slide Sections allow you to           depending on what kind of
                                        information you might want to
  group different parts of your         include in your presentation.
  presentation into sections at a   •   For example the layout called Title
                                        and Content includes title and
  time. It is useful for breaking       content placeholders. While each
  up a larger presentation into         layout has a descriptive name, you
  parts.                                can also tell from the image of the
                                        layout how the placeholders will be
                                        arranged.
Themes • When applying a theme to a slide you can apply it to the selected slide or all slides in the presentation. By default the design will apply to all slides. • Once you’ve applied a theme you can change the colors and font styles for the design. • You can also choose to create a background theme of your own using a solid, gradient, picture, or pattern fill. • The theme on the title page of your presentation will look different from the rest of the slides.
Transitioning Slides
• When creating a presentation,      • You can use the same
  transitions allow for a              transition throughout the
  smoother or more stylistic way       presentation or you can use
  to go from one slide to the          different transitions for each
  next                                 slide.
• Clicking on different              • Once you’ve applied a
  transitions gives you a preview      transition you can set the
  of what it will look like on the     duration for how long the
  current slide                        transition takes and choose
                                       whether to move from one
                                       slide to the next by using your
                                       mouse click or by setting slides
                                       to automatically transition
                                       after a set amount of time
Placeholders Basics
• Placeholders are areas on the slide
that are enclosed by dotted borders.
Placeholders can contain many
different items, including text,
pictures, and charts. They can also
have thumbnail-sized icons that
represent specific commands such as
Insert Picture, Insert Chart, and Insert
ClipArt. In PowerPoint, hover over
each icon to see the type of content
you can insert in a placeholder.
• You can arrange placeholders on the
page however you want and insert
your own if the slide layouts don’t
have the arrangement you want.
• You can also resize placeholders by
using the white circles in the corners
to adjust width and height at the
same time or the white squares at
the top, bottom, left, and right to
adjust width and height individually.Designing Text • When designing text, you have your basic font commands where you can change the font type, size, and color of your text. Placeholders always have bullets in front of sentences but you can change these or remove them completely. You also have options such as – WordArt – preformatted decorative text – SmartArt – preformatted text graphics
Animating Text & Pictures
• To animate text or images in a     • You will also notice that a
  slide you select its placeholder     small star appears on the slide
  then choose from the                 in the slide sorter. This lets you
  animations in the Animations         know which slides contain
  tab. A preview will show on          animation.
  the current selection.             • You can animate some or all
• You only have to hover over an       things on a slide and choose
  animation to see its preview         what order you want the
• When you apply an animation,         objects to show up on the
  numbers appear next to your          page. i.e. title first, then text,
  text. These dictate the order in     then picture
  which the animation will play      • You can also choose for
  and allows you to change             animations to begin
  individual animations                automatically at set intervals
                                       or use your mouse click
Adding Sound & Video • To add sound and video, you • For video files you can choose simply go to your Insert tab a video from your computer, a and choose video or audio clip art video, or you can from the Media group embed the link for a video • For sound files, you can straight from the website it choose music from your was on such as Youtube. computer, clip art sounds, or • When you insert a video file a record your voice. video playback window shows • When you insert a sound file a up and two tabs get added in gray volume icon shows up the ribbon menu to make and two tabs get added in the changes to the video such as ribbon menu to make changes specifying start and end times, to the audio such as specifying volume, and duration. start and end times, volume, and duration.
Timing
• Transitions and           • For animations, the
  animations can move by      animation pane allows
  mouse click or              you to more specifically
  automatically after a set   adjust the time and
  time.                       order in which
• Adjusting the timing on     animations in your slide
  a slideshow can make it     occur.
  substantially easier to   • Timing is measured by
  playback and present        seconds.
  your presentation.
Set Up and Play Slideshows
• Laser Pointer – you can use an    • Record Slideshow – most
  onscreen laser pointer while        useful when you plan to send
  your show plays by holding          your PowerPoint to people or
  down the Ctrl key and your left     post on the web, you can
  click.                              record narrations, laser
• Rehearse Timings – rehearsing       gestures and more to playback
  how long it takes you to get        automatically in your
  through your presentation           slideshow.
  allows you to prepare ahead of    • Slideshow View – at anytime
  time and adjust your transition     you can view your slideshow
  and animation timings as well.      by simply clicking the
                                      slideshow view command in
                                      the bottom right hand corner.
                                      To get back to your editing
                                      screen you just press the ESC
                                      key
Review • What two components do presentations consist of? • What do transitions modify? • What do animations modify? • What are two decorative text options that I have when designing text? • To add sound or video which tab and group do you go to? • To set up your slideshow and rehearse timings which tab do you go to?
The Next Level
Creating a Great PowerPoint
Creating a Great PowerPoint
• In the following exercise we will create a dynamic presentation.
  Follow the instructions as written and read through each individual
  direction before performing it.
• Remember that text is entered (typed in) or pasted wherever the
  insertion point (cursor) is blinking. Always make sure the insertion
  point is where you want the text to be entered.
• Remember, too, that there is usually more than one way to do
  something. If a different way to do it occurs to you, go ahead and
  try it! If it doesn’t work, you can always click on the Undo
  command on the Quick Access Toolbar. If you can’t remember what
  a command does, move the mouse pointer over it and pause. A
  ToolTip appears describing the command’s function.
• In this exercise:
   – Tabs will be underlined
   – Groups will be in Italics
   – Commands will be in bold
Demo Presentations
• If you go to File then New, there are a wide
  variety of templates that can help you get started
  on your next project.
• When you click on the PowerPoint Presentations
  and Slides (or Presentations) menu, there is a
  folder in there called Demo Presentations.
• View the two presentations provided in that
  folder to give you an idea of just how much you
  can create with PowerPoint.
Photo Album
• Create a custom photo album easily by going
  to the insert tab and clicking Photo Album in
  the Images group.
• Add photos from your files, put them in the
  order you want, and decide how you want the
  album to be laid out
Links
• Hyperlink allows you to insert links to an
  existing file, a webpage, or another place in
  the presentation.
• Action allows you to choose whether you
  want to go to a link by clicking on it or by
  mousing over it.
Tables and Charts
• Tables and Charts allow you to visually organize
  and present data in a presentation.
• Charts will open up an excel spreadsheet where
  you input your data. Table and Chart styles and
  designs can be modified once created.
• You can insert different types of tables and charts
  by clicking on the Insert tab and clicking table or
  chart or by clicking on the table or chart icon in a
  placeholder.
Design
• Use WordArt and SmartArt on your text to create fun styles and
  colors.
• Use audio and video to enhance your slideshow with music, your
  own voice, and videos from your file or from the internet.
• Themes, transitions, and animations are the finishing touch to
  generate visual interest and movement that literally brings your
  presentation to life.
• Note: Graphic and media objects will add colored tabs to the ribbon
  menu that are specific to the object you’ve selected. The tabs will
  have a heading above them indicating what kind of object you’re
  working with. (i.e. Text placeholders will bring up Drawing Tools,
  Audio will bring up Audio Tools, Smart Art will bring up SmartArt
  Tools, etc.)
• Note: Remember you can resize and rearrange all text, media and
  graphic placeholders anywhere on the page. (i.e. pictures, video,
  text, charts, etc.)
You can also read