Reference manual
Tuning Fork Sensor Controller
←
→
Page content transcription
If your browser does not render page correctly, please read the page content below
Reference manual Tuning Fork Sensor Controller
© October 2011
Version 1.0

NanoAndMore GmbH		         NanoAndMore USA
Spilburg Bld. A1			        9 James F. Byrnes Street
Steinbühlstrasse 7 		      Lady’s Island, SC 29907 USA
D-35578 Wetzlar, Germany

www.NanoAndMore.com
Important notes:
Operating conditions
■■ Indoor use only
■■ Altitudes below 2000m
■■ Ambient temperature in the range 5-40°C
■■ Maximum relative humidity 80% at 31°C linearly decreasing to 50% at 40°C
■■ Maximum deviations in the power supply up to ±10% from the 100-230V~ 50/60Hz
■■ Power supply with transient overvoltages category II
■■ Ambient atmosphere with rated pollution degree 2

Installation instructions:
■■   The device must be connected to a 100-230V~ 50/60Hz power supply with
     protective grounding.

Operation manual:
■■ The device must be positioned in such a way that the connectors at both ends of
   the power supply cable are easily accessible.
■■ The external surface of the device can be cleaned with a dry piece of soft cloth
   only. Do not use corrosive or easily combustible solvents!
■■ Never use the device for other than its intended purpose! NanoAndMore will
   assume no responsibility for accident or malfunction caused by improper use.

Maintenance:
■■ No periodic maintenance by the manufacturer or an appointed repair
   representative is required.
■■ The fuse is F 2.0A 250V
Quick and simple training
This simple training is for new users to become familiar with the Tuning Fork Sensor Controller.
In this example, a tuning fork sensor from NanoAndMore is used.

                                                                          Comparator

               (1) Power connection                  (2) Preamp connection

                                                                  8(00)~9(00)
                                             0(70)~1(00) 2~4 2~4 TF     Drive signal
            To remove from Gel-sheet
            Twist & pick up                                               Comparator

                                                Low Int.    Wide       Pos.
                                                               oscilloscope
             Larger than 2 mm
                                                           (4) Set knobs and
              (3) Sensor in the holder                          power ON

1) Obtain a sine wave

Please follow the steps above in the described order. Normally, a sine wave should appear
on the oscilloscope. If not, please follow the main part of this manual.

2) Experience how the oscillation changes by turning the knobs

The next step is to play with the “Phase”, “Gain”, and “Amplitude” knobs and to look how the
oscillation changes. The knobs have to be turned one after the other as described below.
■■ “Phase”: Amplitude of the sine wave on the oscilloscope visibly changes. There is a
   minimum amplitude point, which is the resonance of the sensor and the optimum setting.
■■ “Gain”: If the gain is increased too much, the oscillation becomes unstable.
■■ “Amplitude”: Amplitude of the sine wave visibly changes. Depending on the amplitude
   setting, the optimum position of the “Gain” knob is different.

3) Gently stimulate the TF sensor

Gently stimulate the TF sensor, e.g., by blowing on the sensor, and watch how the oscillation
changes.
Next steps: To use the frequency measurement function and/or to know more about the controller,
please read the main part of the manual.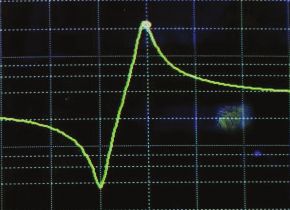
Reference manual:                                                                                                                           5
Tuning Fork Sensor Controller

Table of contents
Important notes .................................................................................................................... 3

Quick and simple training ..................................................................................................... 4

Content of package .............................................................................................................. 5

1. Introduction ....................................................................................................................... 6

2. Knobs and connectors ...................................................................................................... 7

3. Description of Tuning Fork Sensor Controller system ...................................................... 8

4. Practical operations ........................................................................................................ 11

Step 1: Adjusting of parasitic capacitance compensation .................................................. 11

Step 2: Setting up the self-oscillation of a tuning fork sensor ............................................ 15

Step 3: Setting up the frequency measurement function ................................................... 16

5. NANOSENSORS™ Akiyama-Probe operation .............................................................. 16

6. Technical data ................................................................................................................ 19

Content of package
■■ Tuning Fork Sensor Controller
■■ Preamplifier board with sensor holder
■■ Controller-to-preamplifier cable
■■ Controller-to-power supply cable
■■ Printed version of this manual

                          This product is an electrostatic sensitive device.
                          Please adopt maximum countermeasures to avoid ESD (Electrostatic
                          Discharge).
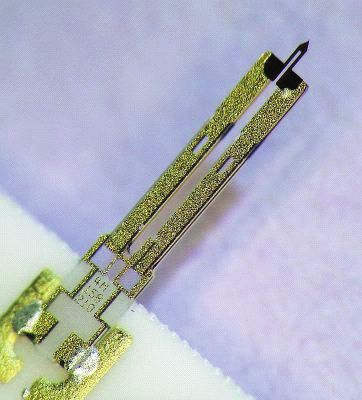
Reference manual:                                                                                    6
Tuning Fork Sensor Controller

1. Introduction
Commercially available “watch crystals”, with a resonance frequency of 32.768 kHz, are of great
interest for various sensing applications such as Scanning Force Microscope (SPM), Atomic Force
Microscope (AFM), viscosity/vacuum measurements, bio/chemical sensing, e.t.c.

Most of these sensors are based on a simple working principle: A quartz tuning fork is self-oscillating
at its resonance frequency. As soon as an external force, an “influence”, or an environmental change
is applied on the tuning fork, the self-oscillation frequency changes. By measuring the frequency
shift, one can obtain quantitative information of the analyte.

The NanoAndMore Tuning Fork Sensor Controller is an electronic device to (i) control the self-
oscillation of a quartz tuning fork based sensor and to (ii) measure its frequency.

The circuit parameters are particularly optimized for AFM applications with the NANOSENSORS™
Akiyama-Probe (see photo above). However, the NanoAndMore Tuning Fork Sensor Controller
can be applied for other sensors based on the same type of quartz tuning fork.

The NanoAndMore Tuning Fork Sensor Controller in conjunction with the preamplifier included
in the package can self-excite a quartz tuning fork sensor at its resonance frequency. The sensor is
driven by an analog signal (normally a sine wave), and the vibration amplitude of the tuning fork is
kept at a setpoint by a feedback loop. The phase-locked loop (PLL) of the NanoAndMore Tuning
Fork Sensor Controller measures the self-oscillation frequency and yields an analog output.
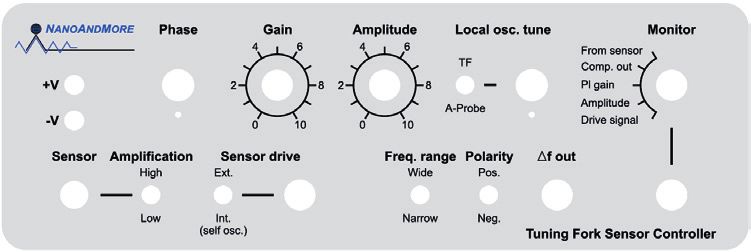
Reference manual:                                                                                         7
Tuning Fork Sensor Controller

2. Knobs and connectors
The front panel

■■ +V, -V : monitor of DC power on the board
■■ Sensor : Terminal to be connected to the preamplifier board with the provided cable.
■■ Amplification : Set amplification for the signal from the sensor, High (×10) or Low (×2.4)
■■ Sensor drive : Select the driving signal to the sensor, either an external signal supplied to the
   BNC on the side or an internal signal for self-oscillation. (Important: The signal applied on the
   terminal should be limited between -10 V to +10 V.)
■■ Phase : Control the phase shifter in the self-oscillation loop
■■ Gain : Control gain of the amplitude controller in the self-oscillation loop
■■ Amplitude : Set the signal amplitude to be maintained in the self-oscillation loop
■■ Local osc. tune: Set the local oscillator frequency, The selector changes the tunable frequency range: TF
   (27.4 kHz ~ 37.9 kHz), A-Probe (37.6 kHz ~ 60.4 kHz) (± 1 kHz variations in different units)
■■ Δf out : Frequency shift output terminal. The output range is from -10V to +10V.
■■ Freq. range : Demodulation frequency range, Wide = ± 2077 Hz (± 150Hz variations in different
   units), Narrow = ± 405 Hz (± 30Hz variations in different units)
■■ Polarity : Pos. (sensor frequency UP > Δf out UP), Neg. (sensor frequency UP > Δf out DOWN)
■■ Monitor : Select one of the signals at different points in the self-oscillation loop. The output
   range of the monitor terminal is from -10V to +10V.
Reference manual:                                                                                   8
Tuning Fork Sensor Controller

The back panel                                         Power line   Power switch

On the back panel, there are the power entry
socket, the fuse box, and the power switch. The
AC power supply should be 100-230V~ 50/60Hz.
The fuse is F 2.0A 250V. When the proper DC
power is supplied on the internal circuit board, the
LEDs on the front panel illuminate.                                 Fuse

3. Description of Tuning Fork Sensor Controller system
The following figure shows the overall system of the NanoAndMore Tuning Fork Sensor Controller
(TFSC). The electronics in the TFSC box consist of two circuit blocks. One is a self-oscillation block
which forms an electrical loop together with the preamp (separated unit) to enable a self-oscillation
of a quartz tuning fork (TF) at its resonance frequency with constant amplitude. The other block is a
frequency measurement unit including a Phase-Locked Loop (PLL) circuit.
Reference manual: 9
Tuning Fork Sensor Controller
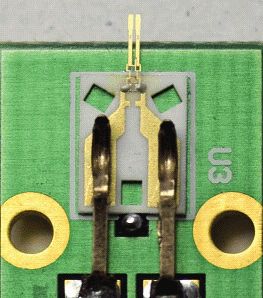
Sensor holder
The preamplifier board and the sensor holder are fabricated on a single PCB. The sensor holder is
designed for mounting the ceramic plate of the NanoAndMore TF sensor and NANOSENSORS™
Akiyama-Probe. The sensors with the ceramic plates can be easily slipped in the slot and held on
the spot. The two spring pins provide the in/out signals to/from the TF. The sensor holder can be
separated from the preamplifier board by cutting the PCB and mounted apart, if this is preferable.
The three electrical connections, however, should be as short as possible.
Trimmer for the parasitic
capacitance compensation
Sensor holder Preamplifier board
--- Preamplifier board and sensor holder ---
In order to perform an accurate measurement with a TF sensor, only the piezoelectric current must
be measured. The base current flowing through a parasitic capacitance related to the sensor must
be compensated. This is done by adjusting the trimmer on the preamplifier board.
!!! Important note !!!
The preamplifier and sensor holder board are not shielded from external electromagnetic
disturbances. They should be used inside of an electromagnetically shielding enclosure.
Preamplifier board
At the first stage of the preamplifier board, the TF driving signal coming from the TFSC is attenuated
by a factor of ten. The signal is then supplied to the TF sensor as well as the parasitic capacitance
compensation line. The outputs from both lines are summed such that only the piezoelectric-current
of the TF is amplified by current-voltage converter. The output is buffered at the final stage on the
board and fed to the TFSC.
In case of the Akiyama-Probe, the silicon cantilever and tip are electrically connected to the left pad
of the ceramic plate through one of the electrodes of the TF. Upon mounting the Akiyama-Probe
on the sensor holder, the left pad is connected to the virtual ground terminal of the current-voltage
convertor. Consequently, the cantilever and tip have the virtual ground potential.Reference manual: 10
Tuning Fork Sensor Controller
Self-oscillation block
A signal from the preamp is amplified at the first stage. The amplification can be set either High
(×10) or Low (×2.4). The first choice should be Low. If the Q factor of the sensor is very low and a
self-oscillation cannot be obtained, one needs to select the high amplification. The amplified signal
can be monitored from the monitor terminal, by selecting “From sensor”.
At the second stage, the amplitude of the amplified signal is measured. The measured value can be
monitored as “Amplitude”. The amplitude controller at the following stage includes a proportional-
integral (PI) regulator and maintains the measured amplitude at a constant value set by the
“Amplitude” knob. The gain of the amplitude controller is set by the “Gain” knob. The output from
the amplitude controller can be monitored from the monitor terminal, by selecting “PI gain”.
The amplified signal at the first stage and the amplitude controller output are multiplied and fed to
a phase shifter. A certain phase shift controlled by the “Phase” knob is applied to the signal. The
yielded signal can be monitored as “Drive signal”. Finally, the signal is fed to the preamp through
the “Sensor drive” switch.
It is possible to apply an external driving signal to the sensor through the “Sensor drive” terminal.
Frequency measurement block
The frequency measurement block includes a Phase-Locked Loop (PLL) circuit. It measures the
self-oscillation frequency and generates an analog signal proportional to a difference between the
self-oscillation frequency and an internal reference. The frequency of the internal reference is set
by the “Local osc. tune” knob and the range selector.
This frequency measurement block is independent from the self-oscillation loop. It does not influence
the self-oscillation of the sensor.
Example (the self-oscillation frequency is 45.000 kHz):
The range selector should be set on the position “A-Probe”. By turning the “Local osc. tune”
knob, one can find the point where the analog output at the Δf out terminal is 0V. With these
settings, the output will follow the change up to the demodulation frequency range selected
by “Freq. range”, if the self-oscillation frequency changes.
+10 V
Δf out
Frequency measurement
(PLL)
Comparison
PLL tune
E.g., 45.000 kHz smaller 0V bigger
Frequency turning
(PLL tune: to be adjusted) Local
oscillator
Frequency range
-10 V 405 Hz 405 Hz
(37.6 kHz – 60.4 kHz range) Output polarity
(Positive)
Monitor
Demodulation frequency range (Comparator) 44.595 kHz 45.405 kHz
(± 405 Hz range) 45.000 kHzReference manual: 11
Tuning Fork Sensor Controller
In this example, “Freq. range” is set “Narrow (± 405 Hz)”. A frequency change from 44.595
kHz to 45.405 kHz can be measured and the corresponding output at the Δf out terminal is
from -10 V to +10 V. The output polarity can be inversed by “Polarity” selector setting.
4. Practical operations
In this chapter, practical steps to setup/optimize the TFSC for measurements are described. There
are three steps which have to be followed: Step 1 > Step 2 > Step 3 > measurements.
Step 1, Set the trimmer on the preamplifier board.
Step 2, Start the self-oscillation and optimize parameters.
Step 3, Set up the frequency measurement function and obtain an analog output.
The initial preparations before the three steps are as follows:
■■ Fix the sensor holder and the preamplifier board.
■■ Connect the preamplifier board and the TFSC with the provided cable.
■■ Connect the AC power cable. The power switch is OFF at this moment.
■■ Mount a TF sensor on the sensor holder.
Step 1: Adjusting of parasitic capacitance compensation
There are three options for adjusting the parasitic capacitance compensation by tuning the trimmer
on the preamplifier board. Choose one of the options according to the available external instruments.
This procedure must be carried out each time after the TF sensor is exchanged.
Option 1:
If a parameter analyzer (Gain-phase, Network, Lock-in amplifier, etc.) is available.Reference manual: 12
Tuning Fork Sensor Controller
■■ Set “Sensor drive” switch to “Ext.” and “Monitor” selector to “From sensor”
■■ Set the selector of “Local osc. tune” depending on the sensor type.
■■ Set “Amplification” switch to “Low” (this is the first choice. If Q of the sensor is very small, this
switch would need to be “High”.)
■■ Connect the reference output channel of the parameter analyzer and “Sensor drive” input with a
50Ω BNC cable.
■■ Connect the test channel of the parameter analyzer and “Monitor” output with a 50Ω
■■ Turn power switch ON, make sure both +V and –V power LEDs are on.
■■ Start a frequency sweep function of the parameter analyzer. The amplitude is set e.g., 1 V peak-
peak.
■■ Find a resonance peak and make the sweep range narrower, e.g., 1 kHz.
■■ Turn the small screw of the trimmer on the amplifier board (see “Preamplifier board and sensor
holder” on p. 9) with a screwdriver so that the amplitude curve becomes symmetric around the
resonance peak. The middle picture below shows the optimum setting.
Amplitude (log)
frequency
Option 2:
If a sine wave generator with frequency sweep function and an oscilloscope are available.
“Tuning fork sensor” Selector to “Amplitude”
or “A-Probe”
Comparator
Selector to “Ext.”
55’000.00
Preamplifier board
First choice “Low”.
If Q is very small Sine wave generator with Oscilloscope
then “High”. frequency sweep modeReference manual: 13
Tuning Fork Sensor Controller
■■ Set “Sensor drive” switch to “Ext.” and “Monitor” selector to “Amplitude”
■■ Set the selector of “Local osc. tune” depending on the sensor type.
■■ Set “Amplification” switch to “Low” (this is the first choice. If Q of the sensor is very small, this
switch would need to be “High”.)
■■ Connect the output channel of the sine wave generator and “Sensor drive” input with a 50Ω BNC
cable.
■■ Connect an input channel of the oscilloscope and “Monitor” output.
■■ Turn power switch ON, make sure both +V and –V power LEDs are on.
■■ Start a frequency sweep of the sine wave generator: e.g., center frequency = resonance
frequency of the sensor, bandwidth = 2 kHz, amplitude = 1 V peak-peak, sweeping time = 5
seconds
■■ Set the time axis of oscilloscope, e.g., 500 ms/div, so that one cycle of the frequency sweep can
be monitored.
■■ Normally, a peak can be found in the signal on the oscilloscope. If yes, make the sweep range
narrower, e.g., 1 kHz, if not, slightly change the center frequency.
■■ Turn the small screw of the trimmer on the amplifier board (see “Preamplifier board and sensor
holder” on p. 9) with a screwdriver so that the amplitude curve becomes symmetric around the
resonance peak.
Option 3:
If a sine wave generator with NO frequency sweep function and a multimeter (or an oscilloscope)
are available.
“Tuning fork sensor” Selector to “Amplitude”
or “A-Probe”
Comparator
Selector to “Ext.”
55’000.00 DC 1.2345 V
Preamplifier board
Multimeter
First choice “Low”.
If Q is very small Sine wave generator with
then “High”. NO frequency sweep modeReference manual: 14
Tuning Fork Sensor Controller
■■ Set “Sensor drive” switch to “Ext.” and “Monitor” selector to “Amplitude”.
■■ Set the selector of “Local osc. tune” depending on the sensor type.
■■ Set “Amplification” switch to “Low” (this is the first choice. If Q of the sensor is very small, this
switch would need to be “High”.).
■■ Connect the output channel of the sine wave generator and “Sensor drive” input with a 50Ω BNC
cable.
■■ Connect a test channel of the multimeter to “Monitor” output. The multimeter should be set in a
DC measurement mode.
■■ Turn power switch ON, make sure both +V and –V power LEDs are on.
■■ Start the sine wave generator. Set the frequency several kHz higher than the expected
resonance of the sensor, e.g., ~60 kHz in case of the Akiyama-Probe and ~40 kHz for the TF
sensor. The amplitude is e.g., 1 V peak-peak.
■■ Turn the small screw of the trimmer on the amplifier board (see “Preamplifier board and
sensor holder” on p. 9) with a screwdriver in order to minimize the amplitude (measure on the
multimeter). With these settings, the adjustment of the parasitic capacitance compensation is
normally sufficient just to obtain self-oscillation of the sensor. Perform the following steps if you
require precise adjustment.
■■ First, the signal frequency from the generator is set at the expected sensor resonance. Precisely
adjust the frequency in order to obtain a maximum amplitude (measure on the multimeter). Take
a note of the frequency and the amplitude.
■■ Slightly change the setting of the trimmer on the preamplifier board to one direction.
■■ Tune the frequency and find maximum amplitude again. Repeat this step if you obtain a smaller
amplitude than before. If the amplitude is increased, turn the trimmer the other direction. The
optimum setting is where the amplitude is at its minimum (see the figure below). Note that the
amplitude change is usually very small.
amplitude
optimum frequency
(symmetric)Reference manual: 15
Tuning Fork Sensor Controller
Step 2: Setting up the self-oscillation of a tuning fork sensor
The next step after the adjustment of the parasitic capacitance compensation is to setup a stable
self-oscillation of the TF sensor.
Selector to “Drive signal”
Comparator
Selector to “Int.”
Scanning probe
system
(z-feed back)
Preamplifier board
First choice “Low”.
If Q is very small
then “High”. Oscilloscope
■■ Turn the power switch OFF.
■■ Connect an oscilloscope to the “Monitor” output with a 50Ω BNC cable.
■■ Set the “Sensor drive” switch to “Int.” and the “Monitor” selector to “Drive signal”.
■■ Set the “Amplification” switch to “Low” (this is the first choice. If Q of the sensor is very small,
this switch would need to be “High”.)
■■ If the tuning knob parameters are not known, set the “Phase” knob to 5(00), the “Gain” knob to
5, and the “Amplitude” knob to 5 for tuning fork sensors and 1(00)/5/5 for A-probes.
■■ Turn the power switch ON. Make sure both +V and –V power LEDs are on.
■■ Turn the “Phase” knob until a stable sine wave appears on the oscilloscope. Normally, its
frequency is around the resonance frequency obtained in Step 1.
■■ Fine-tune the “Phase” knob such that the amplitude of the “Drive signal” appearing on the
oscilloscope is minimal.Reference manual: 16
Tuning Fork Sensor Controller
■■ As the name suggests, the “Amplitude” knob controls the vibration amplitude of the TF sensor.
(In case of the Akiyama-Probe, the tip vibration amplitude in a free space is set by this knob.)
■■ The ‘Gain’ knob controls the feedback loop gain of the amplitude control circuit. Normally, it
should be set as high as possible, but low enough to keep the signal stable. It is recommended
to re-tune this knob each time after the amplitude setting was changed.
Step 3: Setting up the frequency measurement function
At this point, the TFSC can be connected to a planned final measurement setup, e.g., SPM/AFM. The
terminal “Δf out” provides an analog signal proportional to a difference between the self-oscillation
frequency and an internal reference which can be tuned by the “Local osc. tune” knob.
■■ Connect the “Δf out” terminal to a planned measurement setup, if necessary.
■■ Set the “Monitor” selector to “Comp. out”
■■ Turn the “Local osc. tune” knob until the signal at “Δf out” is nearly 0 V and the “Monitor”
output shows a triangle (saw) wave. In fact, there are a couple of circumstances where “Δf out”
becomes nearly 0V. However, there is only one setpoint which fulfills the above mentioned two
conditions simultaneously.
■■ Finally, the “Local osc. tune” knob is set at a setpoint at which “Δf out” yields a preferable voltage,
or frequency, offset (Please refer the paragraph “Frequency measurement block” above).
!!! Important note !!!
The preamplifier and sensor holder board are not shielded from external electromagnetic
disturbances. They should be used inside of an electromagnetically shielding enclosure.
5. NANOSENSORS™ Akiyama-Probe operation
The best operation mode for NANOSENSORS™ Akiyama-Probe is dynamic mode with frequency
modulation (FM) detection, which can be perfectly done using the TFSC. To setup an AFM system
with the Akiyama-Probe, only two things have to be done: (i) fixation of the probe on to the AFM
head and (ii) electrical connection between the frequency output of the TFSC, “Δf out”, and an input
terminal for z-feedback loop of the AFM.
For example, some Veeco/Bruker AFMs are equipped with the so called “Break-out box”, which is
an I/O interface with many BNC connectors for different signals. “In0” of this box is the terminal to
which an external signal should be fed for the z-feedback. The “Δf out” terminal of the TFSC can be
directly connected to the “Input” terminal of “In0” with a 50Ω BNC cable. The switch of “In0” should
be positioned on “Input”.Reference manual: 17
Tuning Fork Sensor Controller
If you don’t know how to introduce an external signal for the z-feedback, please contact your AFM
manufacturer.
In case of Nanoscope III from Veeco/Bruker, if an external input signal for the z-feedback is negative,
the AFM program recognizes that the tip is not touching the sample. In contrast, if the signal is
positive, the tip is considered to be already at the sample surface (This is a setting of the program.).
When the tip-engaging function (start of scanning) is launched, the program checks the input signal.
As long as the signal is negative, the tip is mechanically approached towards the sample. When it
becomes 0 V, the approach is stopped and xy-scanning as well as the z-feedback are started. The
z-piezo is driven with the feedback loop according to the magnitude of the input signal. A higher
input voltage is considered to be a larger cantilever deflection.
The dynamic range of the output of the TFSC is ±10V, which corresponds either to ± 405 Hz or to
± 2077 Hz. The maximum frequency shift (denoted as Δf) of an Akiyama-Probe is approximately 30
Hz ~ 400 Hz (Δf varies depending on temperature and humidity). Normally, the ± 405 Hz range (~24
mV/Hz) is selected for tuning fork sensors and Akiyama-Probe operation.
In ambient conditions, an engaging point should be in the “periodic contact phase” (see figure
below). Here, we suppose that a probe has Δf = 200 Hz and that an engaging point should be at 20
Hz shifted position. In this case, an initial frequency out of the TFSC (“Δf out” terminal) should be
set to -0.48 V (24 mV/Hz × 20 Hz = 0.48 V, negative = lower frequency) by adjusting the “Local osc.
tune” knob. With this setting, the AFM program starts xy-scanning at the desired engaging point.
“Quasi” contact Periodic contact phase
Free
phase oscillation
TFSC Frequency
output shift
+4.32 V
Δf = 200 Hz
Engaging point
Frequency shift
0V
20 Hz
-0.48 V
Initial offset
(± 405 Hz range)
90% 10%
Z-position
A half of peak-peak tip amplitude
For measurements in ambient conditions, it is better to use a relatively large tip vibration amplitude.
However, each probe has different factors between “Driving voltage” and “Tip amplitude”, e.g., dial “2” at
“Amplitude” knob yields 300 nm peak-to-peak for one Akiyama-Probe, but 150 nm- 500 nm for another.Reference manual: 18 Tuning Fork Sensor Controller Real amplitude can be estimated from a full stroke approach curve. The z-displacement over which the periodic contact phase is lying corresponds to a half of the peak-peak tip amplitude. Note that the amplitude of the piezoelectric-current of the TF, which is proportional to the mechanical vibration amplitude of the prongs, is maintained at a set value by the TFSC, but this does not mean that the tip vibration amplitude is also kept at a constant value. It is recommended to optimize the “Gain” whenever the tip amplitude setting is changed. This is especially important if the probe needs to work with a very small tip amplitude (< 150nm). For more information about the Akiyama-Probe, please read the references provided by NANOSENSORS™ (www.akiyamaprobe.com). Although, the TFSC can be configured for the amplitude modulation (AM) detection like shown in the figure below, this mode is not recommended for an operation of the Akiyama-Probe. The reason is that due to the high Q of the Akiyama-Probe, the scan speed would have to be very slow and one would have to compromise the spatial resolution.
Reference manual:                                                                    19
Tuning Fork Sensor Controller

6. Technical data
■■ Self-oscillation frequency range         10 kHz ~ 100 kHz
■■ Frequency measurement range		            (a) 27.4 kHz ~ 37.9 kHz*1
 ■ (@ ∆f out = 0V)				                      (b) 37.6 kHz ~ 60.4 kHz*1
■■ Demodulation output range		              ± 10 V
■■ Demodulation frequency range		           (i) ± 405 Hz *2 (100 mHz resolution)
        					                               (ii) ± 2077 Hz *3 (510 mHz resolution)
■■ Demodulation bandwidth			                ~ 400 Hz
■■ Output polarity selection 			            Yes
■■ Monitor terminal range			                ± 10 V
■■ Required power supply			                 100-230V~ 50/60Hz 4VA

*1 ± 1 kHz variations in different units
*2 ± 30 Hz variations in different units
*3 ± 150 Hz variations in different units

Specifications are subject to change without notice.
www.NanoAndMore.com
Reference manual
Tuning Fork Sensor Controller
You can also read