Roomba Discovery Series Service Manual - Published August 31 2006 Roomba Scheduler Roomba Discovery SE Roomba Discovery Roomba Sage Roomba Red
←
→
Page content transcription
If your browser does not render page correctly, please read the page content below
Roomba Discovery Series
    Service Manual
    Published August 31 2006

                    Roomba Scheduler

                    Roomba Discovery SE

                    Roomba Discovery

                    Roomba Sage

                    Roomba Red

                                          1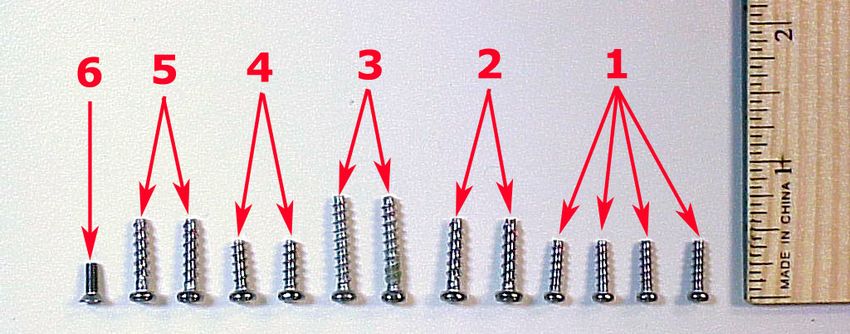
Table of Contents

Roomba Service Process _________________________________________________________ 5
  01: Customer Call___________________________________________________________________ 6
  02: Roomba Return Procedure ________________________________________________________ 7
  03: Incoming Roomba Inspection ______________________________________________________ 7
  04: Roomba Cleaning ________________________________________________________________ 8
  05: Roomba Software & Charging Reset ________________________________________________ 8
  06: Roomba Diagnostics: Built-in-Test (BiT) ____________________________________________ 9
  07: Capture Built-in-Test Data ________________________________________________________ 9
  08: Roomba Diagnostics: Mobility Test _________________________________________________ 9
  09: Fix or Replace Roomba ___________________________________________________________ 9
  10: Test Battery____________________________________________________________________ 10
  11: Test Power Supply ______________________________________________________________ 10
  12: Test Home Base (if applicable) ____________________________________________________ 10
  13: Test Virtual Wall (if applicable) ___________________________________________________ 11
  14: Test Remote (if applicable) _______________________________________________________ 11
  15: Replace Faulty Accessories _______________________________________________________ 11
  16: Pack & Record the Serial Numbers ________________________________________________ 11
  17: Monthly Data Report to iRobot ___________________________________________________ 12
Roomba Vacuuming Robot ______________________________________________________ 13
  Roomba Terminology_______________________________________________________________ 13
  Roomba Chassis Disassembly Procedure _______________________________________________ 14
  Roomba Electrical Inter-Relationships ________________________________________________ 15
  Service Procedure (based on Built-in-Test Failures)______________________________________ 16
    Failed BiT 0 - Panel LEDS _________________________________________________________________        17
    Failed BiT 1 – Bumpers ___________________________________________________________________         18
    Failed BiT 2 or 3 – Outer & Inner Cliff Sensors_________________________________________________   19
    Failed BiT 4 – Wheel Drop_________________________________________________________________         20
    Failed BiT 4 – Wall Sensor_________________________________________________________________        21
    Failed BiT 5 – RCON / IR Receiver __________________________________________________________       22
    Failed BiT 6 – Battery Sensor_______________________________________________________________       22
    Failed BiT 7, 8 or 9 – Drive Wheels & Encoders ________________________________________________    23
    Failed BiT 10 – Stasis (front wheel) __________________________________________________________    25
    Failed BiT 11 – Main Brush ________________________________________________________________        26
    Failed BiT 12 – Debris Sensor ______________________________________________________________       27
    Failed BiT 13 – Vacuum ___________________________________________________________________         28
    Failed BiT 14 – Side Brush_________________________________________________________________        29
    Failed BiT 15-20 – Charging _______________________________________________________________        30

                                                                                                       2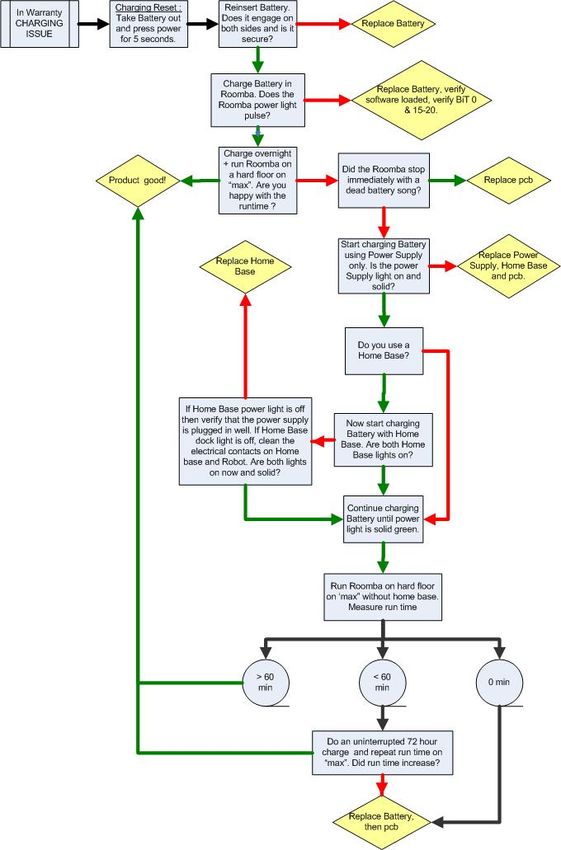
Precautionary Replacements ________________________________________________________________ 31
    Precautionary replacements ________________________________________________________________ 31
Charging Accessories___________________________________________________________ 32
  Roomba Battery ___________________________________________________________________ 33
    Battery Types ___________________________________________________________________________      34
    Battery Insertion Technique ________________________________________________________________   34
    General Battery Maintenance Tips ___________________________________________________________   35
    Battery Troubleshooting ___________________________________________________________________    35
  Roomba Power Supply______________________________________________________________ 36
    Power Supply Generations _________________________________________________________________ 36
    Power Supply Troubleshooting______________________________________________________________ 36
  Roomba Home Base ________________________________________________________________ 37
    Manual Docking _________________________________________________________________________ 38
    Home Base Generations ___________________________________________________________________ 39
    Home Base Troubleshooting________________________________________________________________ 39
  Rapid Charger ____________________________________________________________________ 40
Roomba Accessories____________________________________________________________ 41
  Roomba Virtual Wall _______________________________________________________________ 42
    Virtual Wall Generations __________________________________________________________________ 43
    Virtual Wall Troubleshooting _______________________________________________________________ 43
  Roomba Remote ___________________________________________________________________ 44
    Remote Troubleshooting___________________________________________________________________ 44
  Roomba Filter _____________________________________________________________________ 45
    Filter Troubleshooting_____________________________________________________________________ 45
  Bristle, Flexible and Side Brush ______________________________________________________ 46
    Brush Troubleshooting ____________________________________________________________________ 46
Appendix A: Charging Troubleshooting Flowchart __________________________________ 48
Appendix B: Serial Number Format _______________________________________________ 49
Appendix C: Roomba Code List __________________________________________________ 51
Appendix D: Roomba Error Codes ________________________________________________ 53
Appendix E: Roomba Software & OSMO___________________________________________ 54
Appendix F: Roomba Built-in-Test Procedure_______________________________________ 56
  iRobot Data Capture _______________________________________________________________ 61
  Alternative Data Capture ___________________________________________________________ 61
  Built-in-Test Output File (using iRobot Roomba Factory-Test-Client Version 1.1) ____________ 62
Appendix G: Roomba Built-in-Test Limits __________________________________________ 63
Appendix H: Roomba Mobility Test Procedure ______________________________________ 64
Appendix I: PCB Connector Designation___________________________________________ 68
Appendix J: Battery Test Procedure _______________________________________________ 69
Appendix K: Power Supply Test Procedure _________________________________________ 70

                                                                                                   3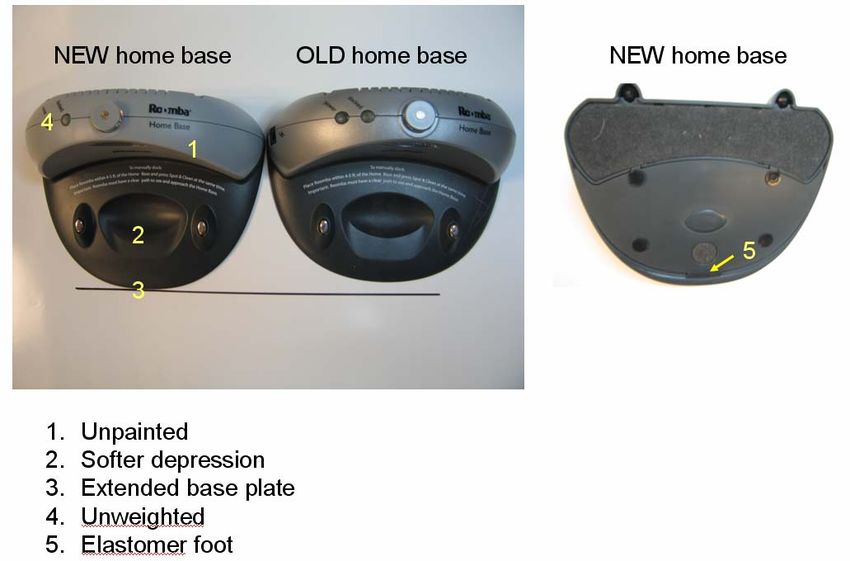
Appendix L: Built-in-Test Toolbox kits_____________________________________________ 71
Appendix M: Disassembly Procedure ______________________________________________ 72
  Roomba Chassis Disassembly Procedure _______________________________________________ 72
  Roomba Cleaning Frame Disassembly Procedure _______________________________________ 73
  Roomba Main PCB & Inner Bumper Removal Procedure ________________________________ 75
  Roomba Wheel Disassembly Procedure ________________________________________________ 77
  Roomba Fixed Caster Removal Procedure _____________________________________________ 79
  Roomba Swivel Caster Removal Procedure_____________________________________________ 80
  Roomba Swivel Optical Stasis & Switch Removal Procedure ______________________________ 80
Appendix N: User Interface______________________________________________________ 82
  User Interface : POWER Light _______________________________________________________ 82
  User Interface : STATUS Light ______________________________________________________ 83
  User Interface : DIRT Detect_________________________________________________________ 83
Appendix O: Roomba Engineering Changes ________________________________________ 84
Appendix P: GLOSSARY________________________________________________________ 87

                                                                                         4
Roomba Service Process
The Roomba Service Manual will guide a technician through the Roomba Service Procedure.
The steps that involve record keeping will enable iRobot to better track and support product
improvements. iRobot requires the data to be sent to them in a standardized manner but it is up
to every Service Center to decide how detailed they require their record keeping to be.

                                            Record Keeping

                                                                                                  5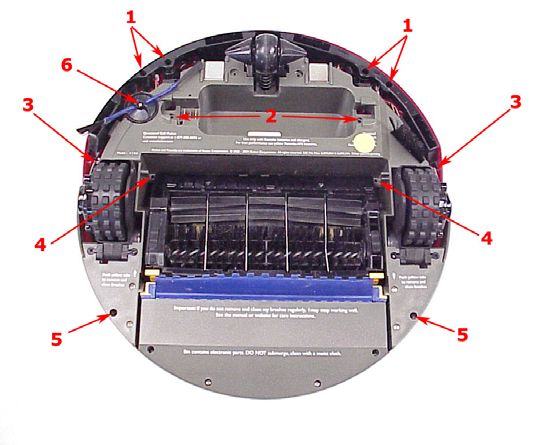
01: Customer Call

Depending on the sophistication of the Customer Service Representation at the service centers,
Roomba issues can be diagnosed over the phone by guiding a user through a troubleshooting
process. For example, Appendix A walks through the charging troubleshooting. At a minimum,
iRobot recommends that the customer be asked to perform routine Roomba maintenance steps to
resolve the Roomba issue. Only if these steps fail to resolve the issue should a customer send the
Roomba to a service center.

   A) Customer should clean Roomba
         i. Clean the cliff sensors under the bumper with compressed air.1
         ii. Remove any hair or obstruction from the three wheels.2
         iii. Remove any hair or obstruction from the brushes and bearings.3
         iv. Clean electrical contacts on Roomba and Home Base with alcohol pad or eraser.4
         v. Clean out the vacuum bin and vacuum filter. 5
                                                   2
                                                                                   1

                                                                                   4

                                                                                   3

                                                                     5

   B) Customer should reset Roomba’s charging system by removing the battery, pressing the
      Roomba power button for at least 5 seconds and reinserting the battery into the Roomba

   C) Customer should fully charge the battery overnight in the Roomba.

                                                                                                6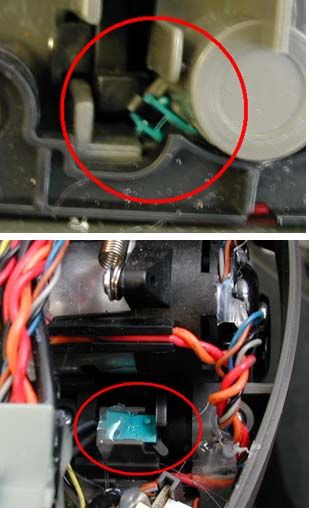
02: Roomba Return Procedure

If the initial maintenance steps did not solve the issue, a customer should proceed to return the
Roomba, battery and all accessories to a service center. The customer should add documentation
that provides the date, their name, address, a reference number and a description of the complaint.

In order to avoid receiving a depleted battery, ask the customer to remove battery from the
Roomba and place it separately in the box.

03: Incoming Roomba Inspection

         Unpack the Roomba return.
         Record serial number of the Roomba, Battery, Power Supply and
                                                                                    Appendix B
         Home Base.

         Record the date and ‘Customer Complaint Code’.                             Appendix C

         Remove the vacuum bin and turn the Roomba on its back on a flat
         surface.

         Perform a general outer visual inspection of the Roomba condition.
         Look at the wear on the chassis, caster & drive wheels.

         Inspect the brushes:
         o Remove the brush guard
         o Manually turn the bristle brush. The flexible brush should counter
             rotate?
         o Remove the brushes and check that both yellow brush bearings are
             present. Consider replacing old bearings with the new holed
             bearing style.1
         o Inspect the square ends of both brushes. Inspect the output gears on
             the side gearbox. to see if
         o Record the ‘Robot Condition Code’. Is the brush new, lightly
             soiled or dirty condition.
         Inspect the drive wheels:
         o Inspect the front wheel and drive wheels. Turn the wheels.

1
    Holed bearings allow captured dirt and hair to escape the cleaning assembly..

                                                                                                 7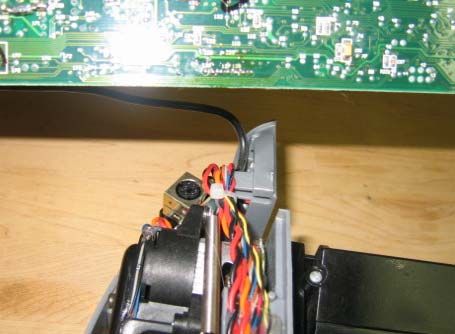
Reinsert all Roomba components (bearings, brushes, wire guard, side
   brush and vacuum bin). Insert *approved* charged battery in the
                                                                           Appendix D
   Roomba and run the Roomba on ‘Clean’. Does the Roomba end
   immediately with an error code? If not, continue.

04: Roomba Cleaning

   Remove and empty the vacuum bin and vacuum filter.

   Inspect the filter for punctures and replace if punctured.

   Clean the main brush, flexible brush and bearings from hair and dirt.

   Clean drive wheel bearings.

   Clean the wheel axles from hair using tweezers.
      o Front caster
      o Drive Wheels

   Remove and clean under the side brush of hair and dirt.

   Clean the sensors with compressed air.
      o Cliff sensors
      o Wall sensor
      o Bumper sensors

   Clean the cleaning assembly with compressed air.

   Clean the electrical contacts on Roomba with alcohol pad.

05: Roomba Software & Charging Reset

   Insert an *approved* charged battery in the Roomba and download the
                                                                           Appendix E
   latest software (if outdated).

   Reset Roomba’s charging system by removing the battery and pressing
   the power button for at least 5 seconds.

                                                                                        8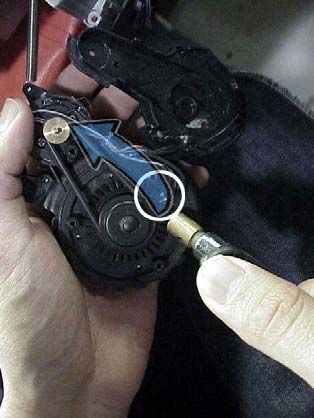
06: Roomba Diagnostics: Built-in-Test (BiT)

    Insert an *approved* charged battery in the Roomba.

    Insert an *approved* main bristle brush and flexible brush.

    Verify the vacuum bin is inserted in the Roomba.

    Use *approved* Power Supply, Home Base, Virtual Wall and Remote.

    Perform BiT steps. Take note of the button & speaker performance.    Appendix F

    Record the ‘Robot BiT Code’ and ‘Robot BiT Sub-Code’. Refer to
    main issue that caused return. Take special notice of the button &   Appendix C
    speaker performance.

07: Capture Built-in-Test Data

    Use “iRobot Factory Test Client Version 1.1” software to download
                                                                         Appendix F
    the BiT output.

08: Roomba Diagnostics: Mobility Test

    Perform the Mobility Test.                                           Appendix H

    Record the “Robot MT Code’.                                          Appendix C

09: Fix or Replace Roomba

    Disassemble Roomba and clean Roomba with compressed air.             Appendix M
                                                                         Service
    Repair parts using Built-in-test Fix.                                Procedure
                                                                         (pg 16)
    Check pcb connections.                                               Appendix I

    Retest the BiT and MT and continue fixing until 100% pass.

    Record ‘Action Code’.                                                Appendix C

                                                                                      9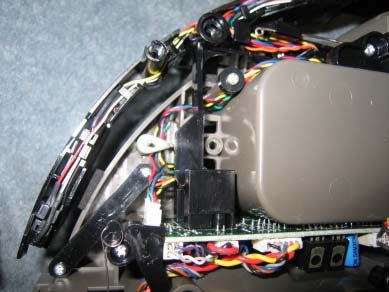
10: Test Battery

    Fully charge the returned Battery in an *approved*Roomba.
                                                                                 Appendix J
    Perform Battery test
       o Battery Voltage
                                                                                 Troubleshoot
       o Battery Voltage Drop with a 5 ohm load
                                                                                 Battery (pg
       o Thermistor value
                                                                                 35)
    [Note: If only battery voltage was low, attempt an uninterrupted 72
    hour charge and repeat test. If the voltage drop failed, replace battery.]

    When battery PASSES the test do a Roomba run time on a hard floor.
    Run time should be over 60 minutes. If runtime is less than 60 minutes,
    try a 72 hour charge again and see if run time improves. If no, replace
    battery.

    Record the ‘Battery Code’.                                                   Appendix C

11: Test Power Supply

                                                                                 Appendix K
    Test returned Power Supply
       o Output current at 90 VAC and 240 VAC
                                                                                 Troubleshoot
       o Output current at 60 VAC
                                                                                 Power Supply
       o Solid green light under load
                                                                                 (pg36)

    [Note: If the power supply light is off or blinking while charging,
    replace the Power Supply, Home Base and the Roomba's main pcb.
    The pcb in the Home Base and Roomba may have been damaged.]

    Record the ‘Power Supply Code’.                                              Appendix C

12: Test Home Base (if applicable)

    Test returned Home Base with a power supply
                                                                                 Troubleshoot
       o Clean Home Base (electrical contacts and IR emitter)
                                                                                 Home Base
       o Check if power and dock LEDs are ‘on’ when charging
                                                                                 (pg 39)
       o Visually inspect contact springs
    Test Home Base Mobility
       o Perform Home Base avoidance (Fig 5 in Appendix H)                       Appendix H
       o Perform the manual dock (Fig 7 in Appendix H)

                                                                                                10
Record the ‘Power Supply Code’ Appendix C
13: Test Virtual Wall (if applicable)
Test returned Virtual Wall with charged batteries
Troubleshoot
o Clean Virtual Wall (IR emitter)
Virtual Wall
o Check power light (if blinking then batteries are low)
(pg 43)
o Check Virtual mobility (Fig 4 in Appendix H)
Record the ‘Virtual Wall Code’ Appendix C
14: Test Remote (if applicable)
Test returned Remote with charged batteries
Troubleshoot
o Clean Remote (IR emitter)
Remote (pg
o Check power light (if blinking then batteries are low)
44)
o Verify all command buttons function with a Roomba
Record the ‘Remote Code’ Appendix C
15: Replace Faulty Accessories
Replace faulty accessories
Record the ‘Action Item Code’. Appendix C
16: Pack & Record the Serial Numbers
Wrap Battery so no electrical contact is made with the Roomba in
order to avoid creating a deeply discharged battery.
Record the serial number of all replacement parts. Appendix B
1117: Monthly Data Report to iRobot
Send monthly report to iRobot (tgiesecke@irobot.com)
1. A zipped up file of monthly Built-in-Test output files. The zip file
should have a name format of YYYYMM_RoombaBiT_##.csv Appendix C
where ## is the name of the service center. Save the file as a CSV
(comma delimited).
2. The detailed Record Sheet which captures all the service codes of
each serviced Roomba.
12Roomba Vacuuming Robot
Roomba Terminology
IR Receiver / RCON
Bumper
Handle
Chassis
Wall Sensor
User Interface (UI)
Vacuum Bin Charging Socket
Serial Port
Front Caster
Contacts
Cliff Sensors
Battery
Cleaning Frame
Brush Guard
Side brush
Drive Wheel Flexible Brush Cleaning Assembly
Debris Sensor
Vacuum Inlet
Main Brush
Vacuum Bin
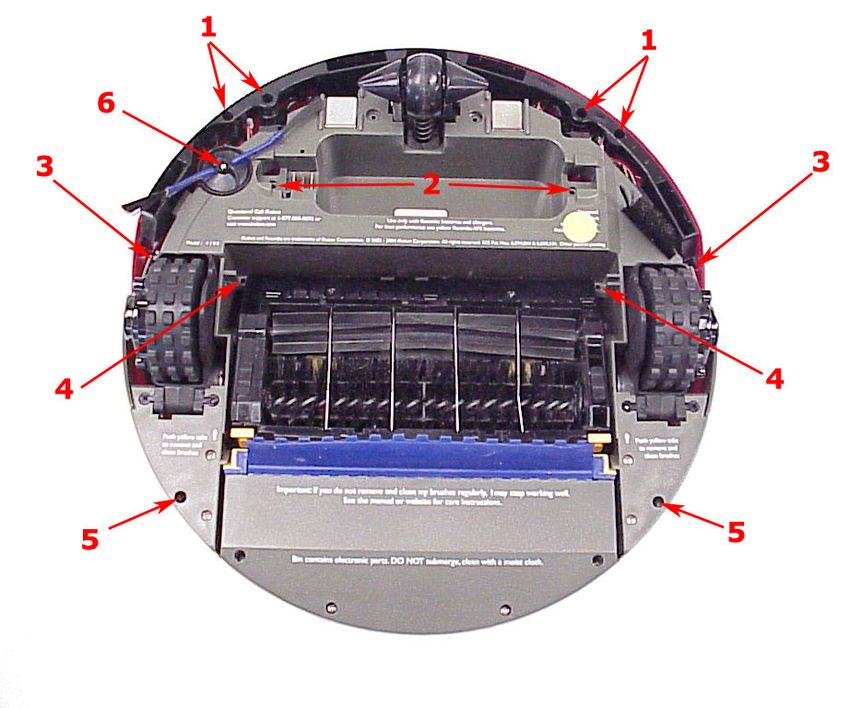
13Roomba Chassis Disassembly Procedure
o Remove Vacuum Bin
o Unscrew bumper screws (1)
o Unscrew chassis screws (2,3,4,5)
o Unscrew side brush if necessary (6)
141 Lift outer bumper slowly (it is attached by a connector)
Angle the bumper outward and carefully disconnect
2
connector from outer bumper
Lift top shell slowly (it is attached by a connector).
3
Carefully disconnect the connector from Roomba.
4 Clean off the internal dirt with compressed air.
Go to Appendix M for details on how to remove the Cleaning Frame, PCB, Inner Bumper, Diver
Wheels and Front Caster.
Roomba Electrical Inter-Relationships
Roomba electrical design is proprietary. However for servicing it is important to know that the
following sensors are in series:
1. Right front cliff sensor, Right outer cliff sensor, Right wall sensor
2. Left front cliff sensor, Left outer cliff sensor
3. Right bumper sensor, Right wheel sensor, Left bumper sensor, Left wheel sensor.
15Service Procedure (based on Built-in-Test Failures)
Every Roomba return is required to undergo a Built-in-Test (BiT) and a Mobility Test (MT) which
will then dictate how to best service the Roomba. iRobot requires that only the initial BiT output
file be recorded and sent back to iRobot on a monthly basis. However, a service technician will
repeat the BiT numerous times during the servicing of a Roomba. A Roomba can only be returned
to the customer after both the BiT and MT pass 100%.
The following Service Procedure is based on failed BiT steps or specific Roomba symptoms. We
provide basic steps on how to attempt to repair the component but as a last resort, a replacement
part is suggested.
BiT Repair Steps
Replacement Part (if needed)
Quality Check (QC)
16Failed BiT 0 - Panel LEDS
Roomba Symptom: Roomba lights do not turn on.
Æ Connect an *approved* top shell to Roomba and
redo BiT step. If BiT step passes, Roomba is working
BiT REPAIR STEPS
and we should now inspect the failed top shell.
Æ Inspect wiring and soldering under the failed top
shell. Are any pcb wires broken or disconnected?
Æ If buttons are not working or intermittent and the
Roomba is a Discovery, SE or Scheduler, open the
user interface panel. Clean the pcb under the snap
dome with alcohol and reapply tape to seal switch
from dirt.
REPLACEMENT
PART
Top Cover/Shell
o Inspect the wiring into the user panel and add hot
glue if it is needed for strain relief.
QC
o Ensure BiT passes.
17Failed BiT 1 – Bumpers
Roomba Symptom: Roomba may back up and circle
with no error code.
Æ Clean area where bumper arms meet the IR sensor
housing on pcb with compressed air. If test still fails
BiT REPAIR STEPS
remove arms (see Appendix M) and wipe sensors in
housing with alcohol.
Æ Make sure the front caster is properly inserted and
that the connectors are secure.
Æ Inspect the bumper springs and ensure they spring
back and that there are no wires or obstructions as
they compress.
Æ Check for broken bumper arms.
REPLACEMENT PART
Main PCB
Inner Bumper Module
o When reattaching the outer bumper verify that
wires are not being pinched and that the springs
QC
are free to compress.
o Ensure BiT passes.
18Failed BiT 2 or 3 – Outer & Inner Cliff Sensors
Roomba Symptom: Roomba does not see cliffs or
o Does not run, says “ehh”
o Backs up in circular arcs
o Stops with “uh-oh and 5 beeps”
BiT REPAIR STEPS
Æ Clean the sensors with compressed air.
Æ Is the side brush blocking the outer sensor? Rotate
the side brush arms away from the cliff sensor
opening.
Æ Remove the outer bumper and inspect the cliff
sensor wiring.
REPLACEMENT
PART
Inner Bumper Module
o When attaching the inner and outer bumper verify
that the wires are well routed and not being
pinched.
QC
o Verify that the bumper can be compressed and
released freely on both sides
o Ensure BiT passes.
19Failed BiT 4 – Wheel Drop
Roomba Symptom: Roomba has triangular wiggle
behavior at startup or stops with “uh-oh and 6 or 9
beeps”.
BiT REPAIR STEPS
Æ Inspect the failed wheel switch and toggle it. If the
switch arm is worn or broken, then replace the switch.
Æ Clean the switch with a drop of alcohol and dry
switch with compressed air.
Æ If switch is loose from its mounting support,
reattach it with hot glue.
REPLACEMENT PART
Fixed Front Caster Module
Speaker/Wheel Drop Switch
20Wheel Drop Switch
Outer Bumper Assembly
o If replacing switch, verify the wires are well
routed and will not be pinched during reassembly.
o Ensure BiT passes.
QC
Failed BiT 4 – Wall Sensor
Roomba Symptom: Roomba does not run parallel to
the walls on its right side.
Æ Clean the wall sensor with compressed air
BiT REPAIR STEPS
Æ Perform a wall follow test (see Figure 2 in
Appendix H)
Æ Attach an *approved* outer bumper and retest to
rule out pcb failures.
Outer Bumper Assembly
o Ensure BiT and MT passes.
QC
21Failed BiT 5 – RCON / IR Receiver
Roomba Symptom: Crosses Virtual Wall beams, hits
accessories, and does not respond to the Remote.
BiT REPAIR STEPS
Æ Wipe the RCON on top of bumper. Retest.
Æ Detach outer bumper and inspect wiring under the
bumper.
Æ Plug in an *approved* outer bumper and retest
with accessories to rule out pcb failures.
REPLACEME
NT PART
Outer Bumper Assembly
QC
o Ensure BiT passes.
Failed BiT 6 – Battery Sensor
Roomba Symptom: Roomba does not charge
BiT REPAIR STEPS
Æ Clean the electrical contacts on the Roomba (in the
battery well) with an alcohol pad.
Æ Remove the outer bumper and inspect for any
broken wires leading from the electrical contacts to
the pcb.
22REPLACEMENT
PART
Battery
QC
o Ensure BiT passes.
Failed BiT 7, 8 or 9 – Drive Wheels & Encoders
Roomba Symptom:
o Roomba spins both forward and backward in
circles and may end in “uh-oh and 4 beeps”.
o Wheels may not turn or sound loud.
If the wheel tests fail or sound bad:
BiT REPAIR STEPS
Æ Put the Roomba on its back and manually turn the
wheel. Is there an obstruction? Is the axle and bearing
centered?
Æ Open wheel cover and clean under the cove with
compressed air, including wiping the encoder sensors
with alcohol. (A,B,C)
Æ Inspect the drive belt and exchange it if it is very
worn or slipping.
Æ If the motor is dead, attach a new wheel assembly
into pcb and repeat test. If it works, the pcb is good
and the wheel needs to be replaced.
23REPLACEMENT
PART
Drive Belt
Right/Left Wheel Assembly
o Ensure BiT passes.
o Verify wires are well routed and not pinched by
QC
the wheel cover.
o Verify the wheel supports are screwed in.
24Failed BiT 10 – Stasis (front wheel)
Roomba Symptom:
o Roomba will take longer to get unstuck.
o Roomba will abruptly interrupt its cleaning
path with a quick panic spin (left or right spin)
If the fixed caster stasis fails, the mechanical switch
may have failed:
BiT REPAIR STEPS
ÆManually spin the wheel and verify that there is no
hair in the axle and that it can spin fairly freely.
ÆReplace caster module if cleaning did not help.
If the swivel caster stasis fails, the optical switch may
have failed:
Æ Remove the black/white wheel and clean the
wheel with alcohol and remove hair from the axle.
ÆWipe the optical stasis window in the chassis above
the wheel (see picture) using a lint free cloth. (see
picture)
Fixed Front Caster Module
REPLACEMENT PART
Swivel optical stasis
QC
o Ensure BiT passes.
25Failed BiT 11 – Main Brush
Roomba Symptom:
o Roomba does not clean or
o Brushes do not spin or sound loud
o Roomba ends with error “uh-oh and 1 beep”.
If the main brush test fails or sounds loud:
Æ If the brush motor is not running, try connecting
an *approved* cleaning assembly to pcb main brush
connector and run test. If test passes, then the
BiT REPAIR STEPS
Roomba pcb is good and we need to inspect the
returned cleaning assembly.
Æ Inspect brush motor power wires for breaks (see
picture 1)
Æ Inspect the output gear into brushes. Is the gear
worn out? (see picture 2)
Æ If there is a ratcheting and grinding sound, inspect
the brush gear box and side gear box for missing
gear teeth. (see picture 3)
REPLACEMENT
PART
Main Brush Assembly
26Output Gears
Brush Motor, Gearbox, Shaft
o Ensure BiT passes with returned or replaced
brushes
QC
o Verify the string is attached to the chassis
Failed BiT 12 – Debris Sensor
Roomba Symptom: Roomba’s blue light never
comes on in a dirty environment.
BiT REPAIR STEPS
Æ Verify the debris sensor is not covered in dirt.
Æ If it test still fails replace main brush assembly.
REPLACEMENT
PART
Main Brush Assembly
27o Ensure BiT passes.
o If replacing Main Brush Assembly with a single
QC
debris sensor version, it will not run with
software older than 2005-10-04-1308.
o Verify string is attached to the chassis
Failed BiT 13 – Vacuum
Roomba Symptom:
o Roomba does not clean or
o Roomba ends with error “uh-oh and 3 beeps” or
TROUBLESHOOTING
o Vacuum Bin sounds loud.
If the vacuum test fails or sounds loud:
ÆVerify the vacuum is unobstructed. Take out grill,
spin impeller and shake out any dirt. Inspect the filter
to make sure it is not punctured and letting particles
into the impeller.
ÆVerify the vacuum contacts are clean.
ÆIf sounds loud or is dead replace unit
REPLACEMENT PART
Bin Motor Assembly
QC
o Ensure BiT passes.
28Failed BiT 14 – Side Brush
Roomba Symptom:
o Roomba side brush does not turn or is loud
TROUBLESHOOTING
o Roomba ends with “uh-oh and 2 beeps”.
Æ Verify the side brush has been cleaned.
Æ Attach an *approved* side brush into the pcb and
retest. If test passes, then the Roomba pcb is good and
we need to inspect returned side brush.
Æ If the motor dead, replace unit. If it fails despite
cleaning, replace side brush module.
REPLACEMENT
PART
Side Brush Module
QC
o Ensure BiT passes.
29Failed BiT 15-20 – Charging
Roomba Symptom: Roomba is not charging.
If the internal charging fails (steps 15-17):
Æ Verify the Power Supply and Home Base are
TROUBLESHOOTING
working and *approved*
Æ Verify Power Supply is correctly plugged into the
Roomba.
Æ If step still fails, replace pcb.
If the external charging fails (steps 18-20):
Æ Verify the Roomba is properly docked on the
Home Base and both lights are on the Home Base.
Clean contacts on the Roomba if it is not docking.
Æ If step still fails, replace pcb.
REPLACEMENT
PART
Main PCB
o Ensure BiT passes.
QC
30Precautionary Replacements
Speaker
Æ Replace if it failed to work.
Brush Bearing
Precautionary replacements
Æ A holed bearing will protect the cleaning assembly
best as it allows dirt to from failing by allowing dirt
not to compact in the bearing and stress the cleaning
frame.
Side Brush
Æ A white bristle brush is transparent to IR and will
not trigger false cliffs which could be a reason for
customer return.
Filter
Æ If filter is punctured it could allow dirt to enter
vacuum assembly. Replace immediately.
31Charging Accessories
Battery
Power Supply
Home Base
Rapid Charger
32Roomba Battery
Batteries are made of 12 NiMH (nickel metal hydride) cells. It has a thermistor to measure battery
temperature and a +ve and –ve contact.
Skid pads
thermistor
-ve contact
+ve contact
33Battery Types
Yellow APS Battery Black Battery
• 3000 mAH • not in production
• ~500 cycle life • 2600 mAH
• 110 min runtime (hard floor)
• 55 min runtime (medium pile carpet)
Battery Insertion Technique
• Hold the Battery with the Roomba logo facing up and place Battery over the battery well.
• Lower the Battery slowly and then release it so that it drops in to the battery well.
• Press each Battery edge so that the latch engages and secures the Battery into the Roomba.
34General Battery Maintenance Tips
• Keep the battery charging at all times unless in use.
• If Roomba is not going to be used for an extended period of time, charge battery first and
then take battery out of Roomba and store separately in a cool place away from sourced of
heat or direct sunlight. If it is not charged first it will deep discharge while in storage.
• Occasionally reset the charging system in the Roomba (remove battery and hold down the
“power” button for at least 5 seconds and install battery), charge and run a “max” cycle
without the Home Base present.
Battery Troubleshooting
• Batteries will deeply discharge when left in the Roomba unplugged. Roomba sleep current
(when not running and left unplugged) is about 7 mA which slowly drains the battery.
• Batteries also naturally degrade over years. They should never be stored in a hot
environment.
• Roomba can inaccurately calculate the battery charge capacity and not fully charge the
battery. Charging systems can be reset by taking the battery out, pressing the Roomba
power button for at least five seconds and reinserting the battery.
• Verify that the Battery tested was charged in a Roomba. This is because a Rapid Charger
does not have the sophisticated software of a Roomba which dictates a proper charging
cycle based on the battery voltage.
• The Battery latch may not be engaging well in the Roomba. Latches have been improved
and can be distinguished below.
Old latch Design No notch
New latch Design Notched
35Roomba Power Supply
Roomba’s are charged by either a Universal (100-240V) or Domestic (120V) Power Supply. The
Power Supply steps the voltage down to 22VDC and 1.25A. The power light on the Power Supply
is an indication that it is plugged in and operating properly.
Power Supply Generations
Generation 1 Generation 1A Generation 2
(implemented ~Jan. 2005) (implemented ~July 2006)
Date code starts with 04 or 05 ‘P’ branded in the plastic Date code starts with A
Power Supply Troubleshooting
• Is the light solid green while charging? If not try another wall socket.
• Generation 1 and 1A : If the power light is off or flashing, discard both the Home Base and
the Power Supply and replace the main pcb on the Roomba.2
• Generation 2: If the power light is flashing or off, replace the Power Supply.
2
A flashing Power Supply and Home Base can destroy the Roomba pcb.
36Roomba Home Base
The Roomba Home Base is a self-charging station where the Roomba (through a sophisticated
infrared tracking mechanism) can drive back to at the end of a clean cycle or when its battery is
low. After docking itself, the Roomba will recharge its battery. The charging sequence takes about
three hours with the fast APS power supply (grey) and six hours with the slow power supply
(black).
The power light on the Home Base tells you that it is plugged in and operating properly. This light
must be on and solid green for Roomba to charge. The dock light on the Home Base tells you that
Roomba is successfully docked and charging.
Power Light
Docked Light
IR Force Field
IR Docking Beams
Electrical Plug
Electrical Contacts
37Manual Docking
To manually test the ability of the Roomba to dock successfully on the Home Base:
1. Verify that the Home Base is plugged in and that the power light is on.
1. Place the Home Base in a relatively open and flat area without any obstacles.
2. Remove any Virtual Walls closer than 8 ft (2.4 meters) from the Home Base.
3. Place Roomba about 3 ft (1 m) in front of the Home Base and press "Spot" and "Clean"
buttons simultaneously. Roomba should drive back to the Home Base and it may take a few
attempts.
4. Once the Roomba is on the Home Base verify the two green lights on the Home Base are lit
and solid. If not, clean the electrical contacts under the Roomba and on the Home Base and
repeat these instructions.
38Home Base Generations
A modified Home Base was necessary to compliment the Roomba swivel caster design. The
modifications are listed below.
Home Base Troubleshooting
• The power light on the Home Base must be on and solid green while charging. If not, check
the connection and the charging brick. [Note: If flashing replace the Home Base, power
supply and Roomba pcb.3]
• The dock light on the Home Base must be on and solid green while charging. If the dock
light is not on, try cleaning the contacts on the Home Base and under the Roomba if this is
the case.
• Inspect the integrity of the spring contacts
• Wipe the IR lens from dust
• Verify that the swivel caster Roomba is paired up with the new extended Home Base. The
new extended Home Base is compatible with fixed caster Roombas.
• Perform the Mobility Test (see Figure 5-7 in Appendix H). This will test docking abilities
and Home base avoidance.
3
A flashing Power Supply and Home Base can destroy the Roomba pcb.
39Rapid Charger
[Note: No longer in production]
Power LED
The Rapid Charger was designed to charge the 2600 mAH black Battery in 2.5 hrs. Although the
Rapid Charger can be used for the 3000 mAH yellow Battery, iRobot recommend that all batteries
be charged in a Roomba. This is to make use of the Roomba charging sequence that initially
measures the battery voltage and then proceeds with a proper charging mode.
40Roomba Accessories
Virtual Wall
Remote
Filters
Bristle Brush
Flexible Brush
Side Brush
41Roomba Virtual Wall
The Virtual Wall emits an invisible, infrared beam up to 13 feet (~4 meters) long that Roomba
regards as a barrier and will not cross. The beam is keyhole shaped and can get up to 3 feet wide
(~1 meter). To avoid IR interference, do not place the Virtual Wall within 8 feet (2.4 meters) from
a Home Base.When turned on, the standard Virtual Wall Unit will turn off automatically after
approximately 2 hours. The batteries last about 140 hrs of operations.
IR Emitter/Force Field
Strength Setting
IR wall beam emitter
Power Button
42Top view of Virtual Wall and beam spread
Virtual Wall Generations
Silver Virtual Wall Slim Virtual Wall Scheduler Virtual Wall
Beam Angle : 24 deg Beam Angle : 27 deg Beam Angle : 27 deg
Diameter : 0.8 m Diameter : 0.6 m Diameter : 0.6 m
Virtual Wall Troubleshooting
• If you press power and the light does not go on or flashes, check the batteries and the virtual
battery door. If the Roomba goes through the beam, wipe the Virtual Wall eye (RCON) on top
of the unit.
• Use a Roomba and the Virtual Wall to perform the Mobility Test (see Figure 4 in Appendix H).
This will test Virtual Wall beam avoidance.
43Roomba Remote
The Roomba Remote enables you to perform a variety of tasks with your Roomba without
touching the robot. It is compatible with all new Roomba models (except Roomba Original).
Remote Troubleshooting
• The light above the buttons comes on when a button is depressed. If not, replace the batteries.
• If the light is on but it does not communicate with the Roomba then :
o Wipe the Remote's IR emitter (located on the front edge of the Remote) and the Roomba's
IR receiver.
o Check that there is a direct line of sight from the remote to Roomba, and that the Remote is
pointed at Roomba. Try using the remote from several different heights and distances from
Roomba.
o Confirm that Roomba is not inside a Virtual Wall and do not try to drive the Roomba
through the virtual wall beam and keep in mind that Virtual Wall beams can reflect off
some surfaces.
o Roomba Remote also will not work if within 8 feet (~2.4 meters) of the Roomba Home
Base (if applicable). The Roomba Home Base creates Infrared (IR) frequency that
overrides the frequency of the Roomba Remote.
o It is possible that the remote is interfering with another IR device like a remote control for a
television.
o Confirm the front of the Roomba is not over a step or in front of an obstacle. The Roomba
should be emitting a low beep sound in this scenario.
o Try using the Roomba Remote in different lighting conditions. Certain halogen lights or
powerful florescent lights can interfere with the Roomba Remote's functioning.
44Roomba Filter
Roomba’s filter is designed to keep Roomba’s vacuuming system clear of debris. For maximum
vacuum power, the filter should be cleaned and inspected after every use. If desired, the filter can
be hand washed with soap and water but needs to be thoroughly dried before use. If punctured,
replace the filter.
Filter Troubleshooting
• Inspect the filter and if punctured, replace the filter.
45Bristle, Flexible and Side Brush
Roomba’s brushes pick up debris from floors and direct it towards into the vacuum bin. For
maximum Roomba life, the brushes should be cleaned and inspected after every use.
Brush Troubleshooting
• Remove and clean the brushes and inspect for tears
• Inspect the brush bearings and verify they are not molten and spin freely in the axle.
• Inspect the brush square ends
• Inspect the side brush arms and bristles
46Appendices
47Appendix A: Charging Troubleshooting Flowchart
♦
♦
♦
WARNING: The Power Supply, Home Base and pcb need to be replaced if the lights are OFF or BLINKING. If
only partial replacement, a compromised Roomba could fail by overheating.
48Appendix B: Serial Number Format
Robot ASCII Serial Number Format
(ASCII sticker in battery well)
LLLL Model number
YY Year (since 2000) this robot was manufactured
mm Month this robot was manufactured
dd Day of the month this robot was manufactured
c CPU type: E or EA if E128 chip, empty if DG256 chip
ssss Order that robot was made on date of manufacture
Robot Barcode Serial Number Format
(barcode sticker in battery well)
MM Manufacturer ID: 'JE' = Jetta, 'PR' = PRC
U Status - 'N' = new, 'R' = remanufactured
LLLLL Model number (00000 - 09999)
YY Year (since 2000) this robot was manufactured
mm Month this robot was manufactured
dd Day of the month this robot was manufactured
RR Model revision for this robot
• 01 indicates DG256 chip
• 02 indicates E128 chip
• 03 indicates OSMO Software Code 1707 and E128 chip
• 04 indicates OSMO Software Code 1308 and E128 chip
sssss Order that robot was made on date of manufacture
49Battery Serial Number Format
(ASCII debossed in plastic)
o YYMMDD XXX
Power Supply Serial Number Format
(ASCII number on sticker)
o YYMMDD or AYYMMDD
o The P on the plastic indicates it has been reworked. If “P” exists on the plastic, then add
this to the end of the serial number.
Home Base Serial Number Format
(ASCII debossed in plastic)
YYMMDD
50Appendix C: Roomba Code List
Record Sheet Example
Code List
Customer Complaint Code Robot Condition Code Roomba BiT Code
CC00-Complaint NONE RC00-Condition NEW RB00-BiT PASS
CC01-(Cleaning) Brush Assembly RC01-(Brush) lightly soiled RB01-(BiT0) user interface / buttons
CC02-(Cleaning) Vacuum Assembly RC02-(Brush) dirty RB02-(BiT0) speaker
CC03-(Cleaning) Side Brush Assembly RC03-Condition - OTHER RB03-(BiT0) chassis
CC04-(Charging) Robot & Battery RB04-(BiT1) bumper
CC05-(Charging) Accessory RB05-(BiT2,3) cliff sensors
CC06-(Mobility) Drive Wheels RB06-(BiT4) wheel switch or wall sensor
CC07-(Mobility) Caster Wheel RB07-(BiT5) robot eye / RCON
CC08-(Mobility) Circle Dance RB08-(BiT7-9) drive wheels/encoders
CC09-(Mobility) Robot RB09-(BiT10) front caster
CC10-(Mobility) Accessory RB10-(BiT11) cleaning frame
CC11-(General) Robot RB11-(BiT12) debris sensor
CC12-(General) User Interface RB12-(BiT13) vacuum bin
CC13-(General) Accessory RB13-(BiT14) side brush
CC14-(Error) ehh RB14-(BiT15-17) internal charging
CC15-(Error) dead battery song RB15-(BiT18-20) external charging
CC16-(Error) uh-oh & no beeps RB16-BiT- OTHER
CC17-(Error) uh-oh & 1 beep Roomba BiT Sub-Code
CC18-(Error) uh-oh & 2 beep F0-BiT PASS
CC19-(Error) uh-oh & 3 beeps F1-mechanical issue
CC20-(Error) uh-oh & 4 beeps F2-electrical issue
CC21-(Error) uh-oh & 5 beeps F3-manufacturing/workmanship issue
CC22-(Error) uh-oh & 6 beeps F4-missing components
CC23-(Error) uh-oh & 9 beeps F5-environmental (dirt, hair)
CC24-(Error) uh-oh & 10 beeps F6-unknown
CC25-Complaint - OTHER
51Roomba MT Code Battery Code Power Supply Code
RM00- MT PASS B00- PASS PS00-PASS
RM01-fails initial spiral B01-voltage low PS01-voltage low
RM02-fails to wall follow B02-voltage high PS02-voltage high
RM03-fails cliff B03-voltage drop fail PS03-current low
RM04-fails to dock B04-low run time PS04-current high
RM05-fails rod transition B05-thermistor PS05-does not shut off
RM06-fails with home base B06-contacts PS06-LED blinking/off
RM07-fails with virtual wall B07-latch PS07-cord
RM08- MT-OTHER B08-OTHER PS08-OTHER
Home Base Code Virtual Wall Code Corrective Action Code
HB00- PASS VW00-PASS AA00-NO ACTION NEEDED
HB01-IR beams (won't dock) VW01-IR Beams (crosses v.w AA01-replace upper shell
HB02-force field (hits base) VW02-force field (hits v.wall) AA02-replace outer bumper
HB03-LED (power) VW03-LED (power) AA03-replace inner bumper
HB04-contacts (charging) VW04-OTHER AA04-replace speaker
HB05- OTHER AA05-replace wheel drop switch
AA06-replace wheel drive belt
AA07-replace drive wheel
AA08-replace front caster
AA09-replace brush motor assembly
AA10-replace cleaning frame
AA11-replace output gears to brushes
AA12-replace vacuum bin motor
AA13-replace vacuum bin
AA14-replace side brush motor
AA15-replace side brush
AA16-replace main pcb
AA17-replace bristle brush
AA18-replace flexible brush
AA19-replace wire guard
AA20-replace brush bearing
AA21-replace filter
AA22-replace power supply
AA23-replace home base
AA24-replace battery
AA25-replace robot
AA25-Cleaning alone fixed issue
AA26-OTHER
52Appendix D: Roomba Error Codes
Roomba Says What It Means What You Should Do
Plays 4-note song The battery is • Connect Roomba to the Power Supply or Home Base and recharge the battery.
as power button low and needs
blinks RED recharging
“Ehh” Cliff sensors are • Pick up the Roomba and turn it over.
dirty or need • Check for any debris underneath the front bumper and around the cliff sensors.
repair • Wipe the sensors with a lint-free cloth or use compressed air to clean them out.
No beeps A wheel is stuck • Lift the Roomba and place it down again.
or off the ground • Press ‘Clean’ to restart the cycle.
“Uh-oh” + 1 beep Roomba's main • Pick up the Roomba and turn it over and remove the wire guard.
brushes are • Look for something blocking the brushes; you may need to remove and reinstall
stalled the brushes to remove the obstruction.
“Uh-oh” + 2 beeps Roomba's side • Pick up the Roomba and turn it over.
brush is stalled • Look for something wrapped around the side brush.
• Remove the side brush with a screw driver and check obstructions.
• Replace the side brush, place Roomba in the center of the Roomba and press
‘Clean’ to resume cleaning
“Uh-oh” + 3 beeps Roomba's • Remove and empty the dirt bin.
vacuum is • Use a flat head screwdriver to remove the grill at the back of the debris bin.
stalled • Spin the vacuum impeller around, shaking out any debris that may be stuck.
• Replace the grill and the dust bin.
“Uh-oh” + 4 beeps Roomba's drive • Your Roomba may be stuck, or something may be caught in a wheel.
motor is stalled • If it's stuck, place it in the center of the room and press ‘Clean’.
• If it isn't stuck, pick up your Roomba and turn it over and look for something
wrapped around the wheels. Push them in and out and verify they rotate freely.
Place Roomba in the middle of the room, press ‘Clean’ and it should resume
cleaning.
“Uh-oh” + 5 beeps Roomba's cliff • Pick up the Roomba and turn it over.
sensors are • Check for any debris that might be caught underneath the front bumper, around
obstructed the cliff sensors.
• Wipe the sensors with a lint-free cloth or use compressed air to clean them out.
“Uh-oh” + 6 beeps Roomba's wheel • Pick up your Roomba, put it in the middle of the room, power it OFF and then
drop sensors are ON again.
overloaded • Select the cleaning cycle you prefer and let it go to work.
“Uh-oh” + 9 beeps Roomba's wheel • Your Roomba probably needs to be serviced; please contact Customer Support.
drop sensors
have failed at
startup
“Uh-oh” + 10 beeps Roomba's • If Roomba travels for a long distance without bumping into anything (which
bumper is not would be unusual), it might think it’s stuck and can’t move; press ‘Clean’ again
registering and it should resume cleaning.
obstacles
53Appendix E: Roomba Software & OSMO
Roomba
Roomba’s software is continuously being updated and implemented in newest Roombas. When a
Roomba is serviced it is best practice to update the Roomba with the latest software code.
Robot Production
Software Date Tag Features OSMO version
Implementation
circle dance mode, deeply
2005-08-11-1707 23 August 2005 Version 1
discharged mode
Hacker code, code for single
24 October 2005 Version 2
2005-10-04-1308 debris
BiT improvements, Single
2006-08-14-1814 29 August 2006 Version 3
Button Roomba code
OSMO
Roomba’s have been manufactured with two different chips (E128 and DG256), and so there are
two software release to match the different chips. The OSMO Teal is used for E128 chips and the
OSMO Purple is used for DG256 chip. Determine the Roomba chip type from Roomba’s serial
number and then use the proper OSMO. Using the wrong OSMO does not harm the Roomba, it
just does not download software. Also, OSMO can only replace older software on the Roomba.
OSMO TEAL (E128)
- Roomba’s with barcodes.
-Roomba’s with serial
number with letter E or EA
OSMO PURPLE (DG256)
- Roomba’s with serial
number and no letter
54To determine OSMO software version, inspect the OSMO date code.
OSMO Date Code OSMO Date Code OSMO Version #
JEN1387Xyymmdd01xxxxxx Version 1 (-1707)
JEN1387Xyymmdd02xxxxxx Version 2 (-1308)
JEN1387Xyymmdd03xxxxxx Version 3 (-1814)
OSMO Download procedure
55Appendix F: Roomba Built-in-Test Procedure
Put Roomba into built-in-test mode:
1. Power Roomba OFF by pressing the POWER button.
2. Hold down the SPOT and CLEAN buttons.
3. Power Roomba ON by pressing the POWER button.
4. Keep holding down the SPOT and CLEAN buttons for about 0.5 SECONDS until you hear
a series of ASCE NDING BEEPS and the user panel LEDs start flashing.
For AUTO-ADVANCE mode:
5. Release the SPOT and CLEAN buttons.
For MANUAL-ADVANCE mode:
6. Continue holding down the SPOT and CLEAN buttons for a total of 3 SECONDS until you
hear a second series of DESCENDING BEEPS.
7. Release the SPOT and CLEAN.
The built-in-test will now be in test number 0.
BUILT-IN-TEST NUMBER 0 tests the user panel LEDs.
1. Check that all of the user panel LEDs are flashing as follows:
a. SPOT LED ON
b. CLEAN LED ON
c. MAX LED ON (for 3 button units)
d. POWER LED GREEN
e. POWER LED RED
f. STATUS LED GREEN
g. STATUS LED RED
h. DIRT ALERT LED BLUE
2. Even in AUTO-ADVANCE mode, you must manually advance to the main test by pressing
the CLEAN button.
56In the MAIN BUILT-IN-TEST (all test numbers except 0):
• Each TEST NUMBER has multiple SUB-TESTS.
• The SPOT and CLEAN LEDs indicate when the sensors are activated.
• The STATUS LED indicates whether the current draw is within correct range where
appropriate.
• Current measurements are taken in 0.5 second readings. During current readings, ALL
LEDS ARE OFF.
• The DIRT ALERT LED will flash to indicate that the test is advancing to the next test
number.
• The robot will BEEP when advancing to the next built-in-test number. Test numbers are
indicated by a pattern of long and short beeps, where one long beep is equal to five short
beeps. For example, test 11 is indicated by long-long-short.
AUTO-ADVANCE mode is designed to be used on the assembly line. In this mode, the robot
internally decides PASS/FAIL for each test number. The test advances automatically so each
sensor or actuator is tested only once.
In AUTO-ADVANCE mode:
• Activate the sensors for each sub-test IN ORDER as described in the chart below.
• When all sub-tests in a test number have PASSED, the built-in-test will AUTO-
ADVANCE to the next test number.
• If a test does not pass, you can press the CLEAN button to MANUALLY ADVANCE to
the next test number to continue the built-in-test.
• The test number checks may check multiple conditions other than those which turn on the
LEDs. Therefore the test number may FAIL even though the sensors that turn on the LEDs
seem to be working. In particular, the CURRENT DRAW of each actuator must be within
acceptable limits for the test to pass.
• The POWER LED will be RED until all sub-tests in a test number are passed, then it will
turn GREEN for a moment before advancing to the next test number.
• When you get to the last test number, either by AUTO- or MANUALLY advancing:
o If all tests PASSED:
The POWER LED will BLINK FAST GREEN.
The robot can be powered off using the power button and will operate
NORMALLY.
57o If any test FAILED:
The POWER LED will BLINK FAST RED.
The robot CANNOT be powered off and will not respond to any buttons
until the BATTERY IS REMOVED.
MANUAL-ADVANCE mode is designed to be used for debugging particular sensors or actuators.
In this mode, the robot DOES NOT decide PASS/FAIL for each test number. The test does not
automatically advance, so sensors or actuators can be tested as many times as needed.
In MANUAL-ADVANCE mode:
• Use the CLEAN button to MANUALLY ADVANCE to the next built-in-test number.
• Use the SPOT button to go back to the previous built-in-test number.
• The POWER LED will always be GREEN.
• There is no pass or fail. If you advance past the last test number, the test number will wrap
around to the first test.
The following chart describes how to use each built-in-test number. To PASS the built-in-test in
AUTO-ADVANCE mode, the user must perform the actions EXACTLY AS DESCRIBED.
Test Name Tester Action Robot Action Spot LED Clean LED Status LED
(Left) (Right)
0 Panel LEDs Check correct flashing of
LEDs. Press CLEAN to
advance to the first test.
1 Bumpers Press and release left Left bumper Right bumper
bumper. Press and release pressed. pressed.
right bumper.
2 Outer Cliff Briefly lift robot's left side Cliff-left Cliff-right
Sensors to simulate cliff-left. detected. detected.
Briefly lift robot's right side
to simulate cliff-right.
3 Inner Cliff Briefly lift robot's left side Cliff-front-left Cliff-front-
Sensors to simulate cliff-front-left. detected. right detected.
Briefly lift robot's right side
to simulate cliff-front-right.
4 Wheel Drop / Briefly lift robot to cause a Wheel drop Wall
Wall Sensor wheel drop on left wheel, detected. detected.
then right wheel, then front
caster. Briefly simulate a
wall.
585 Rcon IR Point a virtual wall at the Virtual-wall Remote signal
Receiver rcon IR receiver. Then signal at rcon at rcon IR
point the virtual wall away IR receiver. receiver
or turn it off.
Point a remote control at the
rcon IR receiver and briefly
press any button except
Power.
6 Battery No user action. Battery Thermistor Baseline
Sensors voltage present. current OK.
between 12
and 18 V.
7 Left Wheel Verify the wheels are in the Left wheel Left wheel Left motor
air and unobstructed. Wait turns in over current current and
until STATUS LED is forward stall. encoder
green. Then briefly stall direction speed OK.
left wheel.
8 Right Wheel Verify the wheels are in the Right wheel Right wheel Right motor
air and unobstructed. Wait turns in over current current and
until STATUS LED is forward stall. encoder
green. Then briefly stall direction. speed OK.
right wheel.
9 Wheel Verify the wheels are in the Drive wheels Left wheel Right wheel Motor
Encoders air and unobstructed. turn in encoder encoder current and
backward signal. signal. encoder
direction. speed OK.
10 Stasis Turn the front caster. Stasis signal
(caster
rotation
switch).
11 Main Brush Verify the brush is Main brush Brush over Brush current
unobstructed. Wait until turns on. current stall. OK.
STATUS LED is green.
Then briefly stall the main
brush.
12 Debris Briefly place robot in debris Main brush Debris Debris
pile on left side. Briefly turns on. detected on detected on
place robot in debris pile on left side. right side.
right side.
13 Vacuum Verify the vacuum is Vacuum turns Vacuum stall. Vacuum
unobstructed. Wait until on. current OK.
STATUS LED is green.
Then briefly stall the
vacuum motor.
14 Side Brush Verify the side brush is Side brush Side brush Side brush
unobstructed. Wait until turns on. stall. current OK.
STATUS LED is green.
Then briefly stall the side
brush motor.
5915 Plug-in Plug in the plug-in charger. Plug-in Pre-charge
Charger charger current OK.
Precharge available.
16 Plug-in Plug-in Charge
Charger On charger current OK.
available.
17 Plug-in Plug-in Trickle
Charger charger current OK.
Trickle available.
18 Home Base / Remove the plug-in Home Base / Pre-charge
Wall-Mount charger. Place Robot in Wall-Mount current OK.
Charger dock or wall mount charger. charger
Precharge available.
19 Home Base / Home Base / Charge
Wall-Mount Wall-Mount current OK.
Charger On charger
available.
20 Home Base / Home Base / Trickle
Wall-Mount Wall-Mount current OK.
Charger charger
Trickle available.
21 Built-in-test
Complete
60Built-in-Test Data Capture Procedure
iRobot Data Capture
o Run the “iRobot Roomba Factory-Test-Client Version 1.1” software (2006-02007-1059).
o Bring the Roomba and *approved* accessories to the computer.
o Manually enter the Roomba’s Serial Number or press “quit” to exit program
o Manually enter the Roomba’s source. Is it from a customer (c), retailer (r) or unknown (u)?
o Ignore the Mobility test but to move on manually enter either ‘p’ or ‘f’.
o Insert a charged battery in the Roomba. Complete a Built-in-Test on the Roomba and the
power light will be flashing GREEN (it passed) or RED (if failed). Do not remove the battery
as this will erase the test information.
o Connect the Roomba serial port, to the serial level shifter box, to a COM port of a computer.
o Press ‘Max’ or ‘Clean’ or ‘Spot’ to capture the data.
o Disconnect the Roomba.
o You can continue to the next robot and the text file will just get appended as more outputs are
added.
Alternative Data Capture
When the built-in-test is completed the Roomba’s power light will be flashing GREEN (it passed)
or RED (if failed). Do not remove the battery as this will erase the test information.
o Plug in the serial adapter from the robot into COM2 of the PC.
o Open HyperTerminal
-- (In Windows) START ->Programs -> Accessories -> Communications ->
HyperTerminal …or…
(In Windows) START->RUN and enter HYPERTRM.EXE
o Name the connection (anything)
o Choose COM1 or COM2 depending on where you attached the adapter.
o Select bits per second and change to “57600”and under flow control select “none” (leave all
other settings alone).
o In "HyperTerminal" go to TRANSFER -> CAPTURE TEST -> START
o Press MAX on the Roomba
o In "HyperTerminal" go to TRANSFER -> CAPTURE TEST -> STOP
61You can also read