SANS Institute InfoSec Reading Room
←
→
Page content transcription
If your browser does not render page correctly, please read the page content below
Interested in learning more
                                                                   about cyber security training?

SANS Institute
InfoSec Reading Room
This paper is from the SANS Institute Reading Room site. Reposting is not permitted without express written permission.

 Digital Forensic Analysis of Amazon Linux EC2
 Instances
 Companies continue to shift business-critical workloads to cloud services such as Amazon Web Services Elastic
 Cloud Computing (EC2). With demand for skilled security engineers at an all-time high, many organizations do
 not have the capability to do an adequate forensic analysis to determine the root cause of an intrusion or to
 identify indicators of compromise. To help organizations improve their incident response capability, this
 paper presents specific tactics for the forensic analysis of Amazon Linux that align wi...

                               Copyright SANS Institute
                               Author Retains Full Rights
   AD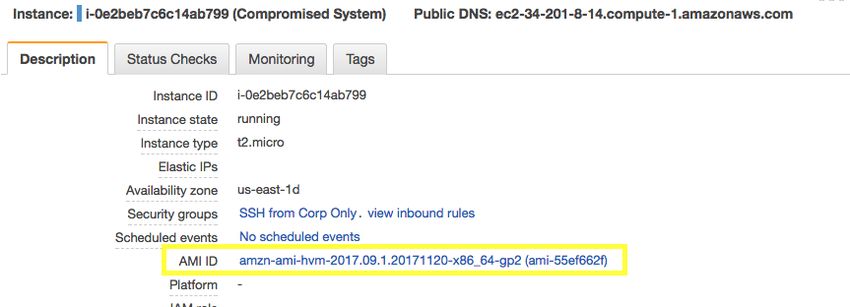
ts
                                                                                                  gh
                                     Digital Forensic Analysis

                                                                                              Ri
                                 of Amazon Linux EC2 Instances

                                                                                           ll
                                                                                      Fu
                                         GIAC GFCA Gold Certification

                                                                                ns
                                                                            ai
                              Author: Kenneth G. Hartman, ken@kennethghartman.com

                                                                         et
                                             Advisor: Sally Vandeven
                                              Accepted: January 2018

                                                                   rR
                                                              ho
                                                          ut
                                                        Abstract

                                                     ,A
                                                 te
                                            itu

               Companies continue to shift business-critical workloads to cloud services such as
                                        st

               Amazon Web Services Elastic Cloud Computing (EC2). With demand for skilled
               security engineers at an all-time high, many organizations do not have the capability to
                                     In

               do an adequate forensic analysis to determine the root cause of an intrusion or to identify
                              NS

               indicators of compromise. To help organizations improve their incident response
               capability, this paper presents specific tactics for the forensic analysis of Amazon Linux
                        SA

               that align with the SANS “Finding Malware – Step by Step” process for Microsoft
               Windows.
                     e
                Th
          18
     20
 ©

© 2018 The SANS Institute                                                                          Author retains full rights.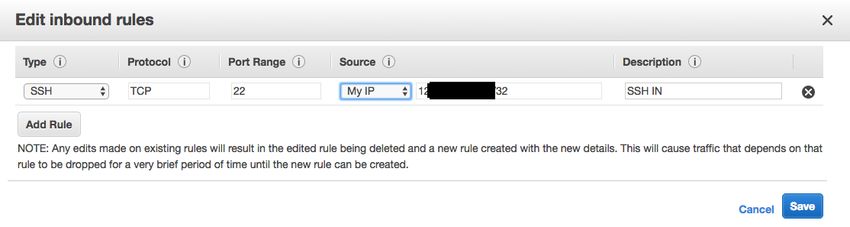
ts
                                      Digital Forensic Analysis of Amazon Linux EC2 Instances 2

                                                                                                    gh
                1. Introduction

                                                                                               Ri
                      Companies are shifting more and more of their business-critical workloads to the

                                                                                           ll
                                                                                      Fu
               cloud and often, the choice is Amazon Web Services (AWS) Elastic Cloud Computing

                                                                                ns
               (EC2). This is supported by industry metrics that indicate that AWS is the undisputed
               market leader with a 47.1% market share, followed by Microsoft Azure at 10.0% and

                                                                            ai
                                                                         et
               Google Cloud Platform with 3.95% (Coles, n.d.). Infrastructure as a Service (IaaS)

                                                                   rR
               offerings, such as EC2, are projected to experience a combined annual growth rate of

                                                              ho
               29.7% (Coles, n.d.). Therefore, it behooves companies to develop security capabilities in
               response to this important trend.

                                                          ut
                                                     ,A
                      Staffing and skills gaps hamper security operations at many organizations. Some
                                                   te
               predict that by 2019, there will be a shortage of two million information security
                                             itu

               professionals (Kauflin, 2917). As a result, many organizations do not have the capability
                                        st

               to do an adequate forensic analysis to determine the root cause of an intrusion or to
                                     In

               identify indicators of compromise (Oltsik, 2017a). The shortage of skilled engineers is
                              NS

               exacerbated by the fact that the number of connected devices is exploding at an
               exponential rate—requiring organizations to find innovative ways to scale up security
                        SA

               operations (Oltsik, 2017b).
                     e
                Th

                      SANS DFIR (digital-forensics.sans.org) provides training and resources to equip
               companies and organizations with necessary skills and tools to perform intrusion analysis
          18

               and digital forensics. Two examples are the SANS FOR508: Advanced Incident
     20

               Response training course (SANS Institute, n.d.a) and the SANS Investigative Forensic
 ©

               Toolkit (SIFT) Workstation (SANS DFIR, n.d.). ThreatResponse is an open-source
               project team that develops tools and promotes techniques focused on improving incident
               response in Amazon Web Services (Krug, McCormack, Ferrier, & Parr, n.d.).

                      To help organizations improve their forensic capabilities in the cloud, this paper
               presents specific tactics for the forensic analysis of Amazon Linux that align with the
               SANS “Finding Malware – Step by Step” process for Microsoft Windows and leverage
               the tools from the ThreatResponse project. Improved cloud forensic capabilities help an
               organization to adapt to adversaries and result in improved overall security.

               Kenneth G. Hartman,
               ken@kennethghartman.com

© 2018 The SANS Institute                                                                           Author retains full rights.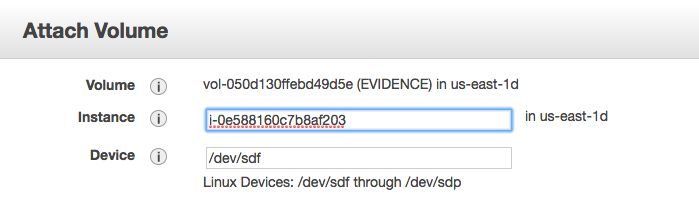
ts
                                        Digital Forensic Analysis of Amazon Linux EC2 Instances 3

                                                                                                 gh
               2. Incident Response Resources

                                                                                             Ri
                      A review of the information currently available on the Internet pertaining to the

                                                                                          ll
                                                                                     Fu
               forensic analysis of EC2 instances focuses primarily on how to acquire drive and memory

                                                                               ns
               images from an EC2 instance (Dykstra, 2013; Olsen, 2014). There are also ample
               references on how to obtain valuable information from the logs generated by AWS

                                                                              ai
                                                                         et
               services, such as CloudTrail (McGeehan, 2016). When enabled, AWS CloudTrail creates

                                                                   rR
               event logs of all interactions with other AWS services including the Management

                                                              ho
               Console, command line tools and the application programing interface (Amazon Web
               Services, n.d.a). However, there is not a concise document that provides guidance on

                                                           ut
                                                       ,A
               what to do with the forensic images of an Amazon Linux EC2 Instance once the images
               are acquired. This document aims to be one such resource.
                                                  te
                                             itu

                      This paper assumes a basic understanding of incident response procedures,
                                          st

               covered by documents such as the SANS paper titled, Incident Handler’s Handbook
                                      In

               (Kral, 2011) and NIST SP 800-61R2 (NIST special publication 800-61 revision 2,
                                NS

               computer security incident handling guide, 2012). For prerequisite knowledge on
               incident handling in AWS, the following two documents are highly recommended:
                        SA

                            •   “Incident Response in Amazon EC2: First Responders Guide to Security
                     e
                Th

                                Incidents in the Cloud” (Arnold, 2016), and
          18

                            •   “Hardening AWS Environments and Automating Incident Response for
     20

                                AWS Compromises” (Krug, 2016).
 ©

               3. Incident Response Life Cycle Model
                      To understand the importance of the role of digital forensics in incident response,
               it is helpful to consider the Incident Response Life Cycle. Once such model presented in
               NIST SP 800-61R2 is depicted below in Figure 1. Another very popular model is the
               traditional PICERL model, which has the following six phases—Preparation,
               Identification, Containment, Eradication, Recovery, and Lessons Learned (Kral, 2011).
               However, the NIST model shown in Figure 1 illustrates the iterative nature of the Digital
               Forensics Incident Response (DFIR) process best, especially when dealing with
               ephemeral assets in the public cloud.

               Kenneth G. Hartman,
               ken@kennethghartman.com

© 2018 The SANS Institute                                                                         Author retains full rights.
ts
Digital Forensic Analysis of Amazon Linux EC2 Instances 4
gh
Ri
ll
Fu
ns
ai
et
rR
ho
ut
,A
te
Figure 1 – Incident Response Life Cycle as Depicted in NIST 800 SP-61R2
itu
In the Detection & Analysis phase, knowledge is produced to be fed into
st
Containment, Eradication & Recovery phase to ensure that the scope of the incident is
In
known and properly contained and eradicated. This knowledge is the synthesis of
NS
forensic analysis, security event information management (SEIM) data, intrusion
SA
detection systems (IDS) events, and external data feeds, among others. Discoveries
resulting from the activities performed in the Containment, Eradication and Recovery
e
Th
phase feed back into the Detection & Analysis phase, including the identification of
additional systems requiring forensic analysis. Similarly, lessons learned as a result of
18
incident handling should improve an organization’s preparedness (NIST SP800-61R2).
20
Digital forensic techniques are typically used to gather and preserve evidence,
©
reconstruct events, determine the how, when, and where the incident occurred (NIST
SP800-61R2) and to generate threat information. Threat information helps an
organization protect itself and includes indicators of compromise (IOC) and tactics,
techniques, and procedures (TTPs). Questions of attribution, i.e. who and why, are very
difficult (Goutam, 2015), a distraction that is best left to law enforcement, and do not
improve an organization’s security posture, according to at least one CISO (Stilgherrian,
2015). Therefore, this paper focuses on gathering evidence, reconstructing events, and
threat information.
Kenneth G. Hartman,
ken@kennethghartman.com
© 2018 The SANS Institute Author retains full rights.ts
Digital Forensic Analysis of Amazon Linux EC2 Instances 5
gh
4. Acquiring Forensic Evidence in EC2
Ri
The virtual hard drives used by an EC2 virtual machine are referred to as an
ll
Fu
Elastic Block Store (EBS) volume (Amazon Web Services, n.d.b). An EBS volume is
ns
used to boot the operating system, but an EC2 instance can have one more than one
volume. The Elastic Cloud Computing service provides a facility for making a snapshot
ai
et
of an EBS volume that can be used to create a second EBS volume which may then be
rR
used for forensic analysis in a manner similar to the approach of cloning physical hard
ho
drives in a conventional forensic investigation (Olsen, 2014).
ut
Snapshots can be shared with other AWS accounts, and this is a good practice,
,A
particularly if the security team has a dedicated account used for incident handling. The
te
advantage of this approach is that once an EBS Volume is created in the new AWS
itu
account, it is protected from anyone who does not have rights to the incident handling
st
account and the forensic analysis can be performed in a presumably uncompromised
In
environment. In the discussion that follows, the dedicated account will be referred to as
NS
incident-response. However, AWS account aliases must be globally unique, so one
solution is to prepend the organization name to this phrase in actual practice. For
SA
example, “acme-incident-response.”
e
Th
Snapshots should never be shared publicly, unless great care is taken. This
common mistake is an easy way to leak sensitive data and keys (NVTEH, 2017). There
18
is an option to encrypt an EBS volume and it is important to note that snapshots made of
20
an encrypted EBS volume will likewise be encrypted (Amazon Web Services, n.d.b).
©
Therefore, the keys used to encrypt an EBS volume must be made available to the
forensicator to analyze the virtual hard drive.
The ThreatResponse aws_ir command line tool has a subcommand,
host_compromise, that automates the process of making the EBS snapshot and will
also call another ThreatResponse tool, MargaritaShotgun, to create a forensic image
of the EC2 instance memory (Krug, 2016). According to Amazon, the only way to
capture the memory of an Amazon Linux EC2 instance is via an SSH session, passing the
SSH keys to a memory imaging tool such as MargaritaShotgun (personal
communication, October 17, 2017). Hence, aws_ir has command line options to
Kenneth G. Hartman,
ken@kennethghartman.com
© 2018 The SANS Institute Author retains full rights.ts
Digital Forensic Analysis of Amazon Linux EC2 Instances 6
gh
provide the SSH key that has root access to the particular EC2 instance being imaged
Ri
(AWS_IR quickstart, n.d.). Appendix B provides instruction on how to use aws_ir to
ll
Fu
create a EBS Snapshot and forensic memory image in a single command. To speed up
incident response, Ephemeral Systems has created publicly-shared Amazon Machine
ns
Images (AMI) with the ThreatResponse tools pre-installed (Ephemeral Systems, n.d.).
ai
et
rR
5. Provision a Forensic Workstation
ho
To manually provision a SIFT Workstation on an AWS EC2 Instance, perform
ut
the following steps:
,A
1. Log into the incident-response account
te
2. Launch an EC2 instance using the console. Use the latest Ubuntu AMI in
itu
the AWS Marketplace, for example:
st
Ubuntu Server 16.04 LTS (HVM), SSD Volume Type - ami-
In
996372fd”
NS
3. Choose a t2.large or larger instance type.
SA
4. Click “next” as needed to get to the "Configure Security Group" form.
e
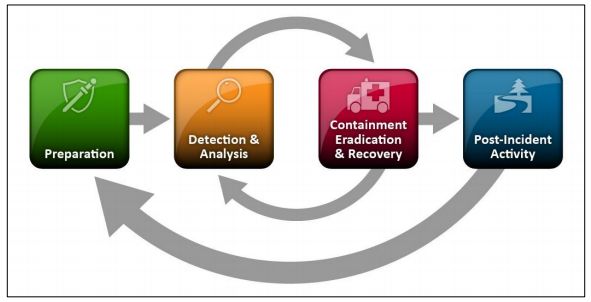
5. Create a new "Incident Response" security group and configure it such
Th
that the only ingress rule is to allow SSH from the external IP address by
18
selecting the "My IP" option as shown in Figure 2, below. The egress rule
20
may be left as the default “allow all” so that the system can install
©
software.
6. Choose an existing SSH key or select the option to that the AWS console
create a new one.
7. Once the instance launches, SSH to it with the appropriate key.
8. On the Ubuntu EC2 instance, run the following command:
wget https://github.com/sans-dfir/sift-
cli/releases/download/v1.5.1/sift-cli-linux
NOTE: The version will change over time, so update the path as necessary to
ensure the command pulls down the latest version.
Kenneth G. Hartman,
ken@kennethghartman.com
© 2018 The SANS Institute Author retains full rights.ts
Digital Forensic Analysis of Amazon Linux EC2 Instances 7
gh
Ri
9. Move and rename the SIFT Install tool:
ll
Fu
sudo mv sift-cli-linux /usr/local/bin/sift
ns
10. Set the proper permissions and run it:
ai
sudo chmod 755 /usr/local/bin/sift
et
sudo sift install
rR
ho
ut
,A
te
itu
Figure 2 – Configure Inbound Rules to Allow SSH from a Single IP Address
st
In
For more information on provisioning an EC2 instance, see Launching an
NS
Instance Using the Launch Instance Wizard (n.d.) and for complete instructions on
installing the SIFT Workstation refer to (SIFT CLI, n.d.). Lastly, a Github repository
SA
named SIFTonEC2 contains a script to automatically provision a SIFT workstation on an
e
Elastic Cloud Computing instance (SIFTonEC2, n.d.).
Th
The SIFT installation process may take up to 30 minutes and it is highly
18
recommended that incident handlers provision a new system for each case. One way to
20
streamline this is to make an AMI of the SIFT Workstation before using it (Olsen, 2014).
©
This allows future SIFT instances to be launched from the AMI. However, the instance
may still need to be updated. To update a SIFT Workstation, run the following
commands:
apt-get update
apt-get upgrade
sift update
shutdown -r now #Reboot
6. Attaching Evidence to the SIFT Workstation
Once the SIFT Workstation has been provisioned, the next step is to attach
evidence to it and mount the volume for analysis. This process is detailed as follows:
Kenneth G. Hartman,
ken@kennethghartman.com
© 2018 The SANS Institute Author retains full rights.ts
Digital Forensic Analysis of Amazon Linux EC2 Instances 8
gh
6.1. Create an EBS Volume from a shared snapshot
Ri
Find the snapshot in the AWS Console, using the private snapshot filter. Next,
ll
Fu
click on the snapshot and select Create Volume from the Actions button. NOTE: Be sure
to create the new volume in the same availability zone as the SIFT Workstation.
ns
ai
While creating the volume, add an additional tag with the key set to “Incident”
et
and the value set to the case number for the incident. Set the “Name” tag to
rR
“EVIDENCE” to distinguish it from the SIFT Workstation OS Volume or other volumes
ho
in the account.
ut
,A
6.2. Attach the new volume to the SIFT Workstation
te
Select the new volume in the AWS Console. Next, select the Attach Volume
itu
option from the Actions button. The wizard will ask which instance to attach to, so select
st
the instance that was just launched. If the instance is not listed, the wizard may have
In
created the EBS volume in the wrong availability zone. The console will report which
NS
device the volume will be attached to, /dev/xvdf, for example (Olsen, 2014).
SA
e
Th
18
20
©
Figure 3 – Attach EVIDENCE volume to SIFT Workstation
6.3. Mount the Evidence Volume as Read Only
Verify the volume was attached as a device using the lsblk command as root:
root@siftworkstation:/home/ubuntu# lsblk
NAME MAJ:MIN RM SIZE RO TYPE MOUNTPOINT
xvda 202:0 0 8G 0 disk
└─xvda1 202:1 0 8G 0 part / ß Root Partition
xvdf 202:80 0 8G 0 disk
└─xvdf1 202:81 0 8G 0 part ß Unmounted Partition
Kenneth G. Hartman,
ken@kennethghartman.com
© 2018 The SANS Institute Author retains full rights.ts
Digital Forensic Analysis of Amazon Linux EC2 Instances 9
gh
The command output above shows that the OS is mounted on partition xvda1 of
Ri
/dev/xvda. It also shows that a single partition on the new volume that is not mounted
ll
Fu
(xvdf1). This indicates that the volume is attached, just not mounted yet.
ns
6.4. Determine the format of the partition and mount
ai
et
Use the file command to determine the format of the partition as shown below:
rR
root@siftworkstation:/home/ubuntu# file -s /dev/xvdf1
/dev/xvdf1: Linux rev 1.0 ext4 filesystem data, UUID=4967eba2-7f57-4688-8f0b-
ho
069ca22b0b3e (extents) (large files) (huge files
ut
Make a directory and mount the evidentiary Linux file system as read-only:
,A
mkdir /mnt/linux_mount # Need to make any Linux mount points
te
mount -o ro /dev/xvdf1 /mnt/linux_mount/
itu
If the file system was Microsoft Windows, the following command would be used
st
(Lee, 2009a):
In
mount –o loop,ro,show_sys_files,streams_interface=windows /dev/xvdf1
NS
/mnt/windows_mount
SA
Note that the windows_mount directory already exists on the SIFT Workstation, but
the linux_mount will need to be created.
e
Th
Verify the partition is mounted using either the mount or the ls commands:
18
root@siftworkstation:/home/ubuntu# mount | grep "/mnt"
20
/dev/xvdf1 on /mnt/linux_mount type ext4 (ro,relatime,data=ordered)
root@siftworkstation:/home/ubuntu# ls -als /mnt/linux_mount/
©
total 128
4 dr-xr-xr-x 25 root root 4096 Jan 23 2017 .
4 drwxr-xr-x 17 root root 4096 Sep 25 22:22 ..
0 -rw-r--r-- 1 root root 0 Jan 13 2017 .autorelabel
4 dr-xr-xr-x 2 root root 4096 Jan 13 2017 bin
4 dr-xr-xr-x 4 root root 4096 Jan 13 2017 boot
4 drwxr-xr-x 11 root root 4096 Jan 13 2017 cgroup
4 drwxr-xr-x 2 root root 4096 Dec 20 2016 dev
4 drwxr-xr-x 77 root root 4096 Jan 13 2017 etc
4 drwxr-xr-x 3 root root 4096 Jan 13 2017 home
4 dr-xr-xr-x 7 root root 4096 Jan 13 2017 lib
(continued...)
Kenneth G. Hartman,
ken@kennethghartman.com
© 2018 The SANS Institute Author retains full rights.ts
Digital Forensic Analysis of Amazon Linux EC2 Instances 10
gh
6.5. Prepare the EC2 Memory Image and Profile
Ri
Assuming that the aws_ir script created an image of the EC2 instance memory,
ll
Fu
the first task is to copy it to the SIFT Workstation from the S3 bucket created when
aws_ir executed. The memory image will have a “lime” file extension and the name of
ns
the bucket will start with “cloud-response.” Copy the image file to /cases.
ai
et
Volatility and Rekall are the leading open-source solutions for memory image
rR
analysis, however both require a profile that is specific to the kernel of the system that
ho
was imaged. Both projects have repositories of profiles for CentOS, Ubuntu, and other
ut
distributions, but do not have any Amazon Linux profiles at the time of this writing.
,A
Since there are so many kernel permutations, the documentation for both Volatility and
te
Rekall provide instructions on how to create a custom profile, assuming the analyst has
itu
the source code for the kernel headers (Linux profiles, n.d.; Linux support in Rekall,
st
n.d.).
In
Creating custom profiles is beyond the scope of this paper, however it should be
NS
stressed that profiles for all kernels used in production should be prepared in advance.
SA
Remember that kernels may be updated as part of the patching process, so maintaining a
current inventory is a critical aspect of incident response preparation (Linux profiles,
e
Th
n.d.). Memory analysis will be discussed further in Section 10.8.
18
7. Perform Forensic Analysis
20
SANS has published a Digital Forensics & Incident Response Poster that
©
describes a process for finding malware on Windows that is titled “Finding Malware –
Step by Step” (SANS DFIR, 2013). The following sections follow that general process,
adapting it for Amazon Linux.
7.1. Evidence Preparation and Data Reduction
Now that the evidence is attached to the SIFT Workstation, a first step is to carve
data from the unallocated space and then separate out the files that are known to be good.
While it may be tempting to skip the step of creating the hash database, this powerful
tactic is easy to do.
Kenneth G. Hartman,
ken@kennethghartman.com
© 2018 The SANS Institute Author retains full rights.ts
Digital Forensic Analysis of Amazon Linux EC2 Instances 11
gh
7.1.1. Generate Hash List from AMI
Ri
The known files hash list will be generated on the SIFT Workstation from the
ll
Fu
same AMI that was used to launch the instance as determined by looking at the original
metadata associated with the compromised instance. See Figure 4.
ns
ai
et
rR
ho
ut
,A
te
itu
Figure 4 – Identifying the AMI to use for the Hash Database
st
Launch an EC2 Instance based on the AMI and make a snapshot as soon as the
In
status checks are complete but before logging onto the system. Next, make a volume
NS
from the snapshot in the same availability zone as the SIFT Workstation. Use a name tag
SA
such as “HASH-BASELINE” for both the snapshot and the volume to differentiate these
e
objects from those related to the evidence and the SIFT Workstation itself.
Th
Using the same steps described in Sections 6.3 and 6.4, attach and mount the
18
HASH-BASELINE volume as the third volume on the SIFT Workstation using a unique
20
mount point, such as /mnt/linux_base. For example:
©
# mkdir /mnt/linux_base
# mount -o ro /dev/xvdg1 /mnt/linux_base/
# lsblk
NAME MAJ:MIN RM SIZE RO TYPE MOUNTPOINT
xvda 202:0 0 8G 0 disk
└─xvda1 202:1 0 8G 0 part /
xvdf 202:80 0 8G 0 disk
└─xvdf1 202:81 0 8G 0 part /mnt/linux_mount
xvdg 202:96 0 8G 0 disk
└─xvdg1 202:97 0 8G 0 part /mnt/linux_base
It is very useful to have the base AMI mounted as a read-only volume that can be
referred to during the investigation as the “known good” state. This is particularly true if
the AMI has been hardened and contains custom files that are intended to be there. To
Kenneth G. Hartman,
ken@kennethghartman.com
© 2018 The SANS Institute Author retains full rights.ts
Digital Forensic Analysis of Amazon Linux EC2 Instances 12
gh
help with identifying the differences between the volume under investigation and the
Ri
reference volume, a hash database of all files on the reference volume can be created
ll
Fu
using hfind (Carrier, 2003a) as follows:
ns
# find /mnt/linux_base/ -exec /usr/bin/md5sum {} \; > known_files.md5
# hfind -i md5sum known_files.md5
ai
et
7.1.2. Identify files which are new or modified
rR
Next, create a hash list of files for the volume under investigation
ho
(“investigate_files.md5”) and use that list to create an additional list of the files
ut
that are new or have changed (“changed_files.txt”). Scanning
,A
changed_files.txt may reveal interesting patterns for further investigation.
te
# find /mnt/linux_mount/ -exec /usr/bin/md5sum {} \; >
itu
investigate_files.md5
# hfind -i md5sum investigate_files.md5
st
# awk '{print $1}' investigate_files.md5 | hfind known_files.md5 | grep
In
"Hash Not Found" | awk '{print $1}' > changed.md5
# hfind -f changed.md5 investigate_files.md5 > changed_files.txt
NS
7.1.3. Recover the unallocated space and sort files
SA
The tsk_recover utility can be used to recover files from unallocated space by
e
passing in the device of the attached volume and the location to store the recovered files
Th
as parameters to the command (Carrier, tsk_recover man page, n.d.b). The syntax for this
18
is simply:
20
tsk_recover /dev/xvdf1 /cases/recovered
©
The tsk_recover tool adds the sector where the file was located to the end of
the file name and uses a semicolon as a delimiter. For example:
/mnt/data/etc/yum.repos.d/epel.repo;5a135316
Visually scanning through the directory listing may identify files that deserve additional
investigation. Use this command:
# ls -lR /cases/recovered/ | less
The Sleuth Kit contains another tool, sorter (Carrier, sorter man page, n.d.c),
for recovering unallocated space and will sort both allocated and unallocated unknown
Kenneth G. Hartman,
ken@kennethghartman.com
© 2018 The SANS Institute Author retains full rights.ts
Digital Forensic Analysis of Amazon Linux EC2 Instances 13
gh
files per rules appropriate to the file system. The command to do this in the background
Ri
is:
ll
Fu
sorter –s -f ext4 -d /mnt/data -x known_files.md5 /dev/xvdf1 &
ns
This command uses the known_files hash list that was indexed previously and stores
ai
the output onto a new data volume that is at least the size of the evidence volume. The
et
AWS documentation explains how to create and attach an empty EBS volume as well as
rR
format it (Amazon Web Services, n.d.c). Note that the above command assumes that the
ho
empty EBS volume was mounted to /mnt/data. The command to do that is:
ut
# mount /dev/xvdh /mnt/data/
,A
The -s switch tells sorter to save a copy of the sorted files into a directory for each
te
category (Carrier, sorter man page, n.d.c). A typical directory listing of the data volume
itu
after running this command is shown below.
st
In
# ls -l
total 9156
NS
drwxr-xr-x 2 root root 4096 Dec 4 21:30 archive
-rw-r--r-- 1 root root 2058 Dec 4 21:30 archive.txt
drwxr-xr-x 2 root root 4096 Dec 4 21:30 data
SA
-rw-r--r-- 1 root root 1386 Dec 4 21:30 data.txt
drwxr-xr-x 2 root root 4096 Dec 4 21:30 documents
-rw-r--r-- 1 root root 1057 Dec 4 21:30 documents.txt
e
-rw-r--r-- 1 root root 6768155 Dec 4 21:30 exclude.txt
Th
drwxr-xr-x 2 root root 4096 Dec 4 21:29 exec
-rw-r--r-- 1 root root 48378 Dec 4 21:29 exec.txt
18
drwxr-xr-x 2 root root 4096 Dec 4 21:30 images
-rw-r--r-- 1 root root 28857 Dec 4 21:30 images.txt
20
-rw-r--r-- 1 root root 2124974 Dec 4 21:30 mismatch_exclude.txt
-rw-r--r-- 1 root root 82004 Dec 4 21:30 mismatch.txt
©
-rw-r--r-- 1 root root 478 Dec 4 21:30 sorter.sum
drwxr-xr-x 2 root root 36864 Dec 4 21:30 text
-rw-r--r-- 1 root root 213600 Dec 4 21:30 text.txt
-rw-r--r-- 1 root root 7148 Dec 4 21:30 unknown.txt
The executable files that are new or modified relative to the AMI are in the
\mnt\data\exec folder and are listed in exec.txt. The output from sorter
can be further refined using a hash list from the National Software Reference Library
(Carrier, 2003b). The National Software Reference Library (n.d.) contains hashes of all
files from the software applications in their expansive “Reference Data Set.”
Kenneth G. Hartman,
ken@kennethghartman.com
© 2018 The SANS Institute Author retains full rights.ts
Digital Forensic Analysis of Amazon Linux EC2 Instances 14
gh
7.1.4. Carving files from unallocated space
Ri
Foremost is another tool for recovering files from unallocated space. While
ll
Fu
sorter uses the output of the file command (Carrier, File system forensic analysis,
2005), Foremost uses signatures of files that consist of distinct byte patterns within
ns
the header and footer of each file type it can extract. This technique is called data
ai
et
carving (Foremost, n.d.). The results depend on the presence of accurate signatures for
rR
the file system to be carved. The current foremost.conf file that is distributed with
ho
the SIFT workstation is focused on media files and Microsoft Windows (Kristensen,
2014). The command to run foremost on the evidence prepared, as discussed above,
ut
,A
is:
te
# foremost –dv –o /cases/forermost –c /etc/foremost.conf /dev/xvdf1
itu
7.1.5. Determine if keys are present on compromised system
st
In
While sorting and classifying the files on the compromised volume, analysts
should look in the SSH and AWS hidden directories for the presence of private keys.
NS
Unprotected private keys on an EC2 instance are a poor security practice and should be in
SA
violation of the organization’s security policy. If SSH keys are needed on an EC2
e
instance, they should be protected with a long passphrase.
Th
Amazon best practices recommend assigning an Identity and Access Management
18
(IAM) role to EC2 instances to avoid storing AWS keys on them (Amazon Web Services,
20
n.d.e). Discussion of the Amazon IAM service is outside of the scope of this paper. If
©
any AWS keys or private SSH keys are identified, they should be assumed to be
compromised. Run the following commands to identify private keys:
# ls /mnt/linux_mount/home/ec2-user/.ssh/
# ls /mnt/linux_mount/home/ec2-user/.aws/
# egrep -r AKIA[A-Z0-9]{16} /mnt/linux_mount/
# egrep -r "PRIVATE KEY-----" /mnt/linux_mount/
It is also recommended to list the public keys that are used to SSH to the instance.
In conjunction with the syslog, this information helps to determine who is accessing
system. Use:
# ls /mnt/linux_mount/home/*/.ssh/authorized_keys
Kenneth G. Hartman,
ken@kennethghartman.com
© 2018 The SANS Institute Author retains full rights.ts
Digital Forensic Analysis of Amazon Linux EC2 Instances 15
gh
# cat /mnt/linux_mount/home/ec2-user/.ssh/authorized_keys
Ri
ll
7.2. Perform Anti-Virus Checks
Fu
The second step in the SANS “Finding Malware – Step by Step” process for
ns
Microsoft Windows advises to scan for malware. However, it should first be determined
ai
if any security software is installed. Sometimes anti-virus software may be installed but
et
the alerts are ignored. In other cases, the discovery of agents may indicate additional
rR
courses of investigation to be explored.
ho
ut
7.2.1. Determine if any security software is installed
,A
AWS System Manager – The AWS System Manager provides the ability to
te
patch, configure, and audit EC2 instances to a baseline. It also allows administrators to
itu
inventory the software on EC2 instances (Amazon Web Services, n.d.f). If the AWS
st
Systems Manager is found, there will be additional information available via the AWS
In
EC2 Console that may support the forensic investigation of the EC2 instance. To check
NS
if the AWS Systems Manager is present, look in the default location for the executable:
SA
# ls /mnt/linux_mount/usr/bin/amazon-ssm-agent
e
or its log:
Th
# ls /mnt/linux_mount/var/log/amazon/ssm/amazon-ssm-agent.log
18
AWS Inspector – AWS Inspector is Amazon’s vulnerability scanner (Amazon
20
Web Services, n.d.g). Finding this tool on an EC2 instance indicates that there may be
©
vulnerability scans available via the Inspector console. To learn more about Inspector,
see the user guide (Amazon Web Services, n.d.g). Any information regarding known
vulnerabilities on the EC2 instance can help focus the investigation. Look for the
executable in the default location:
# ls /mnt/linux_mount/opt/aws/awsagent/bin/awsagent
Splunk Forwarder – The Splunk Universal Forwarder is used by many
organizations to collect and archive system logs (Splunk, n.d.). By default, the
executable is found at
Kenneth G. Hartman,
ken@kennethghartman.com
© 2018 The SANS Institute Author retains full rights.ts
Digital Forensic Analysis of Amazon Linux EC2 Instances 16
gh
/mnt/linux_mount/opt/splunkforwarder/bin/splunkd and the logs it
Ri
collects can be located using the command:
ll
Fu
# cat /mnt/linux_mount/opt/splunkforwarder/etc/apps/*/local/inputs.conf
ns
7.2.2. Scan with ClamAV
ai
et
ClamAV is an open-source anti-malware scanner (ClamAV, n.d.) that comes
rR
preinstalled on the SIFT Workstation. Ensure that SIFT workstation is updated to keep
the signatures current. To scan the mounted evidence volume with ClamAV, use:
ho
ut
# clamscan -i -r --log=/cases/clam.log /mnt/linux_mount/
,A
Likewise, to scan the files recovered from the unallocated space, use:
te
# clamscan -i -r --log=/cases/clam.log /cases/recovered
itu
st
7.3. Search for Known Indicators of Compromise
In
Loki is an IOC scanner written in python (Roth, n.d.) that runs without issue on
NS
the SIFT Workstation, but does have to be installed separately. To install it and have it
scan the attached evidence, use the following commands:
SA
cd /tmp
e
wget https://github.com/Neo23x0/Loki/archive/v0.24.3.tar.gz
Th
tar -xzvf v0.24.3.tar.gz
cd Loki-0.24.3/
pip install pylzma
18
pip install netaddr
python loki.py -p /mnt/linux_mount/
20
The following snippet is output from Loki when it discovers indicators of
©
compromise:
[ALERT]
FILE: /mnt/linux_mount/bin/.libgcc SCORE: 100 TYPE: ELF SIZE: 2979640
FIRST_BYTES: 7f454c4602010103000000000000000002003e00 / ELF>
MD5: 4fa4269b7ce44bfce5ef574e6a37c38f
SHA1: e88c46b6f775cf5079857e45ac7bf3faeb9d8e11
SHA256: 63210b24f42c05b2c5f8fd62e98dba6de45c7d751a2e55700d22983772886017
CREATED: Fri Sep 1 06:28:41 2017 MODIFIED: Wed Aug 30 09:49:31 2017 ACCESSED:
Fri Sep 1 06:27:57 2017
REASON_1: Malware Hash TYPE: MD5 HASH: 4fa4269b7ce44bfce5ef574e6a37c38f
SUBSCORE: 100 DESC: Linux.Lady http://vms.drweb.com/virus/?_is=1&
[WARNING]
FILE: /mnt/linux_mount/usr/lib/python2.7/dist-
packages/pip/_vendor/distlib/w32.exe SCORE: 60 TYPE: EXE SIZE: 88576
FIRST_BYTES: 4d5a90000300000004000000ffff0000b8000000 / MZ
MD5: 8a629fa901ed50f3dd7bba92b4535f03
Kenneth G. Hartman,
ken@kennethghartman.com
© 2018 The SANS Institute Author retains full rights.ts
Digital Forensic Analysis of Amazon Linux EC2 Instances 17
gh
SHA1: cb73af97341c347a20d1246cce906250c17eadf7
Ri
SHA256: 78445153afe05dc55a435336b87011dc14d08ec3c8d126e2986c8c2c60c7ce9b
CREATED: Mon Jun 19 16:04:21 2017 MODIFIED: Wed Aug 10 21:51:27 2016 ACCESSED:
ll
Wed Aug 10 21:51:27 2016
Fu
REASON_1: File Name IOC matched PATTERN:
/(q32|q64|wceaux|w86|q86|quarkpwd[^/]*|m64|m32|hash32|hash64|64|32|w32|w64|wce3
2|wce64|w32|w64|wce|p32|p64|ps32|ps64|mimikatz|mimilove|mm32|mm64|pw32|pw64|g32
ns
|g64|gs32|gs64|hash|hashdump|dumpsvc)\.exe SUBSCORE: 60 DESC: Cred Dumping
ai
et
7.4. Identify Evidence of Persistence
rR
To survive a reboot, malware must use a persistence mechanism. The two most
ho
common methods are cron jobs and start-up scripts.
ut
,A
7.4.1. Look for unusual cron jobs
The SANS Linux Intrusion Discovery Cheat Sheet (SANS Institute, n.d.b)
te
itu
provides the following two suggestions for looking at system-wide cron jobs:
st
cat /mnt/linux_mount/etc/crontab
ls /mnt/linux_mount/etc/cron.*
In
NS
It is also important to check the cron jobs for all users. To list the users that have cron
jobs scheduled on the attached Amazon Linux volume, run:
SA
ls –l /mnt/linux_mount/var/spool/cron/*
e
Th
To quickly peruse the cron jobs when several user accounts have jobs scheduled, use:
find /mnt/linux_mount/var/spool/cron/* -exec cat {} \;
18
20
7.4.2. Look for unusual start-up scripts
©
Some malware will make use of the start-up scripts that Linux runs at boot time
when entering a specific run level. On some Linux distributions, these are found in
/etc/init.d, but on Amazon Linux and Red Hat variants, the scripts will be in
/etc/rc*.d. Use the following command to list the scripts, in reverse chronological
order:
ls -als -t /mnt/linux_mount/etc/rc*.d/
Cron jobs and the start-up scripts may have innocuous names and may call other
scripts, so sometimes an investigator may have to dig into the details to determine its
Kenneth G. Hartman,
ken@kennethghartman.com
© 2018 The SANS Institute Author retains full rights.ts
Digital Forensic Analysis of Amazon Linux EC2 Instances 18
gh
nature. The “Bill Gates Botnet” (Akamai, 2016) for example, installs the following
Ri
scripts:
ll
Fu
/etc/init.d/DbSecuritySpt
/etc/rc1.d/S97DbSecuritySpt
ns
/etc/rc2.d/S97DbSecuritySpt
/etc/rc3.d/S97DbSecuritySpt
ai
/etc/rc4.d/S97DbSecuritySpt
/etc/rc5.d/S97DbSecuritySpt
et
rR
7.5. Check for Suspicious Files
ho
ut
7.5.1. Look in the tmp directory
,A
The /tmp directory is frequently used to store uploaded files. Use the following
te
commands to examine the /tmp directory of the mounted volume as well as the
itu
recovered files:
st
ls -als /mnt/linux_mount/tmp
In
ls –als /cases/recovered/tmp
NS
A look in the /tmp directory on one compromised instance produced the
SA
following three suspicious files:
e
• gates.lod
Th
• moni.lod
18
• tmplog
20
The first two files are IOC’s for the Bill Gates Botnet (Akamai, 2016) as
©
determined by an internet search. The contents of the tmplog file showed the
configuration for a Bitcoin miner:
CMD: /bin/wipefs -B -o stratum+tcp://mine.ppxxmr.com:7777 -u {REDACTED}
-p x -k --max-cpu-usage=100
7.5.2. Look for unusual files
The SANS Linux Intrusion Discovery Cheat Sheet (SANS Institute, n.d.b) advises
to look for unusual SUID files and assumes the user has knowledge of which SUID files
are normal. See What is SUID and how to set SUID in Linux/Unix (Anne, 2011) for an
Kenneth G. Hartman,
ken@kennethghartman.com
© 2018 The SANS Institute Author retains full rights.ts
Digital Forensic Analysis of Amazon Linux EC2 Instances 19
gh
explanation of SUID files. The following commands perform the comparison to the
Ri
mounted baseline volume:
ll
Fu
# find /mnt/linux_mount/ -uid 0 -perm -4000 -print > suid_evidence
# find /mnt/linux_base/ -uid 0 -perm -4000 -print > suid_base
ns
# cut suid_base -d"/" -f4- > suid_base_relative
# cut suid_base -d"/" -f4- > suid_evidence_relative
ai
# diff suid_base_relative suid_evidence_relative
et
The same technique can be used to identify large files that are greater than a
rR
certain size and compare them to the base volume. The following commands look for
ho
files greater than ten megabytes:
ut
find /mnt/linux_mount/ -size +10000k
,A
find /cases/recovered/ -size +10000k
te
7.5.3. Look for files with high entropy
itu
DensityScout is a tool on the SIFT workstation that detects packing, compression,
st
and encrypted files that exceed a “density” threshold (Wojner, 2012). Because
In
compressed files are common on Linux, comparison to the baseline volume reduces the
NS
output significantly.
SA
# densityscout -r -p 0.1 -l 0.1 -o high_density_evidence.txt /mnt/linux_mount/
# densityscout -r -p 0.1 -l 0.1 -o high_density_base.txt /mnt/linux_base/
e
# cut high_density_evidence.txt -d"/" -f4- > high_density_evidence_relative.txt
Th
# cut high_density_base.txt -d"/" -f4- > high_density_base_relative.txt
# diff high_density_base_relative.txt high_density_evidence_relative.txt
18
The files recovered from unallocated space should be examined as well.
20
# densityscout -r -p 0.1 -l 0.1 -o high_density_recovered.txt /cases/recovered/
©
7.5.4. Examine suspicious files for IOCs
When suspicious files are identified, the strings command can provide a quick
indication regarding the nature of the file and can identify potential indicators of
compromise. The output of the strings command may include file names, IP addresses,
configuration details, menu options, and help screens. IP addresses should be
investigated by a network security analyst. Example commands include:
strings mymalwarefile # Extract Strings
grep -aoE "\b([0-9]{1,3}\.){3}[0-9]{1,3}\b" mymalwarefile # Extract IPs
Kenneth G. Hartman,
ken@kennethghartman.com
© 2018 The SANS Institute Author retains full rights.ts
Digital Forensic Analysis of Amazon Linux EC2 Instances 20
gh
7.6. Review system logs and configuration
Ri
Ideally, the critical logs were offloaded to a central repository such as Splunk or a
ll
Fu
S3 bucket. Regardless, an examination of the logs on the EBS volume is an important
activity because system logs are a valuable source of information regarding the state of
ns
the system before and after the attack and may provide answers to how and when the
ai
et
system was compromised.
rR
ho
7.6.1. Review the bash history
Although the bash history is not a robust audit log, it still provides information
ut
,A
that may be of interest to the examiner. For example, it can reveal skill level and stylistic
proclivities unique to a certain hacker in addition its intended purpose of capturing the
te
itu
recent commands entered by a user. A user can modify the bash history associated with
his or her account, but rarely will do so unless trying to cover the tracks. Because there
st
In
are multiple ways to avoid bash history logging (Skoudis, 2012) it should not be
considered a security control. Indications that bash history has been altered or evaded is
NS
a noteworthy TTP. Examine the default ec2-user account, root, and any other accounts
SA
on the system.
e
cat /mnt/linux_mount/home/ec2-user/.bash_history
Th
cat /mnt/linux_mount/root/.bash_history
18
7.6.2. Examine local user accounts and groups
20
The SANS Linux Intrusion Discovery Cheat Sheet (SANS Institute, n.d.b)
©
suggests that an investigator look for unusual accounts and multiple accounts with a user
id (UID) set to zero. Also, note any new groups or services that have created an account
as well.
# diff /mnt/linux_base/etc/passwd /mnt/linux_mount/etc/passwd
# diff /mnt/linux_base/etc/group /mnt/linux_mount/etc/group
Look for accounts with passwords set, assuming this is a policy violation:
cat /mnt/linux_mount/etc/shadow | grep -F "$"
Kenneth G. Hartman,
ken@kennethghartman.com
© 2018 The SANS Institute Author retains full rights.ts
Digital Forensic Analysis of Amazon Linux EC2 Instances 21
gh
7.6.3. Identify boot history
Ri
Understanding when a system has been booted is important information for
ll
Fu
constructing a timeline of events in the life of the EC2 instance. Use the following
commands to glean this information:
ns
ai
# ls -als /mnt/linux_mount/var/log/dmesg*
# grep Cloud-init /mnt/linux_mount/var/log/cloud-init.log
et
# cat /mnt/linux_mount/var/log/boot.log
rR
7.6.4. Identify past IP addresses
ho
Snapshots and AMIs may be shared across different AWS accounts and
ut
knowledge of this can help enrich the timeline. In addition, there may be other
,A
circumstances where the IP address will change. This can be identified in the cloud-
te
init-output.log as follows:
itu
st
# grep -A4 -B1 "Net device info" /mnt/linux_mount/var/log/cloud-init-
output.log
In
NS
7.6.5. Look at the yum log
SA
The yum.log contains a list of the packages that have been installed on the EC2
instance. Understanding this information may provide insight into how the system was
e
Th
intended to function or if any vulnerable software was added. It may be helpful to
compare with the baseline to determine which packages have been added or removed
18
since the system was launched from the AMI.
20
# cat /mnt/linux_mount/var/log/yum.log
©
# diff /mnt/linux_base/var/log/yum.log /mnt/linux_mount/var/log/yum.log
7.6.6. Look in /var/log/ for relevant logs
The default location for all logs is /var/log and all logs should be perused to
identify information that may be relevant to the specific investigation. The
var/log/secure file contains details about user account changes, ssh connections,
sudo activity, and su sessions. By default, Amazon Linux has the auditd service
running and the considerable amount of valuable information that it has logged will be
found in /var/log/audit/*
Kenneth G. Hartman,
ken@kennethghartman.com
© 2018 The SANS Institute Author retains full rights.ts
Digital Forensic Analysis of Amazon Linux EC2 Instances 22
gh
ls -als /mnt/linux_mount/var/log/
Ri
cat /mnt/linux_mount2/var/log/secure* | less
cat /mnt/linux_mount2/var/log/audit/* | less
ll
Fu
The audit logs will take some practice to read and since the timestamp is in epoch
ns
time, the manual review is only to look for anomalies. The SuperTimeline discussed later
in this paper will parse both the secure and audit logs and convert the timestamp to
ai
et
be human readable.
rR
ho
7.6.7. Look at webserver logs
ut
The EC2 instance may be running a vulnerable web server or web service. The
,A
typical configuration will be to have some logging enabled by default, but the logs may
te
be in unusual places on the volume. Any web server logs found on the system are bound
itu
to be a treasure trove of information with a variety of attempted attacks. The following
st
command will find most web logs:
In
# egrep -lr "GET / HTTP/1.1" /mnt/linux_mount | less
NS
The best way to analyze these logs is to pull them into Splunk. Splunk has a free
SA
license that permits ingestion of 500 megabytes of data per day. Incident response teams
should be prepared to launch a dedicated Splunk AMI as needed for ad hoc analysis. If
e
Th
Elastic Load Balancers (ELB) are used to proxy incoming HTTP requests, the source IP
address in the web logs may be the internal address of the ELB and not the attacker.
18
During IR preparations, this setting should be changed and a process to archive the web
20
server logs should be established.
©
7.7. Perform a timeline analysis
A timeline is an indispensable tool that can unify the investigation effort. The
process of creating it can help identify gaps and missing information. A summarized
timeline can help to effectively communicate the sequence of events to management
(Liston, 2012).
Kenneth G. Hartman,
ken@kennethghartman.com
© 2018 The SANS Institute Author retains full rights.ts
Digital Forensic Analysis of Amazon Linux EC2 Instances 23
gh
7.7.1. Make a Filesystem Timeline
Ri
A filesystem timeline is quick to create, as it just sorts the file system metadata
ll
Fu
into chronological order. By default, the timeline will include both allocated as well as
unallocated files (Lee, 2009b). The output of the two-step process is a CSV file that can
ns
be analyzed with grep or converted into a spreadsheet.
ai
et
First, make the body file (Timelines, 2008):
rR
# fls -r -m / /dev/xvdf1 > /cases/body.txt
ho
Then, make a CSV file using mactime (Mactime, 2010):
ut
# mactime -b /cases/body.txt -d > /cases/timeline.csv
,A
The fls command gathers the metadata for each file into a body file which
te
itu
contains one row per file. This includes the modify, access, create, and change/birth
(MACB) timestamps. The mactime command rearranges this metadata in temporal
st
In
order, creating multiple records when the MACB timestamps on a given file are different.
NS
7.7.2. Make a SuperTimeline
SA
A SuperTimeline will take much longer to create but includes many of the system
e
logs, in addition to file system activity (Lee, 2009b). First, make a plaso dump file in the
Th
background with nohup, so that the terminal can be disconnected if necessary:
18
# nohup log2timeline.py /cases/plaso.dump /dev/xvdf1 &
20
Plaso is an engine for storing timestamp data and the dump file is essentially the
©
database. The format of the dump file is designed to be efficient from a performance and
storage perspective (Metz & Gudjonsson, n.d.). Hence, other tools are necessary to
access the database after it is created with the log2timeline.py command.
The log2timeline.py tool supports a command line switch to adjust the timezone,
however EC2 instances are set to UTC by default. Hence, all logs are generated without
time correction and, therefore, this switch is not needed when creating a SuperTimeline.
When the processing is complete, pinfo.py can be used to examine the plaso file (Metz &
Gudjonsson, n.d.):
# pinfo.py -v /cases/plaso.dump | less
Kenneth G. Hartman,
ken@kennethghartman.com
© 2018 The SANS Institute Author retains full rights.ts
Digital Forensic Analysis of Amazon Linux EC2 Instances 24
gh
The psort.py tool is used to create a CSV from the plaso file, however an
Ri
unfiltered CSV file can be unwieldly and is often too large to analyze with Microsoft
ll
Fu
Excel. Therefore, the standard process is to create a CSV between two dates that
encompass the events of interest to the investigation (Nides, 2011).
ns
ai
# psort.py /cases/plaso.dump "date > 'YYYY-MM-DD HH:MM:SS' AND date <
'YYYY-MM-DD HH:MM:SS'" > /cases/supertimeline.csv
et
rR
7.7.3. Fix timestamp in syslog records
ho
There is a potential issue with creating timelines on EC2 instances launched from
ut
the typical Amazon Linux images in the marketplace. These systems use a default setting
,A
for syslog that does not include the year in the date stamp. To address this, plaso
te
assumes that the year on the syslog files is the maximum year in the plaso database.
itu
Thus, if any other logs have invalid time stamps, all syslog records could show up a year
st
or more into the future and could be missed in a CSV file that was created with date
In
filters as shown in the previous section. As of this writing, the plaso developers have an
NS
open ticket to determine a better way to handle this situation (Metz, Is the behavior of
maximum year limit in syslog parser what is desired?, 2017).
SA
Ideally, a hardened image would be used which properly configures the syslog
e
Th
timestamp to include the year, but this may not be the case, so the investigator should be
prepared to address the default settings. The options are to alter the time stamps to
18
include the year before the various syslog files are processed by plaso or to alter the
20
timestamps in the resultant CSV file. Since the CSV is derived and the syslog files are
©
intact evidence, the simplest and best choice is to modify any future dates in the CSV and
re-sort it. The steps are shown below, assuming the EC2 instance has only existed in the
year 2017:
# psort.py /cases/plaso.dump > /cases/supertimeline-all.csv
# sed -r 's|^[[:digit:]]{4}(.*,syslog,.*)$|2017\1|g'
/cases/supertimeline-all.csv > /cases/supertimeline-all-fixed.csv
Next, sort the output and extract the dates of interest, keeping the header row:
# head -n 1 supertimeline-all.csv > supertimeline-all-extract.csv
# sort supertimeline-all-fixed.csv > supertimeline-all-sorted.csv
$ grep "YYYY-MM-DD" supertimeline-all-sorted.csv >> supertimeline-all-
extract.csv
Kenneth G. Hartman,
ken@kennethghartman.com
© 2018 The SANS Institute Author retains full rights.ts
Digital Forensic Analysis of Amazon Linux EC2 Instances 25
gh
The file can now be loaded into a spreadsheet for analysis and color-coding. For an
Ri
example of a colorized timeline for Windows, see the Digital forensic SIFTing:
ll
Fu
Colorized super timeline template for log2timeline output files blog post (Lee, 2012).
ns
7.8. Perform Memory Analysis
ai
et
To perform memory analysis with Rekall, one must have a profile that matches
rR
the operating system kernel (Michael, 2014). Once the memory dump is obtained and
ho
copied to the SIFT Workstation as discussed in Section 6.5 it can be analyzed with Rekall
using the following command, substituting LINUX-PROFILE with the path to the
ut
,A
profile:
te
$ rekall --profile LINUX-PROFILE -f /cases/memcapture.lime
itu
This puts Rekall in an interactive mode allowing plugins to be run one after the other
st
without having to repeat the information that was just entered onto the command line.
In
The steps below show this process:
NS
SA
7.8.1. Identify rogue processes
To capture the list of processes in memory, use pslist and to display the
e
Th
processes in a hierarchical tree us pstree. To save the data to a file use the output
parameter as shown.
18
20
[1] memcapture.lime 02:45:23> pslist output="/cases/pslist.txt"
----------------------------> pslist(output="/cases/pslist.txt")
Out Plugin: pslist (LinuxPsList)
©
[1] memcapture.lime 02:46:38> pstree output="/cases/pstree.txt"
----------------------------> pstree(output="/cases/pstree.txt")
Out Plugin: pstree (LinPSTree)
7.8.2. Dump suspicious processes
Dump the kernel drivers to a directory:
[1] memcapture.lime 03:37:30> moddump dump_dir="/cases/moddump"
----------------------------> moddump(dump_dir="/cases/moddump")
Kenneth G. Hartman,
ken@kennethghartman.com
© 2018 The SANS Institute Author retains full rights.ts
Digital Forensic Analysis of Amazon Linux EC2 Instances 26
gh
Dump all memory into files that can be analyzed with tools like grep and
Ri
strings or a scanned with a virus scanner:
ll
Fu
[1] memcapture.lime 03:40:55> memdump dump_dir="/cases/memdump"
----------------------------> memdump(dump_dir="/cases/memdump")
ns
ai
7.8.1. Review network artifacts
et
The netstat plugin lists the connections and the related process name.
rR
[1] memcapture.lime 03:22:47> netstat output="/cases/netstat.txt"
ho
----------------------------> netstat(output="/cases/netstat.txt")
Out Plugin: netstat (Netstat)
ut
The steps described above are only a small portion of what can be done with
,A
Rekall and memory analysis. Analysis of the processes and network artifacts collected in
te
the previous steps may provide additional IOCs or TTPs.
itu
st
In
7.9. Perform Third-party hash lookups
NS
At this point in the investigation, the investigator may have identified one or more
files that are suspected to be malware and may wonder if the samples have been seen in
SA
the wild. VirusTotal is a free online service that detects malicious content in files and
e
URLs. Suspicious files can be uploaded and will be scanned with multiple anti-virus
Th
scanning engines. In addition, VirusTotal can be searched by hash to see if it is in their
18
database already. VirusTotal also warns that any files that are uploaded are made
20
available to its premium users (VirusTotal, n.d.). Therefore, the service should be used
with discretion, especially if uploading custom malware will tip off an attacker or if the
©
file contains sensitive data or source code.
The SIFT Workstation contains two tools to facilitate VirusTotal usage from the
command line. These tools are both written by Didier Stevens and require a VirusTotal
API key (Stevens, n.d.), which can be obtained by creating a free account on VirusTotal.
The first tool, virustotal-search.py, takes a list of hashes and searches
the VirusTotal database. The following snippet illustrates its usage:
$ export VIRUSTOTAL_API2_KEY={YOUR_API_KEY HERE}
$ cat hashlist4virustotal.md5
4fa4269b7ce44bfce5ef574e6a37c38f
Kenneth G. Hartman,
ken@kennethghartman.com
© 2018 The SANS Institute Author retains full rights.ts
Digital Forensic Analysis of Amazon Linux EC2 Instances 27
gh
8a629fa901ed50f3dd7bba92b4535f03
Ri
3bd016b34cd5bd0a562b8f56f0cb971b
9b587ceee0e1236fff1333bd8752c64e
ll
$ virustotal-search.py hashlist4virustotal.md5 > virustotal-results.txt
Fu
The results of the query are saved as virustotal-results.txt and are
ns
displayed in Appendix B, due to the length. The first two MD5 hashed queries were from
ai
the Loki scan listed in Section 7.3 and the last two hashes were selected at random from
et
files in evidence.
rR
The second tool is virustotal-submit.py and it requires that a python
ho
module called poster be installed before it can be used on the current version of the
ut
,A
SIFT workstation. The command to install poster and submit a file to VirusTotal is
shown below:
te
itu
$ sudo pip install poster
$ virustotal-submit.py /mnt/linux_mount/lib64/libnfsidmap.so
st
/mnt/linux_mount/lib64/libnfsidmap.so;1;Scan request successfully
queued, come back later for the
In
report;3bd016b34cd5bd0a562b8f56f0cb971b;42732907e5cf2ccbba25944ee5bee44
8545465e33363fb2b27200611586c4d31;42732907e5cf2ccbba25944ee5bee44854546
NS
5e33363fb2b27200611586c4d31-
1512590781;https://www.virustotal.com/file/42732907e5cf2ccbba25944ee5be
SA
e448545465e33363fb2b27200611586c4d31/analysis/1512590781/
When the virustotal-submit.py command submits the file, it gets queued
e
Th
for processing and a URL is returned. The investigator can visit the URL with a browser,
or VirusTotal can be queried using virustotal-search.py and providing the hash
18
as before.
20
©
7.10. File Timestamp Anomalies
Attackers have been known to use timestomping to mimic the times of other files
in the folder in which the malware is hiding. Malware does this by altering the MACB
timestamps (MITRE, 2017). On Windows systems, timestomping can be detected by
identifying discrepancies between the $FILE_NAME time stamps and the
$STANDARD_INFO time stamps that are stored in the Master File Table (Hull, 2010),
however that data is not available in Linux file systems.
Timestomping is accomplished using two techniques. One method is to copy the
metadata from one file to another. The other method uses a program to set the metadata
Kenneth G. Hartman,
ken@kennethghartman.com
© 2018 The SANS Institute Author retains full rights.You can also read