Shoulder Replacement Surgery - January 2021 - Rebalance MD
←
→
Page content transcription
If your browser does not render page correctly, please read the page content below

Shoulder
Replacement
  Surgery

              January 2021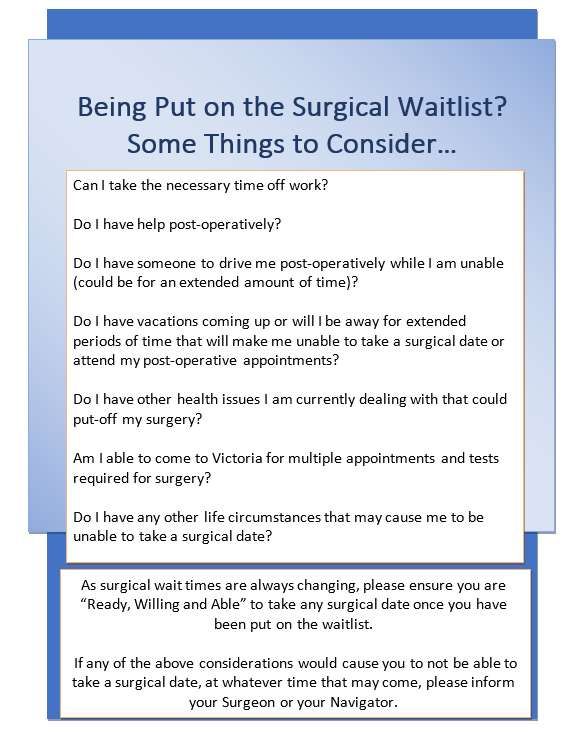
Page 2 of 52
Welcome to the RebalanceMD New Joint Program
Now that you are on the waitlist for a total joint replacement, please review this booklet that has IMPORTANT and
REQUIRED information. Please DO NOT lose this booklet as it will be needed throughout your journey to joint
replacement. Please bring this booklet with you to any future appointments you have at Rebalance MD.

Please watch our Education video. You will be asked to watch it at different times throughout your surgical
journey. It is important that you watch this video before your New Joint Program Intake Assessment so you are
prepared with informative questions.

You can find this video at http://rebalancemd.com/resources/#shoulder. Please note any “forms” mentioned in the
Education video will be provided once you have a booked surgery date.

What you will find in this booklet:

   1. Introduction and Patient Journey (page 4)
   2. Shoulder Anatomy and How the Joint is Replaced (page 5)
   3. Before Your Surgery (page 9)
   4. Once Your Surgery Day is Booked (page 19)
   5. Hospital Stay (page 33)
   6. Physiotherapy/Rehabilitation (page 37)
   7. At Home (page 41)
   8. Resources (page 51)

Thank you from the RebalanceMD team for reviewing this package and taking an active role in your surgical journey.
             If you have any further questions or comments please contact the office. 250-940-4444

                                                                                                       Page 3 of 52
New Joint Surgical Journey
 The next step in your journey is a New Joint Program Intake Assessment. You will be contacted by our office within
 the next 2-4 months to book an appointment with your Navigator. Your Navigator will walk you through all the steps
 for surgery and is available to answer any questions you may have. They will review your medical history, go over a
 discharge plan and ensure your health is optimal for surgery. Having reviewed all the information in this booklet
 will help you and your Navigator have a successful and informative appointment.

 After your Intake Assessment with your Navigator you may not hear from us often during this “waiting phase.” You
 will be contacted by the surgical booker approximately 6-8 weeks before a potential surgical date. Once you have a
 surgical date, they will let you know of any further actions that need to be taken, arrange an appointment with your
 surgeon if necessary and send you a confirmation letter.

 You will then be contacted by the New Joint Program to organize pre-operative tests, watch an Education video, and
 complete and return required forms.

                                                Orthopaedic Consult
                                            Added to the Surgical Waitlist
                                        *complete required bloodwork and ECG

          Recovery, Physiotherapy                                             New Joint Program Navigator
         And Follow up with Surgeon                                                Intake Assessment
                                                                           Health history review & discharge planning

 Surgery &                                                                                   Wait Period
Hospital Stay                                                                  Optimization & Monitoring by Navigator
                                                                                Includes reviewing specialist consults,
                                                                                             diagnostics etc.

     Completion of all Required Tests
            And Appointments                                                        Surgical Date Assigned
   Includes updated bloodwork, ECG, Xrays                                      Pre-op Exam with Family Doctor
   Appointment with hospital pharmacist
                                                                        Surgical confirmation letter e-mailed to patient
 Appointment with Anaesthesiologist (if needed)
Pick up recommended equipment and medical supplies

                                                      Education
                                          The New Joint Program will contact
                                                   you to organize

                                                                                                           Page 4 of 52
Shoulder
Replacement
This section contains information about:
Shoulder Anatomy
Shoulder Disease
Shoulder Replacement Surgery
Page 5 of 52Shoulder Anatomy
The shoulder joint is a ball and socket
joint with the head of the humerus (arm
bone) being the ball and the socket
being formed from the glenoid (the end
of the shoulder blade or scapula). The
rotator cuff tendons attach to the top
or head of the humerus and help the
shoulder move, along with other
muscles like the deltoid on the outside
of the shoulder.
Shoulder Disease
Osteoarthritis: also called degenerative joint
disease- is the most common reason for
shoulder replacement. This is caused by “wear
and tear” thinning of the cartilage, which
causes the bones to rub against each other.
Rheumatoid Arthritis: an autoimmune,
inflammatory arthritis that affects multiple
joints, often including the shoulders and can
causing thinning of the cartilage and tendons. Shoulder osteoarthritis
Post-Traumatic Arthritis: thinning of the
cartilage can happen after a severe trauma or Severe Fractures: a bad break of the
break in the shoulder. top of the humerus is often best
treated with a shoulder replacement,
Rotator Cuff Arthropathy: some patients especially in an older patient.
develop arthritis after having had a long
standing, chronic tear of the rotator cuff Avascular Necrosis: a lack of blood
tendons. Patients with this kind of arthritis supply to the top of the humerus bone
have a very weak arm. can cause the bone to die off and
leads to a painful shoulder
Page 6 of 52Shoulder Replacement Surgery
There are different kinds of shoulder replacement prostheses (artificial body parts). Your surgeon
will work with you to decide what the best prosthesis for you and your shoulder is. A shoulder
replacement can be expected to last around 10-15 years on average.
Types of Shoulder Replacements
Total Shoulder Replacement: Both the
head of the humerus and the socket are
replaced. This is the most common type of
replacement for patients with
Osteoarthritis.
Shoulder Hemi-arthroplasty: Only half the
joint, the head of the humerus is replaced.
This type of prosthesis is often used in
fractures. This type of replacement is less
common.
Reverse Total Shoulder Replacement: This
replaces both the ball and the socket but
switches the pieces so that the ball is
attached to the socket and the socket is
attached to the top of the humerus. This
type of prosthesis is used in patients who
have severe arm weakness, rotator cuff
arthropathy or sometimes if another
replacement has failed.
Page 7 of 52Page 8 of 52
Before Surgery
This section contains information about:
Health Optimization
Nutrition
Stress Management
Exercises
Smoking
Dental Work
“Out-of-Towners”
Having a Plan Worksheet
Page 9 of 52Health Optimization
You and your surgeon have agreed to proceed with a shoulder replacement. Surgery and anaesthesia can
affect many systems in your body. Therefore, it is important to be in your optimal health before proceeding
with surgery. If you have multiple medical issues, your surgeon may refer you to a specialist such an
internist, cardiologist, endocrinologist etc. If you currently see a specialist, it is important that we are
aware of who your specialist is and any upcoming appointments. Specialists will assess you to make sure
you are safe to proceed with surgery. Extra diagnostic tests may be needed before you are “cleared” to
proceed.
Other ways to optimize your health include nutrition, stress management, exercise, smoking cessation
and dental work.
Nutrition
Good nutrition will help you recover from surgery. Having surgery in optimal nutritional health can help
prevent anemia and replace blood loss, help the healing of the incision, nerves, muscle and bones, boost
your immune system to protect against infection and increase your energy level.
Protein- Promotes healing after surgery. Try to eat at least 3 servings of meat, milk or alternate protein
sources every day.
Multivitamin- Promotes healing and is best taken in moderate doses. If you have a history of low iron,
talk to your doctor, pharmacist or dietitian about supplements.
Calcium and Vitamin D- Are important for strong bones. Adults should have 2-3 servings of milk or
calcium-fortified products per day. A minimum of 600 IU Vitamin D supplement is recommended for all
people over 50 years old.
Fibre and Water- It is important to have a regular bowel habit prior to surgery, as constipation can be a
complication. Spread fibre intake throughout the day and drink at least 8 glasses of water per day.
There are many resources available to help guide you to optimal nutritional health. Nutritional
consultations can be helpful but may come with a cost. Online resources or cell phone applications
(“apps”) may also be helpful.
Page 10 of 52Stress Management
Stress affects your entire body causing symptoms such as headaches, heartburn, depression, insomnia, risk
of heart attack, increased blood sugar, increased blood pressure and heart rate, weakened immune
system, stomach aches, low sex-drive and muscle aches.
Having surgery is stressful: anticipation prior to surgery, managing your pain and recovery after surgery.
This is in addition to your own personal stressors that you currently deal with. Managing stress prior to
surgery and having some tools to combat stress can be very beneficial to your mind and body. Deep
breathing/relaxation techniques, meditation and mindfulness, exercise/yoga, aromatherapy, journaling
etc. can be very helpful. There are many online resources and cell phone applications (“apps”) to choose
from to find what works best for you. Alternatively, a discussion with your family doctor or alternative
health care provider can be helpful.
Sleep is also paramount to stress management and healing. After surgery, it may be difficult to get a solid
night sleep for several weeks due to discomfort. Naps throughout the day are recommended.
These resources can help you during your surgical journey. They can help calm your anxiety before
surgery, help to manage pain post-operatively and lead to a positive recovery. Please see “Resources” at
the end of this booklet.
Exercise
Physical activity and exercise preoperatively can help shorten hospitalization and reduce recovery time.
Staying active during your waiting period for surgery can benefit you in many ways: decreases the risk of
developing several diseases, strengthens muscles and increases flexibility, eases anxiety and improves
your quality of life.
Guidance from a physiotherapist is very beneficial. They can show you exercises that are geared toward
your own capability and make sure you are doing them correctly.
If you are not financially able to see a physiotherapist, any cardiovascular exercise (walking, cycling or
stationary bike, pool exercises etc.) will be valuable. In addition to this, you can try the exercises on the
following pages. These exercises help strengthen muscles that support the shoulder. They should not be
continued if they cause pain or make your pain worse.
Page 11 of 52These exercises are to be done
Pre-operative Exercises BEFORE SURGERY ONLY.
They are NOT meant to be done after surgery until your
surgeon or physiotherapist tells you to.
If any of these exercises cause you pain or discomfort, please do not continue them.
Shoulder Pendular Swing:
Rest your good arm on the edge of the table.
Bend over from your waist.
Allow your injured arm to hang down – it should
hang limp and loose.
Using your body, start moving in a manner that
causes your arm to swing in a smooth pendular
motion. Then allow the arm to circle gently in a
clockwise direction with circles that grow
gradually larger. Repeat 30 times then switch
direction.
You can use your non-injured hand to guide it.
Attempt to do 3 times per day.
Active Assisted Shoulder Flexion
While sitting or standing, hold your injured
arm with your good hand. Slowly lift your
injured arm, using your good hand to support
as needed, up to where you can tolerate.
Slowly return to start. Your good arm should
be doing most of the work.
Attempt 10 repetitions 3 times per day.
Scapula Retraction
While standing with an exercise band or
bungee cord secured on something directly in
front of you, grab the two ends in your hands,
arms straight in front of you.
Gently squeeze your shoulder blades down
and together, making sure that your
shoulders do not come up. Then pull the band
in a row-like motion, pulling toward you until
your arms are by your side, NOT further back
than this.
Slowly return your arms to starting position
and repeat 10 times, 3 times per day.
Alternatively, you can do this exercise
without a band.
Page 12 of 52These exercises are to be done
Pre-operative Exercises BEFORE SURGERY ONLY.
They are NOT meant to be done after surgery until your
surgeon or physiotherapist tells you to.
If any of these exercises cause you pain or discomfort, please do not
continue them
Isometric Shoulder ABDUCTION
Start with your non-injured arm so you can
assess how the exercise would normally
feel.
Stand with your side to the wall with your
elbow bent to 90 degrees.
Position a pillow between the arm and the
wall.
Push your elbow against the wall,
maintaining the contraction for 5 seconds
then release. Repeat 10 times then switch
arms.
Attempt to do 3 times per day.
Isometric Shoulder ADDUCTION
Start with your non-injured arm so you can
assess how the exercise would normally
feel.
Place a pillow or rolled-up towel between
arm and body. Bend elbow to 90 degrees.
Pull arm against side of body, maintaining
the contraction for 5 seconds then release.
Repeat 10 times then switch arms.
Attempt to do 3 times per day.
Page 13 of 52These exercises are to be done
Pre-operative Exercises BEFORE SURGERY ONLY.
They are NOT meant to be done after surgery until your
surgeon or physiotherapist tells you to.
If any of these exercises cause you pain or discomfort, please do not
continue them
Isometric Shoulder INTERNAL Rotation
Start with your non-injured arm so you can
assess how the exercise would normally
feel.
Standing at a corner of a wall or in a door
frame, place your arm against the wall
around the corner. Your palm should be
pressed against the wall and elbow bent to
90 degrees.
Push the palm of your hand into the wall,
holding for 5 seconds. Release then repeat
for a total of 10 per session. Switch arms.
Attempt to do 3 times per day.
Isometric Shoulder EXTERNAL Rotation
Start with your non-injured arm so you can
assess how the exercise would normally
feel.
Stand with the side of your body against a
wall, bending your elbow to 90 degrees,
with the back of your hand against the
wall.
Push the back of your hand slowly into the
wall. Hold for 5 seconds. Release then
repeat for a total of 10 per session. Switch
arms.
Attempt to do 3 times per day.
Page 14 of 52Page 15 of 52
Smoking
Smoking increases the risk of postoperative complications, such as poor incision healing and infection.
Not smoking for 2 months before surgery and for 3-6 months after surgery will reduce the chance of a
problem with healing.
If you are a smoker and would like help quitting, please speak to your Navigator to discuss resources.
RebalanceMD can connect you with Quit Now, a free smoking cessation program that motivates,
informs and coaches you to staying smoke-free. www.quitnow.ca
Dental Work
While you are on the waitlist, a routine check-up can help identify any issues that may delay your joint
replacement surgery.
Once you are booked for surgery it is important that you avoid dental work, including a dental cleaning,
to minimize the risk of infection due to bacteria that resides in your mouth. Please note, any major
dental work must be completed 3 months prior to surgery.
A Special Note for “Out-of-Towners”
For patients who do not live within greater Victoria, there are a few things that you need to be aware of
in your planning:
There may be necessary appointments that you need to attend in Victoria before and after
surgery. Organizing transportation to accommodate these appointments will be your
responsibility.
Appointments may not be able to be organized around ferry times.
Your arrival time for surgery could be as early as 6:00am. You may need to make arrangements to
stay in town the night before.
Discharge from the hospital:
o Discharge times are not organized around ferry times.
o Discharge times can vary depending on your individual circumstance. The hospital will try
to give you as much notice but occasionally something will occur that prevents you from
being discharged on schedule.
o There is a “Discharge Lounge” within the Royal Jubilee Hospital where you may wait if your
ride home is unable to come when the hospital needs to discharge you. A trained
orthopaedic nurse is stationed there Monday-Friday.
Page 16 of 52Having a Plan Worksheet
Please review this form prior to your Intake Appointment with your Navigator
Making sure that you are prepared for surgery is important to help you have a successful recovery.
Here are a few things you need to consider so that you can start creating a plan for after surgery.
1. Stairs: How many stairs are there outside the home? Inside the home? Is there a railing?
2. Help: Who will help after surgery with chores such as cooking, cleaning, laundry, grocery
shopping etc. Who can help you after surgery?
PLEASE NOTE: For elective surgeries (all pre-booked surgeries such as the one that you are having), the
hospital does NOT arrange post-operative help, such as home care. You will need to make your own
arrangements prior to having the surgery. Notify your Navigator if you would like a Victoria
Community Resource booklet that lists private, fee-based home care and respite options.
Please be aware that you will still be discharged from hospital when you are medically stable and
able to mobilize. You will still be discharged if you do not have a plan.
3. Transportation: Who will pick you up at the hospital? Who will drive you to follow up
appointments with you surgeon and physiotherapy?
4. Physiotherapy: Physiotherapy AFTER surgery is free at RebalanceMD, the Saanich Peninsula
Hospital and most Island Health hospitals outside of Victoria. You are welcome to attend a private
physiotherapy clinic but you will be responsible for covering the fee.
5. Medical Equipment: Please review the Equipment section on page 18 to review the items you
already own and what you will need to acquire. You will discuss this with your Navigator during
your intake appointment.
6. House Set-Up: Do I have a walk-in shower or do I need to step over a tub?
How tall is my toilet? Do I have supports to push up on beside my toilet?
How is the height of my bed?
Page 17 of 52Page 18 of 52
Once Your Surgery
Day is Booked
This section contains information about:
Surgical Confirmation Letter
Education
Pre-Admission Clinic
Alcohol
Pre-Op Showers
Eating and Drinking Before Surgery
What to Bring to the Hospital
Arranging Help & Transportation
Equipment
Wearing a Sling
Preparing Your Home
General Rules for Dressing with One Arm
Daily Activities with One Arm
Medications
Page 19 of 52Surgical Confirmation Letter
You will receive your surgical confirmation letter in the mail or via e-mail once
your surgery date is booked. This letter will confirm your surgery date as well as
other information to help you prepare.
You will receive your hospital arrival time via email or telephone call 1 week
before your surgery date.
Cancellation:
Your surgery may be cancelled if you have an active infection, open wound, weeping rash, sore
on the surgical limb, a cold, or the flu. Having any dental procedures within 3 months prior to
your surgery (including cleanings) may also cancel your surgery. If you are unwell in any way
before your surgery, please call RebalanceMD.
Education
After you have accepted a surgery date, you will be contacted by
the New Joint Program to arrange your Education. This is a
necessary step in preparation for surgery. You will be asked to
watch a detailed video on our website, complete paperwork and
go to the hospital for updated pre-operative tests.
Equipment
Pre-Admission Clinic
The Pre-Admission Clinic will call you from the hospital to schedule an appointment. At this appointment
you will speak with a pharmacist who will review your medications.
You may also be called to see an anaesthesiologist prior to your surgical date. This may occur at either
the hospital or at RebalanceMD. You should bring any questions you may have about your anaesthesia or
pain issues to this appointment.
It is important that you bring ALL your medications/supplements to this appointment. It is advised that
Alcohol and Smoking
you complete all your pre-op tests before this appointment. Requisitions for these tests will be provided
as part of the Education as mentioned above.
Page 20 of 52Alcohol
Continued use of alcohol may prolong your recovery. Please stop drinking alcohol 7 days prior to
surgery. Do not restart consuming alcohol until you are no longer taking any narcotic medication.
Pre-Op Showers
You will need to take 2 pre-op showers before your surgery. The first shower will take place the night
before your surgery and the second one the morning of your surgery. You will need to purchase 2
Antibacterial Chlorhexidine 4% sponges for this. These are available at most pharmacies or
RebalanceMD. Instructions on how to scrub will be provided in your surgical confirmation letter.
Eating and Drinking Before Surgery
Please follow the fasting guidelines as explained in your Surgical Confirmation
Letter. You are not to eat or drink (ingest anything by mouth) as of midnight the
night before surgery.
What to Bring to the Hospital
Label all essential personal items with your name and phone number (denture cup, glasses case,
hearing aid case, cellphone, etc.).
Bring your own toiletry items (toothbrush, hairbrush, etc.).
Bring loose fitting clothes as well as comfortable closed-toe shoes that are easy to get on/off (slip
on or elastic shoelaces).
Do not bring:
Your own bedding, pillows, blankets. Do not bring flowers, balloons or cards. Non-essential items
will be turned away
Valuables: jewellery, cash, tablets.
Scented products: perfumes, deodorants, make-up, powders or nail polish.
Equipment: These will be provided at the hospital.
Page 21 of 52Arranging Help & Transportation
It may be difficult for you to manage independently after surgery as you will only be able to function with
one arm. Please review HAVING A PLAN WORKSHEET on page 17. You may want to arrange for someone
to bring you meals or help you with bathing, laundry and cleaning. Please note that arranging help after
surgery is your responsibility. The hospital will not organize this for you. Your Navigator can offer a list of
resources, but it will be up to you to organize.
Discharge home: It is recommended that you arrange for someone to pick you up from hospital and drive
you home. You will likely need to stop at a pharmacy to pick up any medications that the surgeon has
prescribed. You are responsible for organizing your transportation. There are many private services that offer
fee-based supported transportation. If you need assistance, speak with your Navigator.
It is very helpful to practice getting in and out of a car without the use of your operated arm BEFORE
surgery.
Equipment
Depending on your limitations after surgery and/or any pre-existing limitations you already have, the
following equipment can aid in your recovery.
Your Navigator will discuss with you where you can obtain the equipment. When possible, arrange for the
following equipment 1-2 weeks prior to surgery to ensure that it fits in your home and is in good working
order before your surgery:
You will need the following equipment: To help you get dressed:
Height adjustable bath bench or shower stool 26” long-handled reacher
Removable tub clamp or installed grab bars 24” long-handled shoehorn
Raised toilet seat Elastic shoelaces for lace up shoes
Toilet safety frame or installed grab bars
Non-slip bath mat
Long-handled sponge
Bed rail assist
Flexible gel ice packs, or a cryotherapy machine
When using these items DO NOT push or pull with your operated arm until your surgeon or
physiotherapist tells you that you can.
Page 22 of 52Places to RENT or PURCHASE equipment in Victoria
Please contact the store to confirm that they have the items you require and to inquire about
pricing.
If you need to purchase an item and have Extended Health Benefits, there are prescriptions in
your education package that you can use for your claim.
Store Phone number Address RENT
One Bracing @ 250-598-7420 104-3551 Blanshard St NO
RebalanceMD *cushions included
ONLINE ORDERING & SHIPPING
AVAILABLE,
please visit www.onebracing.com/shop
Home Health Care 250-474-6966 875 Cecil Blogg Drive Need to
Supply inquire
Motion Specialties - 250-384-8000 1856 Quadra Street YES
Victoria *cushions included
Motion Specialties- 250-656-6228 7-9764 Fifth Street Sidney YES
Sidney *cushions included
Rexall Home Health 250-384-7196 3098 Nanaimo Street YES
Care
Island Mediquip - 250-391-0388 750 Enterprise Crescent (top of YES
Victoria Glanford by Bird of Paradise Pub)
Shoppers Home 250-370-2984 1561 Hillside Avenue YES
Health
Vancouver Island 250-384-4060 1A 3534 Quadra Street YES
Medical Supply
HME Mobility and 250-386-0075 101-265 Wilfert Rd YES
accessibility
Island Orthotics 250-389-1974 1812 Cook St.
Please contact your Navigator if you are having difficulty getting your equipment. 250-940-4444
Page 23 of 52Wearing a Sling
The purpose of a sling is for your comfort and to remind you not to move your operated arm more
than you have been told. The hospital will provide a basic shoulder sling. It will be put on in either the
operating room or when you get to the unit you will be recovering on.
For the first 6 weeks, always wear your arm sling except while exercising or bathing.
Your surgeon will tell you how long you need to continue to wear your sling.
Alternative Shoulder Sling: If you find the sling supplied by the hospital quite irritating or
uncomfortable, you may wish to buy a more padded sling which some patients find more comfortable
(see previous page for vendors).
Your surgeon may prescribe you a special sling prior to your surgery. He will give you a prescription for it.
If so, please bring your sling to your surgery.
If you purchase a sling, make sure that you have it fitted BEFORE your surgery so that
it is properly adjusted. This should be done where you purchase your sling.
Page 24 of 52Wearing a Sling
How to put a basic sling on
1. Relax your operated arm near your stomach.
Lay the sling on your lap with the opening
toward you and the closed, curved elbow end
toward your operated side. Make sure the
straps are attached.
2. Using your unoperated arm, bring the sling
over your hand and forearm until your elbow
fits snugly into the closed end. Gently adjust
the sling upward.
3. Place the strap around your upper back and
over the opposite shoulder. Secure the end of
the strap into the top ring of the sling. Adjust
the strap until your forearm is horizontal. Your
operated arm should not be hanging down.
4. If instructed by your surgeon, place the waist
strap around your waist and secure it to the
lower ring on the sling. This should be
comfortable, not tight.
Page 25 of 52Preparing Your Home
It is helpful to set up your home BEFORE surgery. This will allow you to easily move around your home after
surgery, reduce the risk of falls, and makes it easier to do things with one hand. Your operated arm will be
supported in a sling for several weeks.
Make sure hallways and rooms are free of Keep a icepacks in your freezer to use
clutter and tripping hazards (e.g. scatter on your shoulder to help reduce
rugs, footstools, etc.). swelling after surgery or purchase a
cryotherapy machine and familiarize
Add non-slip surfaces to outside stairs and yourself with how to use it.
walkways.
Have a thermometer at home to check
Install stair railings or make sure the your temperature after surgery.
existing ones are secure.
Use a non-slip bathmat both inside and
Ensure good lighting in hallways and other outside the bathtub or shower.
well used areas.
Do NOT use towel racks or toilet paper
Arrange for help with driving and household holders to assist you to stand or sit.
chores (e.g. groceries, meal preparation, Arrange to have proper hand rails or
vacuuming, laundry etc.). These services are frames installed.
not covered by the Medical Services Plan
and will need to be organized by you. Wear Velcro closure shoes or slip-on
shoes with enclosed heels. You will not
Move often used items to counter height be able to tie shoe laces with your
(e.g. pots and pans). Consider moving items operated arm.
in the lower parts of the fridge/ freezer to a
higher shelf. Wear pull-on elastic waist pants.
Button up shirts or cardigans are
Stock your freezer/pantry with healthy easiest to put on.
foods and snacks. If needed, private
food/meal delivery services are available in Extra pillows to help you get
many areas. comfortable for sleep.
Page 26 of 52General Rules for Dressing with One Arm
We suggest that you practice the following activities before surgery.
Putting on a Button-Up Shirt
Begin with the operated arm when putting clothes on.
When removing clothes, start with the non-operated
arm.
1. Place your shirt on your lap with the
inside of the shirt facing you and the
label up. The collar should lie close to
your stomach and the tail or bottom of
the shirt at your knees.
.
2. Place your operated arm into the
sleeve that is directly in front of it.
3. Make sure that the sleeve is pulled up
past your elbow. Hold the collar of the
shirt on your non-operated side. Lean
forward and bring your non-operated
arm over and behind your head.
4. Now you can pull the shirt over to your
non-operated side. Put your non-
operated arm into the sleeve opening.
5. To straighten out the shirt, lean
forward, bring the shirt past your
shoulders, reach back and pull the tail
or bottom down. Button as usual.
Make sure to not move your operated
arm away from your body.
Page 27 of 52General Rules for Dressing with One Arm
Putting on a T-shirt or Knit Shirt
1. Place the shirt on your lap with the front of
the shirt face down with the collar or tag at
your knees.
2. Roll the bottom edge of the shirt back to
expose the sleeve for the operated arm.
Move the sleeve opening for the operated
arm between your knees and open as large
as possible.
3. Use your non-operated hand to grab your
operated arm and place the operated hand
into the sleeve opening. Make sure your
fingers do not get caught in the sleeve. It
may help to lean forward to let your
operated arm drop down into the sleeve.
4. Put your non-operated arm into the other
sleeve opening and pull the shirt on the
operated side up to the shoulder as much
as you can.
5. Gather the back of the shirt up in your
non-operated hand. Lean slightly forward,
lower your chin and pull the shirt over
your head.
6. Use your non-operated hand and push the
bulk of the shirt material over your
operated shoulder towards your back. Pull
the shirt down over your stomach on both
sides. Pull to adjust as needed.
Page 28 of 52General Rules for Dressing with One Arm
Taking off the Shirt
1. Reach back with your non-operated
hand behind your neck and start to
gather the shirt up in your hand.
2. Lean slightly forward, lower your chin
and pull the shirt over your head.
3. Pull your non-operated arm out of the
sleeve. Use your non-operated hand to
pull the other sleeve off the operated
arm.
Page 29 of 52Daily Activities with One Arm
We suggest that you practice the following activities before surgery.
In the kitchen: Personal care:
To open jars use a piece of waffle- Use a shampoo bottle with a pump.
weave shelf liner to help grip the jar on
the counter or between knees. Use liquid soap with a pump instead of
bar soap.
Use rocker knives to help with one-
handed cutting or use pre-cut food. Use a long-handled sponge with a
bendable handle to reach your back
Deep-sided dishes or containers can and opposite side. Use a reacher to
help keep food on the plate. grab the towel and dry your back and
opposite side.
Put the bread or bun inside a container
or against the side of a deep pan to Use pop-top toothpaste instead of
keep it still while you put spread on it. screw-on cap. Rest your toothbrush
on the counter to put on the
Keep heavier items on the counter so toothpaste.
that you can slide them from place to
place. Put on deodorant by leaning forward
and let your operated arm dangle or
Only put lightweight items above eye swing away from your body. Spray
level in cabinets. deodorant may be easier.
Store items in easy-to-open Use clips to hold hair back instead of
containers. hair ties
Store liquids in small containers
instead of half gallon or gallon
containers.
Try to buy cans with pop-top lids or use
a one-handed can opener.
Page 30 of 52Daily Activities with One Arm
Putting on shoes: Toileting:
Use shoes that slip on or use Velcro Use a raised toilet seat or grab-bar
closures. Avoid shoes that are too on the non-operated side to help
loose or flip flops that may cause you sit and stand.
you to slip or trip.
To help with wiping, try long-
Replace standard shoelaces with handled tongs to reach. You may
elastic laces. purchase a commercial bathroom
aid.
A long-handled shoehorn may be
helpful but not necessary if you can
manage without.
Putting on socks: Other:
1. Put your non-operated hand inside When reading, use 1 or 2 pillows on
the sock, just over the fingers, not your lap to keep the book near eye
.0
up to the palm. level.
2. Cross your leg resting your ankle on Use rubber bands around each half
1
the opposite knee or prop your foot of the book to keep pages open. As
up on a stool if you are able to lean you read, slide the next page under
forward. the rubber band.
3. Slide your toes into the sock, Use a clipboard to keep paper still
opening the sock by spreading your while writing.
fingers.
Wear a fanny pack at your waist for
4. Pull the sock up to your ankle. person items instead of a purse.
Page 31 of 52Medications
Most medications can be taken up to and including the day of surgery. Some medications must be stopped before
surgery to decrease the chances of complications.
Below is a guide to medication use in the lead-up to surgery. Any allowed medications may be taken with 30 mL of
water per pill up to one hour before your hospital arrival time.
You may be given further direction from the anaesthesiologist. If so, follow those instructions.
Generic Medication Name Trade Name When to Stop
Acetaminophen Tylenol May take for pain as needed up to
and including day of surgery
Angiotensin converting enzyme Captopril, Cilazapril, Hold day of surgery to reduce risk
(ACE) inhibitors Enalapril, Rosinopril, of excessive drop in blood pressure
Ramipril, Trandolapril during anaesthesia
Anticoagulants and Antiplatelets Coumadin, Warfarin, If you are on ANY of these
Heparin, Plavix, Ticlid, ASA, medications, contact your
Aspirin, Xarelto cardiologist/ internist and/or
orthopaedic surgeon
Cox-2 NSAIDS Celebrex, Hold day of surgery
Meloxicam
(Mobicox)
Diuretics Hydrochlorothiazide, Hold day of surgery
Furosemide (Lasix),
Spironolactone
Non-steroidal anti-inflammatory Ibuprofen, Advil, Motrin, Stop the day before surgery
drugs (NSAIDS) with a short life Diclofenac, Voltaren,
Ketoprofen, Indomethacin,
NSAIDS with an intermediate life Naproxen, Stop 3 days before surgery
Sulindac,
Ketorolac
(Toradol)
NSAIDS with a long life Prioxicam Stop 10 days before surgery
Oral contraceptives or Stop 1 month before surgery and
hormone replacement restart on the direction of your
therapy surgeon. (You may need to use
alternative forms of birth control during
this period.)
Oral Hypoglycemic agents Chlorpropamide, Hold day of surgery to decrease risk
Glyburide, Metformin of hypoglycemia when fasting
Vitamin E and all other oral Garlic, Gingko, Kava, St Stop 7 days before surgery
natural health products and herbal John’s Wart, Ginseng, Dong
remedies Quai, Glucosamine, Papaya
Regular vitamins and iron pills Hold day of surgery
Page 32 of 52Hospital Stay
This section contains information about:
Length of Stay
Day of Surgery
Pain Control After Surgery
Discharge From Hospital
Page 33 of 52Length of Stay
Your length of stay in the hospital may be as short as 24 hours. It is important that you have made
arrangements with someone to pick you up from the hospital upon discharge. Make sure these
arrangements are flexible, to account for an early discharge time.
Day of Surgery
Before Surgery:
Bring a small suitcase of your belongings (see “What to Bring to the Hospital” page 21).
Do not bring your medications (unless the hospital pharmacist directs otherwise).
If you use a CPAP machine, please bring it to the hospital with you.
Check in at “Patient Admitting”. They will guide you from there.
You will confirm your anaesthesia plan with your anaesthesiologist.
You will see your surgeon at this time as well.
Shoulder Replacement surgery is performed in the operating room under general
anesthesia “going to sleep” but sometimes also with a block anaesthesia “freezing the arm”.
The surgery typically takes between 1-2 hours.
After Surgery:
You will wake up in the recovery room and will stay here until your pain is under control
and you are no longer drowsy.
You will have an intravenous (IV) line to keep you hydrated and to give you medication.
You may have oxygen administered by nasal tubing.
Your stay in the recovery room may last from 1-3 hours.
A sling will be put on in the operating room or on the hospital ward.
Page 34 of 52Day of Surgery
The Hospital Ward:
You will be transferred to the orthopaedic ward once you are medically stable.
A nurse will assist you out of bed the night of the surgery.
Sometimes your bladder function is impaired shortly after surgery. This is usually due to the
anaesthetic. If you are unable to empty your bladder, the nurse will perform a portable ultrasound
of your bladder while you are lying on your bed. If the ultrasound shows a large amount of urine,
the nurse may insert a catheter to drain your bladder. This will be removed once the bladder has
been drained.
It is important to do deep breathing and ankle pumping exercises after your surgery, especially
while lying in bed.
Deep Breathing Ankle Pumping
This exercise is important because it helps clear This exercise is important because it can
your lungs. This exercise can reduce the risk of improve circulation and reduce the risk of
lung problems like pneumonia. getting a blood clot.
While sitting up, take a few normal breaths. While lying down or sitting, start by
Then take one deep breath. Try to hold your pointing your toes up towards the
breath for 2-5 seconds. ceiling. Then, point your toes down,
While making an “O” with your lips, slowly similar to pressing on the gas pedal
breathe out like you are blowing out a while driving.
candle. Do this exercise 10 times every hour
If you feel the need, cough to help clear your that you are awake (this could be done
lungs. in conjunction with your deep
Do this a total of 10 times, remembering to breathing exercises.
take normal breaths in between.
Do this exercise every hour that you are
awake.
You may be given an inspirometer which is a
blue breathing tool that helps you visualize
your deep breathing.
Page 35 of 52Pain Control After Surgery
A common way to reference your pain after surgery is by using a pain scale from 0 to 10
(where 0 means you have no pain and 10 means the worst pain imaginable).
Pain Assessment Scale
0 1 2 3 4 5 6 7 8 9 10
No Pain Mild Uncomfortable Severe Very Severe Worst Pain Imaginable
Staying Ahead of the Pain:
The best time to take your pain medication is when your pain level is around 3 or 4 (uncomfortable but
bearable). This way, you will require a smaller dose of pain medication to bring your pain level back to a
comfortable range (such as 1 or 2). If you wait until your pain level reaches 7, 8, or 9 you will need a higher
dose of pain medication. This can lead to nausea, drowsiness and dizziness and should be avoided.
Types of Pain Medications:
There are a variety of pain medications that your doctor may order for you. These include:
1. Hydromorphone or oxycodone: These narcotics are “heavy duty” painkillers. Your nurse will only
give you the amount that your surgeon feels is safe.
2. Tramadol/Tramacet or Tylenol with codeine: These are effective painkillers, but might not be
strong enough shortly after surgery.
3. Tylenol (extra strength): You will likely be on a regular dose of Tylenol to help keep your pain level
down.
4. Gabapentin or Pregabalin: These are medications to help with nerve pain but are not
recommended for everyone.
5. Discharge from Hospital
Celebrex: This medication will reduce inflammation but is also not recommended for everyone.
You will likely be prescribed a combination of these medicines to control your pain after surgery.
Remember to also use ice to help alleviate pain.
Discharge From Hospital
At discharge, you will be given a “Discharge Sheet” with information on it. You will also be given
prescriptions for your pain medication.
Page 36 of 52Physiotherapy/
Rehabilitation
This section contains information about:
Shoulder Precautions
Physiotherapy
Rehabilitation Exercises
Your Home Exercise Program
Page 37 of 52Shoulder Precautions
There will be movement restrictions for your surgical arm. Your surgeon will give you instructions
before you are discharged by the hospital. Your surgeon will let you know when you can stop these
precautions at your follow up appointment.
Do not lift any objects with the operated arm
Do not support your body weight with the operated arm for bed mobility or transfers
Avoid shoulder hyperextension (moving the arm behind your body)
No active Range of Motion or strengthening. This means do not use your shoulder muscles
when doing your exercises
Physiotherapy
Post-operative physiotherapy is offered free of charge at Rebalance MD, Saanich Peninsula Hospital, and
other Island Health Hospitals and Health Centres on Vancouver Island. Your Navigator will record your
choice around the time of your Navigator Intake and every effort will be made to have you attend at your
preferred facility, but due to capacity limitations this may not always be possible. Most patients will be
seen at RebalanceMD in our integrated group session format. Our group classes are supervised by our
Physiotherapist and carried out by our Kinesiologists/Exercise Therapists in our rehabilitation
department.
Your first physiotherapy appointment will be scheduled anywhere from 4-6 weeks after surgery once you
get approval from your surgeon at your follow-up appointment. If you will be coming to RebalanceMD for
your physiotherapy, please contact our office to make the appointment once you have approval from
your surgeon.
Your home exercise program is the most important part of your rehabilitation. During your physiotherapy
visits, your home exercise program will be reviewed and increased in difficulty as you recover.
Page 38 of 52Rehabilitation Exercises
Physiotherapy Exercises for Shoulder Replacement Patients: You may begin these exercises
immediately after surgery unless told otherwise by your surgeon.
Do the exercises 2-3 times per day for around 10 repetitions each. These exercises will help limit
swelling in your hand and forearm and will keep your circulation pumping well.
Your surgeon will give you a prescription to see a physiotherapist and tell you when to see a
physiotherapist at one of your follow-up appointments.
Remember to move up to, but NOT INTO PAIN.
1. Elbow Flexion-Extension:
Sitting up or lying down, take your sling off and keep your
arm by your side. Using your non-operated hand to guide,
straighten your elbow as far as possible and bring back up to
a bent position
2. Wrist Flexion-Extension:
Keeping your arm at your side, bend your wrist forwards
and backwards as far as possible. You may need to help with
your non-operative hand.
3. Grip:
Make a fist or squeeze a rolled-up cloth or tennis ball.
Page 39 of 52Rehabilitation Exercises
4. Palm Up/Palm Down:
Keeping your arm at your side, start in a hand shake
position. Slowly rotate your palm down as fully as
possible and up as fully as possible until you feel a
stretch in your forearm. If you have had a biceps
repair, do not do this exercise until approved by your
surgeon.
5. Shoulder Pendular Swing Exercises:
Spend about 5-10 minutes, 3 times a day exercising
your shoulder.
Rest your good arm on the edge of the table.
Bend over from your waist.
Allow your operated arm to hang down – it
should hang limp and loose.
Using your body, start moving in a manner
that causes your arm to swing in a smooth
pendular motion. Then allow the arm to circle
gently in a clockwise direction with circles
that grow gradually larger. Repeat 30 times
then switch direction.
You can use your non-operative hand to
guide it.
Page 40 of 52At Home
This section contains information about:
Pain Control at Home
Swelling & Icing
Care of Your Dressing & Bathing
Bowel Movements
Resuming Home Medications
Complications After Surgery
Follow-Up Appointments
Recovery
Activity
Driving
Returning to Work
Dental Work and Medical Procedures
Outcomes After Shoulder Replacement
Page 41 of 52Pain Control at Home
Most people experience a reduction in pain over the 6-12 weeks following surgery.
Please see “Pain Control After Surgery” (page 36) to review effective pain management. It is important
in the transition from hospital to home to maintain consistent dosing.
Acetaminophen:
It can be helpful to take acetaminophen 1000 mg (2 extra strength tablets) every 4-6 hours, ensuring
you do not exceed 4000 mg in a 24-hour time frame. Here is a general schedule for taking
acetaminophen:
6:00 am 11:00 am 4:00 pm 9:00 pm
Please note: TYLENOL is the same medication as ACETAMINOPHEN.
Some pain medication contains acetaminophen, such as Tramacet or Emtec so it is important to read
your prescription bottle carefully to ensure you do not exceed the maximum daily dose.
***If you have a history of liver disease or significant alcohol consumption, you many need to reduce or
avoid acetaminophen use. Discuss this with your pharmacist or family doctor. ***
Narcotics (Hydromorphone, oxycodone, etc):
These are intended for short use following surgery as they pose a risk for addiction or dependence.
Signs of drowsiness, confusion, hallucinations, slow and/or shallow breathing are all signs that you
might be taking too much pain medication. If any of these symptoms are severe, please contact your
Navigator, surgeon’s office, or a nurse through HealthLink BC (see “Resources” page 51).
If your surgeon gave you prescriptions for two pain medication:
Usually this involves a stronger narcotic and another moderate pain medication such as
Tramadol/Tramacet or Tylenol #3. It is important to only use one medication at a time. Start with the
narcotic medication first following surgery. Once your pain starts to improve, try substituting one
narcotic dose with the other pain medication. If this provides adequate pain control, continue replacing
some but not all the narcotic doses with the other pain medication. Over the next few days, continue
substituting the other pain medication, slowly decreasing the amount of your narcotic use until you are
no longer using the narcotic. It is advisable that you do not stop the narcotic suddenly or you may
experience withdrawal symptoms such as nausea, irritability, jitteriness etc.
As your pain continues to improve, start decreasing how often you take your pain medication. If you
have not done so already, you can start substituting extra-strength Tylenol in place of the other pain
medication until you no longer need any pain medication.
Page 42 of 52Swelling & Icing
Swelling: Expect swelling for a few weeks following the surgery. This is due to your body’s inflammatory
response and fluid that was introduced in the joint during surgery. Some swelling or bruising may go into
the front of the chest muscles or down the arm to the hand.
While sitting with the sling on, you may support the arm with a pillow underneath your forearm, making
sure that your arm does not move away from your body.
Icing: Icing your joint regularly throughout the day is an effective way to reduce pain and swelling. It is
useful to ice after your exercises or routinely every 4-6 hours for 20 minutes. You can use ice packs/gel
packs or a cryotherapy unit.
A cryotherapy unit is composed of a container that you fill with ice and water, similar in size to a mini-
cooler. It is connected to a tube that pumps the cold water to a thin pad that is secured to your joint.
To avoid injury, never apply ice directly to your skin. Always have a barrier such as a thin towel or your
shirt. Also, keep the ice off for at least an hour before you reapply it.
Care of Your Dressing & Bathing
Your incision will either have staples or dissolvable sutures. You will receive a Dressing Change Guide
specific to your surgeon in your Education package. This guide will also give you instructions on when
you can shower.
DO NOT apply any ointments or creams to the incision.
DO NOT submerge the incision in water (pool, hot tub, taking a bath, lakes or oceans) until your incision
develops scar tissue and is completely healed (usually 6-8 weeks).
Bowel Movements
Changes in medication, activity and diet can cause constipation (hard, dry bowel movements). To avoid
constipation, drink lots of fluids, eat high fibre foods such as prunes, fruits, bran, whole grains and
vegetables. You may need to take a stool softener or laxative. You can discuss your options with your
pharmacist.
Page 43 of 52Resuming Home Medications
Once you return home following surgery you can resume most of your usual medications, unless
otherwise directed by your surgeon.
Complications After Surgery
Your surgeon will discuss the risks of shoulder replacement surgery as many of the risks are
specific to your situation.
It is a large operation and there are some common risks that include risk of deep infection, damage
to blood vessels or nerves, fractures, and dislocation of the prosthesis. Sometimes a prosthesis can
be become loose before that or develop another problem that may require a second or revision
replacement.
As shoulder replacement surgery is a major operation, general medical complications such as blood
clot, stroke, pneumonia or heart difficulties can occur. The risk of these complications is higher in
older patients or those who are already have medical conditions.
CONTACT YOUR NAVIGATOR IF YOU HAVE:
Bleeding- enough to fill your dressing
Drainage from your incision that changes in appearance or color, especially yellow or green
Significant change in color/redness around the surgery site
Pain that is not relieved by your medications
Fever (38.5/101.3 and over for 2 days or more)
Persistent nausea and vomiting
Signs of circulation problems in operated arm (coolness, change in skin color, numbness)
CONTACT YOUR FAMILY DOCTOR IF YOU HAVE:
Difficult or abnormal urination
Constipation that you cannot manage
Dizziness/light headedness
CALL 911 or GO TO EMERGENCY ROOM IF YOU HAVE:
Shortness of breath
Chest pain
Sharp, throbbing pain in your calf
Confusion/Delirium
Page 44 of 52Follow-Up Appointments
Within 72 hours of coming home, confirm or make your follow-up appointment with your surgeon.
Recovery
For the first 4-8 weeks after surgery, your surgeon will ask you to wear a sling to protect the repaired
tendons and soft tissues around the shoulder. He will give you further instructions at your follow-up
appointment.
The next phase of recovery, from 6-12 weeks after the surgery, is focused on getting the shoulder to
move more normally, while still not doing any lifting that could pull apart the repaired tissues.
Around 3 months after surgery, you will start strengthening exercises. Most of the recovery is complete
around 6-9 months after surgery, but there can be improvement for 1-2 years after surgery.
Sleep
Due to pain and discomfort, it is common that you may not get solid hours of sleep through the night.
Positioning will be important; many patients recovering from shoulder surgery feel more comfortable
upright in a recliner.
Plan on taking naps through the day to catch up on sleep as sleep is important to recovery. You can speak
with your family doctor or pharmacist to suggest a sleep aid if you are having difficulty.
Page 45 of 52Activity
Wear your sling whenever you are up for the first 4-8 weeks after surgery as instructed by your
surgeon. Remove the sling to do physiotherapy exercises 2-3 times per day. See the
rehabilitation exercises (pages 37-40).
Take the time to heal. It is normal to feel weak and tired for the first couple of weeks after
surgery. Rest often, eat well and generally take good care of yourself. This will help your
recovery. Gradually resume normal activities like walking.
Make sure to follow any movement precautions for your shoulder or arm told to you by your
doctor or physiotherapy.
Avoid lifting anything greater than 1-2 lbs with your operated arm until your doctor tells you it
is ok (usually 6-8 weeks).
Use a cane in your non-operative hand if required for balance. Do NOT use a cane in your
operated arm. You should NOT use a walker or crutches.
You may return to sexual activity when you feel ready and comfortable.
Driving
Driving: Do not drive while taking pain medications or if your arm is in a sling.
Discuss with your surgeon when it is safe to drive. You can expect that you will not be able to drive for
at least 6-8 weeks after the surgery. If your ability to safely drive (swerve sharply, perform an
emergency stop, etc) is impaired, your insurance may not be valid in the case of an accident.
Page 46 of 52Returning to Work
When you can return to work depends on:
the kind of job you have and its physical demands
how much pain & swelling you have after surgery
how your physiotherapy is progressing
if you can modify your job or work from home
Your surgeon will help you decide when to return to work
Expect to take off at least 2-4 weeks for a desk job that you are able to
do with your arm in a sling. Expect to take off 3-4 months for work where
you need to use both arms. Expect to take off around 6 months for
more physically demanding work.
Dental Work and Medical Procedures
If you will be having any dental work or medical procedures such as procedures involving the bladder,
prostate, lung, or colon- it is important that you let your health care professional know that you have had
joint replacement surgery.
To avoid the risk of infection, it is important that you avoid dental work, including dental cleaning, for 3
months after surgery.
If you have a health issue that compromises your immune system, you may need antibiotics with every
dental procedure for the rest of your life. Please discuss this further with your surgeon and dentist.
Page 47 of 52Outcomes After Shoulder Replacement
Most patients can expect that shoulder replacement surgery will significantly reduce the pain in their
shoulder. Every patient is different; the outcome depends a lot on the condition of the shoulder before
surgery.
Most patients have enough motion in the shoulder for day to day activities like dressing, washing their
hair and pulling up their pants, without too much difficulty. Some ongoing pain is common and can be
frustrating. Most people can return to many of the activities they were doing before their shoulder
became painful. However, expect to have difficulty with overhead activities or activities that require a lot
of use of the arms. This is usually quite tolerable.
Some patients can have a lot of shoulder stiffness or a 'frozen shoulder' after surgery. This stiffness can
be very painful and frustrating but usually gets better with time, usually 6-12 months. If there was a lot of
weakness in the arm before surgery, this may not improve much after surgery. Strengthening exercises
can help this.
Page 48 of 52NOTES
Page 49 of 52Resources
This section contains resources for:
Arthritis and Surgery Information
Health Professionals
Physical Activity
Stress Management
Transportation
Resource Guides
Page 50 of 52Resources
MD
Rebalance Health Professionals Transportation
www.RebalanceMD.com
Nurse Hotline/HealthLink BC HandyDART
250-940-4444 www.bctransit.com/victoria/
Phone: 8-1-1
www.healthlinkbc.ca riderinfo/handydart
Walk In Clinic Locator Phone: 250-727-7811
Non-emergency health
and Wait Times
information provided by a nurse,
SPARC–
www.medimap.ca pharmacist or dietitian. Disabled parking pass
Victoria Disability
Physical Activity Services at Resource Centre
Arthritis & Surgery
HealthLink BC www.drcvictoria.com/
Information www.healthlinkbc.ca/physical- parking-permits/
activity Phone: 250-595-0044
The Arthritis Society Fax: 250-595-1512
www.arthritis.ca Phone: 8-1-1 Email: parking@drcvictoria.com
Email: info@arthritis.ca
Arthritis Society Information Dietitians of Canada TAP – Travel Assistance
line: 1-800-321-1433 www.dietitians.ca Program- travel and
accommodation
Physiotherapy Association of https://www2.gov.bc.ca/g
Eating Well for Arthritis ov/content/health/accessi
British Columbia (PABC)
http://www.arthritis.ca/living- ng-health-care/tap-bc
– to find a physiotherapist in your
well/optimized-self/eating- Phone: 1-800-663-7100
area
well/your-good-food-guide www.bcphysio.org
Canadian Orthopedic Resource Guides
Foundation Quit Now Seniors Serving Seniors
www.whenithurtstomove.org www.quitnow.ca Directory
www.seniorsservingseniors.bc.ca
BC Smoking Cessation Programs
Ortho Connect Greater Victoria Rec Centre
http://www2.gov.bc.ca/gov/
www.orthoconnect.org Guide
content/health/health-drug-
www.fitinfitness.ca
coverage/pharmacare-for-bc-
American Academy of residents/what-we-cover/drug-
Orthopaedic Surgeons coverage/bc-smoking-cessation- *Please note that information on
www.orthoinfo.aaos.org program this page is provided as a
reference only and is subject to
change. You may need to use
directory assistance or an internet
search.
Page 51 of 52You can also read