Swing base for TT5 tonearm / für TT5 Tonarm - User manual Bedienungsanleitung - Clearaudio
←
→
Page content transcription
If your browser does not render page correctly, please read the page content below
swing base
for TT5 tonearm / für TT5 Tonarm
User manual
Bedienungsanleitung
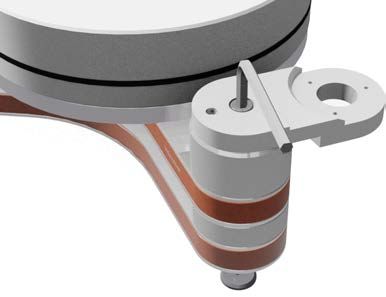
Pic. similar /
Abb. ähnlich
Pic. similar /
Abb. ähnlich
© clearaudio electronic GmbH, 2021-04 Made in Germany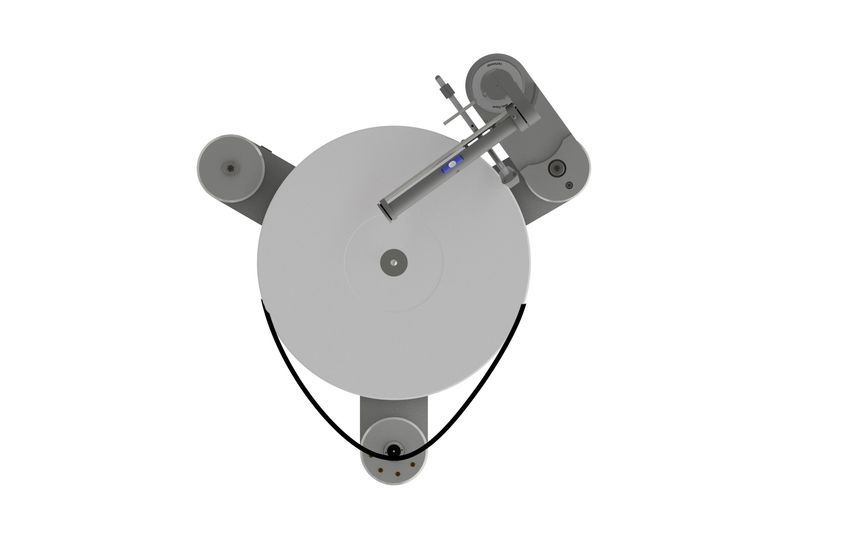
User manual / Bedienungsanleitung

		           User manual ..................................................... 2 - 7

		           Bedienungsanleitung ....................................... 8 - 13

Dear Clearaudio customer,

Thank you for your purchase of Clearaudio’s swing base, which enables highly precise forward and
backward movement of the TT5 tangential tonearm.

This product has been developed with a focus on excellent quality, functionality and ease of use.
Please take a moment to read this product manual to ensure correct set-up and to avoid any
possible damage.

Clearaudio wishes you much enjoyment with your new swing base.

Clearaudio electronic GmbH

                                          Warning
 Do not expose the equipment to rain or moisture.
 No naked flame sources, such as lighted candles, should be placed on the equipment.
 Never insert oil into the precision bearing as this will result in damage of bearing.

Page / Seite 2					                                           © clearaudio electronic GmbH, 2021-04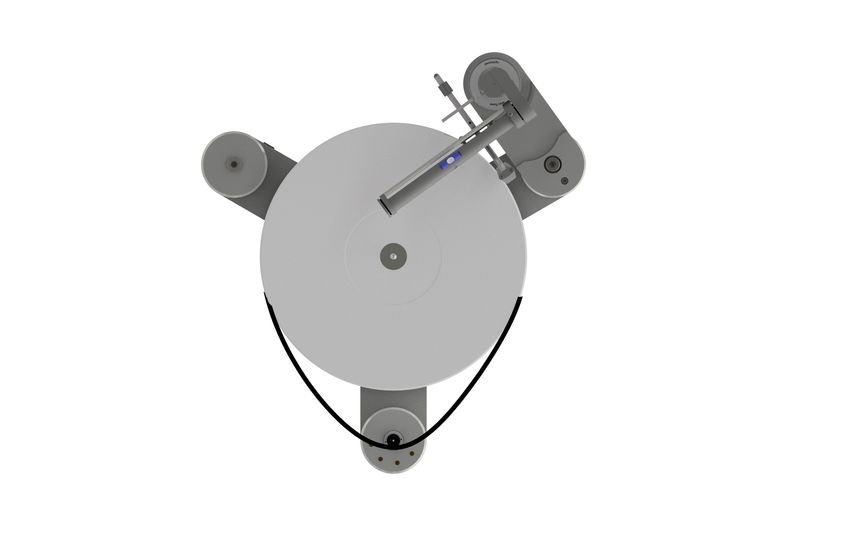
User manual / Bedienungsanleitung

		Contents

             1. Package contents ................................................ 4

		 2. Installation on Unify round base ......................... 4 -6

		           3. Installation on Unify level base ........................... 7 - 8

		           4. Installation on other turntables .......................... 9

		 5. Special instructions ............................................. 9

		           6. Technical details            .......................................... 9

		           Warranty information .............................................. 18 - 19

Made in Germany				                                                                         Page / Seite 3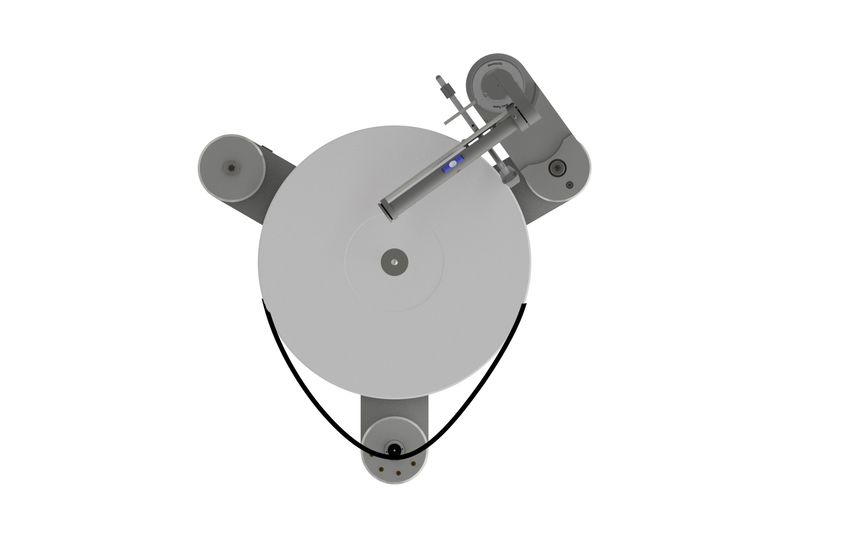
User manual / Bedienungsanleitung

1. Package contents
The Clearaudio swing base is delivered in specially designed packaging to ensure safe transport.
Please retain the original packaging for any future potential transportation and shipping.

Please see the list below to check the contents of your Clearaudio swing base package.

1                               2                                   3

Pic. 1: Package contents

    1.    swing base                                 3.     Socket head cap screw
                                                            3 pcs. M4x16
    2.    Hex wrench                                 4      Not shown:
          (Size: 1.5 / 2 / 3)                               User manual

2. Installation on Unify round base
Please install the appropriate tonearm base on your turntable first.
For Ovation and Performance DC turntables you will need the Unify base (Art. No. AC031-4,
available from your dealer).
Ensure that you set the correct distance of 222mm between platter spindle and tonearm pivot.

Pic. 2: Unify tonearm base   Pic. 3a: Mounting of the tonarm base                 Pic. 3b: Mounting of the
                                                                                           tonarm base on the
                                                                                           bottom side

Page / Seite 4					                                                     © clearaudio electronic GmbH, 2021-04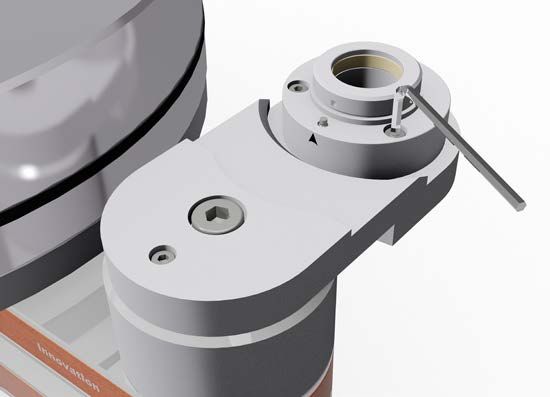
User manual / Bedienungsanleitung

Take the swing base out of the box. Remove the adhesive tape used to secure both parts during
transport.
                                  The upper part of the swing base can be put aside for the time
                                  being.

                                         Place the lower part of the swing base on the tonearm base,
                                         such that the holes of both bases are aligned.

                                         The arrow on the lower part should point towards the platter
                                         (see picture 4). Use the M4 x 16 screws and the hex wrench
                                         #3 (provided) to tighten the lower part of the tonearm base.

Pic. 4: Mounting of the swing base

Now you can thread the tonearm cables of the TT5 tonearm through the upper part of the swing
base (not yet assembled) and through the opening of the assembled lower part and tonearm hole
of the chassis (see pic 5).

Insert the foot of the TT5 through both components of the swing base into the tonearm hole,
allowing the upper ring to rest loosely (see pic. 6).

Pic. 5: Putting the cables through the
        swing base

                                                    Pic. 6: Inserting the cables in the tonearm base

The installation of the swing base is now completed and you are ready to mount and adjust the
TT5 tangential tonearm, following the TT5 user manual.

Once the tonearm has been fully adjusted, you will need to fix the upper part of the swing base.
Here, you can opt for the direction in which the tonearm will swung out.

Made in Germany				                                                                              Page / Seite 5
User manual / Bedienungsanleitung
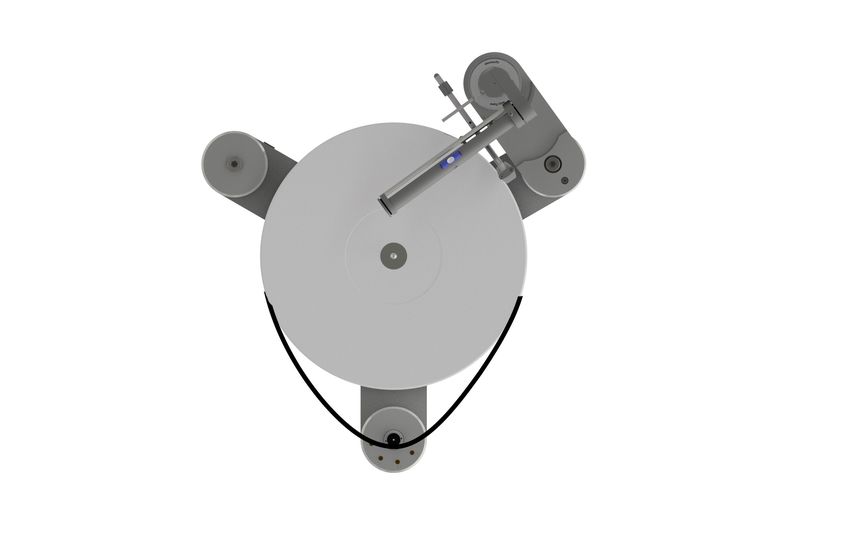
If the tonearm is to swing out counterclockwise (to the right), then the upper part of the swing base
must be tightened in the position as shown in picture 7b.
Pic. 7a: Direction of the tonearm Abb. 7b: Mounting direction of the upper part
(to the right)
If the tonearm is to swing out clockwise (to the rear), then the upper part of the swing base must
be screwed in the position as shown in picture 8b.
Pic. 8a: Direction of the tonearm Pic. 8b: Mounting direction of the upper part
(to the rear)
Now you can tighten the screws of the upper part of the swing base with the hex wrench #2.
Finally, re-check all settings again. The TT5 with swing base is now ready to use.
Page / Seite 6 © clearaudio electronic GmbH, 2021-04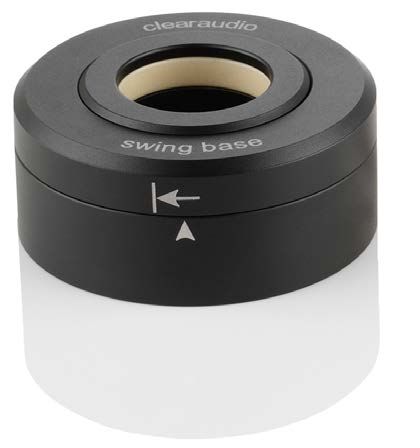
User manual / Bedienungsanleitung

3. Installation on Unify level base
Please install the appropriate tonearm base on your turntable first. For a turntable of the
Clearaudio Innovation series you will need the Unify base (Art. No. AC030-4, available from your
Clearaudio dealer). Ensure that you set the correct distance of 222mm between platter spindle
and tonearm pivot.

Pic. 9: Unify level base

                                            Pic. 10: Mounting of the Unify level base
                                              Take the swing base out of the box.
                                              Remove the adhesive tape used to secure both parts
                                              during transport.
                                              The upper part of the swing base can be put aside
                                              for the time being.

                                              Place the lower part of the swing base on the
                                              tonearm base, such that the holes of both bases are
                                              aligned.

                                              The arrow on the lower part should point towards
                                              the platter (see picture 11). Use the M4 x 16 screws
                                              and the hex wrench #3 (provided) to tighten the
Pic. 11: Mounting of the level base           lower part of the tonearm base.

Now you can thread the tonearm cables of the TT5 tonearm through the upper part of the swing
base (not yet assembled) and through the opening of the assembled lower part and tonearm hole
of the chassis (see pic 12).

Insert the foot of the TT5 through both components of the swing base into the tonearm hole,
allowing the upper ring to rest loosely (see pic. 13).

Pic. 12: Threading the cables through the
        swing base
                                                           Pic. 13: Inserting the cables in the tonearm
                                                           base

Made in Germany				                                                                        Page / Seite 7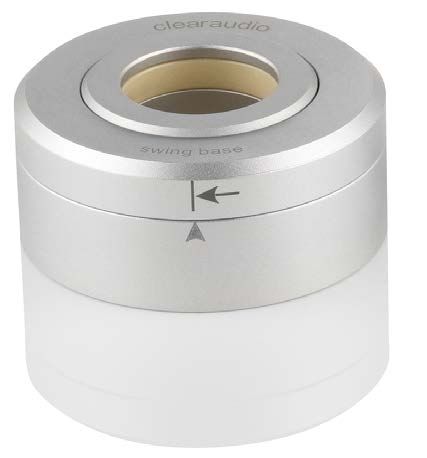
User manual / Bedienungsanleitung

The installation of the swing base is now completed and you are ready to mount and adjust the TT5
tangential tonearm, following the TT5 user manual.

Once the tonearm has been fully adjusted, you will need to fix the upper part of the swing base.
Here, you can opt for the direction in which the tonearm will swung out.
If the tonearm is to swing out counterclockwise (to the right), then the upper part of the swing base
must be tightened in the position as shown in picture 14b.

                                                 Pic 14b: Mounting direction of the upper part
                                                          (to the right)

Pic 14a: Direction of the tonearm

If the tonearm is to swing out clockwise (to the rear), then the upper part of the swing base must
be screwed in the position as shown in Picture 15b.

                                                       Pic 15b: Mounting direction of the upper part
                                                               (to the rear)

Pic. 15a: Direction of the tonearm

Now you can tighten the screws of the upper part of the swing base with the hex wrench #2.
Finally, re-check all settings again. The TT5 with swing base is now ready to use.

Page / Seite 8					                                            © clearaudio electronic GmbH, 2021-04
User manual / Bedienungsanleitung

4. Installation on other turntables

If your turntable does not have a replaceable tonearm base, we recommed to contact the manfucaturer
of the turntable, in order to get your turntable professionally prepared for the Clearaudio swing
base.

5. Special instructions
All necessary service for any Clearaudio products should be peformed by authorized personal only.
In case of any repair, Clearaudio products should be sent to your nearest authorized Clearaudio
distributor or dealer.

PLEASE RETAIN ALL ORIGINAL PACKAGING. You will need it if this product has to be transported
and/or shipped. Any further questions you may have about this product should be directed to your
local dealer.

6. Technical details

Material:                       Aluminium
Weight:                         136g
Outer diameter:                 59mm
Inner diameter:                 24.85mm
Height:                         26mm
Manufacturer‘s warranty:        5 years

Made in Germany				                                                                   Page / Seite 9
User manual / Bedienungsanleitung

Sehr verehrte clearaudio – Kundin, sehr verehrter clearaudio - Kunde,

Sie haben sich für ein hochwertiges Produkt, der neuen clearaudio swing base entschieden.
Diese ermöglicht ein präzise geführtes Vor- und Zurück-Schwenken des clearaudio TT5 Tangential-
Tonarmes.

Bei der Entwicklung des Produkts haben wir höchsten Wert auf Qualität, Funktionalität und
Handhabung gelegt.

Damit Sie die Möglichkeiten dieser einzigartigen Basis optimal nutzen können, lesen Sie bitte diese
Montageanleitung aufmerksam durch. Sämtliche Hinweise beugen Fehlbedienungen vor und dienen
langjähriger Freude im Umgang mit der clearaudio swing base.

Für Ihren Kauf möchten wir uns bedanken und wünschen ihnen viel Freude mit dem clearaudio
Produkt.

clearaudio electronic GmbH

                                         Warnung
 Das Gerät nicht Regen oder Feuchtigkeit aussetzen.
 Die Abdeckung nicht vom Gerät entfernen.
 Keine offenen Flammen, z.B. angezündete Kerzen, auf dem Gerät abstellen.
 Niemals Öl in die Präzisionslager geben, da dies zu einer Beschädigung des Lagers führen könnte.

Page / Seite 10					                                        © clearaudio electronic GmbH, 2021-04
User manual / Bedienungsanleitung Inhaltsverzeichnis 1. Lieferumfang .......................................................................... 12 2. Installation auf Unify Rundbasis ............................................ 12 - 14 3. Installation auf Unify Stufenbasis .......................................... 15 - 16 4. Installation auf Laufwerken anderer Hersteller ..................... 17 5. Besondere Hinweise ............................................................... 17 6. Technische Daten ................................................................... 17 Garantieinformationen ............................................................... 18 - 19 Made in Germany Page / Seite 11
User manual / Bedienungsanleitung

1. Lieferumfang
Die clearaudio swing base verlässt unsere Fertigung in einer besonders sicheren und auf das
Produkt abgestimmten Verpackung, die einen sicheren Transport garantiert.
Bitte bewahren Sie diese Verpackung für den Fall eines wiederholten Transports auf.

Kontrollieren Sie den Lieferumfang Ihrer neu erworbenen clearaudio swing base, gemäß unten
aufgeführter Übersicht:

1                             2                                3

Abb. 1: Lieferumfang

    1.    swing base                               3.     Zylinderkopfschrauben
                                                          3 Stück M4x16
    2.    Innensechskantschlüssel                  4.     Nicht abgebildet:
          (Größe: 1,5 / 2 / 3)                            Bedienungsanleitung

2. Installation auf Unify Basis (Rundbasis)
Bitte montieren Sie zuerst die passende Tonarmbasis auf Ihr Laufwerk. Für clearaudio Ovation
und Performance DC Laufwerke benötigen Sie die Unify Basis Art. Nr. AC031-4 (erhältlich über Ihren
clearaudio Fachhändler).

Abb. 2: Unify Tonarmbasis   Abb. 3a: Montage der Unify Basis                 Abb. 3b: Montage der Unify
                                                                             Basis auf der Unterseite

Page / Seite 12					                                               © clearaudio electronic GmbH, 2021-04
User manual / Bedienungsanleitung
Um die Basis auszutauschen, nehmen SIe die vorherige Tonarmbasis ab, indem Sie mithilfe eines
Innensechskantschlüssels die sechs M4 x 35 Schrauben auf der Unterseite des Klemmrings lösen
(Abb. 3b).
Stellen Sie sicher, dass bei der Montage der Tonarmbasis der richtige Abstand von 222 mm zwischen
Plattenteller-Mitte und Tonarmdrehpunkt eingehalten wird.
Entnehmen Sie die swing base aus der Verpackung.
Das Ober- und Unterteil wurde zu Transportzwecken mit einem Klebeband gesichert, welches Sie
nun entfernen können.
Das Oberteil der swing base können Sie vorerst zur Seite legen.
Das Unterteil der swing base setzen Sie nun auf die Tonarmbasis.
Achten Sie hierbei darauf dass die vorgesehenen Bohrungen der
Basis mit denen der swing base bündig sind.
Der Pfeil auf dem Unterteil sollte hierbei Richtung Plattenteller
zeigen (sh. Abb. 4). Verwenden Sie die im Lieferumfang
enthaltenen Schrauben M4 x 16 und den Innensechskant-
schlüssel 3, um das Unterteil auf der Tonarmbasis zu befestigen.
Abb. 4: Montage der swing base
Nun können Sie die Tonarmkabel des TT5 durch das lose Oberteil der swing base (Abb. 5) und durch
die Öffnung des montierten Unterteils und der Tonarmbohrung führen (sh. Abb 6).
Setzen Sie den Fuß des TT5 durch beide Bauteile der swing base in die Tonarmbohrung, lassen Sie
hierbei den Ring lose aufliegen.
Abb. 5: Auffädeln des Oberteils Abb. 6: Einsetzen des TT5 Tonarmes
Made in Germany Page / Seite 13User manual / Bedienungsanleitung
Zum Abschluss der Montage, muss noch das Oberteil der swing base fixiert werden.
Hierbei können Sie selbst wählen in welche Richtung der Tonarm ausgeschwenkt werden soll.
Soll sich der Tonarm gegen den Uhrzeigersinn ausschwenken (nach rechts), muss das Oberteil in der
Position wie in Abb. 7b zu sehen, festgeschraubt werden.
Abb. 7a: Schwenkrichtung des Tonarmes
Abb. 7b: Montage der swing base (nach rechts)
Soll sich der Tonarm im Uhrzeigersinn ausschwenken (nach hinten), muss das Oberteil in der Position
wie in Abb. 8b zu sehen, festgeschraubt werden.
Abb. 8a: Schwenkrichtung des Tonarmes
Abb. 8b: Montage der swing base (nach hinten)
Nun können Sie die Schrauben zur Fixierung des Oberteils mit einem Innnensechskant #2 fest
anziehen und den TT5 Tangential Tonarm mit Hilfe der TT5 Bedienungsanleitung montieren und
einstellen.
Page / Seite 14 © clearaudio electronic GmbH, 2021-04User manual / Bedienungsanleitung
3. Installation auf Unify Stufenbasis
Bitte montieren Sie zuerst die passende Tonarmbasis auf Ihr Laufwerk. Für ein Laufwerk der Innovation
Serie benötigen Sie Art. Nr. AC030-4 (erhältlich über Ihren clearaudio Fachhändler). Stellen Sie
sicher, dass der richtige Abstand von 222 mm zwischen Plattenteller-Mitte und Tonarmdrehpunkt
eingehalten wird.
Abb. 9: Unify Stufenbasis
Abb. 10: Montage der Unify Basis
Entnehmen Sie die swing base aus der Verpackung.
Das Ober- und Unterteil wurde zu Transportzwecken mit einem Klebeband gesichert, welches Sie
nun entfernen können.
Das Oberteil der swing base können Sie vorerst
zur Seite legen.
Das Unterteil der swing base setzen Sie nun
auf die Tonarmbasis, achten Sie hierbei darauf,
dass die vorgesehenen Bohrungen der Basis mit
denen der swing base bündig sind.
Der Pfeil auf dem Unterteil sollte hierbei Richtung
Plattenteller zeigen (sh. Abb. 11). Verwenden
Sie die im Lieferumfang enthaltenen Schrauben
M4 x 16 und den Innensechskantschlüssel
#3, um das Unterteil auf der Tonarmbasis
festzuschrauben.
Abb. 11: Montage der swing base
Nun können Sie die Tonarmkabel des TT5 durch das lose Oberteil der swing base (Abb. 12) und
durch die Öffnung des montierten Unterteils und der Tonarmbohrung führen (sh. Abb 13).
Setzen Sie den Fuß des TT5 durch beide Bauteile der swing base in die Tonarmbohrung, lassen Sie
hierbei den Ring lose aufliegen.
Abb. 12: Auffädeln des Oberteils
Abb. 13 Einsetzen des TT5 Tonarmes
Made in Germany Page / Seite 15User manual / Bedienungsanleitung
Zum Abschluss der Montage, muss noch das Oberteil der swing base fixiert werden.
Hierbei können Sie selbst wählen in welche Richtung der Tonarm ausgeschwenkt werden soll.
Soll sich der Tonarm gegen den Uhrzeigersinn ausschwenken (nach rechts), muss das Oberteil in der
Position wie in Abb. 7b zu sehen, festgeschraubt werden.
Abb. 14b: Montage der swing base (nach rechts)
Abb. 14a: Schwenkrichtung des Tonarmes
Soll sich der Tonarm im Uhrzeigersinn ausschwenken (nach hinten), muss das Oberteil in der Position
wie in Abb 15b zu sehen, festgeschraubt werden.
Abb. 15b: Montage der swing base (nach hinten)
Abb. 15a: Schwenkrichtung des Tonarmes
Nun können Sie die Schrauben zur Fixierung des Oberteils mit einem Innnensechskant #2 fest
anziehen und den TT5 Tangential Tonarm mit Hilfe der TT5 Bedienungsanleitung montieren und
einstellen.
Page / Seite 16 © clearaudio electronic GmbH, 2021-04User manual / Bedienungsanleitung 4. Installation auf Laufwerken anderer Hersteller Sofern Ihr Laufwerk über keine auswechselbare Tonarmbasis verfügt, raten wir Ihnen, sich mit dem Laufwerkshersteller in Verbindung zu setzen, damit die notwendige Bearbeitung für Ihre clearaudio swing base fachmännisch durchgeführt werden kann. 5. Besondere Hinweise Wenn eine Wartung oder Reparatur an einem clearaudio Produkt erforderlich ist, wenden Sie sich bitte zuerst immer an Ihren Händler oder Vertriebspartner. Alternativ können Sie clearaudio direkt kontaktieren und wir werden Sie über Ihre nächstgelegenen Servicestelle informieren. Bewahren Sie die vollständige Originalverpackung auf. Sie benötigen diese, wenn das Produkt transportiert und / oder verschickt werden soll. Alle weiteren Fragen zu diesem Produkt können Sie an ihren örtlichen Fachhändler richten. 6. Technische Daten Material: Aluminium Gewicht: 136 g Außendurchmesser: 59 mm Innendurchmesser: 24,85 mm Höhe: 26 mm Made in Germany Page / Seite 17
User manual / Bedienungsanleitung

        ENGLISH
        WARRANTY
For warranty information, contact your local Clearaudio distributor.
RETAIN YOUR PURCHASE RECEIPT
Your purchase receipt is your permanent record of a valuable purchase. It should be kept in a safe place to be referred
to as necessary for insurance purposes or when corresponding with Clearaudio.
IMPORTANT
When seeking warranty service, it is the responsibility of the consumer to establish proof and date of purchase.
Your purchase receipt or invoice is adequate for such proof.
FOR U.K. ONLY
This undertaking is in addition to a consumer‘s statutory rights and does not affect those rights in any way.

        FRANÇAIS
         GARANTIE
Pour des informations sur la garantie, contacter le distributeur local Clearaudio.
CONSERVER L‘ATTESTATION D‘ACHAT
L‘attestation d‘achat est la preuve permanente d‘un achat de valeur. La conserver en lieu sur pour s‘y reporter aux fins
d‘obtention d‘une couverture d‘assurance ou dansle cadre de correspondances avec Clearaudio.
IMPORTANT
Pour l‘obtention d‘un service couvert par la garantie, il incombe au client d‘établir la preuve de l‘achat et d‘en corroborer
la date. Le reçu ou la facture constituent des preuves suffisantes.

        DEUTSCH
        GARANTIE
Bei Garantiefragen wenden Sie sich bitte zunächst an Ihren Clearaudio Händler. Heben Sie Ihren Kaufbeleg gut auf.
WICHTIG!
Die Angaben auf Ihrer Quittung erlauben uns die Identifizierung Ihres Gerätes und belegen mit dem Kaufdatum die
Dauer Ihrer Garantie-Ansprüche. Für Serviceleistungen benötigen wir stets die Gerätenummer. Diese finden Sie auf dem
Typenschild auf der Rückseite des Gerätes oder auch in der beigefügten Garantie-Registrierkarte.

        NEDERLANDS
        GARANTIE
Voor inlichtingen omtrent garantie dient u zich tot uw plaatselijke Clearaudio.
UW KWITANTIE, KASSABON E.D. BEWAREN
Uw kwitantie, kassabon e.d. vormen uw bewijs van aankoop van een waardevol artikel en dienen op een veilige plaats
bewaard te worden voor evt, verwijzing bijv, in verbend met verzekering of bij correspondentie met Clearaudio.
BELANGRIJK
Bij een evt, beroep op de garantie is het de verantwoordelijkheid van de consument een gedateerd bewijs van aankoop
te tonen. Uw kassabon of factuurzijn voldoende bewijs.

Page / Seite 18					                                                        © clearaudio electronic GmbH, 2021-04
User manual / Bedienungsanleitung
ITALIANO
GARANZIA
L’apparecchio è coperto da una garanzia di buon funzionamento della durata di un anno, o del periodo previsto dalla
legge, a partire dalla data di acquisto comprovata da un documento attestante il nominativo del Rivenditore e la data di
vendita. La garanzia sarà prestata con la sostituzione o la riparazione gratuita delle parti difettose.Non sono coperti da
garanzia difetti derivanti da uso improprio, errata installazione, manutenzione effettuata da personale non autorizzato
o, comunque, da circostanze che non possano riferirsi a difetti di funzionamento dell’apparecchio. Sono inoltre esclusi
dalla garanzia gli interventi inerenti l’installazione e l’allacciamento agli impianti di alimentazione.
Gli apparecchi verranno riparati presso i nostri Centri di Assistenza Autorizzati. Le spese ed i rischi di trasporto sono a
carico del cliente. La casa costruttrice declina ogni responsabilità per danni diretti o indiretti provocati dalla inosservanza
delle prescrizio-ni di installazione, uso e manutenzione dettagliate nel presente manuale o per guasti dovuti ad uso
continuato a fini professionali.
ESPAÑOL
GARANTIA
Para obtener información acerca de la garantia póngase en contacto con su distribuidor Clearaudio.
GUARDE SU RECIBO DE COMPRA
Su recibo de compra es su prueba permanente de haber adquirido un aparato de valor, Este recibo deberá guardarlo
en un lugar seguro y utilizarlo como referencia cuando tenga que hacer uso del seguro o se ponga en contacto con
Clearaudio.
IMPORTANTE
Cuando solicite el servicio otorgado por la garantia el usuario tiene la responsabilidad de demonstrar cuándo efectuó la
compra. En este caso, su recibo de compra será la prueba apropiada.
Made in Germany Page / Seite 19clearaudio electronic GmbH Spardorfer Straße 150 91054 Erlangen Germany Phone /Tel.: +49 9131 40300 100 Fax: +49 9131 40300 119 www.clearaudio.de www.analogshop.de info@clearaudio.de Handmade in Germany Änderungen bleiben vorbehalten. Lieferbar solange Vorrat reicht. Für Druckfehler keine Haftung. Irrtümer vorbehalten- Kopien und Abdrucke – auch nur auszugsweise – bedürfen der schriftlichen Genehmigung durch die clearaudio electronic GmbH, Deutschland. Clearaudio Electronic accepts no liability for any misprints. Technical specifications are subject to change or improvement without prior notice. Product availability is as long as stock lasts. Copies and reprints of this document, including extracts, require written consent from Clearaudio Electronic GmbH, Germany. 2021 © clearaudio electronic GmbH, 2021-04 Made in Germany
You can also read