TensorFlow setup Documentation - Lyudmil Vladimirov - Feb 28, 2019 - Read the Docs
←
→
Page content transcription
If your browser does not render page correctly, please read the page content below
TensorFlow setup Documentation

                 Lyudmil Vladimirov

                           Feb 28, 2019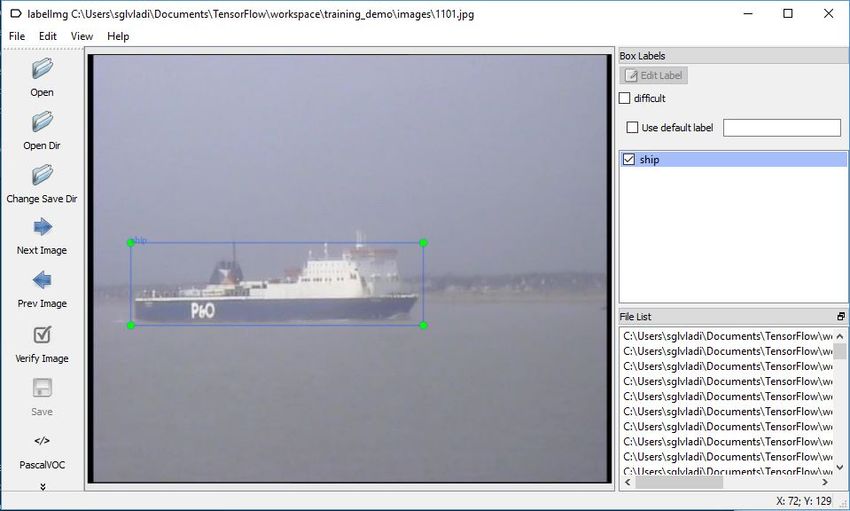
Contents:

1   Installation                                                                                                                                                                          3
    1.1 General Remarks . . . . . . . . . . . . . . . . . . . . . . . . . . . .                                      .   .   .   .   .   .   .   .   .   .   .   .   .   .   .   .   .    3
    1.2 Install Anaconda Python 3.7 (Optional) . . . . . . . . . . . . . . . .                                       .   .   .   .   .   .   .   .   .   .   .   .   .   .   .   .   .    3
    1.3 TensorFlow Installation . . . . . . . . . . . . . . . . . . . . . . . .                                      .   .   .   .   .   .   .   .   .   .   .   .   .   .   .   .   .    4
           1.3.1  TensorFlow CPU . . . . . . . . . . . . . . . . . . . . . . .                                       .   .   .   .   .   .   .   .   .   .   .   .   .   .   .   .   .    4
                 1.3.1.1 Create a new Conda virtual environment (Optional)                                           .   .   .   .   .   .   .   .   .   .   .   .   .   .   .   .   .    4
                 1.3.1.2 Install TensorFlow CPU for Python . . . . . . . . .                                         .   .   .   .   .   .   .   .   .   .   .   .   .   .   .   .   .    5
                 1.3.1.3 Test your Installation . . . . . . . . . . . . . . . .                                      .   .   .   .   .   .   .   .   .   .   .   .   .   .   .   .   .    5
           1.3.2  TensorFlow GPU . . . . . . . . . . . . . . . . . . . . . . .                                       .   .   .   .   .   .   .   .   .   .   .   .   .   .   .   .   .    5
                 1.3.2.1 Install CUDA Toolkit . . . . . . . . . . . . . . . .                                        .   .   .   .   .   .   .   .   .   .   .   .   .   .   .   .   .    6
                 1.3.2.2 Install CUDNN . . . . . . . . . . . . . . . . . . .                                         .   .   .   .   .   .   .   .   .   .   .   .   .   .   .   .   .    6
                 1.3.2.3 Environment Setup . . . . . . . . . . . . . . . . .                                         .   .   .   .   .   .   .   .   .   .   .   .   .   .   .   .   .    6
                 1.3.2.4 Update your GPU drivers (Optional) . . . . . . . .                                          .   .   .   .   .   .   .   .   .   .   .   .   .   .   .   .   .    7
                 1.3.2.5 Create a new Conda virtual environment . . . . . .                                          .   .   .   .   .   .   .   .   .   .   .   .   .   .   .   .   .    7
                 1.3.2.6 Install TensorFlow GPU for Python . . . . . . . . .                                         .   .   .   .   .   .   .   .   .   .   .   .   .   .   .   .   .    7
                 1.3.2.7 Test your Installation . . . . . . . . . . . . . . . .                                      .   .   .   .   .   .   .   .   .   .   .   .   .   .   .   .   .    8
    1.4 TensorFlow Models Installation . . . . . . . . . . . . . . . . . . . .                                       .   .   .   .   .   .   .   .   .   .   .   .   .   .   .   .   .    9
           1.4.1  Install Prerequisites . . . . . . . . . . . . . . . . . . . . . .                                  .   .   .   .   .   .   .   .   .   .   .   .   .   .   .   .   .    9
           1.4.2  Downloading the TensorFlow Models . . . . . . . . . . . .                                          .   .   .   .   .   .   .   .   .   .   .   .   .   .   .   .   .    9
           1.4.3  Protobuf Installation/Compilation . . . . . . . . . . . . . .                                      .   .   .   .   .   .   .   .   .   .   .   .   .   .   .   .   .   10
           1.4.4  Adding necessary Environment Variables . . . . . . . . . .                                         .   .   .   .   .   .   .   .   .   .   .   .   .   .   .   .   .   10
           1.4.5  COCO API installation (Optional) . . . . . . . . . . . . . .                                       .   .   .   .   .   .   .   .   .   .   .   .   .   .   .   .   .   11
           1.4.6  Test your Installation . . . . . . . . . . . . . . . . . . . . .                                   .   .   .   .   .   .   .   .   .   .   .   .   .   .   .   .   .   12
    1.5 LabelImg Installation . . . . . . . . . . . . . . . . . . . . . . . . . .                                    .   .   .   .   .   .   .   .   .   .   .   .   .   .   .   .   .   12
           1.5.1  Create a new Conda virtual environment . . . . . . . . . . .                                       .   .   .   .   .   .   .   .   .   .   .   .   .   .   .   .   .   12
           1.5.2  Downloading labelImg . . . . . . . . . . . . . . . . . . . .                                       .   .   .   .   .   .   .   .   .   .   .   .   .   .   .   .   .   13
           1.5.3  Installing dependencies and compiling package . . . . . . .                                        .   .   .   .   .   .   .   .   .   .   .   .   .   .   .   .   .   13
           1.5.4  Test your installation . . . . . . . . . . . . . . . . . . . . .                                   .   .   .   .   .   .   .   .   .   .   .   .   .   .   .   .   .   14

2   Detect Objects Using Your Webcam                                                                                                                                                     15

3   Training Custom Object Detector                                                                                                                                                      19
    3.1 Preparing workspace . . . . . . . . . .      .   .   .   .   .   .   .   .   .   .   .   .   .   .   .   .   .   .   .   .   .   .   .   .   .   .   .   .   .   .   .   .   .   19
    3.2 Annotating images . . . . . . . . . . .      .   .   .   .   .   .   .   .   .   .   .   .   .   .   .   .   .   .   .   .   .   .   .   .   .   .   .   .   .   .   .   .   .   21
    3.3 Creating Label Map . . . . . . . . . .       .   .   .   .   .   .   .   .   .   .   .   .   .   .   .   .   .   .   .   .   .   .   .   .   .   .   .   .   .   .   .   .   .   22
    3.4 Creating TensorFlow Records . . . . .        .   .   .   .   .   .   .   .   .   .   .   .   .   .   .   .   .   .   .   .   .   .   .   .   .   .   .   .   .   .   .   .   .   22
          3.4.1  Converting *.xml to *.csv           .   .   .   .   .   .   .   .   .   .   .   .   .   .   .   .   .   .   .   .   .   .   .   .   .   .   .   .   .   .   .   .   .   23

                                                                                                                                                                                          i
3.4.2 Converting from *.csv to *.record . . . . . . . . . . . . . . . . . . . . . . . . . . . . 25
3.5 Configuring a Training Pipeline . . . . . . . . . . . . . . . . . . . . . . . . . . . . . . . . . . . . . 28
3.6 Training the Model . . . . . . . . . . . . . . . . . . . . . . . . . . . . . . . . . . . . . . . . . . . . 31
3.7 Monitor Training Job Progress using TensorBoard . . . . . . . . . . . . . . . . . . . . . . . . . . . 33
3.8 Exporting a Trained Inference Graph . . . . . . . . . . . . . . . . . . . . . . . . . . . . . . . . . . 34
4 Common issues 35
4.1 Python crashes - TensorFlow GPU . . . . . . . . . . . . . . . . . . . . . . . . . . . . . . . . . . . . 35
4.2 Cleaning up Nvidia containers (TensorFlow GPU) . . . . . . . . . . . . . . . . . . . . . . . . . . . 35
4.3 labelImg saves annotation files with .xml.xml extension . . . . . . . . . . . . . . . . . . . . . . . 36
5 Indices and tables 37
iiTensorFlow setup Documentation
This is a step-by-step tutorial/guide to setting up and using TensorFlow’s Object Detection API to perform, namely,
object detection in images/video.
The software tools which we shall use throughout this tutorial are listed in the table below:
Target Software versions
OS Windows, Linux*0
Python 3.6
TensorFlow 1.9
CUDA Toolkit v9.0
CuDNN v7.0.5
Anaconda Python 3.7 (Optional)
0 Even though this tutorial is mostly based (and properly tested) on Windows 10, information is also provided for Linux systems.
Contents: 1TensorFlow setup Documentation 2 Contents:
CHAPTER           1

                                                                                                    Installation

1.1 General Remarks

    • There are two different variations of TensorFlow that you might wish to install, depending on whether you would
      like TensorFlow to run on your CPU or GPU, namely TensorFlow CPU and TensorFlow GPU. I will proceed
      to document both and you can choose which one you wish to install.
    • If you wish to install both TensorFlow variants on your machine, ideally you should install each variant under a
      different (virtual) environment. If you attempt to install both TensorFlow CPU and TensorFlow GPU, without
      making use of virtual environments, you will either end up failing, or when we later start running code there
      will always be an uncertainty as to which variant is being used to execute your code.
    • To ensure that we have no package conflicts and/or that we can install several different versions/variants of
      TensorFlow (e.g. CPU and GPU), it is generally recommended to use a virtual environment of some sort. For
      the purposes of this tutorial we will be creating and managing our virtual environments using Anaconda, but
      you are welcome to use the virtual environment manager of your choice (e.g. virtualenv).

1.2 Install Anaconda Python 3.7 (Optional)

Although having Anaconda is not a requirement in order to install and use TensorFlow, I suggest doing so, due to it’s
intuitive way of managing packages and setting up new virtual environments. Anaconda is a pretty useful tool, not
only for working with TensorFlow, but in general for anyone working in Python, so if you haven’t had a chance to
work with it, now is a good chance.
Windows
    • Go to https://www.anaconda.com/download/
    • Download Anaconda Python 3.7 version for Windows
    • Run the downloaded executable (.exe) file to begin the installation. See here for more details.

                                                                                                                    3
TensorFlow setup Documentation
• (Optional) In the next step, check the box “Add Anaconda to my PATH environment variable”. This will
make Anaconda your default Python distribution, which should ensure that you have the same default Python
distribution across all editors.
Linux
• Go to https://www.anaconda.com/download/
• Download Anaconda Python 3.7 version for Linux
• Run the downloaded bash script (.sh) file to begin the installation. See here for more details.
• When prompted with the question “Do you wish the installer to prepend the Anaconda install location
to PATH in your /home//.bashrc ?”, answer “Yes”. If you enter “No”, you must manually add the path to
Anaconda or conda will not work.
1.3 TensorFlow Installation
As mentioned in the Remarks section, there exist two generic variants of TensorFlow, which utilise different hardware
on your computer to run their computationally heavy Machine Learning algorithms.
1. The simplest to install, but also in most cases the slowest in terms of performance, is TensorFlow CPU, which
runs directly on the CPU of your machine.
2. Alternatively, if you own a (compatible) Nvidia graphics card, you can take advantage of the available CUDA
cores to speed up the computations performed by TesnsorFlow, in which case you should follow the guidelines
for installing TensorFlow GPU.
1.3.1 TensorFlow CPU
Getting setup with an installation of TensorFlow CPU can be done in 3 simple steps.
1.3.1.1 Create a new Conda virtual environment (Optional)
• Open a new Anaconda/Command Prompt window
• Type the following command:
conda create -n tensorflow_cpu pip python=3.6
• The above will create a new virtual environment with name tensorflow_cpu
• Now lets activate the newly created virtual environment by running the following in the Anaconda Promt win-
dow:
activate tensorflow_cpu
Once you have activated your virtual environment, the name of the environment should be displayed within brackets
at the beggining of your cmd path specifier, e.g.:
(tensorflow_cpu) C:\Users\sglvladi>
4 Chapter 1. InstallationTensorFlow setup Documentation
1.3.1.2 Install TensorFlow CPU for Python
• Open a new Anaconda/Command Prompt window and activate the tensorflow_cpu environment (if you have not
done so already)
• Once open, type the following on the command line:
pip install --ignore-installed --upgrade tensorflow==1.9
• Wait for the installation to finish
1.3.1.3 Test your Installation
• Open a new Anaconda/Command Prompt window and activate the tensorflow_cpu environment (if you have not
done so already)
• Start a new Python interpreter session by running:
python
• Once the interpreter opens up, type:
>>> import tensorflow as tf
• If the above code shows an error, then check to make sure you have activated the tensorflow_cpu environment
and that tensorflow_cpu was successfully installed within it in the previous step.
• Then run the following:
>>> hello = tf.constant('Hello, TensorFlow!')
>>> sess = tf.Session()
• Once the above is run, if you see a print-out similar (or identical) to the one below, it means that you could
benefit from installing TensorFlow by building the sources that correspond to you specific CPU. Everything
should still run as normal, just slower than if you had built TensorFlow from source.
2019-02-28 11:59:25.810663: I
˓→T:\src\github\tensorflow\tensorflow\core\platform\cpu_feature_guard.
˓→cc:141] Your CPU supports instructions that this TensorFlow binary was
˓→not compiled to use: AVX2
• Finally, for the sake of completing the test as described by TensorFlow themselves (see here), let’s run the
following:
>>> print(sess.run(hello))
b'Hello, TensorFlow!'
1.3.2 TensorFlow GPU
The installation of TesnorFlow GPU is slightly more involved than that of TensorFlow CPU, mainly due to the need
of installing the relevant Graphics and CUDE drivers. There’s a nice Youtube tutorial (see here), explaining how to
install TensorFlow GPU. Although it describes different versions of the relevant components (including TensorFlow
itself), the installation steps are generally the same with this tutorial.
Before proceeding to install TesnsorFlow GPU, you need to make sure that your system can satisfy the following
requirements:
1.3. TensorFlow Installation 5TensorFlow setup Documentation
Prerequisites
Nvidia GPU (GTX 650 or newer)
CUDA Toolkit v9.0
CuDNN v7.0.5
Anaconda with Python 3.7 (Optional)
1.3.2.1 Install CUDA Toolkit
Windows
Follow this link to download and install CUDA Toolkit v9.0.
Linux
Follow this link to download and install CUDA Toolkit v9.0 for your Linux distribution.
1.3.2.2 Install CUDNN
Windows
• Go to https://developer.nvidia.com/rdp/cudnn-download
• Create a user profile if needed and log in
• Select cuDNN v7.0.5 (Feb 28, 2018), for CUDA 9.0
• Download cuDNN v7.0.5 Library for Windows 10
• Extract the contents of the zip file (i.e. the folder named cuda) inside \NVIDIA GPU
Computing Toolkit\CUDA\v9.0\, where points to the installation directory spec-
ified during the installation of the CUDA Toolkit. By default = C:\Program Files.
Linux
• Go to https://developer.nvidia.com/rdp/cudnn-download
• Create a user profile if needed and log in
• Select cuDNN v7.0.5 (Feb 28, 2018), for CUDA 9.0
• Download cuDNN v7.0.5 Library for Linux
• Follow the instructions under Section 2.3.1 of the CuDNN Installation Guide to install CuDNN.
1.3.2.3 Environment Setup
Windows
• Go to Start and Search “environment variables”
• Click the Environment Variables button
• Click on the Path system variable and select edit
• Add the following paths:
– \NVIDIA GPU Computing Toolkit\CUDA\v9.0\bin
– \NVIDIA GPU Computing Toolkit\CUDA\v9.0\libnvvp
6 Chapter 1. InstallationTensorFlow setup Documentation
– \NVIDIA GPU Computing Toolkit\CUDA\v9.
0\extras\CUPTI\libx64
– \NVIDIA GPU Computing Toolkit\CUDA\v9.0\cuda\bin
Linux
As per Section 7.1.1 of the CUDA Installation Guide for Linux, append the following lines to ~/.bashrc:
# CUDA related exports
export PATH=/usr/local/cuda-9.0/bin${PATH:+:${PATH}}
export LD_LIBRARY_PATH=/usr/local/cuda-9.0/lib64${LD_LIBRARY_PATH:+:${LD_LIBRARY_PATH}
˓→}
1.3.2.4 Update your GPU drivers (Optional)
If during the installation of the CUDA Toolkit (see Install CUDA Toolkit) you selected the Express Installation option,
then your GPU drivers will have been overwritten by those that come bundled with the CUDA toolkit. These drivers
are typically NOT the latest drivers and, thus, you may wish to updte your drivers.
• Go to http://www.nvidia.com/Download/index.aspx
• Select your GPU version to download
• Install the driver for your chosen OS
1.3.2.5 Create a new Conda virtual environment
• Open a new Anaconda/Command Prompt window
• Type the following command:
conda create -n tensorflow_gpu pip python=3.6
• The above will create a new virtual environment with name tensorflow_gpu
• Now lets activate the newly created virtual environment by running the following in the Anaconda Promt win-
dow:
activate tensorflow_gpu
Once you have activated your virtual environment, the name of the environment should be displayed within brackets
at the beggining of your cmd path specifier, e.g.:
(tensorflow_gpu) C:\Users\sglvladi>
1.3.2.6 Install TensorFlow GPU for Python
• Open a new Anaconda/Command Prompt window and activate the tensorflow_gpu environment (if you have not
done so already)
• Once open, type the following on the command line:
pip install --ignore-installed --upgrade tensorflow-gpu==1.9
• Wait for the installation to finish
1.3. TensorFlow Installation 7TensorFlow setup Documentation
1.3.2.7 Test your Installation
• Open a new Anaconda/Command Prompt window and activate the tensorflow_gpu environment (if you have not
done so already)
• Start a new Python interpreter session by running:
python
• Once the interpreter opens up, type:
>>> import tensorflow as tf
• If the above code shows an error, then check to make sure you have activated the tensorflow_gpu environment
and that tensorflow_gpu was successfully installed within it in the previous step.
• Then run the following:
>>> hello = tf.constant('Hello, TensorFlow!')
>>> sess = tf.Session()
• Once the above is run, you should see a print-out similar (but not identical) to the one bellow:
2019-02-28 06:56:43.617192: I
˓→T:\src\github\tensorflow\tensorflow\core\platform\cpu_feature_guard.
˓→cc:140] Your CPU supports instructions that this TensorFlow binary was
˓→not compiled to use: AVX2
2019-02-28 06:56:43.792865: I
˓→T:\src\github\tensorflow\tensorflow\core\common_runtime\gpu\gpu_device.
˓→cc:1356] Found device 0 with properties:
name: GeForce GTX 1080 major: 6 minor: 1 memoryClockRate(GHz): 1.7335
pciBusID: 0000:01:00.0
totalMemory: 8.00GiB freeMemory: 6.61GiB
2019-02-28 06:56:43.799610: I
˓→T:\src\github\tensorflow\tensorflow\core\common_runtime\gpu\gpu_device.
˓→cc:1435] Adding visible gpu devices: 0
2019-02-28 06:56:44.338771: I
˓→T:\src\github\tensorflow\tensorflow\core\common_runtime\gpu\gpu_device.
˓→cc:923] Device interconnect StreamExecutor with strength 1 edge matrix:
2019-02-28 06:56:44.348418: I
˓→T:\src\github\tensorflow\tensorflow\core\common_runtime\gpu\gpu_device.
˓→cc:929] 0
2019-02-28 06:56:44.351039: I
˓→T:\src\github\tensorflow\tensorflow\core\common_runtime\gpu\gpu_device.
˓→cc:942] 0: N
2019-02-28 06:56:44.352873: I
˓→T:\src\github\tensorflow\tensorflow\core\common_runtime\gpu\gpu_device.
˓→cc:1053] Created TensorFlow device (/job:localhost/replica:0/task:0/
˓→device:GPU:0 with 6387 MB memory) -> physical GPU (device: 0, name:
˓→GeForce GTX 1080, pci bus id: 0000:01:00.0, compute capability: 6.1)
• Finally, for the sake of completing the test as described by TensorFlow themselves (see here), let’s run the
following:
>>> print(sess.run(hello))
b'Hello, TensorFlow!'
8 Chapter 1. InstallationTensorFlow setup Documentation
1.4 TensorFlow Models Installation
Now that you have installed TensorFlow, it is time to install the models used by TensorFlow to do its magic.
1.4.1 Install Prerequisites
Building on the assumption that you have just created your new virtual environment (whether that’s tensor-
flow_cpu,‘tensorflow_gpu‘ or whatever other name you might have used), there are some packages which need to
be installed before installing the models.
Prerequisite packages
Name Tutorial version-build
pillow 5.4.1-py36hdc69c19_0
lxml 4.3.1-py36h1350720_0
jupyter 1.0.0-py36_7
matplotlib 3.0.2-py36hc8f65d3_0
opencv 3.4.2-py36h40b0b35_0
The packages can be installed using conda by running:
conda install (=), (=), ..., (=)
where can be replaced with the name of the package, and optionally the package version can be
specified by adding the optional specifier = after . For example, to simply install all
packages at their latest versions you can run:
conda install pillow, lxml, jupyter, matplotlib, opencv
Alternatively, if you don’t want to use Anaconda you can install the packages using pip:
pip install (==) (==) ...
˓→(==)
but you will need to install opencv-python instead of opencv.
1.4.2 Downloading the TensorFlow Models
• Create a new folder under a path of your choice and name it TensorFlow. (e.g.
C:\Users\sglvladi\Documents\TensorFlow).
• From your Anaconda/Command Prompt cd into the TensorFlow directory.
• To download the models you can either use Git to clone the TensorFlow Models repo inside the TensorFlow
folder, or you can simply download it as a ZIP and extract it’s contents inside the TensorFlow folder. To
keep things consistent, in the latter case you will have to rename the extracted folder models-master to
models.1
• You should now have a single folder named models under your TensorFlow folder, which contains another
4 folders as such:
1 The latest repo commit when writing this tutorial is 4b566d4.
1.4. TensorFlow Models Installation 9TensorFlow setup Documentation
TensorFlow
models
official
research
samples
tutorials
1.4.3 Protobuf Installation/Compilation
The Tensorflow Object Detection API uses Protobufs to configure model and training parameters. Before the frame-
work can be used, the Protobuf libraries must be downloaded and compiled.
This should be done as follows:
• Head to the protoc releases page
• Download the latest *-win32.zip release (e.g. protoc-3.5.1-win32.zip)
• Create a folder in C:\Program Files and name it Google Protobuf.
• Extract the contents of the downloaded *-win32.zip, inside C:\Program Files\Google Protobuf
• Add C:\Program Files\Google Protobuf\bin to your Path environment variable (see Environ-
ment Setup)
• In a new Anaconda/Command Prompt2 , cd into TensorFlow/models/research/ directory and run the
following command:
# From within TensorFlow/models/research/
protoc object_detection/protos/*.proto --python_out=.
Important: If you are on Windows and using Protobuf 3.5 or later, the multi-file selection wildcard
(i.e *.proto) will not work but you can do one of the following:
Windows Powershell
# From within TensorFlow/models/research/
Get-ChildItem object_detection/protos/*.proto | foreach {protoc "object_
˓→detection/protos/$($_.Name)" --python_out=.}
Command Prompt
# From within TensorFlow/models/research/
for /f %i in ('dir /b object_detection\protos\*.proto') do protoc object_
˓→detection\protos\%i --python_out=.
1.4.4 Adding necessary Environment Variables
1. As Tensorflow\models\research\object_detection is the core package for object detection, it’s
convenient to add the specific folder to our environmental variables.
Linux
This can be done by either adding to ~/.bashrc or running the following:
2 NOTE: You MUST open a new Anaconda/Command Prompt for the changes in the environment variables to take effect.
10 Chapter 1. InstallationTensorFlow setup Documentation
export PYTHONPATH=$PYTHONPATH:/TensorFlow/models/research/object_detection
Windows
The following folder must be added to your PYTHONPATH environment variable (See Environment Setup):
• \TensorFlow\models\research\object_detection
Note: The above can also be achieved, in both Linux and Windows environments, by running the following from
Tensorflow\models\research:
# From within TensorFlow/models/research/
python setup.py build
python setup.py install
The above commands essentially build and install the object_detection Python package.
DRAWBACK: The above commands need to be run everytime there is a change/update of the object_detection
package.
2. For whatever reason, some of the TensorFlow packages that are required to perform object detection, do not
come pre-installed with our tensorflow installation.
Linux
The Installation docs suggest that you either run, or add to ~/.bashrc file, the following command, which adds
these packages to your PYTHONPATH:
# From within tensorflow/models/research/
export PYTHONPATH=$PYTHONPATH:/TensorFlow/models/research:/
˓→TensorFlow/models/research/slim
Windows
The only way that I found works best, is to simply add the following folders to your PYTHONPATH environment
variable (See also Environment Setup):
• \TensorFlow\models\research
• \TensorFlow\models\research\slim
where, in both cases, replaces the absolute path to your TesnorFlow folder. (e.g.
= C:\Users\sglvladi\Documents if TensorFlow resides within your Documents
folder)
1.4.5 COCO API installation (Optional)
The pycocotools package should be installed if you are interested in using COCO evaluation metrics.
Windows
Run the following command to install pycocotools with Windows support:
pip install git+https://github.com/philferriere/cocoapi.git#subdirectory=PythonAPI
Note that, according to the package’s instructions, Visual C++ 2015 build tools must be installed and on your path. If
they are not, make sure to install them from here.
Linux
1.4. TensorFlow Models Installation 11TensorFlow setup Documentation
Download cocoapi to a directory of your choice, then make and copy the pycocotools subfolder to the Tensorflow/
models/research directory, as such:
git clone https://github.com/cocodataset/cocoapi.git
cd cocoapi/PythonAPI
make
cp -r pycocotools /TensorFlow/models/research/
The default metrics are based on those used in Pascal VOC evaluation. To use the COCO object detection metrics
add metrics_set: “coco_detection_metrics” to the eval_config message in the config file. To use the COCO instance
segmentation metrics add metrics_set: “coco_mask_metrics” to the eval_config message in the config file.
1.4.6 Test your Installation
• Open a new Anaconda/Command Prompt window and activate the tensorflow_gpu environment (if you have not
done so already)
• cd into TensorFlow\models\research\object_detection and run the following command:
# From within TensorFlow/models/research/object_detection
jupyter notebook
• This should start a new jupyter notebook server on your machine and you should be redirected to a new
tab of your default browser.
• Once there, simply follow sentdex’s Youtube video to ensure that everything is running smoothly.
• If, when you try to run In [11]:, Python crashes, have a look at the Anaconda/Command Prompt window
you used to run the jupyter notebook service and check for a line similar (maybe identical) to the one
below:
2018-03-22 03:07:54.623130: E C:\tf_jenkins\workspace\rel-win\M\windows-
˓→gpu\PY\36\tensorflow\stream_executor\cuda\cuda_dnn.cc:378] Loaded
˓→runtime CuDNN library: 7101 (compatibility version 7100) but source was
˓→compiled with 7003 (compatibility version 7000). If using a binary
˓→install, upgrade your CuDNN library to match. If building from sources,
˓→ make sure the library loaded at runtime matches a compatible version
˓→specified during compile configuration.
• If the above line is present in the printed debugging, it means that you have not installed the correct version of
the cuDNN libraries. In this case make sure you re-do the Install CUDNN step, making sure you instal cuDNN
v7.0.5.
1.5 LabelImg Installation
For Windows and Linux you can download the precompiled binary here . The steps for installing from source follow
below.
1.5.1 Create a new Conda virtual environment
To deal with the fact that labelImg (on Windows) requires the use of pyqt4, while tensorflow 1.6 (and
possibly other packages) require pyqt5, we will create a new virtual environment in which to run labelImg.
• Open a new Anaconda/Command Prompt window
12 Chapter 1. InstallationTensorFlow setup Documentation
• Type the following command:
Windows
conda create -n labelImg pyqt=4
Linux
conda create -n labelImg pyqt=5
• The above will create a new virtual environment with name labelImg
• Now lets activate the newly created virtual environment by running the following in the Anaconda Promt win-
dow:
activate labelImg
Once you have activated your virtual environment, the name of the environment should be displayed within brackets
at the beginning of your cmd path specifier, e.g.:
(labelImg) C:\Users\sglvladi>
1.5.2 Downloading labelImg
• Inside you TensorFlow folder, create a new directory, name it addons and then cd into it.
• To download the package you can either use Git to clone the labelImg repo inside the TensorFlow\addons
folder, or you can simply download it as a ZIP and extract it’s contents inside the TensorFlow\addons
folder. To keep things consistent, in the latter case you will have to rename the extracted folder
labelImg-master to labelImg.3
• You should now have a single folder named addons\labelImg under your TensorFlow folder, which
contains another 4 folders as such:
TensorFlow
addons
labelImg
models
official
research
samples
tutorials
1.5.3 Installing dependencies and compiling package
• Open a new Anaconda/Command Prompt window and activate the tensorflow_gpu environment (if you have not
done so already)
• cd into TensorFlow\addons\labelImg and run the following commands:
Windows
conda install pyqt=4
conda install lxml
pyrcc4 -py3 -o resources.py resources.qrc
3 The latest repo commit when writing this tutorial is 8d1bd68.
1.5. LabelImg Installation 13TensorFlow setup Documentation
Linux
sudo apt-get install pyqt5-dev-tools
sudo pip install -r requirements/requirements-linux-python3.txt
make qt5py3
1.5.4 Test your installation
• Open a new Anaconda/Command Prompt window and activate the tensorflow_gpu environment (if you have not
done so already)
• cd into TensorFlow\addons\labelImg and run the following command:
python labelImg.py
# or
python labelImg.py [IMAGE_PATH] [PRE-DEFINED CLASS FILE]
14 Chapter 1. InstallationCHAPTER 2
Detect Objects Using Your Webcam
Hereby you can find an example which allows you to use your camera to generate a video stream, based on which you
can perform object_detection.
import numpy as np
import os
import six.moves.urllib as urllib
import sys
import tarfile
import tensorflow as tf
import zipfile
import cv2
from collections import defaultdict
from io import StringIO
from matplotlib import pyplot as plt
from PIL import Image
from utils import label_map_util
from utils import visualization_utils as vis_util
# Define the video stream
cap = cv2.VideoCapture(0) # Change only if you have more than one webcams
# What model to download.
# Models can bee found here: https://github.com/tensorflow/models/blob/master/
˓→research/object_detection/g3doc/detection_model_zoo.md
MODEL_NAME = 'ssd_inception_v2_coco_2017_11_17'
MODEL_FILE = MODEL_NAME + '.tar.gz'
DOWNLOAD_BASE = 'http://download.tensorflow.org/models/object_detection/'
# Path to frozen detection graph. This is the actual model that is used for the
˓→object detection.
PATH_TO_CKPT = MODEL_NAME + '/frozen_inference_graph.pb'
# List of the strings that is used to add correct label for each box.
(continues on next page)
15TensorFlow setup Documentation
(continued from previous page)
PATH_TO_LABELS = os.path.join('data', 'mscoco_label_map.pbtxt')
# Number of classes to detect
NUM_CLASSES = 90
# Download Model
opener = urllib.request.URLopener()
opener.retrieve(DOWNLOAD_BASE + MODEL_FILE, MODEL_FILE)
tar_file = tarfile.open(MODEL_FILE)
for file in tar_file.getmembers():
file_name = os.path.basename(file.name)
if 'frozen_inference_graph.pb' in file_name:
tar_file.extract(file, os.getcwd())
# Load a (frozen) Tensorflow model into memory.
detection_graph = tf.Graph()
with detection_graph.as_default():
od_graph_def = tf.GraphDef()
with tf.gfile.GFile(PATH_TO_CKPT, 'rb') as fid:
serialized_graph = fid.read()
od_graph_def.ParseFromString(serialized_graph)
tf.import_graph_def(od_graph_def, name='')
# Loading label map
# Label maps map indices to category names, so that when our convolution network
˓→predicts `5`, we know that this corresponds to `airplane`. Here we use internal
˓→utility functions, but anything that returns a dictionary mapping integers to
˓→appropriate string labels would be fine
label_map = label_map_util.load_labelmap(PATH_TO_LABELS)
categories = label_map_util.convert_label_map_to_categories(
label_map, max_num_classes=NUM_CLASSES, use_display_name=True)
category_index = label_map_util.create_category_index(categories)
# Helper code
def load_image_into_numpy_array(image):
(im_width, im_height) = image.size
return np.array(image.getdata()).reshape(
(im_height, im_width, 3)).astype(np.uint8)
# Detection
with detection_graph.as_default():
with tf.Session(graph=detection_graph) as sess:
while True:
# Read frame from camera
ret, image_np = cap.read()
# Expand dimensions since the model expects images to have shape: [1,
˓→None, None, 3]
image_np_expanded = np.expand_dims(image_np, axis=0)
# Extract image tensor
image_tensor = detection_graph.get_tensor_by_name('image_tensor:0')
# Extract detection boxes
boxes = detection_graph.get_tensor_by_name('detection_boxes:0')
(continues on next page)
16 Chapter 2. Detect Objects Using Your WebcamTensorFlow setup Documentation
(continued from previous page)
# Extract detection scores
scores = detection_graph.get_tensor_by_name('detection_scores:0')
# Extract detection classes
classes = detection_graph.get_tensor_by_name('detection_classes:0')
# Extract number of detectionsd
num_detections = detection_graph.get_tensor_by_name(
'num_detections:0')
# Actual detection.
(boxes, scores, classes, num_detections) = sess.run(
[boxes, scores, classes, num_detections],
feed_dict={image_tensor: image_np_expanded})
# Visualization of the results of a detection.
vis_util.visualize_boxes_and_labels_on_image_array(
image_np,
np.squeeze(boxes),
np.squeeze(classes).astype(np.int32),
np.squeeze(scores),
category_index,
use_normalized_coordinates=True,
line_thickness=8)
# Display output
cv2.imshow('object detection', cv2.resize(image_np, (800, 600)))
if cv2.waitKey(25) & 0xFF == ord('q'):
cv2.destroyAllWindows()
break
17TensorFlow setup Documentation 18 Chapter 2. Detect Objects Using Your Webcam
CHAPTER          3

                                                                  Training Custom Object Detector

So, up to now you should have done the following:
    • Installed TensorFlow, either CPU or GPU (See TensorFlow Installation)
    • Installed TensorFlow Models (See TensorFlow Models Installation)
    • Installed labelImg (See LabelImg Installation)
Now that we have done all the above, we can start doing some cool stuff. Here we will see how you can train your
own object detector, and since it is not as simple as it sounds, we will have a look at:
   1. How to organise your workspace/training files
   2. How to prepare/annotate image datasets
   3. How to generate tf records from such datasets
   4. How to configure a simple training pipeline
   5. How to train a model and monitor it’s progress
   6. How to export the resulting model and use it to detect objects.

3.1 Preparing workspace

   1. If you have followed the tutorial, you should by now have a folder Tensorflow, placed under
       (e.g. C:\Users\sglvladi\Documents), with the following directory tree:

           TensorFlow
              addons
                   labelImg
              models
                   official
                   research
                   samples
                   tutorials

                                                                                                             19
TensorFlow setup Documentation
2. Now create a new folder under TensorFlow and call it workspace. It is within the workspace that
we will store all our training set-ups. Now let’s go under workspace and create another folder named
training_demo. Now our directory structure should be as so:
TensorFlow
addons
labelImg
models
official
research
samples
tutorials
workspace
training_demo
3. The training_demo folder shall be our training folder, which will contain all files related to our model
training. It is advisable to create a separate training folder each time we wish to train a different model. The
typical structure for training folders is shown below.
training_demo
annotations
images
test
train
pre-trained-model
training
README.md
Here’s an explanation for each of the folders/filer shown in the above tree:
• annotations: This folder will be used to store all *.csv files and the respective TensorFlow *.record
files, which contain the list of annotations for our dataset images.
• images: This folder contains a copy of all the images in our dataset, as well as the respective *.xml files
produced for each one, once labelImg is used to annotate objects.
– images\train: This folder contains a copy of all images, and the respective *.xml files, which will
be used to train our model.
– images\test: This folder contains a copy of all images, and the respective *.xml files, which will be
used to test our model.
• pre-trained-model: This folder will contain the pre-trained model of our choice, which shall be used as
a starting checkpoint for our training job.
• training: This folder will contain the training pipeline configuration file *.config, as well as a *.pbtxt
label map file and all files generated during the training of our model.
• README.md: This is an optional file which provides some general information regarding the training conditions
of our model. It is not used by TensorFlow in any way, but it generally helps when you have a few training folders
and/or you are revisiting a trained model after some time.
If you do not understand most of the things mentioned above, no need to worry, as we’ll see how all the files are
generated further down.
20 Chapter 3. Training Custom Object DetectorTensorFlow setup Documentation
3.2 Annotating images
To annotate images we will be using the labelImg package. If you haven’t installed the package yet, then have a look
at LabelImg Installation.
• Once you have collected all the images to be used to test your model (ideally more than 100 per class), place
them inside the folder training_demo\images.
• Open a new Anaconda/Command Prompt window and cd into Tensorflow\addons\labelImg.
• If (as suggested in LabelImg Installation) you created a separate Conda environment for labelImg then go
ahead and activate it by running:
activate labelImg
• Next go ahead and start labelImg, pointing it to your training_demo\images folder.
python labelImg.py ..\..\workspace\training_demo\images
• A File Explorer Dialog windows should open, which points to the training_demo\images folder.
• Press the “Select Folder” button, to start annotating your images.
Once open, you should see a window similar to the one below:
I won’t be covering a tutorial on how to use labelImg, but you can have a look at labelImg’s repo for more de-
tails. A nice Youtube video demonstrating how to use labelImg is also available here. What is important is that
once you annotate all your images, a set of new *.xml files, one for each image, should be generated inside your
training_demo\images folder.
Once you have finished annotating your image dataset, it is a general convention to use only part of it for training, and
the rest is used for testing purposes. Typically, the ratio is 90%/10%, i.e. 90% of the images are used for training and
the rest 10% is maintained for testing, but you can chose whatever ratio suits your needs.
Once you have decided how you will be splitting your dataset, copy all training images, together with their corre-
sponding *.xml files, and place them inside the training_demo\images\train folder. Similarly, copy all
3.2. Annotating images 21TensorFlow setup Documentation
testing images, with their *.xml files, and paste them inside training_demo\images\train.
3.3 Creating Label Map
TensorFlow requires a label map, which namely maps each of the used labels to an integer values. This label map is
used both by the training and detection processes.
Below I show an example label map (e.g label_map.pbtxt), assuming that our dataset containes 2 labels, dogs
and cats:
item {
id: 1
name: 'cat'
}
item {
id: 2
name: 'dog'
}
Label map files have the extention .pbtxt and should be placed inside the training_demo\annotations
folder.
3.4 Creating TensorFlow Records
Now that we have generated our annotations and split our dataset into the desired training and testing subsets, it is
time to convert our annotations into the so called TFRecord format.
There are two steps in doing so:
• Converting the individual *.xml files to a unified *.csv file for each dataset.
• Converting the *.csv files of each dataset to *.record files (TFRecord format).
Before we proceed to describe the above steps, let’s create a directory where we can store some scripts. Under the
TensorFlow folder, create a new folder TensorFlow\scripts, which we can use to store some useful scripts.
To make things even tidier, let’s create a new folder TensorFlow\scripts\preprocessing, where we shall
store scripts that we can use to preprocess our training inputs. Below is out TensorFlow directory tree structure, up
to now:
TensorFlow
addons
labelImg
models
official
research
samples
tutorials
scripts
preprocessing
workspace
training_demo
22 Chapter 3. Training Custom Object DetectorTensorFlow setup Documentation
3.4.1 Converting *.xml to *.csv
To do this we can write a simple script that iterates through all *.xml files in the
training_demo\images\train and training_demo\images\test folders, and generates a *.csv for
each of the two.
Here is an example script that allows us to do just that:
"""
Usage:
# Create train data:
python xml_to_csv.py -i [PATH_TO_IMAGES_FOLDER]/train -o [PATH_TO_ANNOTATIONS_FOLDER]/
˓→train_labels.csv
# Create test data:
python xml_to_csv.py -i [PATH_TO_IMAGES_FOLDER]/test -o [PATH_TO_ANNOTATIONS_FOLDER]/
˓→test_labels.csv
"""
import os
import glob
import pandas as pd
import argparse
import xml.etree.ElementTree as ET
def xml_to_csv(path):
"""Iterates through all .xml files (generated by labelImg) in a given directory
˓→and combines them in a single Pandas datagrame.
Parameters:
----------
path : {str}
The path containing the .xml files
Returns
-------
Pandas DataFrame
The produced dataframe
"""
xml_list = []
for xml_file in glob.glob(path + '/*.xml'):
tree = ET.parse(xml_file)
root = tree.getroot()
for member in root.findall('object'):
value = (root.find('filename').text,
int(root.find('size')[0].text),
int(root.find('size')[1].text),
member[0].text,
int(member[4][0].text),
int(member[4][1].text),
int(member[4][2].text),
int(member[4][3].text)
)
xml_list.append(value)
column_name = ['filename', 'width', 'height',
'class', 'xmin', 'ymin', 'xmax', 'ymax']
xml_df = pd.DataFrame(xml_list, columns=column_name)
(continues on next page)
3.4. Creating TensorFlow Records 23TensorFlow setup Documentation
(continued from previous page)
return xml_df
def main():
# Initiate argument parser
parser = argparse.ArgumentParser(
description="Sample TensorFlow XML-to-CSV converter")
parser.add_argument("-i",
"--inputDir",
help="Path to the folder where the input .xml files are stored
˓→",
type=str)
parser.add_argument("-o",
"--outputFile",
help="Name of output .csv file (including path)", type=str)
args = parser.parse_args()
if(args.inputDir is None):
args.inputDir = os.getcwd()
if(args.outputFile is None):
args.outputFile = args.inputDir + "/labels.csv"
assert(os.path.isdir(args.inputDir))
xml_df = xml_to_csv(args.inputDir)
xml_df.to_csv(
args.outputFile, index=None)
print('Successfully converted xml to csv.')
if __name__ == '__main__':
main()
• Create a new file with name xml_to_csv.py under TensorFlow\scripts\preprocessing, open it,
paste the above code inside it and save.
• Install the pandas package:
conda install pandas # Anaconda
# or
pip install pandas # pip
• Finally, cd into TensorFlow\scripts\preprocessing and run:
# Create train data:
python xml_to_csv.py -i [PATH_TO_IMAGES_FOLDER]/train -o [PATH_TO_
˓→ANNOTATIONS_FOLDER]/train_labels.csv
# Create test data:
python xml_to_csv.py -i [PATH_TO_IMAGES_FOLDER]/test -o [PATH_TO_
˓→ANNOTATIONS_FOLDER]/test_labels.csv
# For example
# python xml_to_csv.py -i
˓→C:\Users\sglvladi\Documents\TensorFlow\workspace\training_
˓→demo\images\train -o
˓→C:\Users\sglvladi\Documents\TensorFlow\workspace\training_
˓→demo\annotations\train_labels.csv (continues on next page)
24 Chapter 3. Training Custom Object DetectorTensorFlow setup Documentation
(continued from previous page)
# python xml_to_csv.py -i
˓→C:\Users\sglvladi\Documents\TensorFlow\workspace\training_
˓→demo\images\test -o
˓→C:\Users\sglvladi\Documents\TensorFlow\workspace\training_
˓→demo\annotations\test_labels.csv
Once the above is done, there should be 2 new files under the training_demo\annotations folder, named
test_labels.csv and train_labels.csv, respectively.
3.4.2 Converting from *.csv to *.record
Now that we have obtained our *.csv annotation files, we will need to convert them into TFRecords. Below is an
example script that allows us to do just that:
"""
Usage:
# Create train data:
python generate_tfrecord.py --label= --csv_input=/
˓→train_labels.csv --output_path=/train.record
# Create test data:
python generate_tfrecord.py --label= --csv_input=/
˓→test_labels.csv --output_path=/test.record
"""
from __future__ import division
from __future__ import print_function
from __future__ import absolute_import
import os
import io
import pandas as pd
import tensorflow as tf
import sys
sys.path.append("../../models/research")
from PIL import Image
from object_detection.utils import dataset_util
from collections import namedtuple, OrderedDict
flags = tf.app.flags
flags.DEFINE_string('csv_input', '', 'Path to the CSV input')
flags.DEFINE_string('output_path', '', 'Path to output TFRecord')
flags.DEFINE_string('label', '', 'Name of class label')
# if your image has more labels input them as
# flags.DEFINE_string('label0', '', 'Name of class[0] label')
# flags.DEFINE_string('label1', '', 'Name of class[1] label')
# and so on.
flags.DEFINE_string('img_path', '', 'Path to images')
FLAGS = flags.FLAGS
# TO-DO replace this with label map
# for multiple labels add more else if statements
(continues on next page)
3.4. Creating TensorFlow Records 25TensorFlow setup Documentation
(continued from previous page)
def class_text_to_int(row_label):
if row_label == FLAGS.label: # 'ship':
return 1
# comment upper if statement and uncomment these statements for multiple labelling
# if row_label == FLAGS.label0:
# return 1
# elif row_label == FLAGS.label1:
# return 0
else:
None
def split(df, group):
data = namedtuple('data', ['filename', 'object'])
gb = df.groupby(group)
return [data(filename, gb.get_group(x)) for filename, x in zip(gb.groups.keys(),
˓→gb.groups)]
def create_tf_example(group, path):
with tf.gfile.GFile(os.path.join(path, '{}'.format(group.filename)), 'rb') as fid:
encoded_jpg = fid.read()
encoded_jpg_io = io.BytesIO(encoded_jpg)
image = Image.open(encoded_jpg_io)
width, height = image.size
filename = group.filename.encode('utf8')
image_format = b'jpg'
# check if the image format is matching with your images.
xmins = []
xmaxs = []
ymins = []
ymaxs = []
classes_text = []
classes = []
for index, row in group.object.iterrows():
xmins.append(row['xmin'] / width)
xmaxs.append(row['xmax'] / width)
ymins.append(row['ymin'] / height)
ymaxs.append(row['ymax'] / height)
classes_text.append(row['class'].encode('utf8'))
classes.append(class_text_to_int(row['class']))
tf_example = tf.train.Example(features=tf.train.Features(feature={
'image/height': dataset_util.int64_feature(height),
'image/width': dataset_util.int64_feature(width),
'image/filename': dataset_util.bytes_feature(filename),
'image/source_id': dataset_util.bytes_feature(filename),
'image/encoded': dataset_util.bytes_feature(encoded_jpg),
'image/format': dataset_util.bytes_feature(image_format),
'image/object/bbox/xmin': dataset_util.float_list_feature(xmins),
'image/object/bbox/xmax': dataset_util.float_list_feature(xmaxs),
'image/object/bbox/ymin': dataset_util.float_list_feature(ymins),
'image/object/bbox/ymax': dataset_util.float_list_feature(ymaxs),
'image/object/class/text': dataset_util.bytes_list_feature(classes_text),
'image/object/class/label': dataset_util.int64_list_feature(classes),
(continues on next page)
26 Chapter 3. Training Custom Object DetectorTensorFlow setup Documentation
(continued from previous page)
}))
return tf_example
def main(_):
writer = tf.python_io.TFRecordWriter(FLAGS.output_path)
path = os.path.join(os.getcwd(), FLAGS.img_path)
examples = pd.read_csv(FLAGS.csv_input)
grouped = split(examples, 'filename')
for group in grouped:
tf_example = create_tf_example(group, path)
writer.write(tf_example.SerializeToString())
writer.close()
output_path = os.path.join(os.getcwd(), FLAGS.output_path)
print('Successfully created the TFRecords: {}'.format(output_path))
if __name__ == '__main__':
tf.app.run()
• Create a new file with name generate_tfrecord.py under TensorFlow\scripts\preprocessing,
open it, paste the above code inside it and save.
• Once this is done, cd into TensorFlow\scripts\preprocessing and run:
# Create train data:
python generate_tfrecord.py --label= --csv_input=/train_labels.csv
--img_path=/train --output_path=/train.record
# Create test data:
python generate_tfrecord.py --label= --csv_input=/test_labels.csv
--img_path=/test
--output_path=/test.record
# For example
# python generate_tfrecord.py --label=ship --csv_
˓→input=C:\Users\sglvladi\Documents\TensorFlow\workspace\training_
˓→demo\annotations\train_labels.csv --output_
˓→path=C:\Users\sglvladi\Documents\TensorFlow\workspace\training_
˓→demo\annotations\train.record --img_
˓→path=C:\Users\sglvladi\Documents\TensorFlow\workspace\training_
˓→demo\images\train
# python generate_tfrecord.py --label=ship --csv_
˓→input=C:\Users\sglvladi\Documents\TensorFlow\workspace\training_
˓→demo\annotations\test_labels.csv --output_
˓→path=C:\Users\sglvladi\Documents\TensorFlow\workspace\training_
˓→demo\annotations\test.record --img_
˓→path=C:\Users\sglvladi\Documents\TensorFlow\workspace\training_
˓→demo\images\test
Once the above is done, there should be 2 new files under the training_demo\annotations folder, named
test.record and train.record, respectively.
3.4. Creating TensorFlow Records 27TensorFlow setup Documentation
3.5 Configuring a Training Pipeline
For the purposes of this tutorial we will not be creating a training job from the scratch, but rather we will go through
how to reuse one of the pre-trained models provided by TensorFlow. If you would like to train an entirely new model,
you can have a look at TensorFlow’s tutorial.
The model we shall be using in our examples is the ssd_inception_v2_coco model, since it provides a relatively
good trade-off between performance and speed, however there are a number of other models you can use, all of
which are listed in TensorFlow’s detection model zoo. More information about the detection performance, as well as
reference times of execution, for each of the available pre-trained models can be found here.
First of all, we need to get ourselves the sample pipeline configuration file for the specific model we wish to re-
train. You can find the specific file for the model of your choice here. In our case, since we shall be using the
ssd_inception_v2_coco model, we shall be downloading the corresponding ssd_inception_v2_coco.config file.
Apart from the configuration file, we also need to download the latest pre-trained NN for the model we wish to use.
This can be done by simply clicking on the name of the desired model in the tables found in TensorFlow’s detection
model zoo. Clicking on the name of your model should initiate a download for a *.tar.gz file.
Once the *.tar.gz file has been downloaded, open it using a decompression program of your choice (e.g. 7zip,
WinZIP, etc.). Next, open the folder that you see when the compressed folder is opened (typically it will have the
same name as the compressed folded, without the *.tar.gz extension), and extract it’s contents inside the folder
training_demo\pre-trained-model.
Now that we have downloaded and extracted our pre-trained model, let’s have a look at the changes that we shall need
to apply to the downloaded *.config file (highlighted in yellow):
# SSD with Inception v2 configuration for MSCOCO Dataset.
# Users should configure the fine_tune_checkpoint field in the train config as
# well as the label_map_path and input_path fields in the train_input_reader and
# eval_input_reader. Search for "PATH_TO_BE_CONFIGURED" to find the fields that
# should be configured.
model {
ssd {
num_classes: 1 # Set this to the number of different label classes
box_coder {
faster_rcnn_box_coder {
y_scale: 10.0
x_scale: 10.0
height_scale: 5.0
width_scale: 5.0
}
}
matcher {
argmax_matcher {
matched_threshold: 0.5
unmatched_threshold: 0.5
ignore_thresholds: false
negatives_lower_than_unmatched: true
force_match_for_each_row: true
}
}
similarity_calculator {
iou_similarity {
}
}
anchor_generator {
(continues on next page)
28 Chapter 3. Training Custom Object DetectorTensorFlow setup Documentation
(continued from previous page)
ssd_anchor_generator {
num_layers: 6
min_scale: 0.2
max_scale: 0.95
aspect_ratios: 1.0
aspect_ratios: 2.0
aspect_ratios: 0.5
aspect_ratios: 3.0
aspect_ratios: 0.3333
reduce_boxes_in_lowest_layer: true
}
}
image_resizer {
fixed_shape_resizer {
height: 300
width: 300
}
}
box_predictor {
convolutional_box_predictor {
min_depth: 0
max_depth: 0
num_layers_before_predictor: 0
use_dropout: false
dropout_keep_probability: 0.8
kernel_size: 3
box_code_size: 4
apply_sigmoid_to_scores: false
conv_hyperparams {
activation: RELU_6,
regularizer {
l2_regularizer {
weight: 0.00004
}
}
initializer {
truncated_normal_initializer {
stddev: 0.03
mean: 0.0
}
}
}
}
}
feature_extractor {
type: 'ssd_inception_v2' # Set to the name of your chosen pre-trained
˓→ model
min_depth: 16
depth_multiplier: 1.0
conv_hyperparams {
activation: RELU_6,
regularizer {
l2_regularizer {
weight: 0.00004
}
}
initializer {
(continues on next page)
3.5. Configuring a Training Pipeline 29TensorFlow setup Documentation
(continued from previous page)
truncated_normal_initializer {
stddev: 0.03
mean: 0.0
}
}
batch_norm {
train: true,
scale: true,
center: true,
decay: 0.9997,
epsilon: 0.001,
}
}
override_base_feature_extractor_hyperparams: true
}
loss {
classification_loss {
weighted_sigmoid {
}
}
localization_loss {
weighted_smooth_l1 {
}
}
hard_example_miner {
num_hard_examples: 3000
iou_threshold: 0.99
loss_type: CLASSIFICATION
max_negatives_per_positive: 3
min_negatives_per_image: 0
}
classification_weight: 1.0
localization_weight: 1.0
}
normalize_loss_by_num_matches: true
post_processing {
batch_non_max_suppression {
score_threshold: 1e-8
iou_threshold: 0.6
max_detections_per_class: 100
max_total_detections: 100
}
score_converter: SIGMOID
}
}
}
train_config: {
batch_size: 12 # Increase/Decrease this value depending on the available memory
˓→(Higher values require more memory and vice-versa)
optimizer {
rms_prop_optimizer: {
learning_rate: {
exponential_decay_learning_rate {
initial_learning_rate: 0.004
decay_steps: 800720
decay_factor: 0.95
(continues on next page)
30 Chapter 3. Training Custom Object DetectorTensorFlow setup Documentation
(continued from previous page)
}
}
momentum_optimizer_value: 0.9
decay: 0.9
epsilon: 1.0
}
}
fine_tune_checkpoint: "pre-trained-model/model.ckpt" # Path to extracted files of
˓→pre-trained model
from_detection_checkpoint: true
# Note: The below line limits the training process to 200K steps, which we
# empirically found to be sufficient enough to train the pets dataset. This
# effectively bypasses the learning rate schedule (the learning rate will
# never decay). Remove the below line to train indefinitely.
num_steps: 200000
data_augmentation_options {
random_horizontal_flip {
}
}
data_augmentation_options {
ssd_random_crop {
}
}
}
train_input_reader: {
tf_record_input_reader {
input_path: "annotations/train.record" # Path to training TFRecord file
}
label_map_path: "annotations/label_map.pbtxt" # Path to label map file
}
eval_config: {
num_examples: 8000
# Note: The below line limits the evaluation process to 10 evaluations.
# Remove the below line to evaluate indefinitely.
max_evals: 10
}
eval_input_reader: {
tf_record_input_reader {
input_path: "annotations/test.record" # Path to testing TFRecord
}
label_map_path: "annotations/label_map.pbtxt" # Path to label map file
shuffle: false
num_readers: 1
}
Once the above changes have been applied to our config file, go ahead and save it under training_demo/
training.
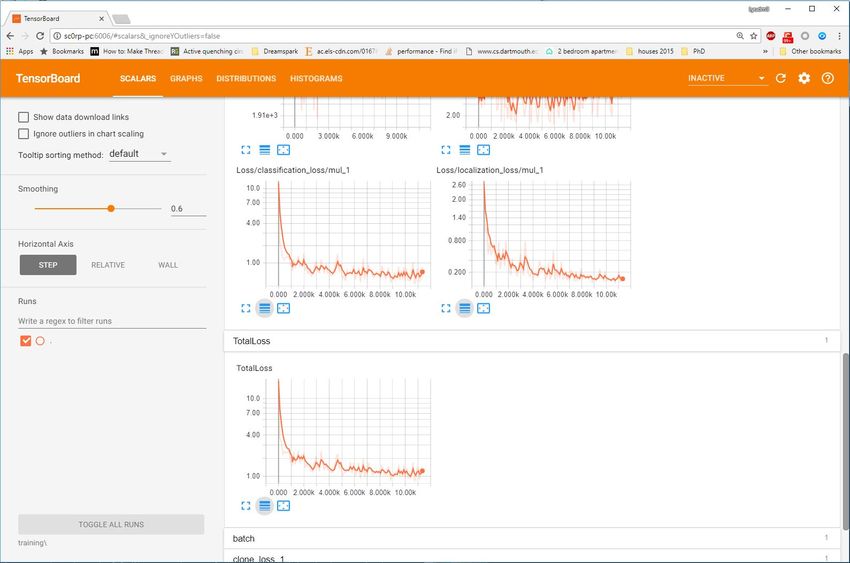
3.6 Training the Model
Before we begin training our model, let’s go and copy the TensorFlow/models/research/
object_detection/legacy/train.py script and paste it straight into our training_demo folder.
3.6. Training the Model 31You can also read