The plumbing basics - Sanware & Plumbing
←
→
Page content transcription
If your browser does not render page correctly, please read the page content below

The plumbing
                               basics
• Tools

• Plumbing emergencies

• Fixing a dripping tap

• Replacing a tap

• Fixing a leaking toilet

• Installing a shower

• Replacing a kitchen sink

• Fitting a dishwasher or
  washing machine

• Green tips

                             Sanware & Plumbing   1
2
Contents

   Tools ............................................................................................ 2

   Plumbing emergencies ....................................................................         5

   Fixing a dripping tap ....................................................................... 12

   Replacing a tap ............................................................................. 15

   Fixing a leaking toilet ...................................................................... 17

   Installing a shower .......................................................................... 20

   Replacing a kitchen sink ................................................................... 25

   Fitting a dishwasher or washing machine ............................................ 30

   Green tips ..................................................................................... 32

                                                                                                          1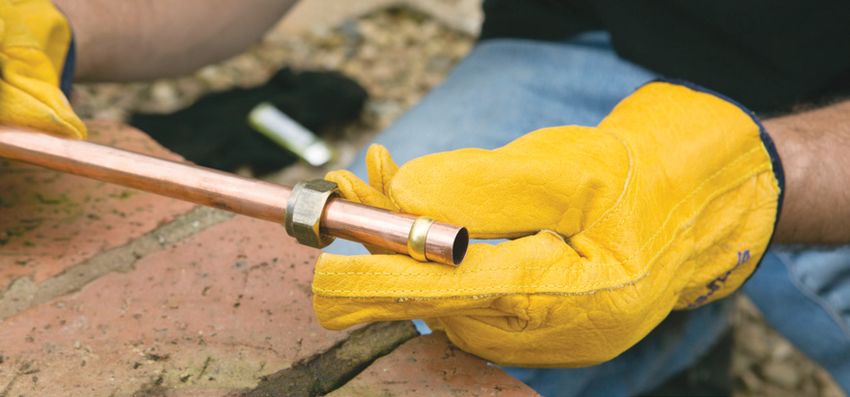
Tools
    GENERAL TOOLS
PIPE WRENCH                      SHIFTING SPANNER
                                                                     When using a pipe
                                                                     wrench, always pull it
                                                                     towards you as you’re
                                                                     less likely to damage your
                                                                     knuckles if it slips.

                                                                 BASIN WRENCH

Also known as a monkey
wrench or ‘bobbejaan spanner’.
It is best to have two pipe
wrenches in your toolbox when    Also known as an adjustable
doing DIY plumbing. However,     wrench. The jaws are flat and
do not use them on nuts as       can be used on nuts and bolts
you will damage them. The        as well as copper compression   Also known as a sink wrench,
wrenches are designed for        fittings.                       the jaws are perpendicular to
firmly gripping couplings and                                    the handle. Designed for use in
thick-walled pipes.                                              awkward or small spaces.
2
SLIP-JOINT PLIERS CAULKING GUN
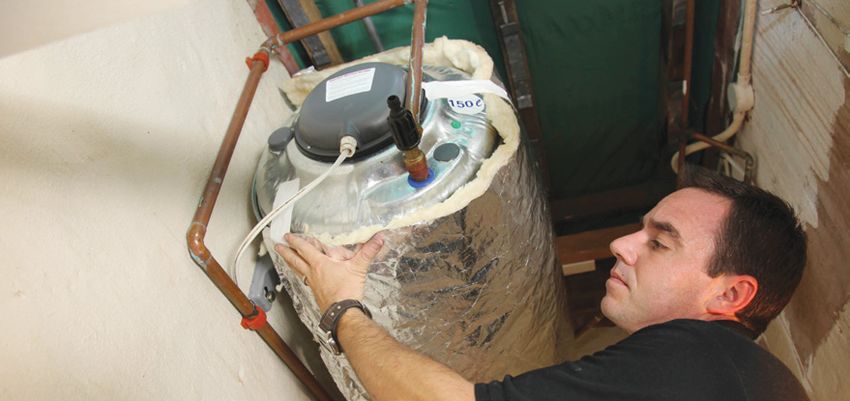
COPPER PIPE TOOLS
TUBE CUTTER
Used to evenly dispense
silicone, adhesive or filler.
Also known as water-pump
pliers, the slip-joint pivot of ELECTRONIC METAL
these allows for a wider range DETECTOR
of sizes to be gripped.
TORCH
Also known as a pipe cutter, it
is used for easily cutting copper
and plastic pipes to length.
SOLDERING TORCH
Also known as a wall scanner,
it is used to detect electrical
Often plumbing work needs to cables and water pipes behind
be done in dark spaces. Ensure walls so you can expose the
you have a headlamp or torch right ones and avoid chiselling
to make the job easier. through electric cables.
TAP WASHERS PLUMBER’S TAPE
These come in all shapes and Also known as thread seal tape This differs from a soldering
sizes and are needed to stop and PTFE tape, used to create iron by having a live flame.
taps leaking. Keep a few a seal when screwing plumbing Used for heating copper pipes
sizes on hand so that you can fittings together. It is wrapped and couplings to solder them
fix those leaking taps without around the threads on the male together. (Can also be used
wasting petrol on visiting the fitting. for making crème brûlée in an
shops again. emergency.)
3
SOLDER
                                        SAFETY GEAR                SAFETY TIPS
                                                                   • Gather all necessary
                                                                     tools before starting
                                                                     a job.
                                                                   • Remember that water
Soft metal wire that melts and                                       and electricity make a
flows when heated. Used to                                           dangerous combination,
joint metal pipes together.                                          so call in a professional
                                                                     to deal with jobs that
FLUX                                                                 involve both, such as
                                    • Safety glasses                 geyser installation.
                                                                   • Wash hands and tools
                                    • Long sleeves and pants
                                                                     thoroughly after any
                                      are best
                                                                     plumbing job involving
                                    • Gloves when soldering          drains and waste water.
                                      and cutting pipes
                                                                   • Use gloves when
                                                                     soldering to protect your
                                                                     hands from the heat of
                                  WIRE BRUSH                         the pipe and any
‘Painted’ onto a joint before                                        dripping solder.
soldering, this allows the
                                                                   • When using a soldering
molten solder to spread evenly
                                                                     torch, hold the nozzle
throughout the joint.
                                                                     away from you and
                                                                     other people when
DEBURRING TOOL                                                       lighting it. Also
                                                                     remember that it will
                                                                     remain hot after being
                                                                     turned off and so must
                                                                     be put where it can’t
                                                                     cause harm.
                                  Used for scuffing the inner      • Molten solder behaves
                                  surface of copper couplings        like a liquid and will
                                  before soldering them so the       burn any skin or
                                  solder will hold fast.             clothing it comes into
                                                                     contact with.
                                  EMERY SPONGE                     • When soldering, always
                                                                     keep a fire extinguisher
                                                                     and a bucket of water
                                                                     close by to deal with
                                                                     emergency fires or burns.

Cleans up (deburs) the cut
edges of metal pipes. The
same can be achieved by           A mild abrasive sponge used to
scraping the metal handle of      clean metal before soldering.
pliers around the inside of the   Normally used after a wire
pipe.                             brush.
4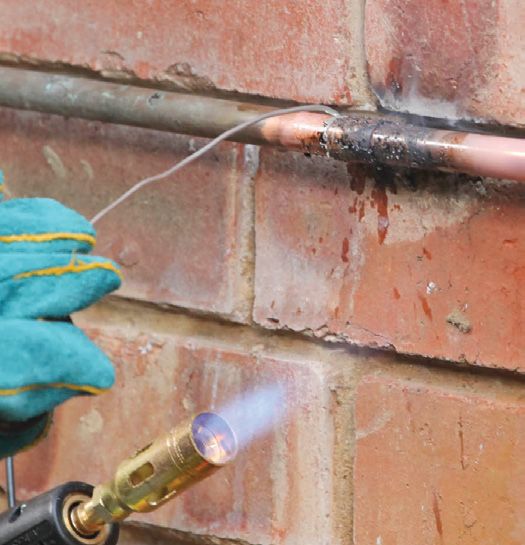
Plumbing emergencies
BLOCKED SINK                                                                 1 PERSON   1     3     5

                                                                   1 HOUR                   SKILL

  HOW TO
                                                                            What you
                                                                            will need:
                                                                       - Bucket

                                                                       - Plunger

                                                                   Chemical drain cleaners
                                                                   are handy for dealing
                                                                   with partial blockages.
                                                                   However, they are very
                                                                   dangerous and can cause
    1                                  2                           harm if not used correctly.
                                                                   Never pour drain cleaner
                                                                   into a sink with water in
1 Using your fingers, fish out any 2 Empty the basin so at most    it, and never use one in
hair or other substances you see   it is half full and place the   conjunction with a plunger.
sitting in the plug hole.          plunger over the plug hole.
                                                                                                        5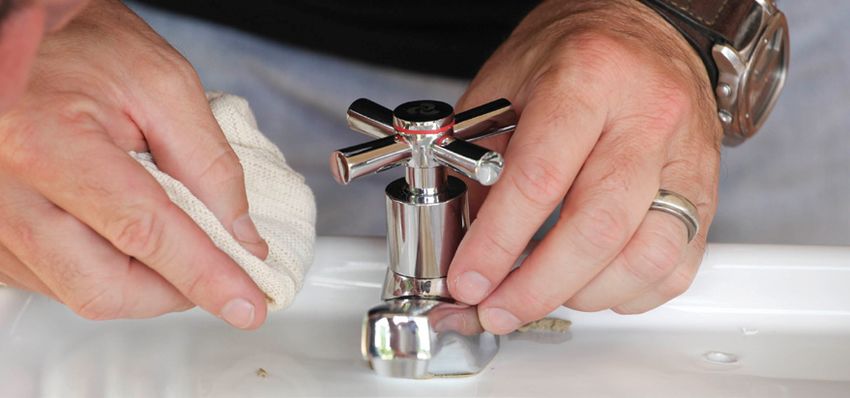
If you have removed the
                                       trap under a sink or basin
                                       and need to pop out to
                                       buy more materials, plug
                                       the open drain with a
                                       damp rag to prevent any
                                       sewer gases and odours
                                       from coming into your
                                       home. Flush the pipe with
                                       water immediately after
     3                                 replacing the trap.
                                                                          8

3 Block off the overflow, if                                          8 Replace the P-trap and run
there is one, with a damp                                             the taps to flush away any last
rag. Gently force the air out of                                      bits of blockage and check for
the plunger so it forms a seal                                        leaks.
around the plug hole. Pump the
plunger up and down quickly
five or so times and then lift it
out of the sink and see if water
flows down the drain.

 4    Repeat step 3 as many             6
as six times.

                                    6 Place a bucket under the trap
                                    and undo it, letting any water        9
                                    flow into the bucket.

                                                                      9 Wash your hands and
                                                                      equipment well (including the
                                                                      plunger), and sterilise them to
                                                                      ensure no germs from the drain
                                                                      are spread in your home.

                                                                         NOTE
                                                                         If you can’t see what’s
     5                                  7                                causing the blockage,
                                                                         it’s time to call in a
5 If the sink remains blocked,      7 Remove the trap and clean          professional to sort out
unscrew the S, P or U-trap          any blockage out of it and the       the problem.
under the sink with a pipe          drainpipe. Use a torch so you
wrench.                             can see into the pipe.
6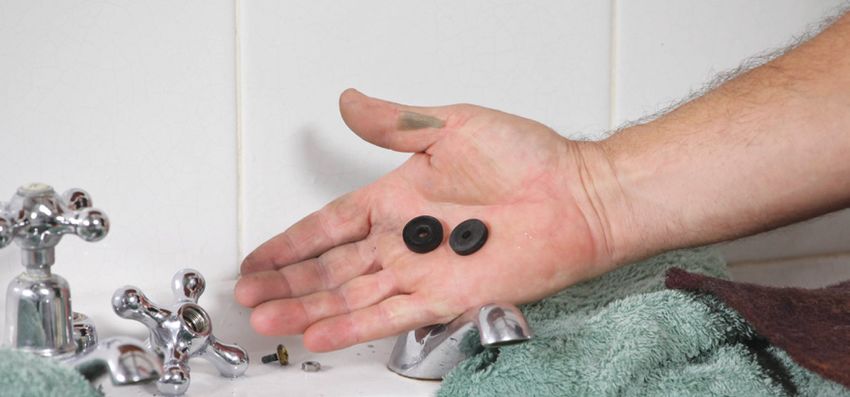
LEAKING WATER PIPE (OR NO WATER)                                                                       3     5
                                                                                      1 PERSON   1
There are many reasons for taps not producing water. You might
                                                                                                     SKILL
have a leak or a burst pipe, or the mains supply might have been           1 HOUR

switched off for local municipal maintenance. But there are ways
of seeing whether you can fix the problem. For one thing, you will
probably notice an indoor leak before discovering you have no
water.                                                                              What you
                                                                                    will need:
  HOW TO FIND THE LEAK                                                       - Tube cutters

                                                                             - 2x capillary slip
                                                                               couplings
                                           SAFETY GEAR
                                           • Safety glasses                  - Wire brush
                                           • Gloves
                                                                             - Emery sponge or cloth
                                           • Long sleeves
                                                                             - Flux

                                                                             - Soldering torch

                                                                             - Solder

                                                                             - Rag
    1                                  3
                                                                             - Piece of pipe
1 Identify which taps don’t have   3 Check your water meter to
water and check the garden         see if it is running. If it is not
for any water welling around       then the problem is on the
possible underground leaks.        municipal side of the meter.
                                   Call to report the fault and
                                   find out if maintenance work is
                                   being done in the area.

    2
                                       4                                    5
2 If you cannot see a leak you
can often hear one, so listen at   4 Trace your water pipes into        5 When you find the leak,
the pipe entering the building     the house, checking the ground       mark the spot (if not obvious),
and you might get an idea of       for dampness and ensuring all        and turn off your mains water
where the leak is.                 shut-off valves are open.            supply.
                                                                                                                 7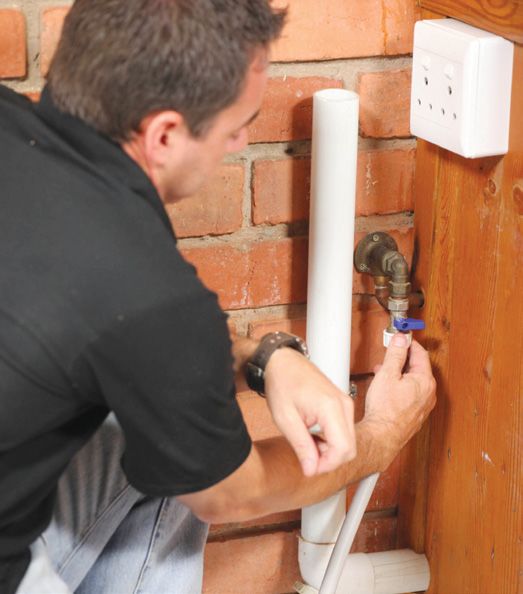
HOW TO REPAIR THE LEAK
Our leak could be fixed with the insertion of a new section of
pipe soldered in place.
                                                                              Soldering a pipe that is
                                                                              full of water will result in
                                                                              popping and crackling
                                                                              (due to the water boiling),
                                                                              and generally also a
                                                                              leaky joint. Where you
                                                                              can’t empty the pipe
                                                                              it’s advisable to use
                                                                              compression fittings as
                                                                              they don’t need soldering.

     1

1 Empty the water from the
leaking pipe by turning on the
downstream tap closest to the                                                 4
leak and letting it run until water
stops coming out.
                                                                          4 Debur both cut ends of the
                                                                          pipe and clean them on the
                                                                          outside with emery cloth.

                                          3

                                      3 Using tube cutters, cut through
                                      the pipe on either side of the
                                      leak and remove the leaky
                                      section. Water might still come
                                      out of the pipe. Dry it off. If
                                      water continues to drip from it,
                                      then ball up some bread and
                                      shove it into the pipe to absorb
                                      the water while you continue
                                      working.
    2                                                                         5
                                       REMEMBER YOU WILL HAVE
2 Decide how best to repair            TO TURN ON THE WATER TO            5 Cut a new piece of pipe the
the pipe -- either with a new          WASH OUT THE BREAD BEFORE          size of the section you have
section, by creating a joint           CONNECTING THE SECOND              removed. Clean and debur
at the leak, or by installing a        INLINE CONNECTOR.                  each end of it to receive the
shut-off valve.                                                           inline connectors.
8
6 8
6 Clean the insides of both 8 Insert the new pipe with connectors into the gap and slide the
ends of each connector with connectors onto the existing pipe to joint everything together.
emery paper wrapped around Ensure that you use the correct connector and not regular
your little finger. couplings, which won’t slide completely onto the pipe. Make sure
the original pipe ends are fully inserted into the connectors. To
make this easier, mark the pipe with a pen at the correct depth.
10
7 9
10 Light your soldering torch
(with the gas turned low),
7 Apply 20 mm of flux to the 9 Unroll 20 cm of solder and making sure it faces away
outsides of both ends of the bend a hook into the end. This from all flammable objects and
new piece of pipe and push is so you will be able to melt people. If there is a dry wall
the connectors onto them, using about 2 cm of solder into each or wooden cupboard behind
a twisting motion to spread the joint. the part you are heating, place
flux evenly. Spread flux onto fireproof cloth behind the
the two ends of the cut pipe as pipe to prevent the flame from
well. damaging it.
9Practise soldering using
a piece of scrap pipe
before embarking on this
procedure if you have
never done it before.
11
11 Heat the fitting and pipe and try to avoid burning the flux (as
it will prevent the joint from sealing).Touch the end of the solder
to the joint until it begins to melt. Remove the flame and press the
solder onto the joint until about 2 cm has been drawn into it.
13
13 Before it solidifies, wipe
away any excess solder and
flux with a dry rag. But be
careful: the pipe and solder
will be hot.
14
14 Repeat for both sides of both
connectors.
12 15 Let the pipe cool
completely before turning on
12 When this is done properly, the solder should spread around the water and checking for
the joint leaving a small visible bead. leaks around your joint.
10BURST GEYSER
1 PERSON 3 5
1
Water is pouring through your house. Your carpets are ruined, your
wood is swelling. What is the first thing you should do when your 1 HOUR SKILL
geyser bursts?
HOW TO
Don’t forget to have your
homeowner’s insurance
policy number handy.
5 Phone your insurance
company to find out if they
have recommended geyser
repairers and phone the
professionals to come and sort
it out. Geysers use both water
1 and electricity so it is best
to get experts in to solve the
problem.
1 Turn off the main household electrical switch (usually found on
your distribution board, often in the kitchen or passage) and turn
off the water mains (or the shut-off valve that feeds the geyser).
2 Move children and
animals to a safe place.
6
6 Take pictures for insurance
purposes and clean up the
water. Open windows and
doors to help with evaporation.
3 4
3 Open all your hot water taps 4 Lay towels around the edge
7 Remember to shut off your
to help empty the geyser and of the flooded area to prevent hot water taps before turning
stop further water damage. the water from spreading the mains water on again after
further. the geyser has been fixed.
11Fixing a dripping tap
HOW TO 1 PERSON 1 3 5
1 HOUR SKILL
What you
will need:
- Shifting spanner
- Cloth
- Screwdriver
(old one)
- Water pump
2 pliers
- Washer or washer-
1 2 When water stops flowing and-jumper unit,
out of the tap, plug the hole in
the sink/basin to prevent losing or washer and
1 Turn off the water to the small items down the drain, seating set
dripping tap and turn on the and place an old towel in the
tap to release any water in the sink to prevent it from being - Scouring pad
system. Leave the tap open. damaged by dropped tools.
123 5
3 Expose the screw holding 5 Using a spanner, undo the nut around the headpiece assembly,
the handle of the tap in place holding the tap body firmly as you do so to prevent it from turning
by levering off the hot/cold on the basin (which could cause other leaks).
button and undo it to remove
the handle.
4 6
4 Cover the nose of your 6 Remove the part holding the washer (tap jumper). Unscrew the
spanner with tape so it won’t nut holding the washer in place using water pump pliers. Make
scratch the finish on your tap. sure no pieces of old washer are left in the body of the tap. Give
the whole assembly a rub with a scouring pad to remove any
debris sitting on the thread.
13If the washer seat is pitted
you should fix it with a
reseating tool. Alternatively,
replace the tap.
7
7 Fit the new washer and replace and tighten the nut holding it to
the jumper. 9
9 Close the tap and turn on the
water supply. Before opening
the tap, see if the leak has
stopped, then test to see if
water comes out of the tap.
cold button
8 10
8 Place the jumper back in the headpiece assembly and replace 10 Replace the hot/cold button.
this in the tap body. Tighten it in place with a spanner. Refit the
handle and tighten the nut/screw that holds it in place.
14Replacing a tap
HOW TO 1 PERSON 1 3 5
1 HOUR SKILL
What you
will need:
- New tap
- Flexi connector
- Plumber’s tape
- Plumber’s putty
- Plumber’s wrench
- Shifting spanner
1
- Basin wrench
1 Turn off the water to the tap and lay a towel in the basin to
- Rag
protect it from your tools. Put a bucket under where you’ll be
working.
152 5 8
2 Disconnect the flexi connector 5 Place a roll of plumber’s putty 8 Turn on the water supply and
supplying water to the tap around the inner edge of the test the tap for leaks.
and let any water run into the base of the tap (to prevent
bucket. water leaking past it into the
cupboard below) and position
the tap on the basin.
3 6 9
3 Using the basin wrench, 6 Fasten it to the basin via the 9 Wipe any excess plumber’s
unscrew the nut under the basin nut underneath, using the basin putty away.
that holds the tap in place and wrench to tighten it well.
remove the tap (you might need
to lever it off its seating with a
screwdriver).
If you are replacing
a hot water tap, with
luck you’ll find a shut-off
valve between it and the
geyser. If you don’t, then
you will have to shut off
7 the water supply to the
geyser. Don’t worry about
4 switching off the electricity
7 Attach the flexi connector to because the geyser will
the tap inlet. Make sure that never drain completely.
4 Assemble the new tap as per the nut is tight as the connector Just open the hot water
the manufacturer’s instructions uses a rubber washer to make tap and wait till it stops
and make sure it fits in the hole a seal (no need for plumber’s running.
in the basin. tape here).
16Fixing a leaking toilet
LEAKING INTO THE BOWL
1 PERSON 3 5
1
Toilet cisterns used to overflow through a pipe that led outdoors, so
it was obvious when they were leaking. Modern cisterns overflow 1 HOUR SKILL
into the toilet bowl. This is a great advancement but means you
could be wasting water (and therefore money) by not noticing
and fixing a leaking toilet. Look into your toilet bowl. If water is
dribbling down the sides and you haven’t recently flushed it, then What you
will need:
you have a leak.
- Screwdriver
HOW TO
1 Remove the lid of the
cistern.
2 Check your float. This is
linked to the inlet valve and
controls the level of the water
in the cistern. If you have a
leak, the water level could be
too high, in which case all you
need to do is get the float to
close the inlet valve at a lower
water level. Is this the case? To
find out, lift the float slightly and
2 gently. If water stops flowing
into the cistern, it is.
17LEAKING FROM THE OUTLET PIPE
If water is dripping down the back of the toilet or there are brown
stains down the back, then you might need to replace the wax
seal between the toilet and the outlet pipe. This is an unpleasant
job but easy and quick to do.
HOW TO 1 PERSON 1 3 5
1 HOUR SKILL
What you
will need:
- Bucket
- Cup
- Wax seal
- Cleaner
1 Give your toilet a good
clean and sterilise it.
- Paper towels
2 There is no need to - Clean cloths
switch off any valves because
you will be working on the
outlet, just don’t flush the toilet
while you are busy.
3
3 Using a screwdriver, tighten
the screw above the float so
that it closes the inlet valve
sooner (you might have to flush
and refill the cistern a couple of
times before you get it right). 4
4 With the cistern full, test 4 Pull out the old seal – try
3
the float by pushing it down and get all of it out. If you are
slightly. Water should spray unable to, then use the bits
into the cistern. Release the 3 Put an old towel under the left behind to provide extra
float and it should stop. Once joint to catch any dripping sealing. Just don’t leave any
this has been achieved you will water and minimise the amount discoloured, saturated wax in
have fixed your leaking toilet. of clean up. there as it won’t seal well.
18SAFETY GEAR
To finish the seal off
neatly, pour some soap
on your hands and wipe
them over the wax to
smooth it. This will also
5 help with cleaning your
hands afterwards.
• Rubber gloves
5 Dry the area thoroughly with
an old cloth.
6 8
6 Gently break the new wax seal and pack it around the joint. 8 Flush the toilet and check for
This can get quite messy but make sure the wax is packed in leaks. If there is one, remould
firmly all the way around and there are no gaps. the wax to fill the gap.
9 Wash all your equipment
well and sterilise it with Dettol.
If the gap between the
toilet and the outlet pipe
is big, roll up some old
newspaper and use it
7 to caulk the gap so you
don’t waste too much
wax.
7 Wipe excess wax off with paper towels and remove any that
got onto the outside of the pipe or toilet with a detergent.
19Installing a shower
HOW TO What you
will need:
5
2 PEOPLE 3
- Shower tray
1
2 DAYS SKILL
- Shower doors
- Shower taps
- Silicone sealer
- Chisel (if taking
off tiles)
- Shifting spanner
- Sugar soap
- Sandpaper
1 2
- Paint and roller
1 Plan what you want to keep 2 Take out the old fittings and - Shower head
from the old shower in the gut the area. We removed the
- Pipe wrench
way of pipes and fittings and shower base (which was built
decide whether you need to in), wall tiles and fittings. - Plumber s tape
change their position.
20FITTING THE TAPS
If you are just updating
the look of your taps, you
might be able to avoid
exposing the previously
chased pipes. All that
might be necessary is
to clean and dry the
threads on the pipes,
wrap plumber’s tape
4 around them to seal
the connections, and
3 then screw on your new
4 Remember to plug any open fittings.
drains so you don’t end up
3 Reroute pipes where inadvertently flooding your
necessary, chasing them into bathroom when using other
the walls. Expose old chased showers and baths in the
pipes in order to move fittings. house.
CHASING PIPES
This is when you hide the check it thoroughly for leaks However, if you are
pipes below the surface before plastering over the changing the type of
of the wall. Use an angle pipes and using a steel float tap, you might need to
grinder to define the edges to create a smooth finish for expose previously chased
of the chase channel, and painting or tiling. Before you pipes in order to change
a chisel and hammer to tile or paint the walls (and the fittings on them and/
quarry out the channel. base, if concrete) make sure or create more space for
Put together as much of you’ve sealed them with a the new taps. Once these
the pipework as possible bonding liquid or sealing are installed, check for
before placing it into agent. leaks before plastering
the channel. Once it’s and smoothing the wall.
connected, remember to
21SHOWER TRAY AND DRAIN WALL COVERING
5 8
5 Plan the height above the 8 We chose to tile the area
floor you want your shower tray with standard white tiles and
to stand and install the P-trap white grout. If you have a
to the drainpipe and then the smooth wall you can use
washer and connectors so that Plascon’s Bathrooms & Kitchens
everything is in position for the paint instead of tiling.
tray.
FITTING YOUR SHOWER HEAD
6
6 Stuff a wet rag into the drain
to prevent any debris from
falling into and blocking your
waste water pipes.
9
9 Clean and dry the shower
arm projecting from the wall.
11
7 11 Wrap plumber’s tape
10 clockwise around the thread
on the shower arm. Make sure
7 Position the tray in place and to wrap it on tightly so that
fit the waste outlet to the tray 10 Assemble the shower head it sinks into the threads and
along with the rubber pipe that according to the instructions that to use an unbroken piece of
came with the tray. come with it. tape.
22INSTALL SHOWER CUBICLE
12
12 Screw the new shower head onto the arm.
15
15 Construct the frame as per
the manufacturer’s instructions
and place glass into the seal.
A shower nozzle should
be 2 m to 2.1 m above
the tray, depending on
the height of the tallest
family member.
13 14 16
13 Direct the head away from 14 If there is a leak at the joint, 16 Position the complete cubicle
you and into a bucket and use a cloth and spanner to on the shower tray with the
test to see if you have sealed tighten the head more. doors closed to ensure it fits
the joint fully and whether the well. You might need help
shower head is working well. holding it in place.
23SEALING YOUR CUBICLE
Wrap tape around the
nose of your wrench to
prevent it from scratching
new fittings.
REROUTING PIPING
17 19 Choose the shortest run
for the pipes and use the
straightest course to prevent
17 Place one of the frame 19 Use anit-mould silicone sealer heat and pressure loss.
sections on the one wall, to seal along all edges and Make sure that you do not
resting it on the corner of the around all corners, smooth off bypass any crucial valves,
shower tray, and mark where bead with a finger. Make sure such as pressure reducing
you need to drill holes in the you seal between tiles and tray valves, as if you do it will
wall to secure it. Drill and and the tiles and cubicle to be dangerous and could
secure with wall plugs and create a watertight enclosure. damage your geyser.
screws. Repeat on the other
wall.
For safety, try to route
the cold water pipe from
as close to the mains as
possible. If you don’t, other
people using cold water
in the house will affect the
temperature of your shower.
Someone flushing a toilet
could even lead to the
person in the shower being
18 20 scalded. The routeing of
the hot water pipe is not as
important, for if someone
18 Screw the shower door 20 Remove the wet rag from else uses hot water it will
hinge into place and check the drain and silicone edges only mean your shower
that the door lines up with the in the drain. Screw the outlet running colder, which is a
magnetic closing strip before strainer into place. comfort issue but not unsafe.
tightening completely.
24Replacing a kitchen sink
What you
HOW TO 2 PEOPLE 1
3
5
will need:
4 HOURS SKILL
REMOVE THE OLD SINK - New sink
- Taps
SAFETY GEAR
• Safety glasses - Water supply lines
- Plumber s putty/
2 Close the hot and cold silicone
shut-off valves and turn on the
taps to release pressure and - Plumber s tape
ensure the water is off.
- Torch
3 Place bucket under supply
line for water run out. - Rags
- Bucket
- Pipe wrench x2
1 - Basin wrench
If your sink has a few small - Pliers
rust spots, use inox cream
1 Take out everything (chemicals to polish them away and
- Drain connection: pipe,
and detergents) from under the washers, slip nut, T-piece,
you won’t have to replace
sink. Put them out of reach of P-trap, wall outlet
the whole sink.
children and pets. connector, elbow piece
254 6 7
4 Use two pipe wrenches to 6 Inside the cupboard, use a 7 Use a blade to cut through
release the compression fittings torch to see and unscrew the any sealant between the sink
for both the hot and cold taps. sink from the cupboard. and the countertop.
8
8 Get some help to lift the sink
off the counter, one person
lifting from the top and the
other pushing from inside the
cupboard, if necessary.
5
5 Use pliers to disconnect the drainpipe and P-trap from the sink 9
outlet. Water will flow out, so have the bucket handy. Remove any
dishwasher or washing machine pipes. If you are replacing the 9 Clean up the edges of the
piping, remove the old piping completely and block the drainpipe countertop and wall and if
through the wall with a wet rag to prevent any sewer gases from necessary cut a larger hole for
coming into your kitchen. the new sink to fit in.
26FITTING THE NEW DRAINPIPE
1O
10 Apply a roll of plumber’s
putty around the outlet hole
on the inside of the sink and
position the new waste outlet
fitting firmly on the putty.
14
14 The drainage system must be planned according to where your
11 main drain is. Construct as much of it as possible before fitting
the sink into the counter, as working space will be limited in the
cupboard. Attach most of it onto the sink before you install the sink.
11 Place the sink on its side and
tightly secure the fitting to the
bottom of the sink, using the
rubber gasket and flanged nut.
12 Repeat the process for the
second sink.
13 15
13 Remove excess putty from 15 Attach a washer, slip nut and tailpiece to the pipe for each sink,
around both fittings using a then join them via a T-piece. Attach a P-trap to the bottom of the
cloth. T-piece and route the pipe to the wall outlet.
27FITTING THE TAP INSTALLING THE NEW SINK
16
16 Assemble the mixer unit as per the manufacturer’s instructions
and wrap plumber’s tape around the threads where it will be
connected to the hot and cold inlet pipes.
20
20 Place the sink into the hole
left by the old one.
17
17 Position the mixer on the sink. You might need to cut a hole in
the sink if there isn’t one — you could use a hole saw designed for
metal, or a chassis punch.
19 Remove excess putty.
21
21 Screw extra struts in place to
Be very careful of
18 stainless steel edges they
create a good solid frame for
can be extremely sharp. the sink and slide it into place.
Wear gloves whenever You might need some help to
18 Fasten mixer to the sink using possible. do this with ease. You could
a basin wrench to tighten the add adhesive to the frame
nut well. before putting the sink in place.
28HOOKING UP THE WATER CONNECTING THE DRAIN
flexible pipe
22
22 Attach the supply lines to the
connector pipes of the mixer
using a compression fitting on
each line. 24 26
24 If you have trouble lining up 26 Run the water to check for
the P-trap and wall outlet you leaks.
could buy a flexible pipe to join
the two pieces. Before joining
them, remove the wet rag from
the pipe through the wall.
23 25
23 Place a container under the 25 Seal the gaps between the sink and the counter with silicone,
mixer and turn on the hot and wiping the sealant smooth to complete the seal and provide a
cold water to check for leaks. neat finish.
29Fitting a dishwasher
or washing machine
HOW TO 1 PERSON 1 3 5
1 HOUR SKILL
What you
will need:
- Flexible
water line
- Reducer
- Hose clamp
1
1 Identify the closest cold water tap and drain. 2 Screw the feeder pipe
onto the back of the washing
machine.
303 5
3 Attach the other end to the tap. The tap should have a thread, 5 Turn on the tap to the washing
if not you might need to replace it with one that does. The pipe is machine, set it on the rinse
usually designed to be attached without the use of tools. cycle and test for leaks.
Fit a reducer between
your drainpipe and
washing machine outlet
and never worry about a
flooded kitchen again.
4
4 Attach the pipe holder and place the end into the drain. Cable
tie in place. 31Green tips
• Lower your geyser • Only wash full loads in your • Taking a shower is more
temperature to save on washing machine. water-efficient than having
electricity costs. a bath as long as you don’t
• Although geysers come spend a long time in the
well insulated, extra insulation shower.
helps them retain the heat even • Change your shower rose for
longer and so reduce your one with a restrictor. This will
energy costs. allow you to enjoy your shower
• Minimise evaporation of while using less water.
irrigation water by using a drip • Modern toilet cisterns are
system instead of a sprinkler much smaller than older ones.
system. If you still have a large cistern,
• Insulate all your hot water wrap a brick or large stone in
pipes, both outside the house plastic and gently place it in
and in the ceiling. This is an the cistern. Less water will now
additional way to save you be needed to fill it, meaning
electricity. If your pipes are you’ll use less water to flush the
chased into the walls, the next • Use a cold wash cycle in loo too.
best thing is to insulate at least your washing machine to save • Install a dual-flush mechanism
three metres of them, starting at on electricity costs. in your cistern. There are many
the geyser. • A dishwasher is more water- times when only a half-flush is
efficient than hand washing, but adequate.
only when it has a full load.
• Don’t let the tap run while you
brush your teeth, you will waste
6-8 litres of water.
• Don’t let the shower run while
you are washing your hair.
3233
Disclaimer
            Builders’ booklets, DVD’s and other guides are provided strictly for informational purposes only. The
            information contained herein is intended to provide general information with regard to simple DIY
            projects. As products, laws and regulations are continually changing, Builders takes no responsibility
            for the accuracy of information contained herein or any liability for omissions, errors or the outcome of
            any project. It is the responsibility of the viewer/reader to ensure compliance with all applicable laws,
            rules, codes and regulations as the case may be. Safety is important, make sure to take proper safety
            precautions and exercise caution when taking on any DIY project. Always read the manufacturer’s
            instructions and heed their guidance for using their product. Certain products or materials may only
            be available at selected Builders stores. If there is any doubt regarding any element of a DIY project
            please consult a professional. Builders cannot be held liable for any loss, damage or injury that may
            result out of the use of the Builders’ booklets, DVD’s and other guides.
     ring side wa me
Floo ng out ature our ho

                                e
                            hom
Tilin solu your ll

              IY p ols
                           y

                         cts
                           n
 Pai g a lu garde

Pain ting a side of

          nd D ight to
Des garde ntials

Ligh mbing me

 We g the re
                     ics
Dec ng the lawn

                    roje
     osin ol ca
Sec your w ns

                   ho
                 bas
The g your s
Kee ing yo g

     urin all
                 fe

               tio
     ign nin
                se

                ur

                in

                 r
               sh

Cho ing po
Edib ing es

Sw g

     eke
    imm
      tin
     ora
     den

      plu
     pin
     nti

       ti
      le

      g
Gar
ALS
 O IN
  THE
      RAN
        GE

      34
You can also read