Stock Recorder USER MANUAL - Version 08.04.2013
←
→
Page content transcription
If your browser does not render page correctly, please read the page content below
Stock Recorder
                         USER MANUAL

Version 08.04.2013   1       www.shearwell.co.uk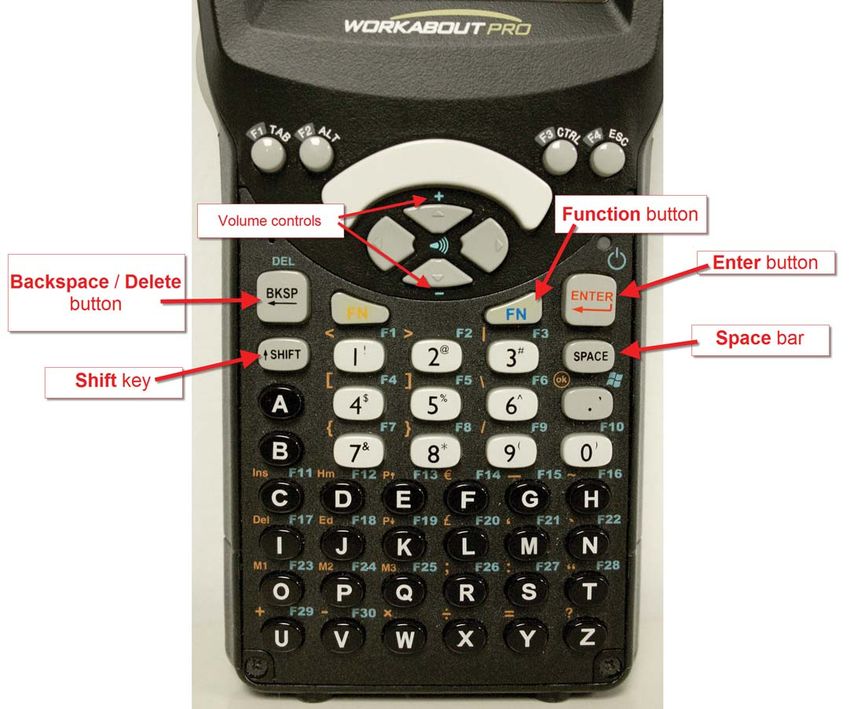
Care of the Stock Recorder
1. Do not use anything other than fingers or the stylus on the screen.
2. The screen has a thin screen protector on it. Replacements can be purchased from
   Shearwell.
3. The ba eries are expensive. Ba eries will inevitably degrade over me, but we are
   advised that they will last longer if not allowed to completely drain, or be le in a
   drained state for any length of me.
4. The Stock Recorder is fairly robust and should be able to tolerate normal use on
   the farm. However, please remember that it is an expensive piece of electronic
   equipment, and should be treated as such. It would be worth checking that it is
   covered by your farm insurance.

                                          2
Table of Contents

 Charging the Stock Recorder - Page 4                 Tupping or service - Page 35
         Changing the ba ery - Page 4                Medical treatments - Page 36
          Learn the keyboard - Page 5               Off-farm movements - Page 37
       Connec ng to your PC - Page 6                On-farm movements - Page 38
    Upgrading the so ware - Page 10                         Private sales - Page 39
           Learn the desktop - Page 11                         Fostering- Page 40
                 Main menu - Page 12                        Review data - Page 41
                     Op ons - Page 13               Management groups - Page 42
           Reading RFID tags - Page 15               Pregnancy scanning - Page 43
  Looking up animal records - Page 17                           Dra ing - Page 44
      Date and me se ngs - Page 20                           Wool score - Page 46
Transferring data with the PC - Page 21                 Mul ple ac ons - Page 47
    Opening Stock Recorder - Page 23                    Problem solving - Page 48
             Adding animals - Page 24          Manual Installa on Win 7- Page 49
                 Linking EIDs - Page 27       Manual Installa on Win XP- Page 53
       Overview of func ons - Page 28                G2 Psion keyboard - Page 57
          Lambing or calving - Page 29            Bluetooth connec ons - Page 58
                   Weighing - Page 33                        Contact us - Page 63

                      Copyright © 2013 Shearwell Data Ltd

                                          3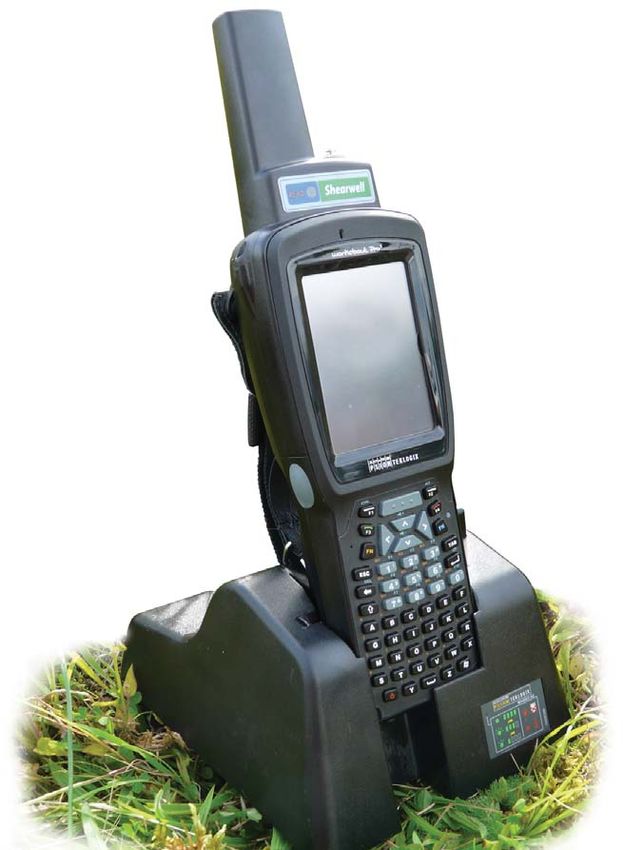
Charging the Unit
The Stock Recorder comes with a cradle (some mes called a docking sta on) that’s used for charging the
internal ba ery and for transferring data between the unit and the computer.

Charging the Stock Recorder

1. Connect the power cord to the port in the back of the cradle and plug the other end into the mains
   power.
2. Dock the Stock Recorder into the cradle to allow it to charge. A small green light on the front of the Stock
   Recorder will flash during charging.
3. Allow at least four hours to fully charge the ba ery from scratch.

Charging a spare baƩery

The cradle has a ba ery charger built into the back. When the Stock Recorder has only 5%
remaining charge then a warning screen will suggest recharging the unit or changing to a
new ba ery.

Changing the baƩery

Access the Stock Recorder ba ery by removing the panel on the back of the unit.
1. Exit FarmWorks and switch off the Stock Recorder.
2. Find the fasteners on the back of the unit,
   close to the bo om.
3. Turn the fasteners out and upwards.
4. Gently pry the panel from the bo om.
5. Pull out the ba ery and replace.

                                                       4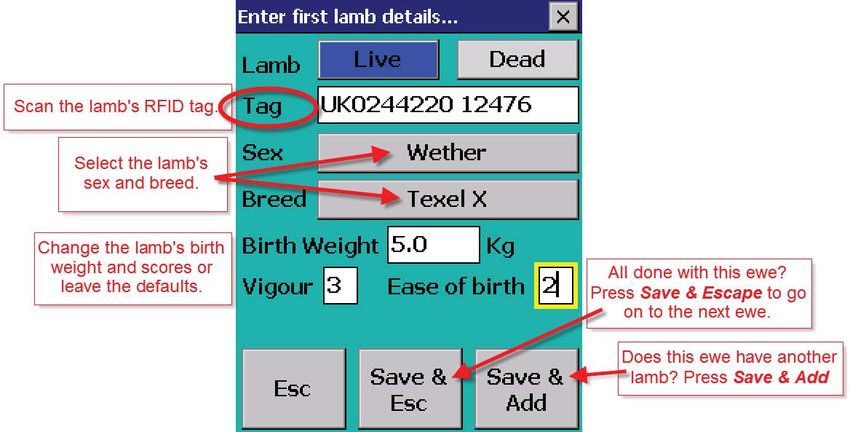
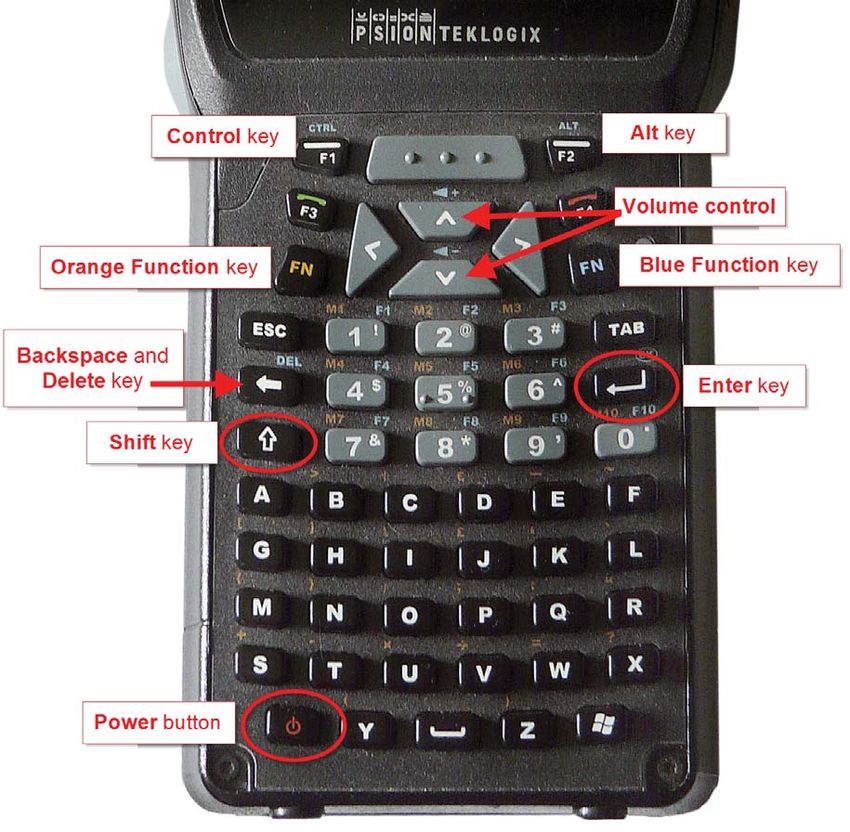
Learn the Keyboard

1. Switch on the Stock Recorder by holding down the Power bu on for a second.
2. Turn off by pressing the Power bu on once.
3. Press the ShiŌ key once to type a capital le er. Press the ShiŌ key twice to turn on Caps Lock so all le ers
   are capitalized. Press the ShiŌ key a third me to turn off Caps Lock.
4. To adjust the sound press the blue FuncƟon bu on twice, then press the + (plus) volume key in the centre
   to increase the volume or the - (minus) key to decrease the volume. Press the blue FuncƟon bu on once
   more when finished.
5. As a general rule the Enter bu on should be used to move from one field to another instead of tapping
   on the screen. This ensures that the data is processed and saved correctly.
6. If the keyboard stops func oning look on the bo om toolbar on the screen to see if the Ctrl, ShiŌ or Alt
   key has been le on by mistake. Push the offending key again to turn it off.

See Appendix lll for a diagram of the G2 Psion keyboard.

                                                      5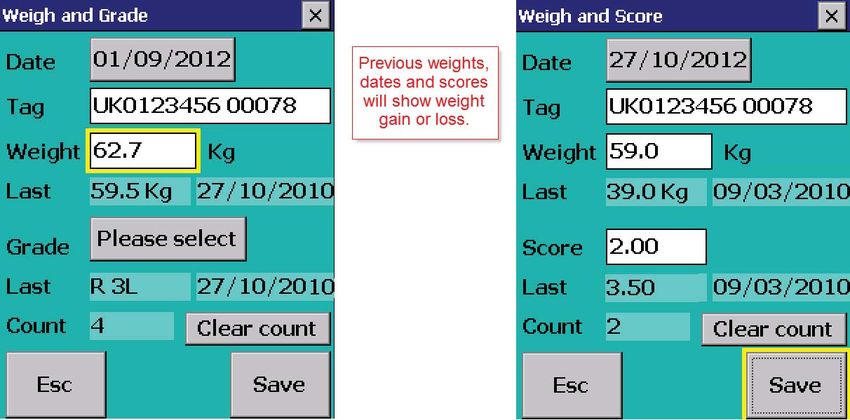
Connecting to Your PC for the First Time
To start the installa on process, switch on the Stock Recorder, seat it firmly in the cradle, and connect the
cradle to your PC with the USB cord provided (see diagram on page 4). When a Stock Recorder is despatched
the battery will have some charge, but it’s worth charging it fully and leaving it connected to the mains
throughout the installation procedure.

The FarmWorks CD contains both the FarmWorks so ware for the PC and the compa ble Stock Recorder so -
ware. To access the Stock Recorder so ware, insert the CD into your computer. Depending on the version of
Windows or par cular se ngs you have on your PC, you will be presented with various op ons.
AutomaƟc Setup

Windows 7 and Vista

Click on Install/Upgrade Stock Recorder.

Alterna vely you may be presented with the op on to run ‘RunFarmWorksCD.exe’ – if so, click on this and
choose the Install / Upgrade Stock Recorder op on.

The program should then proceed to set up any necessary files and se ngs required to establish a link between
the PC and Stock Recorder – please click ConƟnue where necessary and accept the Windows Mobile Device
Centre licence agreement

When prompted to set up a partnership
1. Select No, I want to synchronise with two computers > Next
2. On Select SynchronisaƟon Seƫngs screen, uncheck all op ons > Next

                                                     6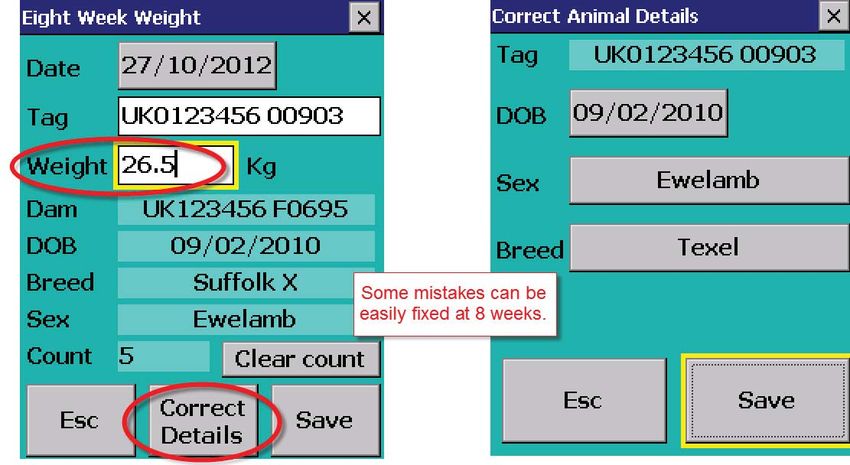
Connecting to Your PC for the First Time
3. In Ready to set up Windows mobile partnership screen give your stock recorder a name to make it easier
   to find on your PC.
4. Accept defaults > Set up

The stock recorder should then be fully connected and synchronised, ready to receive and send data to your
PC.

Manual InstallaƟon

Under certain circumstances it may be necessary to configure se ngs manually.
See Appendix l at the back of this manual for instruc ons.

                                                    7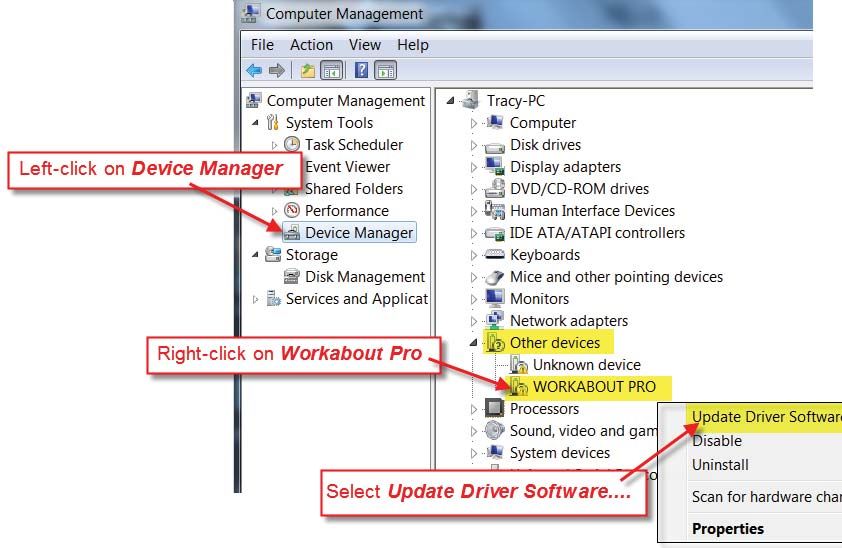
Connecting to Your PC for the First Time
AutomaƟc Setup

Windows XP

To start the installa on process, switch on the Stock Recorder, seat it firmly in the cradle, and connect the
cradle to your PC with the USB cord provided (see diagram on page 4). The FarmWorks CD contains both the
FarmWorks so ware for the PC and the compa ble Stock Recorder so ware. To access the Stock Recorder
so ware, insert the CD into your computer. Depending on the version of Windows or par cular se ngs you
have on your PC, you will be presented with various op ons.
Click on Install/Upgrade Stock Recorder.
Alterna vely you may be presented with the op on to run ‘RunFarmWorksCD.exe’ – if so, click on this and
choose the Install / Upgrade Stock Recorder op on.

The program should then proceed to set up any necessary files and se ngs required to establish a link be-
tween the PC and Stock Recorder.
1. On the Set Up MicrosoŌ AcƟveSync screen click Next.
2. On the Select InstallaƟon Folder screen click Next.

                                                      8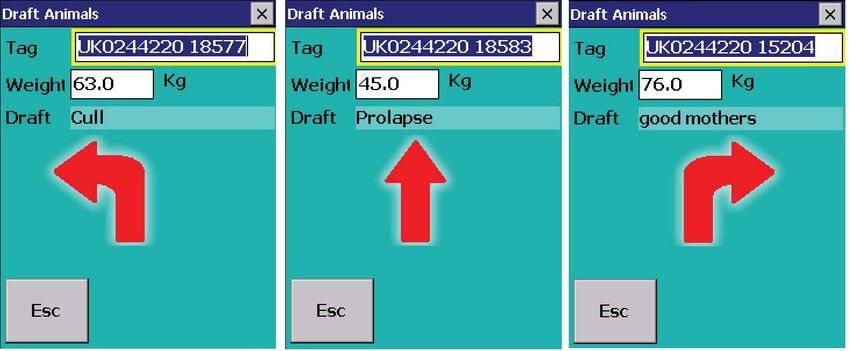
Connecting to Your PC for the First Time
3. Ac veSync will detect the Stock Recorder and show Set up Partnership window. Click Yes.
4. Select Number of Partnerships - Select “No. I want to synchronize with two computers”. Click Next.

5. On the “Select SynchronizaƟon” screen un-Ɵck all the op ons. Click Next.

6. Your Stock Recorder is now in partnership and connected to your computer. Click Finish. You are ready to
   transfer data back and forth from FarmWorks.

Manual InstallaƟon

Under certain circumstances it may be necessary to configure se ngs manually.
See Appendix ll at the back of this manual for instruc ons.

                                                     9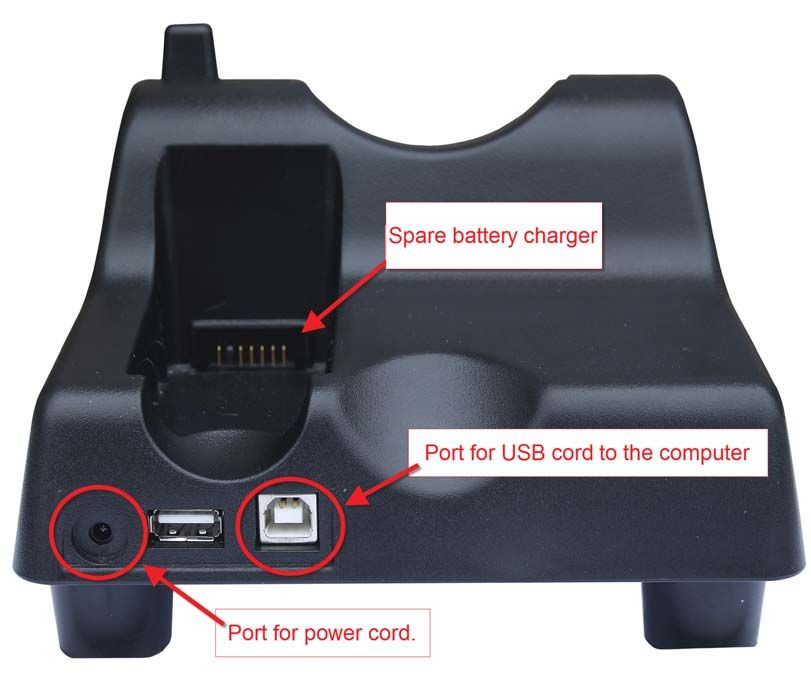
Upgrading the Stock Recorder Program

  Very important: The versions of Stock Recorder and PC FarmWorks soŌware on the CD you have
  been sent will be compaƟble. It is essenƟal that you upgrade both. Please consult the upgrade
  release notes accompanying the CD to see the latest versions.

  The latest version is always pre-installed when a Stock Recorder is despatched, so for newly
  received units it is not necessary to run the upgrade. As ever, if in any doubt, please contact the
  support department.

Note: The upgrading process will overwrite exisƟng data on the Stock Recorder handheld – if necessary
import any new data from the Stock Recorder to your PC before proceeding or that data will be lost.

1. A er impor ng, make a backup of your FarmWorks data on the PC (File>Backup)
2. Exit FarmWorks and close any programs running on your PC.
3. Connect the Stock Recorder handheld to the PC (if it’s not already) and switch it on.

The FarmWorks CD contains both the FarmWorks so ware for the PC and the compa ble Stock Recorder
so ware. To access the Stock Recorder so ware, insert the CD into your computer. Depending on the version
of Windows or par cular se ngs you have on your PC, you will be presented with various op ons.
AutomaƟc upgrade

1. If the program starts up automa cally, choose the Install / Upgrade Stock Recorder op on.
2. Alterna vely you may be presented with the op on to run ‘RunFarmWorksCD.exe’ – if so, click on this
   and choose the Install / Upgrade Stock Recorder op on.
3. The program should then proceed to upgrade any necessary files in Stock Recorder – you may be
   prompted to click ConƟnue where necessary.
4. Start up FarmWorks on the PC, go to Data Transfer and export from the PC to the Stock Recorder as
   normal.
5. Start up the program on the Stock Recorder and select the InformaƟon bu on.
6. Check that the version number matches the latest you have been sent – if it does, the upgrade was
   successful and the Stock Recorder is ready to use.

Note: You must do a data transfer from the PC to the Stock Recorder aŌer upgrading before you can use it!

Manual Upgrading

Under certain circumstances it may be necessary to configure se ngs manually. Please call Shearwell Support
for help with this process.

                                                     10
Learn the Desktop
The Stock Recorder is a computer running the Windows CE opera ng system. The desktop and many of the
func ons will be familiar to Windows users.
Basic controls
– The task bar at the bo om of the screen shows the Start bu on (Windows icon), the me (tap to view
the date) and several other icons.
– Press the small red bar on the right side to show how much ba ery power is le . The Stock Recorder will
work reliably down to about 5%. A low power warning will appear on the screen when the ba ery is in
danger of going flat.
– The unit can be turned off, rebooted or shut down by tapping the Start bu on in the bo om corner.
Select Shutdown, then choose an op on. Suspend will turn off the unit to save the ba ery - the unit is
“asleep” un l the power bu on is pressed again.
– Warm Reset is the equivalent of reboo ng a PC. This op on could be used if the unit is malfunc oning.
– Cold Reset is like a hard shutdown of any computer and is a last resort if the unit has completely stopped
responding. FarmWorks will not be damaged by a cold reset but anything else not saved in permanent
memory may be lost.
11Main Menu
Turn on the Stock Recorder by pressing and holding the power bu on (see page 5). Touch the FarmWorks
icon to highlight it - either press the key or double-tap the icon itself to launch the program. It may
take several seconds for the program to load.
– The main menu screen allows you to choose between ca le and sheep procedures if you intend to record
data.
– To explore OpƟons, see page 13.
– Reconnect Devices is used when your Stock Recorder has Bluetooth links to other equipment.
– Tap the InformaƟon bu on to see the version of the Stock Recorder program installed. This is important
to know when upgrading your so ware.
– The List bu on is a feature to allow recording of EID numbers for animals that are not necessarily already
entered in your FarmWorks data. You can scan animals to make a list of tag numbers, and then after
importing, view and print the list from FarmWorks > Reports > Stock Recorder Animal Lists.
Note: Animals scanned through the List funcƟon will NOT be added to your FarmWorks records!
– Type a name for a new list or choose from a list of exis ng names by tapping the bu on with three dots to
the right of the List name field.
– Scan the first animals’ RF tags. Use the bo om bu ons to view the tags you’ve scanned, remove certain
tags from the list, or delete the list
altogether.
– Transfer data from the Stock Recorder
to FarmWorks on the PC.
– To view or print a list, open Reports >
Stock Recorder Animal Lists
12Options
There are some features on the Stock Recorder that can be changed to suit different situa ons. Tap OpƟons
on the first screen to open the menu.
RF Reader
– The default RF Reader should be set to SDL300I.
– Press to Read means the internal tag reader will only scan for an RF tag when the side scan bu on of the
Stock Recorder is pressed.
– ConƟnuous Read can be useful for scanning large batches of animals. See the instruc ons on page 16.
– Press Test ConnecƟon to ensure the RF reader is working properly.
– The other op ons are for connec ng to s ck readers or a race reader in a dra ing crate. Ask your vendor
for instruc ons to connect other RF readers.
13Options
Weigh Scale
DraŌer
LED Display
Earphones
Printer
– These are external devices that can be linked to the Stock Recorder. Ask your vendor for instruc ons for
connec ng each specific piece of equipment.
Comments
– You can add comments to an animal’s record with the Stock Recorder. See page 17 for instruc ons.
When a comment is added you have the op on to Show When Next Handled, which means the next
me that RF tag is scanned your comment will come up on the screen.
– Under the OpƟons menu, the Comments bu on will allow you to turn off all comments, which will speed
the process when you are dra ing large groups of animals.
Sound
– Turn all the audible alerts on or off.
Tag OpƟons
– Change the default flock or herd number when you are purchasing animals, otherwise leave both fields
empty.
– Remember to remove this other flock/herd number before you start working with your own animals.
14Reading RFID Tags
Reading tags electronically
The Stock Recorder has two large bu ons, one on each side, that are used for FarmWorks. The bu on on the
right-hand side is used to read an RFID ear tag. When the tag field is highlighted on the screen, press and
release the right-hand bu on to read the tag. When the tag number is displayed and the tag field is high-
lighted, the le -hand bu on can be pressed to show the animal’s details.
Entering tags manually
– Type in the tag number, then press the () key on the keyboard.
– Tap Save to save the record.
– Where “enter a tag number” is referred to in this manual, this assumes the tag is being entered by typing
the number in manually.
– Management tags can be added or used by typing a full-stop and then the number – for example .21 – in
any tag number field.
Right-hand scan buƩon
- Press and release
LeŌ-hand buƩon
- Press and release
15Reading RFID Tags
OpƟon for ConƟnuous Read
There is an op on for reading RFID tags that can be useful when scanning large batches of animals. Instead
of pushing the right-hand scan bu on to read a tag, the stock recorder can be set to “Con nuous Read”
mode. In a situa on where many animals in a race need to be scanned, the ConƟnuous Read se ng saves
having to press the scan bu on for each EID.
ConƟnuous Read is constantly trying to detect EIDs when the tag number field is ac ve, so uses substan ally
more ba ery power than the Press to Read se ng.
To ac vate the ConƟnuous Read se ng:
1. Enter the FarmWorks program on the handheld. Select OpƟons then RF Reader
2. Ensure SDL300I is the RF Reader highlighted. Select ConƟnuous Read.
3. Press Test ConnecƟon to confirm the change.
16Looking Up Animal Records
The le -hand bu on on the Stock Recorder opens the Animal Record screen, which has a number of different
screens available for viewing an animal’s details and history. Most of the screens are only for viewing, not for
adding informa on.
Animal Details shows the date of birth, sex, breed, sire, dam, loca on and other details. This screen is for viewing
only - you can not add any data.
Add Comment or Add Cull Comment allow you to type in a comment about this animal that becomes part of
its permanent record once the Stock Recorder is downloaded into the computer. You can make FarmWorks
reports based on the comments you record.
17Looking Up Animal Records
The Comment History is for viewing all comments recorded against an animal.
The Progeny screen shows the number of lambs a ewe has had in her life me, plus details of any of her lambs
s ll on the farm. A ram’s Progeny record will show the lambs he sired that are s ll on farm.
The Weight History screen shows every weight,
body condi on score and grade recorded against
an animal.
18Looking Up Animal Records
The Movement History screen shows the date the animal moved on to the farm, either born or purchased, all
on-farm and off-farm movements that were recorded, and where the animal was finally shipped to.
The Treatment History screen shows all the veterinary treatments recorded for the animal, and details like
date, dose, and the drug withdrawal date a er which the animal can be safely slaughtered.
19Date and Time Settings
Your Stock Recorder may have an incorrect date or me se ng that results in error messages when you try to
import data to your computer.
Note: Never make changes to the date or Ɵme format without being expressly instructed to by Shearwell
support. Some seƫngs are criƟcal for proper funcƟoning and should not be tampered with!
Changing the date or Ɵme
1. Close the FarmWorks program on the Stock Recorder.
2. On the Stock Recorder desktop, double-tap the My Device or My Computer icon, or tap the Start bu on
on the bo om le -hand corner of the screen.
3. Double-tap the Control Panel icon.
4. Double-tap on the Date/Time icon.
5. Change the me and date if needed.
6. Find the Time Zone se ngs at the bo om of the screen. Change to the correct me zone if needed.
7. Press Apply to save your changes.
20Transfer Data with the PC
FarmWorks on the Stock Recorder must be closed to transfer data between the PC and the Stock Recorder.
The unit needs to be si ng in the cradle, powered on, connected to the PC and preferably with the cradle
connected to the mains.
Check your connecƟon to the PC:
– On a newer PC, open the Windows Mobile Device Centre. Look for a green circle on the bo om task bar
or a green circle icon on your desktop. Double-click to open and check that your Stock Recorder is connected.
– On an older PC, open Ac veSync. Look for a green circle on the bo om task bar. Double-click to open and
check that your Stock Recorder is connected.
21Transfer Data with the PC
Send data from FarmWorks on the PC to the Stock Recorder
1. Always transfer data from the PC before you use the Stock Recorder so the latest data is on the unit.
2. If you have had some new electronic ca le tags make sure that file has been saved into FarmWorks.
3. Ensure that any drugs, markets, aba oirs, breeds that you may be using on the Stock Recorder have
been entered onto FarmWorks on the PC.
4. On FarmWorks on the PC, go to Data Transfer>Workabout Pro>Send Data to Stock Recorder
5. A screen will come up, select Send Data to Stock Recorder
Note the warning screen – sending data will completely overwrite any data currently on your Stock
Recorder. If there is any data on the Stock Recorder not yet sent to the PC, do not proceed or you will
lose it and it cannot be recovered.
6. If you are happy that all recently entered data on the Stock Recorder has been imported, click OK to
proceed with the export. If you are unsure then get the data from the Stock Recorder again - it won’t
hurt anything and could prevent accidental data loss.
7. Click OK on the Export complete screen
Get data from the Stock Recorder to FarmWorks on the PC
1. On FarmWorks on the PC, go to Data Transfer>Workabout Pro>Get Data from Stock Recorder
2. A screen will come up, select Get Data from Stock Recorder
3. Click OK on the Import complete screen – if there were any warning messages created on import you
have the op on to review these now, or can look at them later through the Data Transfer>Workabout
Pro menu. These warning messages are there for a reason – please read them at some point (certainly
before using the Stock Recorder again), and act upon them if necessary.
22Opening FarmWorks on the Stock Recorder
– To start FarmWorks on the Stock Recorder, either touch the FarmWorks icon on the screen so that it is
highlighted (FarmWorks will have a dark blue background with a do ed yellow line around the text) and
then press the Enter key, or double tap on the FarmWorks icon with your finger or the stylus.
– The program will take about ten seconds to start up.
– If you have previously had Bluetooth devices linked to the Stock Recorder, you will be presented with
a Reconnect devices screen. If you want to reconnect to them, select as required, make sure they are
turned on and fairly close by, then press Connect.
– If you do not wish to reconnect, just tap Escape.
– You are then taken to the main menu.
23Adding Animals into FarmWorks
There are two ways to add your current animals into the program using the Stock Recorder – please note that
as this is an animal’s first record its method of ‘arrival’ must be correct – i.e. if it is recorded as an on-farm
birth, this cannot be changed to a purchase at a later date (short of deleting the record entirely through
FarmWorks on the PC, then re-recording). To record a purchase, use the Purchase screen – animals entered
on the Stock Recorder through any other screen will be assumed to be an on-farm birth.
Purchase:
1. Open the Purchase func on. Select the date of purchase.
2. Select where the animal was purchased from, i.e. the relevant holding or market.
3. Select where the animal is being moved to – typically your own holding, but it could be directly to a
grasskeep holding or to a specific loca on within your own holding.
4. Tap Next.
5. Enter date of birth, sex, breed and purchase price of the animal. By default the date of birth will be the
1st March that has just passed but you can change the day and month if desired.
6. With the Tag field highlighted, scan the RFID tag
or manually enter the tag number.
7. Press Save – you will see that all the previous
details are retained – provided they s ll apply, all
you need to do is enter the individual tag number
of the next animal.
8. If you are scanning RFID tags, a er the first tag
there is no need to tap Save in between animals.
24Adding Animals into FarmWorks
If you’re not concerned with recording a specific purchase or parentage, and just want to get your current stock
loaded into the system, you can add animals in any of the screens. However, the Review Data screen is probably
the simplest.
Entering caƩle with Review Data:
1. Go to CaƩle Procedures > Review Data. If you are using EID tags displaying the official tag number, and
a “tag file” or “tag bucket” was supplied with the tags, then (assuming this file was previously uploaded
into FarmWorks and sent to the Stock Recorder) when you read an EID the official tag number will be
displayed automa cally. Otherwise you will be asked to “lock” the tag number to that EID.
2. If you are asked to lock the tag, type the tag number. The so ware assumes that any animal you are
entering for the first me will have your herd number - if this is the case, just enter the last relevant digits
of the individual tag number. You will see that the program defaults to your herd number and automa cally
calculates the check digit.
3. See Tag Op ons (page 14) if you want the default herd number to be a number other than your own.
4. If the animal does not have your herd number, enter the herd number then the last relevant digits of the
tag number – no space is necessary a er the herd number (one is inserted automa cally), and the so -
ware will automa cally calculate the check digit; e.g. for animal UK123456 400123, type UK123456123
and the tag number will be displayed appropriately.
5. If the animal is not known, you will be prompted to add the animal. Enter date of birth, sex and breed of
the animal.
6. By default the date of birth will be the 1st March that has just passed, but you can change the day, month
and year as required.
7. Press Save.
25Adding Animals into FarmWorks
Entering sheep with Review Data:
Manual entry
– Sheep Procedures > Review Data. Type in the tag number. The so ware assumes that any animal you are
entering for the first me will have your flock number, so if this is the case (i.e. for all except purchases),
just enter the individual number.
– If the sheep are from other sources the flock number must be entered, followed by a single space and
then the individual animal’s number, e.g. UK0123456 00001. Remember the zero a er the ‘UK’ and
leading zeros on the individual number if appropriate.
Electronic entry
– Sheep Procedures > Review Data. Scan the RFID tag. If adding sheep born January 2010 onwards the so -
ware will automa cally interpret the visual tag number from the EID number.
– If the device is a bolus or blank EID tag type in the tag number carefully. If it is your own flock number just
type in the individual number, if not type in the whole number including the UK. Use one space between
the flock number and the individual number, then press Lock.
– If the animal is not known you will be prompted to add the animal.
– Select Yes to confirm that you wish to add the animal.
– Enter date of birth, sex and breed of the animal. By default the date of birth will be the 1st March that has
just passed but you can change the day, month and year if desired.
– Press Save. Now you are ready to enter the next sheep or you can exit the screen.
26Linking EIDs to Existing Animals
For those animals that are already in FarmWorks, EIDs can be linked in any of the screens. However, as with
adding completely new animals, the Review Data screen is probably the simplest if nothing else needs to be
recorded.
1. Scan the device.
2. If the tag is an official lamb tag supplied since 01/01/2010, the number should be recognised and linked to
the exis ng animal immediately.
3. If the device is a bolus or blank EID tag type in the tag number carefully. If it is your own flock or herd
number just type in the individual number, if not type in the whole number as for manual entry above,
then tap Lock.
Note: the number entered must be an exact match with that of an exis ng animal, and with regard to sheep
this must include the extra zero a er the ‘UK’ in the flock number and any leading zeroes in the individual tag
number. If it does not, Stock Recorder will treat this as a new animal, and you will be prompted to enter date
of birth, sex and breed.
27Overview of Stock Recorder
Choosing Ca le or Sheep Procedures as desired will display the following func ons:
– Weighing (8-week, Weaning, 20-week, etc.)– record the date and the weight, condi on score or grade. A
second reading recorded against the same date as another reading will overwrite the first reading.
– Lambing / Calving – record the date of lambing / calving, the dam and sire, whether the lamb / calf was
born dead or alive, the tag number, sex, breed and birth weight of the animal (default is 4 Kg for lambs, 50
Kg for calves).
– Treatments – record the date of the treatment, the drug (including medicine batch), dosage, reason and
person who carried out the treatment.
– Scanning – record number in utero and weeks pregnant.
– Movement – record the date of movement and the des na on of the animal (also use this for movements
to market or aba oir – do not use ‘sale’ or ‘death’, as the sale price, kill weights, etc. will not be known at
the me of recording, ).
– Death – record the date of death, the cause and the res ng place of the carcass.
– Purchase – record the date of purchase, where the animal was bought from, where it is being moved to,
then the date of birth, sex, breed and tag number of the animal.
– Sale – only for private sale of stock - record the date of movement, des na on and sale price.
– Change Tag Number – record a different tag number for an animal.
– Review Data – iden fy and count animals through a race; displays basic animal details.
– Tupping / Service – record date of service, sire and dam.
– TB tes ng (ca le only) – record first or second reading.
– Dra ing – animals passing through a dra ing crate are read electronically and sent though one of up to
three gates depending on their dra ing details. This can be done by hand – i.e. a race reader and 3-way
dra ing crate are not necessary for the func on to operate. Other than dra ing by weight, specific dra -
ing groups must be set up through FarmWorks on the PC and exported to the Stock Recorder.
– Group – add animals to a new or exis ng management group.
– Wool Score (sheep only) – record a ‘score’ for an animal.
– Mul ple Ac ons – perform combina ons of (most of) the above func ons in one pass, e.g. record the
movement and weight of animals and add them to a management group.
All of the func ons are controlled through pressing where appropriate on the touch screen, and using the key-
pad if entering tag numbers manually or typing in comment text. The key on the keypad will process
any informa on already entered and take you down to the next input field – it can be used instead of tapping
on the next input field on a screen. On every func on, tags can be entered manually or read electronically.
28Lambing and Calving
Recording a live lamb or calf:
1. Open Ca le or Sheep Procedures. Go to Lambing or Calving.
2. Today’s date will show. Change the lambing or calving date if needed.
3. The cursor will move to the Dam field. Scan the dam’s RFID tag or manually enter her tag number.
4. If a tupping or service has been recorded for the dam, the sire’s tag number will appear automa cally. If
not, the sire’s tag may be entered (op onal).
5. There is an op on to record a score for birth ‘traits’, such as ease of birth and milk produc on. Tap on
Traits to open the screen. If No is selected you can return to the lambing/calving screen and start adding
lambs/calves. To enable scoring the dam and her offspring select Yes.
29Lambing and Calving
6. Set a default score for each trait, then score each ewe and lamb compared to the default or “average”
score. Use a scale of your own choosing but an odd-number is the easiest. For example, a scale of 1 to
5, with 5 being the best and 1 being the worst - the default then would be 3; or a scale of 1 to 7, with 1
being the best and 7 being the worst - the default then would be 4. The scale itself is not as important as
you being consistent.
7. The dam traits are mothering ability and the amount of milk she has at birth. The lamb or calf traits are
how vigorous it was at birth (meaning how quickly it stood up and sucked) and how easy the birth was
(meaning how much human help was needed). Mothering, milk and vigour can be odd-number scales.
Ease of Birth should be a linear scale, for example 1 to 4, with 1 being the default - born unassisted. 2
could be an easy pull; 3 a difficult or hard pull; and 4 being a cesarean birth.
8. Change the default birth weight if needed. Press Save to return to the lambing/calving screen.
9. Press Add lamb or Add calf as applicable.
10. Scan the RFID tag of the lamb or calf. Select the sex and breed. A birth weight can also be recorded.
11. If the dam has more than one offspring, select Save and add to record another for that dam, otherwise
Save and Esc to record offspring for the next dam.
30Lambing and Calving
Recording a dead lamb or calf:
1. If the dam has a lamb or calf that died before tagging, select Dead.
2. Choose a cause of death from the drop-down menu.
3. Press Save and Esc, if there are no more calves or lambs to add for that dam. Or select Save and Add if
there are more calves or lambs for that dam.
4. If a lamb or calf dies aŌer it was tagged then record the loss through the Death procedure screen on the
Stock Recorder.
31Deaths
1. Open Ca le or Sheep Procedures. Go to Death. Today’s date will show. Change the date if necessary.
2. Type in a cause of death or pick from a list. Tap the small box with three dots to the right of the Cause
field to display more op ons. A screen with death reasons will appear. If the list is longer touch More.
Select a cause of death.
3. Touch the bu on Send To. This will produce three choices - Knackers Yard, AbaƩoir or Other. Aba oirs
must be added through the Farm Records screen on the PC program in order to appear on the Stock
Recorder. Knackers and Other can be typed in.
4. Put the cursor in the Tag field - scan the animal’s RFID tag.
5. When all details have been recorded press Save.
32Weighing
There are six weigh op ons for sheep and four for ca le to address par cular tasks. All the weight screens
display the last recorded weight and weigh date for that animal.
– Weigh Only (ca le and sheep) - Records the date, each animals’ tag number and weight.
– Weaning Weight (ca le and sheep) - Use this op on to record weaning weights and dates. Informa on
will be transferred into FarmWorks on the PC and will be included in Weaning Reports and used as the
star ng weight for some daily weight gain reports.
– Weigh and Grade (ca le and sheep) - Record the weight and fat grade.
– Weigh and Condi on Score (ca le and sheep) - Record the weight and body condi on score.
– 8 Week (sheep only) - Includes op ons to correct lamb details like dam, birth date, breed and sex.
– 20 Week Weight (sheep only) - Corresponds to 20 Week Weight Reports in FarmWorks.
Weigh Only / Weaning Weight / 20 Week Weight
1. Open Ca le or Sheep Procedures. Go to Weigh. Select a
weigh op on.
2. Today’s date will show. Change the date if necessary.
3. Scan the animal’s RFID tag or type in the tag number.
The daily live weight gain and weight history showing
the most recent weights will be displayed.
4. Type in the weight as it appears on your weigh scale.
5. Press Save.
8 Week Weight
1. Change the date if necessary.
2. Scan the animal’s RFID tag or type in the visual
tag number. The weight history showing the most
recent weights will be displayed.
3. Type in the weight as it appears on your weigh
scale.
4. The lamb’s dam, date of birth, breed and sex
show. There is an op on to change the birth date,
breed and sex if necessary. Save.
33Weighing
Weigh & Grade
1. Open Ca le or Sheep Procedures. Go to Weigh > Weigh & Grade.
2. Today’s date will show. Change the date if necessary
3. Scan the animal’s RFID tag or type in the visual tag number. The last weight and score will be displayed.
Type in the weight as it appears on your weigh scale.
4. Tap Grade and select a fat grade from the chart.
5. Press Save.
Weigh & Score
1. Go to Weigh > Weigh & Score.
2. Today’s date will show. Change the date if necessary
3. Scan the animal’s RFID tag or type in the visual tag number. The last weight and grade will be displayed.
Type in the weight as it appears on your weigh scale.
4. Enter a condi on score between 0.00 and 10.00.
5. Press Save.
34Tupping or Service
1. Open Ca le or Sheep Procedures. Go to Tupping or Service.
2. Today’s date will show. Change the date if necessary.
3. Scan the bull or ram’s RFID tag or type his number into the Sire field.
4. Scan the RFID tags of the dams you want in this breeding group. The Stock Recorder saves a er each tag
is scanned so it’s not necessary to press Save for each ewe. If you are not sure whether or not a dam was
scanned properly then scan her tag again - it won’t hurt anything and she won’t be counted twice!
5. If you are typing tag numbers in manually you must press Save for each animal tupped or served.
35Medical Treatments
1. Open Ca le or Sheep Procedures. Go to Treatment.
2. Today’s date will show. Change the date if necessary.
3. Select a drug. All the medicines currently on your farm will be displayed. Note: medicines can only be
added into FarmWork on the PC through Farm Records > Medicines.
4. Once a drug is selected pick the batch number and type in the dose.
5. Enter a reason for the treatment or pick from a list. Tap the small box with three dots to the right of the
Reason field to display more op ons. A list of ailments will be displayed. If the list is longer touch More.
Select a reason for treatment.
6. Type in the name of the person giving the treatment.
7. Scan the RFID tag of the first animal being treated. The Stock Recorder saves the record a er each tag is
scanned so it’s not necessary to press Save for each animal. If you are typing tag numbers in manually
you must press Save for each animal treated.
Note: The Stock Recorder knows which drugs are in your lock-up but does not track the actual amount
in inventory. If you record more treatments than you have medicine for, when you import from the Stock
Recorder into FarmWorks the program will warn you that it cannot complete the treatment records un l you
add more medicine.
36Off-farm Movements
An animal movement record provides three cri cal pieces of informa on - which, when and where:
- which animal
- when it moved
- where it moved from and where it moved to.
FarmWorks also provides an opportunity to collect sale and slaughter data in conjunc on with the movement
record. The process of selling animals and moving them off your farm depends on whether the sale details
(price, weight, grade) are known at sale me. If you must wait for a kill sheet, grading report or market
receipt to learn the price received then use the two-step process - record the movement in Stock Recorder,
then enter the sale details later in FarmWorks on the PC.
1. Open Ca le or Sheep Procedures. Go to Movement.
2. Today’s date will show. Change the date if necessary.
3. Tap the Move To bu on to see the op ons. Note that all the markets, aba oirs, holdings and on-farm
loca ons must be entered into FarmWorks on the PC before they will be available as a choice on the
Stock Recorder.
4. Scan the animal’s RFID tag or type in the tag number. If reading the tags electronically the Stock Recorder
saves the record a er each tag is scanned so it’s not necessary to press Save for each animal. If you are
typing tag numbers in manually you must press Save for each animal moved.
5. When the Stock Recorder imports into FarmWorks on the PC the animal movement record (which/
where/when) will appear in the Movement Report, Holding Register and as a transport document.
6. Animals sent to market or slaughter are listed as off-farm at market
or at abaƩoir and the sale details can be added at a later date. Note:
Those animals at market or aba oir will remain in your inventory un l
you record their actual sale.
7. Open FarmWorks on the PC. Go to Animal Records > Market> Record
Sale of Animals at Market or Animal Records > Slaughter> Record
Slaughter of Animals.
8. Details of the sales can be viewed in Reports > Sales and Reports >
Slaughter.
37On-farm Movements
Movements from one loca on to another on the same farm are also done under the Movement func on.
1. Open Ca le or Sheep Procedures. Go to Movement.
2. Today’s date will show. Change the date if necessary.
3. Tap the Move To bu on to see the choices. Note that all the on-farm loca ons must be entered into
FarmWorks on the PC before they will be available as a choice on the Stock Recorder.
4. Scan the animal’s RFID tag or type in the tag number. If reading the tags electronically the Stock Recorder
saves the record a er each tag is scanned so it’s not necessary to press Save for each animal. If you are
typing tag numbers in manually you must press Save for each animal moved.
5. When the Stock Recorder imports into FarmWorks on the PC the animals moved will be listed in their
new loca on. On-farm loca ons are useful for filtering the grid for reports.
38Private Sales
Private sales to other farms, where the price of the animal is known beforehand, can be done through the
Sale func on on the Stock Recorder.
1. Open Ca le or Sheep Procedures. Go to Sale.
2. Today’s date will show. Change the date if necessary.
3. Tap the To bu on to see the choices. Note that all the holdings must be entered into FarmWorks on the
PC before they will be available as a choice on the Stock Recorder.
4. Scan the animal’s RFID tag or type in the tag number. If reading the tags electronically the Stock Recorder
saves the record a er each tag is scanned so it’s not necessary to press Save for each animal. If you are
typing tag numbers in manually you must press Save for each animal.
5. When the Stock Recorder imports into FarmWorks on the PC the animal movement record (which/
where/when) will appear in the Movement Report, Holding Register and as a transport document. For
a private sale the animal is immediately out of your inventory and details of the sale can be viewed in
Reports > Sales.
39Fostering
Fostering refers to lambs and calves being raised to weaning on either a bo le and milk replacer, or else
nursed by another female besides their own dam.
Note: The lamb or calf to be fostered must have its birth recorded first, before it can be recorded as fostered.
1. Open Ca le or Sheep Procedures. Go to Fostering.
2. Today’s date will show. Change the date if necessary.
3. Select rearing method of either BoƩle or Dam.
4. Record a reason for fostering. Tap the small box with three dots to the right of the Reason field to select
one of four op ons.
5. If the lamb or calf is to be fostered onto another mother then select Dam.
6. Scan the foster dam’s RFID tag or type in the tag number.
7. Scan the lamb or calf’s tag. Tap Save.
8. If the lamb or calf is to be raised on a bo le, select BoƩle.
9. Scan the lamb or calf’s tag. Tap Save.
40Review Data
The Review Data func on is for coun ng and iden fying animals as they come through a race. Basic informa on
about each animal is displayed, and up to five traits can be selected for that display.
1. Open Ca le or Sheep Procedures. Go to Review Data.
2. Select Configure Display.
3. Choose up to five traits to be displayed and tap Escape.
4. Scan each animal in the race. A count is made - an animal scanned twice will not be counted twice.
41Management Groups
FarmWorks allows animals to be placed in virtual management groups.
1. Open Ca le or Sheep Procedures. Go to Group.
2. Type in the name of a new group you wish to create, or tap the three dots at the side of the group name
field and select a pre-exis ng group.
3. Scan the animal’s tag. Tap Save to add that animal to the group.
4. Tap Remove to take that animal out of the group.
42Pregnancy Scanning
The results of pregnancy scanning can be recorded in Stock Recorder and transferred to FarmWorks on the
PC.
1. Open Ca le or Sheep Procedures. Go to Pregnancy Scanning.
2. Scan the animal’s tag. If the dam has been previously scanned the last results will be displayed. If the
number of weeks pregnant was entered previously then the weeks pregnant will be updated as of
today’s date.
3. Enter the current scanning results.
4. Tap Save to move to the next dam.
43Drafting
There are several methods for sor ng animals using the Stock Recorder.
– Dra by Weight Alone - The simplest process for separa ng out animals by se ng weight parameters - tag
numbers are not required or recorded. For example, lambs weighing below 25 Kg go out of a certain gate,
lambs over 50 Kg go out of another gate, and lambs in between those two weights keep going forward.
– Dra by Weight - Similar to dra ing by weight alone - set the weight parameters and which gates will
open. However this op on also allows you to put the animals into management groups as they are
dra ed, making further sor ng or handling easier. This op on requires the animals to have RFID tags and
the EID numbers are recorded by the Stock Recorder.
– Dra by Dra ing Group - This method allows for dra ing by any criteria, set up through FarmWorks on the
PC. For example, ewes nursing twins can be separated from those with single lambs, or breeding groups to
be put to certain rams can be sorted into different pens.
DraŌing opƟons
– Save weight: Usually the weight of each animal is saved to calculate rate of gain or track body condi on.
– Dra into management groups: This is a way to double-check the count and tag numbers of animals
dra ed out of each gate.
– Set your weight parameters if dra ing by weight. There will be three groups - animals below a minimum
weight, animals above a maximum weight, and all the animals that fall in between those two weights.
– Decide which gates will be used for the three different groups: R = right, L = le , and F = forward (animals
will go straight ahead).
44Drafting
– Type in a name for the new management groups from the different gates.
– When an animal is scanned and a weight is entered, the Stock Recorder will indicate which gate (le , right
or forward) should be opened.
– Depending on the weight, the tag number will be assigned to the management group you designated for
that par cular gate.
– If you using a dra ing group built in FarmWorks on the PC that is sor ng out specific animals, the correct
gate will be indicated by the Stock Recorder, as well as showing the name of the dra ing group.
45Wool Score
Wool Score is designed for you to assign a number score to each sheep, based on fleece quality.
– The scoring system is your personal choice - a one-digit score recorded against an animal that can be used
to make a report in FarmWorks on the PC.
– Decide on your scoring system and set the default score. This is the number that will be assigned to each
sheep unless you enter a different score.
46Multiple Actions
The Stock Recorder has an op on to record up to three ac ons at one me, to save having the same sheep
pass through the race for separate func ons. Most of the dis nct func ons can be combined under Mul ple
Ac ons and all the informa on collected by the Stock Recorder (weights, tags, groups, movements, etc) is
transferred into the appropriate sec on of FarmWorks on the PC.
1. Open Ca le or Sheep Procedures. Go to MulƟple AcƟons.
2. Select up to three ac ons.
3. Scan the first animal’s tag. You must enter whatever informa on is required for the ac ons you have
chosen:
- Movement requires yo to pick a des na on
- Treatment requires you to select a medicine and dose.
- Tup/service requires you to enter a sire tag.
- Group requires you to enter or select a management group.
- Sales and Purchase require the buyer or seller to be selected.
4. Tap Save.
5. Subsequent animals will have the chosen three ac ons applied to them. Stock Recorder will pause at
screens where input is required for each animal, such as weights and scanning results.
47Problem Solving
Not able to get into FarmWorks on the unit but it says that it is open
1. Using the stylus select the Windows key
2. Select Shortcuts
3. Select Task Manager
4. Select Stock Recorder
5. Tap the “Switch to” bu on and a er a few moments the program should appear.
Losing Bluetooth connecƟon
– If you are unable to connect via Bluetooth to a reader, weigh scale or dra er to which you have previously
been able, and when tes ng the connec on on the relevant Stock Recorder op ons screen it tells you that
the connec on is established, the most likely cause is that either the Stock Recorder or external device
didn’t ‘drop’ the Bluetooth link a er previous use. Turn the external device off, both at the unit itself and
at the mains if connected, then exit FarmWorks on the Stock Recorder and try a ‘warm reset’. Turn every-
thing back on and try again.
– If that doesn’t work, make sure that each device is using a unique BSP (Bluetooth Serial Port) number,
and check that the BSP matches that for the external device as listed on the Bluetooth Manager ‘paired’
screen.
– If it s ll won’t connect, it would be worth clearing that device from the ‘paired’ devices in the Bluetooth
Manager, and re-establishing the link from scratch.
– See Appendix IV - Bluetooth Manager.
Screen Freezing
This may happen for various reasons:
– If the orange FN, blue FN, CTRL or ALT keys have been pressed by mistake, it will appear that pressing
numbers or le ers will do nothing.
– Check along the toolbar at the very bo om of the screen, e.g. “ALT KEY”. These keys have a cycle of three
pushes .Press the key associated with the text un l the text is no longer displayed on the bo om of the
screen
– If that has no effect, reboot the unit by tapping the Windows key at the bo om le hand corner of the
screen, select Shutdown, select Warm Reset.
– If this s ll does not work, reboot the unit by tapping the Windows key at the bo om le hand corner of
the screen, select Shutdown, select Cold Reset.
– As a last resort press Orange FN, Blue FN and Enter keys and hold for about six seconds while the unit
turns itself off and automa cally restarts.
– If taking the last op on or the cold reset op on, when you restart FarmWorks you will get a message
about ‘missing u li es’. Follow the onscreen instruc ons to re-install them, then con nue as normal.
– All data is saved automa cally so you will not lose data with resets.
Unable to transfer data between PC and Stock Recorder
– If you have been able to transfer in the past, and you get a message saying “Failed to open connec on….”,
your PC is telling you it can’t find the Stock Recorder. Check that everything is plugged in, and the Stock
Recorder is sat snugly in the cradle (unclip the hand strap at the back, if one is a ached).
– Assuming all connec ons appear complete, it is worth cleaning the copper contacts on the base of the
Stock Recorder, and the ‘pins’ that it sits on in the cradle.
– If the ba ery on the Stock Recorder has been allowed to drain, charge it for at least ten minutes, then try
to start up FarmWorks on the Stock Recorder. You will probably get a message along the lines of “Some
u li es required by this program are missing and will be reinstalled”. Tap OK to allow reinstalla on, then
let the program start up. Exit the program and try transferring again.
– If it s ll won’t transfer data, close FarmWorks and re-start your PC, and perform a warm reset on the Stock
Recorder (tap the Windows key at the bo om le hand corner of the screen, select Shutdown, select
Warm Reset – you will not lose any data). Then try again.
48Appendix I - Manual Installation Windows 7
Install Stock Recorder on Windows 7
The Stock Recorder uses Windows Mobile Device Center to communicate with your PC. This program may
already be installed as part of the Windows opera ng system on your computer but may need addi onal
“drivers” to allow it to connect. If Windows Mobile Device Center is not installed on your PC, the FarmWorks
CD will prompt you to install it.
Do NOT connect the Stock Recorder USB cable unƟl aŌer installing the drivers!
1. The first step is to check your computer’s opera ng system. Go to Control Panel> System and Security >
System
2. Put the Stock Recorder CD into the disk drive of your PC. Find the files on the disk and open the folder
called Vista-W7 Psion Installa on.
3. There are two files in the folder - drvupdate-x86.exe for a 32-bit opera ng system, and drvupdate-
amd64.exe for a 64-bit opera ng system.
4. Double-click on the driver you need for your opera ng system. Permit any installa on warnings and click
on Run. Ignore or close a message saying the driver has not been successfully installed.
49Appendix I - Manual Installation Windows 7
Connect the cradle to the computer, turn on the stock recorder and place it in the cradle. Your computer
might automa cally detect the stock recorder and ask you to set up a partnership. If not follow these steps:
• If a “Found new hardware” window opens, close it.
• Right-click the Computer icon on your desktop; le -click on Manage.
• Le -click on Device Manager
• Under Other Devices, right-click on Workabout Pro.
• Select Update Driver SoŌware.
• Select “Browse my computer for driver soŌware”.
• Select “Let me pick from a list of device drivers”.
50Appendix I - Manual Installation Windows 7
• Select Mobile Devices from Common Hardware Types
• Select MicrosoŌ in the le -hand manufacturer’s window.
• Select MicrosoŌ USB Sync in the right-hand model window.
• Select Next and Yes to the warning.
You are then asked to set up the device.
• Leave the default - “Yes I want to synchronize with only this computer “- click Next
• Op ons for Contacts, Calendar, Tasks, Files - leave all the boxed unƟcked
51Appendix I - Manual Installation Windows 7
• In “Ready to set up Windows Mobile partnership” give your stock recorder a simple name.
• Accept the default “Merge the exisƟng items on the device...”
• Click Set Up
• Your stock recorder is now in partnership and connected to your computer. You are ready to transfer data
back and forth from FarmWorks.
• There will be an icon for the Mobile Device Center on your desktop and on the bo om task bar of your
computer screen. Before transferring data to the computer double-click on the desktop icon to check
that your stock recorder is connected.
Watch for this warning screen!
It can appear behind the Mobile Device Center window
and stop your stock recorder from connecƟng. If you see
this screen close it and your stock recorder should connect
normally.
52Appendix II - Manual Installation Windows XP
Install Stock Recorder on Windows XP
The Stock Recorder uses the Microso Ac veSync program to communicate with your PC. This program
needs to be installed on your computer along with an addi onal “driver” to allow it to connect.
Set up AcƟveSync
1. Put the Stock Recorder CD into the disk drive of your PC. Open the FarmWorks folder, then open the Stock
Recorder folder. Find and open the folder called XP-Psion InstallaƟon.
2. There are three files in the folder - double-click on MSASYNC.EXE
3. Files will be copied over and installed. Be pa ent - the installa on slows at 92%.
4. The Set Up MicrosoŌ AcƟveSync window opens - click Next twice.
5. Close or cancel the “Get Connected” window. Ignore the warning screen, OK to exit.
53Appendix II - Manual Installation Windows XP
Set up Psion UƟlity
1. Open the Stock Recorder CD again and open the XP-Psion InstallaƟon folder.
2. There are three files in the folder - double-click on USBSetupUƟlity.
3. Select WORKABOUT PRO from the drop down list. Click Next.
4. Accept the default loca on. Click Next.
5. Select USB ConnecƟon to Windows CE. Click Next.
6. Leave both boxes cked. Click Next.
7. Ignore warning about logo tes ng - ConƟnue Anyway
54Appendix II - Manual Installation Windows XP
Follow on-screen instruc ons. Turn on the stock recorder, put it in the cradle, connect the cradle to the com-
puter.
• Found New Hardware window will open. Select Install soŌware automaƟcally. Click Next.
• Ignore warning about logo tes ng - ConƟnue Anyway
• Click Finish and exit.
Set up Partnership with the stock recorder
1. Remove the stock recorder from the cradle and reboot your computer.
2. Check for the AcƟveSync icon in the bo om right-hand corner of your screen.
3. If it’s not there go to Start > All Programs > MicrosoŌ AcƟveSync. (The icon should appear automa cally
a er running the first me.)
55Appendix II - Manual Installation Windows XP
1. Turn on the stock recorder and place in the cradle.
2. Ac veSync will detect the stock recorder and show Set up Partnership window. Click Next.
3. Select “No. I want to synchronize with two computers”. Click Next.
4. On the “Select SynchronizaƟon” screen un-Ɵck all the op ons. Click Next.
5. Your stock recorder is now in partnership and connected to your computer. You are ready to transfer data
back and forth from FarmWorks.
56Appendix Ill - G2 Psion Keyboard
1. Switch on the Stock Recorder by holding down the Power bu on for a second.
2. Turn off by pressing the Power bu on once.
3. Press the ShiŌ key once to type a capital le er. Press the ShiŌ key twice to turn on Caps Lock so all le ers
are capitalized. Press the ShiŌ key a third me to turn off Caps Lock.
4. To adjust the sound press the blue FuncƟon bu on twice, then press the + (plus) volume key in the centre
to increase the volume or the - (minus) key to decrease the volume. Press the blue FuncƟon bu on once
more when finished.
5. As a general rule the Enter bu on should be used to move from one field to another instead of tapping
on the screen. This ensures that the data is processed and saved correctly.
6. If the keyboard stops func oning look on the bo om toolbar on the screen to see if the Ctrl, ShiŌ or Alt
key has been le on by mistake. Push the offending key again to turn it off.
57Appendix IV - Bluetooth Manager
Bluetooth is wireless technology that lets electronic gadgets talk to each other via radio waves. A
device “with Bluetooth” means it contains a small computer chip with a Bluetooth radio and some
so ware that allows it to connect wirelessly to other devices.
The Stock Recorder can link to Bluetooth devices like weigh scales and tag readers. The Bluetooth
Manager on the Stock Recorder finds the signal sent out by other devices and assigns each one a
channel for communica ng.
This is the process for ini al linking of the Bluetooth components. Follow the steps for each piece of
equipment and write down each corresponding BSP Channel.
To find an available Bluetooth channel:
1. Turn on the device you are trying to link to the Stock Recorder. Make sure it is close by.
2. On the Stock Recorder desktop find the computer icon. It may be called My Device or My Computer.
Double click the icon to open it.
3. Open Control Panel.
5. Find the Bluetooth symbol. It may be an icon or it may be in a list of folders.
Double-tap to open Bluetooth Device Properites.
58You can also read