THERMOSPAS SWIM SPA OWNER'S MANUAL - 2019 Contents subject to change without notice
←
→
Page content transcription
If your browser does not render page correctly, please read the page content below
THERMOSPAS® SWIM SPA OWNER’S MANUAL

      Contents subject to change without notice

                       2019
TABLE OF CONTENTS
              Important User Safety Instructions
              Warnings                                                          3
              Hyperthermia                                                      4

              Important Electrical Safety Instructions                          5-6
              G.F.C.I. Application Guideline & Wire Size                        5
              North America G.F.C.I. Installation Diagram                       6

              Filling, Checking and Starting your Hot Tub                       7-8
              Pump Priming/Releasing an Air Lock                                7-8

              ThermoSpas® Control Systems                                       9-15

              IN.YE Spa Pack Series                                             9-15
              Platinum Controls                                                 10
              Diamond Controls                                                  11
              Programming                                                       12-15
              Swim Sync System                                                  16-26
              Standby Mode                                                      27

              Topside Panel Display Messages                                    27

              Power Sprint Current Control                                      28

              Water Balance
              General Overview                                                  28
              Initial Fill                                                      28
              Glossary of Common Water Maintenance Terms                        30
              Water Balance Summary for your Hot Tub (chart)                    30
              Water Balance Troubleshooting                                     31

              Routine Hot Tub Maintenance
              Daily, Weekly, Monthly, Quarterly                                 32
              Cleaning the Skimmer Basket                                       32
              Safety Hard Cover                                                 32
              Cartridge Filter, Removal, Cleaning, Re-installation              33
              Cleaning the Acrylic Surface                                      33
              Changing your Swim Spa Water                                      34
              Draining your Swim Spa Water                                      34

              Winterizing your ThermoSpas® Swimspa                              35

              General Troubleshooting                                           36
              What to do in the event of
              Power Fluctuations                                                36
              Cold Weather Power Failure                                        36

              Wiring Diagram (in.ye5)                                           37

NOTE: Product specifications, warnings and labels are subject to change without notice. This user’s manual
should be used as a guide only. For further information, please contact your independent ThermoSpas®
dealer.

                                                    2
SAVE THESE INSTRUCTIONS
IMPORTANT SAVE THESE INSTRUCTIONS
Your physiological response to hot water is subjective and depends on your age, health, and medical history. If you don’t know your
tolerance to hot water, or if you get a headache, or become dizzy or nauseous when using your hot tub, get out
and cool off immediately.
WARNING
1. CHILDREN SHOULD NOT USE SPAS OR HOT TUBS WITHOUT ADULT SUPERVISION.
2. DO NOT USE SPAS OR HOT TUBS UNLESS ALL SUCTION GUARDS ARE INSTALLED TO PREVENT BODY AND HAIR EN-
TRAPMENT.
3. PEOPLE USING MEDICATIONS AND/OR HAVING ANY ADVERSE MEDICAL HISTORY SHOULD CONSULT A PHYSICIAN
BEFORE USING A SPA OR HOT TUB.
4. PEOPLE WITH INFECTIOUS DISEASES SHOULD NOT USE A SPA OR HOT TUB.
5. TO AVOID INJURY, EXERCISE CARE WHEN ENTERING OR EXITING THE SPA OR HOT TUB.
6. DO NOT USE DRUGS OR ALCOHOL BEFORE OR DURING THE USE OF A SPA OR HOT TUB, TO AVOID UNCONSCIOUS-
NESS AND POSSIBLE DROWNING.
7. PREGNANT OR POSSIBLE PREGNANT WOMEN SHOULD CONSULT A PHYSICIAN BEFORE USING A SPA OR HOT TUB.
8. WATER TEMPERATURE IN EXCESS OF 38°C (100°F)MAY BE INJURIOUS TO YOUR HEALTH.
9. BEFORE ENTERING THE SPA OR HOT TUB, MEASURE THE WATER TEMPERATURE WITH AN ACCURATE THERMOME-
TER.
10. DO NOT USE A SPA OR A HOT TUB IMMEDIATELY FOLLOWING STRENUOUS EXERCISE.
11. PROLONGED IMMERSION IN A SPA OR HOT TUB MAY BE INJURIOUS TO YOUR HEALTH.
12. DO NOT PERMIT OR USE ELECTRIC APPLIANCES (SUCH AS LIGHT, TELEPHONE, RADIO OR TELEVISION) WITHIN 1.5M
(5FT) OF THIS SPA OR HOT TUB.
13. CHILDREN SHOULD NOT ENTER A HOT TUB WHERE THE WATER TEMPERATURE EXCEEDS BODY TEMPERATURE (37°
C / 98.6°F).
14. DO NOT ALLOW CHILDREN TO SUBMERGE THEIR HEAD UNDER WATER.
15. NEVER OPERATE THE HOT TUB PUMP AT HIGH SPEED WITHOUT HAVING ALL SUCTION AND RETURN LINES OPEN.
16. ALWAYS KEEP THE HARDCOVER INSTALLED AND LOCKED WHEN THE HOT TUB IS NOT IN USE.
17. TEST THE GFCI (GROUND FAULT CIRCUIT INTERRUPTER) MONTHLY.
18. POST EMERGENCY PHONE NUMBERS FOR POLICE, FIRE DEPARTMENT, AND AMBULANCE AT THE NEAREST PHONE.
19. TO REDUCE THE RISK OF INJURY
THE WATER IN A SPA SHOULD NEVER EXCEED 40°C (104°F). WATER TEMPERATURES BETWEEN 38°C (100°F) AND
40°C (104°F) ARE CONSIDERED SAFE FOR A HEALTHY ADULT. LOWER WATER TEMPERATURES ARE RECOM-
MENDED FOR YOUNG CHILDREN AND WHEN SPA USE EXCEEDS 10 MINUTES.
SINCE EXCESSIVE WATER TEMPERATURES HAVE A HIGH POTENTIAL FOR CAUSING FETAL DAMAGE DURING THE
EARLY MONTHS OF PREGNANCY, PREGNANT OR POSSIBLY PREGNANT WOMEN SHOULD LIMIT SPA WATER TEM-
PERATURES TO 38°C (100°F).
BEFORE ENTERING A SPA, THE USER SHALL MEASURE THE WATER TEMPERATURE SINCE THE TOLERANCE FOR
WATER TEMPERATURE-REGULATING DEVICES VARIES.
THE USE OF ALCOHOL, DRUGS, OR MEDICATION BEFORE OR DURING SPA USE MAY LEAD TO UNCONSCIOUS-
NESS, WITH THE POSSIBILITY OF DROWNING.
OBESE PERSONS AND PERSONS WITH A HISTORY OF HEART DISEASE, LOW OR HIGH BLOOD PRESSURE, CIRCU-
LATORY SYSTEM PROBLEMS OR DIABETES SHOULD CONSULT A PHYSICIAN BEFORE USING A SPA.
PERSONS USING MEDICATION SHOULD CONSULT A PHYSICIAN BEFORE USING A SPA SINCE SOME MEDICATION
MAY INDUCE DROWSINESS WHILE OTHER MEDICATION MAY EFFECT HEART RATE, BLOOD PRESSURE AND CIR-
CULATION.
3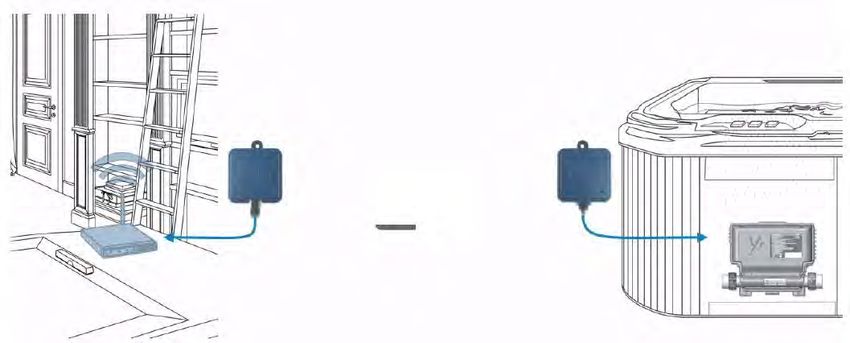
SAVE THESE INSTRUCTIONS
IMPORTANT SAVE THESE INSTRUCTIONS
Your physiological response to hot water is subjective and depends on your age, health, and medical history. If you don’t know your
tolerance to hot water, or if you get a headache, or become dizzy or nauseous when using your hot tub, get out
and cool off immediately.
CAUTION
1. MAINTAIN WATER CHEMISTRY IN ACCORDANCE WITH THE MANUFACTURER’S INSTRUCTIONS.
DANGER
1. RISK OF ACCIDENTAL DROWNING. EXTREME CAUTION MUST BE EXERCISED TO PREVENT UNAUTHORIZED ACCESS
BY CHILDREN. TO AVOID ACCIDENTS, ENSURE THAT CHILDREN CAN’T USE THE SPA UNLESS THEY ARE SUPERVISED
AT ALL TIMES.
2. RISK OF INJURY. THE SUCTION FITTINGS IN THIS SPA ARE SIZED TO MATCH THE SPECIFIC WATER FLOW CREATED
BY THE PUMP. SHOULD THE NEED ARISE TO REPLACE THE SUCTION FITTINGS OR THE PUMP, BE SURE THAT THE
FLOW RATES ARE COMPATIBLE. NEVER OPERATE THE SPA IF THE SUCTION FITTINGS ARE BROKEN OR MISSING.
NEVER REPLACE A SUCTION FITTING WITH ONE RATED LESS THAN THE FLOW RATE MARKED ON THE ORIGINAL
SUCTION FITTING.
3. RISK OF ELECTRIC SHOCK. INSTALL AT LEAST 1.5M (5FT) FROM ALL METAL SURFACES. AS AN ALTERNATIVE, A SPA
MAY BE INSTALLED WITHIN 1.5M (5FT) OF METAL SURFACES IF EACH METAL SURFACE IS PERMANENTLY CONNECT-
ED BY A MINIMUM 8 AWG (8.4 mm2) SOLID COPPER CONDUCTOR TO THE WIRE CONNECTOR ON THE TERMINAL BOX
THAT IS PROVIDED FOR THIS PURPOSE.
4. RISK OF ELECTRIC SHOCK. DO NOT PERMIT ANY APPLIANCE, SUCH AS A LIGHT, TELEPHONE, RADIO, OR TELEVI-
SION, WITHIN 1.5M (5FT) OF THE SPA.
HYPERTHERMIA
Since your hot tub can be set to reach temperatures of 40°C (104° WARNING
F), users should be aware that extended submersion in water that
exceeds normal body temperature can lead to hyperthermia. THE USE OF ALCOHOL, DRUGS OR MEDICATION
CAN SIGNIFICANTLY INCREASE THE RISK OF
FATAL HYPERTHERMIA.
The causes, symptoms and effects of hyperthermia may be de-
scribed as follows:
Hyperthermia occurs when the internal temperature
of the body reaches several degrees above the normal
body temperature of 37°C (98.6°F). The symptoms of
hyperthermia include drowsiness, lethargy, and an increase in the
internal temperature of the body. The effects of hyperthermia in-
clude:
Unawareness of impending hazard
Failure to perceive heat
Failure to recognize the need to exit the hot tub
Physical inability to exit the hot tub
Fetal damage in pregnant woman
Unconsciousness resulting in the danger of drowning
NEVER ALLOW DIVING OR JUMPING
If you sense any of the symptoms of hyperthermia, safely
exit the hot tub immediately. IN YOUR SWIM SPA
4
IMPORTANT ELECTRICAL SAFETY INSTRUCTIONS
                   SAFETY COMES FIRST. WHEN INSTALLING & USING THIS ELECTRICAL EQUIPMENT,
                           BASIC SAFETY PRECAUTIONS MUST ALWAYS BE FOLLOWED!

1 READ AND FOLLOW ALL INSTRUCTIONS                                         IMPORTANT NOTE:
2 Electrical installation must be completed by a qualified elec-           • This guide is for standard installations where the wire
  trician in accordance with all National, Regional and Local               run is 15 m (50 ft.) or less. For longer wire runs, con-
  Codes and Regulations in effect at the time of installation.              sult a qualified electrician.
3 Connect only to a dedicated circuit protected by a class ‘A’
  two-pole ground fault circuit interrupter (GFCI)
4 Use copper conductors only!                                                       G.F.C.I. APPLICATION GUIDE FOR
5 The hot tub equipment and all electrical plugs, outlets and                      THERMOSPAS® SWIM SPA SERIES
  lights within 1.5m (5ft) of the unit must be G.F.C.I protected.
  Consult your electrician or local electrical authority for further
  details.                                                                 NORTH AMERICA
6 A green colored terminal or a terminal marked “G”, “GR”,                 Platinum Series                               50A
  “Ground”, or “Grounding” is located inside the supply termi-             Diamond Series                                60A
  nal box or compartment. To reduce the risk of electric shock,
  this terminal must be connected to the grounding means
  provided in the electric supply service panel with a continu-
  ous copper wire equivalent in size to the circuit conductors
  supplying the equipment.
7 At least two lugs marked “BONDING LUGS” are provided on
  the external surface or on the inside of the supply terminal
  box or compartment. To reduce the risk of electric shock,
  connect the local common bonding grid in the area of the hot
  tub to these terminals with an insulated or bare copper con-
  ductor not smaller than No.6 AWG (Canada/Europe) / No.8
  AWG (USA).
8 All field installed metal components such as rails, ladders,
  drains or other similar hardware within 3 m (10 ft) of the hot
  tub shall be bonded to the equipment grounding bus with
  copper conductors not smaller than No.6 AWG.

WIRE SIZE
NORTH AMERICA

• The minimum wire size for systems that require a 40A GFCI is # 8/3 c/w ground (also referred to as # 8 gauge / 4 conductor).
• The minimum wire size for systems that require a 50A GFCI is # 8/3 c/w ground (also referred to as # 8 gauge / 4 conductor).
• The minimum wire size for systems that require a 60A GFCI is # 6/3 c/w ground (also referred to as # 6 gauge / 4 conductor).

NOTE: Please consult your applicable electrical codes related to the size of conductors as they may vary from what is
stated above. Take into consideration the length of cable as well and increase as required.

                                                                       5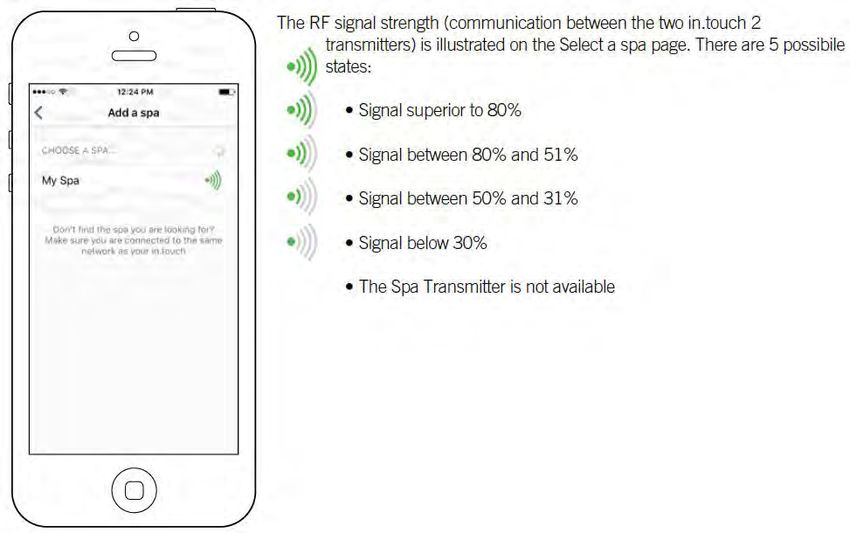
NORTH AMERICA – GFCI INSTALLATION

                                             NOTICE
Installation of the GFCI - Circuit Breaker, including ampere sizing and selection of conductor size and
type, must be performed by a qualified electrician in accordance with the National Electrical Code, or the
Canadian Electrical Code, and all Federal, State/Provincial and local codes and regulations in effect at
the time of installation. ThermoSpas® highly recommends the use of a new Siemens GFCI breaker for all
of its products. Other GFCI’s and older Siemen’s GFCI’s may have tripping issues.
240 VOLT 60Hz SWIMSPA SINGLE GFCI WIRING (MASTER ONLY)

 240 VOLT 60 Hz SWIMSPA SINGLE GFCI WIRING MASTER / SLAVE HEATER

 240 VOLT 60 Hz SWIMSPA DUAL GFCI WIRING MASTER / SLAVE HEATER

                                                  6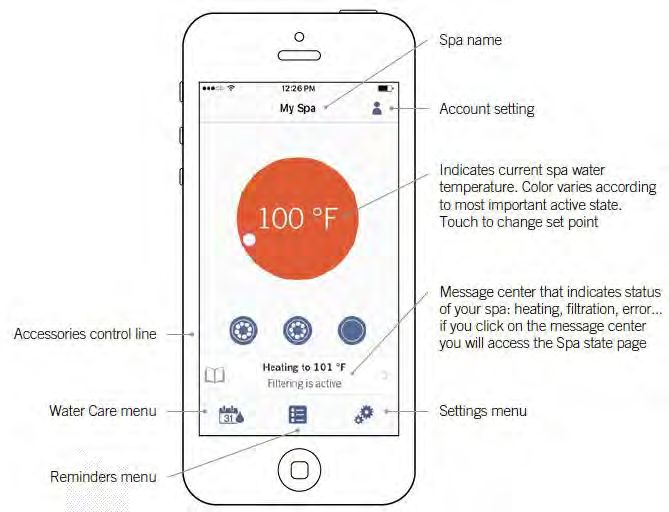
FILLING, CHECKING AND STARTING YOUR SWIM SPA—ALL OTHER SWIMSPAS
CHECKING
Although your swim spa was thoroughly water-tested in the
factory, some loosening of fittings can occur during shipping.
Before any decking, tiling or carpeting is completed around
the installation, fill and operate your hot tub to test for leaks
(this ensures easy access and inexpensive correction).
Check all union connections and plumbing for minor leaks.
In the event of a leak, ensure all union connections and
pump plugs are tight and all o-rings/gaskets are in place.
Also check the tightening of the screws and all the electrical
connections which could loosen during shipping.
STARTING
Before applying voltage to power-up your swim spa, it is
very important that you understand the sequence of events
that occur when the system is activated in order that the
pump can be primed efficiently and damage to the system
can be avoided.
Turn the main power “on” at your electrical panel.
Follow the control instructions for your particular model
swim spa to put the pump into low speed.
See section THERMOSPAS® CONTROL SYSTEMS
PUMP PRIMING/RELEASING AN AIR LOCK
• On some systems a message will appear on the display
indicating that the system is in PUMP PRIMING MODE.
This mode will last for 4 to 5 minutes before automatically
entering the normal operation mode. See complete details
for your spa in section THERMOSPAS® CONTROL SYS-
TEMS.
When the pump is located below water level, the water
should start circulating immediately. If the motor works but if
you do not notice water circulation within the first 15 sec-
onds, the pump may require priming due to trapped air
(referred to as an ‘air lock’). To prime (inset 2), open the
hose-bib to allow trapped air to escape. Close as soon as
PROPER WATER LEVEL
the water flow from the jets becomes regular. If the pumps
have not primed after 2 minutes, and water is not flowing
from the jets, DO NOT allow the pumps to continue to run.
FILLING Turn power off at the main house panel (or GFCI) and try
• When adding water for the first time, the swim spa should releasing the air again by loosening the union on the dis-
be filled through the skimmer opening (helps to prevent air charge side of the pump(s) while the motor is not running.
locks) using a standard garden hose, turning the tap on slow- Turn the power back on. If the pump(s) does not prime after
ly to prevent damage to the surface by a jerking hose connec- 15 seconds, sometimes momentarily turning the pump(s) off
tion. and on will help the system to prime (note: do not do this
• Pull up the handles on the intake and return gate valves and more than 5 times). Repeat if necessary.
clip on the stem locks. (handles are pulled up when valves
are open and pushed down when valves are closed). • Important: Under NO circumstances should the pump
Ensure the drain valve is closed. (s) be allowed to operate without priming beyond 5 minutes,
Ensure that all jets are open. as this may not only cause unwarrantable damage to the
Fill the swim spa to the recommended level as indicated. pump, it may also cause the control system to go into an
overheat condition.
Definition: ‘Priming’ a pump is a term used to describe
the process in which air trapped in the plumbing and pump
wetend (referred to as an ‘air lock’) is released, allowing the
pump to move water efficiently through the plumbing system
and to the jets.
7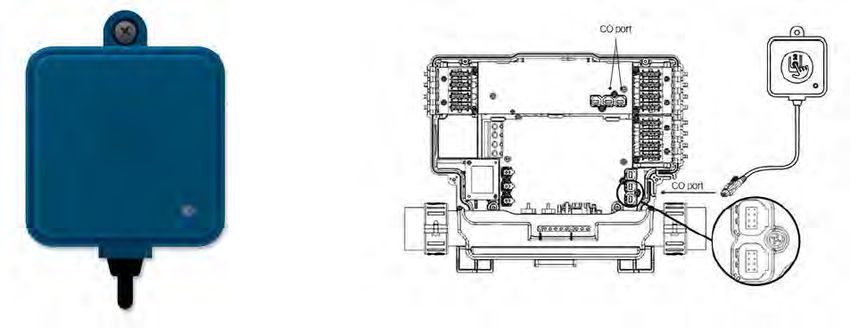
RELEASING AIR TRAPPED IN FILTER...

  ...THROUGH THE
     PUMP UNION
                   RELEASING AN AIR LOCK...       • When the pump starts circulating, it will be necessary to
                                                  release trapped air in the filter. Carefully loosen the air vent
                                                  valve counter-clockwise until there is the hissing sound of air
                                                  escaping. Once there is a steady stream of water, close the
                                                  vent valve, ensuring that the o-ring does not become
                                                  pinched.

                                                  • Turn the Hydrotherapy pump(s) on and re-check for leaks.
                                                  The control system will automatically return the pump(s) off
                                                  after 15 minutes.

                                                  • Adjust the hot tub heat control at the topside panel to the
                                                  desired water temperature.

                                                  • Adjust water balance (pH, TA, calcium hardness) to recom-
                                                  mended levels and add sanitizer once the water temperature
                                                  reaches 20oC (68oF).

                                                  See section WATER BALANCE

                                                  • Keep insulated safety hard cover on the hot tub, and the
                                                  air controls closed during the entire heat up process.

                                                  NOTE:

                                                  In order to prevent damage to your pillows caused by
                                                  the gassing effect of the chemicals, we do recommend
                                                  to remove them when the spa is not in use. By removing
                                                  them you will extend considerably the life length of your
                                                  pillows. We do design ours pillows to be removed easily
                                                  in order to make sure they will not remain in the spa
                                                  when it’s not in use.

                                              8
THERMOSPAS® SWIM SPA SERIES CONTROL SYSTEMS
                                                NORTH AMERICA
                                          IN.YE SPA PACK SERIES

                INITIAL START-UP                                    TEMPERATURE CONTROL
Before applying voltage to power-up your swim                         FUNCTIONALITY AND
spa, it is very important that you understand the                        ADJUSTMENT
sequence of events that occur when the system is
activated in order that the pump(s) can be primed
efficiently and damage to the system can be
avoided.
At initial power-up, the system will show the fol-
lowing screen.

                                                         After you exit the programming mode your hot tub
                                                         will automatically heat to the factory preset default
                                                         temperature of 38°C (100°F).

                                                         The temperature shown at the top of the screen is
                                                         the current water temperature. Use the UP and
The keypad does not store the date and time so           DOWN buttons to set the desired temperature.
when the system starts up after a loss of power a
message will prompt you to reprogram the time            The set point will appear in the blue at the bottom.
and date.                                                After 3 seconds without any change to the set
    PROGRAMMING THE DATE AND TIME                        temperature value, the keypad will resume the
                                                         normal display of messages.

                                                         When the set value is lower than the current tem-
                                                         perature “Cooling to XX” will appear. When the
                                                         value is set higher than the current temperature,
                                                         “Heating to XX” will be indicated.

Here you can adjust the time format (AM/PM or
24h), day of the week and time. Use the arrows to
choose the setting that you want to adjust and se-
lect it by pressing the Light key. Use the arrow
buttons to change the parameters and the Light
key to move between parameters. Pump 1 will
take you back to the main Settings menu.

                                                     9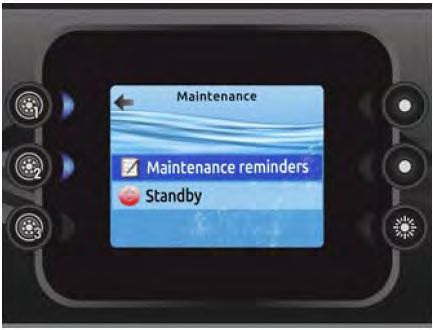
THERMOSPAS® SWIM SPA SERIES CONTROL SYSTEMS
                      NORTH AMERICA
                  IN.YE PLATINUM CONTROLS

       KEYPAD FUNCTIONS AND DISPLAY ICONS

                                                     JET 1 KEY WHICH
SETTINGS KEY
                                                     CONTROLS PUMP 1

LIGHT KEY WHICH                                      JET 2 KEY WHICH
CONTROLS THE                                         CONTROLS PUMP 2
LIGHTING

                                                     TEMPERATURE UP
MODE KEY                                             KEY

PROGRAM SELECT                                       TEMPERATURE
KEY                                                  DOWN KEY

                            10
THERMOSPAS® SWIM SPA SERIES CONTROL SYSTEMS
NORTH AMERICA
IN.YE DIAMOND CONTROLS
KEYPAD FUNCTIONS AND DISPLAY ICONS
TEMPERATURE UP
SETTINGS KEY KEY
TEMPERATURE
MODE KEY DOWN KEY
JET 1 KEY WHICH
SELECT KEY
CONTROLS PUMP 1
JET 2 KEY WHICH PROGRAM SELECT
CONTROLS PUMP 2 KEY
JET 3 KEY WHICH LIGHT KEY WHICH
CONTROLS PUMP 3 CONTROLS THE
LIGHTING
11PUMP 1 FUNCTION WATER CARE
Press this pad to activate the pump The Water Care section will help you set up your
1st press – on (icon rotates slow) ideal filtration and heating settings. Choose from
2nd press – on (icon rotates fast) Away, Beginner, Energy Savings, Super Energy
3rd press – turns off Savings and Weekender, depending on your
PUMP AUTOMATIC TIME-OUT needs.
High speed – 30 minutes Use the Light key to choose your setting. A
checkmark will appear on the selected icon to
PUMP 2 & 3FUNCTION (if included) confirm.
Press this pad to activate the pump In Energy Savings mode, the set point will be re-
1st press – high speed (icon rotates fast) duced by 20oF, which means that the heating sys-
2nd press – turns off tem will not be engaged unless the temperature
PUMP AUTOMATIC TIME-OUT falls to 20oF below the spa’s set temperature.
High speed – 30 minutes
LIGHT FUNCTION
Press this pad to activate the light
1st press: rotating colours
2nd press: solid blue colour
3rd press: solid green colour
4th press: solid red colour Water Care Modes:
Note: Pressing the light key in intervals less than
three seconds will scroll to the next colour. Once you
Away:
have selected the colour another press will turn the In this mode the spa will always be in economy;
light off. the set point will be reduced by 20oF and the filtra-
LIGHT AUTOMATIC TIME-OUT tion can be reduced.
Time out – 60 minutes Beginner:
SETTINGS KEY The spa will never be in economy mode, and will
From the home page you can access the run a normal 24 hours of filtration a day.
Settings, where you will find: Energy Savings:
Water Care The spa will be in economy mode during the peak
Audio (optional)
hours of the day and resume normal mode on the
Maintenance
Day & Time weekend.
Keypad Settings Super Energy Savings:
Wi-Fi (optional)
Miscellaneous The spa will always be in economy mode during
Electrical Configuration peak hours, every day of the week.
Factory Reset Weekender:
About
Use the arrow keys to move up and down in the list. To The spa will be in economy mode from Monday to
select an option, press the lit button beside it (Light Friday, and will run normally on the weekend.
button).
At any point you can press the Settings button to return
to the home screen.
12MODIFYING SCHEDULES AUDIO (optional)
To see and / or modify the Water Care cate- The Audio section in the Settings menu gives you
gory, use the lit button to the right (Jet 1) to open the option to disconnect or unpair your Bluetooth
the selected Water Care menu. enabled device.
Use the arrow keys to choose a schedule to modi-
fy (choice of economy and filtration schedules).
Use the Light key to move between parameters.
You have several possibilities for the schedule
(Mon-Fri, weekend, every day, or single days).
The schedules will be repeated every week. The
time and duration are set in 30 minute increments.
Once you have set the schedule, use Jet 1 key to MAINTENANCE
go back. Ensure that you have selected the de-
sired Water Care option in the main Water Care From the Settings page you can access the
menu. Maintenance Menu, which gives you access to the
The filtration schedule shown on the screen will following options:
apply to the main filtration pump. Your spa uses a
two speed pump configured to run on low speed Maintenance reminders
for filtration. The purges are pre-programmed for a Standby
fixed number of minutes, therefore the duration
will be set to N/A on the screen, and only the start Use the UP and DOWN keys to make a selection
time can be modified. and Pump 2 to confirm the selection.
FILTERING
Your spa is equipped with a two speed pump that
filters your water on low speed for a minimum of 8
hours a day. If the water temperature exceeds the
set temperature b 3 degrees then this pump will
shut off automatically until the temperature drops
below the set point by approximately 1.5 degrees.
13MAINTENANCE REMINDERS DATE AND TIME
The in.k800 keypad will remind you of mainte- Here you can adjust the time format, change the
nance required on your spa, like rinsing or clean- year, date and time. Use the arrows to choose the
ing the filter. Each task has its own duration, setting you want to adjust and select it by pressing
based on normal use. Pump 2.
The Maintenance Reminders menu allows you to Use the arrow keys to change the parameters and
verify the time left before maintenance is required, Pump 2 to move between parameters. Pump 1 will
as well as to reset the time once a task is complet- take you back to the main Settings menu.
ed.
Use the UP and DOWN keys to move through the
list.
To reset a task, select it by pressing Pump 2, then
confirm when prompted. Once you have con-
firmed the task will be reset.
KEYPAD SETTINGS
In this section you can change the temperature
unit, language, invert the display, change the
backlight color and partially of fully lock out the
keypad.
Use the arrow keys and move to the setting that
STANDBY
you would like to change. Use the Light key to
The Standby mode allows you to service your spa. choose and the arrow keys to modify
Pumps will stop for 30 minutes, and automatically
restart after this time. For the temperature setting you have a choice be-
tween Fahrenheit or Celsius.
Once Standby mode has been activated a screen For the language setting you have a choice be-
will appear to show the pumps are stopped. The tween English, French, Spanish, Polish, Nether-
normal spa page will return at the end of the lands, Dutch, Norwegian, Sweden, Portuguese,
maintenance. Italian, Hungarian and Russian.
Press on the Confirm key to leave Standby mode For the Display settings you can choose between
and restart the spa. a Normal or Inverted display
For the backlight color you can choose between
off, white, teal, purple, blue, yellow, green or red.
14KEYPAD SETTINGS (continued) ELECTRICAL CONFIGURATION
For the Security you can choose between unlock, Please do not make changes in this section
partial or full lock modes. unless you are a qualified electrician.
FACTORY RESET
Unlocked mode you have access to all features.
In this section you can see errors that have been
Partial lock mode does not allow access to archived by the system. Use the UP and DOWN
change the water temperature or any of the menu keys to move through the list. Errors are archived
settings. To unlock press the upper right key by chronologically, from most recent to oldest (top to
the window display that shows the lock symbol. bottom).
ABOUT
Full lock mode does not allow access to any of the This section shows information about the keypad
keys or menu settings. To unlock press the upper software number and the revision numbers of the
right key by the window display that shows the different components of your system.
lock symbol.
Wi-Fi (optional)
For the Wi-Fi menu to appear in the Settings
menu your Swim Sync module must be equipped
with software version 11.00 or higher. This menu
allows you to connect your Swim Sync module to PURGE CYCLES
a Wi-Fi network or to change its network.
The purge cycles are programmed to begin at the
To connect your I-Command module to a wireless start of each filter cycle. Pump 2 activates for 1
network, use the UP and DOWN keys to go to the minute, shuts off and then Pump 1 activates for 1
Wi-Fi option in the Settings menu and Pump 2 to minute then shuts off.
select it. SMART WINTER MODE
After a few seconds the available networks will Smart Winter Mode protects your system from the
appear on the screen, as well as their signal cold by turning the pumps on several times a day
strength. to prevent water from freezing in the pipes. The
Smart Winter Mode indicator turns on when in this
Use the UP and DOWN keys to move through the mode of operation. If the temperature drops to 4oC
list. Select your network by pressing the Pump 2 (39oF) within the heater chamber, the system au-
key. tomatically activates the pump to provide freeze
protection. The pump will operate until the temper-
If the Wi-Fi network is password protected enter it
ature reaches 5oC (41oF) before returning to nor-
when prompted. If no password is required it will
mal system mode.
connect automatically.
COOLING DOWN
After heating the spa water to the desired set
point, the heater is turned off, but the filtration
pump remains on for a certain amount of time to
ensure adequate cooling of the heating element in
order to prolong the useful life of the heater. The
heater icon flashes during this time.
15OPTIONAL SWIM SYNC SYSTEM
The Smart Phone App that is designed as a wireless hot tub control which allows you
to pick the water care settings that fit your schedule. Adjust filtration and temperature
settings and create the ideal hot tub experience from inside your home. This option is
supported by your iPhone®, iPOD touch® , iPAD® (requires iOS 8.0 or later) and An-
droid Device (requires Android 2.3.3 and up).
In. touch 2 comes with a state-of-the-art app and 2 pre-paired radio frequency trans-
mitters:
One being part of the spa system and the second one, being connected to the Home
Internet router. Both RF transmitters are pre-linked to one another, enabling an imme-
diate and perfect communication between user and the spa.
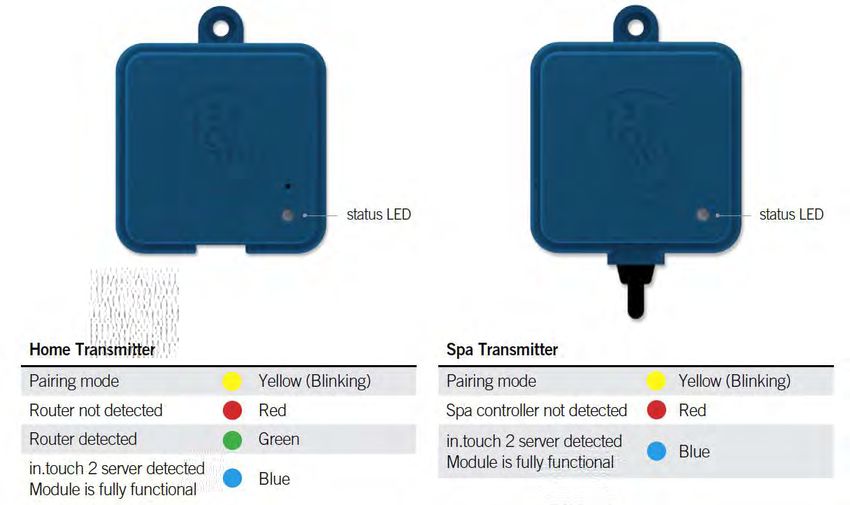
1. Installing the home transmitter
The home transmitter is provided with an Ethernet cable and a power supply.
The in. touch 2 home transmitter unit must be installed inside the house, connected to
a router and powered by the provided wall transformer. A longer Ethernet cable may
be used to bring the home transmitter closer to the spa.
Simply connect the Ethernet cable into the RJ45 port of the in. touch 2 home transmit-
ter and in one of the available LAN ports on your router. To power up the home trans-
mitter, plug the provided wall outlet charger to a 120V (North American model) or 220V
(European model) household supply and connect the USB cable to the wall outlet and
the home transmitter.
162. Installing the spa transmitter
If you purchased a spa with in. touch 2 as a standard feature or as an option, note that
the spa transmitter will be pre-installed.
To ensure proper signal transmission, it may be necessary to change the position of
the transmitter once the spa is installed in the yard. The transmitter should be located
on the side of the spa facing the house.
The in. touch 2 spa transmitter must be installed under the spa skirt, at least 12” (30
cm) away from any metal component or structure, as close as possible to the house to
optimize the signal strength.
Simply connect the spa transmitter into an available CO port of the spa control system
(or any other accessory with a free CO port, such as the in. stream 2 audio amplifier, or
the in. clear water sanitization system).
3. Pairing the home and spa transmitters
If you bought an in. touch 2 equipped spa or a complete retrofit kit, both transmitters of
your in. touch 2 will be factory pre-paired.
17If you need to replace a transmitter or pair your transmitters again, power up the home
transmitter and press on its pairing button with a paper clip. The status light of the
transmitter will blink yellow.
Then, shut off the spa’s breaker to turn the spa transmitter off. Wait a little and put the
breaker back on. Within a few seconds, pairing will be completed and both transmitter
status lights will turn to blue.
4. Transmitters status LED indicator
Both the home and spa transmitters have color status LED that can be used for trou-
bleshooting purposes
.
When the LED status is blinking (blue, green or red) this indicates that the communication between the
EN module and the CO module it not established.
185. Strong and Long Range Communication Signal
Through their proprietary RF technology, in. touch 2 transmitters emit a strong, stable
and long-range signal between your spa and your router (about 3 times longer than
regular signal). No need for repeaters or boosters: your spa will always remain within
reach in typical backyard settings.
6. Application
Download application:
The in. touch app allows you to control your spa using your home network or an Internet connection any-
where in the world. The in. touch 2 app is waiting for you in the App Store for iOS devices and on
Google Play for Android — search for « in. touch 2 » then click on it to install.
19USING THE APP
On your home network
It is possible to access your spa with the in. touch 2 app through your home network.
To be able to see your in. touch 2 in the application you need to connect your device to
the same router (Wi-Fi network) than the one used to connect your Home Transmitter
Go to the Wi-Fi settings section of your mobile device and choose the same network
that your spa is connected to (i.e. Home). Once you've selected it, wait until your de-
vice confirms the connection.
On the Internet
The in. touch 2 allows you to use the Internet to control your spa from anywhere in the
world. In order for them to communicate, both the in. touch 2 module and your device
must be connected to a network that allows access to the Internet.
Once your Home Transmitter is connected to the Internet (the LED status is blue), you
can use your in. touch 2 app any time your device is also connected to the Internet
(wireless or cellular network), even if you are away from home.
To have access to your spa away from home, you will need to have previously linked
your mobile device to your spa on your home network.
20Setup your Wi-Fi on your device
Before using your application, go to the Wi-Fi section of your device’s settings. Make
sure you are connected to your home network. This needs to be the same Wi-Fi pro-
vided by the router to which you connected your Home Transmitter.
21Find the icon for the in. touch 2 application, then tap on it to open it.
The first time you use the application a message will ask you: “in. touch 2”
Would like to send you notifications. If you choose Allow, the application will send you
notifications about the status of your spa. If you choose Don’t Allow, the application will
not send you notifications.
22Login page
Before using your application, you must create an account first and then, you’ll
be able to sign in. Your account will give you the opportunity to have access to
your spa from any in. touch 2 application.
23New account creation
When you choose to create a new account, you agree at the same time the
Terms of Service and the Privacy Policy. You can read them at any time
through this link: https://geckointouch.com/legal
24Choose a spa
This page displays all the spas detected by your application.
To detect your spa, you need to connect your mobile device to the same network to
which you connected your Home Transmitter.
Once you have done a connection with the spa its name will be saved on this page to
allow you to connect to this spa from anywhere.
To add a spa later on, go to Settings (up right corner) - Add a spa
25Home page
The main screen gives you access to your accessories, water temperature, water care
and settings.
The app is mirroring the top side control (keypad) over the internet.
26STANDBY MODE
A press of the SETTINGS key brings you into the menu options. Use the UP and DOWN arrow
keys to highlight STANDBY. Press the LIGHT key and the following message will appear.
“All pumps off! Press Drain to drain spa”
This mode allows you to stop all outputs including all automatic functions such as a filter cycle, heating
requests and smart winter mode purging for 30 minutes to perform quick spa maintenance.
DRAIN MODE
If you wish to put your spa into “DRAIN MODE” press the FUNCTION key beside the word “Drain” on
the display. Once you do that the display will indicate “Drain in progress”. The filtration pump will turn on
and run for 60 minutes.
In order to exit this mode, press the FUNCTION key beside the back arrow once to exit DRAIN MODE.
This will put you back into STANDBY MODE and if you wish to exit that press the same key to go back
to the main screen.
TOPSIDE PANEL DISPLAY MESSAGES
Hr - An internal hardware error has been detected
Prr - The Prr error message indicates a problem with the regulation probe. The system is constantly verifying if the tem
perature probe reading is within its normal limits.
HL - The water temperature at the heater has reached 119oF (48oC). Do not enter spa water.
FLO - The system did not detect any water flow while the filtration pump was running.
UPL - No low level configuration software has been downloaded into the system.
AOH - The temperature inside the spa skirt is too high, causing the internal temperature in the spa pack to increase
above the normal limits.
OH - The water temperature in the spa has reached 108oF (42oC). Do not enter spa water.
27ADJUSTABLE FLOW CONTROL POWER SPRINT CURRENT CONTROL
Your ThermoSpas® swim spa is equipped with a DIVERT- (DIAMOND MODELS only)
ER valve to control and adjust water flow to suit individual
user preference. The pump 1 (P1) DIVERTER valve pro- This system allows for the swimmer to vary the flow of water
vides variable water flow adjustment between the lower cen- and adjust the swim intensity of the jets. Allows quick adjust-
tre swim jet (providing added buoyancy and variable swim ment to level of fitness the swimmer is accustomed to from
resistance), and the hydrotherapy jets on the bucket seats, Novice to Triathlete. This option has keypads near the swim
or a combination of both. end so that they can easily adjust their swim without having
to go back to the main keypad area and eliminates the need
AIR for manual diverters.
CONTROLS
NOTE: You should always start from a full on or full off
position to ensure you have consistent water flow. Fail-
PUMP 1
DIVERTER
ure to do so may unbalance the system requiring it to
be recalibrated.
28SWIM SPA WATER BALANCE – GENERAL OVERVIEW
NOTABLE POINTS WARNING
• The reliability and longevity of your swim spa support equip-
ment are directly related to how well water quality is maintained!
• The small volume of water in your swim spa is easily affected CHEMICAL HANDLING SAFETY HINTS
by the introduction of oils, lotions, perspiration and chemicals. It
is imperative that you give your swim spa regular attention to • Never pre-mix chemicals with each other prior to adding
maintain clean, safe and balanced water to prevent premature to hot tub water.
damage and/or failure (corrosion/calcification) to the support • Add only one chemical to the water at a time.
equipment. Maintaining proper swim spa water balance and • Always add chemicals to water and not vice-versa.
sanitizer levels is extremely important. Neglected hot water will • Chemicals may be corrosive, so handle with care and
allow bacteria to quickly spread. store in a cool dark place.
• The mineral content of swim spa water increases due to water • Never smoke near chemicals as most are flammable
evaporation, sanitizers and other chemicals. If the mineral con- • Ensure any spilled chemicals are carefully cleaned up
centration, particularly calcium, becomes too high, the minerals immediately.
will literally “drop” or precipitate out of the water and deposit on • Always have the POISON CONTROL telephone number
the swim spa walls, plumbing, jets, in the filter and on the heater handy in the event of an emergency.
element. • Keep chemicals out of children‘s reach
It is very important that pH be checked frequently and main- • Wear safety glasses and gloves when handling chemi-
tained in the recommended range as indicated in the chart WA- cals.
TER BALANCE SUMMARY FOR YOUR SWIM SPA
• It is also very important that Total Alkalinity (the ability of the INITIAL WATER FILL & BALANCE
water to resist a change in pH) be maintained in the recom- 1 Make sure the swim spa is circulating.
mended range as indicated in the chart WATER BALANCE 2 Add a sequesterant (stain and scale controller). Allow water
SUMMARY FOR YOUR SWIM SPA to circulate for an hour before adding anything else to the swim
• Although there may be two identical swim spa models right next spa water.
door to each other, the maintenance requirements will be differ- 3 Add a Shock / oxidizing agent .
ent, dependant on such factors as: 4 Add sanitizing tablets (Bromine or Chlorine) to the dispenser:
– bather load
– frequency of use/quantity of bathers
Heater and other component failure due to
– different body chemistry
improper water balance is not covered under
– sun vs. shade
warranty.
– temperature
For these reasons, it is very important to develop proper swim
spa water maintenance habits and follow your ThermoSpas®
retailer’s recommended water maintenance procedures.
Floating dispenser: Add 6 or 7 tablets, adjust initially to ‘5’, allow water to circulate for 3 to 4 hours, then test.
The tablets will dissolve slowly over a 10-14 day period, depending on setting, and use of the hot tub.
5 Test pH and Total Alkalinity and also adjust accordingly.
Expose the large Refill hole at the end of the tube and add 5 or 6 tablets.
Do not overfill dispenser as performance will be affected. Turn to
expose the largest area and allow water to circulate for 3 to 4 hours before testing level. Adjust to lesser area as necessary to main-
tain a level of 3-5 PPM Sanitizer.
29GLOSSARY OF COMMON WATER MAINTENANCE TERMS
1 CHLORINE – in granular, liquid or puck/tablet form, is an oxidant and biocidal agent. It is very effective and fast acting.
Recommended chlorine residual level is 3.0 to 5.0 ppm.
2 CHLORAMINES – a compound formed when chlorine combines with nitrogen or ammonia present in the water. When al-
lowed to go unchecked, it causes eye and skin irritation and is indicated by a strong chlorine odor.
3 ONE-PART BROMINE – also available in puck/tablet form, is another type of oxidant/biocidal agent, and is introduced into
the hot tub water via a brominator. Recommended bromine residual level is 3.0 to 5.0 ppm
4 TWO-PART BROMINE – composed of a liquid or powder component introduced manually into the water on a weekly ba-
sis, and a granular component that is added daily or as the hot tub is used.
5 BROMAMINES – are formed when bromine destroys nitrogen-bearing organic matter. Unlike chloramines, bromamines don’t
cause eye irritation, however, when allowed to go unchecked, will cause an objectionable odour.
6 SHOCK – the practice of adding an oxidizing agent to hot tub water to destroy ammonia, nitrogenous and organic con-
taminants (chloramines and bromamines)
7 pH – a logarithmic value expressing the relative acidity or basicity of a substance (such as hot tub water) as indicated by
the hydrogen ion concentration. pH is expressed as a number on a scale of 0 to 14, where 0 is most acidic, 1 to 7 being acidic, 7
considered neutral, 7 to 14 being basic, and 14 being most basic. The ideal range for hot tub water is 7.4 to 7.6 ppm
8 pH INCREASER – raises the pH level of the water.
9 pH DECREASER – lowers the pH level of the water.
10 TOTAL ALKALINITY (TA) – the amount of carbonate, bicarbonate and hydroxide compounds present in the water that
determines the ability or capacity of the water to resist change in pH. Also known as the ‘buffering’ capacity.
11 ALKALINITY BOOSTER – raises the alkalinity.
12 CALCIUM HARDNESS – the calcium portion of the total alkalinity which represents 70 to 75% of total hardness. Calcium
concentrations determine whether water is ‘soft’ - too little calcium, or ‘hard’ -too much calcium.
13 CALCIUM BOOSTER – increases the calcium level.
14 TOTAL DISSOLVED SOLIDS (TDS) – a measure of the total amount of dissolved matter in the water (calcium, carbonates,
bicarbonates, magnesium, metallic compounds, etc.)
15 SEQUESTERANTS (STAIN AND SCALE CONTROLLERS) – keeps dissolved metals and minerals in the water from attack-
ing the hot tub shell and support equipment components.
16 DEFOAMER – removes foam build-up from the water surface. At best, this is a temporary remedy, as excessive foam is merely
a symptom of improper water balance (typically high organic residue and/or high pH).
17 CARTRIDGE FILTER CLEANER – degreases and cleans cartridge filters.
18 OZONATOR – generates Ozone (a gaseous molecule composed of 3 atoms of oxygen) and is injected into the hot tub
water for the oxidation of water contaminants.
19 TEST KIT – used to monitor specific chemical residual or demands in the water. May be in the form of litmus strips or
liquid drops.
20 PPM – abbreviation for ‘parts per million’, the unit of measurement used in chemical testing which indicates the parts by
WATER BALANCE SUMMARY FOR YOUR SWIM SPA*
SANITIZER (ppm) MIN IDEAL MAX
Chlorine 1.0 3.0 - 5.0 5.0
Bromine 1.0 3.0 - 5.0 5.0
CHEMICAL
PH 7.2 7.4 - 7.6 7.8
Total Alkalinity (TA) 80 80 - 120 180
Calcium Hardness 150 200 -400 500 -1000
*National Spa & Pool Institute recommended levels for residential spas/hot tubs
30WATER BALANCE TROUBLESHOOTING
PROBLEM POSSIBLE CAUSES SOLUTIONS
Cloudy Water Microscopic particles too small to filter out. Test and adjust all water balance elements
and add flocculent* to cause the particles to
combine together so they can be filtered
out. Increase filter cycle time.
High Total Alkalinity Test these water balance elements and
High pH levels adjust to recommended parameters.
High Calcium Hardness
Scale High Calcium Hardness Test calcium hardness level and treat with
(White/Grayish Deposit) sequesting agent* or perform partial drain/
refill.
Skin Eye Irritation Improper pH and/or Total Alkalinity levels Test water balance and make the appropri-
ate changes.
Excessive Foam Buildup of body oils or cosmetics If no water line is present you can try using
defoamer* to break up the contaminants
and then a clarifier* to help filter them away.
If a water line is present the spa may need
to be drained and cleaned. Either way, the
filter should be thoroughly cleaned by soak-
ing over night in bleach. An oil absorbing
sponge can help in preventing this in the
future. Increase filter cycle time.
Laundry detergent residual in swimwear Prevent by running an extra rinse cycle on
washing machine or re-rinse well by hand
Excess organic contaminants Some organic matter is prone to causing
foamy water as it breaks down in the filter
(maple leaves especially). Generally using
defoamer* to break up the contaminants,
then a clarifier*
To help filter them away followed by thor-
oughly cleaning your filter will clear up the
problem. It may however be necessary to
drain and refill your spa if the foaming is
quite excessive.
Low Calcium Hardness Test calcium hardness and if necessary
increase with calcium chloride*
Corrosion/Etching Presence of metals in water (iron, copper, Test total alkalinity levels and if necessary
etc) increase with sodium bicarbonate*
Discoloured Water Presence of metals in water (iron, copper, Treat with chelating* or sequestering agent*
(Clear v. turbid water) etc)
Unstable pH Low Total Alkalinity levels Test total alkalinity levels and if necessary
increase with sodium bicarbonate*
pH resistant to changing High Total Alkalinity levels Test total alkalinity levels and if necessary
decrease with sodium bisulfate* or muriatic
acid*
* Contact your local Thermo Spas retailer
for specific product recommendation
31ROUTINE SWIM SPA MAINTENANCE
REVIEW CHEMICAL HANDLING
SAFETY HINTS
DAILY CLEANING THE SKIMMER BASKET
1 Test water, and if necessary, add shock. 1 Activate the STANDBY/DRAIN ASSIST mode
2 Ensure proper water level is maintained. 2 Remove the skimmer basket by pulling the weir door for-
ward, and pulling the basket up and towards the front
WEEKLY 3 Remove debris from basket. (Note: Avoid hitting the bas-
1 Test pH and Alkalinity. Adjust accordingly ket against objects to knock debris loose as this may
2 Top-up chemical dispenser damage the unit)
3 Add sequesterant (stain and scale controller) 4 Reinsert basket
4 Remove and spray cartridge filter with garden hose and re- 5 Take the system out of STANDBY/DRAIN ASSIST
install (see section CARTRIDGE FILTER) mode, and as the pump begins to operate, monitor water
5 Remove and clean out skimmer basket (see section flow over the weir door to assure that it is free floating
CLEANING THE SKIMMER BASKET)
6 Add Shock / oxidizing agent
7 Inspect union connections for o-ring and gasket leaks -
Tighten if loose.
MONTHLY
Soak your filter cartridge in a filter cartridge cleaning solu-
tion. Rinse thoroughly and, if possible, allow to dry before
re-installing. ThermoSpas® recommends purchasing a
second filter so that while the first is cleaning, the other is
clean and ready to install
QUARTERLY
Drain hot tub at least once per quarter and clean the acrylic
shell surface with a non-abrasive cleaner designed specifi-
cally for acrylic surfaces. See sections CHANGING THE
HOT TUB WATER and DRAINING YOUR SWIM SPA
SAFETY HARD COVER
When a hot tub is uncovered, over 90% of heat is lost from
the water surface. This evaporation also affects the chemical
balance and could create humidity problems indoors. THER-
MOSPAS® Safety Hard Covers are engineered for maximum
thermal efficiency and appearance. They are hinged in the
middle for easier handling, and the zip fastener allows the
tapered foam inserts to be changed if damaged. The skirt of
the safety hard cover hugs the lip of the hot tub for a tight fit.
The locks, with one part fastened to the deck or skirt, prevent
small children or animals from entering the hot tub.
Do not drag the safety hard cover across the hot tub or deck-
ing. Standing on the hardcover could cause the tapered foam
inserts to crack, which will lead to water absorption.
NEVER LEAN OR STAND ON YOUR HARDCOVER.
The cover should be cleaned at least twice a year with a vinyl
moisturizer and protector.
NOTE: ALWAYS ENSURE THE SAFETY HARDCOVER IS
IN PLACE AND LOCKED WHENEVER THE HOT TUB IS
NOT BEING USED. FAILURE TO DO SO MAY CAUSE
DAMAGE OR CRACKING OF THE ACRYLIC SURFACE
NOT COVERED UNDER THE WARRANTY.
32CARTRIDGE FILTER
The cartridge should be cleaned every two to four weeks,
depending on the amount of use. Signs that the filter requires
cleaning include:
• Reduced jet power
• Hazy gray water
• Rattling noise in the pump or filter
• Heater not working
REMOVAL
1 Activate the STANDBY/DRAIN ASSIST mode.
2 Remove the skimmer cover.
3 Pull the basket out.
4 Rotate the filter counter clockwise to unthread.
5 Lift the filter out of the housing.
CLEANING
6 With a garden hose and spray nozzle, hose off the cartridge
element, ensuring to carefully separate every pleat.
7 To remove collected lotions, body oils, etc. soak the car-
tridge in warm water and a filter cleaning/emulsifying com-
pound (available at your THERMOSPAS® retailer).
8 A cleaning cylinder may be purchased from your THERMO
SPAS® Retailer.
9 Rinse thoroughly and dry before replacing. CARTRIDGE FILTER
FILTER HOUSING
10 ThermoSpas® recommends purchasing a spare filter car- ELEMENT
tridge
so that you always have a clean substitute ready to rotate. CLEANING THE ACRYLIC SURFACE
11 After the element has dried - if necessary, lightly brush The acrylic surface can be cleaned and polished using a soft
between pleats with a fine paint-brush to remove remain- cloth and acrylic cleaner, available at your ThermoSpas®
ing dirt particles. retailer.
• Important: Do not use detergents - the
remaining residues will adversely affect
water chemistry, making it difficult to
Do not use a wire brush or other devise maintain proper water balance
to clean cartridge element. • Do Not use abrasive cleaners – damage
Do not put in dishwasher or washing ma- to the acrylic surface will occur.
chine.
RE-INSTALLATION
12 Place the cartridge filter back into the filter housing.
13 Rotate clockwise until the filter is tight in place.
14 Reinstall the skimmer tray.
15 Locate the skimmer face in place and slide down to lock in
place.
16 Take the system out of STANDBY/DRAIN ASSIST mode.
17 When the pump starts circulating on low speed, it will be
necessary to release trapped air in the filter.
33CHANGING THE SWIM SPA WATER 11 To completely flush the old water from the plumbing lines:
The water in your swim spa must be carefully monitored and allow fresh water to fill into the foot-well area while the old
drained regularly as required, depending on size and water continues to be pumped out. Always keep at least
amount of use. Draining at least once annually is strongly 10cm (4 in.) of water in the foot-well so that pump 1 re-
recommended and offers the opportunity for inspection of mains primed.
jets and suction fitting covers. If your swim spa is used daily 12 When the water from the drain hose turns clear (indicating
or by a large number of bathers, the water should be drained fresh fill water), flush is complete.
more often. One method to determine the approximate 13 Turn OFF the filtration pump.
length of time between water changes is to divide the water 14 Close the drain-hose bib on the swim spa plumbing line
volume (in litres) of you swim spa by 13.5 and then divide by and continue filling swim spa with fresh water.
the average number of bathers each day. 15 Place cover on swim spa (to avoid splash-out).
16 Open filtration pump return gate valve.
Formula 17 Press any button on the topside control panel (other than
the pump 1 button) to take the system out of STANDBY/
(_______ ÷ 13.5 ) ÷ (________) = (________) DRAIN ASSIST mode. Filtration pump and the heater
will activate to circulate and heat the water while filling
Volume of water Average daily Days
continues. This also reduces the possibility of an airlock
in litres bathers between occurring.
water 18 Continue adding fresh fill water until level is approximately
changes 19mm (3/4 in.) from the top of the skimmer opening.
19 Once fill is complete, remove the #10 rubber expansion
EXAMPLE: plug from the bottom of the skimmer housing.*
1000 liters divided by 13.5 divided by 2 = 37 days. The swim 20 If the filter housing was opened to replace the cartridge
spa water must be changed when the amount of dissolved filter, it will be necessary to release trapped air from the
solids becomes excessive, and is usually indicated by “gray” filter housing by carefully loosening the small black air
or dull looking water. vent/bleeder valve located on the top of the filter housing.
When water begins to escape close the air vent valve.
DRAINING YOUR SWIM SPA 21 In the unlikely event of a pump air lock (pump 1 is operat-
ing but there is no water movement from the jets), refer to
REFER TO FIGURE 1 & FIGURE 2 section PUMP PRIMING/RELEASING AN AIR LOCK
1 Locate nearest drain facility (Check your local bylaws).
2 Put the hot tub control system into STANDBY/DRAIN * It may be necessary to put system into STANDBY/
ASSIST mode. The system will automatically exit
DRAIN ASSIST* mode in order to remove plug.
Standby Mode after 1 hour and resume normal operating
functions.
3 Remove the skimmer basket so that the hole beneath it is
accessible, and insert the #10 rubber expansion plug
provided.
4 Attach garden hose to hose bib located on plumbing line
beside the hot tub control system.
5 Run garden hose to drain location.
6 Open hose bib.
7 Close filtration pump return gate valve next to the hose
bib (this directs the water out the drain hose).
8 Activate the circ pump.
9 Monitor the swim spa while it drains.
10 Use the second garden hose to wash down interior sur-
face as the swim spa continues to drain. A sponge may
also be used to wipe down the interior surface. FIGURE 1 FIGURE 2
WATER SOFTENERS
Never fill a swim spa with water from a water softener, as it
could adversely effect the water chemistry, making it difficult
to maintain proper water balance. If you live in an area with
hard or soft water, give careful attention to your Calcium
Hardness level. Topping up with soft water is acceptable.
34WINTERIZING YOUR THERMOSPAS SWIM SPA
In the event that you do not wish to use your swim spa year-round, it is very important that you properly winterize to
protect against damage from freezing. Your ThermoSpas® retailer can perform this service for a nominal fee. If you
choose to winterize your swim spa yourself, please follow the directions outlined below:
• Drain the swim spa entirely see section - DRAINING YOUR SWIM SPA
• Remove and clean the cartridge filter element see section - CARTRIDGE FILTER
• Using a wet/dry utility vacuum, remove remaining water from the jet openings, filter cartridge housing, and footwell.
• Either pour or use a turkey-baster where necessary to add potable biodegradable RV antifreeze to areas such as
pump wet end, jet channels, filter housing, blower channels.
DO NOT USE AUTOMOTIVE ANTIFREEZE.
• Important: mixing potable biodegradable RV antifreeze with water significantly reduces its ability to protect against
freezing. Therefore, it is very important ALL water is removed from the swim spa plumbing before adding.
• Add potable RV antifreeze to the holes in the bottom suction/drain to prevent any trapped water in the false floor
from freezing and damaging the swim spa shell.
• Turn pump on for only a few seconds to circulate the antifreeze.
• Unthread and disconnect all unions in the support equipment area. Remove lowest winter drain plug on pump face
plate. Repeat for all pumps, where applicable.
• Cover exposed plumbing connections with plastic bags and duct tape.
• Where practical, disconnect swim spa support equipment and store in a dry heated area.
• Install the safety hardcover, and cover the entire swim spa with a tarp to prevent premature weathering of the cabi-
net and the safety hard cover.
• Remove snow build up regularly to prevent damage to the safety hard cover.
• It is assumed that your ThermoSpas® swim spa has been properly installed on a reinforced concrete pad to elimi-
nate lifting of the swim spa due to hydrostatic ground water pressure.
NOTE:
When winterizing your swim spa, make sure that the swim spa is fully covered to ensure that the acrylic is
not damaged from expose to the sun and to prevent any snow or debris from entering into the swim tank.
When empty, ensure that the shell is properly supported with cross members and that the solid state frame
system is locked in place. Ensure the supporting wall and lip anchors are locked down properly as they will
no longer have the additional load of the weight of the water impacting them.
If you are not 100% confident that your swim spa is properly winterized, please consult
your authorized THERMOSPAS® Swim Spa Retailer. Caution recommends that an au-
thorized ThermoSpas® Retailer winterize your swim spa in the initial year. Damage as a
result of freezing is not covered by the warranty.
Drain Plug
35GENERAL TROUBLESHOOTING CONTINUED
WHAT TO DO IN THE EVENT OF... …POWER FAILURE OR SYSTEM FAULT DURING
…POWER FLUCTUATIONS COLD WEATHER CONDITIONS
The power supply into your home is, for the most part, If your control system will not reset, (ie. GFCI trips) or if your
fairly consistent. pump will not circulate for any other reason, place a low
However, when local power demand is high, there is a wattage space heater under the cabinet in the equipment
tendency for the voltage entering your home to drop area. This will delay the risk of freezing while a service ap-
(sometimes significantly) or fluctuate. pointment is scheduled.
This condition is referred to as a ‘brown-out’. Although
safeguards have been built into the system to protect
against this condition, supply voltage may drop low Always follow the manufacturers instruc-
enough, if even for a second, to cause the system to tions when locating and placing a porta-
display a ‘ghost’ message. Should this occur or if the ble electric space heater into service.
display shows partial messages, try resetting the system Ensure that safe clearance to combus-
by turning power to the swim spa, waiting a few minutes, tible surfaces is maintained. Do not leave
then turning power on again. If this does not reset the unattended.
system, contact your local ThermoSpas® retailer or ser-
vice organization.
NOTES:
36You can also read