USCG UG15: First Logon and Profile Updates - Your First Steps in E2 Release 21.4 | November 2021
←
→
Page content transcription
If your browser does not render page correctly, please read the page content below

USCG UG15: First Logon and
Profile Updates
Your First Steps in E2
Release 21.4 | November 2021

© 2021 CWTSatoTravel

USCG UG15 First Logon and Profile Updates

Table of Contents
1          INTRODUCTION ...........................................................................................................................................3
2          GETTING STARTED .....................................................................................................................................4
3          COMPLETING YOUR FIRST LOGON..........................................................................................................5
4          COMPLETING YOUR PROFILE ...................................................................................................................9
    4.1      Access Your Profile ....................................................................................................................................9
    4.2      Personal Profile ....................................................................................................................................... 12
    4.3      Approver Availability ............................................................................................................................... 14
    4.4      Default Home Site ................................................................................................................................... 15
    4.5      Address Information ................................................................................................................................ 17
    4.6      Email Address ......................................................................................................................................... 18
    4.7      Travel Arrangers ..................................................................................................................................... 20
    4.8      Credit Card Information ........................................................................................................................... 22
    4.9      Travel Preferences .................................................................................................................................. 25
    4.10     Approval Routing .................................................................................................................................... 28
    4.11     Email Notifications .................................................................................................................................. 28
    4.12     Favorite Accounting Codes ..................................................................................................................... 29
    4.13     Password & Security Questions.............................................................................................................. 33
    4.14     Tax Information ....................................................................................................................................... 35
    4.15     Printable Profile ....................................................................................................................................... 36
    4.16     Profile Supplement .................................................................................................................................. 36
5          MANAGING YOUR DEPENDENTS........................................................................................................... 41
    5.1      Add a Dependent .................................................................................................................................... 42
    5.2      Edit a Dependent .................................................................................................................................... 43
    5.3      Delete a Dependent ................................................................................................................................ 43
6          REVISION HISTORY ................................................................................................................................. 44
7          TRADEMARK AND COPYRIGHT ............................................................................................................. 44

CWTSatoTravel                                                   Proprietary & Confidential                                                                    Page 2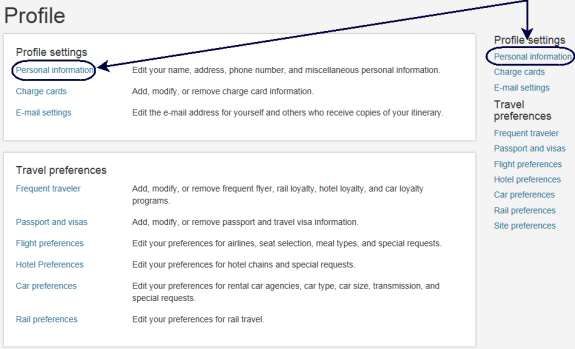
USCG UG15 First Logon and Profile Updates

1        Introduction
         This document contains information regarding the logon process and user profile for E2 Solutions users
         utilizing both Federal Travel Regulations (FTR) and Joint Travel Regulations (JTR). Features and options
         specific to JTR functionality will be indicated.

CWTSatoTravel                               Proprietary & Confidential                                    Page 3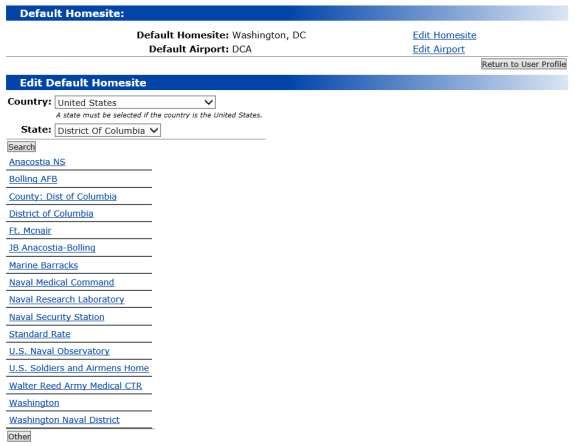
USCG UG15 First Logon and Profile Updates

2        Getting Started
         When your E2 Solutions (E2) account is available, you will receive an email message notifying you that
         your account has been created. The email provides you with a link you must follow to complete your
         security profile and gain access to E2.

         Figure 1: Notification Email

         TIP: You must click the link in the email and follow the instructions within 72 hours. If you do not, the link
         expires. If this happens, contact your Travel Assist Team at 1-866-800-USCG or email HQS-SMB-CG-
         1332-TravelManagementOffice@uscg.mil. They can take the steps needed to generate another email
         notification.

CWTSatoTravel                                 Proprietary & Confidential                                         Page 4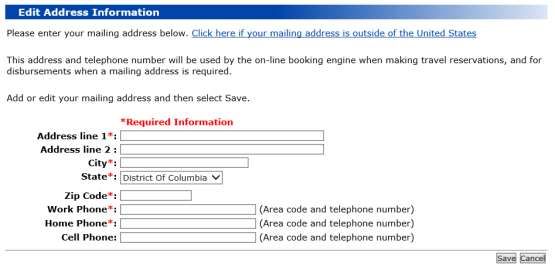
USCG UG15 First Logon and Profile Updates

3        Completing Your First Logon
         When you click the link in the notification email, you are prompted to select a password, as well as
         establish additional security credentials that are used if you forget your password or when you need to
         change passwords. This information is known as your security profile.

         Complete the following steps.

             1. Click the link in your notification email, which displays the Password Maintenance page.

                  Figure 2: Password Maintenance — Initialize Security Information

             2. Enter the required security information.

                  NOTE: The information you enter in these fields must match your account information. If you
                  have questions, contact your travel policy manager.

                      • E2 User Id – Enter your E2 user ID.
                            o For employees, your user ID is USCG-#######, where ####### is your
                                employee ID number (e.g., 1234567).
                            o If you are an invitational traveler or other non-employee, your user ID will be
                                USCG-S#####, where ##### is the ID number assigned to you.
                    • Social Security Number or Employee Id – Enter your employee ID number.
             3. Click Continue, which displays the Edit Password Information section of the Password
                Maintenance page.

                  Figure 3: Password Maintenance — Edit Password Information

CWTSatoTravel                                Proprietary & Confidential                                     Page 5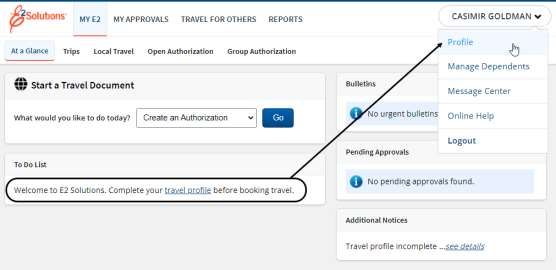
USCG UG15 First Logon and Profile Updates

             4. Complete your security credentials.
                   • New Password – Enter your new password to be used for E2. Passwords must conform
                       to the rules displayed above the field, and cannot be longer than 12 characters.
                   • Confirm New Password – Confirm your password by reentering the value from the New
                       Password field.
                   • First Security Question / Second Security Question – Select your security questions
                       from the drop-down lists.
                   • Security Answer – Enter your answers to the selected security questions in the
                       corresponding fields. Each question and answer must be unique.

                           NOTE: Unlike passwords, security answers are not case-sensitive when you are
                           prompted to enter them for credentials confirmation.

                      • Confirm Security Answer – Confirm your security answers by reentering the values
                        from the Security Answer fields. The Security Answer and corresponding Confirm
                        Security Answer fields must match exactly, including case.
             5. Click Save, which displays the WARNING MESSAGE AND PRIVACY ACT NOTICE window.

                  Figure 4: WARNING MESSAGE AND PRIVACY ACT NOTICE window

CWTSatoTravel                                Proprietary & Confidential                                   Page 6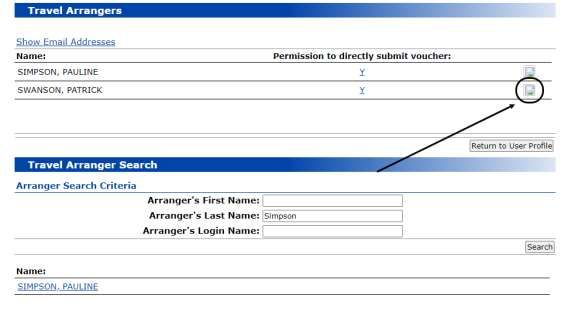
USCG UG15 First Logon and Profile Updates

             6. Scroll down to read all of the information provided in the window, and then click Accept. Per
                agency requirements, this window displays each time you successfully log on to E2. You are
                required to read and accept the terms of use before you can continue.
             7. After you click Accept, because this is the first time you have successfully logged on to E2, the
                Rules of Behavior window displays.

                  Figure 5: Rules of Behavior window

             8. Read the rules, and then click I have read and acknowledge the Rules of Behavior button to
                continue. You are taken into E2 Solutions on the My E2 At a Glance tab; you are now logged on
                and can begin using E2.

                  Figure 6: My E2 At a Glance — After Initial Logon, Incomplete Profile

CWTSatoTravel                                 Proprietary & Confidential                                    Page 7
USCG UG15 First Logon and Profile Updates

                  NOTE: If your profile is complete, but lacks TMC profile information, a different message displays
                  in your To Do List. The message (shown in the following figure), however, still directs you to
                  review and take action on your profile.

                  Figure 7: My E2 At a Glance, To Do List — Complete Profile, No TMC Profile ID

CWTSatoTravel                                Proprietary & Confidential                                      Page 8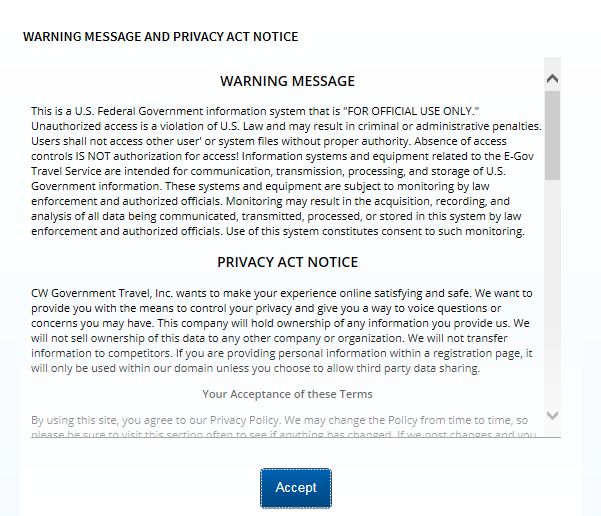
USCG UG15 First Logon and Profile Updates

4        Completing Your Profile
         Every E2 user has a profile. It stores a variety of information, such as your personal preferences
         regarding travel, ticketing, address and contact information, default home site (i.e., your default departure
         location for trips), and document routing information. After you log on for the first time, review your profile
         for accuracy, and add any additional data that may be required before you can plan and book travel using
         E2.

4.1      Access Your Profile
         To get started, click the travel profile link in your To Do List on the My E2 At a Glance tab, or click the
         User Options menu in the task bar (i.e., your name), and then select Profile from the drop-down list. Either
         action displays the User Profile page.

4.1.1             User Profile
                  Each section on the User Profile page displays a section header on the left (i.e., Personal Profile,
                  Default Homesite) and an edit link on the right (i.e., Edit Profile, Edit Homesite).

                  TIP: If an Edit link does not display, you cannot edit the information.

                  The following sections are available:

                      •    Traveler Name – The name that identifies you in E2. Your “traveler name,” which may be
                           different from your reservation name entered in the Personal Profile section, displays at
                           the top of your user profile and as the label for the User Options menu in the task bar.
                           This name is also used by your agency’s FSMS financial system.

                           NOTE: You cannot change this name; if your “traveler name” is incorrect, contact your
                           Travel Assist Team for assistance.

                      •    Last Login Information – Date and time of your last login to E2, as well as the IP
                           address from which you access the site.
                      •    Personal Profile – Click the Edit Profile link to display the Personal Information page,
                           which allows you to maintain your position title and reservation name.
                      •    Approver Availability – If you are an approver, click the Edit Availability link to display
                           the Edit Your Availability page, which allows you to indicate your availability to review and
                           approve documents.

                           NOTE: The Edit Availability link only displays for users with a user type of Approver.

                      •    Default Homesite – Click the Edit Homesite link to display the Default Homesite page,
                           which allows you to indicate your default home location and departure airport.
                      •    Address Information – Click the Edit Address Information link to display the Edit
                           Address Information page, which allows you to maintain your mailing address and
                           contact information (i.e., home and cell phone numbers).
                      •    Email Information – Click the Edit Email Information link to display the Edit Email
                           Information page, which allows you to maintain your primary and alternate email
                           addresses.
                      •    Travel Arrangers – Click the Edit Arrangers link to display the Travel Arrangers page,
                           which allows you to designate other users who are allowed to make travel plans on your
                           behalf.

CWTSatoTravel                                  Proprietary & Confidential                                       Page 9
USCG UG15 First Logon and Profile Updates

                      •    Credit Card Information – Click the Edit Credit Card Information link to display the
                           Credit Cards page, which allows you to enter your GTCC and personal charge card
                           information, as well as indicate which cards should be used by default for air travel, rail
                           reservations, and hotel guarantees.
                      •    Travel Preferences – After adding address and credit card information to your E2 user
                           profile, click the Edit Travel Preferences link to create and update your TMC traveler
                           profile. The Profile page in the online booking tool opens in a new browser window or tab.

4.1.2             Other Features
                  The Other Features section at the bottom of the User Profile page displays additional links for
                  optional information that can be added to your E2 user profile.

                      •    Approval Routing – Click the View Approval Routing link to display the Routing Rules
                           page, which allows you to review the routing templates and individual routing rules
                           assigned to your user account.
                      •    Email Notifications – Click the Edit Email Notifications link to display the Email
                           Notifications page, which allows you to manage your email subscriptions.
                      •    Favorite Accounting Codes – Funds manager approvers can click the Edit Favorite
                           Accounting Code link to display the Favorite Accounts page, which allows you to
                           manage a list of favorite account codes.
                      •    Password Information – Click the Edit Password Information link to expand that
                           section and change your E2 password.
                      •    Tax Information – Click the Edit Tax Information link to display the Edit Tax Information
                           page, which allows you to manage the information needed to calculate taxes for long-
                           term taxable travel.
                      •    Printable Profile – Click the Printable Profile link to display a printable version of your
                           user profile in a new browser window.
                      •    Profile Supplement – Click the Profile Supplement link to display the Profile
                           Supplement page, which allows you to add additional optional information to your user
                           profile.

CWTSatoTravel                                 Proprietary & Confidential                                     Page 10
USCG UG15 First Logon and Profile Updates
Figure 8: User Profile page
CWTSatoTravel Proprietary & Confidential Page 11USCG UG15 First Logon and Profile Updates
4.2 Personal Profile
The Personal Profile page displays when you click the Edit Profile link on the User Profile page. The
page is divided into two sections: Personal Information and Full Name Information for Reservation.
4.2.1 Personal Information
The following fields are included in the Personal Information section of the page.
• Position Title – Enter your professional job title.
• Ticket Preference – This field defaults to Electronic and is disabled.
Figure 9: Personal Profile — Personal Information fields
4.2.2 Full Name Information for Reservation
There are two types of names in E2:
• Traveler Name – The name that identifies you in E2. Your "traveler name" appears at the
top of your user profile and as the label for the User Options menu in the task bar. This
name is also used by the FSMS financial system. You cannot change this name; if your
"traveler name" is incorrect, contact your travel policy manager for assistance.
Figure 10: User Profile — Traveler Name Location
CWTSatoTravel Proprietary & Confidential Page 12USCG UG15 First Logon and Profile Updates
Figure 11: User Options — Traveler Name
• Reservation Name – The name used for all of your commercial airplane reservations
and by the Transportation Security Administration (TSA) for watch list screening. This
name must match the government-issued documentation you will use when traveling
(e.g., passport, driver's license). You can change your reservation name when
necessary.
Figure 12: Personal Profile — Reservation Name
4.2.2.1 Verify and Update
Since your reservation name may be different from your traveler name, you should verify and
update your reservation name information before booking travel in E2. With the User Profile page
displayed, complete the following steps.
1. Click the Edit Profile link on the right side of the Personal Profile section. This displays
the Personal Profile page.
Figure 13: Personal Profile — Full Name Information for Reservation fields
CWTSatoTravel Proprietary & Confidential Page 13USCG UG15 First Logon and Profile Updates
2. Enter up to 32 characters for your first name, as it appears on your government-issued
identification used for travel. This field is required for all air travel in and out of the United
States, in support of the Transportation and Safety Administration’s (TSA) Secure Flight
initiative, and it defaults to your first name as shown in the User Options menu.
3. Enter up to 32 characters for your middle name or initial, as it appears on your
government-issued ID used for travel. DO NOT enter a period after the initial.
4. Enter up to 32 characters for your last name, as it appears on your government-issued ID
used for travel. This field is required for all air travel in and out of the United States, in
support of TSA’s Secure Flight initiative, and it defaults to your last name as shown in the
User Options menu.
NOTE: DO NOT ENTER SUFFIX INFORMATION. TSA does not support suffix
information for watch list screening at this time. Entering suffix information as part of your
last name will cause problems with Secure Flight screening and could result in delayed or
denied boarding.
5. Click the Save button to save your entries.
NOTE: If your reservation name does not match the name on your frequent flyer account,
contact the airline to change your account name to match your reservation name.
4.3 Approver Availability
If you are an approver, the Approver Availability section is part of your E2 user profile. If you are
unavailable due to vacation or illness, this section can be updated to ensure the document is routed to
everyone else in your routing pool.
4.3.1 Edit Approver Availability
Complete the following steps to edit your availability via the User Profile page.
1. Click the Edit Availability link to display the Edit Your Availability page.
Figure 14: Edit Your Availability page
2. Select your status (i.e., Available or Not Available) from the Current Status drop-down
list.
3. If your selected status is Not Available, enter the dates you will be unavailable in the Out
of office start date and Out of office end date fields, or click the calendar icon to select
the dates from the drop-down calendar.
4. Click the Save button to save your entries. If a confirmation window displays, click the
OK button.
CWTSatoTravel Proprietary & Confidential Page 14USCG UG15 First Logon and Profile Updates
NOTE: If you select Not Available, any travel documents that are locked to you will be
unlocked and made available to the other approvers in your routing pool.
4.3.2 Approver Availability History
Click the Approver Availability History link on the User Profile page to display the Approver
Availability History page. This page allows you to review all changes to your availability. Each
dated entry includes a description of the status change and the name of the user who made the
availability update.
Figure 15: Approver Availability History page
4.4 Default Home Site
The Default Home Site page allows you to establish your primary work location and your preferred
departure airport. By default, this information is used as the departure and final arrival information for all
of your travel.
NOTE: You can change your default departure or final arrival site on an authorization, if necessary. This
modification changes the site information for that trip only; the default home site information defined your
user profile remains unchanged.
Click the Edit Homesite link on the User Profile page to display the Default Homesite page.
Figure 16: Default Homesite page
4.4.1 Edit Homesite
Complete the following steps to edit your default homesite.
1. Click the Edit Homesite link, which displays the Edit Default Homesite section on the
page. The default list shows all locations within your current selected country and state.
CWTSatoTravel Proprietary & Confidential Page 15USCG UG15 First Logon and Profile Updates
Figure 17: Default Homesite — Edit Default Homesite
2. If necessary, select the country for your home site from the Country drop-down list.
3. If necessary, select the state for your home site from the State drop-down list.
4. Click Search to generate a list of sites.
5. Click a particular location link to select that location as your default home site. The
Default Homesite field at the top of the page updates to reflect the new location.
• For U.S. locations, if you cannot find the correct city, look for the county.
• Click Other (below the list of location links) if you cannot find your city or country
on the list. Enter the site in the Other Default Homesite field; if necessary,
select the appropriate country and state from the Country and State drop-down
lists, and then click Save.
4.4.2 Edit Airport
Complete the following steps to edit your default departure airport.
1. Click the Edit Airport link, which displays the Edit Default Homesite Airport section on
the page. The default list shows all airports in your original state or country.
CWTSatoTravel Proprietary & Confidential Page 16USCG UG15 First Logon and Profile Updates
Figure 18: Default Homesite — Edit Default Homesite Airport
2. You can enter part of an airport code after the % in the Airport field to limit the list of
airport codes to only those that include that text string.
3. If necessary, select the country in which your departure airport is located from the
Country drop-down list.
4. If necessary, select the state in which your departure airport is located from the State
drop-down list.
5. Click Search to generate a list of airports matching your search criteria.
6. Click a particular airport code link to select that airport as your default departure airport.
The Default Airport field at the top of the page updates to reflect your selection.
4.5 Address Information
Your mailing address and telephone numbers are used when making reservations online, for payments
when a mailing address is required, and to contact you in case of changes to reservations or other travel
emergencies. With the User Profile page displayed, complete the following steps to update this
information.
1. Click the Edit Address Information link on the right side of the Address Information section. This
displays the Edit Address Information page.
Figure 19: Edit Address Information
CWTSatoTravel Proprietary & Confidential Page 17USCG UG15 First Logon and Profile Updates
2. At a minimum, complete all required fields. Required fields are marked with an asterisk (*).
TIP: Click the Click here if your mailing address is outside of the United States link if you can
enter an international mailing address.
• Address line 1 – Enter the street address from your mailing address.
• Address line 2 – Enter the second address line from your mailing address.
TIP: Add an apartment number, suite information, or P.O box details to the Address line
2 field.
• City / City or Town – Enter the city from your mailing address.
• State or Province – This field is pre-filled based on your default home site. If necessary,
enter the state or province from your mailing address.
• Country – Select the country from your mailing address from the drop-down list.
• Zip/Postal Code – Enter the postal code from your mailing address.
• Work Phone – Enter your work telephone number, including area code.
• Home Phone – Enter your home telephone number, including area code.
• Cell Phone – Enter your cell phone number, including area code.
• Alt Phone – Enter your alternate phone number, including area code.
• Fax – Enter your fax number, including area code.
3. Click Save to save your entries.
4.6 Email Address
Your email address is used to notify you of a variety of events, including:
• E-ticket receipts and booking confirmations
• Reservation changes
• Approval of travel documents
• Travel emergencies
• Events requiring your action (e.g., voucher to be submitted, travel to be approved)
4.6.1 Primary Email Address
Your profile must include one primary email address. This address was entered when your E2
account was created, and is the email address where you received your initial E2 access email.
When you book reservations via the online booking tool, your primary email address becomes
part of your reservations.
4.6.2 Alternate Email Addresses
Alternate email addresses receive copies of your reservation-related emails. An alternate email
address might be a personal email address that you check frequently, or the address of a travel
arranger or work supervisor. You can store up to four alternate email addresses in your profile.
E2 sends email address information to the online booking tool. The online booking tool and
airlines may use the first three alternate email addresses for reservation and travel-related emails
(i.e., Alternate Email Address 1, Alternate Email Address 2, and Alternate Email Address 3
fields). The Alternate Email Address 4 field is mapped to the online booking tool's Travel
Arranger E-mail field, found in the E2 online booking tool's Profile Personal Information section.
Like your primary email address, this email address becomes part of your reservations and
CWTSatoTravel Proprietary & Confidential Page 18USCG UG15 First Logon and Profile Updates
receives reservation-related emails and invoices from CWTSatoTravel. This address, however,
will not receive an email at the time of booking or for a reservation change.
4.6.3 Updating Email Addresses
With the User Profile page displayed, complete the following steps to update your primary and/or
alternate email addresses.
1. Click the Edit Email Information link on the right side of the Email Information section.
This displays the Edit Email Information page.
Figure 20: Edit Email Information page
2. Your primary email address displays in the Primary Email Address field. Government
travel policy restricts the domain of the primary email address to the following:
• .gov
• .mil
• .edu (additional restrictions may apply)
• .fed.us
• .state.us (e.g., state.la.us)
3. Enter up to four alternate email addresses in the Alternate Email Address fields.
Travelers must enter their supervisor’s email address (i.e., someone at level E7 or above)
as one of the alternate email addresses to ensure they also receive emails regarding
your approved travel and any other travel-related notifications (e.g., if the Funds Manager
requires their approval prior to approving funds).
TIP: Domain restrictions imposed on the primary email address do not impact alternate
email addresses.
4. Click Save to save your entries.
CWTSatoTravel Proprietary & Confidential Page 19USCG UG15 First Logon and Profile Updates
4.7 Travel Arrangers
Your unit or office may allow another user to make travel plans on your behalf. Travel arrangers can
create authorizations and make reservations for you, as well as take other actions, such as cancel an
approved trip, even if that trip includes reservations or has been ticketed. You can allow arrangers to also
submit vouchers on your behalf.
You can add travel arrangers to your profile, and remove them when necessary, on the Travel Arrangers
page. Click the Edit Arrangers link on the User Profile page to display the Travel Arrangers page. This
page displays a list of any previously defined travel arrangers and their ability to submit vouchers for you.
WARNING: By default, travel arrangers cannot directly submit a voucher for your travel. If you permit a
travel arranger to submit travel vouchers on your behalf, you are legally responsible for the accuracy and
completeness of any travel voucher the travel arranger submits.
Figure 21: Travel Arrangers page
4.7.1 Add a Travel Arranger
With the Travel Arrangers page displayed, complete the following steps to associate a travel
arranger with your E2 user profile.
1. Enter one or more search criteria in the fields in the Travel Arranger Search section.
• You can enter part of a user’s actual name (Arranger’s First Name and/or
Arranger’s Last Name fields) or E2 user ID (Arranger’s Login Name field) as
search criteria. For example, entering j in the Arranger’s First Name field will
return users with names such as James Fields, Jane Martin, Josie Smith, and so
on.
• Fields are not case-sensitive, but, if you enter data in multiple fields, only results
that match all entered data will be returned.
2. Click the Search button to return a list of matching users for your agency.
CWTSatoTravel Proprietary & Confidential Page 20USCG UG15 First Logon and Profile Updates
Figure 22: Travel Arrangers — Travel Arranger Search results
3. Click on the name of the user you want to add as a travel arranger. The page refreshes
and includes the selected user in the list of travel arrangers in the top section of the page.
4. The “Permission to directly submit voucher” column displays in the Travel Arrangers
section. Click the link for an arranger to indicate whether that arranger is allowed to
directly submit a travel voucher on your behalf.
a. When the Arranger Permission window displays, select the Yes or No (default)
radio button.
b. Click the Save button to save your selection and return to the Travel Arrangers
page.
Figure 23: Travel Arrangers — Arranger Permission window
5. Repeat steps 2–4 to associate additional travel arrangers with your profile.
6. Click the Return to User Profile button to return to the User Profile page. All users you
specified as travel arrangers are listed in the Travel Arrangers section.
CWTSatoTravel Proprietary & Confidential Page 21USCG UG15 First Logon and Profile Updates
4.7.2 Remove a Travel Arranger
With the Travel Arrangers page displays, click the Delete icon to the right of the travel arranger
you want to remove from your profile.
Figure 24: Travel Arrangers — Delete icon
4.8 Credit Card Information
Your profile may include government-issued travel charge card and personal credit card information, as
well as the default card or method of payment used for airfare, rail, and to guarantee hotel reservations.
These defaults are used when you book travel online via E2, or when you request travel agent assistance
for bookings via E2. Airfare and rail will typically be charged to your GTCC, if you have one. If you do not
have a GTCC, airfare and rail will be billed to the agency. Your personal credit card can be used for hotel
guarantees.
Complete the following steps to update your credit card information.
1. Click the Edit Credit Card Information link (on the right side of the Credit Card Information
section on the User Profile page). This displays the Credit Cards page.
CWTSatoTravel Proprietary & Confidential Page 22USCG UG15 First Logon and Profile Updates
Figure 25: Credit Cards — No Available Card Information
2. Add the information for your travel charge card in the Travel Charge Card section.
a. Select the type of travel charge card you are adding from the Type of Card drop-down
list.
b. Enter the card number (without dashes or spaces) in the Card Number field.
NOTE: When you click Save Changes, the number entered in the Card Number field will
be masked and display only the last four digits (e.g., XXXXXXXXXXXX1234).
c. Select the card's expiration date using the Expiration Date drop-down lists. Select the
month from the first drop-down list and the year from the second list.
3. If you do not have a GTCC, you may add a personal credit card to book hotel reservations. Add
the information for your personal credit card in the Personal Charge Card section.
a. Select the type of personal credit card you are adding from the Type of Card drop-down
list.
b. Enter the card number (without dashes or spaces) in the Card Number field.
NOTE: When you click Save Changes, the number entered in the Card Number field will
be masked and display only the last four digits (e.g., XXXXXXXXXXXX1234).
c. Select the card's expiration date using the Expiration Date drop-down lists. Select the
month from the first drop-down list and the year from the second list.
CWTSatoTravel Proprietary & Confidential Page 23USCG UG15 First Logon and Profile Updates
4. Select your default payment methods in the Online Booking Charge Card Defaults section.
a. Select one of the following options from the Airfare Charge Card drop-down list to
indicate the default form of payment to use for airfare.
• CBA (Centrally Billed Account) – Select this option to use the CBA for airfare
charges.
• No default – Select this option to indicate there is no default form of payment for
airfare charges. You will be required to enter a travel charge card or CBA
information each time you book travel reservations.
• Travel Charge Card – Select this option to use your travel charge card for
airfare charges.
b. Select one of the following options from the Rail Charge Card drop-down list to indicate
the default form of payment to use for rail reservations.
• CBA (Centrally Billed Account) – Select this option to use the CBA for rail
charges.
• No default – Select this option to indicate there is no default form of payment for
rail charges. If selected, the TMC must contact you for billing information and you
may be charged a full service TMC fee, even though you made the reservation
online.
• Travel Charge Card – Select this option to use your travel charge card for rail
charges.
c. Select one of the following options from the Hotel Guarantee Charge Card drop-down
list to indicate the default form of payment to use for hotel guarantees.
• No default – Select this option to indicate there is no default form of payment for
hotel guarantees. If selected, you may not be able to make hotel reservations
online via E2.
• Personal Charge Card – Select this option to use your personal charge card for
hotel guarantees.
• Travel Charge Card – Select this option to use your travel charge card for hotel
guarantees.
5. Click Save Changes to save your entries. Your online booking tool profile and the GDS are also
updated with your entries/selections.
6. Click the Back to Profile link to return to the User Profile page.
4.8.1 Modifying Existing Credit Card Information
If you need to modify the information for a travel or personal charge card that was previously
added to your profile, simply enter or select the new information in the appropriate section.
TIP: Be sure to click Save Changes to save your changes before returning to your profile!
• All existing Online Booking Charge Card Defaults will remain in place and will not change
unless you choose to update them.
• Any changes will also be sent to the GDS and the online booking tool to update your
profile.
• When the travel charge card (TCC) is updated, E2 will check for any future-dated
reservations using that TCC. If reservations are found and they have not yet been
ticketed, E2 will update those reservations with the new TCC number and/or expiration
date. An entry will also be added to the Trip History for any affected trip to reference the
change: [DATE/TIME] – PNR [RECORD LOCATOR] was updated with new TCC
information for [TRAVELER NAME].
CWTSatoTravel Proprietary & Confidential Page 24USCG UG15 First Logon and Profile Updates
4.8.2 Delete Existing Credit Card Information
Click the trash can icon ( ) in a section to remove that credit card information. The Type of
Card field is reset to No Card on File, and the Card Number and Expiration Date fields are
cleared.
• Any existing Online Booking Charge Card Defaults for that card will also be removed, and
the corresponding field(s) will revert to Select One. All other existing defaults, however,
will remain in place and will not change unless you choose to update them.
• The card that was deleted will also be removed from your profile on the online booking
tool and the GDS.
TIP: Be sure to click Save Changes to save your changes before returning to your profile!
4.9 Travel Preferences
Your TMC travel profile is used when you book travel using the E2 online booking tool or request agent
assistance for reservations. When you first log on to E2, the Travel Preferences section of your E2 user
profile usually shows that you do not have a TMC travel profile, and there is no link to edit or create a
profile. The Edit Travel Preferences link displays after you enter your address and credit card
information.
Figure 26: Travel Preferences — Edit Travel Preferences
When you click the Edit Travel Preferences link for the first time, your TMC travel profile is created, and
information from your E2 profile is copied to your TMC travel profile, including reservation name, address
information, email addresses, and credit card information. After your TMC travel profile is created, it is
automatically updated when your E2 profile changes. This assures that information shared between the
profiles is always synchronized.
With the User Profile page displayed, complete the following steps to add information to your TMC travel
profile that is not shared by your E2 profile.
WARNING: While you have the ability to update shared information (i.e., addresses, credit cards, email
settings) in your TMC travel profile, CWTSatoTravel strongly recommends that you only update those
settings within your E2 profile. Updates to shared information made in your TMC travel profile are not
transferred back to E2. Making the updates in E2 ensures that both profiles have the correct and most
current information. Having this information out of sync can cause difficulties when you try to book travel.
1. Click the Edit Travel Preferences link on the right side of the Travel Preferences section. Your
TMC travel profile is created, and you are redirected to the E2 online booking tool's Profile page,
displayed in a new browser window or tab.
CWTSatoTravel Proprietary & Confidential Page 25USCG UG15 First Logon and Profile Updates
Figure 27: E2 Online Booking Tool — TMC Travel Profile, Profile page
2. Click the Personal information link in the Profile Settings section. This displays the Personal
Information page for your TMC travel profile.
Figure 28: TMC Travel Profile, Personal Information — TSA-Requested Details
3. Gender – Select your gender from the Gender drop-down list.
4. Date of birth – Enter your birth date in the Date of birth fields.
CWTSatoTravel Proprietary & Confidential Page 26USCG UG15 First Logon and Profile Updates
a. Select the month you were born from the Month drop-down list.
b. Select the day you were born from the Day drop-down list.
c. Select the year you were born from the Year drop-down list.
NOTE: Your gender and date of birth are required by the TSA. If you do not save this information
in your TMC travel profile, you must enter it each time you book airline reservations. Tickets
cannot be issued without this information.
5. Redress number – If applicable, enter 13 alpha-numeric characters for your redress number in
the field. You may have a redress number if you were previously misidentified as a potential
match to the watch list, and applied for redress through the DHS Traveler Redress Inquiry
Program (TRIP). TSA's Secure Flight program uses the results of the redress process in its watch
list matching, thus preventing future misidentifications for passengers who may have a name that
is similar to an individual on the watch list. Refer to the TSA website for more information.
TIP: Due to varied levels of support by the global distribution systems (GDS), the redress number
is available for profile capture only. If provided, the redress number is not currently included with
the reservation. Travelers with a redress number should contact the airline directly to include this
information on the air travel itinerary.
6. Known Traveler Number – If you participate in the TSA Pre✓™ expedited screening program,
enter your Known Traveler Number (PASS ID) in the field, making that information available for
both online and offline bookings.
Figure 29: TMC Travel Profile, Personal Information — Additional Information
7. Click Save at the bottom of the page.
8. If you want to record other traveler preferences, click the Flight preferences link to specify your
seat and meal preferences, or click the Frequent traveler link to add frequent flyer and other
loyalty program numbers to your TMC travel profile.
TIP: Always click Save after making any changes.
9. Click the CLICK HERE when finished to close the window hyperlink (at the top of the page),
when you are finished with your entries, or just close the window.
Figure 30: E2 Online Booking Tool — CLICK HERE link
In E2, the Travel Preferences section of your profile will be updated with your TMC profile ID. This
may take a few minutes; you should see your TMC profile information if you refresh the page or
when you next review your user profile.
CWTSatoTravel Proprietary & Confidential Page 27USCG UG15 First Logon and Profile Updates
Figure 31: Travel Preferences — TMC Profile ID
4.10 Approval Routing
Default document approval routing information is stored in your profile. Click the View Approval Routing
link in the Other Features section of the User Profile page to display the Routing Rules page. The page
allows you to review the routing templates and individual routing rules assigned to your user account.
TIP: If your approval routing information is incorrect or needs to be changed, or if your profile does not
include approval routing information, contact the Travel Assist Team for assistance.
Figure 32: Approval Routing — View Approval Routing
TIP: Click a View Rules link in the Routing Templates Applied data grid to view a list of all routing rules
associated with the corresponding template. Click the Hide Rules link to collapse the expanded list of
rules.
4.11 Email Notifications
Many actions in E2 result in notifications to interested parties via email. For example, approval of a
document results in an email notification. The recall of a document triggers an email to the assigned
approver or group of approvers. Changing a password in E2 sends an email notification to the user.
Click the Edit Email Notifications link in the Other Features section on the User Profile page to display
the Email Notifications page and manage your email subscriptions. By default, you are automatically
“subscribed” to all E2 emails. Your travel policy, however, may allow you to opt out of receiving certain E2
emails. If you have received an email that has been customized to allow you to manage subscriptions, a
description of that email type and category displays in the Email Notifications data grid.
CWTSatoTravel Proprietary & Confidential Page 28USCG UG15 First Logon and Profile Updates
Figure 33: Email Notifications page
4.11.1 Opt Out of Receipt of an Email
Complete the following steps to disable an email notification.
1. Locate the email in the data grid.
2. Clear the Enabled check box.
3. Click the Save button to save your selection.
4.11.2 Subscribe to an Email You Previously Opted Not to Receive
Complete the following steps to re-enable an email notification that was previously disabled.
1. Locate the email in the data grid.
2. Select the Enabled check box. A check mark displays in the box.
3. Click the Save button to save your selection.
4.12 Favorite Accounting Codes
In addition to travel documents, funds manager approvers may also save favorite account codes to a
Favorites list in their E2 user profile, if the account code has been previously added to a document. Click
the Edit Favorite Accounting Code link in the Other Features section on the User Profile page to display
the Favorite Accounts page.
CWTSatoTravel Proprietary & Confidential Page 29USCG UG15 First Logon and Profile Updates
Figure 34: Favorite Accounts — No favorites available
Complete the following steps to add favorite account codes to your profile.
1. Click the Search button. This displays the Accounting Codes Search window.
Figure 35: Accounting Codes Search — Radio buttons
2. Select one of the following radio buttons to indicate the type of search you would like to perform.
TIP: If no radio buttons are available, the type of search you can perform is fixed. Continue to the
next step.
• Search by Segment Value – Select this radio button to search for an account code
based on a value contained in a specific segment.
• Drill-down Search – Select this radio button to search for an account code by segments
in descending order.
3. Click the Continue button. The Accounting Codes Search window refreshes to display the fields
to be used for the selected search.
• If you selected the Search by Segment Value radio button, enter the values of the
account code segments on which you want to search in the available fields.
Figure 36: Accounting Codes Search — Search by Segment Value fields
CWTSatoTravel Proprietary & Confidential Page 30USCG UG15 First Logon and Profile Updates
• If you selected the Drill-down Search radio button, select a value from the first drop-
down list, and then click the Refine Search link. Repeat this process until you have
selected the necessary search criteria.
Figure 37: Accounting Codes Search — Drill-down Search fields
4. Click the Search button. The Accounting Codes Search window refreshes to display the list of
account codes matching your search criteria.
Figure 38: Accounting Codes Search — Search results
5. Select the check box to the right of each account code you want to add as a favorite.
6. Click the Select button at the bottom of the window. When the Accounting Codes Search window
refreshes, the check box for any account code added as a favorite will be checked and disabled.
7. Repeat these steps to search for and select additional account codes.
8. Click the Close button, when you are finished, to close the Accounting Codes Search window
and return to the Favorite Accounts page. All selected favorite account codes will be listed in the
data grid on the page.
CWTSatoTravel Proprietary & Confidential Page 31USCG UG15 First Logon and Profile Updates
Figure 39: Favorite Accounts — Favorite account codes
4.12.1 “Personalize” an Account Code Favorite
Once an account code has been added as a favorite, you can assign a name to the code to help
you quickly identify it when allocating travel expenses. You can also choose, if appropriate, to
make the account code available for use with local travel claims. With the Favorite Accounts page
displayed, complete the following steps.
1. Click the account code string link. The full account code string displays below the data
grid on the Favorite Accounts page.
Figure 40: Favorite Accounts — Selected account code
2. Enter your name for the account code in the Description field.
3. Select the Local Travel check box to make the account code available for local travel
claims.
4. Click the Save button to save your entries.
4.12.2 Delete an Account Code Favorite
With the Favorite Accounts page displayed, complete the following steps to delete a favorite
account code from your E2 user profile.
1. Locate the account code you want to remove in the data grid, and then click the
corresponding Delete link on the right side of the row.
CWTSatoTravel Proprietary & Confidential Page 32USCG UG15 First Logon and Profile Updates
Figure 41: Favorite Accounts — Delete link
2. A pop-up window displays the message Are you sure you want to delete? Click the OK
button to confirm your actions, or click the Cancel button to cancel the request and leave
the account code as a favorite.
4.13 Password & Security Questions
You can change your password and security questions by clicking the Edit Password Information link in
the Other Features section on the User Profile page. Passwords are active for a maximum of 90 days.
You will be notified as your password expiration date nears.
NOTE: Passwords can only be changed by a user. Your Travel Assist Team, though, can reinitialize your
security credentials, requiring you to reset your security profile and choose a new password. If you
receive an access reset or reinitialization email, follow the link in the message to reset your security
profile.
4.13.1 Edit Password Information Authentication
The Edit Password Information Authentication section displays directly on the User Profile page
after clicking the Edit Password Information link. Before continuing, you must verify your
security information by entering your current password or the answers to your security questions.
Figure 42: Profile — Edit Password Information Authentication section
Complete the following steps.
1. Click the radio button next to the Current Password label or your security questions to
indicate the information you will provide.
2. Enter the requested information in the corresponding field(s).
CWTSatoTravel Proprietary & Confidential Page 33USCG UG15 First Logon and Profile Updates
3. Click the Continue button. This displays the Edit Password Information page.
4.13.2 Edit Password Information Page
The Edit Password Information page allows you to update your password and/or security
questions.
TIP: If you wish to change your security questions before it is time to update your password, you
can skip directly to the security questions section on the page. You do not need to enter new
password information if you want to only change your security questions.
Figure 43: Edit Password Information page
Complete the following steps.
1. Enter a new password in the New Password field.
NOTE: Password requirements differ, but your password must include at least one
uppercase character, one lowercase character, one number, and one special character
(e.g., !, @, #, etc.). The first character in your password should be a letter (e.g.,
Mypswd#1).
2. Confirm the new password by entering it in the Confirm New Password field.
3. Select a security question from the First Security Question drop-down list.
TIP: A security question should refer to an answer that only you will know. If you forget
your password, this security information (along with the primary email address from your
profile) will be used to verify your identity and assist you with resetting your password.
When verifying your identity, security answers are not considered case sensitive.
4. Enter the answer to the first security question in the Security Answer field.
5. Confirm your answer to the first security question by reentering the answer in the
Confirm Security Answer field.
6. Repeat steps 3–5 for the Second Security Question, Security Answer, and Confirm
Security Answer fields.
CWTSatoTravel Proprietary & Confidential Page 34USCG UG15 First Logon and Profile Updates
NOTE: Each security answer must be unique; the answer for the first security question
cannot be the same as the answer for the second security question.
7. Click the Save button. You are returned to the User Profile page where a message
displays indicating your credentials were successfully updated. The system also sends
an email to the primary email address in your profile confirming that your password was
changed.
4.14 Tax Information
Long-term taxable travel applies to travel that is one year (i.e., 365 days) or longer in length and that uses
a travel type that allows long-term taxable travel calculations. When your trip meets these conditions, E2
uses the information on the Edit Tax Information page to determine the appropriate tax calculations for
the trip. Click the Edit Tax Information link in the Other Features section of the User Profile page to
display the Edit Tax Information page.
Figure 44: Edit Tax Information page
Populate the following fields, and then click the Save button to save your entries.
• Payroll State – Select the state that should be used to calculate state tax information (i.e.,
typically the state in which you reside and pay taxes) from the drop-down list.
• Retirement System – Select your retirement system (i.e., Civil Service Retirement System
(CSRS) or Federal Employees Retirement System (FERS)) from the drop-down list.
• OASDI Indicator – Select the appropriate Old Age, Survivor, and Disability Insurance (OASDI)
indicator from the drop-down list.
o Select Q (FICA not Withheld) if FICA is not withheld from your paycheck. (This typically
occurs when your retirement system is CSRS).
o Select R (FICA Withheld) if FICA is normally withheld from your paycheck.
• Withholding Tax Allowance (WTA) – Select Yes or No from the drop-down list to indicate
whether E2 should calculate withholding tax allowance information.
CWTSatoTravel Proprietary & Confidential Page 35USCG UG15 First Logon and Profile Updates
4.15 Printable Profile
Click the Printable Profile link in the Other Features section on the User Profile page to generate a
printable version of the E2 user profile in a new browser window. Click the Print This Page button to print
the profile, or click the Close button to close the window and return to the User Profile page.
Figure 45: Printable Profile window
4.16 Profile Supplement
Click the Profile Supplement link in the Other Features section of the User Profile page to access the
Profile Supplement page. This page allows you to enter optional information that can be added to your E2
user profile and used for reporting purposes.
Click the arrow to the right of each section header to expand that section and view or update the
corresponding information. Click the Save button when you are finished to save your entries.
Figure 46: Profile Supplement page
CWTSatoTravel Proprietary & Confidential Page 36USCG UG15 First Logon and Profile Updates
4.16.1 Personal Information
Select an option from the Traveler Security Clearance drop-down list (e.g., None, Confidential,
Secret, Top Secret) to indicate your security clearance level.
Figure 47: Profile Supplement — Personal Information section
4.16.2 Travel Contact Information
Use the fields in the Travel Contact Information section to establish your office and residence
addresses, as well as a special address, if necessary.
• Street Address 1 – Enter up to 32 alpha-numeric characters for the first address line
from the corresponding address.
• Street Address 2 – Enter up to 32 alpha-numeric characters for the second address line
from the corresponding address.
• City – Enter up to 40 alpha-numeric characters for the city from the corresponding
address.
• State/Province – Enter up to 20 alpha-numeric characters for the state or province from
the corresponding address.
• Country – Select the country from the corresponding address from the drop-down list.
• Zip/Postal Code – Enter up to 20 alpha-numeric characters for the zip or postal code
from the corresponding address.
• Telephone Number – Enter up to 32 alpha-numeric characters for the telephone number
associated with the residence or special address.
CWTSatoTravel Proprietary & Confidential Page 37USCG UG15 First Logon and Profile Updates
Figure 48: Profile Supplement — Travel Contact Information section
CWTSatoTravel Proprietary & Confidential Page 38USCG UG15 First Logon and Profile Updates
4.16.3 Emergency Contact Information
Use the fields in the Emergency Contact Information section to establish the name, address, and
contact information for your primary emergency contact.
Figure 49: Profile Supplement — Emergency Contact Information section
CWTSatoTravel Proprietary & Confidential Page 39USCG UG15 First Logon and Profile Updates
4.16.3.1 Emergency Contact Name
The following fields are available in the Emergency Contact Name sub-section.
• Name Prefix – Enter up to 10 alpha-numeric characters for the name prefix for your
emergency contact.
• First Name – Enter up to 20 alpha-numeric characters for the first name of your
emergency contact.
• Middle Name – Enter up to 20 alpha-numeric characters for the middle name of your
emergency contact.
• Last Name – Enter up to 20 alpha-numeric characters for the last name of your
emergency contact.
4.16.3.2 Emergency Contact Address
The following fields are available in the Emergency Contact Address sub-section.
• Street Address 1 – Enter up to 32 alpha-numeric characters for the first address line
from your emergency contact’s address.
• Street Address 2 – Enter up to 32 alpha-numeric characters for the second address line
from your emergency contact’s address.
• City – Enter up to 40 alpha-numeric characters for the city from your emergency
contact’s address.
• State/Province – Enter up to 20 alpha-numeric characters for the state or province from
your emergency contact’s address.
• Country – Select the country from your emergency contact’s address from the drop-
down list.
• Zip/Postal Code – Enter up to 20 alpha-numeric characters for the zip or postal code
from your emergency contact’s address.
• County – Enter up to 40 alpha-numeric characters for the county from your emergency
contact’s address.
4.16.3.3 Emergency Contact Phone
The following fields are available in the Emergency Contact Phone sub-section.
• Country Code – Enter up to three characters for the country code from your emergency
contact’s phone number.
• Area/City Code – Enter up to 10 characters for the area or city code from your
emergency contact’s phone number.
• Phone Number – Enter up to 32 characters for your emergency contact’s phone number.
• Extension – Enter up to 10 characters for the extension from your emergency contact’s
phone number.
CWTSatoTravel Proprietary & Confidential Page 40You can also read