User's Manual for Road Map Creation and Road Map Projection
←
→
Page content transcription
If your browser does not render page correctly, please read the page content below
User’s Manual for Road Map Creation and Road Map Projection
Introduction
This manual aims, primarily, to guide the usage of the Projector Calibration Tool, the Road Map
Creation Tool and the Road Map Projection Tool. For instructions on the rest of the truck software
and Qualisys Track Manager (QTM) motion capture system please refer to Appendix A of
Implementation and Analysis of Platoon Catch Up Scenarios For Heavy Duty Vehicles by Pedro F.
Lima.

Projector Calibration Tool
First of all, the projector has to be calibrated to the system. To do this, mount the projector so that it
covers the area of interest. Try to get the edges of the projection parallel with the QTM coordinate
system. Then connect the projector to the computer with which you wish to project the road network
onto the ground and then extend the desktop to the projector image. In Windows 7, this is done by
right-clicking on the desktop and then clicking Screen Resolution. Here, select the projector and go to
the “Multiple Displays”-menu and select “Extend these displays”. You should end up with something
like this.
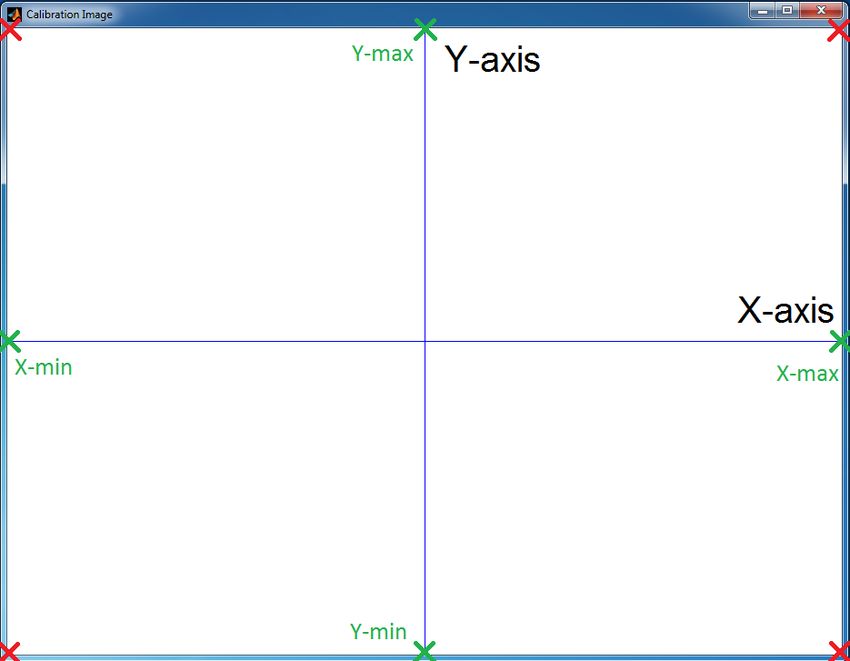
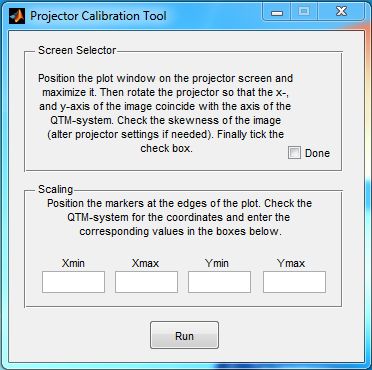
Now, you are ready to start the Projector Calibration Tool. To do this, simply open the
calibration_tool.m. This will start the program and present you with the window below as well as a
plot-window with x- and y-coordinate axes titled “Calibration Image”.

The program is rather self-explanatory but this guide will take you through it step by step anyway.
Start off by placing the “Calibration Image” in the projector screen and then maximize it. Adjust the
projector, if necessary, to align the axes of the QTM with the projected axes. If the image is distorted,
the projector has built in keystone correction that can be adjusted somewhat using the remote control.

When this is done, you may tick the “Done”-checkbox.

Now position a QTM-marker in each of the corners of the projected screen as shown by the red
crosses in the image below.

Read the x- and y-coordinates of each of the markers from the QTM software and calculate pair-wise
means to get the x-min, x-max, y-min and y-max (marked by green crosses in the image above). Enter
these values in the boxes of the Projector Calibration Tool and finally click “Run”. This will save a
file called Calibration.txt in the folder in which calibration_tool.m is located.

This text file contains two lines of data. The first line contains the values of the borders of projection
and the second contains data for the position and size of the plot window. These two lines of data is
primarily required to run the Road Map Projection Tool but the first line is also useful in the Road
Map Creation Tool if you wish to see the border of projection whilst generating your road network. If
the Road Map Creation Tool is to be used at a separate computer, you could just copy over the file
Calibration.txt to that computer or run the program again on that computer and enter the same borders
there. If you choose the second option, the second line of the file will be meaningless but this line is
only required for the Road Map Projection Tool so there is no need to worry. When the file has been
successfully saved, you are prompted with a message that tells you so.

Road Map Creation Tool
Now that the calibration file is created the next step is to run the Road_Network_Creator.m to open the
Road Map Creation Tool. If this is the first time you run the program (meaning there is no file
named OptionsInfo.txt in the folder), you will be presented with a window for options as shown by the
image below.

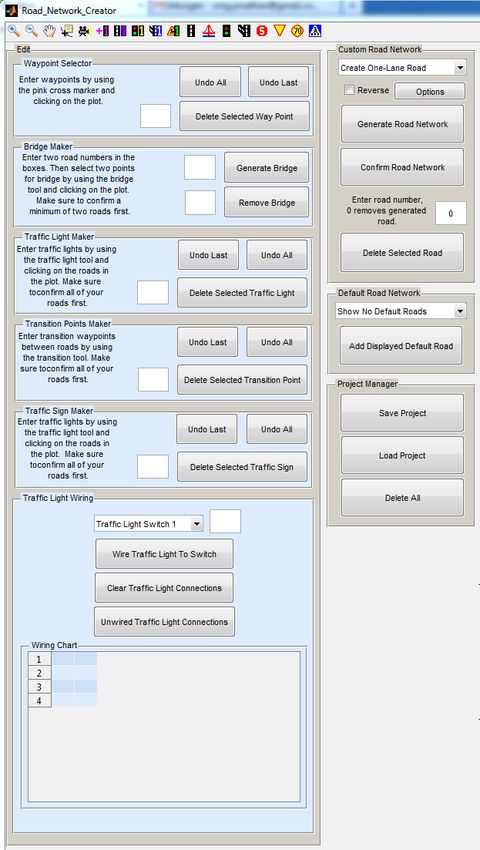
Here you are asked to enter the desired spacing between multi-lane roads. At the time of writing this
manual, the larger version of trucks were used in the Smart Mobility Lab and for these, a suitable
spacing was found to be 0.4.

You are also asked to enter the borders for the area that the roads are to be confined within. This area
is regulated by the QTM-setup and at the time of writing the area was 6 by 6 meters with the origin in
the center. This means that the values used at the time were: xMin= -3, xMax=3, yMin=-3 and
yMax=3.

By entering your desired values and clicking “OK” a file called OptionsInfo.txt will be generated
which will be used in any future running of the Road Map Creation Tool. To change these options at
any later time, click the button titled “Options” under the “Custom Road Network”-panel in the main
window of the Road Map Creation Tool, as presented below. Note that any change of the lane
spacing will only affect future road networks, not previously created ones.

After the Options-file is saved you should be presented with a large window with the following panels
to the left and a large empty plot to the right. The plot axes should span the area you just specified in
the “Options” window. This manual will now guide you through each step of creating a road network.
Toolbar
The toolbar is located at the top of the program and contains all necessary tools for creating a road
network. The first four tools on the toolbar will do exactly what they would normally do. In order:
“zoom in”, “zoom out”, “pan” and “show data cursor”. The rest of the tools will be explained as they
are used in the text below.

Waypoint Selector
To create your first road, the first thing you might want to do is to click   , located on the toolbar,
which will present you with a red border showing what part of the whole area that the projection will
cover. This will help you to place the most interesting parts of your road network in the visible part of
the road network area. Next, click       which will turn your cursor into a large crosshair. By clicking
with this inside the plot, you will place pink waypoint markers which will be used as guidelines when
generating your road. A minimum of three markers is required but too many might make the road
somewhat jagged and not very smooth. Bear in mind that the trucks have limited turning radii so take
care not to have to sharp corners. When you are satisfied with your markers, click the same icon again
to stop the program from recording any more clicks. Note that the crosshair will still remain but just
clicking anywhere will turn the cursor back to normal.

If any waypoints are misplaced or placed badly there are options to remove them under the “Waypoint
Selector”-tab. To remove a marker you may want to start by clicking       . This will show a number
next to each pink waypoint marker. Then simply select which marker to remove and type the
associated number into the textbox beside the “Delete Selected Waypoint”-button and then clicking
the button itself. You can also choose to remove the last placed marker by clicking “Undo Last” in the
“Waypoint Selector”-tab, or to remove all placed markers by clicking “Undo All” in the same tab.

Custom Road Network
With the markers in place, it is time to generate a road. To do this, go to the “Custom Road Network”-
panel and start off by choosing what kind of road you want to create from the pop-up menu shown
below.
You can also select whether or not you want the road to be reversed in terms of the order you placed
the pink markers, by ticking the checkbox titled “Reverse”. When you are happy with your decision it
is time to generate the road, which is done by simply clicking the “Generate Road Network”-button.
The program will then spline through the markers and generate waypoints that lay approximately 10
cm apart along a smooth trajectory. This trajectory will be visible in the plot as a green line. An arrow
at the start-point of each road indicates the direction of the road. If you chose a multi-lane road, the
center of the road will be located at the positions of your placed pink markers. You should end up with
something similar to what the image below presents.

Should you be unhappy with the generated road, you still have the option to edit the pink markers in
the same manner as earlier, or chose a different road type and then clicking “Generate Road Network”
again to update the road. Again, make sure that the turns of the road are not too sharp as the trucks
have a limited turning radius. When you are pleased with the road, it is time to click “Confirm Road
Network” which will save the roads into a temporary cell array inside the program. The road(s) should
now turn blue.

If you wish to remove one of the confirmed roads, you can do this at any time by entering the number
associated with the road into the small text box above the “Delete Selected Road”-button and then
clicking said button. To see all road numbers, simply click    on the toolbar. By typing the number
zero into the box and clicking “Delete Selected Road” you will remove the generated (but not
confirmed) road network if there exists one.

Repeat this procedure for the number of roads you want to add to your road network.

Note that the “Create Pedestrian Road”-option in the popup menu above generates a special kind of
road that the trucks are unable to drive on. This is a road for imaginary pedestrians which will generate
a crosswalk at every intersection with a normal road. Pedestrian roads are therefore grey instead of
blue when they are confirmed and the road numbers of pedestrian walkways are negative. The
crossings will be marked with traffic signs in the plot as illustrated by the image below.

Bridge Maker
Now, you have the option to create a bridge, or a merging, of any two roads. To do this, click         and
then click between the two roads you want to merge together at the start and at the end of where you
want the bridge to be placed. Then enter the road numbers of the two roads into the small text boxes in
the “Bridge Maker”-tab. Now click generate bridge and you will see the modified roads with an added
bridge in green. If you are happy with the bridge, click “Confirm Road Network” under the “Custom
Road Network”-tab. This will add an option to use the bridge instead of the normal roads when
driving. Note that the original roads still exist as they were. However, if you are dissatisfied with how
the bridge turned out you can simply click “Remove Bridge”. This will remove the green lines and you
may start over. A finished bridge could look something like the image below.

Traffic Light Maker
To place traffic lights, click   . Then click in the plot where you want to place it. The program will
automatically find the closest waypoint place a traffic light there. Repeat this procedure for the number
of traffic lights that you want.
Just like the previous features, you can click    to show the traffic light number. You can also
remove traffic lights just like you could remove waypoint markers but this time using the buttons
under the “Traffic Light Maker”-tab.

Transition Points Maker
If any two roads intersect, the program will automatically calculate transition points between the two
roads so that it is possible for the trucks to change road at these intersections. Similarly, if you create a
multi-lane road where two, or more, lanes go in the same directions the program will make transition
points all the way along the road so that it is possible to change between these lanes at any point. If
there is a bridge between two roads and if the roads are travelling in the same direction on the bridge
the program will generate transition points on the bridge as well.

Should you desire extra transition points between roads, you can click      and then click once at the
point of the road you wish to transition from and once at the point on the point of the other road that
you wish to transition to. You should end up with something similar to the following image.

Here, the transition point is set so that it is possible to change from road 3 to road 2 at the selected
point. Similar to the marker numbers, the road numbers and the traffic light numbers, transition point
numbers can be shown by clicking        . Manual transition points such as this can also be deleted and
edited in the same manner as the waypoint markers and the traffic lights. This is done in the same way
but using the buttons in the “Transition Points Maker”-panel.

Traffic Sign Maker
Note that none of the traffic signs are implemented in the LabVIEW software for running the trucks
at the time of writing the manual. This means that the trucks will ignore any sign you place, at this
time.
Traffic Signs are placed in the same way as you place traffic lights, but using the icons that look like
traffic signs instead. You are given the option of four different traffic signs: stop (   ), yield (   ),
speed limit ( ), and pedestrian crosswalk ( ). The speed limit sign will give you a pop-up window
upon placement where you are asked to enter the speed limit you want for that part of the road.
Pedestrian crosswalk signs are also automatically generated where there is a crossing between a road
and a pedestrian walkway as described earlier.

The sign numbers can be shown and deleted just as with the other features by clicking           and using
the buttons under the “Traffic Sign Maker”-tab.

Traffic Light Wiring
To be able to control the traffic lights you will need to wire them to a set of ten switches which you
can press in the LabVIEW software. This is done under the “Traffic Light Wiring”-tab. To connect a
traffic light to a switch, you first choose the desired switch and then enter the traffic light number into
the text box before clicking the “Wire Traffic light To Switch”-button. The light will now turn green
whenever the switch is on and red when the switch is off. Wiring a traffic light will update the “Wiring
chart” were you can see all the connections you have made. Each row in the chart represents a switch.
A single switch can have up to 100 traffic lights connected to it.

By entering the traffic light number with a negative sign in front of it whilst wiring, you can have the
traffic light and the switch out of sync. This means that the traffic light will turn red when the switch is
on and green when the switch is off. In this way you can control a whole intersection with a single
switch by having one road green whilst the other is red and vice versa. As an example, consider the
intersection below.

Here, you could control all three traffic lights with one switch by, for example, wiring them to switch
1 as follows.
There is also a button in the “Traffic Light Wiring”-panel to clear all connections you have done, in
case you want to start over. The final button in the tab will give a popup window that shows all the
traffic lights you have placed but have yet to wire to a switch.

Default Road network
In this tab, you can choose from a popup menu to show already created roads in the plot. These roads
will be shown in orange in the plot and can serve as guidelines when you create your own network.
They can also be added to your network by choosing a network from the popup menu and clicking
“Add Displayed Default Road”, which will turn them blue meaning they serve as any other road in
your network.

Note that the roads with bridge in this tab do not function as the bridges created using the method
described earlier. They were created prior to the existence of this program using a different method. If
you want to add bridges to the default roads, add them to your road network (without bridge) and then
use the method described earlier to add a bridge.

Project Manager
The final panel is probably the most important one. Here, you have the option to save your road
network as a project. This means that you could have a different road network for each scenario you
want to investigate. By clicking the “Save Project”-button you will be presented with a window such
as the one below.

In this window, you can choose to replace a previous project or to create a new project folder. When
you are happy with your decision, press “Select Folder”. This will generate a number of files in the
folder you specified that are necessary for the running of the LabVIEW software as well as the Road
Map Projection Tool. What these file contain will be covered later in this manual. When the project
is fully saved, you should be presented with a popup window saying that the save was successful.

When running the LabVIEW software the files of your road network have to be located in a folder
called RoadNetwork inside the directory that contains the LabVIEW software itself, so if you want to
use your newly created road network at once, you may want to find this folder and save the project
directly into it (but make sure not to replace someone else’s road network by mistake). Otherwise you
could save it in any folder and then copy over the files to the correct directory when you want to use
them.

The next button in the tab is named “Load Project” which will do exactly what it says. When clicking
the button you will be presented with a window very similar to the one that shows up when you press
“Save Project”. Here you will instead be asked to choose a project folder created earlier. When
clicking “Select Folder” all the files in that folder will be read into the program and you can continue
modifying and designing an old road network where you left off last time.

The last button in the tab is the “Delete All”-button which simply deletes the entire road network and
allows you to redo everything from scratch. Note that this does not delete any files but rather just the
data stored inside the program.

Road Network Files
The guide will now take you through each of the files generated by the Road Map Creation Tool. A
table containing a small excerpt of the file for a simple road network accompanies some file
descriptions. The tables have headings for each row and column. The example road network looks like
the following with the single traffic light wired to switch 1.

The first one is savedRoads.txt which contains two or four rows of data for each road in the network
(except for pedestrian roads). The first row is the x-coordinates of the waypoints on the road and
similarly the second row contains the y-coordinates for the same road waypoints. The third and fourth
line contains the x- and y-coordinates of the version of the road with a bridge, if there exists one.
Whether or not a bridge exists for a certain road is recorded in roadinfo.txt. Note that the file has to
have the same number of columns in each row which means that the number 1000 is saved in empty
positions. For the network above, the first few columns of savedRoads.txt look like the following.
X-coordinates for road
1                                                 -2.340563           -2.404820        -2.457847               -2.499975      -2.531497                    …
Y-coordinates for road
1                                                  2.113250            2.075965         2.026095               1.965697       1.896784                     …
X-coordinates for the
bridge version of road 1                          -2.340563           -2.404820        -2.457847               -2.499975      -2.531497                    …
Y-coordinates for the
bridge version of road 1                           2.113250            2.075965         2.026095               1.965697       1.896784                     …
X-coordinates for road
2                                                 -1.172900           -1.230664        -1.299348               -1.376643      -1.460273                    …
Y-coordinates for road
2                                                  0.540816            0.488201         0.439850               0.396501       0.358896                     …
X-coordinates for the
bridge version of road 2                          -1.172900           -1.230664        -1.299348               -1.376643      -1.460273                    …
Y-coordinates for the
bridge version of road 1                           0.540816            0.488201         0.439850               0.396501       0.358896                     …

The second file is the savedLUT.txt which consists of a lookup table for each road where, for each
waypoint, the distances, in meters, to all other waypoints along the road are stored. If there is more
than one road in the network, the next lookup table is saved below the first one and so on.

roadInfo.txt contains one row of information for each road in the network. The first column gives the
road number. The second specifies what kind of road it is (1=one-lane, 2=two-lane and so forth). The
third column denotes the road number inside the road type. This means that for every multi-lane road
this column keeps track of the internal numbering of these roads. The fourth column gives the
direction of the road inside the road type. The first road in the road type denotes the default direction
of the road and if a road inside the road type goes in the opposite direction, this number would be a
one, otherwise it is a zero. The fifth column states the number of waypoints of the road. The sixth
column contains the number two if the road has a bridge associated with it and the number one
otherwise. The seventh column gives the road number of the other road in the bridge, if there exists
one. Otherwise, this is a zero. The eighth and ninth column contains the waypoint index of the start
and end point of the bridge, if there is one. Otherwise these two columns contain zeros. roadInfo.txt
for the example network looks as follows.
           Road number

                             Road type

                                             type
                                             inside road
                                             Road number

                                                               road type
                                                               road inside
                                                               Direction of

                                                                              road
                                                                              waypoints in
                                                                              Number of

                                                                                                  Bridge

                                                                                                                companion
                                                                                                                for bridge
                                                                                                                Road number

                                                                                                                              bridge
                                                                                                                              waypoint for
                                                                                                                              Start

                                                                                                                                                  bridge
                                                                                                                                                  waypoint for
                                                                                                                                                  End

Road 1                   1               1                 1              0                  43            2              2                  18           26
Road 2                   2               1                 1              0                  45            2              1                  22           34

TLInfo.txt is comprised of one column of information for each traffic light placed in the road network.
The first row states which road the traffic light is located on. The second row gives the waypoint index
that the traffic light is located on. The third and fourth rows specify the x- and y-coordinate
respectively of the traffic light location. Below, you find TLInfo.txt for the example network.

                                                                                    Traffic Light 1
Road number                                                                                                                                                1
Waypoint number 29
X-coordinate -1.251656
Y-coordinate 1.608742
TLMatrix.txt is simply a text file that looks exactly like the traffic light wiring chart and specifies how
the traffic lights and switches are wired. Due to the simplicity of the example network, the first few
rows of the TLMatrix.txt-file look as follows.
Switch 1 1
Switch 2 0
… …
ManualTransitionMatrix.txt contains data on the transition points created by the user. There is one
column for each transition point created where the first and second row is the road number and
waypoint index respectively that the trucks can transition from. The third and fourth rows are the road
number and the waypoint index that the trucks transition to. For the example, this looks like the
following table displays.
Transition 1
Road number of the road you are coming from 1
Waypoint number on the road you are coming from 26
Road number of the road you are going to 2
Waypoint number on the road you are going to 35
TransitionMatrix.txt is the same as ManualTransitionMatrix.txt except that it also contains columns
for the automatically generated transition waypoints.
Next, we have SignInfo.txt which contains information about all the signs created by the user and signs
automatically created at intersections with pedestrian walkways. One column will be generated for
each sign, where the first row denotes the road number of the signs placement. The second row is the
waypoint index on that road. The third and fourth rows are the x- and y-coordinate of the waypoint.
The fifth row is the type of the sign (1=stop sign, 2=yield sign, 3=speed limit sign and 4=pedestrian
crossing sign). The sixth, and final, row contains the speed limit of the sign (zero if the sign is not a
speed limit sign). The file from the example network is shown below.
Sign 1 Sign 2 Sign 3 Sign 4 Sign 5
Road number 1 2 2 1 1
Waypoint number 5 20 37 36 38
X-coordinate -2.531497 -2.152390 -1.148379 -1.631175 -1.823657
Y-coordinate 1.896784 0.789487 1.027971 2.005995 2.086869
Sign type 3 1 2 4 4
Speed limit 50 0 0 0 0
PedestrianRoads.txt is built in the same way as savedRoads.txt with the exception that
PedestrianRoads.txt only contains pedestrian walkways and do not allow extra lines for bridges since
bridges cannot be created using pedestrian walkways. The first few columns from the example file are
given below.
X-coordinate -1.793758 -1.844505 -1.852165 -1.819938 -1.752202 …
Y-coordinate 2.296352 2.237350 2.132719 2.034718 1.991263 …PedestrianCrossingInfo.txt contains information of the pedestrian crossings that are generated by
pedestrian walkways. One column for each crossing is generated. The first row is the pedestrian
walkway number. The second row is the waypoint index on the pedestrian road that the crossing is
located at. The third and fourth rows are the same as the first and second, but for the normal road that
the pedestrian walkway intersects with. For the example, you will get the following table.
Crossing 1 Crossing 2
Walkway number -1 -1
Waypoint number on
walkway 6 3
Road number 1 1
Waypoint number on road 36 38
RoadMap.png is a saved image of how the road network looked in the Road Map Creation Tool.
This could be used to compare to the final projected image on the floor, or the trajectories of the
trucks. The example network thereby generates the following image.
LabVIEW Application MainEJ.vi
This LabVIEW application MainEJ.vi works, in many ways, in the same way as Main.vi but it has
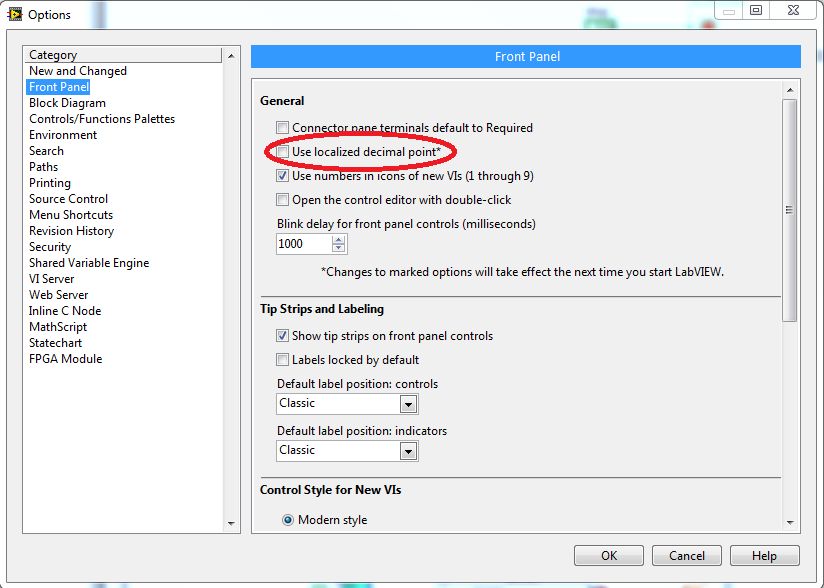
been modified to work with the new system of saving road networks. Note that all files are savedusing dots as decimal separators. If LabVIEW uses commas instead, you can change this under
Tools->Options ->Front Panel and then unchecking the box marked in the image below.
Should you, instead want to use comma as a decimal separator you can use the following simple
MATLAB function on the files of your road network.
function point2comma_overwrite( filespec )
% replaces all occurences of point (".") with comma (",") in a text-
file.
% Note that the file is overwritten, which is the price for high speed.
file = memmapfile( filespec, 'writable', true );
comma = uint8(',');
point = uint8('.');
file.Data( transpose( file.Data==point) ) = comma;
end
To change them back, use the MATLAB function below.
function comma2point_overwrite( filespec )
% replaces all occurences of comma (",") with point (".") in a text-
file.
% Note that the file is overwritten, which is the price for high speed.
file = memmapfile( filespec, 'writable', true );
comma = uint8(',');
point = uint8('.');
file.Data( transpose( file.Data==comma) ) = point;
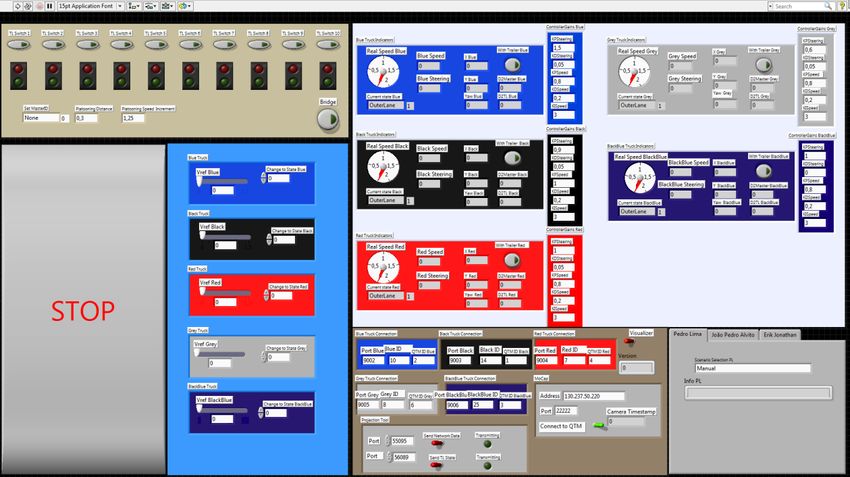
endWhen you start the MainEJ.vi, you will be presented with the following screen. Before pressing the run-button (the small arrow at the top left) you need to make sure that the files of the road network you wish to use are located in the folder named RoadNetwork and make some decisions. First of all, do you wish to use the bridge version of the roads? If so, press the “Bridge”- button in the tan panel. Secondly, do you want to use the Road Map Projection Tool to project the road network on the floor? In that case follow the instructions below. The most important panel of the LabVIEW application, for the Road Map Projection Tool is presented below. Here, you can (before you run the program) decide whether or not to send the road network data via TCP/IP to another computer (or indeed locally) so that the Road Map Projection Tool has the data it needs to project the road network. The network data is sent only once, when the program is started. The LED-indicator will light up when the information is ready to be sent, and the program will then wait for a connection to the Road Map Projection Tool before anything else can happen. You can also choose to send information about the state of the traffic. This means that if you press a traffic light switch, as presented in the image below, the affected traffic lights on the floor will automatically update from green to red or vice versa. Lastly, you can choose to send the positions of the trucks that will project small boxes representing the trucks. The traffic light data and the truck position data will be sent continuously when the program is running. Here, the other LED-indicator will light up and the program will once again wait for a connection before continuing.
The truck position might not be that useful but is meant to work as a proof of concept so that, in the
future, virtual traffic and pedestrians can be simulated and plotted.

You also have the option to select what ports to send this data through, but make sure to change the
ports in the Road Map Projection Tool as well.

The other parts of the program work in the same way as they do for the Main.vi. For a guide how to
use this, refer to Appendix A of Implementation and Analysis of Platoon Catch Up Scenarios For
Heavy Duty Vehicles by Pedro F. Lima.

Road Map Projection Tool
To launch this tool, start by running Road_Network_Projection_Tool.m. This should present you with
the following window.
This program is runnable without a connection with MainEJ.vi. To project the road network without a
connection, simply click the large button that reads “RUN Road Network Projection”. You can then
modify the scale of the projected roads by use of the slider. The default value works well for the large
trucks, but if the small trucks are used, you might want to decrease the scale somewhat. The program
will project the part of the road network that the projector image can cover with the signs and traffic
lights placed in the correct place on the image.

There is also an option to show every waypoint on the road network. By ticking the “Show Way-
Points”-checkbox all waypoints will be projected with a small yellow arrow pointing in the direction
of the road. The first waypoint on every road is marked by a green arrow. You can also choose
whether or not to plot the bridge version of the road or not by ticking the “Bridge”-checkbox and
control the traffic lights by the use of the “Traffic Lights”-checkbox. If you choose to receive data
from the LabVIEW software, on the other hand, these settings are not alterable once the connection
has been established.

To receive the road network you need to first run the LabVIEW application with the “Send Network
Data”-switch turned on. Then wait for the top green LED-indicator in the “Projection Tool”-panel to
light up. Next, check so that the IP address in the “Road Network Transfer”-panel of the Road Map
Projection Tool is the IP address of the computer at which the LabVIEW application is running and
that the port number is the same in both programs. Finally click the “Transfer Road Network”-button
in the Road Map Projection Tool. When the LED-indicator lights up, the road network data has been
received. This means that the road network files have been read and saved to the directory of the Road
Map Projection Tool. Then you are free to project the network as described earlier. Note that if you
are running the Road Map Projection Tool on the same computer as the LabVIEW application, it
might be faster and easier to simply copy over the road network files from the RoadNetwork directory
to the one where Road Map Projection Tool is located.

To receive data about the traffic light states, run the LabVIEW software instead with the “Send TL
State”-switch turned on. Wait for the LED-light to indicate that the program is transmitting, then go to
the Road Map Projection Tool and, once again, check the IP address and the port so that they match
with the computer and port of the LabVIEW application. Finally click “Connect” and when the LED-
indicator is turned on, the connection has been established. You are then ready to project the road
network by pressing “RUN Road Network Projection”. Every time a traffic light switch is pressed in
the LabVIEW program, the projected traffic lights will now update their state.

Receiving truck positions works in the same way as receiving traffic light states, except that you use
the “Send Truck Positions”-switch.

Should you wish to send and receive both the road network, the traffic light states and the truck
positions, simply switch both the “Send Network Data”-, the “Send TL State” – and the “Send Truck
Positions”-switches to on before running the LabVIEW program and then, in Road Map Projection
Tool first click “Transfer Road Network” and then “Connect” once the “Received”-LED turns green.
When the “Connect”-LED turns green, you may click “RUN Road Network Projection” to project the
network.

Any combination of sending and receiving data works but if the road network is to be sent, always
make sure to click “Transfer Road Network” first and wait for the “Received”-LED to light up before
clicking “Connect”.

A projection of a road network with the waypoints turned on could look something like this.
The grey road visible in the image is a pedestrian road. Note that the area visible in the image is about
a quarter of the area of the entire road network. This is due to the limited capacity of the current
projector in the SmartMobilityLab.

A road with a bridge may look similar to the image below when projected.
When you are finished with your session and have been receiving data from the LabVIEW
application, make sure stop the LabVIEW application before closing the Road Map Projection Tool.
This is done by pressing the large button marked “STOP” on the left of the front panel of Main.vi
which makes sure all TCP/IP connections are closed correctly.
You can also read