VILLAGE WATER SUPPLY CARETAKERS MANUAL - C.A.R.D
←
→
Page content transcription
If your browser does not render page correctly, please read the page content below
VILLAGE WATER SUPPLY

    CARETAKERS MANUAL

      INADES
                                                  C.A.R.D

 INADES-Formation      P.O. Box 114 – Bamenda   P.O. Box 688 Bamenda
P.O. Box 252 Bamenda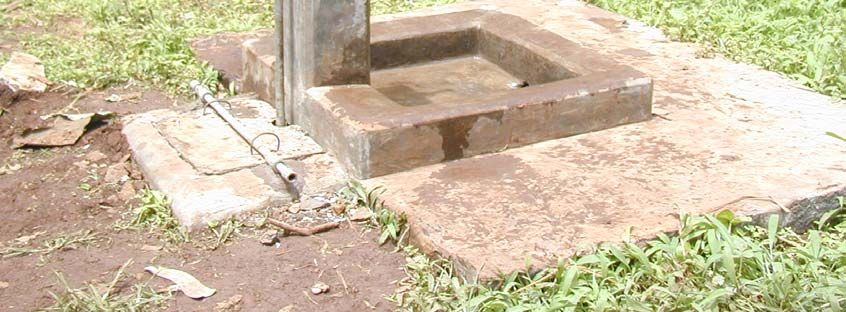
i

                             Table of Contents

Contents                                                         i
Introduction                                                    vi
Acknowledgement                                                 vii
                            Module One

                         The Caretaker                          1

Lesson One: The Job of a Caretaker                              2

1.1.   Introduction                                             2
1.2.   Job of a caretaker                                       2
1.3    Relationship between Caretakers (CT), Water
       Management Committee (WMC), CT and Community             3
1.4    Qualities of a good caretaker                            4
1.5    The importance of a caretaker                            4
1.6    Summary                                                  4
1.7    Self check test                                          5

Lesson Two: Conflict Management                                 6

2.2    Introduction                                             6
2.3    What is a conflict?                                      6
2.4    What is conflict management?                             6
2.5    Possible areas of conflicts between caretakers and WMC   6
2.6    Reducing conflict between caretakers and WMC             7
2.7    Managing (resolving) conflicts                           8
2.8    Summary                                                  8
2.9    Self check test                                          9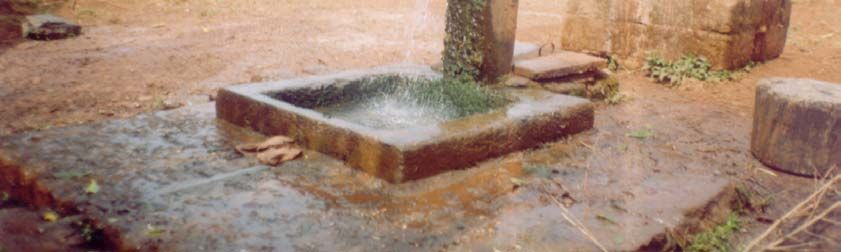
ii

                      Module Two
      Maintenance of a Village Water Supply Scheme
                         (VWSS)                        10
Lesson one: Water Supply Structures

1.1     Introduction                                   11
1.2     Spring intake                                  11
1.3     Spring inspection chamber                      12
1.4     Stream intake                                  12
1.5     Treatment station                              13
1.6     Break pressure tanks (Interruption chamber)    17
1.7     Storage tank                                   17
1.8     Water collection points                        18
1.9     Valve chambers                                 18
1.10    Summary                                        18
1.11    Self check test                                19

Lesson Two: Maintenance of VWSS Structures             20

2.1     Introduction                                   20
2.2     Types of maintenance                           20
2.3     Operation/maintenance of VWSS structures       21
2.4     Some general hints on VWSS maintenance         23
2.5     Summary                                        24
2.6     Self check test                                25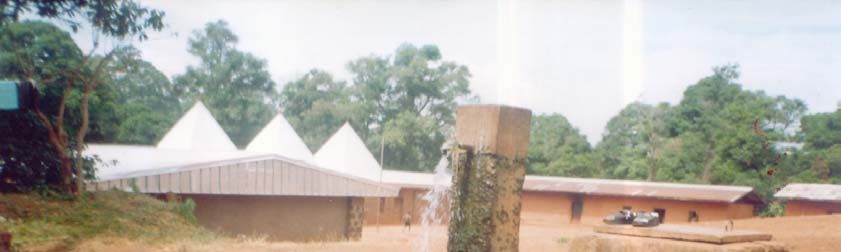
iii

Lesson Three: Pipes and Fittings           26

3.1   Introduction                         26
3.2   Pipes                                26
3.3   Taps                                 28
3.4   Types of valves                      29
3.5   Fittings                             30
3.6   Maintenance of pipes and fittings    33
3.7   Describing fittings                  37
3.8   Summary                              37
3.9   Self check test                      38

Lesson Four: Catchment Protection          39

4.1   Introduction                         39
4.2   The spring catchment area            39
4.3   The catchment area of a stream       40
4.4   Protecting the catchment areas       40
4.5   Summary                              41
4.6   Self check test                      42

Lesson Five: Water Lifting Devices         43

5.1   Introduction                         43
5.2   Pumps and hydraulic rams             43
5.3   Maintenance of pumps                 44
5.4   Summary                              44
5.5   Self check test                      45

Lesson Six: Maintenance and Repair Tools   46

6.1   Introduction                         46
6.2   Common tools for caretakers          47
iv

6.3   Tools and their uses                                  49
6.4   Summary                                               50
6.5   Self check test                                       51

                    Module Three
      Planning, Implementation, Monitoring and
                     Evaluation                             52

Lesson One: Planning and Implementation                     53

1.1   Introduction                                          53
1.2   Planning work with the community                      53
1.3   Summary                                               54
1.4   Self check test                                       55

Lesson Two: Monitoring and Evaluation                       56

2.1   Introduction                                          56
2.2   What is monitoring?                                   56
2.3   Monitoring activities in a VWSS                       56
2.4   Evaluation                                            56
2.5   Summary                                               57
2.6   Self check test                                       58

Lesson Three: Monitoring of a Village Water Supply Scheme   59

3.1   Introduction                                          59
3.2   How and what to monitor                               59
3.3   Monitoring periods                                    59
3.4   Summary                                               59
3.5   Self check test                                       60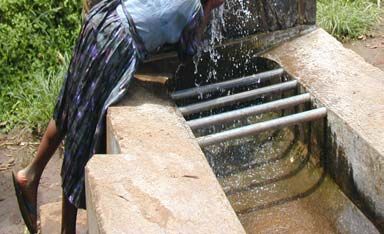
v

Lesson Four: Record Keeping                    61

4.1   Introduction                             61
4.2   Records of a Caretaker                   62
4.3   Source yield measurement and recording   64
4.4   Summary                                  65
4.5   Self check test                          66

GLossary                                       67
1

                           MODULE ONE

                        THE CARETAKER

Global Objective: Caretakers know who they are.

Specific objectives:

   -   Describe the functions and qualities of a caretaker
   -   Establish the relationship between the caretaker, the WMC and the
       community.
2

                               LESSON ONE

                       THE JOB OF A CARETAKER

1.1     Introduction

A Caretaker (CT) is somebody who pays close attention to something or
somebody. A CT is also somebody who looks after something. This something
can be a house, a bridge, a school etc. In this manual we will be talking
about a caretaker as a person who looks after a village water supply Scheme
(VWSS)

A caretaker can be compared to a babysitter. Just as a babysitter takes care
of a baby in a home, a caretaker takes care of the water supply scheme in a
village. A VWSS is the baby of a caretaker, which needs close attention to
function everyday. A caretaker can be a woman or a man and is recruited by
the Water Management Committee (WMC).

1.2     Job of a caretaker

The job of a CT is at two levels:

A)      Role in relation to technical work

-     Regularly inspects the water supply network to identify areas that need
      maintenance/repairs.
-     Identifies and carries out repairs which he is able to do.
-     Identifies and handles the stock of spare parts needed for the smooth
      running of the scheme.
-     Keeps a record of all repairs
-     Keeps the tool box with all the tools
-     Keeps a list of all tap points and their managers.
-     Supervises activities in the catchment area on behalf of the WMC.
-     Monitors the VWSS together with the WMC.

B)      Responsibilities to water management committee (WMC)

     The caretaker works for the community and is under the supervision of
     the WMC. He is thus expected to do the following:

-     Takes instructions from the WMC.
-     Participates in WMC meetings.
-     Reports to WMC on his/her activities.
-     Informs WMC when the community is required to participate in
      maintenance activities like cleaning of tanks or clearing of catchment
3
areas. This information should be given in time to permit the WMC to
mobilize the community.
- Reports to the WMC of lost, stolen, damaged or worn out tools. It is left
to the WMC to decide to replace the tool.
- Submits to a check of stock by the WMC at any time.
1.3 Relationship between CT and WMC, CT and Community
a) Caretaker and WMC
- A CT is employed by the community.
- A CT is paid by the WMC with money from the community, e.g. collected
by the Village Development Association or the WMC directly.
- The WMC supervises the work of the CT.
- The WMC supplies the CT with working tools and materials.
- The CT makes a private connection only with a written instruction of the
WMC (he also files the instructions).
b) Caretaker and community
- The CT guides the community during community work
- The community informs the caretaker of problems e.g. leakages noticed
in the network
Organisation and management of a village water supply scheme
FON
COMMUNITY
VILLAGE DEVELOPMENT
ASSOCIATION
WATER MANAGEMENT
COMMITTEE
STAND PIPE
CARETAKER
MANAGER4
N.B.:
- The Fon instructs the community to fully participate financially and
physically in the running of the water scheme
- Not all communities have a village development association. In this
case, the community works directly with the WMC
- The standpipe manager is under the WMC not under the CT. The CT
however advises the standpipe manager on how clean the standpipe.
1.4 Qualities of a Good caretaker
To be able to properly take care of a village water supply, the care taker must
have these qualities:
1) Have technical knowledge in repairs/maintenance of water supply
structures and fittings.
2) Know how to read and write
3) Be hardworking and smart
4) Be healthy and strong
5) Live in the village and be available
6) Be a good communicator
7) Know the importance of clean drinking water
8) Not too money minded
9) Be trustworthy.
10) Know how to plan and coordinate work.
1.5 The importance of a Caretaker
He is important for various reasons.
1) If water is life, then a caretaker contributes in enhancing life. He works
hard to ensure a continuous flow of clean drinking water.
2) Without a caretaker, repairs become costly and will not be carried out
quickly since a technician must come from outside the village.
3) Without a caretaker there will be nobody to technically guide and
coordinate community work on the VWSS.
1.6 Summary
From this lesson it is clear that the success of a VWSS will depend much on a
caretaker. His/her importance cannot be underestimated. It is the caretaker
who does or reports so that all maintenance or repairs can be done on a
VWSS. He/she is however under the direct supervision of the WMC.5
1.7 Self check test
1) Tick the right answer(s)
a) A caretaker takes instructions from WMC
b) WMC reports to the caretaker
c) Caretaker keeps records of his activities
2) A caretaker participates in WMC meetings in the capacity as an adviser
____________(yes/no)
3) A caretaker can carry out private connections without the knowledge
of the WMC if it is for an important man_____________(yes/no)
4) Tick the right answer(s)
a) A good caretaker should be money minded
b) A good caretaker should not be a good communicator
c) A good caretaker should know the importance of clean drinking
water.6
LESSON TWO
CONFLICT MANAGEMENT
2.1 Introduction
Conflict is part of daily life. Conflicts come from the fact that no two human
beings are the same. Humans are different in the way they think and react to
situations. Conflicts have positive and negative consequences or outcomes.
The extent to which a conflict will have positive or negative outcomes
depends on how it is handled or managed. If managed poorly, the conflict
can have very destructive consequences but if handled well, the outcome will
be positive leading to growth in relationships.
2.2 What is a conflict?
It is a disagreement, misunderstanding or quarrel between people. In a
VWSS, there can be conflicts between the caretaker and the WMC or between
the caretaker and the community.
2.3 What is conflict management?
It is the various ways/methods used in handling or resolving a disagreement
or misunderstanding between people. Even though conflict is part of human
life, efforts should be made to prevent conflict.
2.4 Possible areas of conflict between caretakers and WMC
1) Money
- WMC has not paid caretaker
- WMC has not bought materials needed by caretaker for repairs
2) Tools, materials, spare parts
- Caretaker cannot account to WMC concerning missing tools, materials
or spare parts or shortage in materials
- Tools have not been returned after community work and the persons
keeping them are not known.
3) Work
- WMC brings in external technician without knowledge of caretaker
- WMC accuses caretaker of laziness and incompetence
- WMC arranges community work without knowledge of caretaker
- Caretaker arranges community work without knowledge of WMC7
- Caretaker reports to community without passing though WMC
- Caretaker does not inform WMC in time about community work.
- Caretaker carries out private connection without permission from the
WMC
4) During meetings
- Caretaker is rude to WMC or vice-versa
- Caretaker is too technical to be understood by WMC
- Caretaker always comes late to meetings.
2.5 Reducing conflict between caretaker and WMC
1) Money
- WMC should make efforts to raise money to pay the CT regularly.
- Caretaker should exercise patience and understanding with difficulties
faced by WMC in mobilizing resources.
- CT should work very hard in order to encourage the community to
contribute.
- There should be transparent management of resources.
2) Tools, materials, spare parts
- Caretaker should keep good and up to date records of all tools,
materials, spare parts, and all his/her activities.
3) Works
- Caretaker should obey instructions of WMC
- WMC should send caretaker to training workshops to improve on his
skills
- Caretaker should be hardworking and committed to his work
- Caretaker should inform the WMC on work carried out.
- Caretaker should receive an authorisation from the WMC to make
private connections.
4) Meeting
- There should be respect for each other
- Respect each others opinion and be tolerant
- Speak in simple and clear language
- Respect meeting time
- Apologize when you know you are wrong. The words “I am sorry”
resolves many conflicts.8 2.6 Managing (resolving) conflicts In the situation where a conflict between the caretaker and the WMC cannot be solved by both parties the matter should be reported to the Council. The Council will call a meeting and look for ways to solve the problem. 2.7 Summary People who love peace, unity and progress always try to reduce conflict situations or look for solutions when conflicts arise. The caretaker and the WMC are agents of development in the community. Development is however difficult when people live in permanent conflict.
9
2.8   Self check test

  1) Conflicts have positive and negative results ____________(yes/no)
  2) When conflicts between caretaker and WMC are solved peacefully, it is
      good for the proper functioning of the VWSS__________(yes/no)
  3) Name 3 conflicts which have occurred between you and the WMC or
      you and the community
  a)______________________________________________________
  b)______________________________________________________
  c) ______________________________________________________
  4) Explain how one of the conflicts was solved or managed.
  _________________________________________________________
  _________________________________________________________
  _________________________________________________________
  _________________________________________________________
  _________________________________________________________
  _________________________________________________________
  _________________________________________________________
  _________________________________________________________
  _________________________________________________________
10
MODULE TWO
MAINTENANCE OF A VILLAGE
WATER SUPPLY SCHEME
Global Objective
Caretakers acquire knowledge and skills necessary for the maintenance of
village water supply schemes (VWSS)
Specific Objectives
- Caretakers know and understand the functioning of VWSS
- Caretakers know how to operate and maintain VWSS
- Caretakers know how to use tools and materials to operate and
maintain VWSS11
LESSON ONE
WATER SUPPLY STRUCTURES
1.1 Introduction
A VWSS has various structures. These structures can also be called the parts
of a VWSS. These various parts are necessary and important for the proper
functioning of the system. It is necessary for a caretaker to be able to
recognize and know the functions/importance of these structures when
he/she sees them.
It is also important to know that a VWSS usually has one of the following
types of sources:
1) Spring source
2) Stream source
In any case, one village may have the two types.
The intake structure for a spring is different from that of a stream. We will
therefore name and describe the parts of a VWSS.
1.2. Spring intake
This is the structure constructed to collect water coming out of the ground.
The intake is made up of:
- A channel or channels which collect water behind the dam and drains
it into the spring inspection chamber
- A dam that guides water into the supply pipe.
- Collection chamber – chamber collects water from two or more spring
intakes and feeds it into one pipeline for transportation into the
storage tank.12
Spring intake
1.3 Spring inspection chamber
This structure enables the CT to inspect the water flow from the spring, it is
constructed in a manner that water should not stand behind the dam.
1.4 Stream intake
The stream intake structure consists of a dam constructed across a stream
with an intake chamber to take in the required amount of water needed for a
VWSS. It is located above the village where the riverbed is not too wide and
in many cases to reduce the possibilities of contamination.13
9
1. Intake gate
2. Spill way
3. Dam wall
4. Guide wall
5. Intake chamber
6. Pipe out to filter
7. Overflow pipe from chamber
8. Log dam (silt trap)
9. Stilling basin
Stream intake
1.5 Treatment station
Stream water is not safe for human consumption without some form of
treatment. Most VWSS treatment stations consist of the structures shown
below.14 1.5.1 Sedimentation tank This tank, receives water flowing from the intake chamber. The tank serves as a settlement structure. In the tank; heavy particles like soil and silt sink to the bottom, while floating objects e.g. leaves and sticks on the surface are taken out by the caretaker.
15

1.5.2 Filters

These are structures installed for the purification of water. There are many
types of filters in use on VWSS.

i)    Roughing filters (Vertical flow)

The vertical flow filter and precisely the up-flow roughing filter (URF) has
been adopted for VWSS.
16

These are pre-treatment units for water. They precede the final treatment
involving slow sand filtration. The main purpose of the gavel filter is to
remove the bulk of the silt and suspended materials thus reducing the
amount of silt reaching the sand filter.

The filter material for up-flow roughing filters is arranged with very coarse
filter medium at the bottom and coarse material at the top. Water flows
through the filter medium at O.5 to 1 m/h.

ii)   Slow sand filter

This one is constructed to carry of sand and gravel for use in filtering water.
Sand and gravel have a depth from 1.3 m to 1.5 m. When filtration starts, a
biological layer is formed on top of the sand. This biological layer together
with the sub-layers work to kill bacteria and filter the water.

When this layer becomes too thick, the flow rate of water through the filter
reduces and soon the filter block thus needing cleaning.
17

1.6   Break pressure tanks (interruption chamber)

These are found along pipelines to break or reduce the water pressure. They
are placed where the water pressure exceeds a vertical height difference (or
altitude) of 70 to 100 meters depending on the pressure rating of the pipe.
The structures are similar to storage tanks.

1.7   Storage tank

Storage tanks help to store water when it is not needed and releases it when
it is needed. Storage tanks guarantee a continuous flow of water at all the
collection points (i.e. standpipes, wash places etc).
18
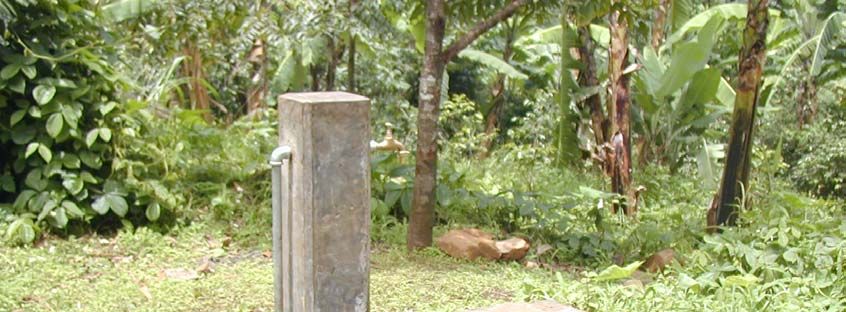
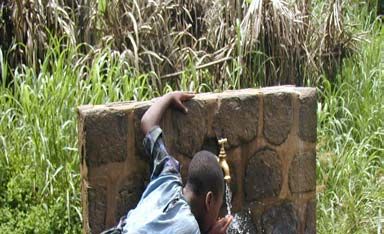
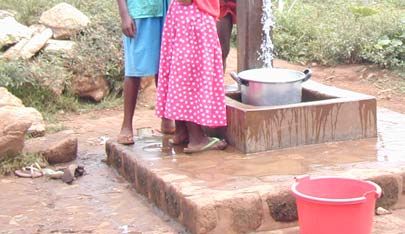
1.8 Water collection points
These are standpipes, fountains and wash places
Stand pipe wash place
1.9 Valve chambers
These are chambers built along pipelines to protect them. They provide easy
access for control of flow within the system.
- Control valve chambers.
- Washout valve chambers.
- Air release valve chambers etc.
1.10 Summary
This lesson covered the various types of VWSS structures and their functions.19
1.11 Self check test
1) Name 5 structures in your VWSS
a) ______________________________
b) ______________________________
c) ______________________________
d) ______________________________
e) ______________________________
2) The spring control chamber enables water flow from the spring without
water standing behind the dam ______________(yes/no)
3) Dams are built across spring intakes________(yes/no)
4) Which of the filters below kills bacteria in water (tick right answers)
♦ Up flow roughing filter
♦ Treatment station
♦ Slow sand filter
5) Some stream intakes have no treatment station _________(yes/no)
6) Name 3 water collection points
a) ___________________
b) ___________________
c) ___________________20
LESSON TWO
MAINTENANCE OF VWSS STRUCTURES
2.1 Introduction
A village water supply, once constructed, serves its purpose only when there
is regular operation and maintenance. When a VWSS is poorly operated and
maintained it could become a big waste to the community in this case the
water will not flow regularly and the community will be forced to return to the
old sources for drinking water.
A caretaker’s work is to take care of the VWSS. Taking care of a VWSS means
ensuring that the structures are in good condition and function as expected.
When the structures function as expected, there will be a continuous and
uninterrupted flow of clean drinking water.
This lesson is on how a caretaker with the assistance of the water
management committee (WMC) and the community can maintain the various
structures and installations of VWSS.
2.2 Types of maintenance
There are three types of maintenance.
1) Preventive maintenance: this is done to avoid or prevent water structures
and fittings from getting bad.
2) Corrective maintenance: This is done when there is something not
working well on the network. It is done to prevent the damage from
getting worse.
3) Emergency maintenance: This is done to rescue the VWSS from total
collapse. This is mostly as a result of failure in preventive and corrective
maintenance, and acts of nature, e.g. a flood breaking a stream crossing.
Examples of types of maintenance:
Preventive Corrective Emergency
maintenance maintenance maintenance
- Washing of the tank - Filling soil round the - Reconstruction of
- Flushing of the URF foundation when it low point chamber
- Fire tracing around is being washed broken by floods
the catchment away
- Creating contour - Filling holes with
bonds mortar in chamber
- Replacing taps
N.B.: An active and effective caretaker does more of
preventive than corrective or emergency maintenance21
2.3 Operation/ Maintenance of VWSS structures
Structure What should be done
Spring intake - Dig and cut roots of trees growing toward masonry
works.
- Check for erosion around the structure and divert
any run off away from the structure.
- Check roots growing into channels and pipes.
- Keep grass low around structure.
Spring inspection, - Regularly open and check the chambers to remove
collection, and sediments at the bottom, if necessary drain or clean
interruption - Inspect and clean inside and outside of the
chambers chambers
- Clean and grease locks
- Check roots in pipes
- Wash internal walls, if necessary
Sedimentation tank, - Cut grass around the entrance and the road
Storage tank and leading to the structure
Break pressure tank - In cases where leaks are found, report to WMC
and make sure they are repaired as quickly as
possible
- All cracks should be reported to the WMC who
shall call a qualified person to do the repairs
- Enter these structures wearing wooden shoes,
never enter bare footed. Each structure should
have its own shoes which are left there
- Cleaning the tank: see below
Valve chambers - Regularly inspect the valves. Open and close them
Low points during each visit.
High points - Check the walls for cracks.
- When cleaning the storage tank: close the valve to
the supply pipe, and open the cleaning pipe; after
cleaning, close the cleaning pipe and open the
supply valve; follow the supply pipe and check
whether all the branch valves are working; open
the washout valves until the water coming out is
clean and close them again.
- Keep grass low around the structure.
- Check valves to see whether they are working
Standpipes, - Check drainage and ask users to clear if blocked
Wash places and - Clear the grass around the standpipes, wash places
Fountains. and fountains
- If the tap manager does not ensure clean tap
surroundings after warnings, the tap should be
locked22
Structure What should be done
Up flow - Up roughing filters are cleaned by flushing.
roughing filters - Shut the incoming water.
in layers - Open the drain valve and watch the flow out of the
filter.
- If the water remains dirty when the tank is getting
empty, the up flow roughing filter is filled again and the
flushing process repeated. This flushing is done once a
week in the rainy season and monthly in the dry season
- Once a year, at the end of the rainy season the gravel
in the filter is removed and thoroughly washed and put
back. Remember: the very coarse gravel is put first, the
coarse gravel second etc.
Slow sand - Empty any water in the slow sand filter tank through the
filters drainpipe at its bottom or through special overflow
installed just above the maximum sand level.
- Remove your shoes before entering the filter and wear
the special shoes made of wood.
- Remove the top layer of the sand carefully 5 to 10 cm,
according to degree of clogging and keep it outside for
washing later. Check depth of sand removed to know
how much remains underneath, record it and the date
- Level the sand carefully and fill the filter again with
water through the inlet pipe.
- When the sand layer height remaining in the filter is
equal or less than 0.45 m after several sand removals at
earlier intervals, all the sand is removed, washed and
filled back into the tank to its original height of 1.3m to
1.5 m; and the filter filled with water again
- The cleaning process should be finished between half
and one day, otherwise, the silt in the lower layers
might dry off and block water from passing.
- For proper functioning, the filter should run for five days
before water is sent to the community.
- Once in every year the sand is removed completely,
washed and put back, especially at the end of the rainy
season (November/December).23
2.4 Some general hints on VWSS maintenance
1) Water works need regular maintenance and repairs
2) Never use a kerosene lamp inside a tank. 1 litre of kerosene can
contaminate up to 1 000 000 litres of water.
3) Control the colour of water after heavy rainfall to check whether there is
infiltration of surface run off.
4) Caretakers should always inform the WMC of problems they cannot solve.
5) To check if all the dirt on sand has been washed out, take a handful of
wet sand and rub it between your hands. If there is still any trace of dirt
remaining, then the sand is not yet clean enough.
6) The owner of a private tap must also allow the caretaker to inspect the
installations and commit himself to undertake the repairs. Report
unauthorised connections to WMC for action.
7) Check regularly water cleanliness (colour, smell and taste) and water
quantity.
8) Check regularly structural conditions: cracks, leaks, plastering,
installations especially valves
Care taker cleaning the water tank24 2.5 Summary In this lesson, the caretaker now knows what to do, in order to maintain or repair the various structures of VWSS. It is only by conducting regular checks on these structures that the caretaker with the assistance of the WMC and discover faults and carry out repairs.
25

2.6     Self check test

1) Name the 3 types of maintenance and tick the best type
         a) __________________
         b) __________________
         c) __________________
2) What do you do when there is a crack on one of the structures? Tick the
      right answer.
         1) Mix mortar and repair it
         2) Invite a builder to repair it
         3) Inform the WMC
3)      Digging and cutting root trees growing towards masonry works is
        corrective maintenance ________________ (Yes/no)
5)      When cleaning the slow sand filter you can wear slippers, rain boats or
        enter the tank barefooted___________(yes/no)
6)      For proper functioning, valves should be opened and closed during
        each visit _________________(yes/no)
7)      Tick the wrong answer
         a) private connections are part of the job of a caretaker
         b) private connections bring in money to the WMC
         c) the caretaker has the right to inspect private connections
         d) the caretaker can carry out private connections without informing
             the WMC.
26
LESSON THREE
PIPES AND FITTINGS
3.1 Introduction
Water transportation and distribution in the community is done through
pipes. The distribution network is divided into 2 categories, namely:
Mainlines which carry the water through the network; it is from there that
branches go off.
Branch lines branch off from the mainlines to collection points.
.
This lesson describes the types of pipes used in a VWSS and how to lay them
in the network. The lesson also gives some maintenance hints on pipes, taps
and valves.
3.2 Pipes
There are several kinds of pipes but we will consider only those commonly
used locally for water supplies. There are plastic (PVC and Polyethylene, PET)
and galvanised iron pipes.(GI PIPES)
3.2.1 PVC pipes
PVC pipes are divided into two groups, pressure and non-pressure pipes.
Non-Pressure pipes
These are pipes used for draining water where the water does not flow under
pressure. They are supplied in four metre lengths and should not be buried
deeper than 20cm. The external diameters range from 32 mm to 110 mm.27
Pressure Pipes.
Pressure pipes are available in standard lengths of six metres in several
pressure ratings. The pressure is indicated in bars (1 bar = 1 kg/cm2 or the
pressure of a water column of 10m height on an area of 1cm2)
Table1 Pressure ratings of pipes
Nominal Bars Resistance
pressure to water
pressure
4 4 40m high
6 6 60m high
10 10 100m high
16 16 160m high
25 25 250m high
Manufacturers depending on the raw materials produce pipes of different
dimensions. So when you buy pipes, please refer to the markings on the
pipes. The situation plan handed over to the community at the end of the
project gives the pipe sizes and pressure as they have been laid. So always
refer to this plan before embarking on repairs.
Plastic pipes should be labelled properly so as to identify the manufacturers,
the pipe dimensions and the pressure. Avoid pipes that are not marked for
this is probably a sign of low quality.
Table 2 Pipe sizes for PVC Pipes
Commercial Internal and external Pressure rating
description diameter number (np)
Pipe 110 98.8x110 10
Pipe 90 80.6x90 10
Pipe 75 68.6x75 6
Pipe 75 63x75 10
Pipe 63 56.6x63 6
Pipe 63 53x63 10
Pipe 50 43.6x50 6
Pipe 50 42x50 10
Pipe 40 35x40 6
Pipe 40 33x40 10
Pipe 32 28x32 6
Pipe 32 26.8x32 10
Pipe 25 21x25 10
These figures are indicative; some manufacturers may have different
dimensions. PET pipes are not widely used in Cameroon since they are eaten
by rodents.28
3.2.2 G.I. pipes
GI pipes also called galvanised iron pipes, come in nominal lengths of six
metres. These are steel pipes that have been treated chemically (galvanised)
to prevent rust from attacking them. They are generally described in inches
e.g. three quarter inch, one inch etc. Galvanised pipes are used in marshy
areas and sections of the pipeline where the pipes cannot be buried (over
rocks and stream or valley crossings)
GI pipes are six meters long and have both ends diced. When transporting
them fit sockets on the diced ends to prevent the threads from being
damaged.
Dicing machines with proper and complete sets of teeth are few in the field
and they are very expensive to buy. Therefore it is advisable to make a
detailed list of GI pipes, with diameter and length, and then order them with
the ends already diced. However you may also cut the pipes to the required
lengths and take where there is a good dicing machine. When dicing a metal
pipe, the pipe is weakened by cutting off part of its thickness. Therefore care
has to be taken in making clean threads. Too much cutting not only causes
leaks at the joints but also weakens them. Pipes should never be transported
or moved after they have been joined together. The length of the diced part
or thread varies according to the diameter of the pipe.
Table 3 Measurements of thread length
Pipe Length (mm)
3/8’’ 10
½ 13
¾ 15
1 17
1¼ 19
1½ 19
2 24
2½ 27
3 30
4 40
3.3 Taps
Standpipe taps are the most used in any VWSS and therefore require more
attention.29 3.4 Types of valves a) Air valves These are fitted at the high points on of the network to release any air that might be accumulating. b) Float valves Fitted in storage tanks or break pressure tanks to stop water entering the tank when it is full c) Washout valves Fitted at low points on the network to remove mud and settlements from the pipes.
30
d)    Service pipe valves or branch valves

Fitted on the service pipe to control flow of water to the standpipe.

e)    Branch valves

Branch valves are created where lines take off from the main line.

3.5   Fittings

Fittings are described according to their types. Fittings described in numbers
or metric units are generally of the plastic type. Those described in inches are
of the galvanized type. Always remember to state whether the fitting is
pressure or non-pressure.
31
32
33

3.6   Maintenance of pipes and fitting

 Installation       Possible         What should be done
                    problem
 Pipes              Mending of       -    Cut out the broken length of pipe
                    broken PVC            Replace with a new section of pipe
                    pipes            -    Following reconnection, partially
                                          backfill the pipe leaving the joints
                                          exposed
                                     -    Slowly open the control valve to
                                          check that there are no leaks at the
                                          joint
                                     -    Backfill and compact the trench
                                     -    Mark the position of the pipes with
                                          stones or pegs etc.
                                     -    Record the repair (date, location,
                                          type of repair etc)
                    Laying of PVC        - Remove all dirt or ground from the
                    pipes                   pipe
                                         - Clean the inside of the socket end
                                            with a dry cloth
                                         - Carefully sandpaper the socket
                                            ends
                                         - Apply glue on the sand papered
                                            end
                                         - Put the chamfered end into the
                                            socket and hold steadily for five
                                            minutes
                                         - Lay the pipe but do not backfill
                                         - Allow water to pass through the
                                            pipes for 48 hours before
                                            backfilling if no leakage is
                                            discovered.
                    Hints for            - Calculate the length of the bend by
                    making bends            measuring the outside diameter of
                    and elbows on           the pipe and multiply by 5.
                    PVC pipes            - Measure and mark the point of the
                                            bend
                                         - Fill the pipe with dry sand
                                         - Heat the pipe at the mark gently
                                            and regularly until it becomes soft
                                            and flexible
                                         - Put the pipe level in the trench and
                                            bend it to the desired angle
                                         - Cool the pipe with water and let
                                            the sand flow out.
34
Installation Possible What should be done
problem
Mending a - Turn off the water at the nearest
broken GI pipe control valve upstream of the leak
- Excavate and expose the leaking
section of pipe
- Cut out the broken length of pipe
- Take distance between the fittings
and the threat lengths to get the
total length to be used
- Replace cut out pipe with a new
piece of pipe
- Follow steps on how to lay GI pipes
below
Laying of GI - Dice the pipe heads
pipes - Clean the thread with an iron
brush
- Hemp the thread in a clockwise
direction on the diced head
- Apply putty to make the joints
water tight
- Screw the sockets to the two ends
of the pipe using a pipe wrench
Water tight - After dicing the pipe, take a good
joints of GI amount of hemp and put it around
pipes the pipe, following the screwing
direction, or clockwise. Add putty on
the hemp to facilitate the screwing
and to make the joint fully water
tight.
If pipe route is - Mark pipeline routes with pipelines
not marked markers especially in areas where
pipes cross farms
- Plant grass along the pipeline route
to stabilise soil
- Check and repair pipe supports and
anchor blocks at stream or gully
crossings.
Taps Tap handle - Fix handle or replace the tap
turns but the
tap does not
flow or stop
Water dripping - Tighten the gland or replace the
from around packing
the spindle35
Installation Possible What should be done
problem
A corroded - Clean or re-cut the thread and
joint between replace the tap
pipe and tap
Water dripping - Clean the tap
from a closed - Replace the washer
tap or leaking
from the gland
around the
spindle of a
tap or valve
Water - Locate the problem by measuring
shortage at the the spring flow at the source and in
collection point the tank and compare with
previously measured figures. If low
verify leakages by checking all the
valves and pipelines
- If problem persist, check on possible
clogging or check whether there is
air or vacuum in the pipes. These
can be eliminated by opening and
checking all taps and ventilation
valves at low pressure
Tap washer - Close the control stop cock or valve
replacement - Unscrew the tap
- Remove the worn out washer and
replace with a new one36
Installation Possible What should be done
problem
Tap packing - Unscrew the gland nut
replacement - Remove the old material and clean
around the spindle
- Place new packing material
- Screw back the gland nut and slowly
tighten
Fitting a new - Remove the old tap carefully
tap - Remove rust and old putty
- Wrap the hemp of tape around the
threat in clockwise direction
- Screw the new tap tightly holding
the pipe with a wrench.
Valves - Water - Valves should be checked monthly
hammer - Valves should be opened and closed
which can periodically
damage - Valves should not be over tightened
pipes and - A valve should not be shut quickly
fittings. but slowly, until the flow is stopped.
- Damaged
valve seat
or thread
Picture of poorly managed standpipe.37
3.7 Describing fittings
To describe a fitting you must use the name, type and size,
Example:
1) Gate valve GI 2inch
2) Ball valve PVC 50mm
This order must be respected for somebody to recognize the exact fitting
required.
3.8 Summary
This lesson is installations and fittings. You have learnt how to carry out
minor repairs on pipes, taps and valves. Pipes and taps are very important
components in the transportation and distribution of water in a VWSS
network. A good caretaker has to ensure that leaks do not occur often on
pipes taps and valves and even when it occurs, repairs should be immediate.
Immediate repair of leakages, prevents waste of water and ensures
continuous water supply.38
3.9 Self check test
1) Name the two types of pipes used in village water supplies
a) ________________________
b) ________________________
2) State 2 things to do when making bends and elbows on PVC pipes.
a) _________________________
b) _________________________
3) PVC pipes are described in mm while GI pipes are described in
inches________(yes/no)
4) Where are G.I pipes used? Tick right answers
a) In marshy areas
b) Over rocks and streams
c) At valley crossings
5) After mending a broken pipe, backfill immediately
_____________(yes/no)
6) When water is dripping from around the tap spindle you
can______________or_____________ to stop the water dripping (fill
the spaces)
7) Which tool is used in holding the pipe when filling a new tap (tick right
answer)
a) Pliers
b) Pincers
c) Wrench
8) Valves should be shut quickly for them to last for long _______
(yes/no)39
LESSON FOUR
CATCHMENT PROTECTION
4.1. Introduction
Most village water supply schemes (VWSS) have either spring or stream
sources of water. These sources have catchment areas. There is need to
protect these catchments areas in order to ensure a continuous supply of
clean water.
4.2. The spring catchment area
The spring catchment area is divided into immediate catchment area and the
enlarged catchment area. The immediate catchment area is where human
activity is not allowed. It is defined by a water shed specialist and should be
fenced off immediately. The enlarged catchment area extends further beyond
the immediate catchment area. Here some form of human activity maybe
allowed with the advice of a watershed specialist.40
AREA
4.3 The catchment area of a stream
It is also divided into an immediate and an enlarged area. These areas are
marked out by a water shed specialist.
4.4 Protecting the catchment areas
The community needs to be sensitised to participate in the protection of the
catchment area. In order to get the participation of the community in
catchment area protection, they should be involved in the planning and
decision making stages of the VWSS. The community through the WMC
should work with the Rural Council to get the Administration concerned with
land matters to expropriate the catchment area to keep it protected.41
Immediate catchment area
What should be done What should not be done
- Build fence with barbed wire - No farming
followed by a natural fence
- Dig and cut roots of trees - No grazing
growing toward the masonry
works
- Plant grass which has a dense - No hunting
root system to prevent erosion
e.g. vetiver
- Dig trenches to divert runoff out - No burning
of the catchment
- Cut grass to avoid fire
- No excreting
Enlarged catchment area
What should be done What should not be done
- Plant trees and shrubs which do Do not plant trees like Eucalyptus
not absorb water which absorb much water
- Farm but only plant the type of Do not use fertilizers, chemicals,
crop advised by catchment insecticides and pesticides
protection specialist
N.B.: The catchment protection specialist will advise on the type of trees and
grass to plant in the catchment areas.
4.5 Summary
It is important for the community, especially people living near the water
source, to know what to do and what not to do in the catchment areas of a
VWSS. It is necessary that during monitoring, the caretaker is vigilant to
notice whether the community is respecting catchment protection rules or
not.42
4.6 Self check test
1) Farming can be done in the immediate and enlarged catchment area
________(yes/no)
2) Catchment landowners need to be sensitized to participate in the
protection of the catchment ____________(true/false)
3) Name 5 things which should not be done in the immediate catchment area
a) _____________________________
b) _____________________________
c) ____________________________
d) ____________________________
e) ____________________________
4) Whom should the community contact for advice on the type of farming to
carry out in the catchment area?
____________________________________________________________43
LESSON FIVE
WATER LIFTING DEVICES
5.1 Introduction
When water is found at a lower level than where the water is needed, a
water lifting device is required to get the water to the higher level. There are
several kinds of water lifting devices among which all, water wheels, rope and
bucket, pumps, rams etc. We shall discuss only pumps and rams.
5.2 Pumps and hydraulic rams
a) Hand-pumps
As the name implies, water is lifted up manually with the use of the hand.
There are various types of hand-pumps.
b) Mechanical pumps
There are many different types of mechanical water pumps. Some use diesel,
some kerosene, some petrol, some water and some electricity. The cheapest
mechanical pump used in VWSS is the hydraulic ram
c) Hydraulic rams
These are mechanical pumps, which pump water-using devices powered by
water under pressure coming from a dam at a higher level. With a special
valve mechanism, part of the water (approximately 10 to 20 %) is separated
and diverted into a supply pipe leading to an elevated tank meanwhile the
rest is flowing off. Pumping is done by a process of continuous strokes, the
pressured water being the energy.44 5.3 Maintenance of pumps 1) Regular check on weekly basis has to be made to make sure that the strainer, pump sumps and regulating valves are clean. 2) When pump parts are dirty, do the following - Change oil - Clean fuel tank - Clean or change oil filters, washers and seals - Clean and grease engine 3) Always maintain the battery 4) Check the main electrical cables and contacts 5) In case of repeated breakdowns, call a mechanic or engineer to examine the pump. 5.4 Summary Pumps are good for lifting water from lower to higher points in a water supply network. Pumps require a clean source of water such as a stream or spring. The simplicity of pumps makes them reliable and if well maintained, they can operate for a long time.
45
5.5 Self check test

1) Not all VWSS need water lifting devices ______________ (true/false)
2) Name the most common mechanical pumps used in VWSS__________
3) When pump parts are dirty, the following can be done (tick the right
   answers)
      a) Change oil
      b) Change battery
      c) Clean fuel tank
      d) Check main electrical cables.
46
LESSON SIX
MAINTENANCE AND REPAIR TOOLS
6.1 Introduction
At completion of a VWSS, the WMC receives tools for use by the caretakers.
The caretakers receive many types of tools, which are used depending on the
type of maintenance or repair work to be carried out. It is the responsibility of
the caretaker to use these tools judiciously or supervise the judicious use of
the tools by others during community work.47 6.2 Common tools for caretakers
48
49

6.3    Tools and their uses

  N°         Tools              Uses
       1)    Spade              For digging and carrying top soil, mortar etc
       2)    Cutlass            For cutting grass, wood etc.
       3)    Metal file         For smoothing or sharpening metals (cutlass,
                                spades) to make them sharp
       4)    Pliers             For gripping, bending or cutting wire, can also
                                be used for pulling nails
       5)    Shifting spanner   For tightening or loosening nuts, bolts, etc.
       6)    Screw driver       For turning screws to put them in or get them
                                out
       7)    Round chisel       For cutting or carving wood
       8)    Flat chisel        For cutting or carving wood
       9)    Carpenter chisel   For cutting or carving wood
       10)   Pincers            For gripping things tightly especially when
                                pulling out nails or cutting barbed wire
       11) Wood saw             For cutting wood and pipes
       12) Hack saw             For cutting metals e.g. GI pipes
       13) Club hammer          For driving nails into wood and breaking hard
                                substances
       14)   Trowel             For spreading mortar (it’s like a small shovel)
       15)   Meter              For measuring lengths of pipes
       16)   Pipe wrench        For holding pipes
       17)   Spirit level       For determining flatness and inclination of a
                                surface when laying pipes
       18)   Head pan           For carrying soil, mortar, gravel etc.
       19)   Plastic bucket     For carrying water or measuring water yield
       20)   Dicing machine     For dicing ends of GI pipes
       21)   Table Vice         For holding pipes especially during dicing
       22)   Iron brush         For washing of stones so that they can hold the
                                cement, for cleaning rust on pipes
       23) Rasp file            For filing or smoothening plastic and wood
       24) Oil can              For cooling and smoothening dicing machine
                                when dicing pipes
       25) Rubber brush         For washing tank
       26) Blow lamp            For warming pipes so that they can be bent

How to use the dicing machine

1) Choose the correct teeth, or socket head according to the diameter of the
   pipe
2) Fix the guiding teeth of the machine
3) While pushing the machine frontally against the pipe, keep turning the
   handle of the machine clockwise and anticlockwise to form the thread
50 4) Keep oiling the threads on the pipe to facilitate the cutting and to have properly formed threads 5) Measure and check the length of the thread, 6.4 Summary With this lesson it is now easy to see and recognize the various tools used by a caretaker during maintenance and repairing structures and fittings of a VWSS. These tools have also been described in the lesson.
51

6.5    Self check test

1) A caretaker without tools is like a farmer without a
   hoe___________(true/false)
2) Which tool is used for cutting GI pipes ____________________________
3) The dicing machine needs constant oiling when in use
   __________(yes/no)
4) A dicing machine is used for dicing PVC pipes __________(true/false)
5) Which tool is used for smoothening or filing plastic pipes (tick)
       a) Oil can
       b) Table vice
       c) Rasp file
       d) Chisel
52
MODULE THREE
PLANNING, IMPLEMENTATION, MONITORING
AND EVALUATION
Global Objective: Caretakers are able to plan, implement, monitor and
evaluate their actions and activities.
Specific Objectives:
- Caretakers know how to plan and implement their work.
- Caretakers know how to monitor and evaluate a VWSS;53
LESSON ONE
PLANNING AND IMPLEMENTATION
1.1 Introduction
To succeed in life you need to plan. Working without planning can be
compared to a man stumbling and falling because it is too dark to see. In
order for a caretaker to succeed in his responsibilities he needs to plan and
also keep records of his activities. Keeping records of all what you do and
have to do will help you in planning.
In a VWSS there are activities that have to be done by the community but
with the advice and direction of the caretaker. Some of the work for which
the community is needed are:
- Fire tracing of the catchment area
- Planting of grass and trees in the catchment area
- Clearing along the pipeline
- Washing of tanks.
- Excavation of the pipeline in case of a leakage.
- Fencing the catchment area.
These tasks need planning in order to be successfully carried out by the
community.
1.2. Planning work with the community
In carrying out work with the community, the caretaker should proceed as
follows:
1.2.1 Before the day of community work
- Identify work to be done e.g. fence repairing, back filling etc.
- Inform the water management committee early enough on the type of
work to be done, the date and the number of persons required.
- Inform WMC on the type of tools to be brought along by men and
women for the work e.g. spades or cutlasses or hoes.
- Prepare tools/materials that have to be supplied by the caretaker.
1.2.2 On the day of community work
- The caretaker should be at work site early with members of the WMC.
- The caretaker should explain to the WMC at the site the work that is to
be done and how it will be done54
- When population arrives the caretaker and WMC partition the work to
be done
- The caretaker demonstrates what is to be done
- When work starts, the caretaker moves around giving advice politely
and helping where necessary
- At the end of the work, he/she collects all tools
- He/she assesses the work done and with the WMC plans for the next
set of activities.
1.2.3. Planning chart
The caretaker with the WMC can plan activities using this format.
Table 4 Planning chart
Do what With what By whom When
(Activity) (Tools/materials) (Date/day)
Fire tracing on Cutlasses and hoes Community Tuesday
catchment 20th march 200_
Washing of Spades, brooms, Community Friday
storage tanks and buckets 30th may 200_
Repairs on leaking Spindle Caretaker Monday 31 May
tap at market Valve 200_
square
This planning chart helps the caretaker to know in advance what is to be
done with what, when and by whom. Time of work should also be fixed in
advance
1.3 Summary
Planning is good. It helps you to manage time and resources properly.
Caretakers should always plan all their activities before carrying them out.55
1.4 Self check test
1) Tick the right statements
a) Planning has no use
b) Planning is a condition of success
c) Implementation without planning is not good
d) Implement before planning
2) On the day of community work the caretaker should come_________
members of the community (select and insert word (a) with (b) after(c)
before (d) together.
3) A caretaker should be rude when showing people what to do during
community work______________ (false/true)
4) Following the planning chart format in this lesson, plan your activities
for the next 3 months.56
LESSON TWO
MONITORING AND EVALUATION
2.1 Introduction
A caretaker has to monitor and evaluate a VWSS. This is to find out if the
scheme is functioning well. Planning and record keeping helps in the
monitoring process. You cannot monitor or evaluate if from the very
beginning you did not plan and keep records.
2.2 What is monitoring?
Monitoring means keeping a close and careful check on planned actions and
activities. It means following up constantly to make sure that everything is
going on well as expected or planned.
2.3 Monitoring activities in a VWSS
What to monitor How to monitor
- Monthly work plan - Compare work plan done at beginning of
month with realisations at end of month
- Spring flow speed of - Compare current speed with speed when
various inlets. VWSS was handed over.
- Project tools, materials - Count and crosscheck tools with tools
and spare parts record especially after community work
- Verify materials and spare parts used with
quantity in stock
- All records - Go through each record to ensure that
they are up to date.
- Standpipes - How many are functioning
- Are the surroundings clean
- Water quality. Is the - Find out about N° of water borne diseases
water clean from village clinic
- Frequency and duration - Compare interval between repairs and
of breakdowns damage
2.4 Evaluation
Evaluation means identifying and analysing the successes and difficulties
registered during the period of carrying out planned or unplanned activities in
a project. The caretaker can conduct minor evaluations during the year when
he/she is monitoring. A major evaluation should however be conducted at the
end of the year.57 2.4.1 Evaluation questions When carrying out an evaluation, you have to ask and answer the following questions: 1) What did I plan to do? Your monthly or yearly planning chart should contain activities, which you planned to carry out within the month or year. 2) What did I do well? Why? Here you are identifying your successes and things that contributed to your successes; 3) What did I not do well? Why? Here you identify your failures and things that contributed to your failures. 4) What do I need to improve next time? When you identify what caused your failures, it will be easy to know what to do in order not to have the same failure next time. 2.4.2 What to evaluate? 1) Evaluate objectives/yearly plan of work 2) Evaluate caretaker’s relationship with WMC and community 3) Evaluate record keeping 4) Evaluate repairs carried out on network 5) Evaluate the functioning of the network 6) Evaluate the quality and quantity of water. 2.4.3 Who evaluates? 1) The caretaker should carry out self evaluation that is he/she should evaluate his/her activities in order to improve 2) The WMC can evaluate the caretaker in order to make recommendations for improvement. 2.5 Summary The objective of this lesson has been for the caretaker to understand the terms monitoring and evaluation. It has equally come out with what the caretaker has to monitor and evaluate in order to attain the goal of being a good VWSS caretaker.
58

2.6   Self check test

1) Record      keeping      is      necessary         for   monitoring   and
   evaluation_________(true/false)
2) Tick the correct statements
      a) Monitoring is evaluation
      b) Monitoring means following up to ensure that things are going on
         as planned.
      c) Without planning, monitoring is difficult.
      d) Monitoring is for educated caretakers
3) Name three things which a caretaker has to monitor and evaluate.
      a) _________________________
      b) ________________________
      c) _________________________
4) Who has to carry out evaluation
      a) ___________________________
      b) ___________________________
59
LESSON THREE
MONITORING OF A VILLAGE WATER SUPPLY SCHEME
3.1 Introduction
One of the most important jobs of the WMC together with the CT is regular
monitoring of the VWSS. It involves visiting every part of the scheme.
3.2 How and what to monitor
1) Before the monitoring exercise review your notes so that you are
familiar with how the parts of the VWSS should be. This will enable
you to quickly spot problems with any part.
2) The monitoring starts from the catchment area and intake and follows
the pipeline by visiting all the structures on the way.
3) All problems seen in the catchment areas, intakes or pipelines are
recorded and the points noted. Notes are taken as follows: e.g.
catchment area 1: fence broken, needs fire tracing, farming in the
area; spring intake: drainage channels blocked by grass, needs
cleaning around and inside.
4) Structures along the pipeline are visited and any problems noted.
5) Private connections are checked.
6) At each stand tap the records of the stand tap manager are verified
7) At the end of the exercise the WMC holds a meeting and a report is
made by those who carried out the monitoring.
8) The meeting shall end with a plan of actions on how to correct all
problems identified during the monitoring.
9) Do not carry out repairs during monitoring or propose solutions. Note
the problems and the solutions shall be part of the plan of actions
drawn up at the end of the meeting.
3.3 Monitoring periods
Monitoring is best carried out in January, April, June, and October.
3.4 Summary
Monitoring the VWSS should be taken seriously by the caretaker and the
WMC in order to enable the VWSS to function well. It also allows small
problems to be identified and corrected before they become big ones.60
3.5 Self check test
1) At least how many times per year should a caretaker monitor the
village water supply scheme (VWSS) (tick right answer)
a) At least 2 times
b) At least 4 times
c) At least 8 times.
2) If the caretaker does not monitor the VWSS, the system will surely
collapse __________(true/false)
3) Tick the correct statements
a) Monitoring also involves the catchment area
b) Monitoring a VWSS is done only by the WMC
c) Monitoring should be done at the end of the rainy season
d) Filling a monitoring form is not necessary
e) Monitoring a VWSS is the most important job of the caretaker.61
LESSON FOUR
RECORD KEEPING
4.1 Introduction
There are some essential records, which a caretaker has to keep and update
continuously. These records are:
1) Pipe stock records
2) Fitting stock records
3) Tools record and logbook
4) Network repairs record
5) Spring flow record
6) Visitors book (record)
To avoid confusion, each record should have a clearly defined section in a
ledger. The name of the village water supply scheme should be written on
the front cover of the ledger.62
4.2 Records of a Caretaker
Table 5 Pipes stock record
Pipe type: 98.8 x 110 NP 10
Date Quantity Quantity Quantity Signature Remarks
in out balance
28/04/0- 20 - 20 Pipes
brought in
by pa Paul
02/05/0- - 5 15 5 pipes
used to
repair old
leaking
pipes
08/12/0- 5 - 20 5 pipes
donated by
Kun
women’s
group.
NB
- All pipe types should have a separate page designed in this same way.
- With this format, the stock of each pipe type is followed up closely by
the caretaker.
Table 6 fittings stock record
Fitting type: pressure plastic, elbow
Date Stock Quan. Quan. Quan. Bal. Signa Remarks
descrip- In -
tion stock in out ture
2/5/0- elbow 90 0 10 - 10 Left over after
mm completion of
project
2/5/0- elbow 10 10 - 20 Left over after
60mm completion of
project
4/6/0- elbow 60 20 - 5 15 5 elbow
mm 60mm used
during repairs
of 04/06 200
12/6/0- elbow 90 15 - 2 13 Used at Fon’s
mm Palace63
Table 7 tools logbook
Item Name Date Date to be Signature Remarks
and sign received returned on return
of
receiver
Spade Peter 04/04/200.. 05/04200.. Returned
on
6/6/200…
broken
Cutlass Paul 10/05/200.. 10/05/200.. Returned
on time
hoe Mary 10/05/200.. 10/05/200.. Returned
on time
N.B.:
- Caretaker should report all cases of lost, stolen, damaged or worn out
tools to the WMC who will take the necessary action.
Table 8 repairs logbook
Date of Date of Materials Remarks Signature of
damage repairs and tools WMC
or date used chairman
reported
10/10/200- 11/10/200- Glue and 2/6 Pipeline
piece of pipe leakage
caused by
bush fire at
Kwang.
14/11/200- 20/11/200- Pipe wrench, Stand tap
glue and leakage
gland nut caused by
worn out
gland nut at
market
square.
NB: The record briefly states the fault that has to be repaired, the cause of
the fault and where the repairs took place
This record is usually used by the WMC to evaluate the work of the caretaker.
The logbook is filled after repairs have been carried out, then taken to WMC
chairman for signature.You can also read