WISCONSIN FLAGGING HANDBOOK 2020 - Wisconsin DOT
←
→
Page content transcription
If your browser does not render page correctly, please read the page content below
2020

WISCONSIN
FLAGGING
HANDBOOK
CONTENTS

INTRODUCTION....................................1

BEFORE YOU BEGIN............................ 2
 Rules of conduct...........................................2
 Flagger apparel and equipment..................4
 Flagger’s position.........................................6

TWO-FLAGGER OPERATIONS............ 8
 Stopping traffic............................................8
 Releasing traffic.........................................10
 Slowing traffic............................................ 12

SINGLE-FLAGGER OPERATIONS......16
 Releasing traffic for
 single-flagger operations........................... 16

PILOT CAR OPERATIONS...................18
 Pilot car operations using
 a Stop/Slow paddle.................................... 18
 Pilot Car..................................................... 19
OTHER SITUATIONS.......................... 20
 Equipment crossings................................ 20
 Railroad crossings.....................................22
 Intersection work.......................................24
 Mobile operations......................................25
 Nighttime...................................................25
 Emergency flagging...................................26
 Nighttime emergency situations...............27

CHANNELIZING DEVICES.................27

GUIDELINES FOR
THE SUPERVISOR.............................. 28

FLAGGING TRAINING
REQUIREMENTS............................... 29

HOW TO GET CERTIFIED ................. 30

ADDENDUM.........................................31

     Remember, you play a vital part
     in keeping the public and your
     coworkers safe. If you are unsure
     of any flagging procedure, ask your
     supervisor for further explanation.

     Lives, including your own, depend on it!

     Name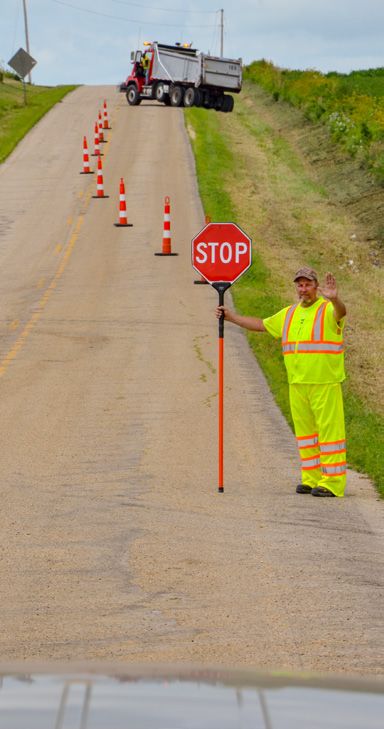
Wisconsin Statutes
340.01(22e) “Highway maintenance or
construction area” means the entire section
of roadway between the first advance
warning sign of highway maintenance or
construction work and an “END ROAD
WORK” or “END CONSTRUCTION” sign.

346.27 Persons working on highway.
The operator of a vehicle shall yield
the right-of-way to persons engaged
in maintenance or construction work
on a highway whenever the operator
is notified of their presence by
flagmen or warning signs.

  The information in this booklet
  is consistent with the 2009 edition
  of the Wisconsin Manual on
  Uniform Traffic Control Devices
  (WMUTCD), Part 6, and the
  State of Wisconsin Standard
  Specifications for Highway and
  Structures Construction.

INTRODUCTION
You’ve been chosen to be a flagger because
your supervisor believes you are physically
able and mentally alert to properly
control traffic through construction,
maintenance and utility work areas.
As a flagger, your chief duties are to:
 • Guide traffic safely through work areas.
 • Protect your fellow workers.
 • Prevent unreasonable delays for road users.
 • Answer motorists’ questions
   politely and knowledgeably.
This handbook will help you carry out these
important duties. Study it carefully to learn
proper flagging procedures in Wisconsin,
and keep it handy for quick reference.

                     1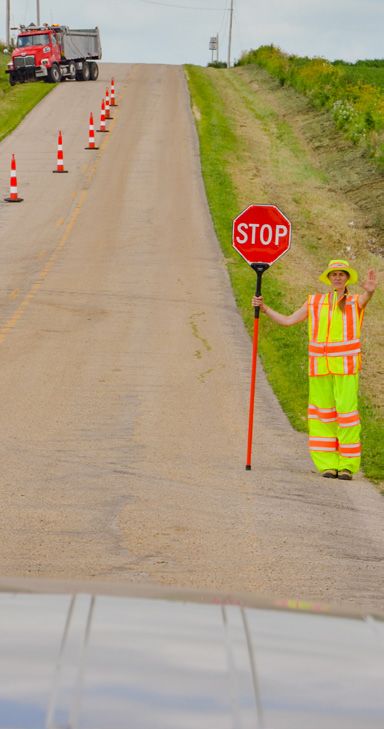
BEFORE YOU BEGIN
Rules of conduct
Flagging is an important responsibility
and should be carried out with authority
and dignity. Courtesy and a professional
attitude are vital in gaining the respect
of the traveling public. The image you
project as a flagger will affect the public’s
attitude toward the whole project and your
organization. The following guidelines will
make you a safer and more effective flagger.
Before beginning your flagging
duties, do the following:
 • Park your vehicle in a location that does
   not conflict with flagging operations and
   allows you to have an escape route.
 • Make sure your apparel and equipment
   are clean and in good working condition.
 • Make sure proper signs are in place.
 • Become familiar with the work activities
   so you can answer motorists’ questions.
 • Discuss a reasonable relief schedule
   with your supervisor or crew leader.
When two or more flaggers will be working
together, make sure one flagger is
designated as the flagger in charge
(the other flagger[s] will coordinate their
activities accordingly). The foreman
may be the person in charge.

                         2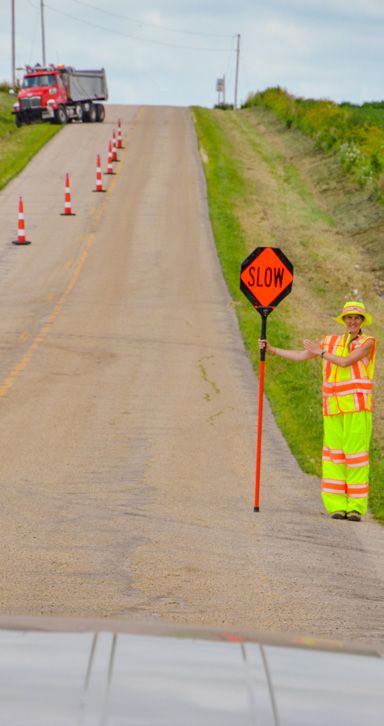
During flagging operations,
do the following:
 • Always hold the paddle.
 • Do not leave your position for
   any reason until relieved.
 • Always remain standing and
   never turn your back on traffic.
 • Stand alone. Do not mingle with the work
   crew, the traveling public, or other people.
 • Stay alert. Do not be distracted
   by the work operation and do not
   perform other activities.
 • Be courteous and polite with the public,
   but do not engage in small talk.
 • Never argue with the
   occupants of a vehicle.
 • If a driver refuses to obey
   instructions, inform your supervisor
   or crew leader as soon as possible
   without leaving your post.
 • Carry a pocket notebook for recording:
    ◊ Information to identify the driver.
    ◊ Description of the vehicle and
      license plate number.
    ◊ Circumstances involved in the incident.
 • Be alert to the needs of emergency
   vehicles. They should be given priority, but
   only when safety will not be compromised.
If a crash occurs in or
near the work zone:
 • Do not leave your post.
 • Warn other flaggers and workers.
 • Advise your supervisor and/or authorities.
 • Record any pertinent information.

                     3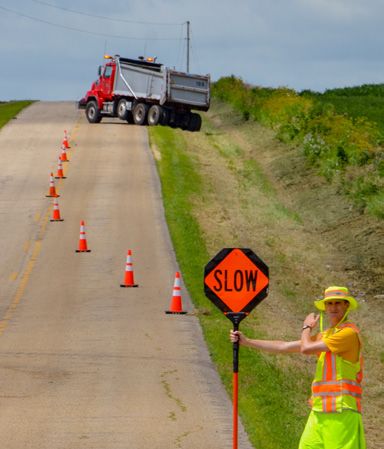
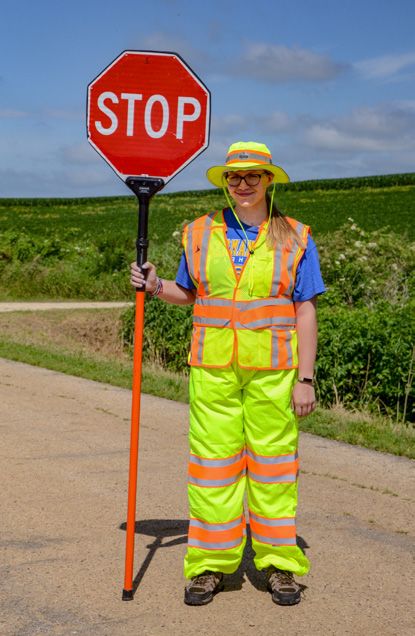
Flagger apparel and equipment
Clothing
In addition to being dressed neatly,
flaggers need to be dressed for safety.
In particular, flaggers are required to be
easily visible to traffic. Flaggers shall wear
the following required items, even when
serving as a replacement for a short period
(See Figure 1). The following required items
must all be ANSI 107-2015 type R compliant:
  • Vest-Class 2
  • Pants-Class E
Any gear for inclement weather must
also follow the above guidelines.
Flaggers are recommended to wear headwear
meeting ANSI 107 requirements. Highly visible
retroreflective wristbands or gloves are also
recommended for nighttime operations.
Equipment
Flaggers shall be equipped with the following:
 • STOP/SLOW paddle (See Figure 1).
   Retroreflective sheeting shall comply
   with applicable specifications.
 • Hand-held radio for communication
   when two or more flaggers are needed.
At night flaggers shall be
equipped additionally with:
 • Flashlight with red glow cone,
   lantern, or other lighted signal that
   will display a red warning light.
 • Lighted flagger station.
Recommended equipment:
 • Pad and pencil
 • Air horn or whistle
                         4
18" min.

18"                                          Letter Height
min.                                            6" min.
       Minimum 5' to ground

Figure 1: Apparel and equipment
for flagging operations

                                         5
Flagger’s position
In rural areas, flagger stations should
generally be located (See Figure 2):
• A minimum of 200–300 feet
in advance of the work area.
• Where the flagger is visible to approaching
traffic appropriate for speed of facility.
Factors such as visibility, traffic speeds
and volume, road conditions, road
alignment, topography and the work
being done should be considered in
determining your proper location.
Positioning yourself carefully, according to the
following suggestions, will help keep you safe
during flagging and will assist you in skillfully
controlling traffic through the work area.
• Always stand and face oncoming traffic.
• Do not stand in the path of
an approaching vehicle.
• Stand where you will be highly
visible at all times and:
◊ Do not stand in shadows.
◊ Do not stand near parked vehicles
or equipment that might hide you
from approaching drivers.
◊ Do not sit.
• Always have an escape route
from errant vehicles in mind.
6200'–300'
Rural
500'
minimum
visibility
Rural
Figure 2: Flagger’s position
7TWO-FLAGGER OPERATIONS
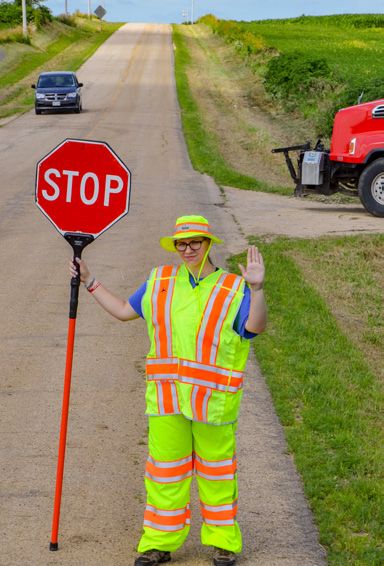
Stopping traffic
To stop traffic, follow these
steps (See Figure 3):
1. Stand on the shoulder of the road
holding the STOP/SLOW paddle
in your right hand, erect and away
from your body with the STOP
side facing approaching traffic.
2. Look directly at the approaching
driver. Try to establish eye contact.
3. Raise your free arm with the palm of
your hand toward oncoming drivers.
4. Bring the first vehicle to a full stop.
5. Stop other vehicles from this
position using the STOP sign, hand
signal, and eye contact as described
in steps 1–4. (Optional: During
daytime operations, flagger may
move to centerline to improve their
visibility carrying the STOP/SLOW
paddle, only after the first vehicle
has come to a complete stop.)
6. Remain in this position until
you can safely permit travel
through the work area.
7. Communicate by radio with the
other flagger(s) a description of the
last vehicle passing through and
that you are holding traffic.
8Figure 3: Stopping first vehicle from shoulder
9Releasing traffic
To release traffic, follow these steps:
1. If on centerline, return to shoulder.
2. Hold paddle in your right hand, turn
SLOW side toward stopped vehicles.
3. With your free arm signal drivers
to proceed. Never wave the
paddle. (See Figures 4 and 5.)
4. Use your radio to notify the other
flagger(s) that traffic is being released.
Figure 4: Releasing traffic into the
open lane; opposite drive lane
10Figure 5: Releasing traffic into the
open lane; standard drive lane
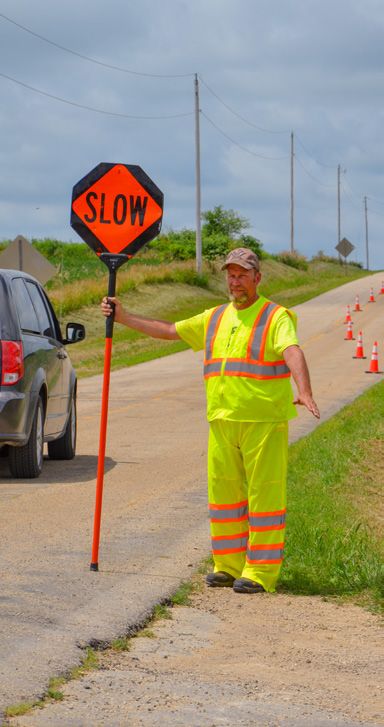
11Slowing traffic
To slow approaching traffic,
follow these steps:
1. Stand on the shoulder of the road
holding the paddle in your right hand
with the SLOW side toward traffic.
2. Extend your left arm and with the
palm facing downward, motion up and
down slowly to gain driver attention
(See Figure 6). If needed for emphasis,
this motion can be more forceful.
12Figure 6: Slowing traffic
132 2
G20-2A 5' min.
A
Stop/slow paddle
on support staff
A/2
A
3 Sign spacing and temporary
portable rumble strip placement
Variable
distance Speed limit Spacing “A”
A
20– 30 mph 200'
35 – 40 mph 350'
45 – 55 mph 500'
1
A
Use of WO3 - 4 sign
is optional. When
used, this sign shall
be located between
200'– 300' the W20 -7A and
( TYP.) WO3-4 W20- 4A signs,
using spacing “A”.
LEGEND
Sign on portable
Work or permanent support
area
Temporary portable
rumble strip array
Direction of traffic
Work area
200'– 300' Flagger, equipped
( TYP.) with stop/slow
paddle fastened
on support staff
A 1
A
Variable
distance
A
A/2
3
A
2 2
G20 -2A
Figure 7: Two-Flagger Operation
14GENERAL NOTES
• Details of traffic control devices and installation
not shown on this drawing s hall conform to the
pertinent requirements of the standard specifications,
t he special provisions, and the WMUTCD.
• All signs are 48" x 48" unless otherwise noted.
End Road Work (G20-2A) sign size is 48" x 24".
• “WO” signs are the same as “W” signs except
the background is orange. The exact number,
location and spacing of all signs, devices and
location of all flaggers shall be adjusted to fit
field conditions as approved by the engineer.
• The first advance warning sign should typically be located
in advance o f the anticipated traffic backup or queue.
• When a side road or ramp intersects the facility on which
the work is being p erformed, additional traffic controls
shall be provided as specified in the p lans and/or the
special provisions or as approved by the engineer.
FLAGGING
• When the flagging operation is not in effect
remove temporary portable rumble s trips prior
to covering or removing all advance signing.
• For moving work operations, post additional W20-7A
flagger signs a t approximately 3,500' intervals in the
moving work operation or as a pproved by the engineer.
• Sign not required if flagging operation occurs
within a signed road work zone area.
TEMPORARY PORTABLE RUMBLE STRIPS
• Utilize temporary portable rumble strips
on all flagging operations.
• Each temporary portable rumble strip array
consists of three rumble strips s paced according
to manufacturer’s recommendation, placed
transverse a cross the lane at locations shown.
• Only use temporary portable rumble strips
from the approved products list.
• Place advance signing prior to installing
temporary portable rumble strips.
• Do not install temporary portable rumble
strips on gravel, milled surfaces, o r asphalt
that has been paved less than 12 hours.
• Temporary portable rumble strips are not required on
roadways with posted speed limits of 35 mph or less.
15SINGLE-FLAGGER
OPERATIONS
A single-flagger can be used when sight
distance is adequate, traffic volume low
(less than 1500 ADT), and work zone length
500 feet or less. A second flagger shall be
added when these conditions change or when
traffic conflicts and delays become excessive.
Single-flagger operations usually involve
temporary traffic stoppage in only one lane
(for example, loading or unloading
operations). The other lane is allowed
to flow freely at all times.
Releasing traffic for
single-flagger operations
In single-flagger operations, follow the
flagging procedures for slowing and stopping
traffic, as described on pages 8–12.
To release traffic as a single-
flagger, follow these steps:
1. Return to the shoulder of the road with
the STOP side toward stopped vehicles.
2. Turn the paddle so neither STOP nor
SLOW can be read by drivers approaching
from either direction. Take care not to
confuse continuous traffic traveling in
the other lane in the opposite direction.
3. Motion for traffic to proceed.
16② ②
G20-2A
A
Sign spacing and temporary
portable rumble strip placement
Speed limit Spacing “A”
A 20– 30 mph 200'
35 – 40 mph 350'
45 – 55 mph 500'
LEGEND
Sign on portable
or permanent support
Temporary portable
rumble strip array
Direction of traffic
500 feet
maximum Work area
Flagger, equipped
with stop/slow
paddle fastened
on support staff
Channelizing device
(optional)
200'–300'
(TYP.)
Two-way traffic ②③
taper 50'
See page 15 for notes
A
A
4
3-
A
O
A/2
W
3 Use of WO3 - 4 sign
is optional. When
used, this sign shall
be located between
A
② ② the W20 -7A and
W20- 4A signs,
using spacing “A”.
G20-2A
Figure 8: Single-Flagger Operation
17PILOT CAR OPERATIONS
Pilot car operations using
a Stop/Slow paddle
1. When the distance between
flaggers exceeds 2 miles, a
pilot car shall be required.
2. Try to limit delays to
15 minutes maximum.
3. Stop vehicles in the approved manner
(See Stopping Traffic, pages 8).
4. Detain all vehicles until the pilot car
arrives from the opposite direction.
5. After the pilot car arrives and has
pulled into position at the head
of your column of vehicles, step
back onto the shoulder with STOP
displayed. Follow the procedure for
releasing traffic on page 10.
6. Refrain from unnecessary conversations
with the pilot car driver.
7. Turn the SLOW side to face
traffic, and motion the pilot car
driver and others to proceed.
Note: More than one pilot car may be used.
18Pilot Car
1. Driver shall have a valid drivers license.
2. Be in radio contact with all flaggers.
3. Drive at a speed not to exceed
the posted speed limit.
4. Use a street legal vehicle (No ATV/UTVs).
5. Prominently display the name of
contractor or contracting authority
on each side of the vehicle.
6. Have a “Pilot Car, Follow Me” sign
mounted on the rear of the vehicle, a
minimum 5-feet above the pavement.
7. “Do Not Pass” signs may be
added to the work zone.
PILOT CAR
FOLLOW ME
G20-4, 36" x 18"
19OTHER SITUATIONS
Equipment crossings
Generally, traffic control procedures are
the same for haul road intersections as for
other work areas (See Stopping Traffic on
page 8 and Releasing Traffic on page 16).
Figure 9: Stopping traffic for left-turning vehicles
20When trucks are crossing the highway or
making a left turn, two flaggers may be
required, one for each direction (See Figure 9).
When trucks are making a right turn
onto the highway, only one flagger
may be required (See Figure 10).
Figure 10: Stopping traffic for right-turning vehicles
21Railroad crossings
When flagging near railroad crossings,
be sure your flagging station is not located
where traffic may be backed up over the
crossing. If the flagger position cannot
be moved, an additional flagger will
be needed to keep the crossing clear of
stopped traffic (See Figure 11). Refer to
Part 6 of the WMUTCD for more details.
Coordinate with the appropriate
railroad for any work near a railroad as
additional measures may be required.
222
2
G20-2A
5' min.
A
Stop/slow paddle
on support staff
A/2
A
3 Sign spacing and temporary
portable rumble strip placement
Variable
distance Speed limit Spacing “A”
A
25– 30 mph 200'
35 – 40 mph 350'
45 – 55 mph 500'
1
A
Use of WO3 - 4 sign
is optional. When
used, this sign shall
be located between
200'– 300' the W20 -7A and
( TYP.) Two-way traffic WO3-4 W20- 4A signs,
taper 50' using spacing “A”.
Extended
Work area buffer space
RA
G
IL
IN
SS
O
RO
LEGEND
CR
AD
RA
Sign on portable
G
IL
IN
or permanent
SS
O
RO
support
CR
AD
Two-way traffic
taper 50' Temporary portable
200'– 300' rumble strip array
( TYP.)
Direction of traffic
Work area
A 1 Flagger, equipped
with stop/slow
paddle fastened
on support staff
Channelizing device
A (optional)
Variable
distance
A 1 ②③
A/2
3 See page 15 for notes
A
2 2
G20 -2A
Figure 11: Work in the vicinity of a grade crossing
23Intersection work
When work activities occur in an intersection,
at least one additional flagger may be
needed per intersection. A dedicated
flagger may need to be assigned to an
approach with high traffic volumes.
The flagger(s) should use hand signals with
a flag or flashlight with red glow cone to
control traffic movements rather than the
typical STOP/SLOW paddle (See page 26).
Intersections with traffic control signals
must be either flashing red or deactivated
with STOP signs displayed for a flagger
to override the signal. Contact the signal
maintaining authority for coordination.
Flaggers may direct vehicles to proceed
through a STOP sign controlled condition
while holding traffic on other approaches.
Although the flagger may urge motorists
to continue through the STOP sign,
the flagger has no authority to prevent
traffic from stopping and must allow
for stopping within the operation.
24Mobile operations
Mobile work zones present particular
challenges for flaggers. Because you may be
moving down the road with the other workers,
your visibility and conflicts from intersecting
roads and driveways are continually changing.
As a flagger, always be alert for the need
to maintain adequate advance warning
for approaching drivers while providing
protection and warning for workers. It will
be necessary to stop operations periodically
to relocate advance warning signs and other
devices, or place additional devices.
Nighttime
• Using a flashlight with red glow
cone, show drivers where to proceed.
Do not wave the flashlight.
• When flagging at night illuminate the
flaggers station with auxillary lighting
such as floodlights or balloon lighting.
• Auxiliary lighting shall not produce a
disabling glare condition for approaching
road users, flaggers or workers.
Flashlight with red glow cone
25EMERGENCY FLAGGING
In emergencies, the following equipment
and procedures may be used. However,
provide standard traffic control as soon
as possible (See Figures 7 and 8).
If the STOP/SLOW paddle is not available,
use a good quality red flag to regulate traffic
in emergency situations. The flag shall have
minimum dimensions of 24 inches by
24 inches and a minimum 3-foot handle.
The free edge of the flag should be weighted
so the flag will hang vertically even in
windy conditions.
36 in To stop traffic,
the flagger should
24 in stand on the
shoulder of the
road and extend
24 in the flag across the
traffic lane. The
To stop traffic flagger’s free hand
should be raised above shoulder height with
the palm facing the approaching vehicle and
eye contact should be made with the driver.
To let traffic proceed,
the flagger should lower
the flag to their side
and with their free arm
motion traffic to proceed.
Do not use the flag to
motion traffic through.
To let traffic
proceed
26To alert and slow
traffic, the flagger
should extend the flag
staff and slowly move
the flag up and down
in a sweeping motion
between shoulder
height and straight
To alert and down. Their free hand
slow traffic
should be kept down.
Nighttime emergency situations
• A flashlight with red glow cone may
be used in addition to the red flag.
• Retroreflectorized clothing shall be worn.
CHANNELIZING DEVICES
A taper of 42" cones may be used to
direct traffic to the appropriate side of
the roadway. For operations where the
flaggers are moving every 15 minutes
or less, 28" cones may be used.
27GUIDELINES FOR
THE SUPERVISOR
• The supervisor’s involvement is critical
to proper flagging and traffic control.
• Be sure flaggers are properly
trained and instructed. Impress on
flaggers the value and importance of
performing their duties properly.
• Provide proper equipment
and apparel for flaggers.
• Provide adequate breaks for flaggers.
• Provide relief for flaggers by alternating
flaggers and/or pilot car drivers
periodically throughout the day.
• Develop a procedure for handling
non-compliant drivers.
• Discuss appropriate actions for possible
incidents in or near the work zone.
• Drive through the work area periodically
to observe traffic control operations.
Correct activities not in compliance with
this Wisconsin Flagging Handbook, the
WMUTCD and other contract documents.
• Ensure proper signs are in place prior to
beginning operations and that they remain
in place only as long as they are needed.
28FLAGGING TRAINING
REQUIREMENTS
Understand the requirements for proper
personal protective equipment.
Demonstrate the proper advance warning
sign placement for flagging.
Demonstrate the proper placement of
temporary portable rumble strips.
Demonstrate properly locating
themselves in relation to traffic.
Demonstrate properly locating themselves in
relation to obstructions (clear escape route).
Demonstrate proper single flagging technique.
Demonstrate proper two-flagger
flagging technique.
Demonstrate proper flagging
technique at an intersection.
Demonstrate proper flagging technique
when pilot cars are used.
Demonstrate proper measures for warning
others of non-compliant vehicles.
Demonstrate proper technique
when flagging at night.
Required to have a minimum of 4 hours
classroom and 8 hours of on the job training
to demonstrate the proper flagging
techniques shown in this document.
Required to take a refresher course every
2 years and demonstrate these skills.
29HOW TO GET CERTIFIED
Contractors and counties may choose
their own training programs for flaggers.
The training program must cover the
requirements listed on page 29.
For counties, submit to WisDOT Bureau
of Traffic Operations the list of trained
flaggers who have passed the training
program for certificates to be issued.
See Contact us on back cover.
Contractors may issue their own
certification cards when an employee
passes their training. Make sure the
cards contain the below information.
WISCONSIN DEPARTMENT OF TRANSPORTATION
This acknowledges that
M P L E has successfully passed the
SA
Wisconsin Flaggers Handbook
Training Certification Course
and is eligible to perform flagging operations
on Wisconsin state-owned highways
Instructor Date
No: Expiration date (2 years from training date)
30ADDENDUM (added 12/3/19) • Emergency Flagging and backing or spotting vehicles onto the roadway do not require a certified flagger, advanced warning signs, or temporary portable rumble strips. • For short-duration work, anticipated to last 60 minutes or less, a certified flagger is required, advanced warning signs (Flagger Ahead and One Lane Road Ahead) are required. All other advanced warning signs (Road Work Ahead and End Road Work) are recommended. Temporary portable rumble strips are not required. • For work anticipated to last longer than 60 minutes, a certified flagger, advanced warning signs and temporary portable rumble strips are required. • Flaggers shall wear both vest and pants at all times. At a minimum, the vest shall be Class 2. Other apparel such as shirts and coats that exceed the Class 2 requirements may be worn instead of the vest. The pants at a minimum shall be Class E.
CONTACT US
Wisconsin Department of Transportation
Bureau of Traffic Operations
Statewide Work Zone Engineers
Email:
DOTDTSDFlaggerCertification@dot.wi.gov
WisDOT Traffic Operations Manuals webpage:
https://wisconsindot.gov/Pages/doing-
bus/local-gov/traffic-ops/manuals-
and-standards/manuals.aspx
You can also read