Worker User Guide
July 2021
v.1.0
←
→
Page content transcription
If your browser does not render page correctly, please read the page content below

Worker User Guide July 2021 v.1.0
Contents
Registration and Compliance........................................................................................................ 3
Jobs ....................................................................................................................................................... 6
Timesheets.......................................................................................................................................... 9
Payslips .............................................................................................................................................. 11
   E-payslips by email ....................................................................................................................... 13

Registration and Compliance

To work for the RCA as a Casual Worker or Visiting Lecturer you will need to register on
the Dashboard platform: https://dashboard.rca.ac.uk/users/sign_in

   1. Click Register as a Worker

   2. Enter your email address and select a password that you can remember and click
      Sign Up

NB: Any email address can be used to register. However, if you have a 'rca.ac.uk'
address, we recommend using that so you can access your account with your College
login details.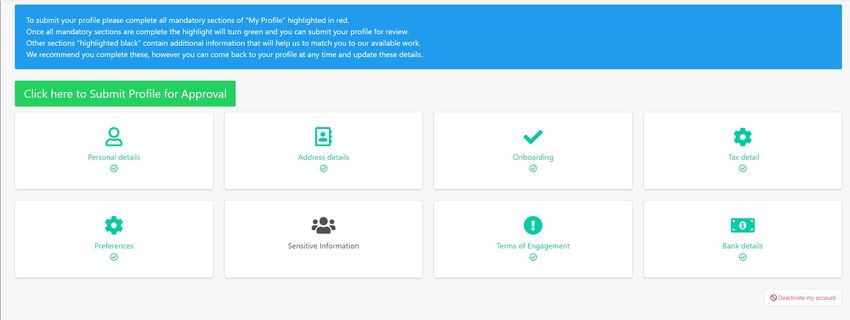
3. You will receive an email notification to verify your email address. Click the link in the email received to activate your profile. Once you have activated your profile, log into Dashboard to complete your profile. 4. You will be returned to the sign-in page. Sign in using the email address and password you entered previously. 5. Once in your account, use the navigation tiles or the left hand menu to go to your 'My Profile' page. 6. Red tile cards are mandatory and must be completed in order to submit your profile for Approval. Until completed, these sections are highlighted in red and with a cross. Within each section, mandatory fields are marked with an asterisk (*).
NB: A national insurance number is required by Dashboard. If you do not have a
national insurance number, please populate the field with an alpha-numeric
combination that satisfies this requirement, for example AA123456B.
Once complete, mandatory sections will be highlighted in green and with a tick.
The non mandatory-sections of your profile let you provide additional information
that support reporting across the College. We recommend you complete these
sections, but you can return to update these details at any time.
IMPORTANT: When you register the system will complete the First Name and Last
Name fields of your "Personal Details" section with your email address. You must
change these fields from your email address to your legal name.
7. On completion of the mandatory screens, a big Green button will become
available that says Click here to Submit Profile for Approval.
8. Clicking the 'Submit Profile for approval' button will bring up a confirmation step:
9. Click OK to submit your profile to HR for Approval.
10. After submitting your profile you will see a message informing you that 'Your
Profile is waiting for approval'. You will also receive an email confirming that your
profile has been submitted and providing you with instructions on how to have
your right to work documentation checked.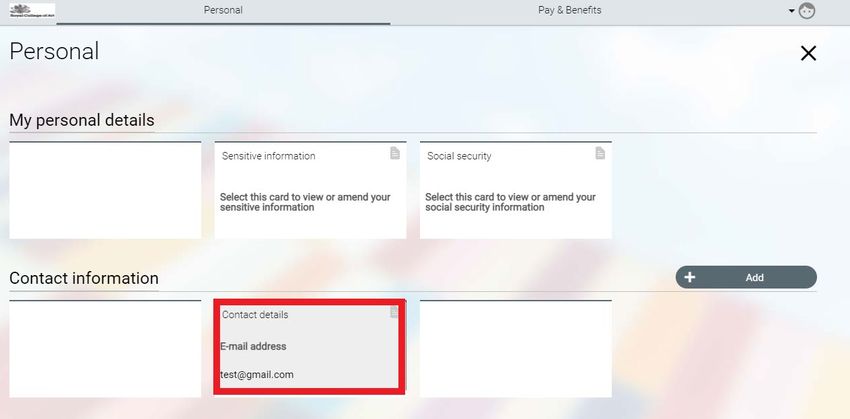
11. Once your right to work check is complete, we will approve your profile and notify
       you by e-mail. You will then be able to accept/reject jobs offered to you.

Further information on Right to Work checks and the documents accepted can be found
here https://intranet.rca.ac.uk/right-work-uk/

Jobs

When you are assigned a job by a school/department you will be notified by email. The
email will outline the following details:

   •   Reference
   •   Job Title
   •   Rate of Pay
   •   Date and Time of the job
   •   Department
   •   Name of person who created the job
   •   Location
   •   Job contact
   •   Total number of days/hours assigned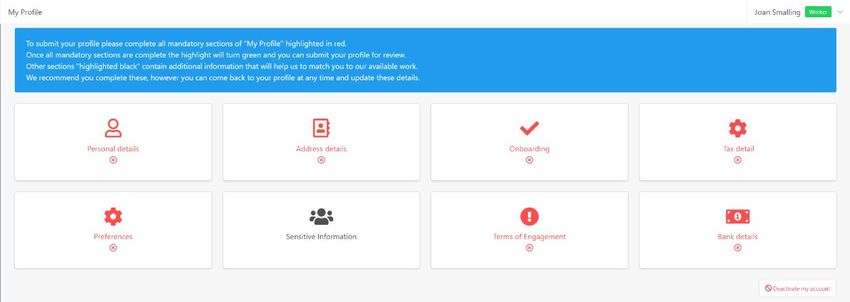
You can view details of all pending, accepted and rejected job offers on Dashboard under
the Jobs section:

Once a job has been assigned, you are expected to undertake the work outlined in the
job offer.

Timesheets

At the end time of your booking, Dashboard will auto-generate a timesheet for you. You
can then confirm or amend the details on the timesheet and submit it for approval.

   1. Login to Dashboard and navigate to the Timesheet section:

   2. Timesheets are separated into different tabs relating to approval status:

      •   To Submit: unsubmitted timesheets
      •   Submitted: awaiting approval by the timesheet approver
      •   Disputed: timesheet approver has raised a query over the claim
      •   Approved: by timesheet approver.
      •   Processed: timesheet exported

   3. On the 'To Submit' page, select the timesheet(s) you wish to submit by clicking
      the tick boxes on the left. Scroll to the bottom of the page and press the “Submit
      Selected” button.
The timesheet will then move to the “Submitted” page.

If the timesheet is disputed, it will move to the “Disputed” page.

All Disputed timesheets have a note attached outlining the reason for the dispute. Make
any necessary amendments to the timesheet and click Re-submit.
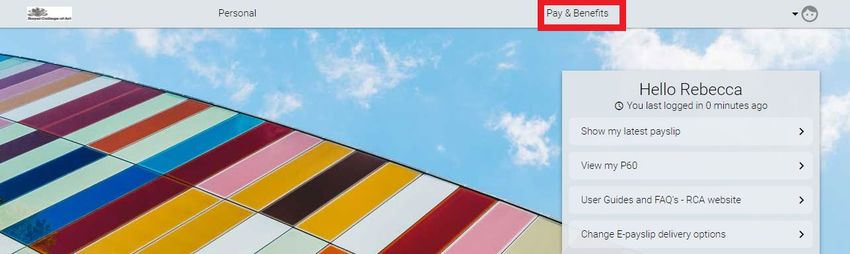
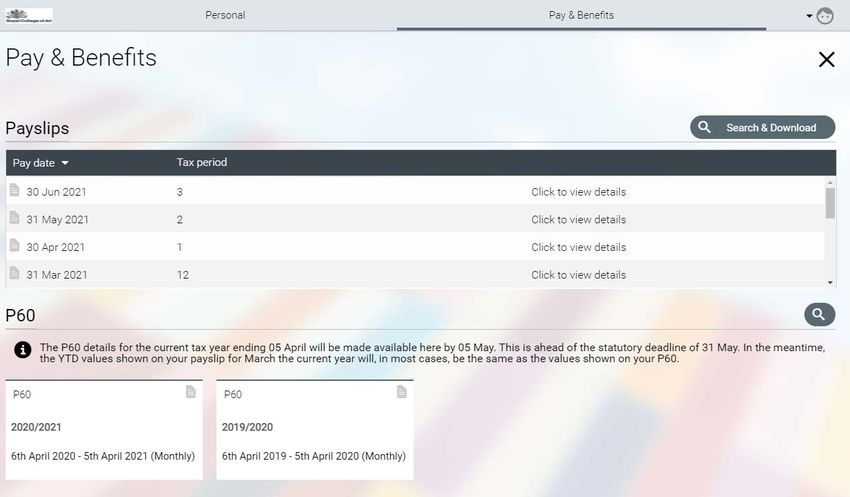
When the timesheet is approved by the timesheet approver, it will move to the
“Approved” page.

Once the timesheet has been processed via the Payroll, it will move to the “Processed”
page.

Payslips

   1. To view your payslip, you will need to login to iTrent Employee Self-Service

   2. Navigate to the “Pay & Benefits” page

   3. On the Pay & Benefits homepage you will see a list of your payslips
4. Press “Click to view details” or the small paper icon next to the pay date to view
   or download a PDF copy of your payslip.

5. To view a payslip that is not in the current list view, you can use the search and
   download function.
6. You can also view and download a copy of your P60.

E-payslips by email

You can setup E-payslips from Employee Self-Service, so that your payslips and P60’s
are emailed to you securely on a monthly basis. That way, you don’t need to login to ESS
each month to download them.
To set up E-payslips complete the following steps

   1. Navigate to the “Personal” tab

   2. Check your Contact Information and ensure that you have an email address
      updated. This should be your personal email address, not your RCA email
      address. Use the Add button to add an email address.

   3. Navigate to the ESS homepage by clicking the RCA logo.
4. On the ESS homepage under quick links, click “Click E-Payslip delivery
options” button
5. Check the following boxes
i. Print payslip
ii. Email payslip
iii. Print P60
iv. Email P60
v. Use the same email and password for P60’s
6. Choose a unique password that you can remember easily. This should be
different to your RCA password and click Save.
Your Payslips and P60’s will now be emailed to you in a password protected PDF
document.You can also read