Z432 Mobile Phone User Manual - Chatr
←
→
Page content transcription
If your browser does not render page correctly, please read the page content below
Z432 Mobile Phone User Manual
LEGAL INFORMATION
Copyright © 2014 ZTE CORPORATION.

All rights reserved.
No part of this publication may be excerpted, reproduced, translated or utilized in
any form or by any means, electronic or mechanical, including photocopying and
microfilm, without the prior written permission of ZTE Corporation.
The manual is published by ZTE Corporation. We reserve the right to make
modifications on print errors or update specifications without prior notice.
The Bluetooth® trademark and logos are owned by the Bluetooth SIG, Inc. and
any use of such trademarks by ZTE Corporation is under licence. Other
trademarks and trade names are the property of their respective owners.

Version No. : R1.0
Edition Time : 2014.5
Contents
Getting Started ......................................................................................................1
     Keys and Parts ................................................................................................ 1
     Keypad Functions ............................................................................................ 3
     Indicators and Icons ........................................................................................ 5
Starting Up ............................................................................................................6
     Installing the Battery ........................................................................................ 6
     Removing the Battery ...................................................................................... 7
     Inserting the SIM card ..................................................................................... 8
     Removing the SIM Card .................................................................................. 8
     Inserting the microSD™ Card.......................................................................... 9
     Charging Your Phone .................................................................................... 10
     Power on/off the Phone ................................................................................. 12
Quick Operation .................................................................................................. 13
     Home screen ................................................................................................. 13
     Navigation Keys ............................................................................................ 13
     Soft Keys ....................................................................................................... 14
     Back and Exit Keys........................................................................................ 14
     Main Menu..................................................................................................... 15
Phone Calls ......................................................................................................... 16
     How to Make Calls......................................................................................... 16
     Using the Address Book ................................................................................ 16
     How to Receive Calls .................................................................................... 16
     Adjusting Your Call Settings .......................................................................... 17
     Adjusting the Volume..................................................................................... 17
Recent Calls ........................................................................................................ 18
Address Book ...................................................................................................... 19
     Adding a New Contact ................................................................................... 19
     Searching Contacts ....................................................................................... 19
     Configuring Speed Dial.................................................................................. 20
     Performing a Speed Dial ............................................................................... 21
     Using Address Book Entry Options ............................................................... 21
Messaging ........................................................................................................... 23
     SMS and MMS Messages ............................................................................. 23
     Voicemail ....................................................................................................... 26
Email ................................................................................................................... 28
     Setting Up Your Email Account ..................................................................... 28
Browsing the Internet .......................................................................................... 29
Using Mobile Web ......................................................................................... 29
     Visiting a Website from within the Browser.................................................... 29
Bluetooth® ........................................................................................................... 30
     Enabling Bluetooth®....................................................................................... 30
     Connecting to Other Devices......................................................................... 31
     Sending Data ................................................................................................. 32
     Receiving Data .............................................................................................. 32
Camera ............................................................................................................... 33
     Capturing and Viewing Pictures .................................................................... 33
     Capturing and Viewing Video ........................................................................ 34
Music ................................................................................................................... 35
     Playing Music ................................................................................................ 35
     Managing a Playlist ....................................................................................... 35
Calendar.............................................................................................................. 36
Profiles ................................................................................................................ 37
Tools ................................................................................................................... 38
     Alarm ............................................................................................................. 38
     Calculator ...................................................................................................... 38
     Tip Calculator ................................................................................................ 38
Stopwatch...................................................................................................... 38
World Time .................................................................................................... 38
Converter....................................................................................................... 39
Notepad ......................................................................................................... 39
Voice Recorder .............................................................................................. 39
Settings ............................................................................................................... 41
Display Settings ............................................................................................. 41
Phone Settings .............................................................................................. 41
Call Settings .................................................................................................. 43
Connection Settings ...................................................................................... 44
Security Settings ........................................................................................... 44
Customization ..................................................................................................... 48
Accessibility......................................................................................................... 49
TTY Mode...................................................................................................... 49
HAC (Hearing Aid Compatibility) Mode ......................................................... 49
Text Input ............................................................................................................ 51
Care and Maintenance ........................................................................................ 53
General Care ................................................................................................. 53
Aircraft Safety ................................................................................................ 56Hospital Safety .............................................................................................. 56
General Guidelines ........................................................................................ 56
Road Safety................................................................................................... 58
Vehicles Equipped with an Airbag ................................................................. 59
Third Party Equipment ................................................................................... 59
Emergency Service ....................................................................................... 60
Declaration of Conformity .............................................................................. 61
Privacy Information ........................................................................................ 61
Copyright Notice ............................................................................................ 61
IC compliance ................................................................................................ 62
Troubleshooting and FAQ’s................................................................................. 63
Specifications ...................................................................................................... 65
Glossary .............................................................................................................. 66Getting Started
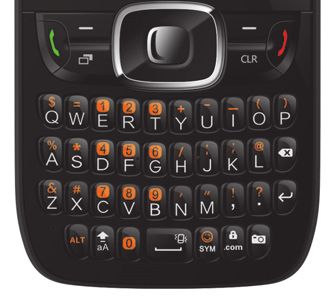
Keys and Parts
3.5 mm Headset Jack
Earpiece
4-Way Navigation key OK key
Left Soft key Right Soft key
Send key End key
Task key Clear key
Delete key
Enter key
Alt key Camera key
Lock key
Shift key Space key
1Camera
Power key Volume Up/ Down keys
USB port
Speaker
2Keypad Functions
Key Functions
In lists and menus: This key will activate the currently
OK Key selected option.
From the home screen: This key will launch the main menu.
In lists, messages and menus: Used to scroll up, down, left,
and right.
From the home screen:
4-Way Up: Press to start a SMS (text) message.
Navigation Key
Down: Press to open the Address Book.
Right: Press to access Alarm.
Left: Press to access My Stuff.
Power Key Hold to turn the phone on/off.
The bottom line of the display shows the options that can
Left/Right Soft
be selected using the Left and Right Soft Keys. The options
Keys
change depending on the application/function being used.
3Key Functions
Press to dial or answer a call.
Send Key
From the home screen: Press to show a list of recent calls.
Press to end a call, reject an incoming call, cancel dialing,
End Key
or return to the home screen from any screen.
Task Key Press to launch the Multitasking screen.
Clear Key Delete characters when entering text.
Volume Up/Down
Adjust the volume of the phone.
Keys
From the home screen: Hold to activate the camera
function.
From within the Camera application in Camera mode: Take
Camera Key
a photo.
From within the Camera application in Camcorder mode:
Start or stop recording.
Add a space when entering text. From the home screen:
Space Key
Hold to activate/deactivate meeting mode.
4Indicators and Icons
Indicator What it means Indicator What it means
Signal strength New SMS (text) message
New MMS (multimedia)
3G network
message
EDGE network New email message
GSM network Bluetooth® on
Message memory full Call forwarding active
Email inbox full Battery status
New voicemail Missed call
GPRS in use (green
Mute
and white)
Headset mode Alarm
Meeting mode
5Starting Up
Installing the Battery
Notes:
• The phone automatically turns off if the battery power is too low.
• If you are not going to use the battery for a long time, remove it from the
phone and store it in a cool dry place.
1. Hold the Power key to turn off the phone.
2. Remove the back cover using the thumb catch at the bottom of the phone.
3. Insert the battery with the contacts located against the metal springs and
push down the battery until it clicks into place.
64. Replace the cover on the back of the phone.
Caution:
• Make sure the cover is lined up before pressing it into place. Do not force it.
Doing so will damage the back cover.
Removing the Battery
1. Press and hold the Power key to power off the phone.
2. Remove the back cover.
3. Lift the end of the battery near the bottom of the phone and remove the
battery from the phone.
7Inserting the SIM card
Caution:
• Do not bend or scratch your SIM card. Keep the card away from electricity
and magnetism.
• Don’t touch the metal surface of the SIM card. Doing so could cause
information on the card to be lost or destroyed.
• Disconnect the charger and other accessories from your phone and remove
the battery before inserting and removing your SIM card.
1. Hold the Power key to turn off the phone and
then remove the back cover and the battery.
2. Insert the card with the metal contacts facing
downward and the cut corner at the upper left.
And push it until it clicks into position.
3. Install the battery and replace the cover on the
back of your phone.
Removing the SIM Card
1. Hold the Power key to turn off the phone.
2. Remove the back cover of your phone and the battery.
3. Gently remove the SIM card from the card holder.
8Inserting the microSD™ Card
Note:
This phone can support a memory card with a capacity of up to 32 GB.
1. Insert the microSD card carefully with the metal contacts facing downward as
shown. Make sure that the card is fully seated in the slot.
2. Replace the back cover.
9Charging Your Phone
Your phone uses a rechargeable battery. When you first unpack the phone, the
battery is not fully charged, but there might be enough power to turn on the phone.
You can use the provided charger to charge the phone battery.
1. Insert the charger’s USB adapter into the USB port.
2. Plug the charger into a standard AC wall outlet.
3. When the battery is fully charged, unplug the charger and disconnect it from
the phone.
10Notes:
• Make sure the adapter’s connector is inserted correctly. Do not force the
connector into the port.
• The battery will remain fully charged for 3 to 4 hours.
• If the phone is used too often when the battery is low or not used for a long
time, the screen may not display the charge indicator until the battery has
been continuously charged for 10 to 40 minutes.
• To get the maximum performance out of your battery, it is recommended that
you completely charge the battery before using the phone for the first time. A
new battery’s full performance is only reached after three complete charge
and discharge cycles have been finished.
• Charging is only possible within a temperature range of 0°C to 45°C.
11Power on/off the Phone
Notes:
Do not power on your phone if wireless phone use is unapproved, or when it may
cause interference or danger.
Press and hold the Power Key to turn on / off the phone.
Notes:
• When prompted, enter your PIN (Personal Identification Number) code or
handset code and press the OK Key.
• The PIN code is the password provided by your network service provider.
You cannot use the SIM card without it.
• When the PIN code or handset code is accepted, the phone automatically
searches for the network. After a few seconds, your phone displays standby
mode.
12Quick Operation
Home screen
After powering on the phone, when the name of the network is displayed on the
screen, the phone is in the home screen and ready for use.
Indicators
The function for the The function for the
Left Soft Key Right Soft Key
Navigation Keys
Use the Navigation Keys to access menu shortcuts, move around the Main
Menu, and move the cursor.
13Soft Keys
The two keys at the top of the keypad are the Left and Right Soft Keys. They are
used to select the options shown at the bottom of the display. The options vary
depending on the application/function being used.
Back and Exit Keys
Press the Right Soft Key to go back one step or press the End Key to return to
home screen.
14Main Menu
From home screen, press the OK Key or Right Soft Key to show the Main Menu.
Address Book Add, edit, and manage your contacts.
Messaging Send and read text (SMS) or multimedia (MMS)
messages.
Email Access mobile email.
Calendar See what’s on your calendar.
Recent Calls Check the phone numbers of missed, received, and dialed
calls.
Browser Use your phone to get the latest information from the
Internet.
Music Play audio files.
Camera Capture digital photos.
Profiles Personalize your phone to best suit the environment you
are in.
File manager Organize the files or folders.
My Stuff View applications and tools such as Alarm, Calendar, and
more.
Settings Set up and personalize your phone.
15Phone Calls
How to Make Calls
1. From the home screen, enter a phone number.
2. Press the Send Key to place the call.
Using the Address Book
1. From the home screen, select Main Menu > Address Book.
2. Highlight a contact and press the Send Key to call the contact.
3. Refer to the Address Book section in this manual for more details.
How to Receive Calls
Press the Send Key or OK Key to answer an incoming call. Press the OK Key to
activate the speakerphone.
Tip:
If you have connected a headset to the phone, you can press the button on the
headset to answer the call.
16Adjusting Your Call Settings
During a call, you can press the Left Soft Key to access in-call options. The
options displayed on the menu will change when certain functions are activated.
The options below will be displayed by default.
• Record: Record the current call. Press the OK Key to start/stop recording.
• Create Note: Write a note for later retrieval via the Notepad application.
• Hold: Put the current call on hold or return to a call previously put on hold.
• Goto: Display the Contacts, Call Log, Messaging, Browser, or Main Menu
during a call.
• DTMF off: Enable or disable DTMF tones (touch-tone sounds).
• End Call: Disconnect the current call.
Adjusting the Volume
During a call, press the Volume Up/Down Keys to adjust the earpiece or speaker
volume.
17Recent Calls
With this feature, you can check the call log and call duration.
1. From the home screen, select Main Menu > Settings.
2. There are four tabs on the Screen: All Calls, Missed Calls, Dialed Calls,
and Received Calls. Press the Left Soft Key for Options and select Call
Timers to check the call timer.
Note:
Recent Calls can also be accessed by pressing the Send Key from the home
screen.
18Address Book
You can store contacts with multiple phone numbers and email addresses, as
well as a physical address and additional details.
The phone can store up to 1000 items. Your SIM card can store contact
information as well; however, a SIM card may not be able to save all of the
contact fields supported by the phone. Check with your service provider for more
details about your SIM card, including its capacity.
Adding a New Contact
1. Select Main Menu > Address Book > Left Soft Key for Options > New
Contact.
2. Enter the contact information into the appropriate fields.
3. Press the OK Key to save the new contact.
Searching Contacts
1. Select Main Menu > Address Book to view all contacts.
2. Enter a letter, and the phone will display all contacts whose first names begin
with that letter. For example, to search for “Sam Green,” press the S Key
once. All first names starting with “S” or “s” will be displayed.
19Note:
• If you have changed the Display Order setting on your phone to show last
name first (e.g. “Green, Sam”), then the search function will display all
contacts whose last names begin with the letter(s) you enter. In this example,
typing the G Key would result in the contact being displayed.
• You can refine a search by entering one or more letters that appear
subsequent to the first letter in the contact’s name. For example, typing “JN”
into the search field will return contacts named “John” and “Julian,” but not
“James.”
Configuring Speed Dial
1. From the home screen, select Main Menu > Address Book.
2. Use the 4-Way Navigation Key to select a contact, press the Left Soft Key
for Options and select Set as Speed Dial.
3. Press Up or Down on the 4-Way Navigation Key to select an unassigned
slot. Press the OK Key > Left Soft Key for Yes to assign the speed dial
number.
4. Press the Right Soft Key for Back to return to the previous menu or press
the End Key to return to the home screen.
20Performing a Speed Dial
Note: The 1 Key is reserved for the Voicemail number.
1. From the home screen, hold the corresponding Number Key (2 to 9) in the
speed dial list to make the call.
2. Press the End Key to end the call.
Using Address Book Entry Options
1. From the home screen, select Main Menu > Address Book.
2. Scroll to the desired contact and press the Left Soft Key for Options to
reveal the following menu settings.
• Send Message: Send SMS or MMS messages to the highlighted contact.
• Call: Call the highlighted contact.
• New Contact: Create a new contact.
• Edit: Edit the highlighted contact’s information.
• Send Contact Info: Send the contact information formatted as a business
card via MMS message or in an email.
• Delete: Delete the highlighted contact.
• Add to Group: Add the highlighted contact to a group: Colleagues, Family, or
Friends.
21• Multi-Select: Apply an action to all of the contacts you select. You have three
options:
Send Message: Send an SMS or MMS message to all of the selected
contacts.
Send Email: Send an email to all of the selected contacts.
Delete: Delete all of the selected contacts.
• Set as Speed Dial: Assign the highlighted contact to one of the Speed
Dial positions.
• Settings: Change global Address Book settings. You have four options:
SIM Management: Copy contacts from/to SIM card, delete contacts from
SIM card.
Display Order: Choose the order in which names are displayed and sorted
(First&Last or Last&First).
Speed Dial: View and edit the Speed Dial list.
Memory Info: View current available memory and total capacity of the
phone’s internal memory as well as the SIM card.
22Messaging
This phone supports the following message types:
• Text Messages (SMS)
• Multimedia (Picture) Messages (MMS)
Short Message Service (SMS) lets you send and receive text messages to and
from other mobile phones and email addresses.
Multimedia Message Service (MMS) lets you send and receive multimedia
(picture and video) messages to and from other mobile phones and email
addresses.
Note: These features require subscription-based messaging plans. Charges may
apply. Contact your service provider for more information.
SMS and MMS Messages
Sending a New SMS Message
1. Select Main Menu > Messaging > Create New Message.
2. Enter a name, mobile phone number, or press the OK Key to choose the
message recipient(s) from the Address Book.
3. Press down on the 4-Way Navigation Key to move the cursor to the text
field.
234. Enter your message. Use the 4-Way Navigation Key to add a picture, video,
or audio file.
5. Press the OK Key to send the message.
Note: To save an unfinished message, press the Left Soft Key for Options >
Save as Draft to save it to the Drafts folder. You can edit and send the message
at a later time.
Viewing a Message
The envelope icon ( ) will appear at the top of the screen to notify you that you
have received a new message, and a message alert will pop up.
Press the OK Key to view the message, or, from the home screen, select Main
Menu > Messaging > Conversations to check your messages.
Message Options
From the home screen, select Main Menu > Messaging > Conversation to
access your messages. While any single message is highlighted, press the Left
Soft Key for Options to access the following menu items.
• Reply: Reply to the sender of the message via SMS or MMS.
• Call: Call the sender of the message.
• Message Menu: Return to the Messaging menu.
• Delete: Delete the message.
24• Delete Multiple: Select multiple messages to delete.
• Lock Message: This will prevent the message from being deleted.
• Save Contact: Save a new contact or update existing contact information.
• Sort By: Sort messages by Time, Unread/Read, or Sender.
Quick Text
The phone has 10 Quick Text templates for SMS and MMS messages. You can
insert commonly used Quick Text phrases into the body of a message for
convenience. Follow these steps to insert Quick Text into an SMS or MMS
message.
1. From the home screen, select Main Menu > Messaging >Create New
Message.
2. Press down on the 4-Way Navigation Key to move the cursor into the Text
field. Select Options > Insert Quick Text.
3. Select a Quick Text message from the list and press the OK Key to insert it.
Edit your message as desired.
Text Message Settings
Text Message center number: Service center number given to you by your
service provider.
25Multimedia Message Settings
From the home screen, select Main Menu > Messaging > Settings >
Multimedia Message Settings to access advanced settings for MMS messaging
functionality.
• Retrieval Settings: Configure the phone to retrieve new messages
automatically or manually.
• Slide Timing (sec): Set the play time of each MMS image when played as a
slide show.
• Anonymous Message: Set the phone to accept or reject anonymous
messages.
• Connection: Choose MMS or WAP for your connection option.
Voicemail
Voicemail Settings
From the home screen, select Main Menu > Messaging > Settings > Voicemail
to determine the number to dial to retrieve your voice messages. Your voicemail
phone number is preset by your service provider. You do not need to set it
manually.
26Retrieving a Voicemail
The new voicemail icon ( ) will appear at the top of the screen to notify you that
you have received a new voice message, and a message alert will pop up. Press
the OK Key to listen to the voice message, or, from the home screen, hold the 1
Key to automatically dial the voice mailbox number.
Note:
Voicemail features and options vary depending on your service provider. Contact
your service provider for more information.
27Email
Setting Up Your Email Account
With the Email application, you can access your email from various providers.
1. From the home screen, select Main Menu > Email.
2. Select the name of your email provider. (The following steps will vary
depending on your provider.)
3. If your email provider is not listed, scroll down and select Other Providers.
Follow the on-screen instructions.
4. Enter your email address and password.
5. Press the OK Key.
6. Select POP3 or IMAP4 and press the OK Key. (If you are uncertain which
option you should select, contact your email provider.)
7. Enter a display name and press the OK Key.
8. After you have logged into your account, you will be able to view your inbox.
Select an email and press the OK Key to read it. Press the Left Soft Key to
view additional options.
28Browsing the Internet
Browse the web directly from your mobile phone. Check the weather, visit your
favorite websites, and enjoy access to the Internet on the go.
Using Mobile Web
1. From the home screen, select Main Menu > Browser.
2. Type a website address directly into the URL field, or, scroll down the list of
recent websites using the 4-Way Navigation Key.
3. Press the OK Key.
4. While browsing, you can access a list of favorite sites by choosing Options >
Bookmarks.
5. To add a site to the list, select Options > Web Page Options > Add to
Bookmarks > Save.
Visiting a Website from within the Browser
1. From any web page, press the Left Soft Key and select New Link [*].
2. Enter a web address and press the OK Key.
3. To follow a link on a website, scroll to it using the 4-Way Navigation Key and
press the OK Key.
29Bluetooth®
Your phone includes support for Bluetooth®, which can be used to connect your
phone to a wireless headset. You can also use it to transfer files between your
phone and other Bluetooth® devices, such as another phone or a laptop.
Note: Not all applications and devices support Bluetooth®.
Enabling Bluetooth®
By default, Bluetooth® is disabled. If you enable Bluetooth® and turn off the phone,
Bluetooth® will be automatically enabled when you turn the phone back on.
1. From the home screen, select Main Menu > Settings > Connection
Settings > Bluetooth®.
2. Press the OK Key to turn Bluetooth® on. You will see ( ) displayed at the
top of the screen.
3. Highlight Visibility and press the OK Key. Select Visible or Visible for 60
sec.
4. Highlight My Device and enter the phone name.
Note:
Setting Visibility to Visible or Visible for 60 sec will allow compatible devices to
find your phone.
30Connecting to Other Devices
1. From the home screen, select Main Menu > Settings > Connection
Settings > Bluetooth® > Search for Devices.
2. Press the OK Key to search for available Bluetooth® devices.
3. Wait 60 seconds for the phone to finish searching, or press the Right Soft
Key for Stop if the target device appears in the list before 60 seconds have
elapsed.
4. Highlight a device from the list and press the OK Key for Pair.
5. Press the OK Key to initiate device pairing. You may be asked to confirm a
passkey.
When you pair your phone with another device, you will be given the option to set
incoming security. There are two options for incoming security: Always Ask and
Always Connect.
• Always Ask: Require the other Bluetooth® device that is connecting to your
phone to request connections in the future.
• Always Connect: Authorize the other Bluetooth® device to connect to the
phone without requesting in the future.
Note:
Some devices don’t support automatic Bluetooth® connections. You will always
need to connect manually with these devices.
31Sending Data
Before sending data, please confirm that:
• Bluetooth® function is enabled.
• The device is visible and paired with the other device.
1. Open the file you wish to send. Press the Left Soft Key for Options > Send >
Via Bluetooth®.
2. Select the destination device from the list, and press the OK Key to send the
file.
Receiving Data
1. Enable Bluetooth® function and pair the phone with the device from which
you wish to receive the file.
2. When the paired device tries to send a file to your phone, a popup dialogue
will appear in your screen. Press the Left Soft Key for Yes to authorize the
connection.
3. You will see another popup asking you to accept or reject the specific file that
the other device is sending. Press the Left Soft Key for Yes to accept the
incoming file, or press the Right Soft Key for No to reject the incoming file.
32Camera
The Camera feature allows you to take photos and shoot video clips. Z432 also
features a Voice Recorder for capturing notes.
Capturing and Viewing Pictures
Your phone has an integrated digital camera, which allows you to capture images.
Photos taken with the camera can be stored in the phone’s memory or on the
microSD card. You can share these photos via MMS message, email, or
Bluetooth®, or use them as the background wallpaper for the phone. The photo
browser will allow you to move, rename, copy, and/or delete the photos stored on
the phone and the microSD card.
Note: The preloaded photos on the phone cannot be shared or deleted.
Taking a Photo
1. From the home screen, hold the Camera Key.
2. Press the OK Key or Camera Key to take the photo.
Viewing Pictures
1. From the home screen, select Main Menu > My Stuff > Pictures > My
Pictures.
2. Highlight a photo and press the OK Key to view it.
33Capturing and Viewing Video
Your phone allows you to record, store, and play back video files.
Recording a Video
1. From the home screen, hold the Camera Key.
2. Press right on the 4-Way Navigation Key to switch to video camera mode.
3. Press the OK Key to start recording.
4. Press the OK Key to stop recording.
5. The video camera will display a preview frame of the video with a “play” arrow.
Press the OK Key to play back the video.
Playing Videos
1. From the home screen, select Main Menu > My Stuff > Videos.
2. Highlight a video and press the OK Key to play it.
34Music
When you have audio files stored in your phone, you can create a playlist. This
allows you to set the order in which the audio files are played.
Playing Music
1. From the home screen, select Main Menu > Music > Music Player > All
Music.
2. Highlight a sound file and press the OK key to play it.
Managing a Playlist
1. From the home screen, select Main Menu > Music > Music Player >
Playlists.
2. If a playlist has not been created, press the OK Key [Add] to create a new
playlist.
3. Press the 4-Way Navigation Key and OK Key to select the sound files into
the playlist.
35Calendar
With the Calendar feature you can set appointments and view events.
1. From the home screen, select Main Menu > Calendar.
2. Press the Left Soft Key for Options to access the following menu:
• New: Create a new appointment or task reminder.
Appointment: Add an appointment.
TO DO: Add a task.
• Weekly View: View the schedule for the current week.
• Go to: Jump directly to a specified date on the Calendar.
Today: View the events of the current day.
Date: Enter a date and view the scheduled events of that day.
• View All Events: View a chronological list of all appointments and tasks that
have been scheduled.
• Delete: Delete some or all of the appointments and tasks on your phone.
Before a Special Day: Delete all appointments and tasks scheduled prior to
the date you select.
All: Delete all appointments and tasks in the phone.
• Settings: Change the Default View or the first day of the week.
36Profiles
A profile is a set of configurations appropriate to a specific environment. Each
profile allows you to set the ringtone volume/vibration, the earpiece volume, and
the warning tone.
1. From the home screen, select Main Menu > Profiles.
2. Select a profile and press the Left Soft Key to edit that profile.
• Voice Call Ringtone: Set the voice call ringtone.
• Ringtone Volume: Set the volume of the ringtone.
• Alert Type: Set the ring type (e.g. ring, vibrate and ring).
• Receiver Volume: Set the volume of the receiver.
• Message Tone: Set the notification ringtone for an incoming SMS or
MMS message.
• Key Tone: Enable or disable keypad tones when dialing.
• Warning Tone: Turn the warning tone on or off.
• Power On/Off Tone: Turn on/off the sound that plays while powering on/off
the phone.
• Missed Calls Alert: Enable, disable, and set timing for the missed calls
audible notification.
37Tools
Alarm
You can set the alarm to ring if required.
Calculator
The calculator allows you to add, subtract, multiply and divide.
Tip Calculator
The Tip Calculator will automatically calculate the tip at a restaurant, and it can
also divide the bill according to the number of people in the party.
Stopwatch
You can use the stopwatch to measure time and take split times or lap times. For
example, this can be used for timing a variety of sports.
World Time
You can check the current local date and time for major cities around the world.
38Converter
This feature allows you to convert between different units of measurement.
From the home screen, select Main Menu > My Stuff > Tools > Converter. Use
the Type field to select the type of conversion to perform (Currency, Area, Length,
Mass, Volume, or Temperature).
Notepad
Use the Notepad feature to quickly type and save ideas, notes, and even
messages to be sent at a later time.
Voice Recorder
This function allows you to record a voice memo. You can also set the voice
memo as a ringtone.
1. From the home screen, select Main Menu > My Stuff > Tools > Voice
Recorder.
2. Select Start to start recording your voice memo.
3. Select Pause to pause the recording.
4. Select Continue to resume recording.
5. Select Stop to stop recording and save the new audio file to My Recordings.
39Notes:
• If you have installed a microSD card in your phone, you can choose to save
recorded audio files to the phone or the memory card. To change this setting,
press the Left Soft Key for Options, then select Storage Location.
• If you choose to save recordings to the phone, you can access them from the
home screen by selecting Main Menu > File Manager > Audios > My
Records.
• If you choose to save recordings to the memory card, you will only be able to
access them from within the Voice Recorder application. To do this, press
the Left Soft Key for Options, then select My Recordings.
40Settings
Display Settings
From the home screen, select Main Menu > Settings > Display Settings.
• Theme: Switch between display themes.
• Wallpaper: Set the background wallpaper, which will be displayed on the
home screen. You can select a photo saved in My Pictures, or you can
choose from one of the default pictures, preloaded on the phone.
• Backlight: Adjust the backlight settings. You can change the screen and
keypad backlight timers as well as the screen brightness.
• Dialing Font: Choose the size of the numerals that display when using the
phone dialer.
• Greetings: Enter a text greeting, which will display when the phone is first
powered on.
Phone Settings
From the home screen, select Main Menu > Settings > Phone Settings.
• Language: Set the current display language.
• T-9 Input: Toggle T-9 text input. T-9 text input makes messaging easier by
predicting words for you and displaying them as options as you type.
41• Date and Time: Set the date, time, and date/time format. You can configure
the phone to automatically synchronize its clock with the network, or you can
choose to disable this function and set the clock manually.
• Shortcut Settings: Assign shortcuts to the 4-Way Navigation Key for phone
functions. These shortcut assignments will work from the home screen only.
For example, you could assign right on the 4-Way Navigation Key to start
the Calculator.
• Auto Keypad Lock: Configure your phone to lock the keypad when it is not
in use. You can select the time delay from the available choices. If you select
Off, the phone will not lock the keypad automatically.
• Main Menu Style: Set the main menu to be displayed as a list or a grid.
• Default Storage Location: Assign either the phone or the memory card as
the location where the phone will save downloaded files.
• TTY Setting: Toggle TTY functionality. Please refer to “TTY Mode” under
Accessibility in this manual for more information about this feature.
• T-coil Setting: Enables you to hear the phone’s audio through a hearing aid
with a telecoil.
• Phone Info: View technical information about your phone, including My
Device Number, Version Info, Icon Glossary and Operating System.
42Call Settings
From the home screen, select Main Menu > Settings > Call Settings.
• Earphone Auto Answer: You can configure the phone to answer incoming
calls automatically when an earphone is connected to the phone.
• Any Key to Mute: This option allows you to silence the ringtone by pressing
any key when there is an incoming call.
• Connection Reminder: When a call connects, you will hear a three-tone
beep to notify you that the connection was successful.
• Minute Reminder: When this setting is enabled, you will hear a short beep
every minute while a call is in progress.
• Send My Caller ID: This function allows you to prevent others from seeing
your phone number when making outbound calls.
Off: The call recipient will not see your phone number.
On: The call recipient will see your phone number.
Set by Network: The network chooses whether to show/hide your phone
number.
• Auto Redial: Sets the phone to repeatedly redial, in the event of a busy
signal, until it successfully makes a connection.
• Call Forwarding: Allows you to reroute your incoming calls to another phone
number. Contact your service provider for more information and availability.
43• Call Waiting: If a call comes in when you are already on a call, you will be
notified with a call waiting tone. The phone will display the caller’s phone
number. If the caller is in your Address Book, their name will display also.
Contact your service provider for more information and availability.
Connection Settings
From the home screen, select Main Menu > Settings > Connection Settings.
You can configure the following options:
• Bluetooth®: Configure Bluetooth® settings. See the Bluetooth section in this
manual for details.
• Access Point: Add to, edit, or view the Access Point list.
• Internet Profiles: Create or edit the connection data for a service provider.
• PC Connection: Choose whether to connect your phone to a computer via
USB or Bluetooth®.
• GPS: Turn on/off your GPS status, or enable the Third-party GPS option.
Security Settings
Phone Password
A password can protect your phone and help prevent unauthorized use. When the
phone is password protected, it will ask for the password every time the phone is
44turned on. Password protection is disabled by default, and the default password is
0000.
• From the home screen, select Main Menu > Settings > Security Settings >
Lock Settings > Phone Password to toggle password protection on and off.
• From the home screen, select Main Menu > Settings > Security Settings >
Change Codes > Phone Password to change the phone’s password. It is
recommended that you change the password to something you will easily
remember.
Note:
Take care to remember your password. If you forget it, you will not be able to use
your phone. You will have to contact your service provider to unlock it.
PIN Code
A PIN is attached to a SIM card. If the SIM card is moved to another phone, the
same PIN will still be required in order to make calls. When you assign a PIN to
your SIM card, you will need to enter the PIN code when the phone is powered on.
Without the PIN code, the phone will only be able to make emergency calls.The
default PIN is assigned by the service provider.
• From the home screen, select Main Menu > Settings > Security Settings >
Lock Settings > PIN Lock to enable or disable the PIN code.
• From the home screen, select Main Menu > Settings > Security Settings >
Change Codes > PIN code to change the PIN code.
45Note:
If you change the PIN code, please remember the new number. If you enter the
wrong PIN code ten times in a row, the phone will lock the SIM card and prompt
you to enter a PUK code to unlock it.
PIN2 and PUK Codes
PIN2 codes are used for some settings. To change the PIN2 code, use the same
procedure as outlined above for the PIN code.
A PUK code is the unlock code for the SIM card. This code can be used to unlock
a SIM card when you have entered the wrong PIN code 10 times. When you enter
the correct PUK code, you will be able to re-assign a new PIN code, after which
the SIM card can be used normally. Contact your service provider for more
information.
A PUK code can only be entered 10 times in a row. If you enter the wrong PUK
code more than 10 times, the SIM card will be locked indefinitely.
Note:
If a PUK code is supplied with your SIM card, store it securely.
Fixed Dialing
If you set Fixed Dialing Status to On, you can only dial numbers on the Fixed
Dialing Numbers list. You will need to enter your PIN2 code to use this feature.
46Master Clear/Reset
The Master Clear function will clear all user data and reset the phone to factory
default settings. The Master Reset function will only reset the phone to factory
default settings.
47Customization
My Menu allows you to customize shortcuts to frequently used functions on your
phone.
1. From the home screen, press the Left Soft Key for Go To. My Menu
displays the list of menu shortcuts.
2. Using the keypad, press the number of the shortcut to access it immediately.
3. To add a shortcut, use the 4-Way Navigation Key to highlight a slot
designated as Empty.
4. Press the Left Soft Key for Options and press the OK Key to Assign.
Choose from the list of Main Menu items and press the Left Soft Key to
Assign the shortcut.
5. To remove a feature from the My Menu list, press the Left Soft Key for
Options and choose Remove > OK.
48Accessibility
TTY Mode
Your handset is a TTY-compatible device. Simply connect the TTY equipment to
the headset jack.
1. From the home screen, select Main Menu > Settings > Phone Settings >
TTY Setting.
2. Select one of the following options and press the OK Key.
• Full: Users who cannot talk or hear may use this setting to send and receive
text messages through TTY equipment.
• Read & Talk: Users who can talk, but cannot hear, may use this setting to
talk through the phone and receive responses via text message.
• Write & Hear: Users who can hear, but cannot talk, may use this setting to
listen to the other party and respond via text message.
• Off: Disable TTY support.
HAC (Hearing Aid Compatibility) Mode
This phone supports HAC (Hearing Aid Compatibility). When you turn on HAC
Mode and use a hearing aid with a telecoil to answer the phone, it will help you
hear more clearly.
491. From the home screen, select Main Menu > Settings > Phone Settings >
T-coil Setting.
2. Press the OK Key to enable or disable the T-coil Setting.
Your Z432 has been tested for hearing-aid device compatibility and has an M3/T3
rating.
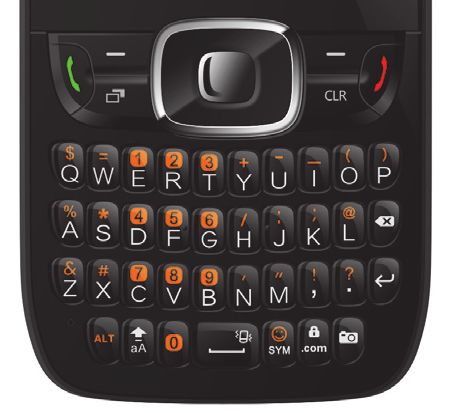
50Text Input
4-Way Navigation key
OK key
Clear key
Delete key
Enter key
Alt key Symbols key
Shift key
Space key
• To enter letters, press the letter keys on the keyboard.
• Press the Shift Key to switch the uppercase and lowercase letters. Press the
Shift Key twice to change to all caps.
• Press the Alt Key to enter a number or alternate character shown on a key.
Press the Alt Key twice to change to numeric mode.
51• To enter symbols, press the Symbols Key, then use the 4-Way Navigation
Key to locate a symbol. Press the OK Key to enter the symbol.
• To move the cursor, press the 4-Way Navigation Key.
• To delete the character before the cursor, press the Delete Key or the Clear
Key. Hold the Delete Key or the Clear Key to delete all characters before the
cursor.
• To enter a carriage return, press the Enter Key.
• To enter a space, press the Space Key.
52Care and Maintenance
General Care
• Do not allow the phone, battery or accessories to come into contact with
liquids or moisture at any time. Do not immerse the phone in any liquid.
• Do not place the phone next to computer disks, credit cards, travel cards and
other magnetic media. The information contained on the disks or cards may
be affected by the phone.
• Do not place anything in the folded phone.
• Do not paint the phone.
• Do not leave the phone or battery in places where the temperature could
exceed 60° C. For example, on a car dashboard or a Windowsill, behind
glass in direct sunlight, etc.
• Do not remove the phone’s battery while the phone is turned on.
• Do not to allow metal objects, such as coins or key rings, to contact or
short-circuit the battery terminals.
• Do not dispose of the battery packs in a fire. The handset’s Li-ION batteries
may be safely disposed of at a Li-ION recycling point.
• Do not put the phone’s battery in your mouth. Battery electrolytes may be
toxic if swallowed.
53• Do not attempt to dismantle the phone or any of its accessories.
• The phone has an internal battery. Take it to a qualified service engineer
when battery replacement is required.
• There is a risk of explosion if the battery is replaced with the incorrect battery
type. Dispose of the used battery in accordance with the manufacturer’s
instructions.
• Do not put a battery into a microwave oven, dryer or high-pressure container.
• Do not put the battery in direct contact with an electric outlet or cigarette
lighter charger. Use only approved charger units.
• Do not pierce the battery with a sharp object, such as a needle.
• When the battery is thrown away, be sure it is non-conducting by applying
vinyl tape to the (+) and (-) terminals.
• Do not disassemble or modify the battery.
• Do not drop, throw, or subject the handset to rough treatment.
• Stop using the battery if abnormal heat, odour, discoloration, deformation or
any abnormal condition is detected during use, charge or storage.
• In the unlikely event of a battery leak, keep the battery discharge away from
your eyes or skin. If the leakage comes into contact with the eyes or skin,
please flush thoroughly in clean water and consult a doctor.
• Do not use a damaged or deformed battery.
54• Do not directly solder a battery.
• If the battery’s life cycle has expired, remove it from equipment immediately.
• The earpiece may become warm during normal use. In addition, the phone
itself may become warm while the battery is being charged.
• When a phone is in vibration mode, the vibration can sometimes cause the
phone to move.
• Be careful not to place the phone near heat sources (such as a heater) or too
close to the edge of a table.
• Use a damp or anti-static cloth to clean the phone. Do not use an ordinary dry
cloth or electrostatic cloth. Do not use chemical or abrasive cleaners as these
could damage the casing.
• Third party equipment: The use of third party equipment, cables or
accessories, not made or authorized by the manufacturer, may invalidate the
warranty of your handset and adversely affect the phone’s safety/operation.
• Remember to make backup copies of all of the important data on your
handset.
• Remember to recycle: the cardboard packing supplied with this handset is
ideal for recycling.
Caution:
There is a danger of explosion if battery is replaced by with the incorrect type.
Dispose of used batteries according to the instructions.
55Aircraft Safety
• Turn off your phone before the airplane takes off. To protect airplane’s
communication system from interference, using a mobile phone in flight is
prohibited. If you want to use mobile phone before the airplane takes off, you
should get aircrew's permission according to the safety regulations.
• If the mobile phone has an automatic timing power-on function, please check
your alarm setting to ensure that your phone will not be automatically turned
on during the flight.
Hospital Safety
• Switch off your phone and remove the battery in areas where the use of
phones is prohibited.
• Follow the instructions given by the respective medical facility regarding the
use of phones on their premises.
General Guidelines
• In some countries national law prevents unapproved private copying of
copyrighted material. Please check the national legislation of the applicable
country concerning the use of such material.
• Many jurisdictions have laws and regulations about taking pictures in public
or private areas and regarding the processing and further use of such
56pictures. The manufacturer encourages its customers to obey all laws and to
respect the personal rights of others.
• Please check the roaming agreement availability with your service provider.
• The use of mobile phones is not allowed in some radiation sensitive areas,
such as hospitals, research centers and airplanes. The user is responsible for
turning off the device. If there is any uncertainty, you should remove the
battery from the handset.
• Observe any signs that indicate that you must turn off your phone, such as
those near gas stations or explosives and turn off the phone immediately.
• If you have a heart condition, be careful with the settings for call vibration or
tone volume.
• Do not allow children to play with the phone, charger or batteries.
• Do not use the phone where blasting is in progress.
• Do not try to make a call while the temperature of charging battery is above
45°C.
• Take care not to put your phone in the back pocket of your trousers or skirt
and then sit on it. In addition, do not put your phone at the bottom of a bag
where it may subject to excessive weight or pressure. Doing so may damage
the LCD and camera lens and cause them to malfunction.
57• The operation of some medical electronic devices, such as hearing aids and
pacemakers, may be affected if a phone is used next to them. Observe any
caution signs and the manufacturer’s recommendations.
• Do not leave the phone discharged or without a battery for a long time. Doing
so may cause some data to be erased.
• Your phone contains metal, which may cause you to itch, or have a rash or
eczema depending on your physical condition.
Road Safety
• You must exercise proper control of your vehicle at all times. Give your full
attention to driving.
• Observe all of the recommendations contained in your local traffic safety
code.
• Pull off the road and park before making or answering a call, if driving
conditions require this to be done.
• Check whether local laws and/or regulations restrict the use of phones while
driving.
• You MUST NOT stop on the hard shoulder of a highway to answer or make a
call, except in an emergency.
• Switch off your phone at a refueling point, such as a gas station, even if you
are not refueling your own car.
58• Do not store or carry flammable or explosive materials in the same
compartment as the phone.
• Electronic vehicle systems, such as anti-lock brakes, speed control and fuel
injection systems are not normally affected by radio transmissions. The
manufacturer of such equipment can advise if it is adequately shielded from
radio transmissions. If you suspect vehicle problems are being caused by
radio transmissions, consult your dealer and do not switch on the handset
until it has been checked by qualified approved installers.
Vehicles Equipped with an Airbag
An airbag inflates with great force. Do not place objects, including either installed
or portable wireless equipment, in the area over the airbag or in the airbag
deployment area. If in-vehicle wireless equipment is improperly installed and the
airbag inflates, serious injury could result.
Third Party Equipment
The use of third party equipment, cables or accessories, not made or authorized
by the manufacturer, may invalidate the warranty of your handset and also
adversely affect the handset’s operation. For example, use only the
manufacturer’s power cable supplied with the AC charger.
59You can also read