Ascent 2020 Quick Guide - Subaru Technical Information System
←
→
Page content transcription
If your browser does not render page correctly, please read the page content below
Quick Guide
                                              Ascent
                                                2020

Love. It’s what makes a Subaru, a Subaru.
© 2019 Subaru of America, Inc. All rights reserved.

Contents may not be reproduced in whole or in part without prior written permission of
publisher. Specifications in this Guide are based on the latest product information available
at the time of publication. Some images shown are for illustration purposes only. Some
equipment shown in photography within this Guide is optional at extra cost. Specific
options may be available only in combination with other options. Specific combinations
of equipment or features may vary from time to time, and by geographic area. Subaru
of America, Inc. reserves the right to change or discontinue at any time, without notice:
Prices, colors, materials, equipment, accessories, specifications, models and packages,
without incurring any obligation to make the same or similar changes on vehicles
previously sold. Colors shown may vary due to reproduction and printing processes.
Subaru of America, Inc. is not responsible for typographical errors.

Aha™ is a trademark of Harman International Industries, Inc. Alcantara® is a registered
trademark of Alcantara S.p.A., and Alcantara is produced by the Toray Group. App Store®
is a registered trademark of Apple, Inc. Apple® is a registered trademark of Apple, Inc.
BBS® is a registered trademark of BBS Kraftahrzeugtechnik, AG. Bluetooth® is a registered
trademark of Bluetooth SIG, Inc. Brembo® is a registered trademark of Freni Brembo, S.p.A.
GreenEdge® is a registered trademark of Harman International Industries, Inc. Harman
Kardon® is a registered trademark of Harman International Industries, Inc. HD Radio® is a
registered trademark of iBiquity Digital Corporation. HomeLink® is a registered trademark
of Prince Corporation, a wholly owned subsidiary of Johnson Controls. iHeart® Radio
is a registered trademark of iHeartMedia, Inc. iPod® is a registered trademark of Apple,
Inc. iTunes® is a registered trademark of Apple, Inc. Metal-Matrix Diaphragm (MMD®) is a
registered trademark of Harman International Industries, Inc. MirrorLink™ is a trademark of
Car Connectivity Consortium, LLC. Pandora® is a registered trademark of Pandora Media,
Inc. Siri® is a registered trademark of Apple, Inc. Smart Way® is a registered trademark
of the U.S. Environmental Protection Agency. Stitcher™ is a trademark of Stitcher™, Inc.
TORSEN LSD® is a registered trademark of JTEKT TORSEN North America, Inc. SiriusXM®
All Access Radio is a registered trademark of SiriusXM Radio, Inc. SiriusXM Traffic® and
SiriusXM Travel Link® are registered trademarks of SiriusXM Radio, Inc. Added Security,
Crosstrek, Forester and Outback are registered trademarks of Subaru of America, Inc. BRZ,
EyeSight, Impreza, Lineartronic, Legacy, Subaru, SUBARU BOXER, WRX, STI and X-MODE
are registered trademarks of Subaru Corporation. Confidence in Motion and SUBARU
STARLINK™ are trademarks of Subaru Corporation.
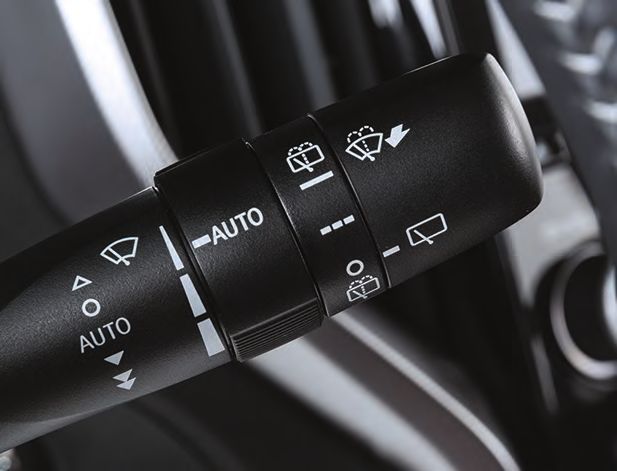
TABLE OF CONTENTS

2    PURPOSE OF THIS GUIDE
  ENTRY AND EXIT
4
  INSTRUMENT PANEL
6
  GETTING COMFORTABLE
8
   CONTROLS
16
   GAUGES AND WARNING LIGHTS
21
   OPERATING THE VEHICLE
22
   REFUELING
26
   PASSENGER/CARGO AREAS
27
   ENGINE COMPARTMENT
31
   ADDITIONAL SPECIFICATIONS
32
PURPOSE OF THIS GUIDE

FORWARD
Congratulations on choosing a Subaru vehicle! This Quick Guide is designed to provide
information on the basic operation and key features of your Subaru vehicle. The Quick
Guide is not intended as a substitute for the Owner’s Manual. We strongly encourage you
to review the entire Owner’s Manual to ensure complete understanding.

IMPORTANT SAFETY INFORMATION
The Quick Guide is not intended as a substitute for the Owner’s Manual. We strongly
encourage you to review the entire Owner’s Manual to ensure complete understanding.

ADDITIONAL RESOURCES
If you’re having difficulty using any of the functions outlined in this guide, you can get more
information from the following sources:
Your Subaru Owner’s Manual:
Located in the glovebox
Online Subaru Owner’s Resources:
www.subaru.com/owners
Subaru Customer Support:                              Scan to learn more   Scan to learn more
www.subaru.com/customer-support                         about Owner’s       about Customer
                                                         Resources.            Support.
1-800-SUBARU3 (1-800-782-2783)

                                     Scan to get the MySubaru App.

                                     Scan to get the SUBARU STARLINK™ App.

2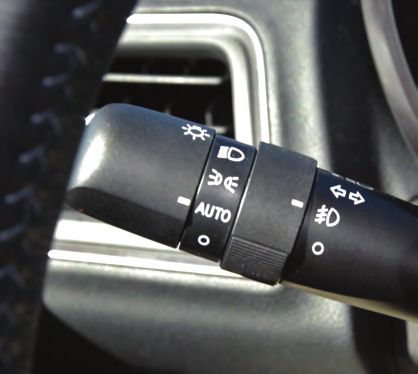
IN CASE OF EMERGENCY
SUBARU STARLINK™ Safety and Security (subscription required)
SOS Emergency: Press the red “SOS” button on the overhead
console in the event of an emergency to speak with a SUBARU
STARLINK™ Customer Care Advisor.

Enhanced Roadside Assistance: Press the blue “i” button on the
overhead console or select the “Roadside Assistance” option in the
“MySubaru” menu on the SUBARU STARLINK™ Multimedia system.

Subaru Roadside Assistance
Subaru Roadside Assistance is free and standard on your Subaru. Coverage is
automatic; there are no forms to complete. Subaru Roadside Assistance is available
anytime during the 3-year/36,000-mile Subaru Limited Warranty, whichever comes first.*
A Subaru Roadside Assistance decal has been affixed to the driver’s door window.

Subaru Roadside Assistance:
1-800-261-2155

Roadside assistance helps with:

  •	Towing to the nearest authorized Subaru Retailer if you cannot safely
     drive your Subaru

  •	Jump-start if your battery is dead

  •	Gasoline delivery if you run out of gas

  •	Flat tire change to install your spare

  •	Emergency lockout service

  •	National Subaru Retailer locator service, with phone numbers and location of
     the nearest Retailer anywhere in the U.S. or Canada

*See your Retailer for details.

TOWING YOUR ALL-WHEEL DRIVE SUBARU
Since Subaru Symmetrical All-Wheel Drive distributes power to all four wheels, improper
towing may damage your AWD system. The best way to tow your Subaru is with a flatbed
truck by your Subaru Retailer or a commercial towing service.

                                                                                      3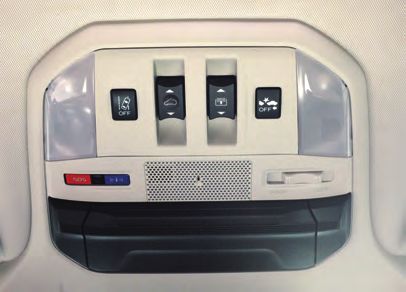
ENTRY AND EXIT

KEYLESS ENTRY
 1    Lock/Arm
      •	Pressing this button will lock all doors, rear gate and fuel
         door and activate the security alarm.
      •	If any of the doors or the rear gate are not fully closed,
         five rapid chirps will sound and the hazard warning
         flashers will flash.
      •	Pressing this button three times (within five seconds)                         1
         will activate the vehicle finder function. If you are within
         30 feet of your Subaru, the horn will sound once, and the                  2        3
         hazard warning flashers will flash three times.
                                                                                        4
 2    Unlock/Disarm
      •	Pressing this button once will unlock the driver’s door.
      •	Pressing this button twice (within five seconds) will
         unlock all doors, rear gate and fuel door.                         Access Key Fob

      •	When you press this button, the interior lights will
         illuminate if set to the “DOOR” position.

 3    Rear Gate                                                                  1

      •	Pressing this button will unlock the rear gate.                       2
      •	If equipped with a power rear gate, pressing and
         holding this button will open or close the rear gate.                  3

 4    Panic Alarm                                                                4
      •	Pressing this button will sound the horn
         and flash the hazard warning lights.
      •	Press any button on the access key
         fob or transmitter to deactivate.

Automatic Door Locking/Unlocking
                                                                            Transmitter
With this function, all doors and the fuel lid will automatically
lock or unlock when certain conditions are met based on your
preference. You can change the setting in the Combination Meter
Display (CMD) or the Touchscreen. Possible settings are:

     AUTOMATIC         Vehicle Speed           Shift
                                                                      Off
      LOCKING            (12 mph)           Out of Park

     AUTOMATIC                                                   Drive Door
                       Shift into Park      Ignition Off                                    Off
     UNLOCKING                                                      Open

4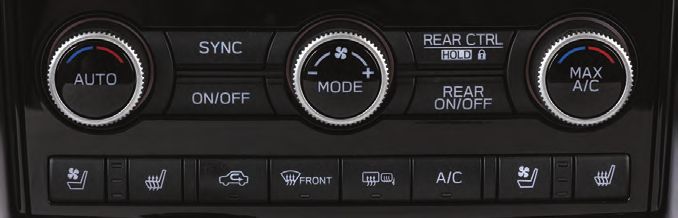
KEYLESS ACCESS WITH PUSH BUTTON START
(if equipped)
Your Subaru allows for customizing of the door unlock settings. The default setting is when
you unlock the vehicle, only the driver’s door and fuel lid unlock. If preferred, you can set the
vehicle to unlock all doors, the rear gate and the fuel lid. This adjustment can be performed
through the SUBARU STARLINK™ Multimedia Touchscreen under “Settings”, then “Vehicle”.

Unlocking Using Door Handles
Grip the driver’s door handle to unlock the driver’s door
(or all doors depending on the setting). Grip the front
passenger’s handle to unlock all doors and the rear gate.
Two chirps will sound and the hazard warning flashers
will flash twice.

Locking Using Door Handles
Close all doors and the rear gate and touch the door lock
sensor (two lines) on either front door handle. All doors
and the rear gate will lock. One chirp will sound and the
hazard warning flashers will flash once.

Opening the Rear Gate
Press the rear gate opener button to unlock and open
the rear gate (or also unlock all doors depending on the
setting). Two chirps will sound and the hazard warning
flashers will flash twice.

Locking Using the Rear Gate
Close all doors and the rear gate and press the rear
lock button. All doors and the rear gate will lock. One
chirp will sound and the hazard warning flashers will
flash once.

                                                                                               5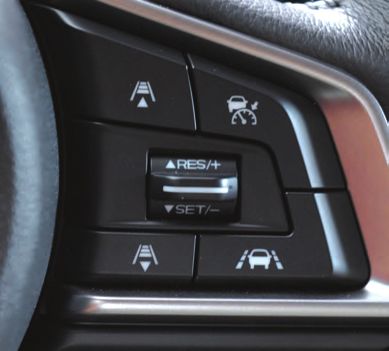
INSTRUMENT PANEL

                          6
                                                    7

                                            5

                                                4

        2                        3

         1

    1   Power windows (p. 11)

    2   Power exterior mirrors (p. 10)

    3   Instrument panel switches (p. 20)

    4   I/Set switch (p. 16)

    5   Audio controls (p. 16)

    6   Light controls (p. 17)

    7   Gauges and warning lights (p. 21)

6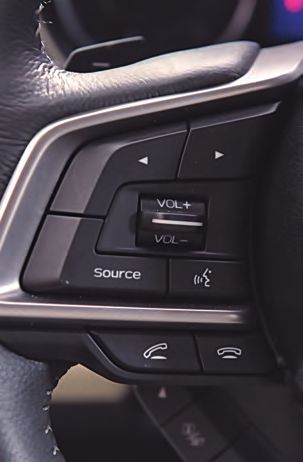
9

                                                  10

                                                   11

                      8

                                        12

                                             13

8   Adaptive cruise control (p. 16)

9   Multi-Function Display (MFD)

10 Windshield wipers (p. 18)

11 SUBARU STARLINK™ Multimedia Touchscreen

12 Climate control system (p. 12)

13 Select lever (p. 23)

                                                            7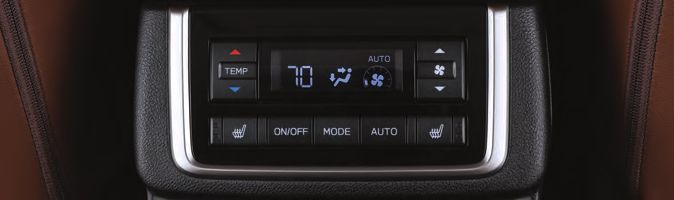
GETTING COMFORTABLE

SEATING
Manual Seats
 1      orward/Backward: Pull the lever below the
       F
       seat up and slide the seat forward or backward.
       Release the lever and make sure the seat is
                                                                          2              3
       locked into place.
                                                               1
 2     Seat Height (Driver’s Seat): Pulling up or
       pushing down on the lever will raise or lower
       the seat cushion.
 3     Recline Seatback: Pull the lever up to adjust the seatback to the desired position.
       Release the lever and make sure the seat is locked into place.

Power Driver’s Seat (if equipped)
       Forward/Backward and Height: Moving the                                2
 1                                                                 1                 3
       switch forward or backward will adjust the seat in
       that direction. Pulling up or pushing down on the
       front of the switch will adjust the angle of the seat
       cushion. Pulling up or pushing down the entire
       switch will adjust the height of the seat cushion.
 2     Recline Seatback: Moving the switch forward or
       backward will adjust the
       angle of the seatback.
 3     Lumbar Support (if equipped): Pressing the
       front of the switch will increase support. Pressing
       the rear of the switch will decrease support.
                                                               4
 4     Thigh Extension (if equipped): Pull up on
       the lever below the seat cushion to adjust
       the length.

Memory Driver’s Seat (if equipped)
You can set a seat position and retrieve it using the buttons on the driver’s door or each of
the access key fobs.
To set a seat position with a button:
    1. Make sure the select lever is in the “P” position.
    2. Adjust the seat to the desired position.
    3. While holding the “SET” button, press and hold
        either button “1” or “2”. A chirp sounds when
        the position is registered.
                              3

8
To retrieve the seat position with a button:
1. Turn the ignition switch to “ON”.
2. While the select lever is in the “P” position, press button “1” or “2”.
To set a seat position with the access key fob:
1. Make sure the select lever is in the “P” position with the parking brake on and the
ignition “OFF”.
2. Adjust the seat to the desired position.
3. While holding the “SET” button, press and hold the unlock button on the access key
fob. A chirp sounds when the position is registered.
To retrieve the seat position with the access key fob:
1. Hold the access key fob.
2. Unlock and open the driver’s door.
Head Restraint Adjustment
Pull the head restraint up to raise it. To lower it,
push it down while pressing the release button on
the top of the seatback. Each head restraint should
be adjusted so that the center of the head restraint
is closest to the top of the occupant’s ears. This
adjustment should be made for any seating position,
front or rear, that has a new occupant.
You can adjust the angle of the front head restraints by tilting them forward. You will hear a
click when the restraint is locked. Pulling the head restraint as far forward as it will go will
allow it to return to the fully upright position.
Seatbelt Adjuster
Always position the seatbelt adjuster so the shoulder
belt passes over the middle of your shoulder without
touching your neck. Pull the adjuster out and slide it
up or down. Release the adjuster and make sure it is
locked in place.
TILT AND TELESCOPIC
STEERING COLUMN
Pull the lever down firmly to unlock, then adjust the
height and lengthwise position of the column. Push
the lever firmly back up to lock the column in place.
9GETTING COMFORTABLE POWER EXTERIOR MIRRORS Turn the knob to “L” (left side) or “R” (right side) to select a mirror. Move the knob in the direction you want to move the mirror. Return the knob to the neutral center position. Power Folding Mirrors (if equipped) Press the switch to fold the outside mirrors. Press again to unfold the mirrors. REAR VIEW MIRROR Auto-dimming Mirror (if equipped) When driving at night, the auto-dimming function senses brightness from vehicle headlights behind you and automatically dims to reduce glare. Pressing the switch will turn this function on or off. A green LED indicator on the switch will illuminate when the function is on. HomeLink® 5 Accessory Mirror (if equipped) The HomeLink 5 accessory mirror provides three buttons to replace up to three hand-held radio frequency remotes used to activate devices such as garage door openers, gate openers, entry door locks, security systems and home lighting. Please see the Owner’s Manual for programming Scan to learn more instructions or visit www.subaru.com/homelink to view a how-to video. about HomeLink®. Smart Rearview Mirror (if equipped) Pull the mode lever toward you to show the image from the camera that is on the rear gate window. Use when something in your Subaru is blocking your view out of the rear window. Push the mode lever away from you to use as a normal mirror. Cabin View Mirror (if equipped) Push gently on the mirror “PUSH” mark and it will automatically open (eyeglass holder). Push the lid back up halfway to use the cabin view mirror. Push up all the way to close the mirror. 10
POWER WINDOWS
To open or close a window, partially press or
pull up the corresponding switch and hold. The
front windows have a one-touch auto up/down
function. Fully press down or pull up and release to
automatically open or close the window.

POWER MOONROOF
You can tilt and slide the moonroof.                                  3            1

Opening/Closing the Sunshade
 1 O
    pening: Slide the switch rearward and
   release to automatically open the sunshade.                        4            2
   To stop the sunshade halfway, slide the switch
   in either direction.
 2 C
    losing: Slide the switch forward and release to automatically close the sunshade.
   To stop the sunshade halfway, slide the switch in either direction.

Tilting the Moonroof
Press and hold the moonroof switch to tilt or lower the moonroof.

Opening/Closing the Moonroof
 3 O
    pening: Slide the switch rearward and release to open the moonroof. It will stop slightly
   before the fully-open position to reduce wind noise. Slide the switch rearward again and
   release to fully open it.
 4 C
    losing: Slide the switch forward release to close the moonroof. It will stop in the
   tilted position. Slide the switch forward and hold to fully close it.

ONE-TOUCH INTERIOR LIGHTING
(if equipped)
Press the switch to turn on the map lights and reading lights. Press it
again to turn the lights off. The lights will also turn off if you lock your
Subaru with the access key fob or transmitter, or using the front door
handle or rear gate lock.

                                                                                            11
GETTING COMFORTABLE
CLIMATE CONTROL SYSTEM
Three-zone Automatic Climate Control
3
2 7 2
11
12
1 6 5
8 9 10 4
You can set separate temperatures for the driver, front passenger, and rear seats. Set your
desired temperature and let the system automatically make the adjustments for you. At
any time, you can manually take control of the climate settings.
Operation in Automatic Mode
1 Automatic Control Button: This system automatically controls all of the climate system
except defogging. Press “AUTO” to activate. Press “OFF” to turn off the system.
2
Temperature Control Dial: Turn the dial clockwise to increase the temperature
or counterclockwise to decrease the temperature. The temperature will appear on
the screen. You can adjust separate temperature settings for the driver’s side and
passenger’s side.
3
S
YNC Button: Press the button to synchronize the driver’s, passenger’s and rear
temperatures to the driver’s temperature control dial.
When using automatic mode, the fan speed, airflow distribution, air-inlet control and air
conditioning compressor are controlled automatically. To activate:
1. Press the “AUTO” button. The “FULL AUTO” indicator light illuminates on the climate
control display.
2. Set the preferred temperature using the temperature control dial.
If you operate any of the buttons other than “ON/OFF”, rear window defogger, “SYNC”,
or the temperature control dial, the “FULL” indicator light will turn off. The “AUTO” light
will remain illuminated. You can then manually control the system as desired. Press the
“AUTO” button to change back to “FULL AUTO” mode.
Operation in Manual Mode
A
ir Conditioner Button: Press this button to activate or deactivate the air conditioning.
4
5 MAX A/C Button: Press this button for quickest cooling.
126 A
irflow Mode Selection Button: Press the button to select the desired airflow mode.
The selected mode – ventilation, ventilation 2, bi-level, feet, feet-defrost or defrost – is
shown on the display.
ICON MODE FUNCTION
Ventilation Instrument panel outlets
Bi-Level Instrument panel outlets and foot outlets
Ventilation 2 Instrument panel outlets and less foot outlets than bi-level
Foot outlets, both side outlets of the instrument panel
Feet
and some through windshield defroster outlets
Windshield defroster outlets, foot outlets and
Feet-Defrost
both side outlets of the instrument panel
Windshield defroster outlets and both side
Defrost
outlets of the instrument panel
7 Fan Speed Control Dial: Turn the fan speed control dial to increase or decrease
fan speed.
Recirculated/Outside Air Button: Press this button to prevent outside air from
8
entering your Subaru. Press the button again to allow outside air into your Subaru.
NOTE: To prevent windshield fogging, do not remain in the recirculated mode for an
extended period of time.
9 Defroster Button: Press this button to defrost or dehumidify the windshield and front
door windows. NOTE: The air conditioning may turn on to defrost the windshield
more quickly. However, the indicator on the air conditioner button will not illuminate.
Rear Window Defogger Button: Press this button to turn on the defogger. It will
10
automatically turn off after about 15 minutes. If the window clears before then, press
the button again to turn it off. If equipped, the outside mirror defogger and windshield
wiper deicer will also activate. You can customize this function for continual operation
through the Combination Meter Display (CMD).
11 Rear Climate Control Button: Press this button to operate the rear climate control
with the front climate control panel. Press the button while the rear climate control is
on. If equipped, press and hold to lock the rear climate control. The lock indicator will
illuminate on the front and rear climate control panels.
Rear Climate On and Off Button: Press this button to turn the rear climate control
12
system on or off.
13GETTING COMFORTABLE
Rear Climate Control Panel (if equipped)
1 2
3 4 5
1 emperature Control Button: Press the up or down arrow to increase or decrease
T
the temperature.
2 Fan Speed Control Button: Press the up or down arrow to increase or decrease the
fan speed.
3 On/Off Button: Press this button to turn the rear climate control system on or off.
4 Airflow Mode Selection Button: Press this button to select the desired airflow
mode. The selected mode — ventilation, bi-level or feet — is shown on the display.
5 Automatic Control Button: This system automatically controls all of the rear climate
system. Press “AUTO” to activate. Press “OFF” to turn off the system.
To activate automatic mode:
1. Press the “AUTO” button. The “FULL AUTO” indicator light illuminates on the climate
control display.
2. Set the preferred temperature using the temperature control buttons.
If you use any of the buttons other that the temperature control buttons, the “FULL” indicator
light will turn off. The “AUTO” light remains illuminated. You can then manually control the
system as desired. Press the “AUTO” button to change back to “FULL AUTO” mode.
Remote Engine Start with Climate Control
You can remotely start your Subaru and adjust the
temperature using the Starlink Safety and Security features
through the MySubaru App (subscription required).
Scan to get the
Ventilated Seats (if equipped) MySubaru app.
Press the ventilated seat switch located on the climate control
system. There is a separate switch for the driver and passenger.
Each time you press the switch, the mode will change as
follows: High, Mid, Low, Off. Blue indicators will illuminate
indicating the level.
14Heated Seats
Press the front seat heater switch located on the climate control
system. There is a separate switch for the driver and passenger.
Each time you press the switch, the mode will change as follows:
High, Mid, Low, Off. Yellow indicators will illuminate indicating the level.
Second-row Seat Heater (if equipped)
Press the rear seat heater switch located on the rear climate control
system. There is a button for each of the seats. Each time you press
the switch, the mode will change as follows: High, Low, Off.
Yellow indicators will illuminate indicating the level.
Heated Steering Wheel
To activate, pull the heated steering wheel switch while
the ignition is “ON”. The indicator light on the switch will
illuminate. The heater will turn off after a while or you
can deactivate it at any time by pulling the switch again.
ACCESSORY CONNECTIONS
Power Outlets
Power outlets (12V) are located at the front of the center console and in the cargo area.
Electrical power is available for use with in-vehicle electrical appliances with a maximum
power rating of 120W. You may also have a 120V AC power outlet located below the rear
climate control panel (if equipped).
1 uxiliary Input Jack
A
The 3.5mm auxiliary input jack is located in the
front of the center console. You can connect
a portable music player to the auxiliary jack
1
and hear the music stored on it through your
Subaru’s speakers. Press the “Source” button 2
located on the steering wheel or the “Media”
button on the Touchscreen to select the auxiliary
mode. For more information, refer to the
SUBARU STARLINK™ Owner’s Manual.
2 USB Ports
The USB ports are located in the front of the center console and the rear seat areas.
You can connect a variety of USB-equipped devices to the front port, such as
portable music players or smartphones, to enjoy your favorite music through your
Subaru’s speakers. These ports also provide charging (5V, 2.1A) to devices. For more
information, refer to the SUBARU STARLINK™ Owner’s Manual or Quick Guide.
15CONTROLS
AUDIO CONTROLS
Please refer to the SUBARU STARLINK™ Owner’s 1
Manual or Quick Guide.
1 Presets/Skip 2
2 Volume
3 4
3 Source
4 Voice recognition
5 Hands-free calling 5
ADAPTIVE CRUISE CONTROL
Please refer to the EyeSight® Owner’s Manual or 4
1
Quick Guide.
1 Adaptive Cruise Control
2 Lane Keep Assist 5
3 Decrease Distance
4 Increase Distance 3 2
5 Resume/Set
I/SET SWITCH
Use the controls to display and change selected
items in the Combination Meter Display (CMD). Pull
and hold this switch to access the settings menu. Pull
the arrows to move up or down the menu.
16LIGHT CONTROLS
1 AUTO: If equipped, rotate the end of
the lever to automatically turn your
Subaru’s lights on or off, depending 4 3
on the level of outside light. 2
2 Running Lights: Rotate the end of 1
the lever to turn on the instrument 5
panel lights, parking lights, side
marker lights, tail lights, and license
plate lights.
3 Headlights: Rotate the end of the lever to turn on the headlights, instrument panel
lights, parking lights, side marker lights, tail lights and license plate lights.
4 High Beams: Push the lever forward to change from low beam to high beam. If
equipped, this also activates the High Beam Assist (HBA) system. Pull the lever back
to center to return to low beam.
5 Fog Lights: If equipped, rotate the dial to turn on the fog lights.
Illumination Brightness
While the light switch is on, rotating the dial on the instrument panel
upward will make the illumination brighter. When the dial is fully rotated
upward (dots aligned), the instrument panel illumination stays at full
brightness. Rotating the dial downward dims the instrument panel
illumination.
Daytime Running Lights
The daytime running lights automatically turn on when the engine has started, the parking
brake is fully released, the light switch is in the off, “AUTO” (if equipped) or “ ”
position, and the select lever is not in the “P” position. Always turn on the headlights when
it’s dark outside by rotating the dial to the “ ” or “AUTO” position.
TURN SIGNALS
Push slightly up for right lane change or
fully up for right turn signal. Push slightly
down for left lane change or fully down
for left turn signal.
17CONTROLS
WINDSHIELD WIPERS
To turn on the wipers, press the wiper
control lever down one position for SINGLE
intermittent, two positions for low speed, OFF
or three positions for high speed. To turn
the wipers off, return the lever to the
1 INT.
“OFF” position. For a single wipe, move
the lever up one position. 2 LOW
When the lever is in the intermittent
3 HIGH
position, rotate the dial to adjust the
operating interval of the wipers.
Pull the lever toward you to spray washer fluid. The washer will spray until you release the
lever, then wipe twice.
Rain Sensing Windshield
Wipers (if equipped)
Press the wiper control lever down one
position. When the wiper control lever OFF
is in the “AUTO” position, the wipers
operate automatically when the rain/light
1 AUTO
sensor on the windshield glass detects
moisture on the windshield. Rotate the
dial to adjust the sensitivity of the rain/
light sensor. Make sure you turn off the
wipers before entering a car wash. All
other functions of the wiper system work
the same as above.
18REAR WINDOW WIPER
Rotate the end of the lever up one
position for intermittent, or two positions
for continuous wipe.
When the lever in is the intermittent
position, the wiper operates at intervals
corresponding with vehicle speed.
When you move the select lever to the
“R” position, the wiper will switch to
continuous operation. It will return to
intermittent when you move the select
lever out of “R”.
Rotate the dial up from the continuous wipe position or down from the off position to spray
washer fluid. The washer will spray until you release the dial, then return to the previous
position and wipe twice.
19CONTROLS
INSTRUMENT PANEL SWITCHES (LOWER LEFT)
1 Power rear gate button (if equipped)
(see page 29) 1 2 3 6
2 One-touch interior lighting
(if equipped) (see page 11)
3 Power rear gate memory switch
(if equipped) (see page 29) 4 5
4 Vehicle Dynamics Control OFF switch
5 Blind Spot Detection/Rear Cross
Traffic Alert OFF switch (if equipped)
6 Illumination brightness control (see page 17)
OVERHEAD PANEL
1 OS Emergency Assistance: Press
S
the “SOS” button to connect with
a SUBARU STARLINK™ Customer 6 6
Care Advisor. (Subscription required.)
Press and hold the button for about 3 4
two seconds to cancel the call. Refer
to the SUBARU STARLINK™ Safety
and Security Owner’s Manual or the 1 2 5
SUBARU STARLINK™ Quick Guide.
2 nhanced Roadside Assistance: Press the “i” button to connect with a SUBARU
E
STARLINK™ Roadside Assistance Provider. (Subscription required.) Press and
hold the button for about two seconds to cancel the call. Refer to the SUBARU
STARLINK™ Quick Guide.
3 ane Departure Warning OFF switch: Press and hold this switch for two seconds
L
to turn off the Lane Departure Warning and the Lane Sway Warning function. Press
and hold the switch again for two seconds to turn the systems back on. Refer to the
EyeSight® Owner’s Manual or Quick Guide.
4 re-Collision Braking System OFF switch: Press and hold this switch for two
P
seconds to turn off the Pre-Collision Braking System and Pre-Collision Throttle
Management. Press and hold the switch again for two seconds to turn the systems
back on. Refer to the EyeSight® Owner’s Manual or Quick Guide.
Automatic Illumination: When the switch is in the “DOOR” position, the map lights
5
illuminate when any door is opened, the doors are unlocked using the remote keyless
entry system or keyless access function, or the ignition is turned from “ON” or “ACC”
to “LOCK”/“OFF”.
Map Lights: Press a map light to turn it on or off.
6
20GAUGES AND WARNING LIGHTS
GAUGES
2
1 3
6 5
7 4
1 Tachometer 5 Trip meter and odometer
2 Combination Meter Display (CMD) 6 Select lever/gear position indicator
3 Speedometer 7 Engine coolant temperature gauge
4 Fuel gauge
WARNING AND INDICATOR LIGHTS
Red lights indicate immediate attention is required. Some examples are:
Seatbelt warning Door open Brake system
Yellow lights indicate caution. Some examples are:
Engine oil level Tire pressure
Low fuel
warning light warning light
Green and blue lights are for information. Some examples are:
Headlight Cold coolant High beam
indicator light temperature indicator light
21OPERATING THE VEHICLE
IGNITION SWITCH
The ignition switch has four positions:
LOCK: You can only insert or remove the key in this position.
ACC (Accessory): Provides power to the radio and accessory power outlets.
ON: All electric systems are available. The key returns to this position after starting the engine.
START: Turn the key to this position to start the engine.
PUSH-BUTTON IGNITION
SWITCH (if equipped)
Each time you press the ignition switch without
depressing the brake pedal, the ignition position will
change as follows: ACC, ON, OFF.
ACC (Accessory): Provides power to the radio and
accessory power outlets. The orange LED illuminates.
ON: All electrical systems will be available. The orange LED illuminates.
OFF: Power off and indicator off.
STARTING THE ENGINE
Without Push-button Ignition
To start the engine:
1. Make sure the select lever is in the “P” position.
2. Using the key, turn the ignition switch to “START”.
NOTE: Do not depress the accelerator pedal.
Release the key as soon as the engine starts.
With Push-button Ignition
To start the engine:
1. Sit in the driver’s seat with the access key fob.
2. Make sure the select lever is in the “P” position.
3. Depress the brake pedal. The green LED on the ignition switch illuminates.
4. While depressing the brake pedal, briefly press and release the ignition switch.
22DRIVING THE VEHICLE
Automatic Transmission Shift Mode
The Continuously Variable Transmission (CVT) is
electronically controlled and provides two different
driving modes: normal and manual.
Normal Mode
When the selector lever is in the “D” (Drive) position,
the transmission is in normal shift mode. The select
lever position indicator in the Combination Meter
Display (CMD) shows “D” and the transmission
automatically shifts into a suitable forward gear.
Manual Mode
In manual mode, you select the desired gear position to obtain necessary acceleration and
engine braking. Move the select lever left from the “D” position into the “M” position to select
manual mode. The gear position indicator in the Combination Meter Display (CMD) shows
the currently selected gear. Arrow-shaped indicators show when upshifting or downshifting is
available. To shift, use the paddle shift control switches behind the steering wheel.
Paddle Shift Control Switches
• You can shift gears using the paddle shift
control switches. To upshift to the next higher
gear, pull the “+” paddle on the right toward you.
To downshift to the next lower gear, pull the “-”
paddle on the left toward you.
• You can temporarily shift gears even when the
select lever is in the “D” position by pulling either
the “+” or “-” paddle toward you. Once vehicle speed stabilizes,
the transmission will switch back to normal mode.
23OPERATING THE VEHICLE X-MODE® X-MODE is the integrated control system of the engine, All-Wheel Drive (AWD) system and Vehicle Dynamics Control (VDC) systems. It helps to maximize traction in slippery conditions such as mud or snow. In certain situations such as deep mud or snow, it may help to turn VDC off to allow for more wheel spin. X-MODE functions with the select lever in the “D” or “R” position. Press the X-MODE button with the vehicle speed less than 12 mph to activate the system. When active, the Multi-Function Display (MFD) shows the steering direction, vehicle angle and power distribution. If the vehicle speed reaches 25 mph while X-MODE is active, the system is cancelled and you will need to activate it again once you reach a lower speed. Hill Descent Control (HDC) This function helps maintain a constant vehicle speed when driving down steep hills or declines. HDC is automatically engaged with X-MODE and functions with the select lever in the “D” or “R” position. ELECTRONIC PARKING BRAKE (EPB) To apply the parking brake, pull up the parking brake switch. The indicator light on the parking brake switch will illuminate and “PARK” will appear in the combination meter. To release the parking brake manually, depress the brake pedal and push the parking brake switch down. To automatically release, gently press the accelerator pedal with the select lever in the “D” or “R” position. NOTE: All the doors must be closed and your seatbelt must be fastened. 24
Auto Vehicle Hold (AVH)
This function automatically holds your Subaru in
place when at a complete stop, such as a traffic
signal, even after you release the brake pedal. Press
the Auto Vehicle Hold switch on the center console to
turn on the function. The indicator in the combination      ICON        MODE
meter will illuminate.
                                                                   Auto Vehicle Hold
While your Subaru is being held by this function,
                                                                          ON
the operation indicator in the combination meter
will illuminate. The function is canceled when you                 Auto Vehicle Hold
depress the accelerator pedal or the brake pedal.                    OPERATION
Press the switch again to turn it off. The function works
with the select lever in either the “D” or “R” position.

TURNING OFF THE VEHICLE
Without Push-button Ignition Switch
To Stop the engine:
  1. Stop your Subaru completely.
  2. Move the select lever to the “P” position.
  3. Turn the ignition switch to “OFF”.
NOTE: The windows will remain active for about 45 seconds and the SUBARU STARLINK™
Multimedia system will remain on for about three minutes or until a door is opened,
whichever occurs first.

With Push-button Ignition Switch (if equipped)
To Stop the engine:
  1. Stop the vehicle completely.
  2. Move the select lever to the “P” position.
  3. Press the ignition switch.
NOTE: The SUBARU STARLINK™ Multimedia system will remain on for about three
minutes or until a door is opened, whichever occurs first.

                                                                                       25
REFUELING
FUEL FILLER LID
The fuel filler lid is located toward the rear of the passenger side. To open the lid:
1. Make sure your Subaru is stopped with the
ignition in “LOCK”/“OFF”.
2. Unlock the lid by pressing the unlock/disarm
button on the access key fob or transmitter,
pressing the unlock side of the power door
locking switch, or putting the vehicle in
“LOCK”/“OFF”.
3. Push the rear side of the lid.
4. When the lid opens slightly, open it further
by hand.
While refueling, place the fuel filler cap on the cap
holder inside the lid.
To close the lid, press it until you hear it latch.
FUEL
Use regular unleaded gasoline with an octane rating of 87 AKI or higher. Do not use fuels
with more than 15% ethanol. See the Owner’s Manual for more information.
FUEL CAPACITY
19.3 US gallons
The low fuel warning light illuminates when the tank is nearly empty,
at approximately 2.6 US gallons.
26PASSENGER/CARGO AREAS
ACCESSING THE THIRD-ROW
While pulling up the lever on the second-row seat, fold
the seatback forward and slide the seat toward the front.
EXITING THE THIRD-ROW
From the third-row seat, raise the lever on the second-
row seatback. The seatback of the second-row seat
will tip forward and the seat will slide forward.
FOLDING THE REAR SEATS
Second-row Seat
1 Tilt: Pull the lever and tilt the seatback forward.
2 Fold: After tilting the seatback, pull the lever to
unlock the seatback and fold it down. To return
the seatback to its original position, raise the
1 2
seatback until it locks into place, making sure
that it is securely locked.
Third-row Seat
1 Fold: While pulling the strap, fold the
seatback forward.
1
2 Return: To return the seatback to the upright
position from inside your Subaru, lift the seatback
up. From outside your Subaru, pull up on the
strap on the back of the seatback. Lift the seat 2
up securely until it locks in place.
CHILD SAFETY LOCKS
The child safety locks are located on the inside edges
of the rear doors. In the locked position, the rear
doors can only be opened from the outside.
27PASSENGER/CARGO AREAS
LATCH/ANCHOR
To ensure the safety of all occupants,
and prior to installing any child restraint
system, carefully read all materials
provided by the restraint system
manufacturer and the important
installation and safety information located
in your Subaru Owner’s Manual.
7-Passenger 8-Passenger
Lower anchor
Tether anchor
REAR SEAT REMINDER
The Rear Seat Reminder system assists you in preventing a child or pet from being left
in your Subaru. The system monitors the opening and closing of the rear side door. It
does not physically sense the presence of a child or pet.
The system turns on if your Subaru is started within 30 minutes of a rear side door
opening or closing. It also turns on if a rear side door is opened and closed when your
Subaru is running and stationary. The system remains on if your Subaru is turned off
and back on again within 30 minutes and the rears side doors remained closed.
When you turn your Subaru off, the system warns you audibly and with a “Reminder,
Look in Rear Seat” message in the Combination Meter Display (CMD).
The system operates only one time with each ignition cycle and opening and closing
of a rear side door. You can turn the Rear Seat Reminder off in the Combination Meter
Display (CMD).
28POWER REAR GATE (PRG) (if equipped)
Power Rear Gate Button
Briefly press and release the button on the instrument panel to
automatically open or close the rear gate. Two chirps will sound
and the hazard warning flashers will flash twice. If you briefly press
the button while it is closing, it will open. If you briefly press the
button while it is opening, it will pause. Press the button again to close the rear gate. If you
attempt to open the power rear gate with the doors locked, three rapid beeps will sound.
The operation is the same using the power rear gate button on the access key fob
or transmitter.
From the Rear of the Vehicle
To open the rear gate, unlock your Subaru or have
access key fob with you. Then, briefly press the
button on the underside trim near the license plate.
The rear gate will automatically open. If you briefly
press the button while the gate is opening, it will
pause. Press the button again to close the rear gate.
To close the rear gate, briefly press the power rear gate button on
the inside edge of the rear gate. If you press the button again, the
rear gate will open.
Power Rear Gate Lock
With the rear gate open, press the lock button on the inside edge
of the rear gate. All doors, the rear gate and the fuel lid will lock,
and the rear gate will close.
Memory Height
You can set where the rear gate stops when it opens. To set the height:
1. Make sure the ignition is in the “LOCK”/”OFF” position.
2. Open the rear gate using the power rear gate function.
3. Stop the rear gate when it reaches the desired height by
pressing the PRG button on the rear gate or instrument panel.
4. Press the memory switch in the instrument panel to select
the “ON” status (switch indented).
5. With the rear gate at the desired height, press and hold the
power rear gate button on the inside edge of the rear gate.
A chirp will sound and the hazard warning flashers will flash
three times to confirm the height is set.
When the memory switch is in the “ON” status, the rear gate will stop at the set memory
height when you use any of the power rear gate switches.
29PASSENGER/CARGO AREAS CARGO COVER Use the detachable cargo cover to protect contents in the cargo area from direct sunlight. Pull the cover toward the rear of your Subaru and insert both ends of the cover into the guides. Store the cover under the floor of the cargo area when not in use. Instructions for operation are included on the cargo cover housing. SPARE TIRE The spare tire is located in the spare tire holder located under the rear of your Subaru. The holder has a hoist mechanism that can lower and raise the spare tire. JACK AND TOOLS A jack and other maintenance tools, which are used to release the spare tire, are stored under the cargo floor. 30
ENGINE COMPARTMENT

HOOD PROP
The hood prop is located in the left front of the engine
compartment. Fold it up and insert the end into the
slot marked with an arrow.

2.4 L ENGINE

                                                                 1

                                                                                2

                                                                                3
        10                                                           5
                                                             8
                                   9                                            4
                                                                 7
                                                                         6

 1     Brake Fluid Reservoir                    6   Radiator Cap
 2     Main Fuse Box                            7   Engine Coolant Reservoir
 3   Battery                                   8   Engine Oil Filter
4     Windshield Washer Tank                    9   Engine Oil Dipstick
 5     Engine Oil Filler Cap                    10 Air Cleaner Element

                                                                                    31
ADDITIONAL SPECIFICATIONS
NEW VEHICLE BREAK-IN
The performance and long life of your Subaru are dependent on how you handle and care
for your Subaru while it is new.
Follow these instructions during the first 1,000 miles:
• Do not race the engine.
• Do not drive at one consistent engine or vehicle speed, either fast or slow.
• Avoid starting suddenly and rapid acceleration, except in an emergency.
• Avoid hard braking, except in an emergency.
ENGINE OIL
Use 0W-20 synthetic, with one of the follow specifications:
• API classification SN with the words “RESOURCE CONSERVING”.
• ILSAC GF-5, which can be identified with the ILSAC certification mark (Starburst mark).
ENGINE OIL CAPACITY
4.8 US quarts (during oil and filter change). There is
approximately 1 quart between the low and full level.
1 Full Level 1 2
2 Low Level
ROOF RAIL CAPACITY
CROSS BAR DYNAMIC ROOF RAIL DYNAMIC ROOF RAIL STATIONARY
150 Pounds 176 Pounds 700 Pounds
32TRAILER TOWING CAPACITY
Maximum gross trailer weight (with trailer brakes):
• Base: 2,000 pounds (200 pound tongue weight)
• Premium/Limited/Touring: 5,000 pounds (500 pound tongue weight)
TIRE PRESSURE
MONITORING SYSTEM (TPMS)
Your Subaru has a Tire Pressure Monitoring System (TPMS).
The individual tire pressure is found in the Combination Meter
Display (CMD).
Tire pressure specification is on the tire information placard
located on the driver’s side door pillar.
33NOTES
NOTES
NOTES
SUBARU of America, Inc.
One Subaru Drive
Camden, NJ 08103-9800

                          MSA5B2000A
                          Issued May 2019
                          Printed in USA 05/19

                                                 Love.
You can also read